
Software problems and solutions
Abstract
This chapter discusses issues related to software on computers and mobile devices, inclusive to malware and viruses, and solutions on how to protect and rid them from a system. We also discuss preventative measures that can be used to protect a system, such as updates, patches, and disaster recovery.
Keywords
Cyber safety; disaster recovery; viruses; malware; updates; patches
There are threats that are directed against your personal safety, and those against your computer. When your system becomes infected with software designed to damage data, alter security settings, or take over your system, it can compromise your digital assets, privacy, and ability to use your computer. If the software is designed to capture financial or personal data, or coerce, extort, or blackmail you into sending money to someone, it can devastate you.
While having an attacker inflict this kind of damage is increasingly common, it isn’t the only risk to your property. A natural disaster or human mistake can destroy your computer and devices with equal or greater efficiency. In this chapter, we’ll discuss these dangers, how to protect yourself, and what to do after damage has been done.
Malware and Viruses
Malware is a term that’s short for malicious software and describes any type of code that’s designed to compromise the functions of a computer by bypassing access controls, stealing, andor damaging data, or otherwise disrupting its normal operations. Note that we said that it’s designed for this purpose. If you install a bad piece of software (such as a buggy update) that causes problems on your computer, this doesn’t necessarily make it malware. After all, software developers are humans, and humans make mistakes. What makes it malware is that the software was designed with a malicious intent and/or with the purpose of causing that problem.
The other thing to understand about malware is that it’s an umbrella term, used to describe a number of different software threats. One type of malware you’ve probably heard of is a virus. A virus is a type of program or code that spreads from one system to another by attaching itself to other files. When you open a document, execute a program, or run a script file that’s been infected with a virus, it often makes a copy of itself and can attach itself to other files on your system. When you share one of those files with other people, such as by sending an infected document as an attachment via email or saving it to a network where someone else can open it, other computers then become infected. Code in the virus determines what the virus will do to a system, inclusive to damaging data or stealing information.
When you hear people talk about viruses and malware, they often use the words interchangeably, but that’s not the case. Viruses have been around for decades, gaining significant media attention in the 1990s when the Internet became commercial and people first began using it on home PCs. The term was seared in the public mindset and people began to refer to any kind of malicious software threat as a virus. While they’re still a real danger to your computer, there are many kinds of malware that are not viruses. Now that you have a good understanding that all viruses are malware, but not all malware are viruses, let’s look at some other types of malicious software.
Types of Malware
There is no way to know how much malware is on the Internet, because new ones are always being developed and undiscovered. In the Q2 report for April–June 2015 by PandaLabs (www.pandasecurity.com/mediacenter/reports/), it was stated that during this period they saw “an average of 230,000 new types each day and a total of 21 million new threats during those three months.” A majority of these were variants of existing malware, which are changed to avoid detection.
In addition to new forms of malware being developed, there is polymorphism, in which a virus or other unwanted program is designed to replicate itself with modifications, which makes it harder to detect. Sometimes these variants are identified as new malware, and later recognized as being part of the same family.
Because of the sheer volume of unwanted programs that exist, they’re grouped into different categories so it’s easier to understand their function and characteristics. Some of these categories include:
![]() Adware is short for advertising-supported software, and is designed to deliver advertisements. You’ve probably experienced pop-up ads on websites or advertisements in free programs (freeware) or those offered on a trial basis (shareware). In these cases, the site or software’s creator gets money through the ads displayed or clicked on, which helps fund his or her endeavors. While this is a legitimate use of adware, it becomes malicious when its bundled with spyware (which we will discuss later) that gathers information about you, and sends it to a third party.
Adware is short for advertising-supported software, and is designed to deliver advertisements. You’ve probably experienced pop-up ads on websites or advertisements in free programs (freeware) or those offered on a trial basis (shareware). In these cases, the site or software’s creator gets money through the ads displayed or clicked on, which helps fund his or her endeavors. While this is a legitimate use of adware, it becomes malicious when its bundled with spyware (which we will discuss later) that gathers information about you, and sends it to a third party.
![]() Backdoors are methods to gain unauthorized access to a system. A software developer may write a backdoor into a program so that he or she can troubleshoot problems, which may also be used by hackers to gain access. Malware may also be used to install a backdoor to a system by taking advantage of some vulnerability in the software. For example, Remote Access Trojans are used to create such backdoors, allowing the attacker access to your system from a remote location. Once in, the attacker has access to your system, and can operate the computer as if he or she was sitting at your keyboard.
Backdoors are methods to gain unauthorized access to a system. A software developer may write a backdoor into a program so that he or she can troubleshoot problems, which may also be used by hackers to gain access. Malware may also be used to install a backdoor to a system by taking advantage of some vulnerability in the software. For example, Remote Access Trojans are used to create such backdoors, allowing the attacker access to your system from a remote location. Once in, the attacker has access to your system, and can operate the computer as if he or she was sitting at your keyboard.
![]() Bots, which are short for robots, are programs that perform a specific task or operate in a way that simulates human activity. They can be used to gather information, deploy additional malware, or used in collections called botnets as part of a larger attack. We will discuss these more thoroughly in Chapter 5, Cybercrime.
Bots, which are short for robots, are programs that perform a specific task or operate in a way that simulates human activity. They can be used to gather information, deploy additional malware, or used in collections called botnets as part of a larger attack. We will discuss these more thoroughly in Chapter 5, Cybercrime.
![]() Browser hijackers, which attack Internet browsers, prevent you from navigating to an intended site. This may prevent you from using search engines properly, visiting antivirus sites to get additional help or download removal tools, and may direct you to sites to steal information or download additional malware.
Browser hijackers, which attack Internet browsers, prevent you from navigating to an intended site. This may prevent you from using search engines properly, visiting antivirus sites to get additional help or download removal tools, and may direct you to sites to steal information or download additional malware.
![]() Exploits are designed to take advantage of system vulnerabilities, such as a security hole in an operating system. It may use a known vulnerability that the vendor has decided to fix later, exists because a patch hasn’t been released yet, or is still a problem on your computer because you haven’t kept your system updated. There are also zero day exploits, which take advantage of vulnerabilities that are unknown to a vendor.
Exploits are designed to take advantage of system vulnerabilities, such as a security hole in an operating system. It may use a known vulnerability that the vendor has decided to fix later, exists because a patch hasn’t been released yet, or is still a problem on your computer because you haven’t kept your system updated. There are also zero day exploits, which take advantage of vulnerabilities that are unknown to a vendor.
![]() Password Stealers and Monitoring Tools are used to monitor your system and record information on your activities. They can record passwords as they’re entered, access ones stored in a browser, and (in the case of keyboard loggers) capture anything else you type on a keyboard. We’ll discuss these in greater detail in Chapter 5, Cybercrime.
Password Stealers and Monitoring Tools are used to monitor your system and record information on your activities. They can record passwords as they’re entered, access ones stored in a browser, and (in the case of keyboard loggers) capture anything else you type on a keyboard. We’ll discuss these in greater detail in Chapter 5, Cybercrime.
![]() Ransomware is a kind of malicious software that prevents access or performs some other action that either locks your computer or devices or encrypts your data, essentially holding your computer/data hostage until you pay the malware’s creator to release it. We’ll discuss this in greater detail in Chapter 4, Email safety and security.
Ransomware is a kind of malicious software that prevents access or performs some other action that either locks your computer or devices or encrypts your data, essentially holding your computer/data hostage until you pay the malware’s creator to release it. We’ll discuss this in greater detail in Chapter 4, Email safety and security.
![]() Rootkits are programs designed to hide on your system and perform specific actions programmed or configured by the attacker. After the rootkit installs, it will reside there until the attacker uses it to gain remote access to your system, install additional malware, or control the computer as part of a botnet. They are difficult to detect, and may need to be removed manually or with special tools available on antivirus and antimalware sites. We will discuss these in detail in Chapter 5, Cybercrime.
Rootkits are programs designed to hide on your system and perform specific actions programmed or configured by the attacker. After the rootkit installs, it will reside there until the attacker uses it to gain remote access to your system, install additional malware, or control the computer as part of a botnet. They are difficult to detect, and may need to be removed manually or with special tools available on antivirus and antimalware sites. We will discuss these in detail in Chapter 5, Cybercrime.
![]() Scareware is a malware that’s designed to scare you into visiting websites that will install other malicious software, or tries to get you to purchase software to remove viruses or other threats that don’t actually exist on your system. We’ll discuss this in greater detail in Chapter 4, Email safety and security.
Scareware is a malware that’s designed to scare you into visiting websites that will install other malicious software, or tries to get you to purchase software to remove viruses or other threats that don’t actually exist on your system. We’ll discuss this in greater detail in Chapter 4, Email safety and security.
![]() Spyware is a software that’s designed to monitor your activities and report them in some way. Spyware may be used to track your browsing activities, log what’s entered on a keyboard, and send this data to a particular email address or server. Tracking cookies may be used to store information about the user on the person’s own computer, and send this information to advertisers or other third parties. In addition to being a threat to your privacy, it may also modify security settings, interfere with network connections, or cause other problems that you may attribute to your operating system or software you’re running. It may be hidden in legitimate software you install, or Trojan Horses that have infected your computer.
Spyware is a software that’s designed to monitor your activities and report them in some way. Spyware may be used to track your browsing activities, log what’s entered on a keyboard, and send this data to a particular email address or server. Tracking cookies may be used to store information about the user on the person’s own computer, and send this information to advertisers or other third parties. In addition to being a threat to your privacy, it may also modify security settings, interfere with network connections, or cause other problems that you may attribute to your operating system or software you’re running. It may be hidden in legitimate software you install, or Trojan Horses that have infected your computer.
![]() A Trojan Horse (or Trojan) is a malicious software that’s hidden inside or disguises itself as a seemingly harmless program, document, or other file. For example, you might download a flashlight app for your mobile phone. Once installed or executed, it then runs malicious code that harms your system, downloads other malware, or performs some other harmful function. Trojans are the most common form of malware.
A Trojan Horse (or Trojan) is a malicious software that’s hidden inside or disguises itself as a seemingly harmless program, document, or other file. For example, you might download a flashlight app for your mobile phone. Once installed or executed, it then runs malicious code that harms your system, downloads other malware, or performs some other harmful function. Trojans are the most common form of malware.
![]() Worms are another common type of malware, and can cause serious problems for computers and networks. They are selfreplicating, and can fill up computer memory and/or consume bandwidth across a network, causing performance issues and errors. They may also include a payload, which is a program that’s released to perform some other action, such as stealing or damaging data, create botnets, and so on.
Worms are another common type of malware, and can cause serious problems for computers and networks. They are selfreplicating, and can fill up computer memory and/or consume bandwidth across a network, causing performance issues and errors. They may also include a payload, which is a program that’s released to perform some other action, such as stealing or damaging data, create botnets, and so on.
Antivirus
A primary defense against malware is using a good software to protect your system. While there are a number of antivirus programs on the market, the one you choose should be established with a good reputation. The software should focus on this type of protection, and not a program that includes antivirus features as an afterthought. Whichever one you choose, the antivirus should constantly run in the background, so it can check for viruses, Trojans, and other threats while you’re using the computer, and can be scheduled to run regular scans of your file system.
In choosing antivirus protection, cost doesn’t necessarily have to be a concern. There are a number of reliable programs available that are free. The companies that provide free versions make their money by selling premium versions that include additional features and enhanced protection against threats. When deciding on what software to use, you should review what each version offers so you’re getting the protection you expect and not paying for features you won’t use. Some of the free antivirus programs available include:
![]() AVG (http://free.avg.com/) is a free antivirus software that runs on Windows, Macs, and mobile devices running Android. While the free version also protects against spyware and malware, a premium version is available that includes a firewall, antispam protection, and other features.
AVG (http://free.avg.com/) is a free antivirus software that runs on Windows, Macs, and mobile devices running Android. While the free version also protects against spyware and malware, a premium version is available that includes a firewall, antispam protection, and other features.
![]() Avast (www.avast.com) is a free antivirus and antispyware software that runs on Windows, Macs, and mobile devices running Android. Premium versions are also available that includes a firewall, antispam protection, and other features.
Avast (www.avast.com) is a free antivirus and antispyware software that runs on Windows, Macs, and mobile devices running Android. Premium versions are also available that includes a firewall, antispam protection, and other features.
![]() Windows Defender is an antivirus and antispyware tool that’s included with Windows 8x and 10. It replaces Microsoft Security Essentials (http://windows.microsoft.com/en-us/windows/security-essentials-download), which can be used on Windows 7 machines.
Windows Defender is an antivirus and antispyware tool that’s included with Windows 8x and 10. It replaces Microsoft Security Essentials (http://windows.microsoft.com/en-us/windows/security-essentials-download), which can be used on Windows 7 machines.
In addition to these free tools, there are also products that only come at a price, but provide a wide range of features. These include:
![]() McAffee (www.mcafee.com), which provides protection for devices running Windows, Mac and iOS, and Android.
McAffee (www.mcafee.com), which provides protection for devices running Windows, Mac and iOS, and Android.
![]() Panda (www.pandasecurity.com), which has a number of products for securing Windows, Mac and iOS, and Android devices.
Panda (www.pandasecurity.com), which has a number of products for securing Windows, Mac and iOS, and Android devices.
![]() Symantec (www.symantec.com), which provides protection for computers, servers, and devices running Windows, Linux, Mac, and Android. They provide security suites and tools inclusive to Norton Anti-Virus (www.norton.com) and Symantec Endpoint Protection.
Symantec (www.symantec.com), which provides protection for computers, servers, and devices running Windows, Linux, Mac, and Android. They provide security suites and tools inclusive to Norton Anti-Virus (www.norton.com) and Symantec Endpoint Protection.
If price is an issue, you should check with your Internet Service Provider (ISP), school, and employer to see what they offer. Some ISPs provide free antivirus products when signing up for Internet service. Universities, colleges, and companies may also provide free or discounted versions of the commercial product they use for home use. The logic is that by installing protection on your home computer, there is less chance that you’ll bring virus-infected documents or other files to work or school and infect their systems.
Windows Defender
Windows Defender is probably the first tool you’ll use to protect yourself from malware, because it comes installed with Windows 8x and 10. When it was first released, it was antispyware software, but evolved into protecting against a wider range of threats. The current version of the product was upgraded to protect your computer against viruses, providing real-time protection, and protects your system from files downloaded with Internet Explorer or Edge. When a file is downloaded with one of these browsers, Windows Defender will scan it to block any malicious software or virus-infected files from being installed on your system.
In looking at its interface, you’ll see that there are a number of settings and features that are common to any program that protects against malware. To open Windows Defender in Windows 8x, you would type “Windows Defender” on the start screen, and then click Windows Defender. In Windows 10, you would click Start, select Settings, click Update & Security, and then click Windows Defender.
As seen in Fig. 3.1, the Home tab provides information about whether the virus and spyware definitions (used to detect and remove threats) are up-to-date, and if real-time protection is turn on. It also provides three options for scanning your system:
![]() Quick, which scans areas of your computer that are most likely to be infected.
Quick, which scans areas of your computer that are most likely to be infected.
![]() Full, which scans files on your hard disk(s) and programs that are running.
Full, which scans files on your hard disk(s) and programs that are running.
![]() Custom, which allows you to select what drives and folders will be scanned.
Custom, which allows you to select what drives and folders will be scanned.
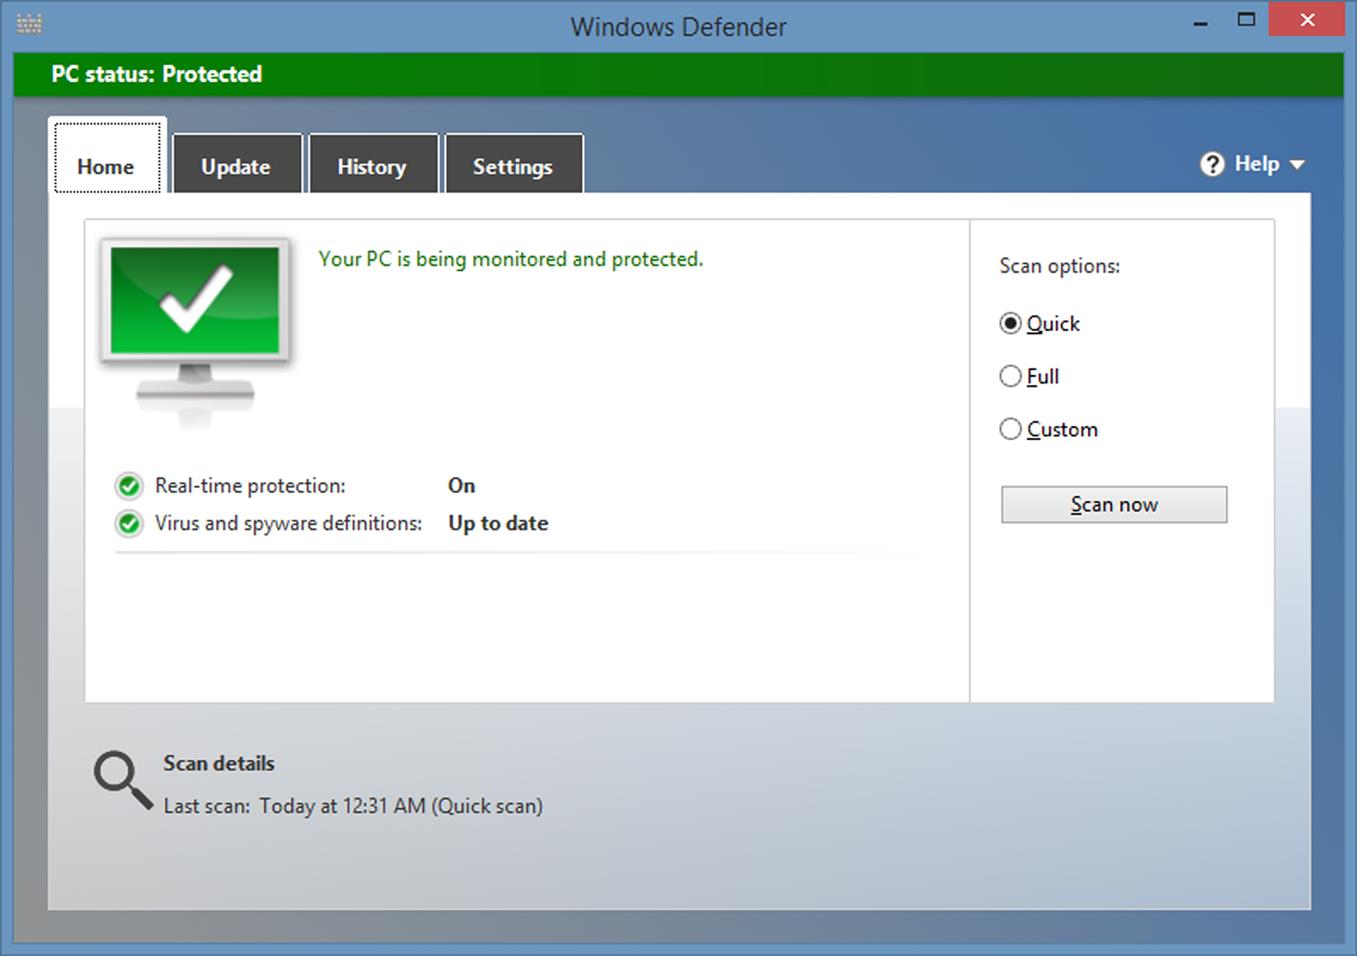
After selecting the type of scan to perform, you would click the Scan now button to start the scan. If you selected a Custom scan, you’ll be prompted to select the drives and folders to be scanned first. Once started, a quick scan will only take a few minutes, but a full scan may take hours to complete.
The History tab is used to view a list of items you’ve allowed to run on your computer, quarantined items, and all items that were detected on the machine. Quarantined items are infected files, malware, and potentially dangerous items found on your machine, which have been removed so they can’t cause additional damage. Once quarantined, the files can’t run on your computer, but they haven’t been removed. You’re given the options on this tab of deleting them, or restoring the ones you feel were quarantined by mistake to their original locations.
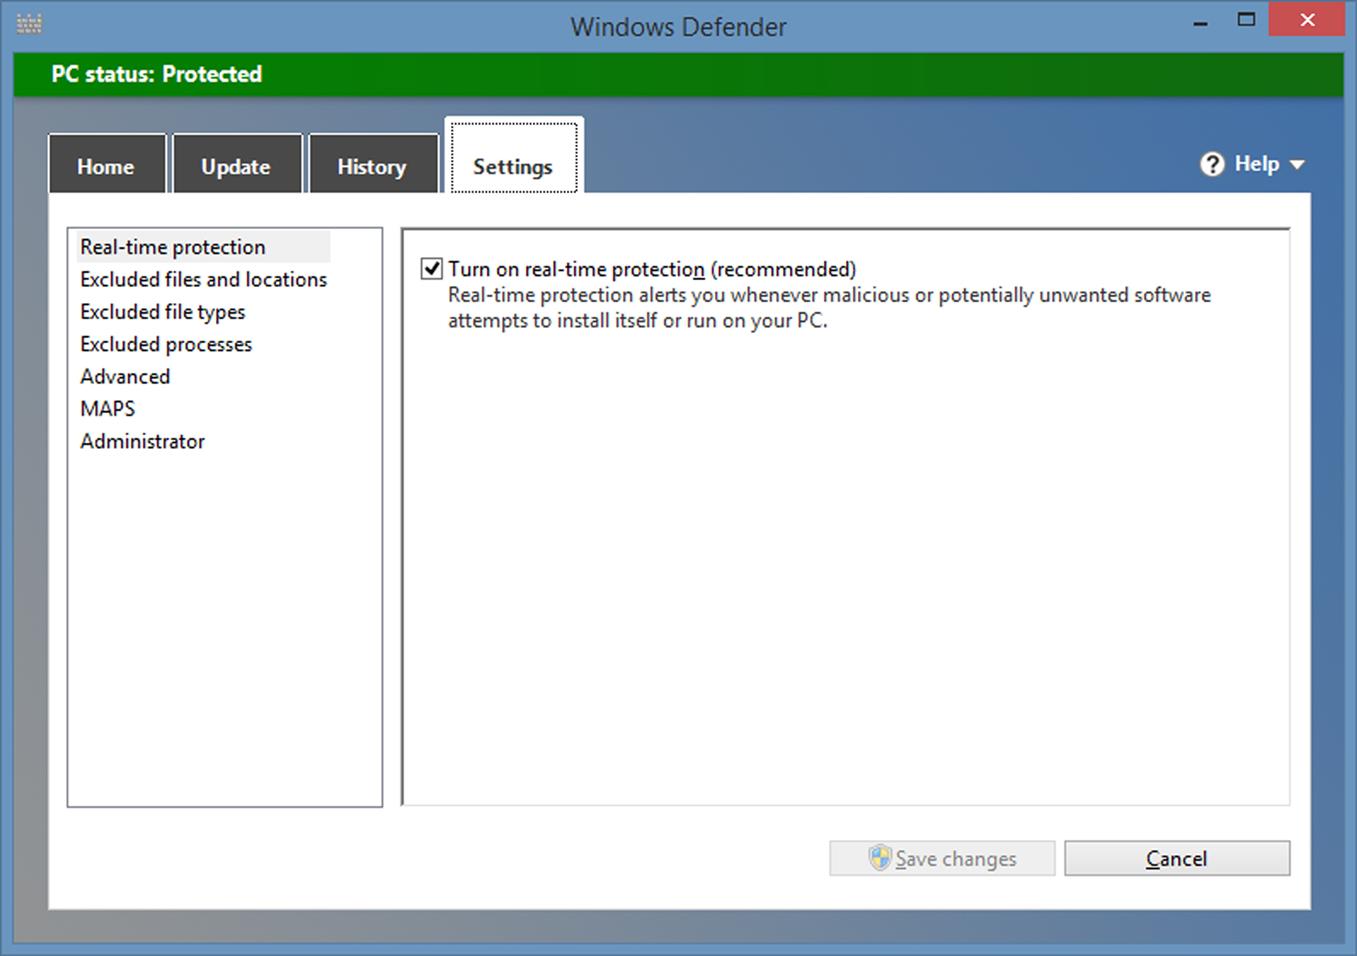
As seen in Fig. 3.2, the Settings tab is where you can configure Windows Defender to perform the way you want. By clicking on categories in the left pane, you can view and set options in the right pane. The various categories of options you can configure include:
![]() Real-time protection, which allows Windows Defender to warn you when malware or potentially unwanted programs (PUPs) attempt to install themselves on your computer. The checkbox for this option should be checked.
Real-time protection, which allows Windows Defender to warn you when malware or potentially unwanted programs (PUPs) attempt to install themselves on your computer. The checkbox for this option should be checked.
![]() Excluded files and locations, which allows you to set what files and folders should be ignored during scans. You might need to set particular locations so that Windows Defender doesn’t quarantine any programs or files that may be seen as a threat, but you want to keep. For example, you may have downloaded or installed monitoring tools, password recovery utilities, and so forth that could be a potential threat if the wrong person installed and used them.
Excluded files and locations, which allows you to set what files and folders should be ignored during scans. You might need to set particular locations so that Windows Defender doesn’t quarantine any programs or files that may be seen as a threat, but you want to keep. For example, you may have downloaded or installed monitoring tools, password recovery utilities, and so forth that could be a potential threat if the wrong person installed and used them.
![]() Excluded file types, which allows you to set which file extensions should be ignored during a scan. This should not be used unless you have a specific reason for excluding a file type.
Excluded file types, which allows you to set which file extensions should be ignored during a scan. This should not be used unless you have a specific reason for excluding a file type.
![]() Excluded processes, which allows you to specify processes (programs running in memory) that should be ignored in the scan.
Excluded processes, which allows you to specify processes (programs running in memory) that should be ignored in the scan.
![]() Advanced, which provides a number of settings that we’ll discuss shortly.
Advanced, which provides a number of settings that we’ll discuss shortly.
![]() MAPS, which allows you to provide Microsoft with information on malware and other PUPs that were found on your computer. If privacy is a concern, then click the I don’t want to join MAPS option. Otherwise leave the option set to the default membership, so that the latest virus or spyware definition can be automatically downloaded when a problem is detected.
MAPS, which allows you to provide Microsoft with information on malware and other PUPs that were found on your computer. If privacy is a concern, then click the I don’t want to join MAPS option. Otherwise leave the option set to the default membership, so that the latest virus or spyware definition can be automatically downloaded when a problem is detected.
![]() Administrator, which has an option to turn Windows Defender on or off. Unless you have another antivirus program that is actively running, the checkbox for this option should be checked so that Windows Defender is turned on. You may need to turn it off at times temporarily, such as when you’re installing certain tools that may be recognized as a threat and need to set files and locations to exclude from a scan. If you do disable it temporarily, remember to turn it back on as soon as possible.
Administrator, which has an option to turn Windows Defender on or off. Unless you have another antivirus program that is actively running, the checkbox for this option should be checked so that Windows Defender is turned on. You may need to turn it off at times temporarily, such as when you’re installing certain tools that may be recognized as a threat and need to set files and locations to exclude from a scan. If you do disable it temporarily, remember to turn it back on as soon as possible.
The Advanced section of the Settings tab provides a number of options that can be used to improve how Windows Defender scans your system. These include:
![]() Scan archive files, which will have any zip or cab files scanned for viruses and malware. You should have this checkbox checked.
Scan archive files, which will have any zip or cab files scanned for viruses and malware. You should have this checkbox checked.
![]() Scan removable drives, which will scan USB flash drives and removable disks that you’ve attached to your system. Unless you’re going to install a tool that may be seen as a potential threat, it’s advisable to have this checkbox checked.
Scan removable drives, which will scan USB flash drives and removable disks that you’ve attached to your system. Unless you’re going to install a tool that may be seen as a potential threat, it’s advisable to have this checkbox checked.
![]() Create a system restore point, which (as we’ll discuss later in this chapter) will create a point that you can restore your system to prior to removing, running, or quarantining detected items. The benefit of this is that you can restore the computer to the state it was in prior to when any items were removed. However, it also presents an opportunity for you to accidentally restore the system to when it had malware installed. By default, this checkbox is unchecked.
Create a system restore point, which (as we’ll discuss later in this chapter) will create a point that you can restore your system to prior to removing, running, or quarantining detected items. The benefit of this is that you can restore the computer to the state it was in prior to when any items were removed. However, it also presents an opportunity for you to accidentally restore the system to when it had malware installed. By default, this checkbox is unchecked.
![]() Allow all users to view the full History results, which enables anyone who uses the computer to see items that others have been quarantined. By default, this checkbox is unchecked so that user privacy is respected.
Allow all users to view the full History results, which enables anyone who uses the computer to see items that others have been quarantined. By default, this checkbox is unchecked so that user privacy is respected.
![]() Remove quarantined files after is an option that provides a dropdown box that allows you to set when quarantined files are deleted. By default, it’s set to 3 months.
Remove quarantined files after is an option that provides a dropdown box that allows you to set when quarantined files are deleted. By default, it’s set to 3 months.
![]() Send file samples automatically when further analysis is required is a setting that gives your permission for the computer to automatically send samples of items that may be malicious. This helps Microsoft to identify threats and is enabled by default. If privacy is a concern, then uncheck this box. Otherwise, you’ll be prompted whether a file can be sent if Windows Defender determines it may contain private information.
Send file samples automatically when further analysis is required is a setting that gives your permission for the computer to automatically send samples of items that may be malicious. This helps Microsoft to identify threats and is enabled by default. If privacy is a concern, then uncheck this box. Otherwise, you’ll be prompted whether a file can be sent if Windows Defender determines it may contain private information.
Updating
Signature files or definitions are an important part of how antivirus and antimalware software works. These files contain information about different viruses and malware, which is used by the software to detect, clean, and remove detected threats. If you haven’t updated these files, then your antivirus software isn’t nearly as effective.
In Windows Defender, these files are automatically updated as part of the Windows Update process. By clicking on the Update tab, you can see the last time antivirus and antispyware definitions were downloaded by your system. To manually update them, you can click the Update button.
Scheduling Regular Scans
Many antivirus programs provide an option to schedule when scans are to be performed. This allows you to configure a time when a scan runs, the frequency (daily, weekly, etc.), and what should be scanned. The software may provide real-time protection, and may protect your files when you’re not using the computer, but regular full scans of your system are advisable.
Windows Defender does not have the option to schedule scans in the program, but uses a different tool in Windows for this purpose. To schedule when a scan occurs:
1. Search for Schedule Tasks, and open the program.
2. In the left pane, click on the arrow beside Task Schedule Library to expand it, and then repeat the process to expand the Microsoft and Windows nodes.
3. Double-click on Windows Defender.
4. In the top middle pane, double-click on Windows Defender Scheduled Scan.
5. When the dialog box opens, click on the Triggers tab, and then select New.
6. Set the frequency of the scan and what is to be scanned, and then click OK.
Rogue Antivirus
As we’ll discuss further in Chapter 5, Cybercrime, it’s important to be aware of fake security alerts that may appear while surfing the Web, or which appears on your screen from previously downloaded malware. A pop-up may be designed to appear as if it’s a genuine warning, telling you that your computer has been infected or that you need to update your antivirus, but it’s actually a link to lure you into downloading bogus software or install malware. You may also expose yourself to installing such malware when searching for antivirus software, and clicking on a link to a site that automatically downloads malicious code and/or provides a link to download their product.
You can limit the risk of installing such software by having up-to-date antivirus and antimalware protection on your computer, using firewall protection, and using nonadministrator accounts on your computer to limit its ability to be installed. Another key factor in avoiding these scams is to be wary of clicking on such links, and becoming familiar with how your antivirus and antimalware looks, as well as the messages they present. Most of these pop-ups aren’t exact duplicates, so if it doesn’t look right, don’t click on it.
Antimalware
If viruses are a type of malware, and antivirus software also protects against other kinds of malware, then you’re probably wondering why you need antimalware software. It’s true that the antivirus software discussed previously will protect you from most of the threats on the Web. According to the Q2 report by PandaLabs (www.pandasecurity.com/mediacenter/reports/), systems infected between April and June 2015 by different types of malware were as follows:
By looking at this, we can see that Trojans are by far the biggest malware threat facing computer users. Since antivirus software focuses on protecting against Trojans, viruses, and worms, you definitely need one installed. However, while antivirus software prevents, detects, and removes a majority of infections, it will not catch everything. Companies that specialize in antimalware protection often focus on certain types of threats (such as spyware and adware), with some providing superior protection against zero-day or zero-hour malware that was previously unknown. While you need antivirus software running constantly in the background, you should also run antimalware software to catch threats your antivirus hasn’t detected. Some of the antimalware available include:
![]() Ad-aware (www.lavasoft.com) is a free antivirus and antispyware tool, which also has premium versions that provide features like parental controls that prevent access to adult websites, email protection, and more.
Ad-aware (www.lavasoft.com) is a free antivirus and antispyware tool, which also has premium versions that provide features like parental controls that prevent access to adult websites, email protection, and more.
![]() Spybot—Search & Destory (www.safer-networking.org) is a free antimalware and antispyware tool, which also has premium versions that provide antivirus protection and additional features.
Spybot—Search & Destory (www.safer-networking.org) is a free antimalware and antispyware tool, which also has premium versions that provide antivirus protection and additional features.
![]() Microsoft (http://www.microsoft.com/security/pc-security/malware-removal.aspx) also provides an antimalware tool that is available on their site and is downloaded automatically as part of Windows Updates.
Microsoft (http://www.microsoft.com/security/pc-security/malware-removal.aspx) also provides an antimalware tool that is available on their site and is downloaded automatically as part of Windows Updates.
![]() Malwarebytes Anti-Malware (www.malwarebytes.org) is a free antimalware tool that’s designed to remove malware and spyware from your computer. The premium version has additional features that provide additional scanning features and stop malware from activating. They also have additional free and premium tools to protect systems from exploits. Versions are available for Windows, Mac, and mobile devices running Android.
Malwarebytes Anti-Malware (www.malwarebytes.org) is a free antimalware tool that’s designed to remove malware and spyware from your computer. The premium version has additional features that provide additional scanning features and stop malware from activating. They also have additional free and premium tools to protect systems from exploits. Versions are available for Windows, Mac, and mobile devices running Android.
While Microsoft deploys an antimalware tool to detect and remove known threats, you shouldn’t rely on this as your only means of defense. While included in your Windows Update once a month, this utility can’t compare to tools like Malwarebytes Anti-Malware, which updates itself on a recurring basis throughout the day to find the latest threats. Therefore, think of Microsoft’s utility as one layer of protection, but not the only one. Use other tools that can be scheduled to run daily or weekly or on-demand, in addition to a good antivirus program that runs in the background.
Don’t Forget Your Mobile
While people may install antivirus and antimalware protection on their computers, it’s easy to forget that your mobile devices are vulnerable to the same threats. There are mobile versions of many popular antivirus and antimalware tools, which can be installed to scan your device and provide real-time protection against threats.
When looking at possible antivirus and antimalware apps, you should only install ones that you trust. There are apps that promise protection, but are actually malware. Use apps developed by reliable companies, such as Avast, AVG, and Malwarebytes, and look up the reviews of people who have used any of the apps you’re considering installing.
Staying Up-To-Date
When a software company releases their final product, it’s not exactly final. Operating systems, games, apps, and other software may be released with known issues or have problems that are discovered after being released. For example, previous versions of Windows have been released with thousands of known bugs, with Microsoft deciding it better to fix the problems later than delay the release and face poor user adoption. In addition, security vulnerabilities, bugs that effect performance or functionality, or other issues are often discovered after it’s on the market. To remedy these problems, vendors will release software to install on your system that repairs the problem(s).
There are many different names to describe software that updates the existing software, including updates, fixes, bugfixes, hotfixes, patches, and updates. If several updates are combined into one, you’ll hear it referred to as a cumulative update, or if it’s a major update to the system it may be called a service pack. Regardless of the name, they are designed to repair issues that have been identified, and/or provide new features that weren’t available previously.
It’s important that updates get applied, so that any security holes or other problems with the software are repaired, and the system works as expected. If not, it’s a vulnerability that allows a hacker to gain access to your system that’s like having the front door to your house open, and refusing to close it.
Types of Updates
There are different kinds of updates that may be applied to a system. Mobile apps and other systems may simply provide an update that upgrades the application or OS to a new version, while others will modify parts of the code and replace certain files. Different terminology may also be applied to describe the updates. Microsoft operating systems and products will separate updates into different types, including:
![]() Security updates, which are designed to fix vulnerabilities in the software. These may be further rated based on the severity of the vulnerability as critical, important, moderate, or low. It is important to install any security update rated as critical.
Security updates, which are designed to fix vulnerabilities in the software. These may be further rated based on the severity of the vulnerability as critical, important, moderate, or low. It is important to install any security update rated as critical.
![]() Critical updates, which are nonsecurity updates that address certain bugs found in the software.
Critical updates, which are nonsecurity updates that address certain bugs found in the software.
![]() Service packs, which are cumulative sets of updates, as well as certain changes or features to the software. Once installed, previous recommended updates may no longer be offered, because they’ve already been applied through the service pack, and new ones that are designed to fix problems found after the service pack was released may be offered.
Service packs, which are cumulative sets of updates, as well as certain changes or features to the software. Once installed, previous recommended updates may no longer be offered, because they’ve already been applied through the service pack, and new ones that are designed to fix problems found after the service pack was released may be offered.
You may also see other updates offered, such as ones that will upgrade your browser to a new version, optional updates for drivers, or new software that can be installed on your system. Important updates that you should install relate to fixing privacy or security issues, and you should always consider installing them as soon as possible.
To see if there are updates available for a computer, you can visit their website. If you’re running a Mac, you can visit www.apple.com/ca/support/osx/software-updates/ to view recent updates for OS X. In the same way, when visiting a software manufacturer’s site, you’ll often see a Support or Download section that provides information on downloading and installing any patches that have been released. To check for updates on Windows machines, you would follow these steps:
1. Click on the Start button and click Control Panel in Windows 7. Right-click on the Start button in Windows 8.1, and then click Control Panel. In Windows 10, Windows Update is no longer in the Control Panel, so you’ll need to click Start, select Settings, and then click Update & Security.
3. Click the Check for Updates button.
4. After checking, you’ll be informed if there are no updates available for your computer, or if you’re using Window’s 7 or 8x, you’ll be provided with a list of available updates specifically for the operating system you’re using. You can then select the updates you want to install, and follow any instructions that might be related to the installation on your screen. In Windows 10, you’re not given the option to pick individual downloads, and they’ll install automatically.
Automatic Updates
Some systems will automatically check for updates, and either notify you or automatically install them for you. The benefit of having the OS automatically install updates is that it takes the bother of checking for updates out of your hands, which can also be a problem. Sometimes, updates can cause new issues, and may have new bugs or introduce new vulnerabilities. This is why many organizations wait before installing them. By not immediately installing a patch or service pack, you can see if others have had problems, and gives the vendor time to retract any buggy updates.
In Windows, you can turn automatic updates on or off by doing the following:
1. Click on the Start button and click Control Panel in Windows 7. Right-click on the Start button in Windows 8.1, and then click Control Panel.
2. In the left pane, click Change Settings.
3. Under Important Updates, click on the dropdown list and select one of the following:
a. Never check for updates, which turns automatic updates off. If you choose this, you’ll need to manually check for updates. This is not a recommended setting.
b. Install updates automatically, which sets Windows to check for updates and install them automatically. Depending on the update, you may still be prompted for some input. This is the setting recommended by Microsoft, and works for most users.
c. Download updates but let me choose whether to install them, which gives you the option of which updates to install, so updates aren’t installed immediately. The benefit of this is that you’re given more control on what’s being installed on your computer.
d. Check for updates by let me choose whether to download and install them, which is similar to the last option, but Windows won’t automatically download them to your computer.
4. To schedule how often Windows checks for updates, click on the Install new updates dropdown lists. You should have Windows check for new updates every day to insure critical or security updates are applied (or, depending on your update settings, that you’re aware they exist). You can also select the time that Windows will check. If your computer is in hibernation mode when it’s time to check for updates, Windows will check when you start your computer, and prompt you if you want to postpone installation.
Updates in Windows 10
Windows 10 handles updates differently from previous versions. You have less control, and the operating system will update you automatically, with little control over what’s being installed. The updates on Windows 10 also modify the usability of the system. Rather than holding back new features until the next version of Windows, updates are automatically installed to deploy new features and remove old ones that Microsoft feels you don’t need anymore.
As we saw earlier, the update feature in Windows 10 is no longer in the Control Panel. To manually start an update, you need to click Start, select Settings, click Update & Security, and then click Windows Update. If updates are available, this screen will inform you. Clicking the Download button will download them immediately.
To control what happens when updates are installed, you would click the Advanced Options at the bottom of this screen. You’ll immediately notice that your options are significantly limited, and the Choose how updates are installed dropdown list only allows you to choose whether your system restarts automatically or will schedule a reboot when you’re not using it.
You are however given a checkbox to Give me updates for other Microsoft products when I update Windows, which when checked will update Microsoft Office and other programs on your system that are made by Microsoft. Generally, people will leave this checked so that everything is updated at once, but if you want to disable such updates, click on the box to uncheck it.
If you’re using the Professional, Enterprise, or Education versions of Windows 10, the Advanced Options screen also provides a Defer upgrades checkbox. It’s used to prevent feature updates from being installed for several months, but will not prevent any security updates from being installed. This ensures that organizations running the Professional, Enterprise, or Education editions will have stable systems that don’t have new features suddenly appearing. In doing so, trainers won’t be surprised by a new feature they don’t know about, and IT support staff won’t have to field calls on features that didn’t exist the day before. If you’re using the standard edition however you won’t see this checkbox. To delay upgrades, you would click on the Defer upgrades checkbox, so it appears checked.
A benefit of the automatic feature updates is you get new features without having to buy a new version of Windows. However, if you feel like a bit of a guinea pig used for testing, you’re not exactly wrong. The Defer upgrades option gives a business time to test features before they’re deployed company-wide and any problems with features will be experienced by home users, giving Microsoft time to fix or remove the feature in future updates. Another potential issue is that you may get used to using a feature at home, but not see that feature on your work computer for months.
A problem with Windows 10 forcing updates to be installed is when there’s a glitch in the update, or other issues prevent it from being installed properly. Take what happened in August 2015 as an example, when people had the frustrating experience where an update would partially install, reboot the computer, and fail (Gibbs, 2015). Windows 10 would roll back the installation, but the next time you logged onto your computer, it would again try to install the update and the problem would repeat itself. This didn’t just happen once, but with three different cumulative updates released that month (KB 3081424 on August 5, KB 3081436 on August 12, and KB 3081438 on August 14). It wasn’t until August 19 when people reported the updates weren’t installing properly. Added to this was the problem that Microsoft began providing vague descriptions about their updates, merely stating that “This update includes improvements to enhance the functionality of Windows 10.” Without knowing what the update fixes or does to a system, you can’t decide whether you really need it or not.
While Windows 10 doesn’t provide an option to prevent automatic updates, there is a sneaky way of doing it. Later in this chapter, we’ll show you how to control updates when using a mobile Internet connection, and show how setting a connection as metered will prevent any automatic updates that aren’t marked as being a priority. So, to prevent automatic updates, simply mark the connection to your home wireless network as metered. By setting the connection as metered, you’ll receive a message stating that Windows will download the updates when you’ve connected to Wi-Fi. When you’re ready to receive updates, you can unmark the Wi-Fi connection so it is no longer metered or manually download the updates as we showed you earlier.
Windows 10 peer-to-peer updates
A new feature in Windows 10 involves how updates are downloaded from the Internet. It uses a peer-to-peer (P2P) method to distribute updates, similar to that used for torrents. Microsoft makes updates and Windows Store apps available by turning the computers that have them into servers, so these files are shared and available to others wanting to download it.
Traditionally, your operating system would connect to Microsoft’s servers, or you would visit their site using a browser, and directly download any updates from their servers. This would be done on each computer on your home network. In Windows 10, you can download the update once, and the machine downloading it could then share it with other computers on your local network. This is beneficial because it saves wasted bandwidth as each machine no longer needs to download the same files over the Internet.
The problem with this delivery method is in the default settings for the P2P updates, as it allows your computer to share any installed updates with users on the Internet. While this arrangement benefits Microsoft, in that fewer customers are chewing up bandwidth and potentially overloading their servers, it does not benefit you. The P2P file sharing will eat up some bandwidth, possibly slowing your Internet connection and drawing you closer to any data transfer limits (i.e., how many GB of data you can upload/download per month) set by your ISP. The issue of how much data is being transferred is particularly important if you’re using a mobile hotspot, such as one in your vehicle or created with your phone.
To configure how updates are delivered, and disable updates being sent to the Internet from your computer:
1. Click Start, select Settings, and then click Update & Security.
3. On the Advanced Options screen, click Advanced Options.
4. To turn off the P2P updates completely, slide the option that allows your PC to send parts of previously downloaded Windows updates and apps to Off. If you want to allow Windows to share these files, slide the option to On. If set to On, you can then choose one of the following options:
a. If you want to allow your computer to share and get updates from other computers on your local network, click the PCs on my local network option. This is beneficial, as any computer on your home network will get an update from the first computer to install it. This saves time and bandwidth, as each computer in your home won’t need to connect to the Internet to download the same file from Microsoft.
b. If you want to allow your computer to share and get updates from not only computers on your local network but also computers on the Internet, then click the PCs on my local network, and PCs on the Internet option. As we’ll discuss later, it is recommended that you don’t select this option if there’s a concern of how much bandwidth it will use, especially when using a mobile hotspot.
Mobile Device Updates
Mobile devices like smartphones and tablets also need to have updates applied to them. Although they’re different devices, the way you check and install updates on them is similar to one another.
![]() On the Blackberry 10 OS, you would go to Settings, tap Software Updates, and then tap Check for Updates.
On the Blackberry 10 OS, you would go to Settings, tap Software Updates, and then tap Check for Updates.
![]() On the iOS for an iPhone, iPad, or iPod touch, you would tap Settings, tap General, and then tap Software Update.
On the iOS for an iPhone, iPad, or iPod touch, you would tap Settings, tap General, and then tap Software Update.
![]() To update the OS on an Android smartphone or tablet, tap Settings, tap About Phone or About Tablet (if you have a tabbed settings menu, this appears on the General tab), tap Software Update, and then tap Software update check.
To update the OS on an Android smartphone or tablet, tap Settings, tap About Phone or About Tablet (if you have a tabbed settings menu, this appears on the General tab), tap Software Update, and then tap Software update check.
Regardless of the OS you’re using, if an update is available, follow the onscreen instructions to download and install. When doing an update, you should always have your mobile device plugged in and charged. If you lost power during an update, it could corrupt the OS or cause other problems because the update failed without completing.
You should also check for any updates that might be available for apps installed on your mobile device. These too could have patches available to fix vulnerabilities or other issues. To update your apps, do the following:
![]() On the Blackberry, you should receive notifications when a new version of an installed app is available. Opening the notification reveals an option to open, and then update. You can also manually check for updates by tapping Blackberry World, swiping right to reveal the navigation menu, tapping My World, and then tapping My Apps & Games. A list of available updates will be displayed. Tapping the icon beside an app’s name will update that particular app, while tapping the Update All option will update all of the listed apps.
On the Blackberry, you should receive notifications when a new version of an installed app is available. Opening the notification reveals an option to open, and then update. You can also manually check for updates by tapping Blackberry World, swiping right to reveal the navigation menu, tapping My World, and then tapping My Apps & Games. A list of available updates will be displayed. Tapping the icon beside an app’s name will update that particular app, while tapping the Update All option will update all of the listed apps.
![]() Mobile devices running iOS can check for app updates by tapping App Store. Upon opening, it will check for any available updates. You can then click the Update button to update each app separately.
Mobile devices running iOS can check for app updates by tapping App Store. Upon opening, it will check for any available updates. You can then click the Update button to update each app separately.
![]() On Android devices, tap Play Store, tap the menu icon (which appears as three horizontal bars), and then tap My Apps. Select that app that’s labeled “Update,” and tap Update.
On Android devices, tap Play Store, tap the menu icon (which appears as three horizontal bars), and then tap My Apps. Select that app that’s labeled “Update,” and tap Update.
Other Device Updates
As we discussed in Chapter 1, What is cyber safety?, it’s important to be aware of all the devices connected to the Internet. You may also have game systems (such as an X-Box, PlayStation 3, or 4), a Smart TV, or apps on those systems (e.g., Netflix and Hulu) that require occasional updates. The systems may require you to update when you first start them, or you may need to check the settings to check for updates manually. By looking in the user guides for those systems and devices, you should find instructions on the steps involved in checking for upgrades and installing them.
Disaster Recovery
Disaster recovery involves methods that protect your data from natural or human-induced disasters. A disaster may be a fire, earthquake, flood, or some other natural occurrence, or intentional acts or mistakes caused by a person (such as a hacking attack, viruses, malware, dropping a mobile device in water, or accidentally reformatting a hard disk). If you’ve been adversely affected by such an event, you want to get yourself up and running with as little permanent loss as possible.
Businesses will have sets of policies and procedures to protect data, software, and hardware, so they can recover in the event of a disaster and resume normal functions. However, this doesn’t mean that you shouldn’t take steps to ensure your personal data, software, and devices aren’t protected from the same or similar problems that can cause damage. By taking steps to protect yourself, you’ll be able to recover the digital photos, documents, and other assets stored on your computer, laptop, or other mobile devices.
Keeping a Copy of Passwords
As we discussed in Chapter 2, Before connecting to the Internet, an important part of disaster recovery is keeping a list of accounts and passwords in a safe place. If anything happens to your computer, you may not be able to logon or access accounts, encrypted folders, and so on without a necessary key or password. You may not even remember all the sites you used.
Any list you have should be stored in a safe, locked firebox, or another secure location. Regardless of whether it’s a printed sheet or a document saved on a USB stick, you don’t want others having access to it. You also want it protected so that if there’s a fire or flood, the list is protected and usable.
Backing Up Files
A backup is a copy of files on your computer saved to a single file. These can be only certain folders that you select, or everything on a hard disk. When you create a backup of your computer, a system image can also be made, which can be used to restore the computer if it crashes and no longer works properly.
When you backup a drive, its strongly advised not to save the backed up files to the same drive or computer. If you have a home network, you could backup to another computer. However, you should remember that the price of storage is cheap, and buying an external hard disk is relatively inexpensive. An external drive is a hard disk that comes in a case that connects to your computer with a USB cable. This allows you to add and remove a particular disk as needed, or have multiple external drives connected to your system. To backup a Windows 7 machine, you would do the following:
1. Click Start, and then click Control Panel. Under System and Security, click Back up your computer.
2. In the Backup section, click Set up backup.
3. Select a destination where the backup files are to be saved by double clicking on a drive letter.
4. On the next screen, you can select what to backup. Your options are Let Windows choose, which will have the system backup files in your libraries, the desktop, and Windows folders for each user account on the computer. It will also create a system image. If you choose Let me choose, then only the files you choose are backed up. Generally you’ll select the first option that’s recommended, but for the purposes of this exercise, we’ll have you choose the latter.
5. When the next screen appears, you will see a list of libraries belonging to users on that computer, which are checked by default. This backs up all libraries for each user, but you can click on a library to expand it and then select only certain libraries belonging to a particular user. A list of local and external hard disks also appears in the listing. To backup an entire drive, click the checkbox beside a particular drive letter. If you only want certain files, then navigate to the folders you want to backup, and click the checkbox beside the folder. To make a system image of the drive where Windows is installed, ensure the Include a system image of drives checkbox is checked. Click Next.
6. To automate the backup so it runs on a recurring basis, click Change schedule.
7. Ensure the Run backup on a schedule checkbox is checked. In the How often dropdown list, select whether the backup should run Daily, Weekly, or Monthly. In the What day dropdown list, select the day it has to run on. If you selected a weekly backup, you would select the day of the week, but if you selected monthly, you’d choose a number corresponding to the day of the month. Finally, in the What time dropdown list, select the time the backup should run. Click OK.
8. Review the summary of your choices, and then click Save settings and run backup.
9. In Windows 8x and 10, backups are done slightly differently. Windows 8x still provides a link to the Windows 7 File Recovery tool, which is the backup tool we just discussed. The new backup feature is called Fire Recovery in Windows 8x and 10. Using this, you can have Windows save copies of files so that they can be retrieved if they’re deleted or damaged. It also provides the ability to create an image backup, where a copy of the drives containing files that Windows uses are backed up. To use File History, you need to do the following:
1. Right-click on the Start button, click Control Panel.
3. Click Turn On, and File History will be activated on the computer.
4. To control how often your files are backed up, click Advanced Settings.
5. Click the Run backup on a schedule checkbox so its checked. In the How often dropdown list, select the frequency that your files will be backed up (e.g., Daily, Weekly), and in the What day dropdown list, select the day of the week these backups are to run. Click OK.
To perform an image backup in Windows 8x and 10, you would also use the File History app in Control Panel, but would do the following:
2. When the wizard starts, select where you want to save the backup. While you can backup to blank DVDs or a network share, for these steps, you would choose On a hard disk. As we mentioned, this should not be a local drive, but an external hard disk. Click Next.
Online backups
While backing up files to an external drive is a commonly used solution, it won’t help you if something happens to both your computer and external drive. If a fire, flood, or some other disaster happened in your home, there’s a good possibility that you’d lose both your computer and any backups because both are kept in the same place.
Offsite storage involves keeping a copy of your data in another location. Larger companies will have backups copied across a network to a remote server and/or store backup tapes at another building or secure storage facility. Since most of us don’t have such options, a simple solution is to use an online backup service.
There are a number of different companies that provide large amounts of storage space on a secure Internet server. The price ranges depending on the company you use, the amount of space you need, and the number of computers you’ll be backing up. A number will also provide a trial evaluation period, so you can test the services for a limited time without paying. Some of the online backup service providers you might choose include:
![]() Carbonite (www.carbonite.com)
Carbonite (www.carbonite.com)
![]() Barracuda Cloud Storage (www.barracuda.com)
Barracuda Cloud Storage (www.barracuda.com)
![]() CrashPlan (www.crashplan.com)
CrashPlan (www.crashplan.com)
![]() Mozy (www.mozy.com)
Mozy (www.mozy.com)
When you use one of these services, you backup and restore your computer using the tools they provide, which are designed for various platforms like Windows, Mac, Linux, and mobile devices. You can schedule regular backups, or use continuous backups so that any changed files are automatically copied to one of their servers. If you ever have a problem, you can restore individual files or the entire hard drive on your machine.
If you are going to backup your device to the Cloud, security should be your primary concern. There is a difference between making a backup that copies your files and settings to some free storage space on the Cloud, and using a business that is focused on providing secure online storage solutions. While you should always check what such companies offer, ones like Carbonite encrypt your data as it’s transferred between your device and their servers, and encrypt the files so that they’re inaccessible without a key (i.e., password).
Backing up phones and tablets
While backing up computers has been stressed as a vital process since long before the Internet, many don’t consider the need to backup data on mobile devices. If you think of the number of photos and documents on your phone or tablet, you can see how much you could lose if the phone was lost, stolen, or seriously damaged.
One method of backing up the files on your mobile device involves connecting it to your computer, so it’s accessed as a removable drive. After connecting your phone to the computer using a USB cable, you would select the prompt on your phone to allow access to your SD card, or go into the phones settings and allow it to connect as USB Mass Storage. For example, on an Android device, you would swipe down from the top of the screen to view the main menu, tap USB connection, tap USB Mass Storage, and then tap OK. Once your SD card and storage on the phone appear as new drives (removable disks) on your computer, you can then copy the files to a new location on your computer. You could then include the folder containing these files in any backups you do of the computer.
Some devices also include software for your PC, so you can backup and restore your mobile device to a computer. For example, Blackberry devices allow you to install a program called Blackberry Blend, which includes a Backup & Restore feature. In using it, you can backup and restore your settings, phone history, saved searches, messages, browser bookmarks, organizer data, fonts, and media files. If your phone doesn’t include such an application, there are third-party backup solutions that provide similar functionality.
Other devices like iPhone provide the ability to backup the phone to iCloud. You can also set the phone to make automatic backups while connected to a Wi-Fi network, or do it manually. Once you’re connected to a Wi-Fi network, you would tap Settings, tap iCloud, and then tap Backup. You would need to make sure that the iCloud Backup slider was turned on, and then tap Back Up Now.
Companies that specialize in secure online backups commonly provide backup solutions for popular mobile devices, such as those running iOS and Android, as well as Windows Phone. Using these tools, you can backup and restore your mobile device, and access and restore files from a backup using a mobile app. As we mentioned earlier, with online backups, you should always ensure that encryption is used to transfer and store your data, so that you’re the only one who can access it.
Setting and Restoring Restore Points
A checkpoint or restore point is essentially a snapshot of your system at a given point in time. When you create a restore point, information about your computer is stored, and can later be used to restore Registry settings, system files, and programs that Windows needs to run properly. If a problem occurs, you can used the restore point to restore your system to its previous state, so it’s exactly like it was when the restore point was made.
Restoring a system in this way is useful when a serious problem occurs. If a change was made to Windows, such as a bad update being applied or malware infecting your computer, a system restore can help make it the way it was before the problem occurred. This may sound like a backup, but it’s different in that you can’t select individual files to restore, and your personal files are never affected. It just restores Windows.
Restore points are automatically created by Windows on a weekly basis, and also when a significant change occurs, such as a program being installed. You can also create restore points manually. To create a restore point:
1. In Windows 7, click the Start button, right-click Computer, and then click Properties.
2. Click on System Protection in the left pane.
3. When the Systems Properties dialog box appears, ensure the System Protection tab is selected. Click the Create button.
To restore your system to a specific point in time, you would do the following:
1. In Windows 7, click Start, click All Programs, click Accessories, click System Tools, and then click System Restore.
2. When System Restore opens, click Next.
3. Select the most recent restore point from the list. To view additional restore points, you would click on the Show more restore points checkbox so it appears checked. Click Next.
Summary
The best way to deal with a disaster is to avoid it. Following the advice outlined here will go a long way to ensure your data is protected. As we saw in this chapter, while there are a number of threats on the Internet (inclusive to malware, viruses, and vulnerabilities that can be exploited) there are also tools that can be used to protect systems from being infected. That being said, sometimes you can’t avoid a serious problem, and it might just take your system down. That’s why you need to prepare.
By being ready for the possibility of a problem, you’re better able to recover from it. Backups, recover points, keeping copies of passwords, and having the ability to get additional help can help you recover from a disaster. As we saw, by backing up your computer and mobile devices, you can then restore it to a previous state, and minimize your loss.