
Before connecting to the Internet
Abstract
This chapter instructs the user on common elements that should be configured properly prior to connecting to the Internet. This includes systems they would have in their home, business, and/or may come in contact with when mobile.
Keywords
Cyber safety; setup; configuration
When people get a new computer, they often set up an Internet connection and begin having fun. This is a mistake, because the tools you’re using to visit sites may not be as secure as you hoped. If you’re already using the Internet, then you should review your settings, and ensure that your home network is as secure as you hoped.
Securing Your Web Browser
A browser is your window to the Web, and likely the most used program you’ll use on the Internet. Internet or Web browsers are programs with a graphical user interface (GUI) that display HTML files (web pages), images, and other content found on the Internet. Using this tool, you’re able to navigate the Internet, and view different websites, as well as the various resources and services available through them.
The most popular Web browser used today is Google Chrome (www.google.com/chrome). According to sites like StatsCounter (http://gs.statcounter.com), statistics on the browsers being used by people show that Chrome is used by dramatically more people than any other browser, followed by
![]() Internet Explorer (IE) (http://windows.microsoft.com/internet-explorer)
Internet Explorer (IE) (http://windows.microsoft.com/internet-explorer)
![]() Firefox (https://www.mozilla.org/firefox)
Firefox (https://www.mozilla.org/firefox)
![]() Safari (www.apple.com/safari)
Safari (www.apple.com/safari)
![]() Opera (www.opera.com)
Opera (www.opera.com)
Of the various browsers available, Safari is for Apple computers, and comes preinstalled on your Mac. Similarly, IE comes preinstalled with Windows. Although IE was once the major browser on the Web, its popularity has been in steady decline for years, as more and more people switching to other browsers like Chrome. Microsoft’s new Edge browser (https://www.microsoft.com/en-us/windows/microsoft-edge) is also included with Windows 10, but appears to be catching on slowly with users (0–4% usage, depending on the country) according to StatsCounter. However, as with Safari, IE is installed on your computer when you first buy your computer or install the operating system. As such, many people will simply use what’s already installed, enjoy using the preinstalled browser, or use it at least once to download a different browser like Chrome.
Regardless of the browser being used, you should always review its privacy and security settings to make sure you’re comfortable with the default settings. Even though the default settings may be what’s recommended, you should know what it is or isn’t protecting you from, and whether or not those settings are right for you. While we’ll be discussing settings throughout this book, in the sections that follow we’ll show you a number of settings that should be configured as soon as you start using a browser.
Cookies
One of the settings you’ll want to review and possibly disable involve cookies. Cookies are text files sent to the browser by a Web server, and used to store information about your visit to a site. For example, the first time you visit a site, you may be asked to fill out a form and provide information about yourself, or your preferences in using the site. In doing so, when you revisit the site, or move from page-to-page on a site, you won’t need to provide this information again, because the browser can provide saved information through the cookie. There are session cookies, which are stored temporarily, and deleted once you close the browser, and persistent cookies (also called permanent or stored cookies) that remain on your computer indefinitely or until a specific date is reached when the cookie expires.
Often, cookies don’t present a problem, and are beneficial to your experience on the Web. It would after all be annoying to set your preferences (such as safe search options being set to high or off) each and every time you visited a search engine like Bing or Google. While these types of cookies are innocuous, there are certain kinds of cookies that present a risk to your privacy.
Tracking cookies are used to record information and report it back to where the cookie’s designer wants the information to go. They record your online activities (i.e., the sites you visit), and send this information to a third party where it’s stored with data collected from millions of other people. The data can then be analyzed for marketing and statistical analysis, and may be used to target advertising that appears on different websites you visit. Ever wonder how a particular website seems to have ads that are relevant to you? Now you know. If the tracking cookie is designed to gather names, addresses, and other personal information, you may see ads mentioning your name, or showing businesses close to your location (Fig. 2.1).
To manage and delete cookies in Chrome, you would perform the following steps:
1. Click on the Chrome menu  , which is located in the upper right-hand corner of the browser.
3. Scroll to the bottom of the page and click Show Advanced Settings.
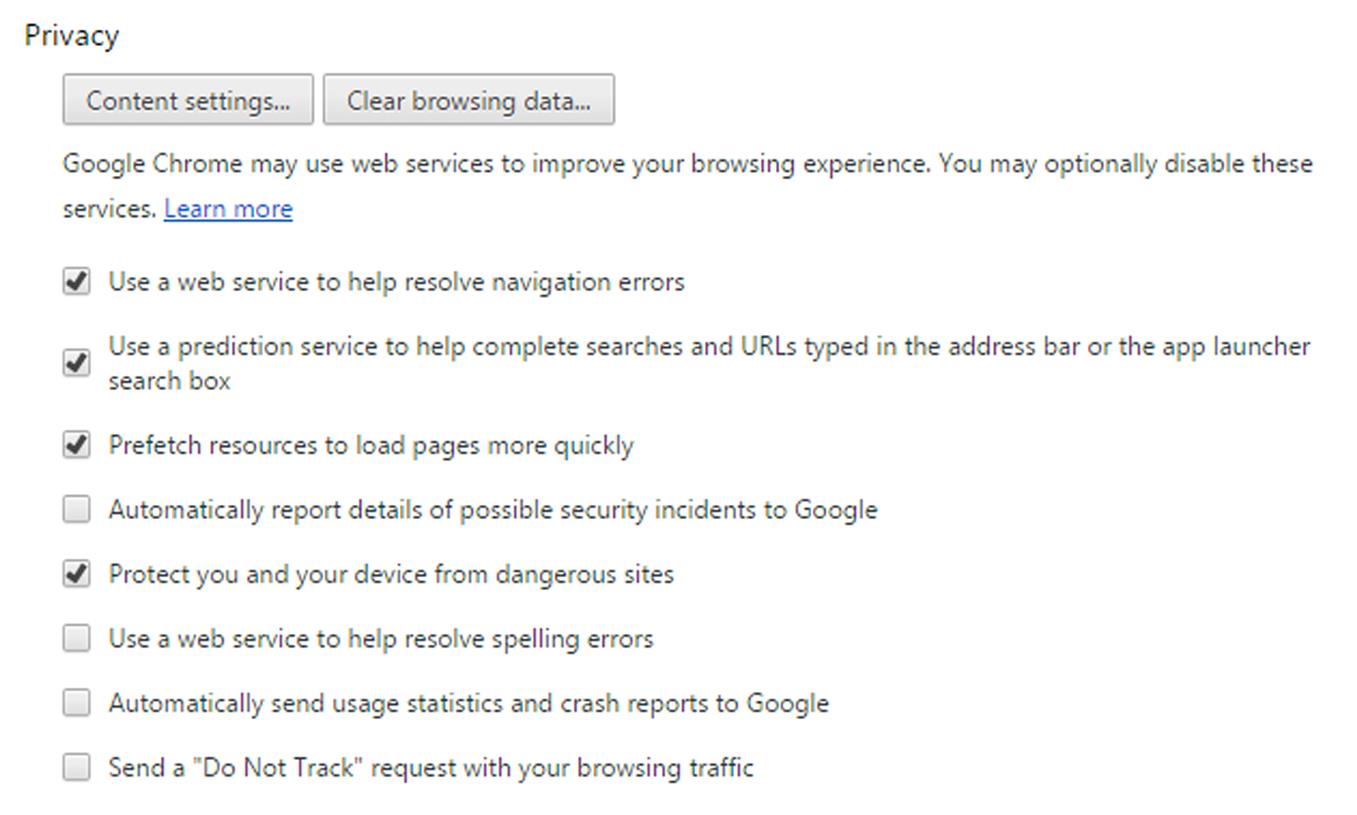
4. Scroll to the Privacy section of the page (shown in the following figure), and click the Content Settings button.
5. To disable cookies, click Block sites from setting any data. If you only want to block third-party cookies, then leave the recommended setting to Allow local data to be set, but click Block third-party cookies and site data so the checkbox appears checked.
6. To view andor delete any existing cookies, click on the All cookies and site data… button.
7. Review the cookies that appear in the dialog box, click on a cookie that you want to remove, and then click the X that appears to the right of that entry. To remove all of them, click the Remove All button at the top right of the dialog box.
9. To request that sites don’t track you, click on the Send a “Do Not Track” request with your browsing traffic so the checkbox appears checked.
In IE, you can also manage and delete your cookies. In IE 11 for Windows 7 and 8x, you would delete cookies by doing the following:
1. After opening IE, click on the gear-shaped Tools icon  in the upper right-hand corner, select Safety, and then click Delete browsing history.
2. Click on the Cookies and website data checkbox so it appears checked.
To adjust your settings for cookies, you would do the following:
1. After opening IE, click on the gear-shaped Tools icon  in the upper right-hand corner, and click Internet Options.
2. On the Privacy tab, adjust the slider in the Settings section to a level that you feel comfortable with. Information on what occurs with each setting appears to the right of the slider. Moving the slider to the top will block all cookies.
3. To override the settings and block third-party cookies completely, click on the Advanced button. When the Advanced dialog box appears, click Override automatic cookie handling so the checkbox appears checked. Under Third-party cookies, click on the Block option. Click OK.
Tracking Protection
Earlier in the chapter you learned how to set one option in Chrome that has the browser send a request to sites to not track you. In doing so, your browsing activities are kept more private. You can (and should) also set Tracking Protection on IE to help prevent browsing information from being sent to third-party sites, which are sites that are external from the one you’re actually visiting. To start, you need to add a tracking list, which is essentially a blacklist of sites that provide third-party content, and collect information about your browsing activity.
Using IE 11, you would add a tracking list by doing the following:
1. After opening IE, visit the Internet Explorer Gallery (www.iegallery.com/en-us/trackingprotectionlists), and click Add.
2. Click Add List when prompted.
3. Repeat this for any additional tracking lists you want to add.
Now that you have one or more tracking lists installed, you need to turn on Tracking Protection. If you’re using IE 11 on Windows 7 or 8x, you would follow these steps:
1. After opening IE, click on the Tools icon, select Safety, and then click Turn on Do Not Track request.
If you’re using IE 11 on Windows 10, you would follow these instructions:
Disabling and Managing Pop-Ups
A pop-up is a small window or other display area that opens when you click or move your mouse over a link or a particular area of a web page, or when you first open the page itself. The pop-up is generally smaller than the initial window you were in, and may be used to display a small web page, text, an image, or a GUI interface that allows you to provide input. It may appear in a different window, or overlaid on the page you’re currently viewing. Pop-ups can be aggravating when surfing the Web when you have multiple pages displaying advertisements, and taking you to sites that you had no intention of going to. At worst, the pop-up may be used to automatically run malicious code, download viruses or malware, or gather information about you.
Despite the inherent dangers and annoyances of pop-ups, they aren’t all bad. There may be some sites where pop-ups are used for basic functionality. For example, if you were to visit a chat site, you might click on a link to enter a particular forum, or open a pop-up that allows you to chat with one or more people. In doing so, the pop-up might be running a Java applet or some other kind of program that allows you to chat with others in the new window. Because you went there to chat, and the design of the site requires pop-ups to be used, you expect this behavior to use the basic functionality of the site.
Now that you’re aware of the potential problems and benefits of pop-ups, you should configure your browser to block most pop-ups, except the ones on sites that you explicitly allow. To disable and/or manage pop-ups in Chrome, you would follow these steps:
1. In Chrome, click on the Chrome menu in the upper-right hand side of the browser.
2. Click Settings, scroll down to the bottom of the page, and click Show advanced settings.
3. In the Privacy section, click the Content settings button.
4. When the dialog appears, scroll down to the Pop-ups section, and click Do not allow any site to show pop-ups (recommended). By default, this will be selected.
5. To specify which sites are allowed to use pop-ups, click on the Manage exceptions button
6. When the dialog appears, enter the web address (URL) of the site that’s allowed to use pop-ups in the box. To allow any page or subsite under a particular website to show pop-ups, add [*] at the beginning of the Web address. For example, if you wanted anything under delphiforums.com to use pop-ups, you would enter “[*]. delphiforums.com.” To the right of the box, click on the dropdown box and select Allow.
7. To remove a previously added site from using pop-ups, click the X to right of the entry.
IE also has settings that allow you to disable and/or manage pop-ups. To configure IE, do the following:
1. In IE, click on the Tools button, and then click Internet Options.
2. Click on the Privacy tab, and under the Pop-up Blocker section, click on the Turn on Pop-up Blocker so that the checkbox appears checked.
3. If there are some sites you want to allow pop-ups, click on the Settings button. The Pop-up Blocker Settings dialog box will appear.
4. To ensure you’re notified of when a pop-up is blocked, look at the settings in the Notifications and blocking level section. If the Show Notification bar when a pop-up is blocked checkbox is unchecked, click on it so it appears checked.
5. Review the settings in the Blocking level section. By default it is set to Medium, which blocks most automatic pop-ups. This is sufficient for most people, but if you want to block all pop-ups, click on the dropdown list and select High. If you want to allow all pop-ups for secure sites, set it to Low, but be aware that this is the least secure setting.
6. To enable pop-ups on certain sites, enter the website you want to allow pop-ups to work in the Address of website to allow box, and then click Add. The site will now appear in the listing of Allowed sites below this box.
7. To remove a site you previously allowed, click on the site in the Allowed sites listing, and then click the Remove button at the right of this list.
Wi-fi Security and Safety
When you sign-up for Internet access with an Internet Service Provider (ISP), you may have had a technician come to your home and setup devices, or you may have set them up yourself. In many cases, it probably allowed you to connect your computer, phone, or other devices wirelessly, giving you a home network. Before you purchased Internet service, you may have even had a home network already installed. This question is whether this network is secure, and keeps others out.
If you have a smartphone or other mobile devices, you’ve probably searched for open networks, which will allow you to use another person’s Internet connectivity. In using it, you become a part of that person’s network, acquire an IP address, and can surf the Web on their dime. The problem is that you would have to pay additional fees if others caused you to exceed a monthly data transfer limit (i.e., the maximum amount you can download and upload), and experience performance problems as bandwidth limits were reached. If a hacker gained access, they might gain access to your computer or monitor the traffic going across your network to view unencrypted passwords and other data. If someone downloaded movies, music, or other pirated material from a site, or visited sites with illegal content (such as child pornography), it would appear to the ISP that you were the one downloading or accessing those sites. As you can see, it’s important that your wireless network is secure, and allows access to only the computers and devices that you control. Before we go into the steps involved, let’s first look at what makes up your network.
A Basic Understanding of Components Used to Connect to the Internet
When you connect to the Internet, there are a number of components involved. Moving forward from you, there is the device you’re using. Whether it’s a computer, smartphone, tablet, or another device, it connects to the Internet using a combination of hardware (physical components) and software (programs). Generally, it will use a network card that allows it to communicate over a network, which is a series of interconnected computers and devices. A network cable may be plugged into an Ethernet port with the other end plugged into a router (which we’ll discuss next), or the device may have a chip or card that allows it to connect wirelessly. This wireless connection is called wifi or Wi-Fi.
A router is used to connect several computers or devices together. This allows you to have a home network, and enables multiple devices to use a single Internet connection. You may plug the network cable directly into the router, but if you have a wireless router, you’ll generally connect without using cables.
The router may connect into another device called a modem. The modem is used to connect to the Internet, and communicate across a particular medium. For example, if you have dial-up access, a telephone modem is used. Similarly, if you subscribed to a DSL service, it will connect over the phone line using a DSL modem. Other mediums will use different kinds of modems. If you have cable access to the Internet, a cable modem is used, while satellite service will use a satellite adapter. The kind of modem you use depends on the type of service you purchased, which the modem will connect to, allowing you to access content and services on the Internet.
Because technology has the tendency to converge, you may be thinking that you’re missing something in how you connect to the Internet. There may be only one device that you connect computers and other devices to, which then allows you to connect to the Internet. This is because the router may be built into the modem. Instead of separate modems and routers, a multipurpose device may be used, which consists of a router and modem in one.
Configuring Your Router
At the most basic level, you or a technician will use a browser to logon to the router, and set the required information that allows devices on your home network to connect to the Internet. Aside from that, once you’re on the Internet, everything just seems to work. You may think you’re done, but all you may have is an insecure network that provides you, your neighbors, and anyone close enough to connect with free access to the Web. What you need to do now is make your Wi-Fi secure by configuring the wireless router properly.
Changing the administrator username/password
One of the first things you should change on a wireless network is the password and (if possible) the username of the administrator account. A password is a string of characters that is used to verify access, while a username is the name of an account that determines what access you have to a system. In this case, the administrator account is used to logon to the router and change its settings.
Routers come with a default username and password that allows you to logon after you first install it, and it isn’t difficult to hack into a router that hasn’t had this changed. If you know the manufacturer and model of the router, you can look up the specific default account name and password online at sites like www.routerpasswords.com, and if you don’t have this information, it’s still easy to guess. For example, if it’s a Linksys router, you can logon as the administrator on most models using the username Admin, and a blank password.
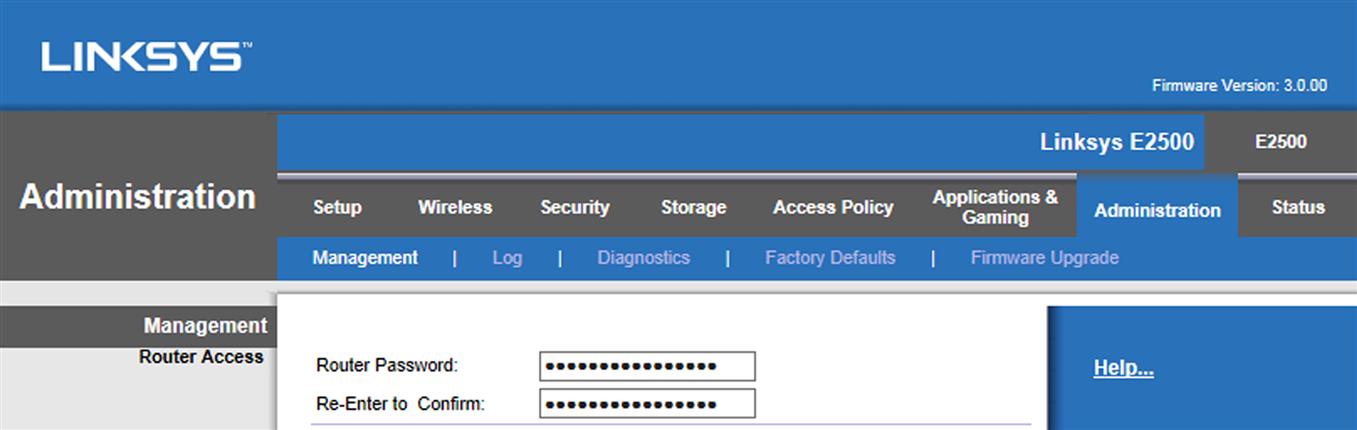
If you check your installation instructions, or look up your router’s make and model on the Internet, you should find that there’s an IP address that you can enter into your browser to access the router’s settings. For example, for a Linksys router, you would enter http://192.168.1.1 into the address bar of your browser, and then enter a default username and password. In the case of our examples and figures, we’ll use a Linksys router, which is commonly used on home networks. If you’re using a different router, similar options should be available.
After logging in, you’ll see a screen as shown in Fig. 2.2. By clicking on the Administration tab, and then clicking Management, you’ll see two boxes where you can enter a new password and then reenter it to confirm that its typed correct. After entering the new password, click the Save Password button at the bottom of the screen.
Service set identifier
The next step is to change the name of your wireless network, which is also called an SSID (Service Set Identifier). This is a unique identifier that’s 32 characters, and will be broadcast to people looking to connect to a network. Generally, when you first install the router, it’s set to the name of the manufacturer or ISP that you purchased or rented it from. For example, it may be Linksys, ComCast, or Dlink. This is a problem, because it shows the type of modem you’re using or the name of your ISP, which provides a starting point for hackers. If I have this, and you haven’t made other configuration changes, I can look up on the Internet and see what the default username / password combination is, as well as other useful information about your router.
To change the name, you need to navigate through the router’s interface to find the area where the name is set. For example, on the Linksys router, you’ll generally find this by clicking on the Setup tab, and then clicking Basic Setup. On this page, you’ll see a section that specifies the router’s name. Change this to a unique name, which is what will appear when looking for a Wi-Fi network to connect with.
Security mode
The next area to configure is the security mode and passphrase that will be used to connect to the network. A passphrase is similar to a password in that it’s used to verify authorized access, but is longer and can contain multiple words. The security mode determines whether encryption is used to protect any data that’s transmitted between your computer or mobile device and the router, and requires that someone connects using a Wi-Fi password (discussed in Section SSID Passphrase). If no encryption is used, then someone could use a tool to capture network traffic (as we’ll see in chapter: Cybercrime), and see usernames, passwords, and other data being passed over the network.
On a Linksys router, you set the security mode by clicking on Wireless and then clicking Wireless Security. You’ll generally see a dropdown box of various security modes that can be set for connecting to the router. You will want to set it to the most secure method that will support the devices connecting to your network. Some of your options will include:
![]() None or Disabled, which provides no encryption whatsoever.
None or Disabled, which provides no encryption whatsoever.
![]() WEP, which stands for Wired Encryption Protocol, was the first encryption available for wireless networks. As its name states, it was designed to provide the same security as wired networks, but it has a number of security flaws and isn’t difficult to break.
WEP, which stands for Wired Encryption Protocol, was the first encryption available for wireless networks. As its name states, it was designed to provide the same security as wired networks, but it has a number of security flaws and isn’t difficult to break.
![]() WPA, which stands for Wi-Fi Protected Access, was created as an interim measure to deal with the vulnerabilities of WEP. It is more secure than WEP, but less secure than its successor.
WPA, which stands for Wi-Fi Protected Access, was created as an interim measure to deal with the vulnerabilities of WEP. It is more secure than WEP, but less secure than its successor.
![]() WPA2, which is the second version of WPA, uses the Advanced Encryption Standard (AES) for encryption. As we discussed in the previous security mode, you may see WPA2-Personal and WPA2-Enterprise, which are designed for home and enterprise networks, respectively.
WPA2, which is the second version of WPA, uses the Advanced Encryption Standard (AES) for encryption. As we discussed in the previous security mode, you may see WPA2-Personal and WPA2-Enterprise, which are designed for home and enterprise networks, respectively.
![]() Because some of these modes require additional servers and configuration, you’ll want to use the most secure method of connecting (WPA2). If you have older wireless clients, you’ll probably want to set your router to use WPA2/WPA Mixed Mode. With this setting, the router will use AES if possible, but also allow older wireless clients to connect with WPA. Using this mode, you can have clients using WPA or WPA2 to coexist on the same SSID, so you won’t need multiple routers with different security modes on your network.
Because some of these modes require additional servers and configuration, you’ll want to use the most secure method of connecting (WPA2). If you have older wireless clients, you’ll probably want to set your router to use WPA2/WPA Mixed Mode. With this setting, the router will use AES if possible, but also allow older wireless clients to connect with WPA. Using this mode, you can have clients using WPA or WPA2 to coexist on the same SSID, so you won’t need multiple routers with different security modes on your network.
To enable clients to use encryption, you’ll need to set an associated passphrase, which we’ll discuss further in the next section. The passphrase not only grants access to the wireless network, but is also the encryption password. It is a preshared key that is used in the process of encrypting and decrypting packets of data sent between a computer or other device and the router.
SSID passphrase
As mentioned, routers generally work right out of the box, so there won’t be a passphrase to connect to the network when it’s initially setup. To force a person to provide a password, you need to set one. On different routers, this is called a SSID password, Security Key, WPA Key, Pre-Shared Key, or Passphrase. This is different from the administrator password we discussed earlier. When a person attempts to connect to your Wi-Fi, they’ll be asked for this password, and will join your network as if they were wired directly to the router. Because it can be saved on the person’s computer or device, they don’t need to reenter it each time, so you should feel free to make it as long and difficult to guess as possible.
On a Linksys router, you set the passphrase on the same page where you set the Security Mode (clicking on Wireless and then clicking Wireless Security). Below the Security Mode you selected, you’ll see a box to enter a passphrase. Upon entering this passphrase, click the Save Settings button at the bottom of the screen.
Using Other People’s Wi-Fi
There are always risks in connecting to a wireless network that isn’t your own. Even if you’ve gone to exceptional effort to secure your own Wi-Fi, when you use someone else’s, you trust that a complete stranger has done the same. There is no guarantee that they or others using the Wi-Fi aren’t running software to capture network traffic going over that connection.
If you’re using open Wi-Fi networks like the ones you’ll find at coffee shops, restaurants, airports, and libraries, the connection generally isn’t encrypted. You’ll be able to tell because the icon for that Wi-Fi connection doesn’t have a lock symbol on it, and you didn’t have to enter a passphrase. Any unencrypted web pages, forms, or logons you connect to over the Wi-Fi will be visible to anyone using the right tools (which we discuss in chapter: Cybercrime) without you ever knowing.
As we discussed in Chapter 1, What is cyber safety?, you should always pay attention to the URL of the site you’re connecting with, and see whether it’s using HTTPS. If you’re doing something sensitive, you’ll want to ensure that the browser is going to encrypted pages whenever possible. You should also avoid using the insecure Wi-Fi for any business that could be used by others for financial gain, or cause significant problems for you. This would mean avoiding any online banking, checking credit card balances, and so on.
If you’re connecting using a laptop running Windows, you’ll be prompted the first time connecting to a network to choose the network location. You should always select Public network for any insecure networks in public places. This prevents others from seeing your computer on the wireless network, and will also configure the connection so that you’re better protected from any malicious software while surfing. This setting automatically locks down many of the settings on your computer, providing you with the best level of security. In using it, Windows automatically turns off file sharing, network discovery, and public folder sharing. The only other time you’ll want to specify a connection as Public is if you’re using a mobile broadband connection, or you don’t use a router and connect directly to the Internet.
You should also be aware that just because a public wireless hotspot appears to be free Wi-Fi provided by a business or some other legitimate source, this may not be the case. A hacker can easily setup a honeypot network. When searching for Wi-Fi networks, you may see something that says “Public Wi-Fi” or another name related to a business that offers free Internet, but it’s actually a hotspot created to entice people into connecting. Once connected, your security is compromised because you’re part of a network that’s sole purpose is to monitor traffic, capture data, and possibly infect or hack into computers that have joined it. When possible, ask the business for the name of their free Wi-Fi, so you know you’re connecting to the right network.
Sharing Your Wi-Fi With Others
It’s not uncommon for people to share their Wi-Fi with others, but doing so carries its share of risks and concerns. While we discussed some issues with insecure networks, there are potential problems when sharing your Wi-Fi with anyone. If you’ve used encryption on your Wi-Fi, then it’s important to be careful about handing out the SSID passphrase. Think of the passphrase like a key to your house, and only give it to those you trust.
Once someone has the passphrase, it can be saved to the device and used anytime they’re in range of your Wi-Fi. If that person lost their phone, tablet, etc., anyone who found it could then get into your network. This might seem not worth worrying about until you consider that when someone connects to your Wi-Fi, their device could see other computers, as well as printers, shared files, and other resources on your network. Unless you’re careful about what’s shared on a computer, and the locked down systems they shouldn’t have access to, you may be making more than just your Internet connectivity available to them.
Another problem is if the person’s computer or mobile device is compromised. Just because you’re running antivirus and antimalware scans doesn’t mean everyone does. Allowing infected systems onto your network could leave you open to malicious software, worms, viruses, and other threats.
While most people give access thinking it will be temporarily, this isn’t always the case. If you’re living in an apartment, perhaps you and your neighbor decided to split the cost of Internet connectivity. Maybe your neighbor is out-of-work, and you decided to be the Good Samaritan and given them your SSID passphrase until they’re back on their feet. In both these cases, the ISP would probably view the extra household as stealing Internet. If the neighbor was visiting, got the password to check email on a phone, and then went home and setup everything to use your Wi-Fi, you’d probably feel the same. If the terms of service with your ISP prohibit this, you could be penalized or have your service dropped.
If you’re concerned about someone piggybacking on your Internet, or the possibility of an unknown person gaining access through a stolen device or learning the password, there is an easy solution. Simply change the password. You can go into the router and change passphrase for your Wi-Fi at any time, which forces anyone attempting to connect to provide the new passphrase.
Setting up a guest network
A way to avoid many of the problems caused by people accessing your Wi-Fi is to setup guest access. In doing so, they are using a separate wireless network, and visitors won’t have access to your main network.
When a computer or device connects to a guest network, the person always needs to enter the guest password before they can access the Internet. The password can and should be different from the SSID passphrase you set for your main network, and you’ll often find that people use a shorter, more user friendly password than the complex passphrase used for setting up devices on the main network.
On a Linksys router, you can setup guest access by logging into the router, as we saw earlier, and then clicking on the Wireless tab and then clicking Guest Access. On this page, look for the option to Allow Guest Access and click on the Yes option. Click the Change button to set the Guest Password, and then enter a new password. In the Total Guests Allowed dropdown, set the total number of devices that can be connected at any given time. You should keep this number low. Finally, to prevent everyone from seeing the name of your guest Wi-Fi, click Disabled in the SSID Broadcast section. This final step doesn’t provide much security, but it will prevent people from easily seeing that the guest network exists. Anyone attempting to connect to your guest network will know it exists, and need to manually add it as a wireless hotspot.
Some routers also provide the ability to set a separate security mode for guest access. If a Security Mode option exists on your router for guest access, you can select what type of encryption to use for the separate network, and even use a different security mode from what’s used on your regular network.
Passwords
As we discussed earlier, passwords are strings of letters, numbers, and/or special characters that are used to verify your identity, while passphrases are longer and can consist of multiple words. Whether you’re logging onto your computer, a social media site, an application, or other systems and applications that require you to prove that you’re authorized to have access, passwords and passphrases serve as a basic line of security.
Strong Passwords
There are a number of factors that can make a good or bad password. Strong passwords are more complex, more difficult to guess, and will take longer to crack using software. To create a strong password, you should include the following characteristics:
![]() The length should be at least 8 characters, with 12–14 characters being a better target to shoot for. The rule here is that longer is better.
The length should be at least 8 characters, with 12–14 characters being a better target to shoot for. The rule here is that longer is better.
![]() A mix of uppercase letters (A, B, C,…), lowercase (a, b, c,…)letters, numbers (0, 1, 2,…), and special characters (` ~ ! @ # $ % ^ & * ( )_ - +={ } [ ] | : ; " ' <>, . ? /)
A mix of uppercase letters (A, B, C,…), lowercase (a, b, c,…)letters, numbers (0, 1, 2,…), and special characters (` ~ ! @ # $ % ^ & * ( )_ - +={ } [ ] | : ; " ' <>, . ? /)
![]() It should not contain any dictionary words (e.g., password, monkey,…). This includes complete words merged together like LetMeIn!
It should not contain any dictionary words (e.g., password, monkey,…). This includes complete words merged together like LetMeIn!
Even when following this criterion, you can still create a weak or mediocre password. For example, P@$$w0rd would follow all these rules, but a tool to crack passwords would recognize that you’re using symbols to replace letters and crack it easily. Avoid using characters that look like letters as a replacement for letters.
The best way to determine if you have a strong password is to test it, such as by using the password checker tool at Online Domain Tools (http://password-checker.online-domain-tools.com/). If you enter a password on this page and click the Check! button, it will analyze its strength, provide information about the properties of the password (such as length, number of upper and lower case letters), and whether it is a frequently used password used by others. It will also provide estimates as to how long it would take to crack it using brute-force password cracking tools, which we discuss in Chapter 5, Cybercrime.
Changing Passwords
Nothing good lasts forever, including good passwords. Just because you’ve created a strong password you can remember, you shouldn’t keep it indefinitely. Even a strong password can be compromised, and if someone else has it, they can use it to access your account. If you change your password every 30–180 days, it will limit how long the password is useful to anyone who has it.
Any passwords you create should be different from previous passwords. Some people rotate through several passwords, so if a hacker knew a previous password, he would only need to wait until you reused it. This is why systems will often keep a history of previously used passwords to prevent you from reusing the same passwords.
Making the password significantly different is also important. If someone guessed your last password, making a minor change would mean the guesser had most of your password. Increasing a number in your password (such as changing YbSane1? to YbSane2?) or making other logical increments (like changing January1! to February1!) might fool a system into seeing the password as different from previous ones, but lots of people change passwords in this way. It wouldn’t fool a hacker, especially if he knew you had a habit of doing this.
Password Policies
Companies enforce how their employees create and change passwords through policies on the network. In doing so, they can set how frequently you must change the password, how long it must be, how often it can be reused, and how complex it must be. Depending on the operating system you’re using, you can also use policies to control passwords used on your personal computer. In doing so, you can ensure that any of the accounts logging onto an account on that machine uses strong passwords.
If you’re using the nonhome versions of Windows 7, 8x, and 10, and logged on with an Administrator account, you can also enforce passwords using the Local Security Policy. In Windows 7, you can start this tool by clicking Start, typing secpol.msc in the Run dialog, and then clicking OK. In Windows 8x and 10, you can type Local Security Policy in the start menu search, and then press the Enter key on your keyboard. As shown in Fig. 2.3, once the tool appears, you can then click in the left pane to expand Account Policies, and then click Password Policy.
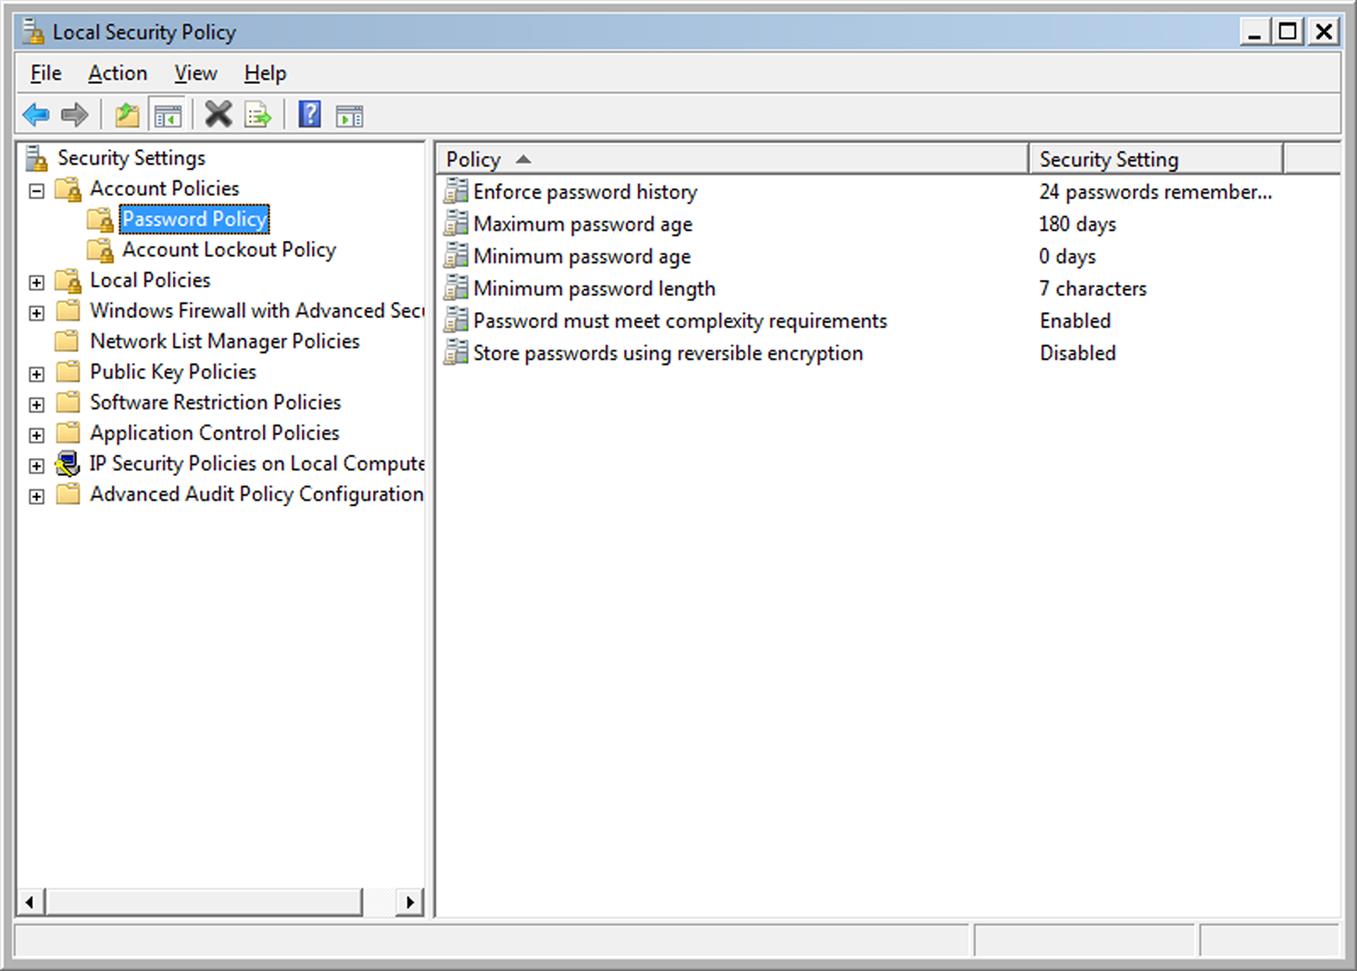
To change any of the policies regarding passwords, double-click on the policy in the right pane, and then modify the setting. The available options are as follows:
![]() Enforce password history, which enforces the number of unique passwords that must be used before an old one can be reused. You can set this to a value between 0 and 24. At the very least, change it to 1 so the user can’t “change” their password to an existing one.
Enforce password history, which enforces the number of unique passwords that must be used before an old one can be reused. You can set this to a value between 0 and 24. At the very least, change it to 1 so the user can’t “change” their password to an existing one.
![]() Maximum password age, which is the number of days before users must change their passwords. You can set a password to expire after 1–999 days. If set to 0, passwords never expire. Microsoft recommends that you set this to 70 days, but the important thing to remember is not to set it so high that it provides hackers with an extended period of access to your computer and network, or so low that anyone using the computer has to change it frequently.
Maximum password age, which is the number of days before users must change their passwords. You can set a password to expire after 1–999 days. If set to 0, passwords never expire. Microsoft recommends that you set this to 70 days, but the important thing to remember is not to set it so high that it provides hackers with an extended period of access to your computer and network, or so low that anyone using the computer has to change it frequently.
![]() Minimum password age, which is the number of days that the password is used before a user can change it. If set to 0, a user can change it immediately. Otherwise, you can set it to a value less than the maximum password age (unless that value has been set to 0). You should set this to a value of at least 1 day, so that users can only change the password once a day.
Minimum password age, which is the number of days that the password is used before a user can change it. If set to 0, a user can change it immediately. Otherwise, you can set it to a value less than the maximum password age (unless that value has been set to 0). You should set this to a value of at least 1 day, so that users can only change the password once a day.
![]() Minimum password length, which sets how short a password can be. It can be set to 1–14 characters, or set to 0 if no password is required. You should set this to a value of 8 or higher.
Minimum password length, which sets how short a password can be. It can be set to 1–14 characters, or set to 0 if no password is required. You should set this to a value of 8 or higher.
![]() Password must meet complexity requirements, which can be enabled or disabled to enforce that passwords must not contain the username, any part longer than two characters of the user’s full name, be six or more characters in length, and contain at least three of the following: uppercase letters, lowercase letters, numbers, and special characters that we described earlier. This should be enabled.
Password must meet complexity requirements, which can be enabled or disabled to enforce that passwords must not contain the username, any part longer than two characters of the user’s full name, be six or more characters in length, and contain at least three of the following: uppercase letters, lowercase letters, numbers, and special characters that we described earlier. This should be enabled.
![]() Store passwords using reversible encryption, which saves a user’s password without encryption (i.e., as plaintext). You should leave this disabled unless otherwise required.
Store passwords using reversible encryption, which saves a user’s password without encryption (i.e., as plaintext). You should leave this disabled unless otherwise required.
As you should expect, these settings only affect the passwords used by user accounts on the computer, and have no effect on passwords on websites or applications.
Setting Up Security Questions
When you setup your account, you’re often required to provide answers to security questions, which are later used if you forget your password. These questions are often the same, regardless of whether it’s a social media site, online retailer, or your bank. You might be asked for your mother’s maiden name, the town you were born in, or some other seemingly innocuous question. The problem is when others know these answers. If a hacker can see a maternal uncle’s name on a list of Facebook friends, he’s got your mother’s maiden name. If you’ve mentioned where you were born, he’s got that answer too. The hacker can now click on the “Forgot Your Password” option, reset your password, and take over your account. Even if they access one account, the problems and embarrassment they can cause can be significant.
If this seems unlikely, consider what happened during the 2008 US presidential election, when Sarah Palin’s online email account was hacked. The hacker looked up details about the vice presidential candidate on Wikipedia, and then used information about the high school she attended and her birthdate in Yahoo!’s account recovery. Clicking a link to indicate a forgotten password, he answered the questions, accessed her account, and then posted her emails on another site (Zetter, 2008).
Obviously, it’s best to restrict who has access to your information, but that’s easier said than done. To get someone’s birthdate, simply look at their Facebook wall and see how many people wish the person a happy birthday, and mention which birthday it is. Some simple math will reveal their birthdate.
Some sites have recognized the problem, and allow users to create their own custom security questions. When presented with this option on a site, don’t simply recreate one of the standard security questions we’ve been discussing. Instead, try and come up with a question and answer that is unique to you, and isn’t something people would normally know. The food your mom made for Sunday dinners as a kid, or the person you hated most in grade 3, might be something no one else knows. Using difficult to answer questions, relating to things you’d never admit to or mention online, are the kind of security questions that will really make your account secure.
Another way to deal with the security questions is to make up false answers. There is no reason that you have to give your actual personal information to answer these questions. When asked about the name of your first pet, or the make and model of your first car, give the name of your favorite pet or favorite car instead. Using an easy-to-remember lie can sometimes be better than the truth. If however you’re worried you’ll forget, you could include the answers in a password list, which we’ll discuss next.
Remembering Passwords
Passwords can be difficult to remember, which is a reason why so many people develop bad habits when creating passwords, or reusing the same passwords on multiple sites. There are however a number of tricks and tools that can be used to manage your accounts and passwords.
The best kind of password is one that is long and random, or at least appears to be random. A trick to creating a strong password is to think of a phrase that’s meaningful, and will be one you can remember. For example, if you took the phrase “My daughter’s birthday is on Oct 18, 2015!”, you could change it to Mdb-dayionOct18!. Although it’s a strong password, it would be easy for you to remember, so long as you remember the phrase.
Another way to remember passwords is to take the strong password, and try and read it phonically. For example, if your password was dRzorm!In9egs, you might recite it in your mind as “Dr. zorm! I need 9 eggs” each time you typed it. The more you typed it this way, the easier it will be to remember.
Because you should use a different password for each site and application you use, you should consider creating a password list. This doesn’t mean a set of sticky notes on your monitor, or a piece of paper tucked in the top drawer of your desk. In companies, it’s common for IT departments to keep a list of all administrative usernames and passwords stored in a safe, which can be retrieved in the event of a disaster. The list may be printed, or stored on a USB stick. Even if you don’t have a safe, you probably have a secure location in your house where you keep a copy of your mortgage, insurance policy, and other important documents that the list can be kept with.
As we’ll see in the sections that follow, there are apps available for mobile devices and computers, which allow you to keep track of the various usernames and passwords you use. The password management software allows you to store this information into a central location, referring to it as needed and/or using features to automatically log onto a site. When using these tools, your credentials may be saved on the computer or mobile device, meaning that if it’s lost or stolen, your passwords are gone as well. This is a reason why you’d want to keep that password list in a secure location, so you’ll still be able to get into your online accounts and change the passwords when needed.
You should also remember to keep it up-to-date. A common problem with changing passwords is that many people forget their passwords a short time after changing them. Give yourself time to get used to the new password, and remember to update any entries you make in a password list or any password management software you use. You’d be surprised how many calls a company’s Help Desk will get from people who changed their password and forgot it by the time they got back from lunch.
Tools
There are a number of tools for creating, storing, and generating new passwords. They take a lot of the guesswork out of keeping an account secure and keeping track of your credentials. However, as we’ll see, not all of the features and tools that are available for password management should be used, or used in all circumstances.
Password generators
A password generator is a tool that automatically creates a random password. Some products will include such a tool with its other products, but if you don’t have one, there are free ones you can download and online generators you can use. When choosing a password generator, make sure you’re using a trustworthy site, and not the one that’s going to gather information about the sites you’re using, your interests, and so on.
A good password generator is available on the Norton website (https://identitysafe.norton.com/password-generator/), which can be used online or downloaded and run from your computer. When visiting this tool, you’ll see that you can specify the criteria for your password (i.e., length, whether to include letters, numbers), and the number of passwords to create. After clicking the Generate Password(s) button, your new password(s) will be presented to you.
Password vaults
Password vaults or password managers are programs that keep your passwords in a secure location. When you use this software, the passwords are encrypted, and you use a single master password to access them. Depending on the tool being used, these passwords may be stored on a secure website, or on your local computer. In using it, you only need to remember one password to view the database of other passwords for various sites and apps. Some of the password managers available include
![]() LastPass (https://lastpass.com)
LastPass (https://lastpass.com)
![]() RoboForm (www.roboform.com)
RoboForm (www.roboform.com)
Each of the above-mentioned tools are free, although premium versions can be purchased. Both have versions available that work with mobile devices and Windows computers, while RoboForm also has a version that works with Macs. By installing an extension to your browser, you navigate to a site, enter your username and password, and have the option to save it to the password manager. After this, you can navigate to the bookmarked sites and automatically login.
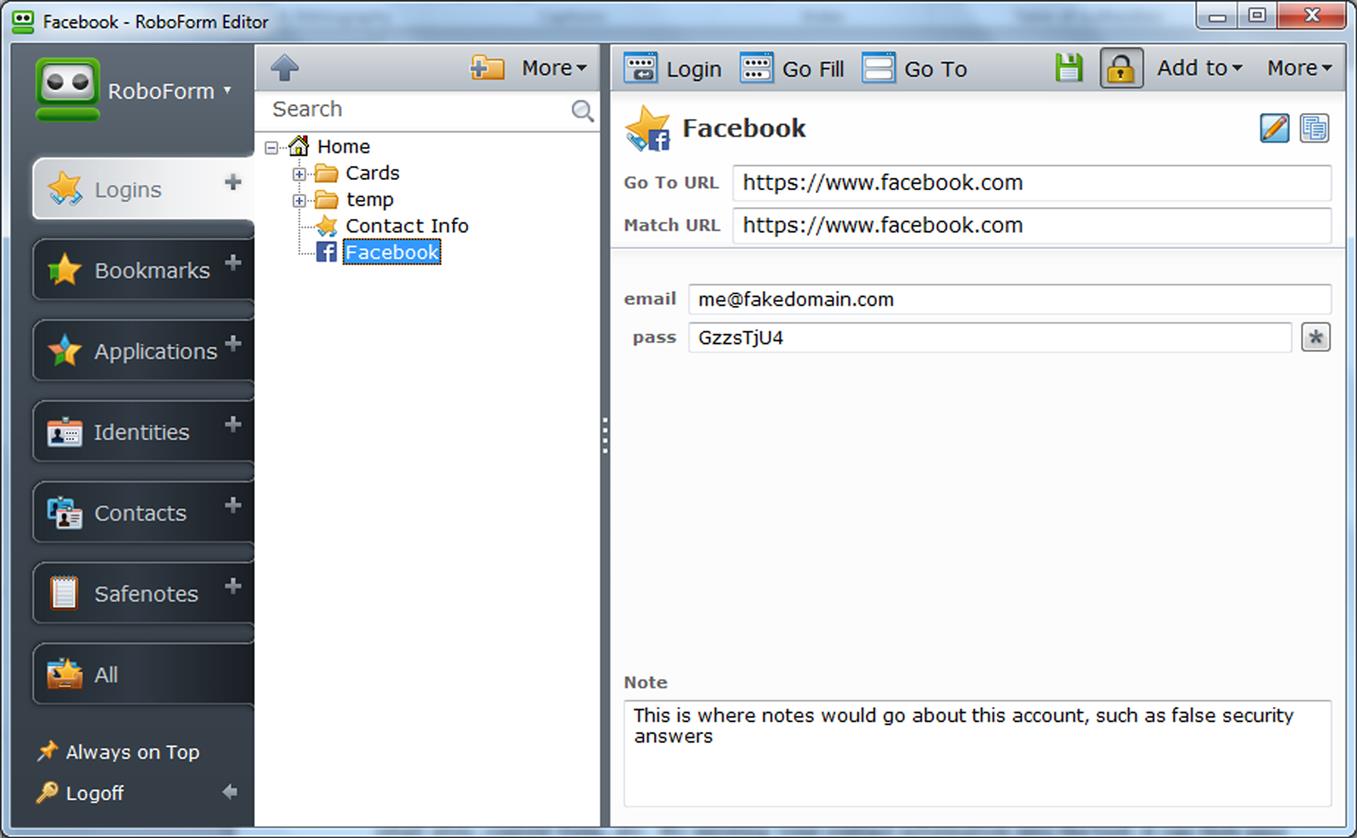
At any time, you can view and edit the logon information you’ve saved. As shown in Fig. 2.4, tools like RoboForm also provide additional fields, where you can add additional notes about the account.
Password management tools also provide a number of other common features. It’s common for them to have password generators that can be used to create strong passwords. Many also have the ability to automatically fill out Web forms, such as online job applications, order forms on retail sites, and contest forms. By entering your contact information into the tool, it can then pass your name, address, and other contact information into fields on whatever Web form is loaded in your browser. With a click of a button, you can fill out most or all of a form.
When using password management software, there are serious considerations you need to make. If the tool saves passwords on the local computer, then all of these may be lost to you if the computer itself is stolen. As such, many provide the ability to print a list of your passwords, which you can then keep in a safe place. If it’s stored on the cloud, then this isn’t a concern, unless you’ve used a weak password to access your other passwords. If you have, someone could enter the easy-to-guess password or easily crack the password to gain access to all of your account credentials.
Passwords stored in IE
Even without a password manager installed, browsers commonly provide the ability to save passwords. When you logon to a site for the first time, you’re prompted whether you’d like to save the password. If you choose yes, the next time you visit the site and enter your username, the browser will automatically fill in the password field. This can be dangerous if you’re using a public computer, or someone else is browsing under your Window’s or Google account. If you’re using someone else’s computer, never agree to save the password.
Saving passwords is not without its vulnerabilities. For example, when you save a password in IE, it’s encrypted and stored in the Windows Registry. While this might seem secure, as we’ll see in Chapter 5, Cybercrime, there are tools that can easily view the username and password being used to logon to a site. These potential threats should always be considered when you’re deciding whether to use a third-party password management system or the native features of a browser. If you are going to use third-party software, you should disable the browser’s ability to save passwords.
IE has AutoComplete features to save passwords, and fill in information on forms automatically. When you visit a site and begin entering your username, it will provide a dropdown list of possible data to fill into that field, and after selecting an account from the list, it will fill in the password. To enable or disable IE’s ability to save passwords on Windows 7 and 8x, you would do the following:
1. In IE, click on the gear-shaped Tools button, and then click Internet Options.
2. Click on the Content tab, and in the AutoComplete section, click the Settings button.
3. To delete all your previously saved passwords, click the Delete AutoComplete History button.
4. To prevent IE from saving passwords, click on the Usernames and passwords on Forms checkbox so it appears unchecked. To allow IE to save passwords, click this checkbox so it appears checked, and then ensure the Ask me before saving passwords checkbox is also checked.
On Windows 10, you would disable the ability to save passwords by doing the following:
1. After opening IE, point your mouse at the lower right-hand corner of the screen, and then move the mouse pointer up. Click Settings.
2. Click Options, and in the Passwords section, turn Offer to save passwords when I log into sites to Off.
In Windows 8x and 10, you can also view and remove stored passwords for sites by going to Control Panel, and then clicking on Credential Manager. Once open, click on Web Credentials and a list of passwords for sites will appear on the screen below. By clicking on the down arrow beside an entry, you can view information on the account and password used for that site. To view the password, click the Show link beside the password field, and then enter your Window’s password. To remove the stored password, click on the Remove link below it, and then click Yes on the dialog box that appears.
Passwords stored in Chrome
When you visit a site in Chrome on your computer, you’re also presented with a dialog that asks if you want to save the password. You can click Save Password to save the password, Nope to not save it, or Never for this site to never be asked again when visiting that site. Mobile devices are presented with simple Yes or Never options. To manage passwords in Chrome, or disable Chrome’s ability to store passwords, you would do the following:
1. Click on the Chrome menu that appears as three horizontal bars in the upper right hand side of the browser.
3. Scroll to the bottom of the page and click Show advanced settings.
4. Scroll to the Passwords and Forms section. If you want to turn off the ability to save passwords, click on the Offer to save your web passwords checkbox so it appears unchecked. Otherwise, to leave it enabled, leave the box checked.
6. When the Passwords dialog box appears, you will see a listing showing the site, username, and a series of dots indicating the password. To view the password, click on the password field, and then click the Show button that appears.
7. Enter your Windows password. The password will now appear.
8. To remove a password, click the X at the right of the site that you want removed.
If you remove a password, the browser will not be able to log onto the site using a stored password. You would again need to reenter the password, and then save it.
Google smart lock
Google Chrome and Android devices that use Google Smart Lock for Passwords provide the ability to save passwords, and have them associated with your Google account. When you save a password with Google Smart lock, it’s associated with your Google account, so you can then sign onto your Google account on any machine, and then sign into any site or app you’ve previously saved. To manage passwords saved with Smart Lock, do the following:
1. After logging into Google, go to https://passwords.google.com.
2. If you don’t want passwords for Android apps to be saved, click on the toggle beside Smart Lock for Passwords so it is set to the left and appears white. If you want passwords for these apps to be saved, click on the toggle so that it is set to the right and appears blue. By default, this is turned on.
3. In the Auto Sign-In section, review the listing of saved passwords. To remove a password, click on the X to the right of a site or app. To view the existing password, click on the eye icon to the right of the Passwords field.
4. If you don’t want to be able to automatically sign in to apps and sites, click on the toggle so it is set to the right and appears white. Otherwise, click on the toggle so that it is set to the right and appears blue.
Firewalls
A firewall is a software or hardware that works as a barrier between your computer and the outside network. It allows your computer to communicate on a network, while blocking unauthorized access to your computer. On larger networks, such as those used by a company, the settings for firewall software on your computer may be set using policies. On your home computer, you may use a firewall like the one that comes with Windows, or install software like ZoneAlarm (www.zonealarm.com) or other firewalls included with security suites that we’ll discuss in Chapter 3, Software problems and solutions.
1. To ensure Windows Firewall is running, click on the Start button and click Control Panel in Windows 7. Right-click on the Start button in Windows 8.1, or right-click on the taskbar in Windows 10, and then click Control Panel.
2. On Windows 7 and 8x, click on System and Security, and then click Windows Firewall. On Windows 10, click Windows Firewall.
3. In the left pane, click on Turn Windows Firewall on or off. On the screen that appears, shown in Fig. 2.5, ensure that the Turn on Windows Firewall option is selected under Private network settings and Public network settings sections. Click on the Notify me when Windows Firewall blocks a new app under both sections, beneath the option to turn on Windows Firewall.
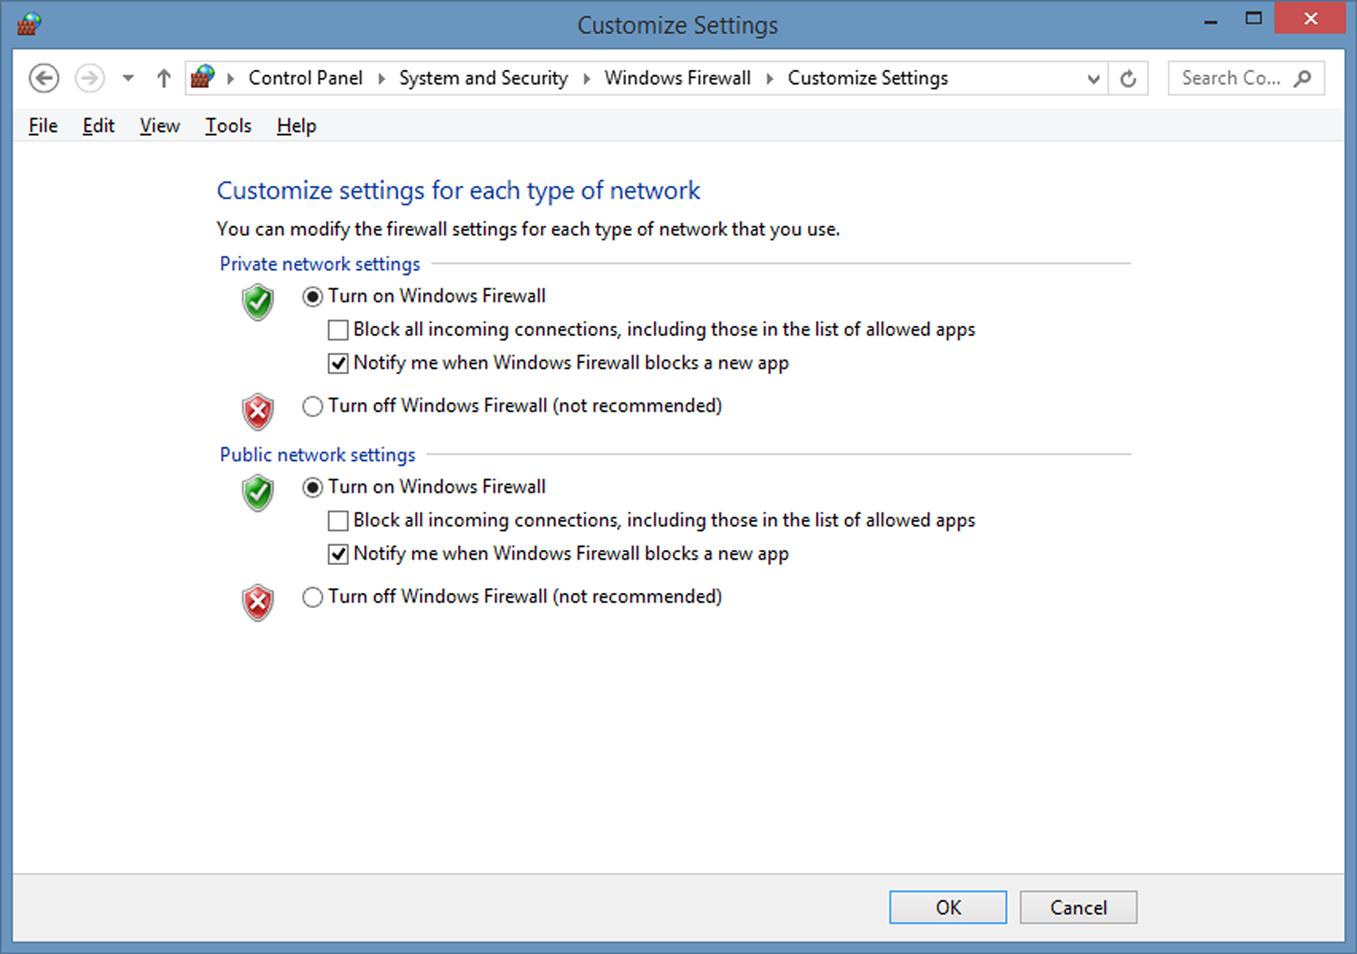
You should not turn off Windows Firewall unless you’ve installed another product that provides this security. Once you’ve installed another firewall product, you would control the settings through it, and not the Windows Firewall settings in Control Panel.
Firewall on a Router
You should also have a firewall on your router that protects the entire network from outside networks like the Internet. For example, if you own a Linksys router, you would log onto it as we discussed earlier in this chapter, and then click to the Security tab to be presented with the screen similar to that shown in Fig. 2.6.
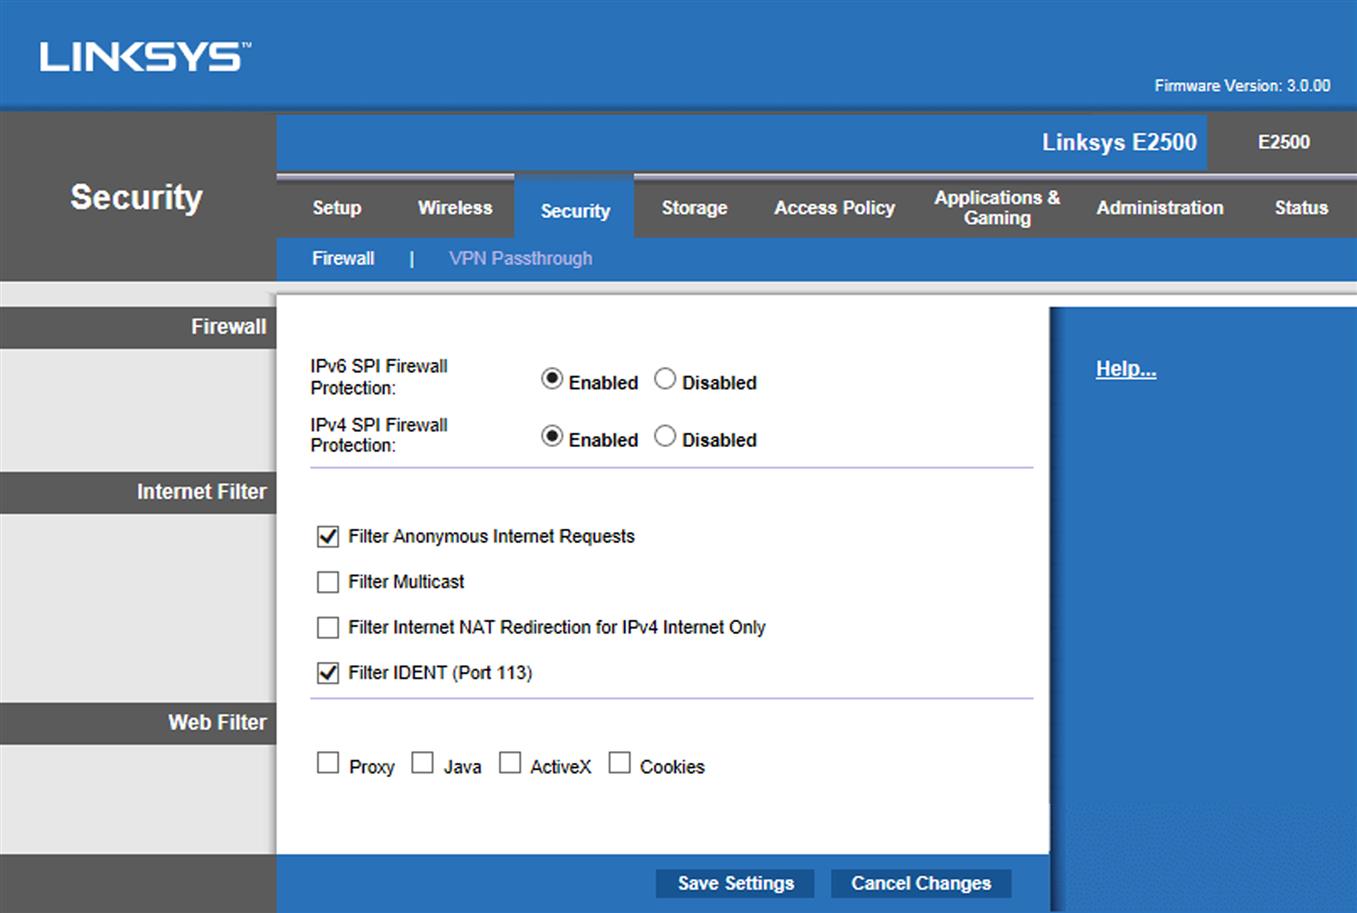
In looking at this screen, you’ll see that there are a number of options. The ones that you should always have enabled are IPv6 SPI Firewall Protection and IPv6 SPI Firewall Protection. These will protect you from incoming Internet traffic. The other options include
![]() Filter Anonymous Internet Requests, which should be enabled to hide your network ports, prevent your network from being detected from Internet users, and basically make it more difficult from Internet users from getting into your network.
Filter Anonymous Internet Requests, which should be enabled to hide your network ports, prevent your network from being detected from Internet users, and basically make it more difficult from Internet users from getting into your network.
![]() Filter Multicast, which prevents others on the network from multicasting, in which multiple transmissions can be sent to specific computers.
Filter Multicast, which prevents others on the network from multicasting, in which multiple transmissions can be sent to specific computers.
![]() Filter Internet NAT Redirection for IPv4 Internet Only, which will use port forwarding to block access to local servers from local computers.
Filter Internet NAT Redirection for IPv4 Internet Only, which will use port forwarding to block access to local servers from local computers.
![]() Filter IDENT (Port 113), which prevents scanning of port 113.
Filter IDENT (Port 113), which prevents scanning of port 113.
![]() Web Filter, which provides checkboxes that allow you to disable Internet Proxy Web servers, Java, ActiveX, and Cookies. Depending on the checkboxes that are checked, sites that use Java or ActiveX content on pages won’t work, and the use of cookies will be disabled.
Web Filter, which provides checkboxes that allow you to disable Internet Proxy Web servers, Java, ActiveX, and Cookies. Depending on the checkboxes that are checked, sites that use Java or ActiveX content on pages won’t work, and the use of cookies will be disabled.
Summary
In this chapter we saw that you have a lot of control over your privacy and the security of your network, computer, and other devices. These settings are available to protect systems from unwanted attacks, ways to keep others from gaining access to your accounts, and tools that will help you in generating and managing passwords. Now that you’ve looked at the various security and privacy settings available on browsers, routers, and operating systems. We’ll move on to show you how to protect yourself from some of the most ruthless threats on the Internet: viruses and malware.