Chapter 11. Fine-Edged Selections

Selecting, masking, and isolating subjects with fine-edged detail, such as hair and fur or the translucency in smoke or shadows, remains the most challenging types of selection to make while maintaining realistic edges and believable transitions. When it comes to silhouetting people with a full head of hair, animals with fur, or fine-detailed images, we sometimes wish that everyone was as bald as Michael Jordan, that all animals were as smooth as dolphins, and that we worked only with pictures of rectangular skyscrapers. Beauty is in the details, and maintaining the nuances of reflections, translucency, and shadow in a scene are among the most critical aspects of photoreal compositing because they add dimensionality and delicacy to an image that is barely tangible, yet vitally important.
Making selections of fine details requires patience, practice, and creative thinking. One technique may work perfectly well on one type of image but not on another. You may need to combine techniques, and most of the time you’ll need to fine-tune the mask with careful handiwork. In this chapter, you’ll learn how to:
• Composite images shot on white, gray, and black backgrounds
• Maintain fine detail and shadows with layer blending modes
• Use the Refine Edge tool on fur and hair
• Understand greenscreen photography and third-party plug-ins
• Select translucent subjects including glass and smoke
When you’re selecting finely detailed images, starting with sharp, high-quality, and high-resolution originals in which the figure is in contrast to the background yields the best results. If you plan on taking someone’s picture for a composite, preparing the lighting, the point of view, and the background are essential to success, as addressed in Chapters 3, 4, and 5.
Working with White, Black, and Gray Backdrops
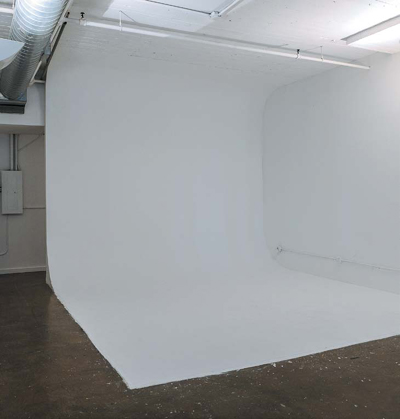
Visit any professional photo studio and you’ll usually find some combination of white, black, and gray backdrops or a curved white cyc (cyclorama) wall (FIGURE 11.1). You may not find all three neutral shades, but photographers with a light meter, controllable light output, and manual camera exposure control can turn a gray or white backdrop white, gray, or black depending on how they light and expose for it (TABLE 11.1). Shooting on white, gray, or black allows you to take advantage of layer blending modes to quickly replace drab studio backgrounds and add pizzazz to sterile studio shots.
© JP
Figure 11.1. The white, curved cyc wall in Jim Porto’s studio.
Table 11.1. Exposing a Gray Backdrop and Composite Blending Mode
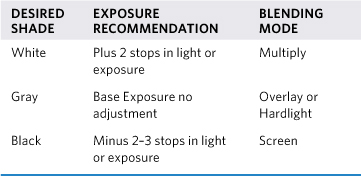
When you’re replacing backgrounds, starting with a neutral background is a good first step, but it is not an instant button that will solve all of your fine-detail masking needs. In our experience, using the blending modes is helpful. But to achieve professional results, you still need to pay attention to the edges and finesse the composites with channel and layer masks as the examples in this chapter will illustrate.
As addressed in the section “Blending Mode Guide” in Chapter 10, “The Power of Channel Masking,” the majority of blending modes are neutral to—meaning they do not affect one of the three neutral tones—white, gray, or black. As compositing artists, you can take advantage of this when replacing images with neutral backgrounds by placing the new background above the original image and using the appropriate blending mode, as shown in the following section with examples that use each neutral tone.
When you’re replacing neutral backgrounds, drag or copy and paste the new backdrop on top of the image with the neutral background. Use the layer blending modes to do the initial work, and then refine with layer masking techniques.
Masking on White with Multiply
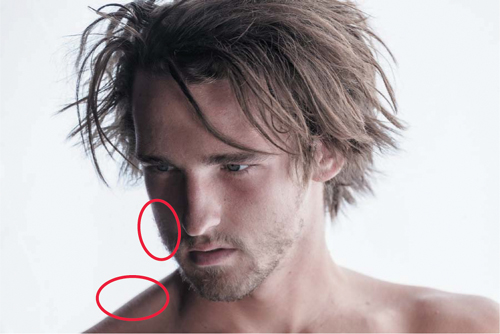
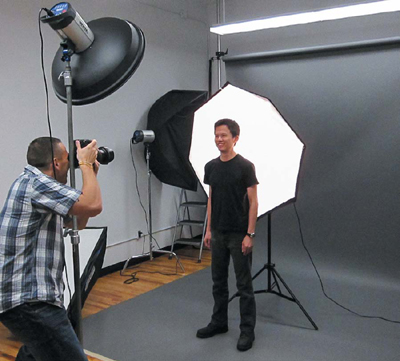
For the best results when you’re photographing dark subjects on a white background, position the subject at least 3–6 feet away from the background to avoid shadows and light wrap around (FIGURE 11.2), which will wash out edge contours and makes pulling a well-defined mask more difficult. Alternatively, you can use a large Octabank or softbox as a white backdrop (FIGURE 11.3).
© KE
Figure 11.2. Allowing the white to wash over the model may be aesthetically pleasing but will make pulling a good mask more challenging.
© KE
Figure 11.3. Calvin Hollywood teaching a lighting and compositing class with Hensel lighting equipment.
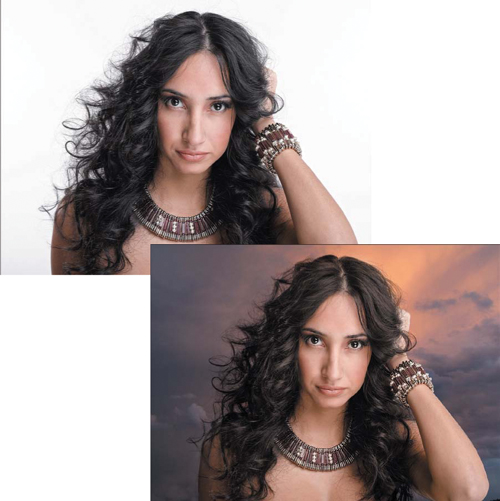
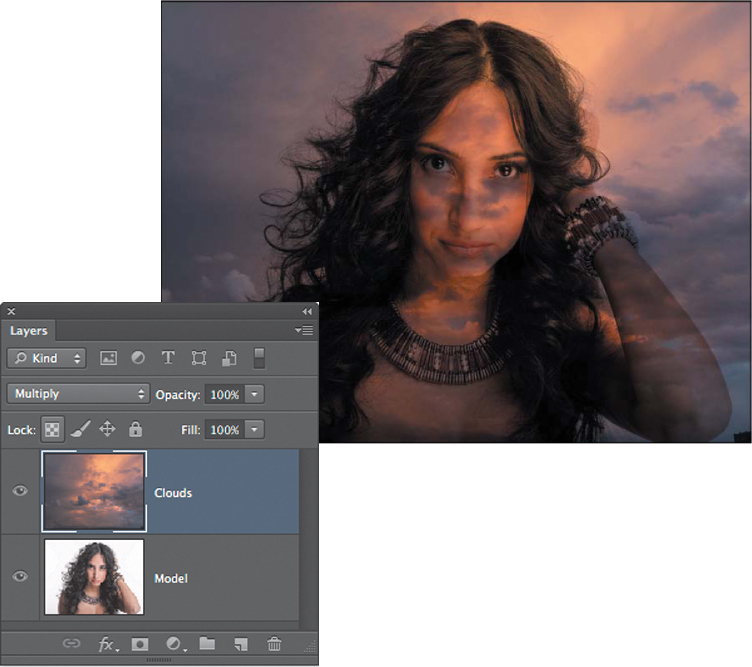
To add a new background to a “shot on white” image (FIGURE 11.4), use the Multiply blending mode to replace the white background.
© Maryana Hordeychuk; Clouds © KE
Figure 11.4. Changing a drab white backdrop to a more dramatic sky can be done fairly quickly.
![]() ch11_model.jpg
ch11_model.jpg
ch11_clouds.jpg
1. Choose Window > Arrange > Tile All Vertically, and from the Layers panel drag the desired backdrop onto the shot on white image.
2. To replace the white parts of the underlying image, on the upper, new backdrop layer, change the layer blending mode to Multiply (FIGURE 11.5).
Figure 11.5. The Multiply blending mode darkens the white background.
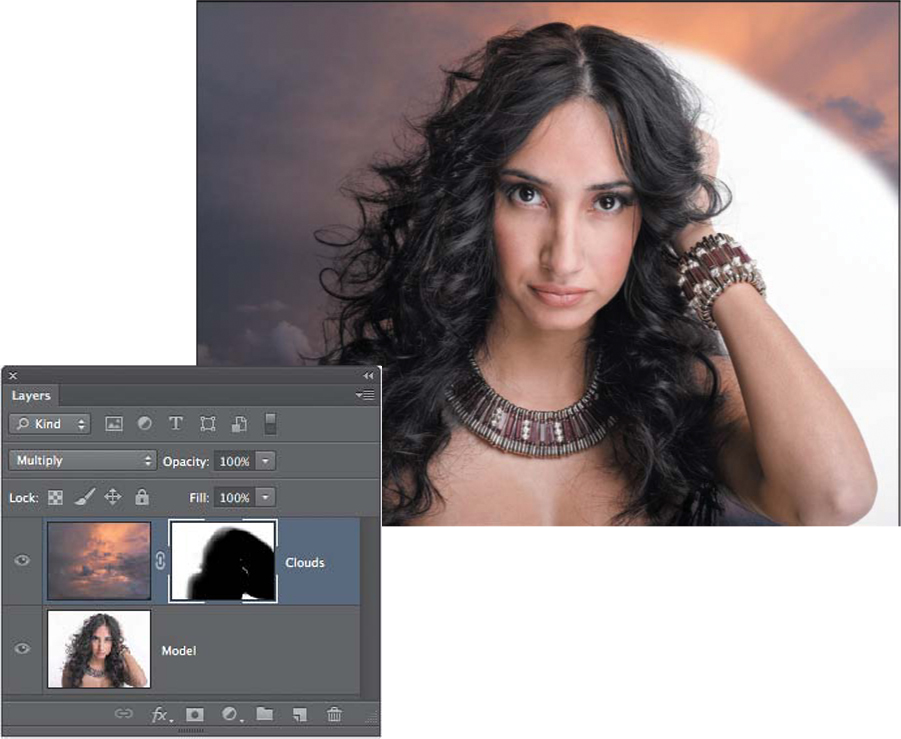
3. To conceal the new backdrop, add a black layer mask to the new backdrop layer (Option-click [Alt-click] the Add layer mask icon).
4. To reveal the subject, use a large, soft, white brush and paint on the black layer mask (FIGURE 11.6).
Figure 11.6. Paint in large areas with a large, soft, white brush.
5. To fine-tune the transition between the model’s hair and the new backdrop, use a 50–70% hardness, 50% opacity white brush and paint in the subtle transitions. Keep one finger over the X key to quickly swap foreground and background colors—black and white—to paint the new clouds in or out of the image.
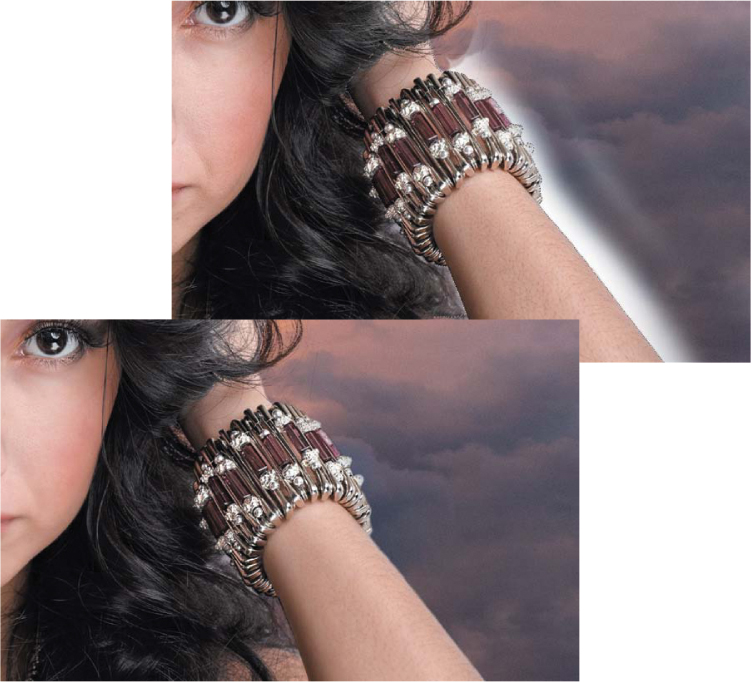
6. In this example, the model’s arm and hard-edged bracelet require more precision than a brush allows. Use the Quick Selection tool to select her arm and then inverse the selection; add a subtle feather of two; and continue painting on the layer mask to complete the backdrop replacement (FIGURE 11.7).
Figure 11.7. Well-defined edges require a more accurate selection to better control the background replacement.
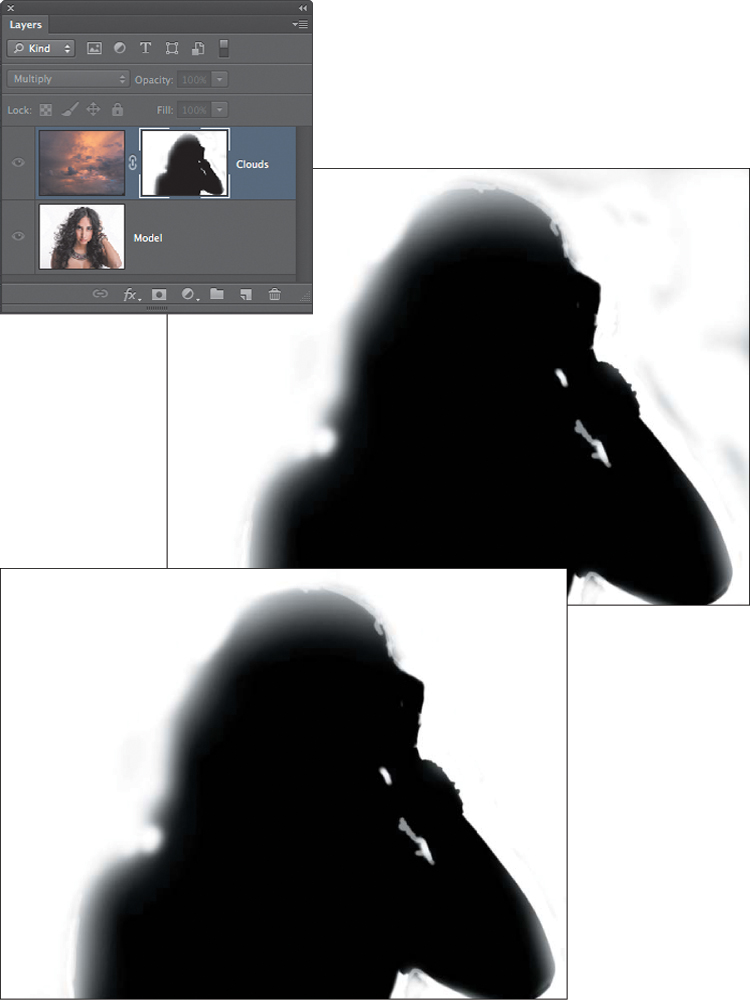
7. Always inspect the layer mask in black and white to identify any gaps or smudges that may cause irregularities in the background replacement. Option-click (Alt-click) on the layer mask, and in this example, notice the small smudges created by uneven brushing. Clean these up with a white brush (FIGURE 11.8).
Figure 11.8. Viewing the mask in black and white reveals gaps that need to be removed.
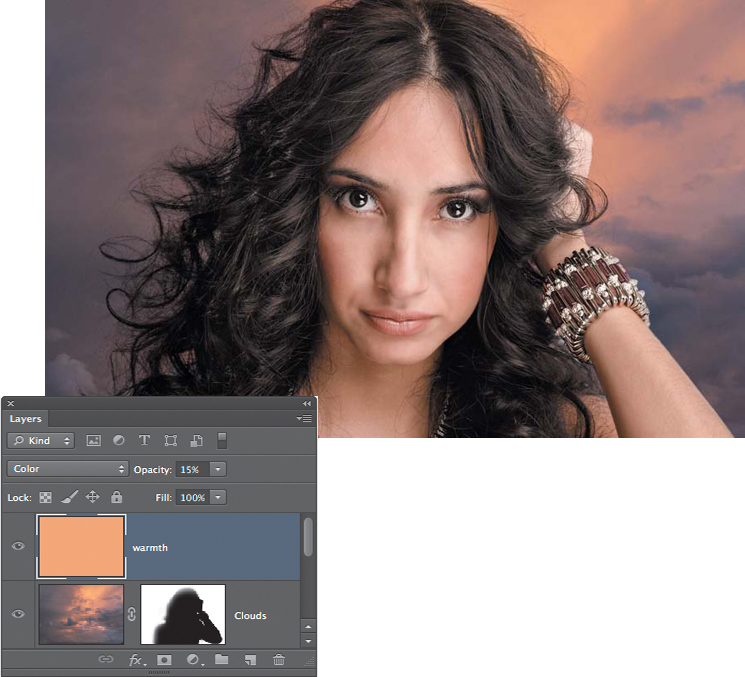
8. To add a hint of the sunset color onto the model, use the Eyedropper to sample the warm sky, add a new layer, and fill it with the sampled color.
9. Change the layer blending mode to Color and reduce the opacity to 10–15% (FIGURE 11.9).
Figure 11.9. Toning the subject with a color from the new background adds realism.
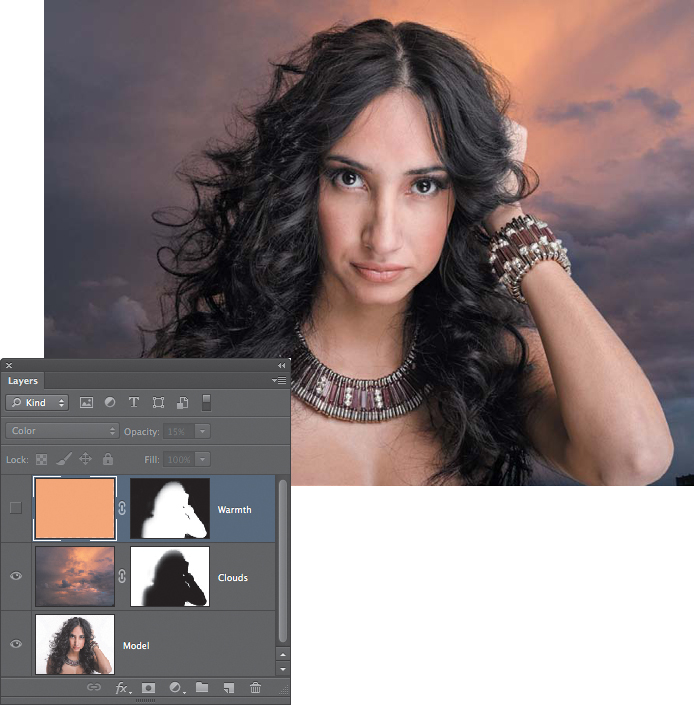
10. To avoid changing the color of the sky, Option+Shift-drag (Alt+Shift-drag) the layer mask from the Clouds layer to the Warmth layer (FIGURE 11.10), which adds an inverted layer mask that is in perfect registration with the Clouds layer.
Figure 11.10. Take advantage of one mask to create another mask.
When you’re painting in subtle transitions, use short brush strokes, and use the Undo/Redo command (Command+Z [Ctrl+Z]) to monitor your progress.
Masking on Gray with Overlay or Hardlight
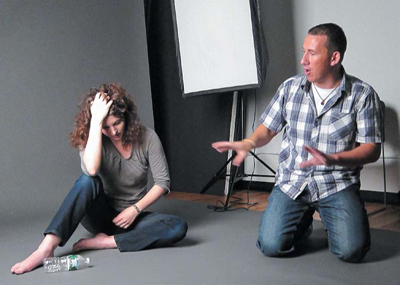
Photographing on a Thunder Gray (slightly darker than 18% gray) backdrop is the best option when you’re photographing full-body images and maintaining the original shadows is also required. Use a 9-foot or 12-foot wide seamless backdrop, and help the model imagine the upcoming scene. Tell the model what you are planning on doing, and encourage the model to imagine being transported to another scene, street, or scenario (FIGURE 11.11).
© KE
Figure 11.11. Calvin Hollywood working with student and model Julie Saad to explain which expressions and scenarios he is envisioning.
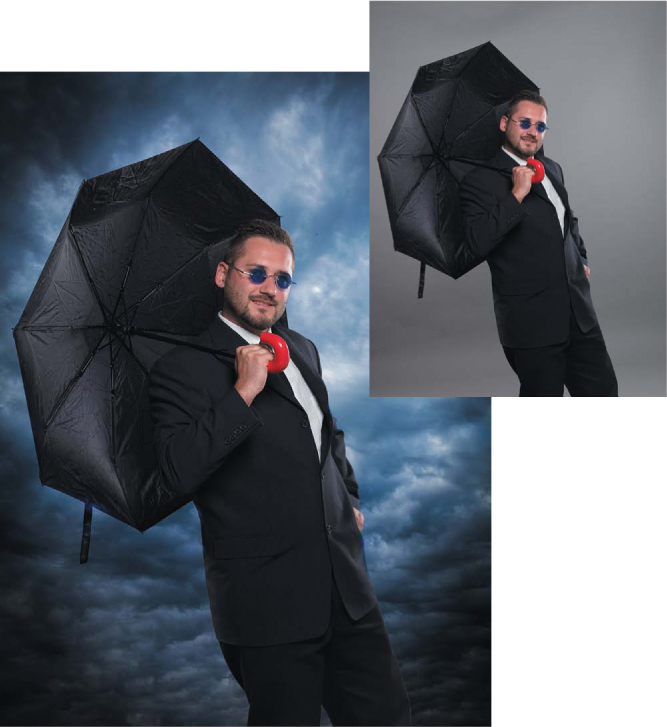
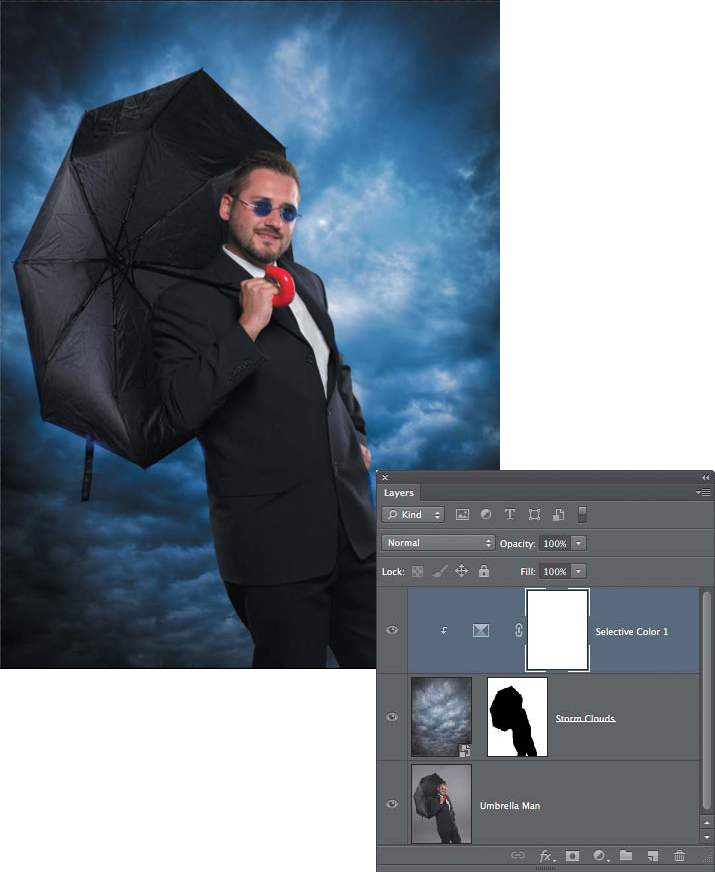
To add a new background to a “shot on gray” image (FIGURE 11.12) use the Overlay or Hardlight blending mode to replace the gray background.
© Julie Lance; Clouds © KE
Figure 11.12. Shooting the model in the studio offers great control, and replacing the background offers great creativity.
![]() ch11_umbrella-man.jpg
ch11_umbrella-man.jpg
ch11_storm-clouds.jpg
To replace a gray background, follow these steps.
1. Choose Window > Arrange > Tile All Vertically, and from the Layers panel drag the desired backdrop on top of the “shot on gray” image.
We prefer to drag and drop files versus copy and pasting them because dragging and dropping is more efficient in terms of not requiring the clipboard and taking up valuable RAM.
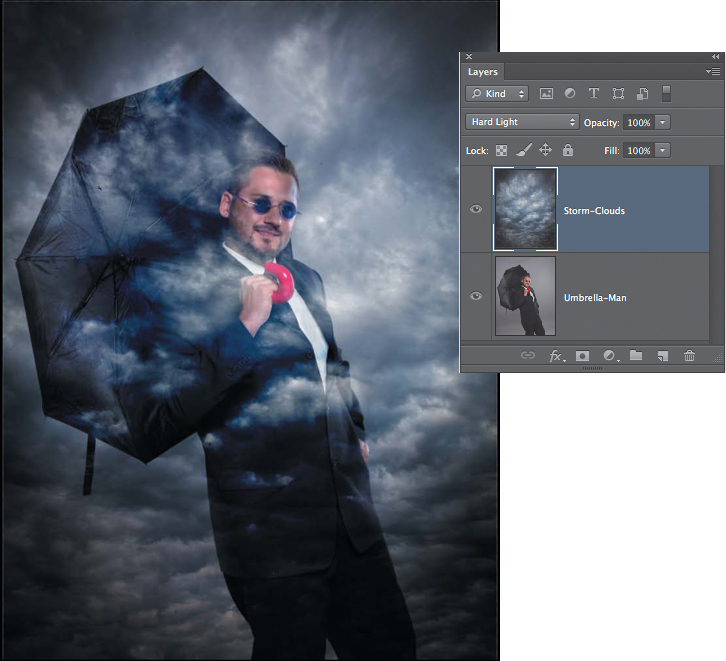
2. To replace the neutral gray of the underlying layer, on the new backdrop layer, change the layer blending mode to Overlay or for a more dramatic effect use the Hardlight blending mode (FIGURE 11.13).
Figure 11.13. A Hardlight blending mode replaces the gray background.
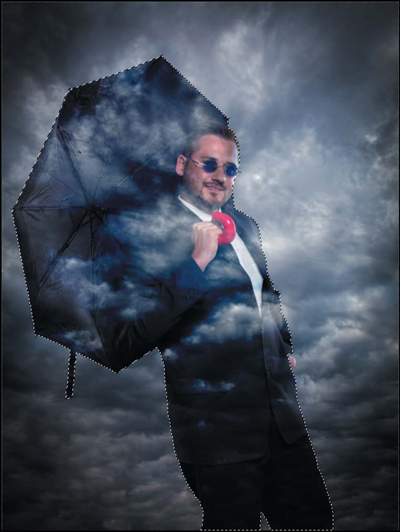
3. Drop down to the subject layer (in this example, the man with the umbrella) and use the Quick Selection tool to select the man (FIGURE 11.14). Note that you can also turn off the visibility of the clouds layer and work on the subject layer—the man.
Figure 11.14. The Quick Selection tool creates an accurate selection of the man.
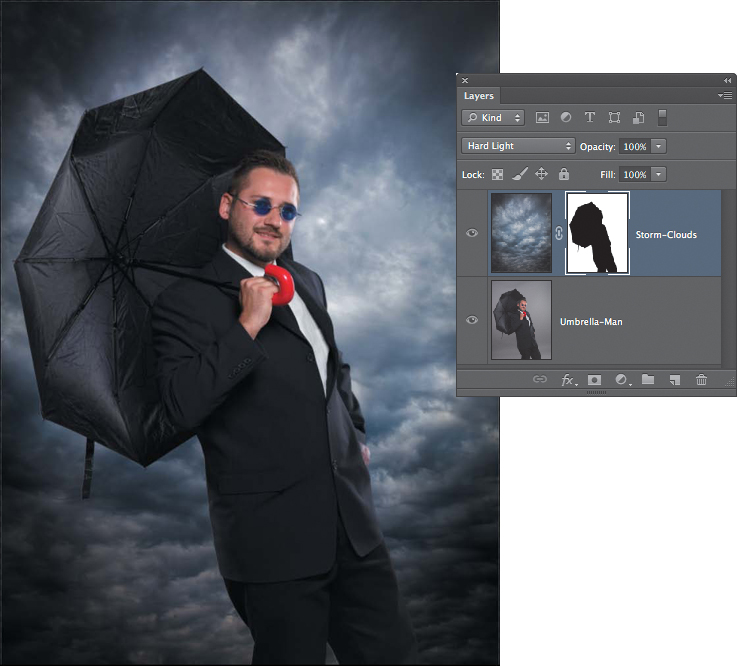
4. Activate the new background image (in this example, the storm clouds) and add a layer mask to place the man in front of the clouds (FIGURE 11.15).
Figure 11.15. A layer mask based on the selection of the man.
5. To fine-tune the transition from the man to the new backdrop, use a 50% hardness white or black brush along the edges to refine the transitions.
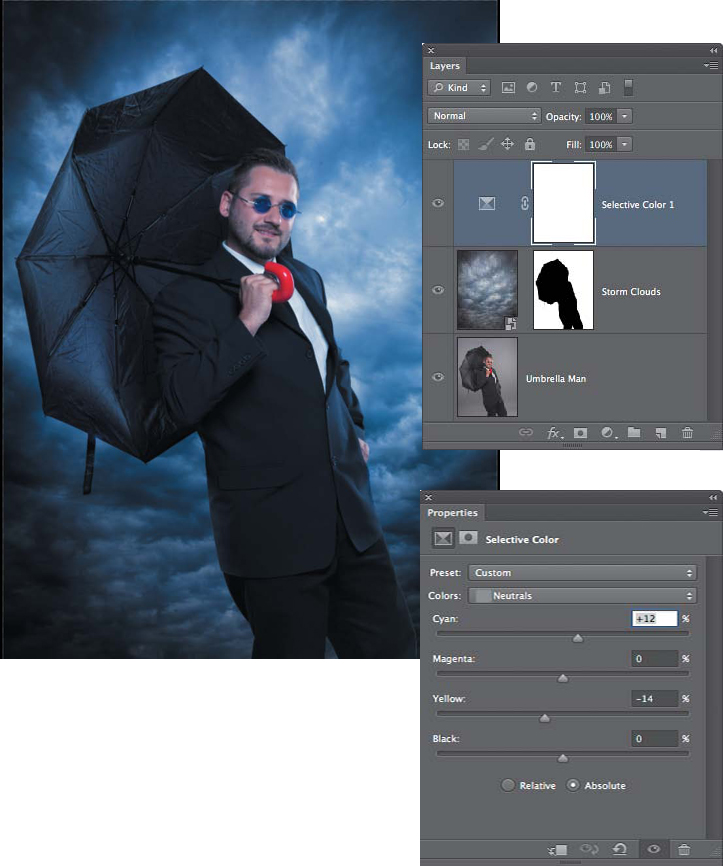
6. To increase the impact, add a Selective Color adjustment layer, and adjust the neutral Yellow and Cyan sliders. Of course, this is a subjective move and you can adjust to taste (FIGURE 11.16).
Figure 11.16. Strengthening the color of the new background adds drama.
7. In the Layers panel, Option-click (Alt-click) on the thin line between the clouds and the Selective Color layer to clip the color and only impact the clouds (FIGURE 11.17).
Figure 11.17. Clipping the Selective Color layer to the Clouds layer constrains where the effect takes place.
Super spy on gray
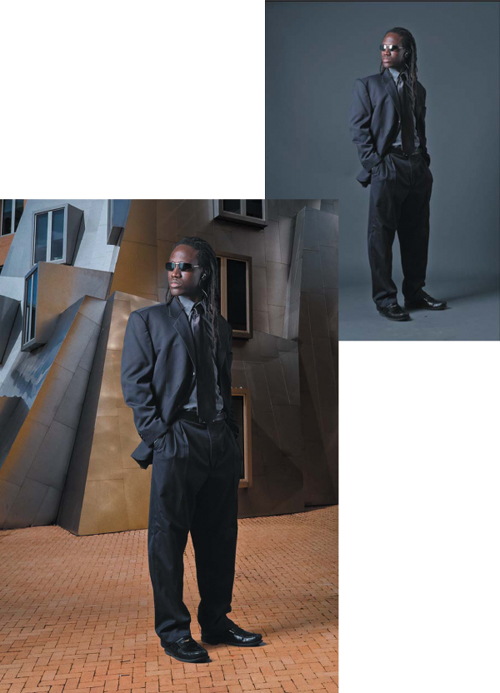
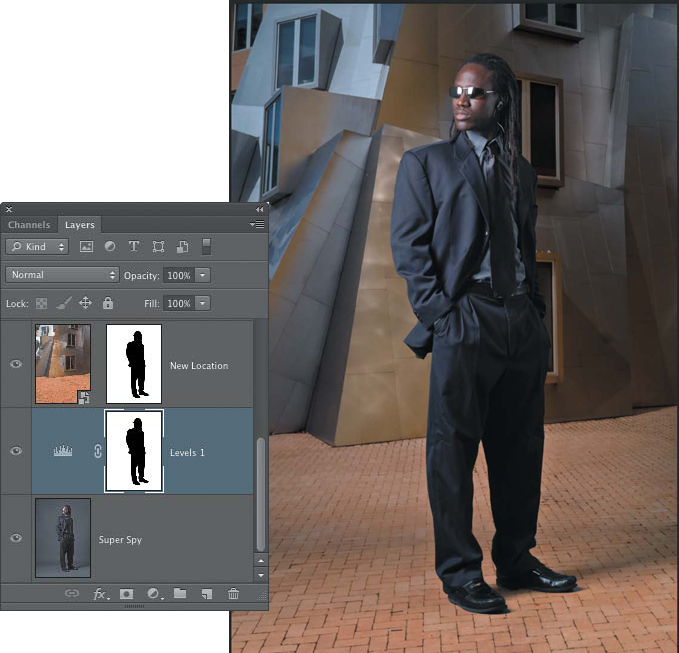
After seeing Julie Lance’s photograph of a model on a dark-gray background (FIGURE 11.18), Katrin decided to place him into the Ray and Maria Stata Center (by architect Frank Gehry) at the Massachusetts Institute of Technology that she photographed on a visit in 2010. Working as described in the previous section “Masking on Gray with Overlay or Hardlight,” Katrin wanted to refine the texture and reflections as explained here.
© Julie Lance; Building © KE
Figure 11.18. Replacing the studio background with a contemporary environment creates a more interesting visual story.
![]() ch11_model-spy.jpg
ch11_model-spy.jpg
ch11_metalbuilding.jpg
Each image requires attention to subtle details, and what may work with one image might not work with another. But the more you experiment and practice, the more Photoshop smarts you’ll develop, which will always serve you well.
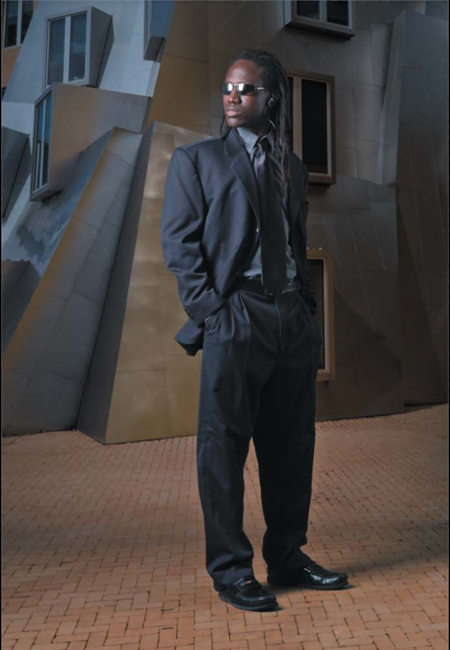
After adding the new background with the same technique used in the previous example, the scene lacked visual snap (FIGURE 11.19), which Katrin enhanced by taking the following steps.
Figure 11.19. Adding a new backdrop is often only the first step in creative compositing.
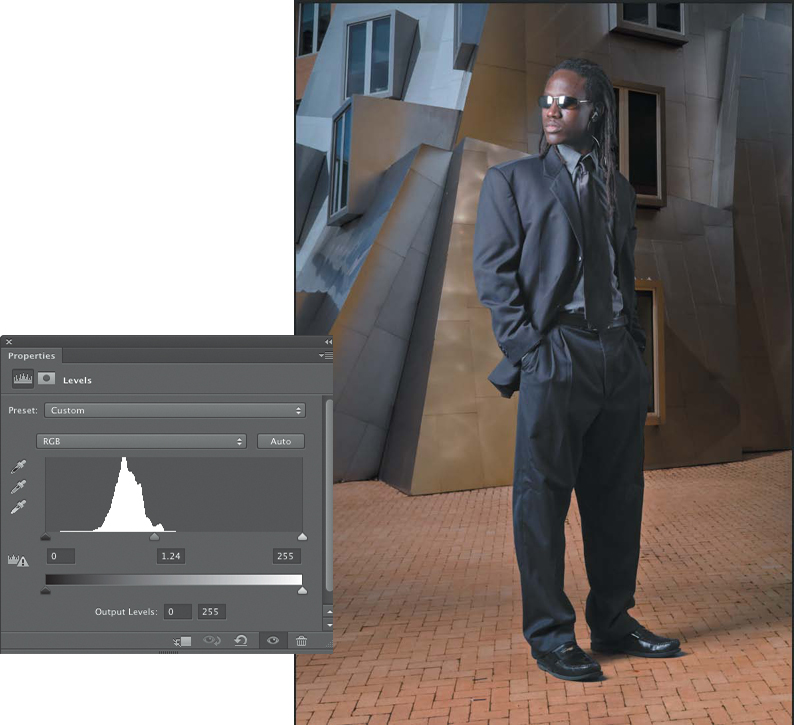
1. Adding a Levels adjustment layer below the new background layer and moving the midtone slider to the left lightened the studio backdrop and allowed the Overlay blending mode of the architecture layer to work more efficiently (FIGURE 11.20).
Figure 11.20. Using Levels to lighten (or darken) the background allows the new background to be more effective.
2. To make sure that the male model was not affected, Katrin Option-dragged (Alt-dragged) the layer mask from the modern building layer to the Levels adjustment layer (FIGURE 11.21).
Figure 11.21. Take advantage of existing layer masks to speed up your work.
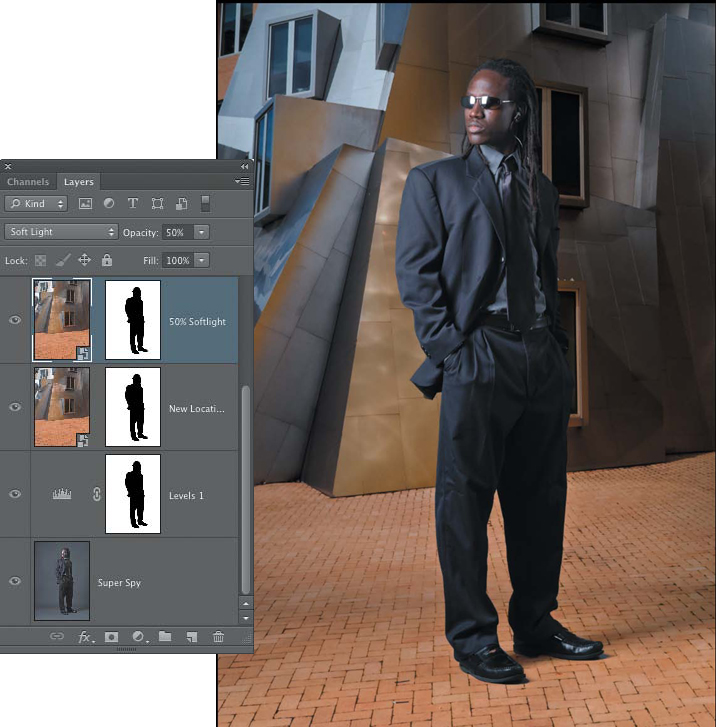
3. To increase the effect even more, she then duplicated the modern building layer and changed the new building layer blending mode to Softlight with 50% opacity (FIGURE 11.22).
Figure 11.22. Experiment with duplicating layers and adjusting blending modes and opacity to create the image in your mind’s eye.
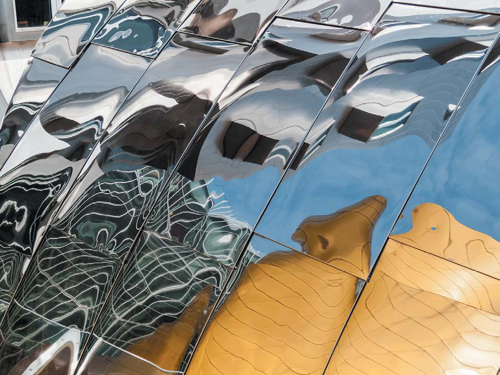
To enhance the illusion, reflective surfaces should reflect the environment that the figure or subject is in. As FIGURE 11.23 shows, Katrin also photographed the abstract reflections in the buildings; in other words, if you’re in an interesting location, shoot more pictures. You never know when you’ll need image material!
© KE
Figure 11.23. Photograph environments, reflections, and a wide variety of material to build your image library.
Paying attention to reflective surfaces in still images is important, but in motion graphics, such as video special effects where a character moves, making sure that reflective surfaces like glass or metal mirror the environment as the camera moves is critical.
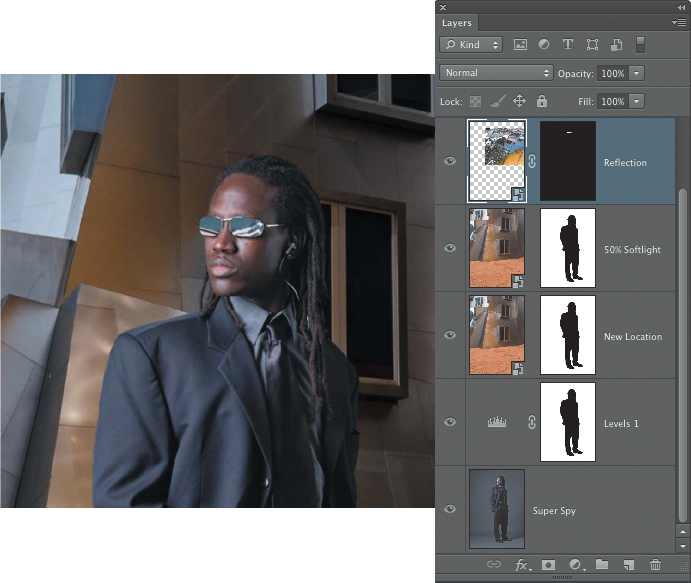
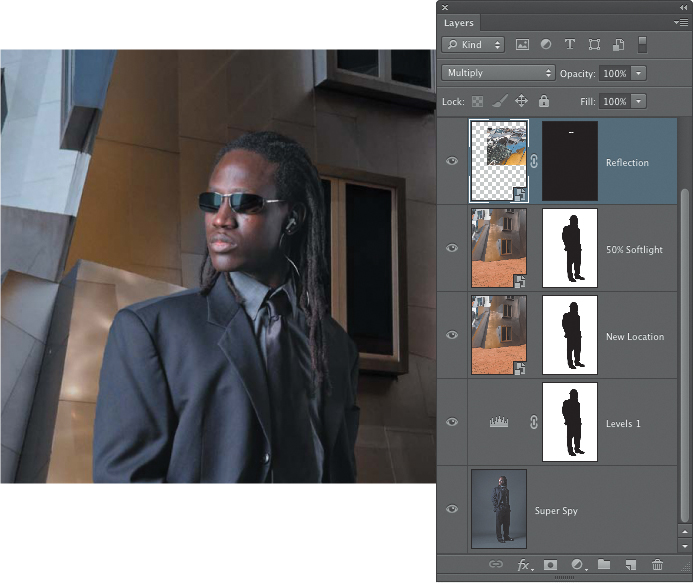
1. To control where the reflection went, Katrin used the Pen tool to outline the interior of the sunglasses.
2. After dragging the abstract reflection into the composite, Katrin converted the sunglasses path to a selection and added a layer mask to the Reflection layer (FIGURE 11.24).
Figure 11.24. The sunglasses don’t look real with a 100% opacity Normal reflection.
3. Changing the reflections blending mode to Multiply created a more realistic effect (FIGURE 11.25). Of course, you’ll need to experiment with blending modes and opacity when you’re working on your own images.
Figure 11.25. Using the Multiply blending mode and adjusting the opacity allows the reflection to interact with the original photograph.
Adding texture
When you’re working with disparate cameras, matching or concealing texture differences is helpful to create a believable illusion. In this example, the model was photographed with a medium format Hasselblad H4H-31 digital camera with a 31 million-pixel image sensor, which is a professional studio camera; whereas the abstract building was photographed with a point-and-shoot Canon PowerShot G10 with 14.7 million pixels. To conceal the difference in image structure, Katrin added faux film grain on an Overlay layer.
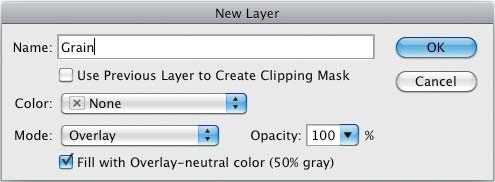
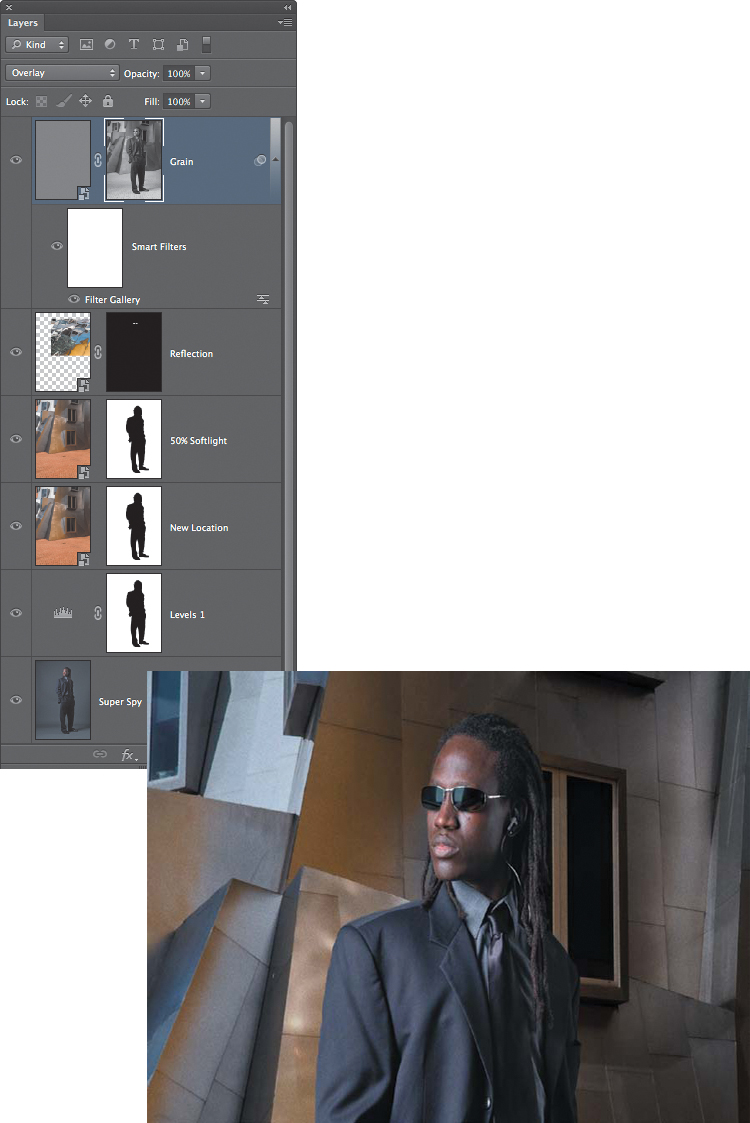
1. On the Layers panel, she Option-clicked (Alt-clicked) the New Layer button, changed the Mode to Overlay, and selected “Fill with Overlay-neutral color (50% gray)” (FIGURE 11.26).
Figure 11.26. Creating the neutral gray surface of the grain layer.
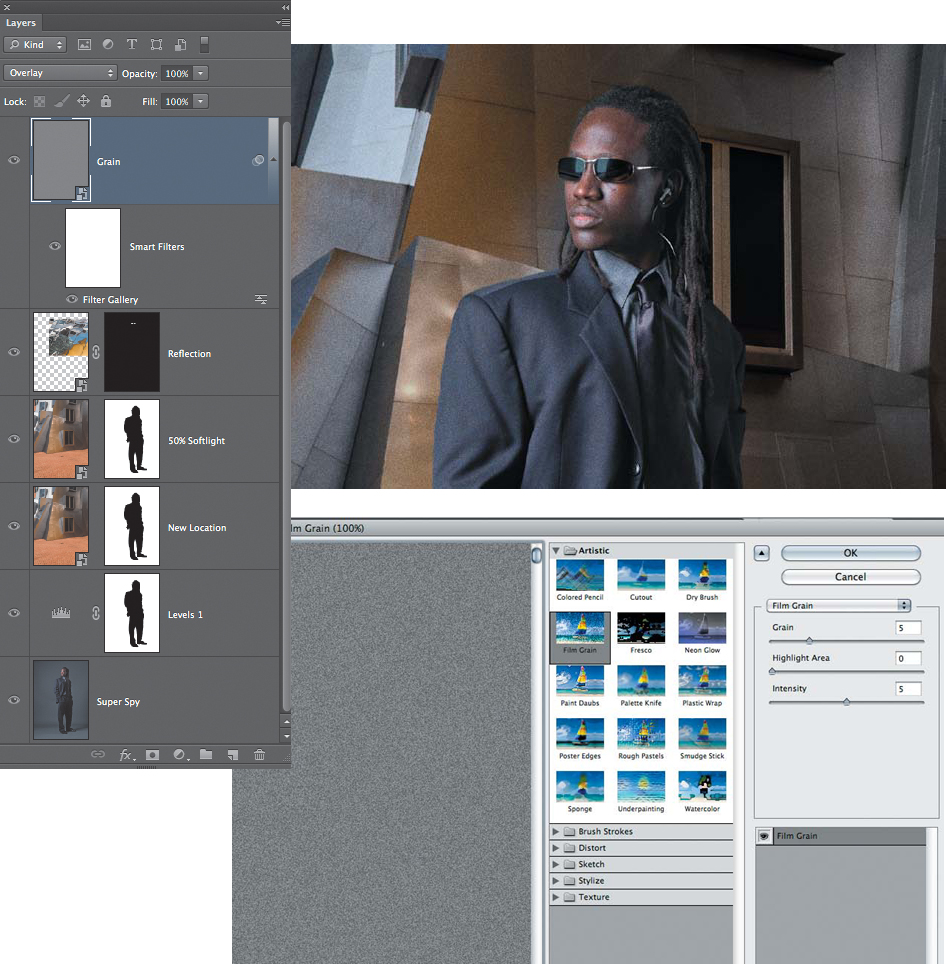
2. To maintain flexibility, she then chose Filter > Convert for Smart Filters followed by Filter > Filter Gallery > Artistic > Film Grain.
3. At this point, it was easiest to use higher, more aggressive settings and use layer opacity and layer masks to control and refine the effect. Katrin usually starts with 5 – 0 – 5, which you can always adjust later on (FIGURE 11.27).
Figure 11.27. Estimating a reasonable grain setting.
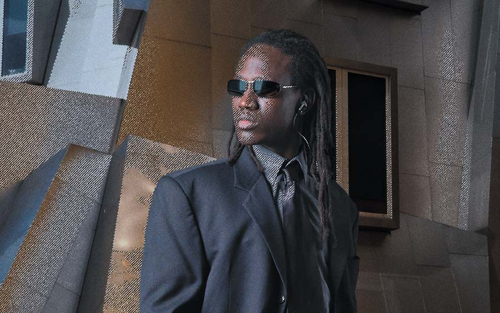
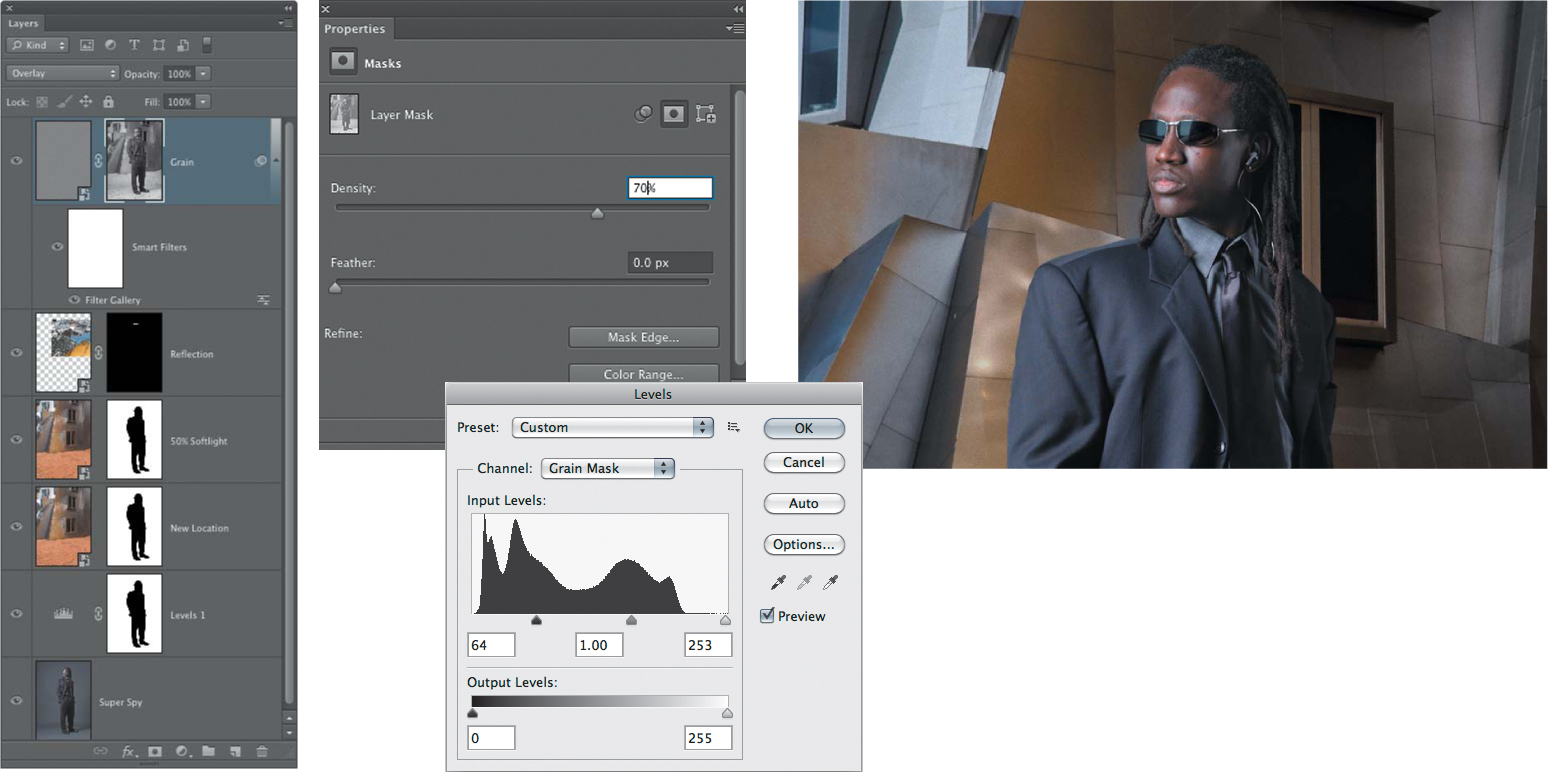
4. Having the same texture, or in this example, film grain, on the overall image looked fake and computer generated. Before digital cameras, when we worked with film, the grain was less visible in the shadows and darker areas. To re-create that look, in the channels panel Katrin Command-clicked (Ctrl-clicked) the Red channel icon (Katrin uses the Red channel because it is the one with the greatest tonal difference) to create a selection based on tone (FIGURE 11.28).
Figure 11.28. A tonal selection based on the Red channel.
5. Clicking the layer mask icon of the Film Grain layer blocked the film grain from impacting the darker areas (FIGURE 11.29).
Figure 11.29. The layer mask based on image tonality created seamless transitions.
6. To refine the effect, she experimented with the Layer Mask Density slider (View > Properties) and/or used Levels to increase mask density by moving the Shadow slider to the right (FIGURE 11.30).
Figure 11.30. Experimenting with darkening, lightening, blurring, and adjusting layer mask density.
Adding film grain in 16-bit
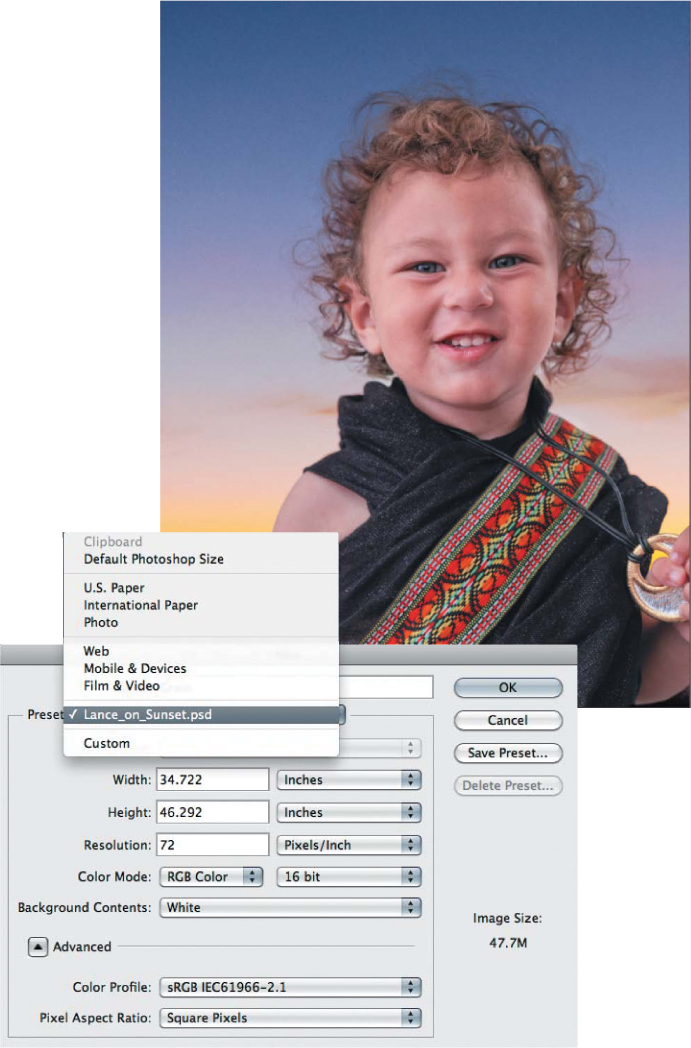
Photoshop’s more attractive (in our opinion) Film Grain (Filter Gallery > Artistic > Film Grain) only works in 8 bit—or does it? To trick Photoshop into adding Film Grain on a 16-bit file, try this.
1. With your composite image open, choose File > New, click the Preset drop-down menu, select the composite filename (FIGURE 11.31), and change the bit depth to 8 bit.
© Julie Lance
Figure 11.31. Creating an identically sized neutral gray surface.
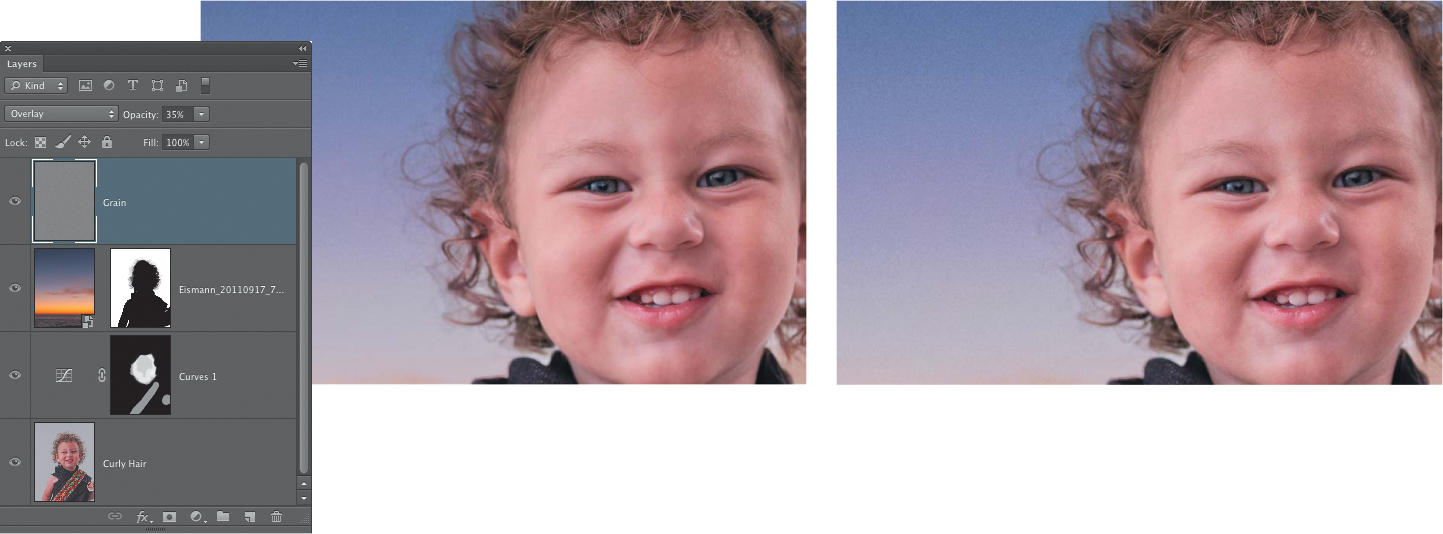
2. Click OK and choose Edit > Fill > 50% Gray.
3. Choose Film > Filter Gallery > Artistic > Film Grain, and use the familiar settings of 5 – 0 – 5.
4. Choose Select All > Edit Copy and paste the noise layer onto the 16-bit composite. Change the layer blending mode to Overlay (FIGURE 11.32), and adjust the layer opacity to your personal preference.
© Julie Lance
Figure 11.32. Adding grain creates visual coherency and makes the image look sharper.
Adding texture or film grain is a great way to add a unifying texture to your images, and in some cases you’ll notice that the images look sharper, which is an added bonus.
Masking on Black with Screen
Working with a black background is best for photographing people with light hair. When you’re lighting the scene, make sure that the keylight (main light) does not spill onto the background, use a hair or rim light to create separation of the subject and the background, and use a matte nonreflective surface as the backdrop.
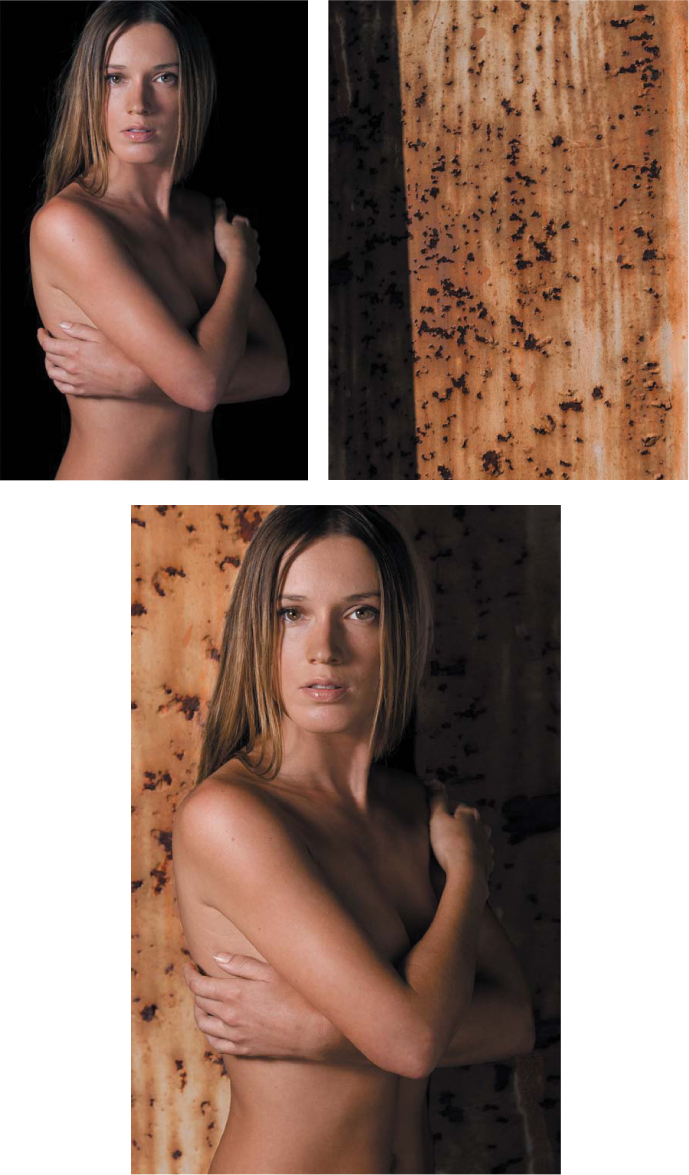
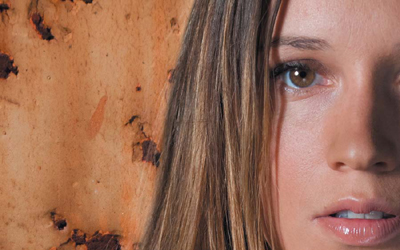
Choosing a suitable background is very important. Take the time to either photograph or find backgrounds that will flatter the subject and fit in terms of color, tone, texture, and emotional expression. In the following example, Katrin needed to replace the bland black background of Leslie’s portrait. Katrin felt that Leslie’s appreciation of the quirky would be well portrayed with the addition of the rusty wall (FIGURE 11.33).
Both images © KE
Figure 11.33. Use backgrounds that fit and flatter the primary subject.
![]() ch11_model-on-black.jpg
ch11_model-on-black.jpg
ch11_rusty-wall.jpg
To add a new background to a “shot on black” image, follow these steps.
1. Choose Window > Arrange > Tile All Vertically and from the Layers panel drag the desired backdrop (in our example, the rusty wall) onto the “shot on black” image of Leslie.
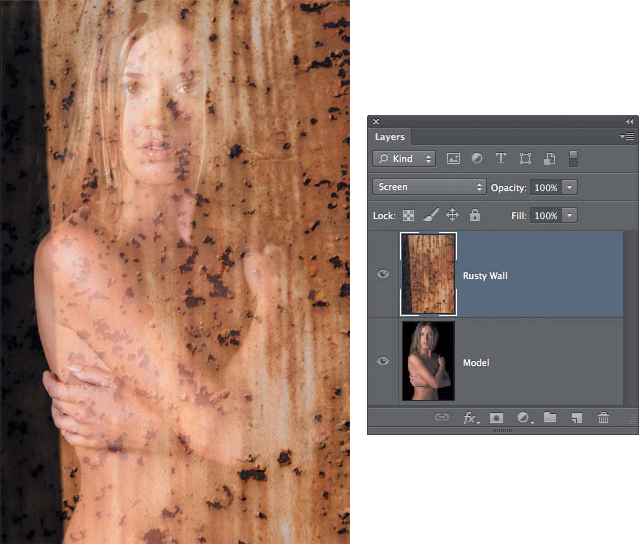
2. On the new backdrop layer, change the layer blending mode to Screen (FIGURE 11.34) and rotate the rusty wall 180 degrees so that the darker side is where less light is in the original photograph (on the right side).
Figure 11.34. The Screen blending mode quickly replaces the darker background.
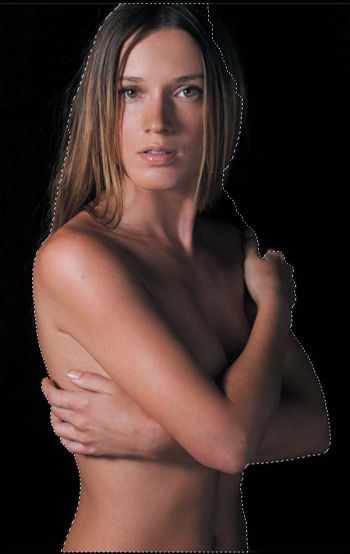
3. Turn off the visibility of the Rusty Wall layer and drop down to the subject layer (in this example, the model), and use the Quick Selection tool to select her (FIGURE 11.35). Because the right side of the image is so dark, you may need to press Option (Alt) while redrawing some areas to subtract from the unwanted selection.
Figure 11.35. Use the Quick Selection tool to make an initial selection.
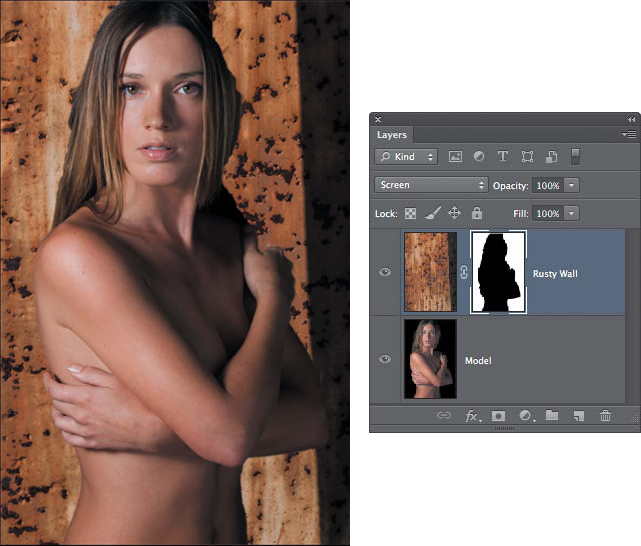
4. Activate the new background image (in this example, the rusty wall) and add a layer mask. If the model is concealed on the layer mask, press Command+I (Ctrl+I) to invert the layer mask to reveal her (FIGURE 11.36).
Figure 11.36. The preliminary composite is rather rough.
5. Zoom to 100%, or better yet 200%, view, and carefully inspect the edges. Use a soft-edged white brush on the layer mask to carefully refine the transition by her hair (FIGURE 11.37) and the rusty wall. You may notice that in the darker areas that her hair color is getting darker, which should not be too noticeable because it is dark on dark.
Figure 11.37. Painting with a soft-edged brush on the layer mask creates a soft transition between wall and hair.
When you’re painting on a layer or channel mask, keep one finger over the X key to quickly swap black and white without pause.
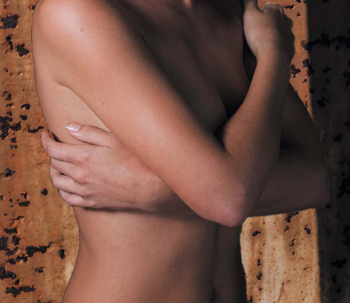
The hair and the body edges are so different that they need to be handled separately. The hair is soft and flowing, whereas the body is clearly delineated. As FIGURE 11.38 shows, the edges of her body look cut out and need to be finessed with the spread & choke technique that will simultaneously soften and tighten the transitions to make them more realistic.
Figure 11.38. The edges of her body look cut out and unnatural.
The origins of the spread & choke technique are based in the traditional darkroom when masks were made with Kodalith film. By adjusting exposure and development times, the darkroom technician could create masks that were slightly larger or smaller as needed to conceal telltale edges. In prepress a similar process was called trapping and ensured that no fine white gaps occurred between flat colors.
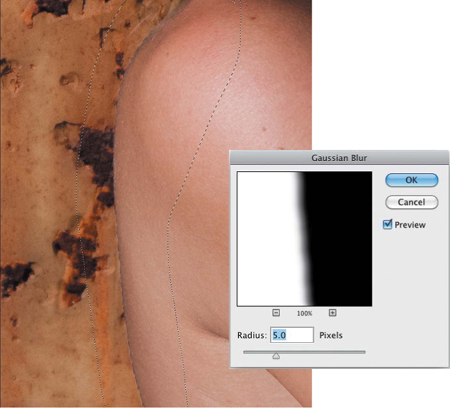
6. On the layer mask, use the Lasso tool to generously select the body edge (FIGURE 11.39).
Figure 11.39. Use Gaussian Blur on the layer mask to soften the edge.
7. Choose Filter > Blur > Gaussian Blur and set it to 5.
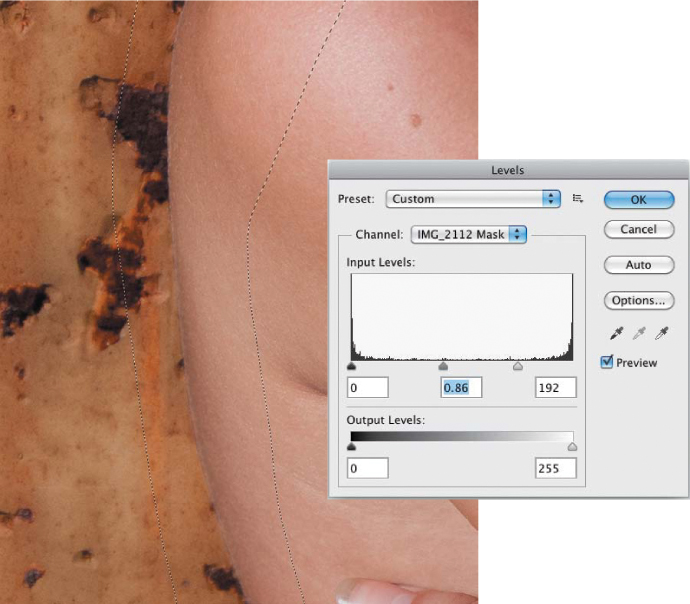
8. Choose Image > Adjustments > Levels and move the Shadow and Highlight sliders inward to increase the edge contrast (FIGURE 11.40).
Figure 11.40. Use Levels to tighten the blur and create a more realistic edge transition.
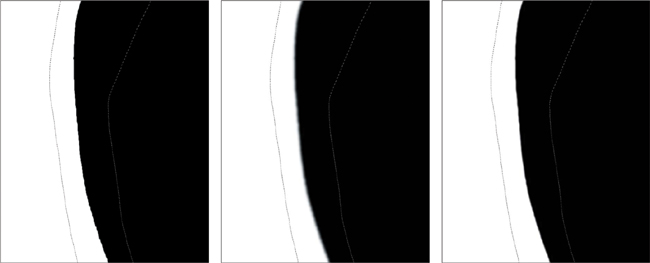
9. Repeat the Gaussian Blur with half of the original value and the Levels with a less aggressive setting. FIGURE 11.41 shows the original edge, blurred edge, and final tightened edge.
Figure 11.41. Original edge. Softened edge. Tightened edge.
10. In this example, you’ll need to repeat steps 6–9 on the other side of the image by the hands and body, and fine-tune any remaining telltale edges by painting on the layer mask with a small brush to perfect the edges.
The Refine Mask Feather and Shift Edge sliders can create similar effects to the classic spread & choke technique. But many people still prefer the traditional method because it offers a great deal of control and visual feedback.
Matching color
As we’re sure you’ve learned, there is no one-click “make good” button in Photoshop, and paying attention to important details will raise your composite work to a higher level. Issues to be aware of include edges, transitions, color, texture, and focus.
When you’re changing the environment, or as in this example, changing the image background, it is very important to make sure that the subject’s color is adjusted to fit into the new scene. The three primary methods to do this are to use a Photo Filter adjustment layer to warm or cool the image, to fill an empty layer with the desired color and adjust blending mode and opacity as shown previously, or to sample the image color using a Solid Color layer as explained here.
1. Use the Eyedropper tool set to 3 by 3 Average to sample the primary color in the background (FIGURE 11.42).
Figure 11.42. Sample a color from the new background and add a Solid Color Fill layer.
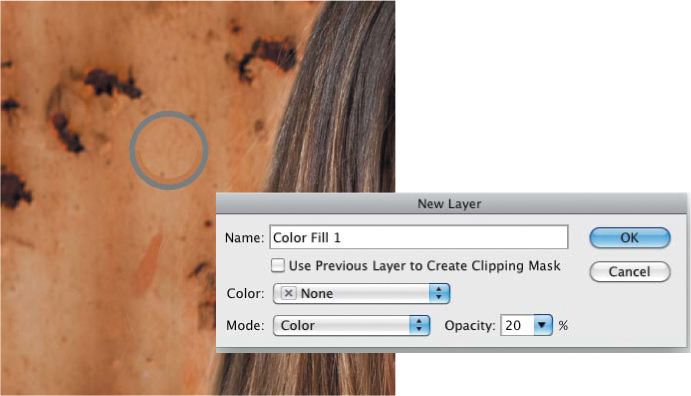
2. Press Option (Alt) and choose Layer > New Fill > Solid Color, reduce the opacity to 20%, change the Mode to Color, and click OK. Then click OK in the color picker that pops up.
This Color Fill layer will tone the entire image, which in most cases is undesired because the background is the reference color and shouldn’t be changed. To manage where the color toning takes place, take advantage of the layer mask that is controlling where the background is visible.
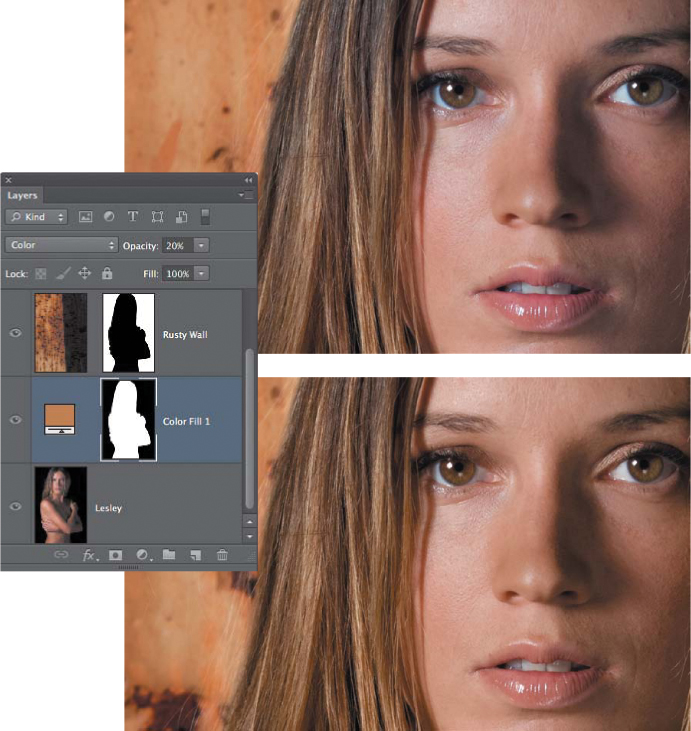
3. Make sure that the Color Fill layer is below the new background so it only colorizes the model. Option-drag (Alt-drag) the Rusty Wall layer mask to the Color Fill layer mask slot, and click OK. Press Command+I (Ctrl+I) to invert the layer mask (FIGURE 11.43).
Figure 11.43. Use the existing masks to control where the color is applied. Above—original color. Below—color matched to the environment.
To duplicate a layer mask and simultaneously invert it, press Option+Shift (Alt+Shift) while dragging one layer mask to another layer mask slot.
Softening the background
Blurring image backgrounds pushes the background farther back and reduces its visual importance, which simultaneously enhances the importance of the primary subject. Photoshop CS6 includes a great number of Blur filters and a new Blur Filter Gallery.
Before experimenting with blurring or softening layers, duplicate the layer and turn off its visibility or convert it to a Smart Object to ensure that you maintain the original information.
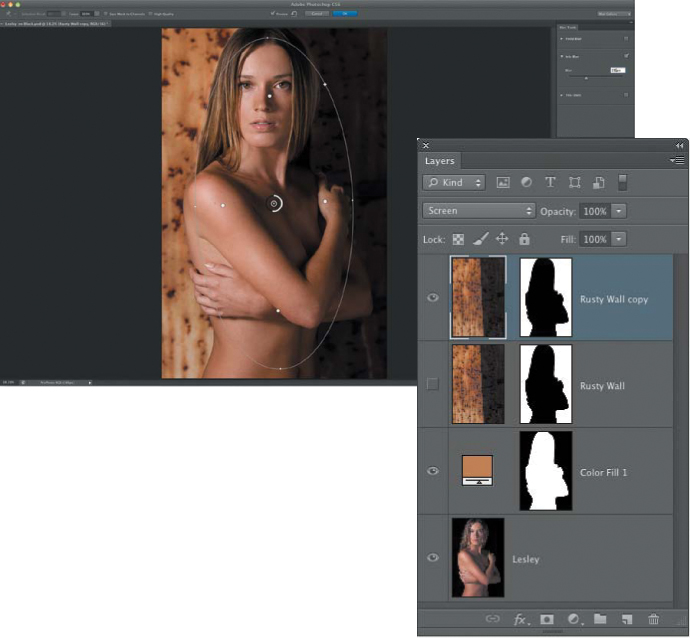
1. Duplicate the Rusty Wall background and turn off its visibility.
2. Choose Filter > Blur > Iris Blur and adjust the settings to soften the background (FIGURE 11.44).
Figure 11.44. Use the Iris Blur to soften the background.
3. Upon exiting the Blur filter, turn on the duplicate layer and reduce its opacity to 20% to create the final image (FIGURE 11.45).
Figure 11.45. The softer background gives the image more depth.
Experimenting with an effect, such as a filter, layer opacity, or blending mode, is rarely predictable but always a pleasure to explore to see what will happen.
Team up with a friend or an assistant and set up a variety of shots with white, gray, and black backgrounds. Then gather a variety of backgrounds and see who can pull the best fine-edged mask. Be sure to share what you learned with each other, because teaching is a great way to learn.
Working with Refine Edge
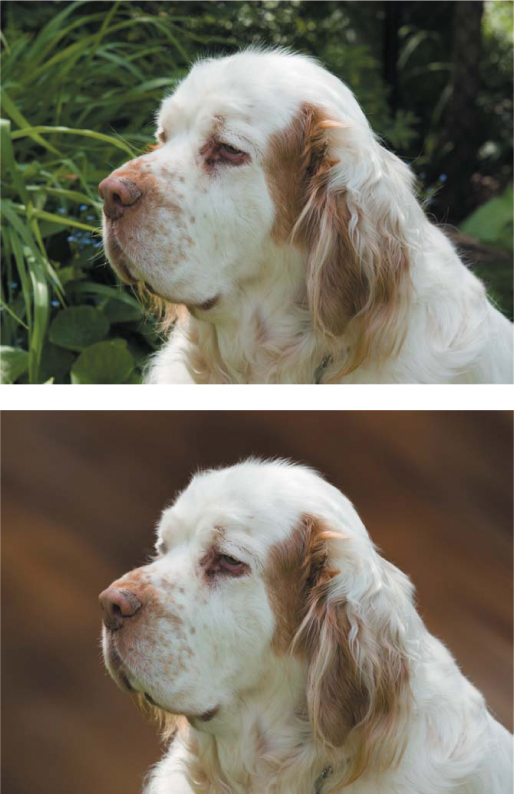
As addressed in Chapter 7, “The Essential Select Menu,” the Refine Mask panel offers tremendous control over refining mask edges with Edge Detection and Color Decontamination controls, as reviewed here using Murphy the dog (FIGURE 11.46).
© Mark Beckelman
Figure 11.46. Original photo with a very busy background and Murphy on a new background.
![]() ch11_murphy-dog.jpg
ch11_murphy-dog.jpg
ch11_murphy-background.jpg
To best see how the composite will look, before entering Refine Edge, place the new background underneath the subject to be masked or drag the subject on top of the new background.
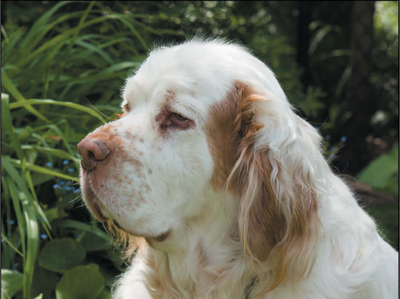
1. Using the Quick Selection tool with Auto Enhance selected in the Options bar, make a rough selection inside the dog (FIGURE 11.47). You don’t need to be too concerned with absolute accuracy in your selection, because Refine Edge is the better option to maintain the fine hair/fur detail.
Figure 11.47. For higher-quality edges when using the Quick Selection tool, make sure that Auto Enhance is turned on.
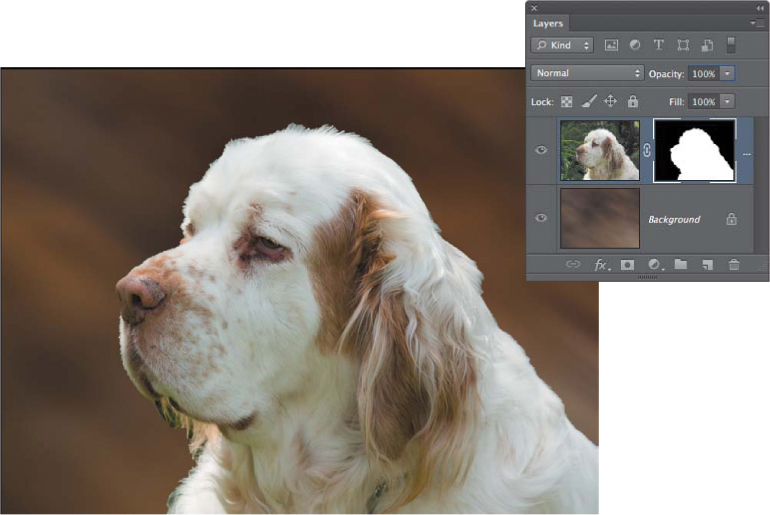
2. In the Layers panel, click the Add Layer Mask icon to add a layer mask based on the active selection (FIGURE 11.48), and then choose Select > Refine Mask or Command-click (Ctrl-click) on the layer mask and select Refine Mask.
Figure 11.48. The initial mask is very rough.
4. For an accurate preview of how the dog will look against the new background, choose the On Layers (or tap L) view mode.
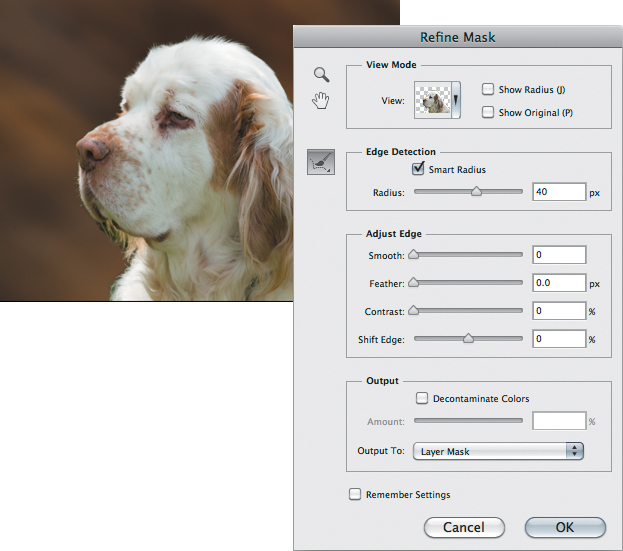
5. Murphy has wide-edged and narrow-edged areas: His fur is wide edged and his nose is narrow edged. Select Smart Radius (which automatically adapts the radius to the image’s edges). For this particular example, 40 pixels works well (FIGURE 11.49). Of course, each image is different, so always experiment when you’re working with your own images. In general, try higher settings for wide-edged areas and lower settings for narrow-edged or harder-edged areas.
Figure 11.49. Use a high Smart Radius for images with both hard and detailed edges.
6. The use of Smart Radius helps the edges look more realistic, but important fur detail is still missing. Paint with the Refine Radius brush along the missing areas, such as his whiskers and back, to expand the detection area and add additional fur detail (FIGURE 11.50).
Figure 11.50. The Refine Radius brush reassesses and improves the mask.
7. If parts of the original background are still visible, press the Option (Alt) key while using the Refine Radius brush to change it to the Erase Refinements brush, which shrinks rather than expands detection areas, thereby removing unwanted details.
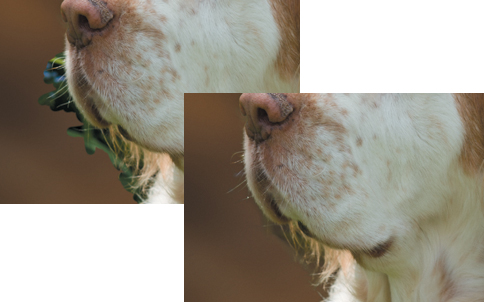
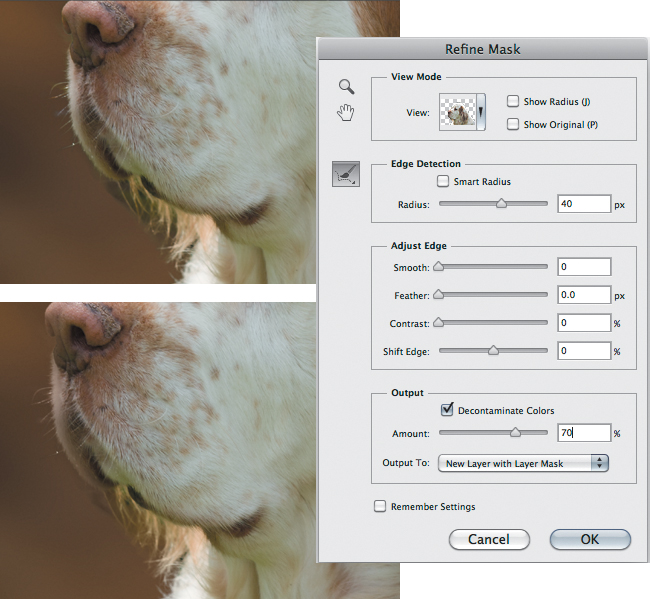
8. Even with careful brushing, a green edge still shows by his white chest. Select the Decontaminate Colors check box to remove the color fringe from the image. A setting of 70% produces a nice natural edge. Because Decontaminate Colors is active, the Output option of New Layer with Layer Mask becomes the default choice (FIGURE 11.51).
Figure 11.51. Use Decontaminate Color to remove color spill along the edges.
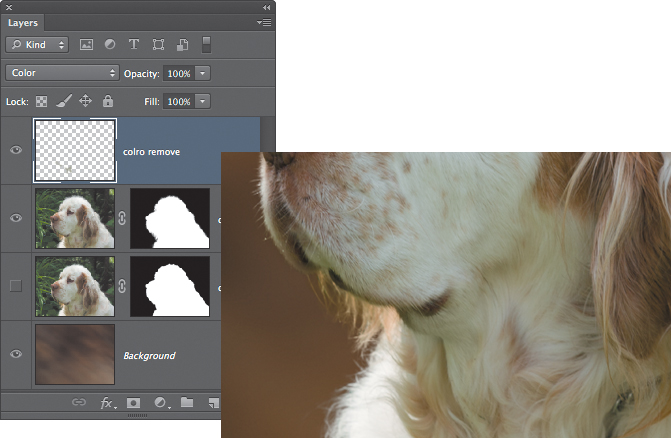
9. Upon exiting Refine Edge, you may notice that some green is still in his white fur that was created by the light bouncing off the green grass. To remove the green cast, add a new layer and change the blending mode to Color. Sample neutral fur and paint over the green (FIGURE 11.52).
Figure 11.52. Paint on a color layer to neutralize remaining color contamination.
The Refine Edge works best with sharp, low noise, high-resolution files. In the following section, we’ll take Refine Edge one step further to create even better results.
High-fidelity Compositing with Refine Edge
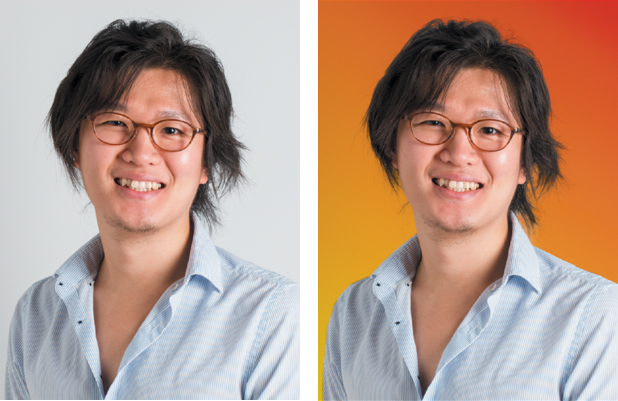
You can take the Refine Edge mask effectiveness one step further as Gregg Wilensky, a researcher at Adobe Systems, explains by using the Subtract blending modes to help maintain fine detail (FIGURE 11.53). Gregg worked on developing a number of advanced Photoshop features that we use every day, including the Art History Brush, Shadow/Highlight, Quick Selection tool, and most important, the Refine Edge algorithms.
© KE
Figure 11.53. Original photo and Background replacement that maintains hair detail.
The Refine Edge is a great way to start a complex mask that maintains detail, but adding the power of layer blending modes you’ll get even better results. When you’re working on a white or nearly white image background, use the Subtract blending mode and an Invert adjustment layer to replace backgrounds fairly painlessly.
Replacing white or nearly white backgrounds
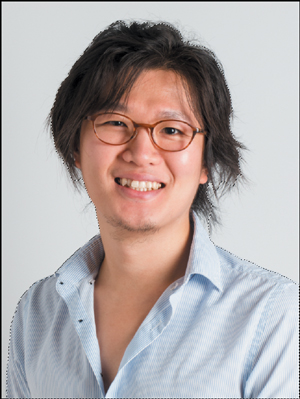
When you’re working with an image on a white background, follow these steps to maintain the finest hair details.
![]() ch11_bojune.jpg
ch11_bojune.jpg
1. Double-click on the Background layer and name it Original.
2. Place a colorful Gradient Fill layer underneath the Original layer by choosing Layer > New Fill > Gradient. In this example, Katrin loaded the Color Harmonies 2 by clicking on the small triangle next to the default gradient, selecting Color Harmonies 2, and clicking Append. The colorful gradient may not be your final background, but it is helpful to see progress against a strong color.
3. Use the Quick Selection tool to draw in an initial selection (FIGURE 11.54).
Figure 11.54. Use the Quick Selection tool to create the initial selection.
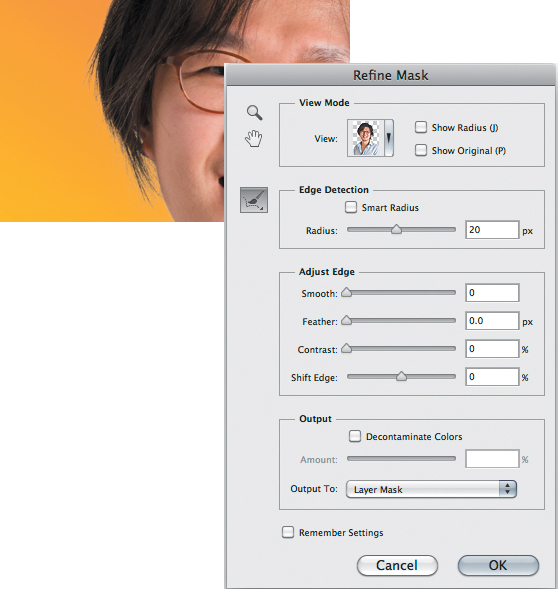
4. Add a layer mask and choose Select > Refine Mask.
5. Use a Smart Radius of 20 and paint along the fine hair with the Refine Radius brush (FIGURE 11.55).
Figure 11.55. The initial mask is very rough.
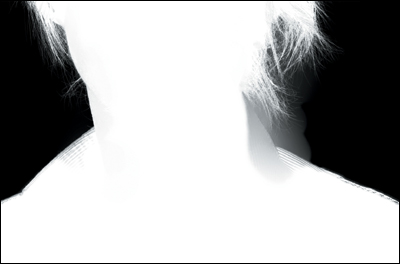
6. It can be helpful to view the progress in Black & White. Tap K and notice that areas of the shirt are included in the mask (FIGURE 11.56).
Figure 11.56. It’s easier to see areas that need refinement when viewing on black.
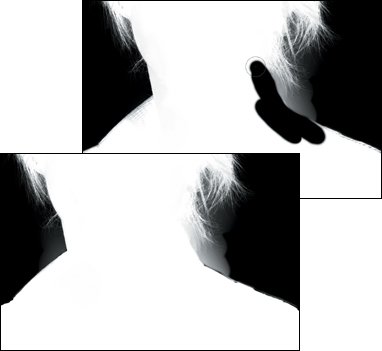
7. To remove areas from the mask that should not be replaced, press Option (Alt) to change the Refine Radius brush to the Erase Refinements brush and paint over areas that should not be affected (FIGURE 11.57).
Figure 11.57. The Erase Refinements brush restores image areas to the original untouched state.
8. Exit Refine Edge (click OK) and take a moment to inspect the layer mask by Option-clicking (Alt-clicking) on the layer mask to see it. In this example, the shoulder is blending into the white background. On the layer mask, use a small, 50% hardness white brush to paint the correct shoulder contours back in (FIGURE 11.58).
Figure 11.58. Fine-tuning the layer mask is always time well spent.
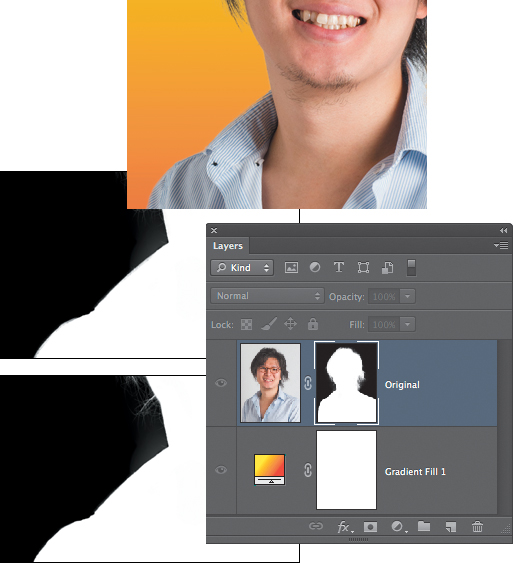
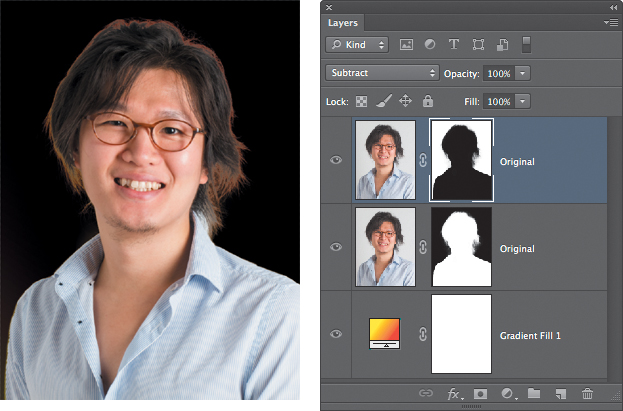
9. Duplicate the masked portrait layer, click on the layer mask, and press Command+I (Ctrl+I) to invert the layer mask. Change the layer blending mode to Subtract (FIGURE 11.59).
Figure 11.59. The Subtract layer does not yield very attractive results.
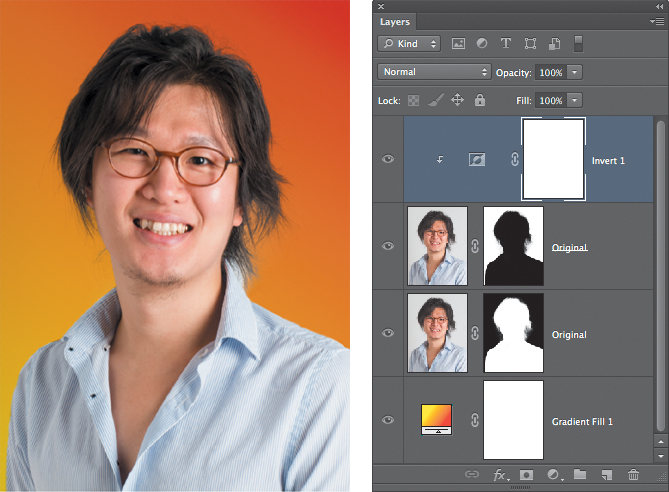
10. Press Option (Alt) while choosing Layer > New Adjustment Layer > Invert, and select the Use Previous Layer to Create Clipping Mask check box to create the results shown in FIGURE 11.60.
Figure 11.60. The clipped Invert layer conceals the original background and allows the gradient to appear.
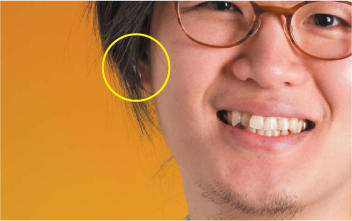
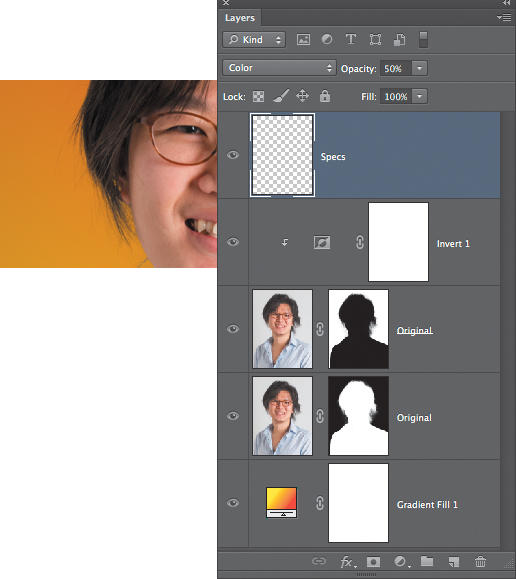
11. Take a moment to review the edges and find telltale white areas of the original backdrop (FIGURE 11.61). To conceal these areas, add a new layer, change the blending mode to Color, sample the desired color from the background (in this case, orange), and daub over the white areas. Reduce the layer opacity to blend in the new color (FIGURE 11.62).
Figure 11.61. Check for pieces of the original background.
Figure 11.62. Concealing the original background that was shimmering through the hair.
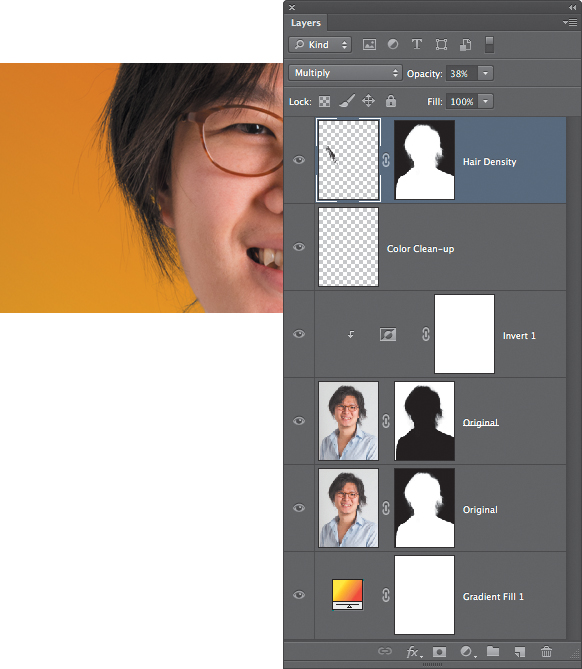
12. To add a hint of density to the hair, add a new layer and change the blending mode to Multiply. To protect the background from being affected. Take advantage of the existing layer mask on the Original layer and Option-drag (Alt-drag) it up to the mask slot of the Multiply layer.
Figure 11.63. Darkening down the wisps of hair.
13. Sample hair color and paint over the finer strands of hair. Reduce the layer opacity to 30–40% to fine-tune the results (FIGURE 11.63).
With a little practice and patience when you’re refining the initial edge, this technique is an effective method to replace white or nearly white backgrounds.
After working along with the provided examples, try all of these techniques on your own images to learn and develop fine-detail masking skills.
Masking Fine Detail with Brushes
In all honesty, sometimes when we’re masking hair we just want to rip out our hair and cry uncle! No matter which technique or Photoshop feature we use—dodging and burning, channel and layer masking, Image Calculations, Refine Edge—the masked edges still don’t look right. To add back the hint or should we say hair of realism, we use a Scatter brush to paint in delicate wisps of hair, fur, cloth, carpet, or anything that has a fine or wispy edge that needs to be re-created.
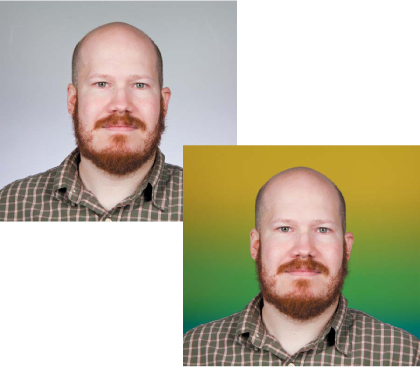
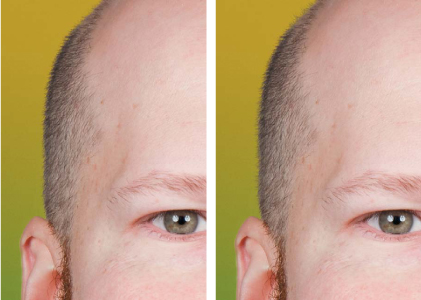
In the example in FIGURE 11.64, Katrin wanted to replace the bland white background with a colorful gradient. She used the High Fidelity Compositing technique explained previously but wasn’t satisfied with the final results. To add back delicate hairs and other fine detail, she used a Scatter brush as explained in the following exercise to add faux hair, which looks very real (FIGURE 11.65).
© KE
Figure 11.64. Original and replaced background.
Figure 11.65. After replacing the background, the hair seemed unnatural (left). After painting in a new edge, the hair looks more organic (right).
![]() ch11_chris.jpg
ch11_chris.jpg
To get a feel for how the Scatter brush settings work, start with an empty Photoshop canvas and use it as a scratch pad before working on an important project.
1. After replacing the white background with the High Fidelity Compositing technique, add a new layer to the top of the layer stack and name it Hair.
2. To protect the existing head from being affected by faux hair, Katrin Option-dragged (Alt-dragged) the layer mask from the original layer up to the hair layer.
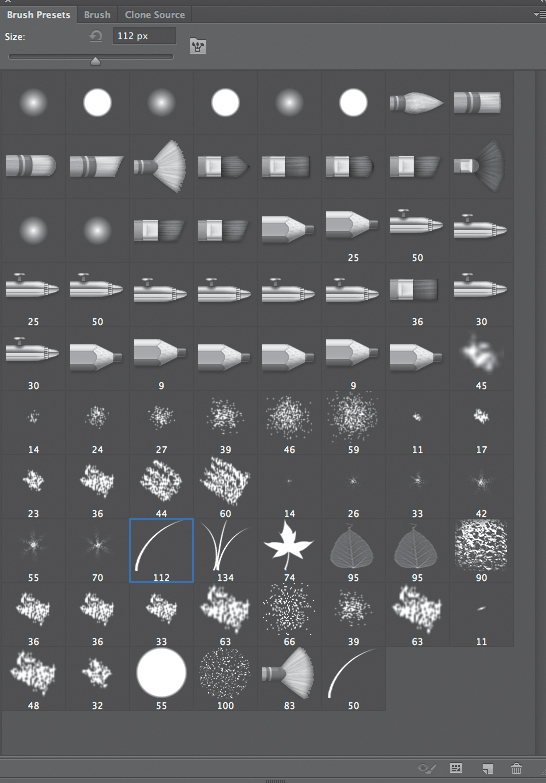
3. To create the “hair brush,” Katrin started with the Dune Grass brush in the default brush panel (FIGURE 11.66).
Figure 11.66. Start with the default Dune Grass brush.
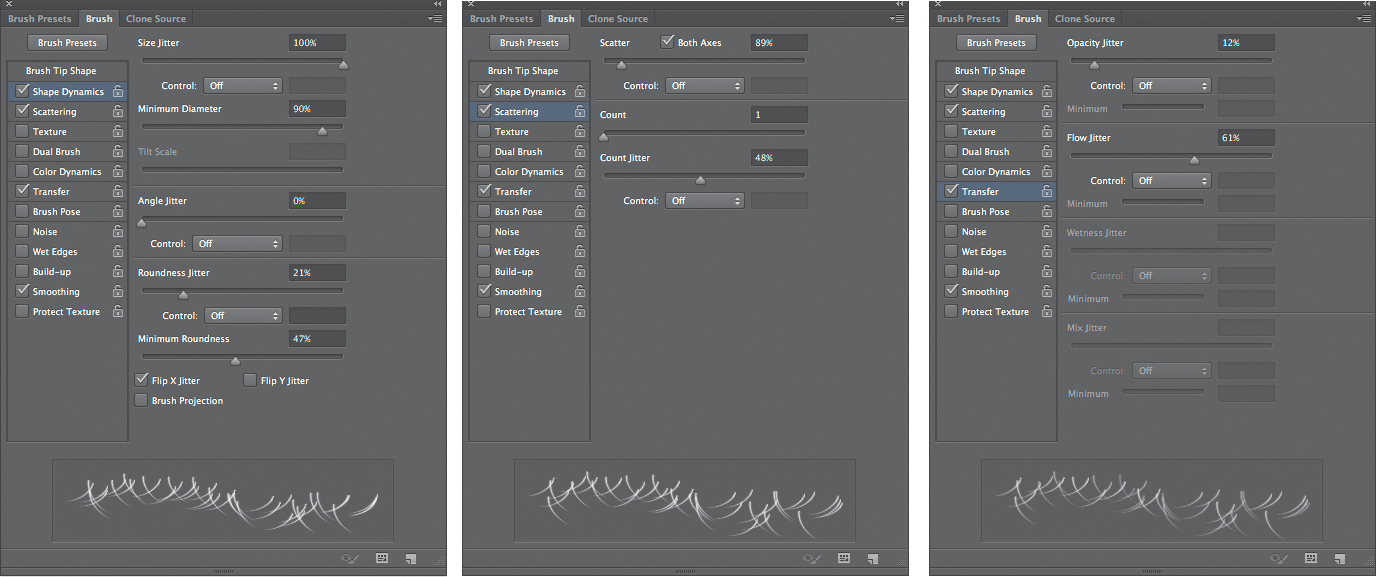
4. By adjusting the Shape Dynamics, Scattering, and Transfer (FIGURE 11.67), she spread the hairs out and randomized the angle and opacity. Building a good Scatter brush involves experimentation and several passes of adjusting the sliders in each panel.
Figure 11.67. Adjust Shape Dynamics, Scattering, and Transfer to randomize the brush.
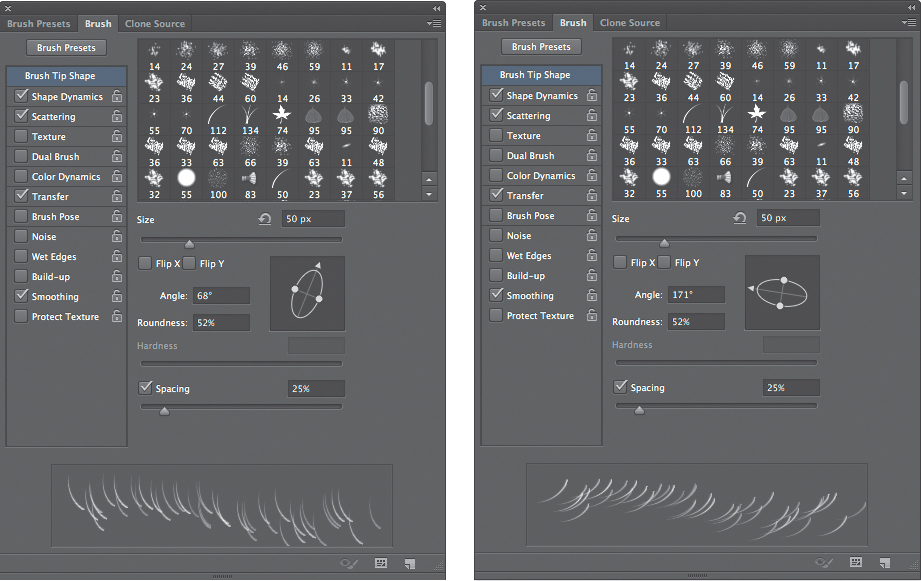
5. To match the required angle—for example, the hair needs to grow out of his head differently on the left and right side of his head—Katrin adjusted the angle of the flow in the Brush Tip Shape panel (FIGURE 11.68).
Figure 11.68. Rotate the brush so that the hairs grow out of the subject properly.
6. To use the brush, she Option-clicked (Alt-clicked) on his hair to sample the actual hair color and then painted/daubed in fake hair (FIGURE 11.69), which looks pretty good!
Figure 11.69. Control the angle via the Brush Tip Shape panel.
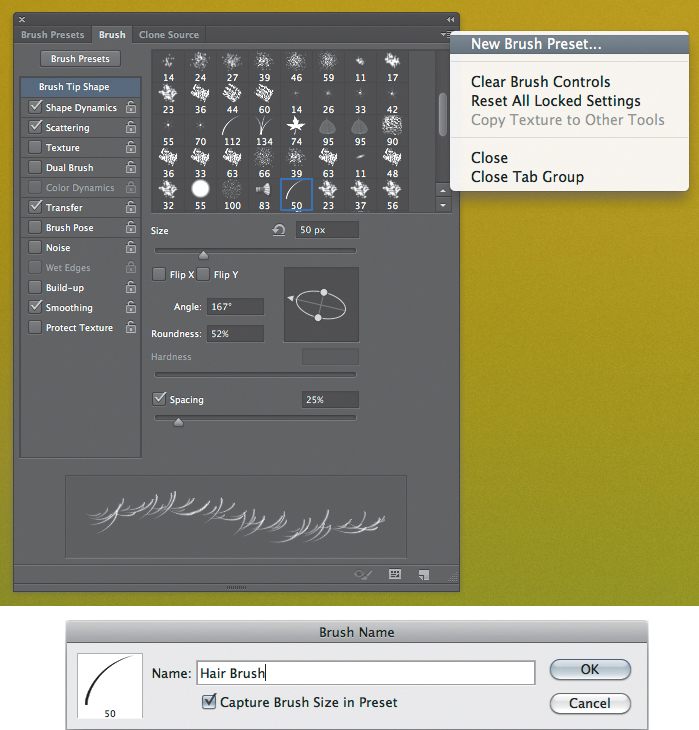
7. Once you’ve built a brush that works for you, be sure to save it as a Brush Preset (FIGURE 11.70). Granted, it might not be the perfect brush for all types of hair, but it will serve as a starting point for the next hair treatment.
Figure 11.70. Save the Scatter brush for future use.
8. To randomize the hair edges a bit more, use a small, soft-edged Eraser to trim away some of the added hair. Yes, this is most likely the only time Katrin ever uses the Eraser tool!
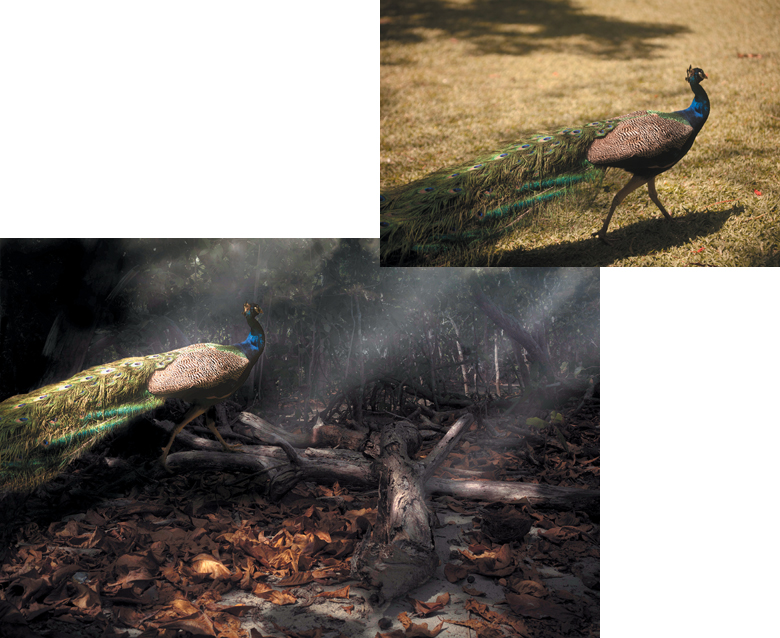
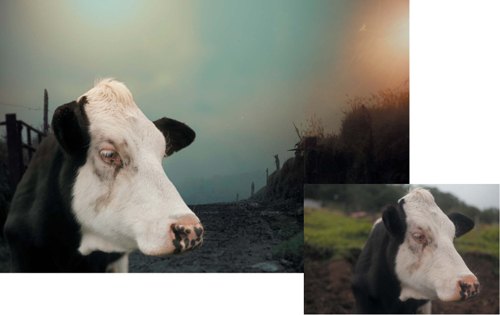
Rebeca Saborio used this technique very successfully to refine the images for her 2012 Masters in Digital Photography thesis project “Voiceless,” which addresses the state of domesticated animals in a world abandoned by humankind (FIGURE 11.71 and FIGURE 11.72).
© Rebeca Saborio
Figure 11.71. Original peacock and final artwork.
© Rebeca Saborio
Figure 11.72. Original cow and final artwork.
Greenscreen and Bluescreen Techniques
A local TV weather forecaster, Forrest Gump shaking President Kennedy’s hand, and the hordes of warriors in Lord of the Rings: The Return of the King all have one thing in common: Not one of these examples exists as we see them on TV or in the movies, although we like to believe they do.
The weather forecaster stands in front of a pure blue-screen, which is then chroma keyed out of the scene and replaced with the weather map, making it look as if the weather forecaster is interacting with the image. Have you ever noticed how weather forecasters constantly look off camera as they’re pointing at the map? They are actually watching themselves on a monitor to see where they’re pointing.
For the Lord of the Rings trilogy, Weta Digital (www.wetadigital.com), the special effects production house in New Zealand that created the innumerable computer-generated and computer-enhanced shots, built a huge outdoor bluescreen backdrop. To create the thousands of warrior soldiers, five rows of soldiers in full costume marched in front of the bluescreen. After one take, the five rows were mixed up and moved farther away from the camera and then they would march by again. This was repeated a number of times. The digital compositing department pulled masks (also referred to as mattes) based on the blue channel, and the receding rows of masked soldiers were composited together to create an unbelievably large army.
Because blue is rarely found in skin tones, it’s the default color used for bluescreen studio backdrops. Green is being used more and more, because green paint reflects more light than blue. In addition, video and digital cameras capture the best detail and luminance information in the green channel. The drawback to using either a bluescreen or a greenscreen is that the color can contaminate the subject with color spill, which is undesired, because blue or green tinges on people don’t look healthy or natural.
Bluescreen and Greenscreen Photography
Here are a few issues to consider when you’re photographing using a bluescreen or greenscreen:
• The background should be evenly illuminated to create an even surface from which to pull the key, the digital video artist term for making the mask.
• The lights that illuminate the background should be behind the subject.
• Keep the subject as reasonably far away from the backdrop as possible to reduce unwanted color spill.
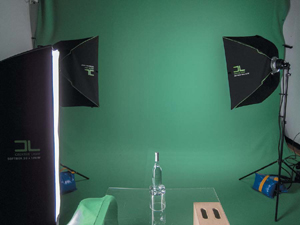
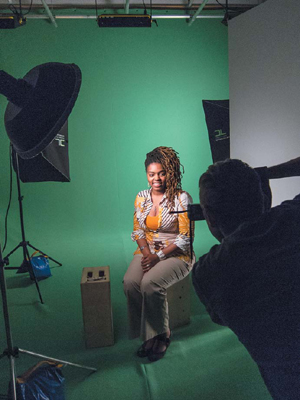
• Light your subject with a dedicated set of lights. You can light the subject as dramatically as you normally would in a photography studio. Many people think that lighting for bluescreen or greenscreen photography needs to be very flat—that is true for the backdrop, but not for the subject. As you can see in FIGURE 11.73, the background is lit with two studio strobe softboxes and the subject was lit with a beauty dish and a white reflector (FIGURE 11.74).
© KE
Figure 11.73. Light the greenscreen backdrop evenly.
© KE
Figure 11.74. Light the subject as you normally would.
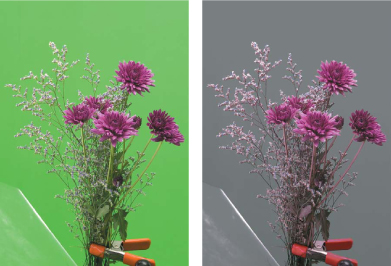
• Make sure your subjects aren’t wearing the same color as the backdrop, or else they’ll suddenly have holes where their clothes used to be when the background color is dropped out. For example, a green blouse is masked out along with the green backdrop. Or as you can see in FIGURE 11.75, the green in the flower stems has been removed, making the flowers look dead.
© KE
Figure 11.75. Avoid photographing green subjects against a greenscreen backdrop.
• You can build a greenscreen studio with bright-green seamless paper. Light the backdrop with two lights (preferably studio flash heads) on either side at a 45-degree angle to the seamless paper. Use Rosco #389 colored gels over each background light to intensify the green.
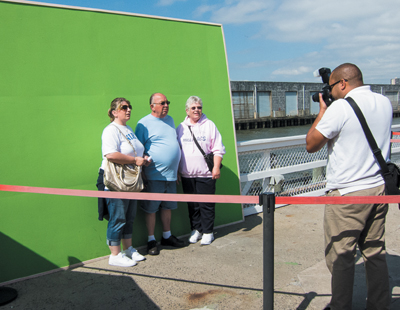
Professional photography suppliers sell bluescreen and greenscreen cloth backdrops, and in larger cities you can rent them for daily use. Many events and tourist attractions offer greenscreen photos that place the visitor into theme-based themes (FIGURE 11.76 and FIGURE 11.77).
© KE
Figure 11.76. Tourists being photographed on a greenscreen before boarding a Hudson River Cruise.
© KE
Figure 11.77. Upon returning from the cruise, visitors can purchase a variety of prints with different backgrounds.
Working with Digital Anarchy Primatte Chromakeyer
Greenscreen photography is a very useful tool for compositing artists and event and school photographers. The third-party plug-ins or programs available to do masking in conjunction with greenscreen photography do more than just pull a mask based on the background color: They also remove the offending color spill very well. Digital Anarchy Primatte Chromakeyer and Nova Design Cinematte are available for both Mac and Windows platforms. Complete backdrop and lighting kits are available for approximately $250–$450 by Westcott and Impact. In the following section, we use Primatte 5.1 (visit https://digitalanarchy.com/demos/psd_mac.html#d3 to download a trial version of Primatte) to pull amazing masks that maintain translucency and detail.
To work along, download the trial version of Primatte 5.1, which has all of the release version features but places a grid pattern over the final image.
![]() ch11_greenbottle.jpg © Marko Kovacevic
ch11_greenbottle.jpg © Marko Kovacevic
ch11_iceberg.jpg © KE
1. Drag the object to be masked (in this case, the bottle) on top of the new background image (iceberg).
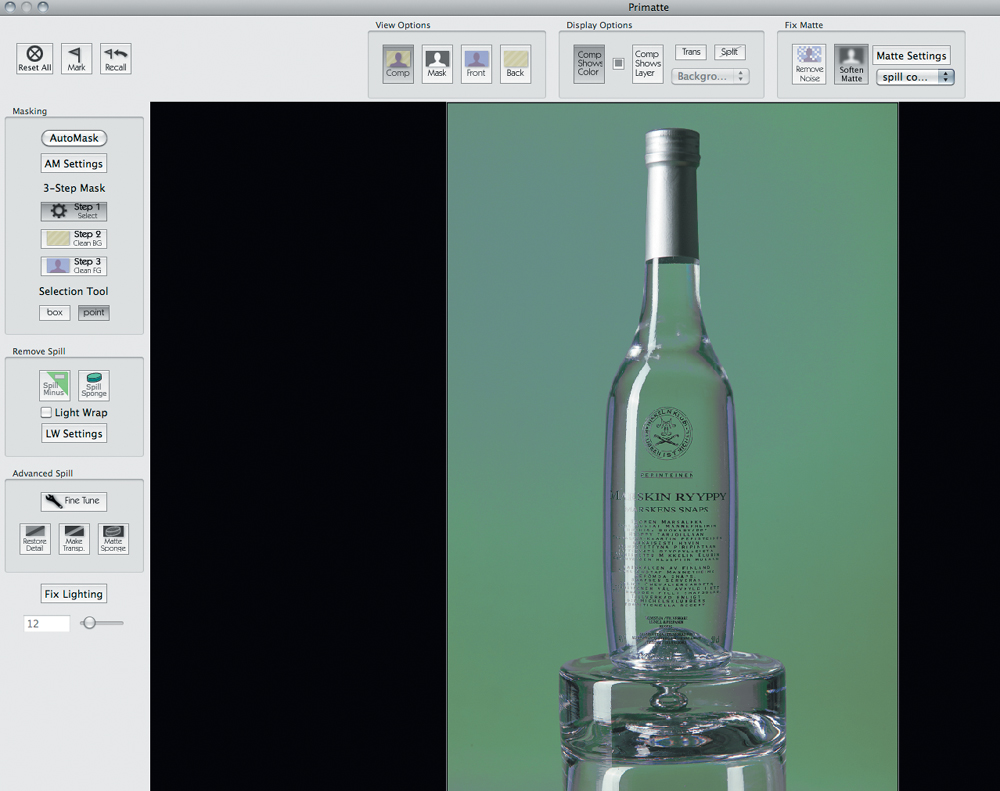
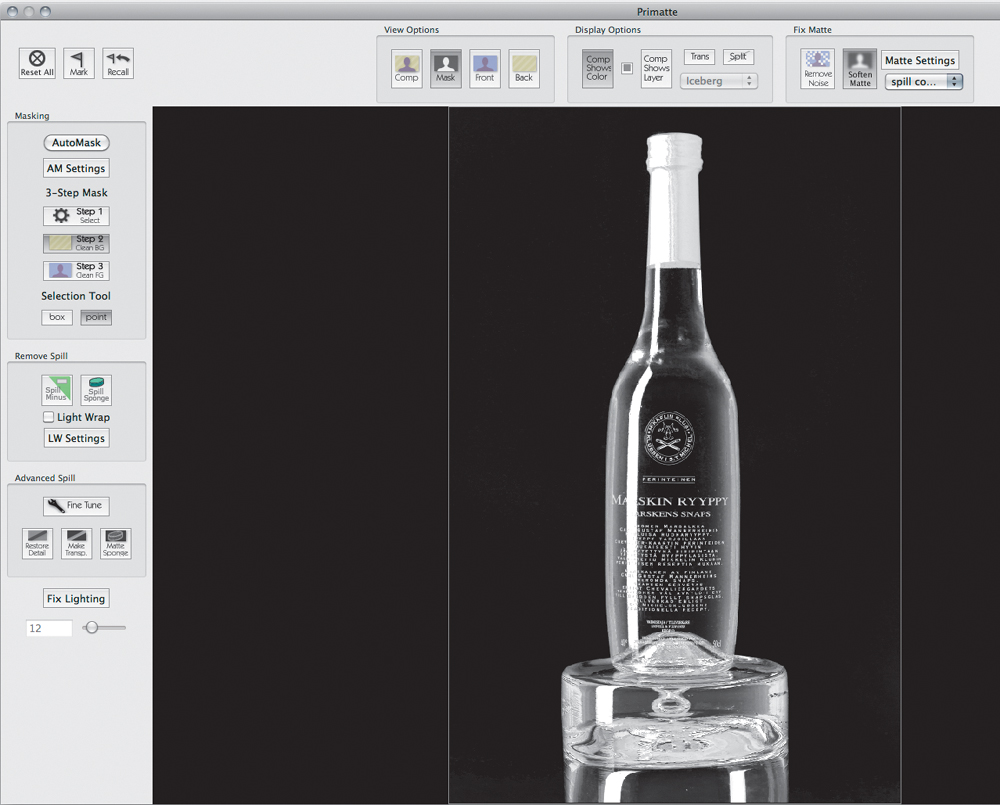
2. Choose Filter > Digital Anarchy > Primatte to enter the interface (FIGURE 11.78).
Figure 11.78. The initial Primatte interface.
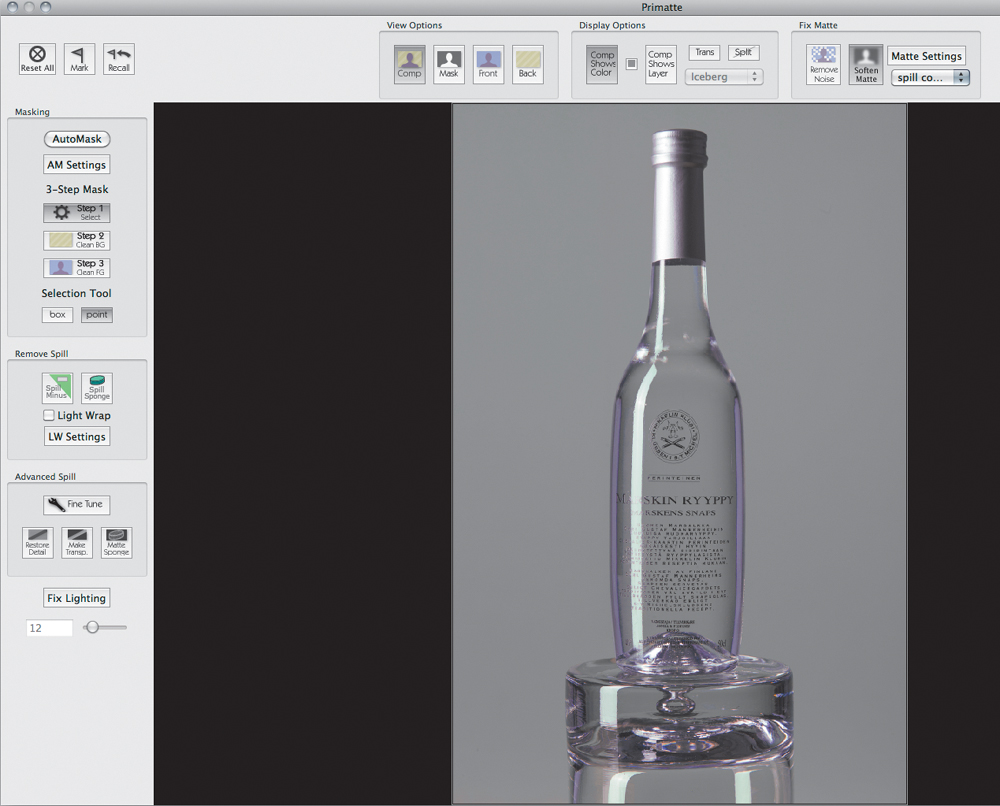
3. Start with Automask options on the left. Use the Step 1: Select button to circle a sample of the green background color. In a few seconds you’ll see the first rendition of the image extraction (FIGURE 11.79).
Figure 11.79. The automatic settings do a fantastic job.
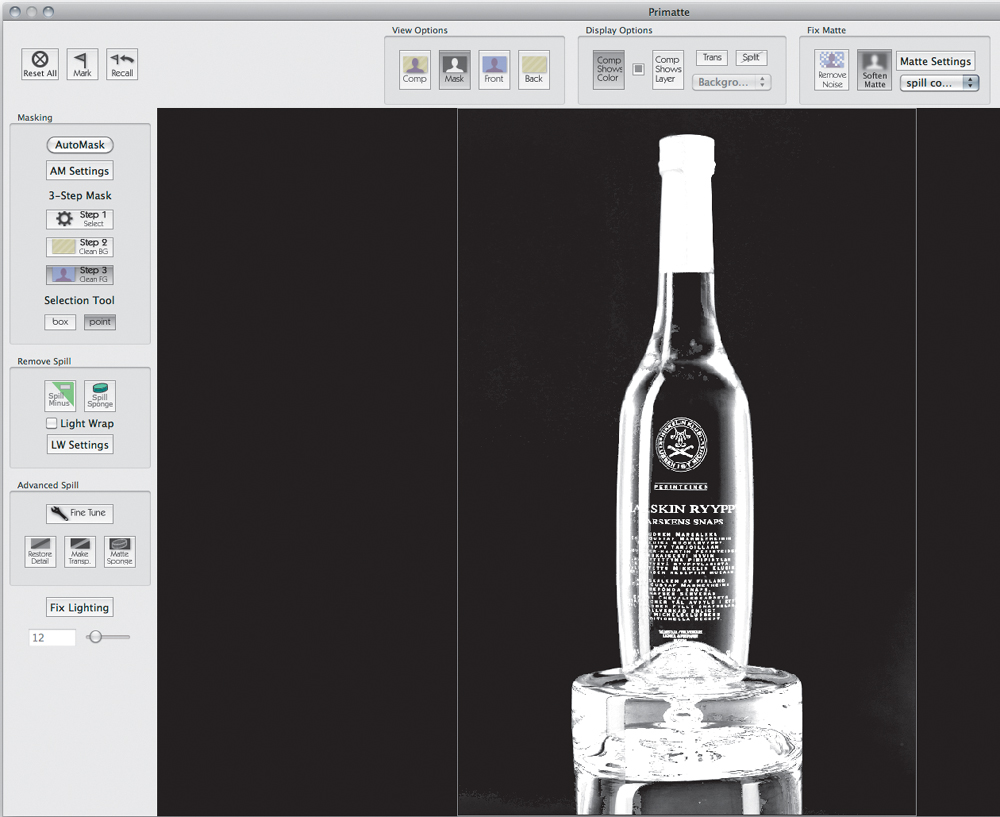
4. View the mask to look for artifacts and density by clicking the Mask button, and use the Step 2: Clean BG (background) tool by drawing from bottom to top on the background to add density to the mask, which yields a cleaner extraction (FIGURE 11.80).
Figure 11.80. View the extraction in black and white to judge mask density and quality.
5. Use the Step 3: Clean FG (foreground) tool and draw over the bottle cap to make it white (FIGURE 11.81).
Figure 11.81. Clean the bottle cap.
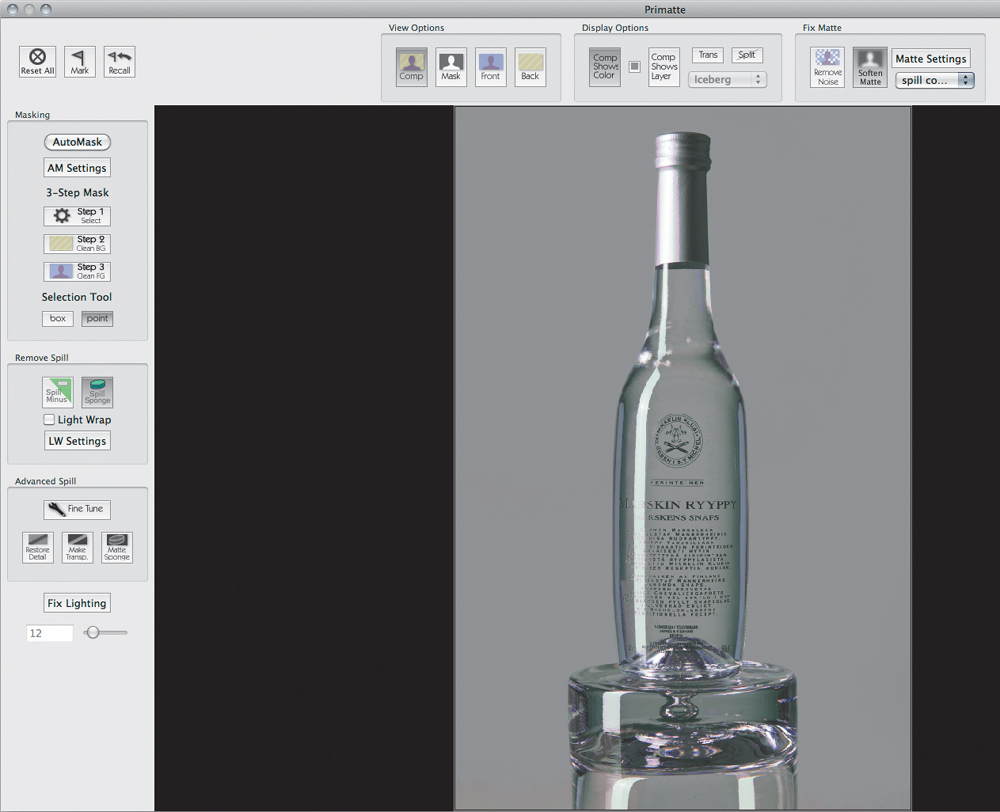
6. Return to Comp view and use the Spill Sponge to paint over any remaining green tints (FIGURE 11.82).
Figure 11.82. Remove green spill with the Sponge tool.
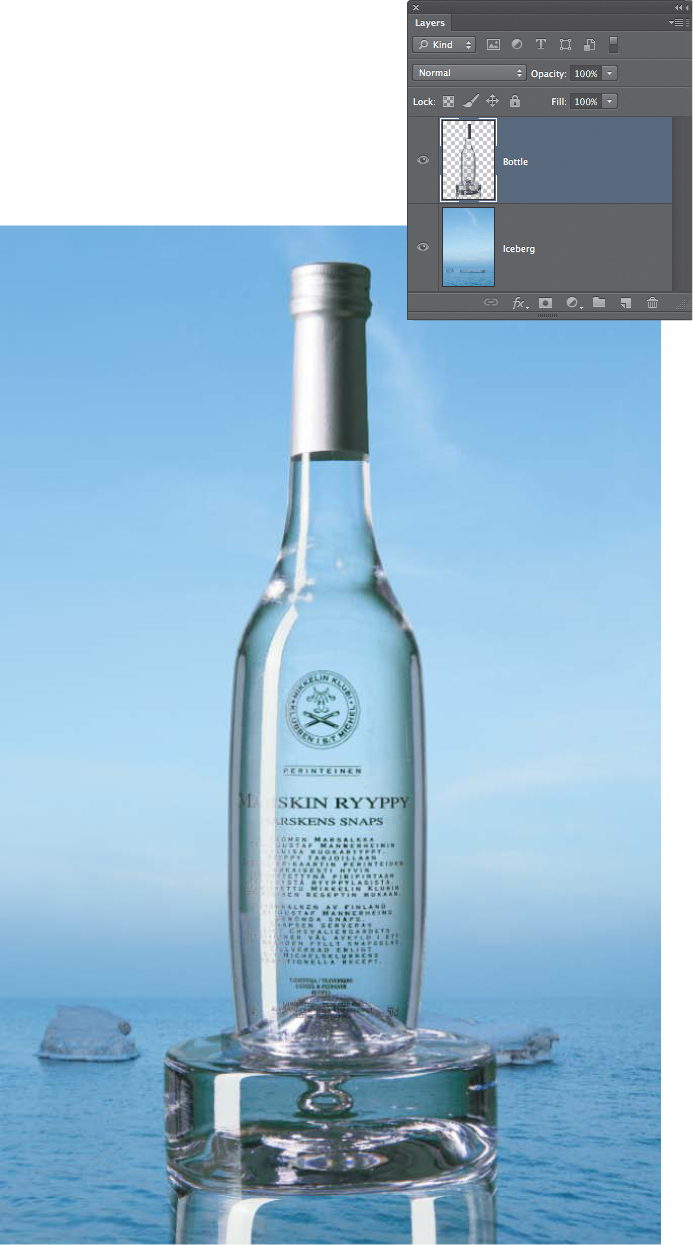
Greenscreen software does more than pull a mask: It speeds up your work and is a wise investment if you shoot and isolate a lot of translucent or fine-edged subjects (FIGURE 11.83).
© Marko Kovacevic
Figure 11.83. Final results.
Greenscreen with Adobe Camera Raw
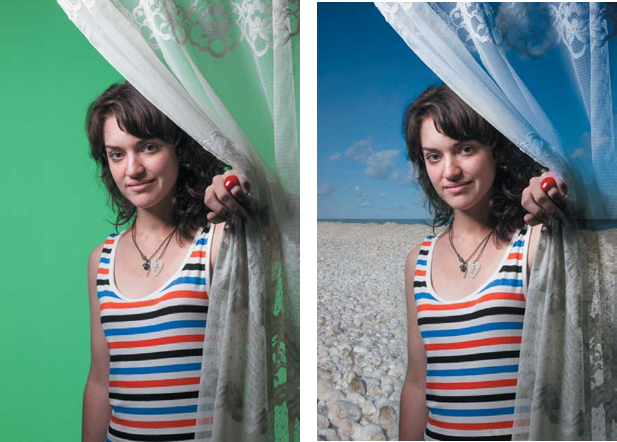
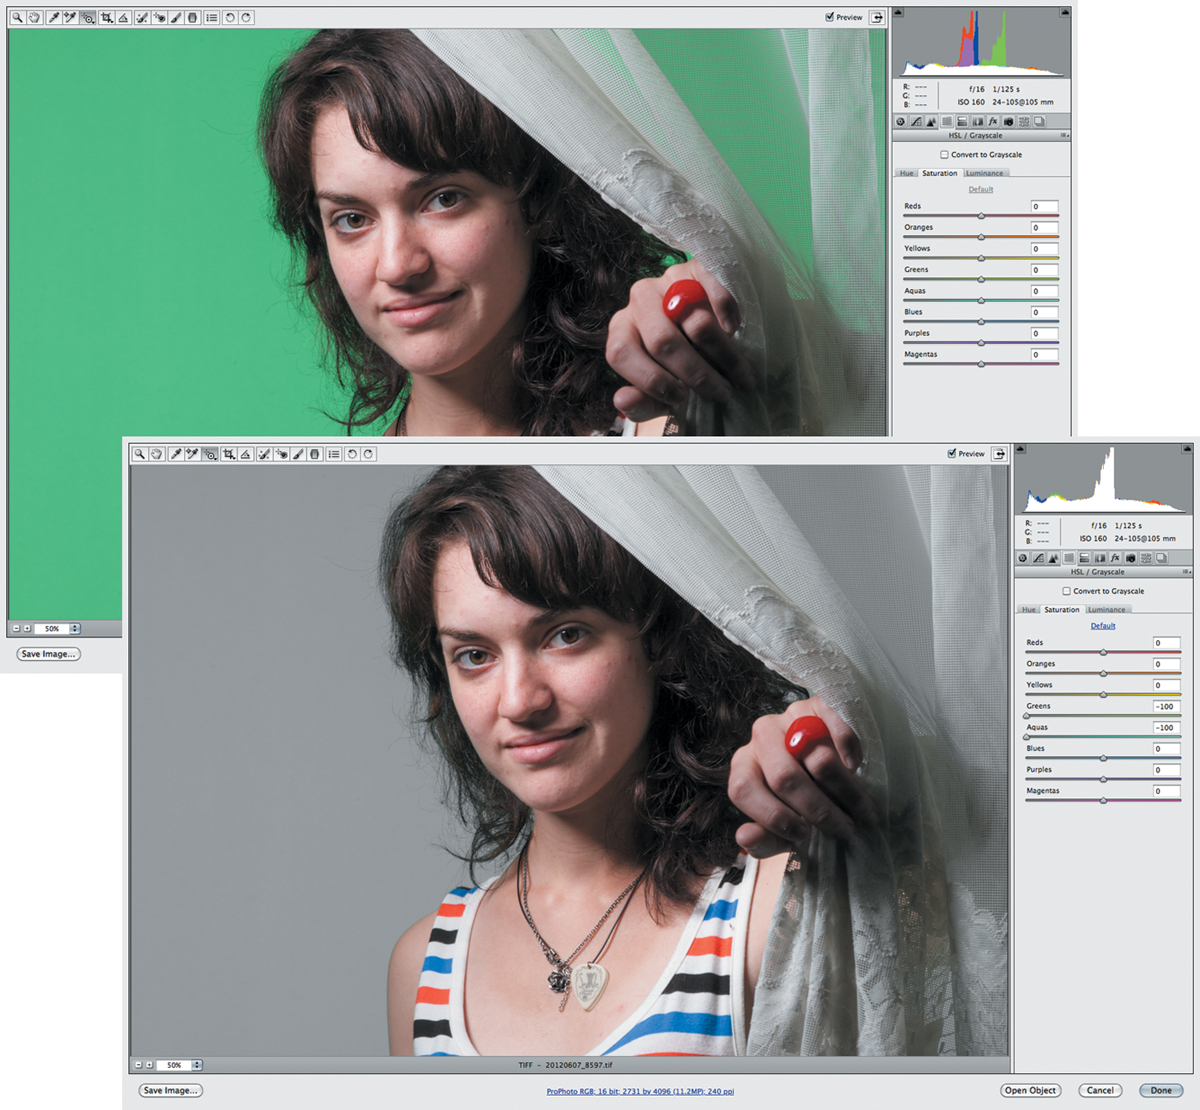
Shooting on a greenscreen background is a great way to composite images, even if you don’t use a third-party plug-in or application (FIGURE 11.84). Katrin learned the following technique from Kevin Halliburton, owner of Ice Imaging, a custom, illustrative photography studio in Abilene, Texas. This technique allowed her to place a student into an icy scene very quickly while maintaining the translucency of the lace curtain.
© Marko Kovacevic
Figure 11.84. A quick and easy faux greenscreen composite.
![]() ch11_greengirl.jpg © Marko Kovacevic
ch11_greengirl.jpg © Marko Kovacevic
ch11_iceshore.jpg © KE
1. Open the file in Adobe Camera Raw or Adobe Lightroom and process the image as you normally would, adjusting exposure, contrast, sharpening, lens correction, and so on.
To open a JPEG or TIFF file in Adobe Camera Raw, start in Adobe Bridge, click to highlight the file, and press Command+R (Ctrl+R).
2. Before exiting Adobe Camera Raw, click the HSL panel and use the Target Adjustment tool (Command+Option+Shift+S [Ctrl+Alt+Shift+S]) to thoroughly desaturate the green background by clicking on the green backdrop and dragging down (FIGURE 11.85), which creates a neutral gray background. Click OK to apply the change and exit Adobe Camera Raw.
Figure 11.85. Desaturate the greenscreen background in Adobe Camera Raw to create a perfectly neutral background.
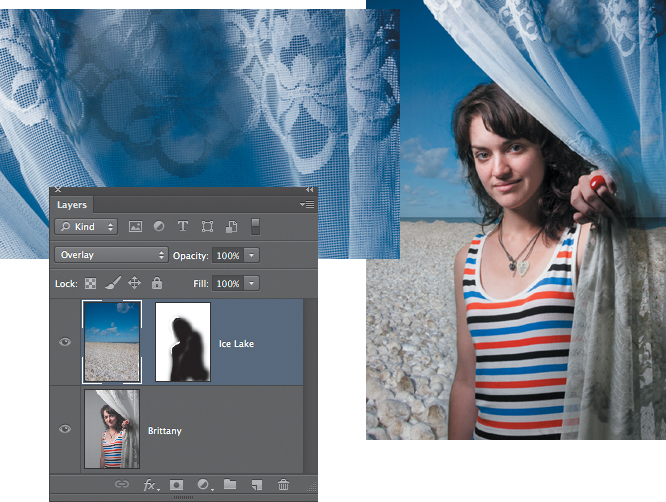
3. Use the Overlay blending mode technique (previously explained in this chapter) to replace the backdrop (FIGURE 11.86).
Figure 11.86. The final composite and a detail of the curtain, which would be very challenging to mask out with other techniques.
As Kevin explained on a retouch forum, “When I shoot on gray, it’s more difficult to isolate and alter the brightness of the background to match the scene, so I have to shoot on the correct tone of gray (light to dark, depending on the luminance of the scene I’m compositing). With a greenscreen I can easily desaturate the isolated chroma green and control its brightness with the Luminance slider to perfectly match the brightness of the background I’m compositing into the image, even if I change my mind later.”
“Behind every image is the joy of creating. My art is my reality.”
—Mark Beckelman, 1956–2011
Masking Smoke
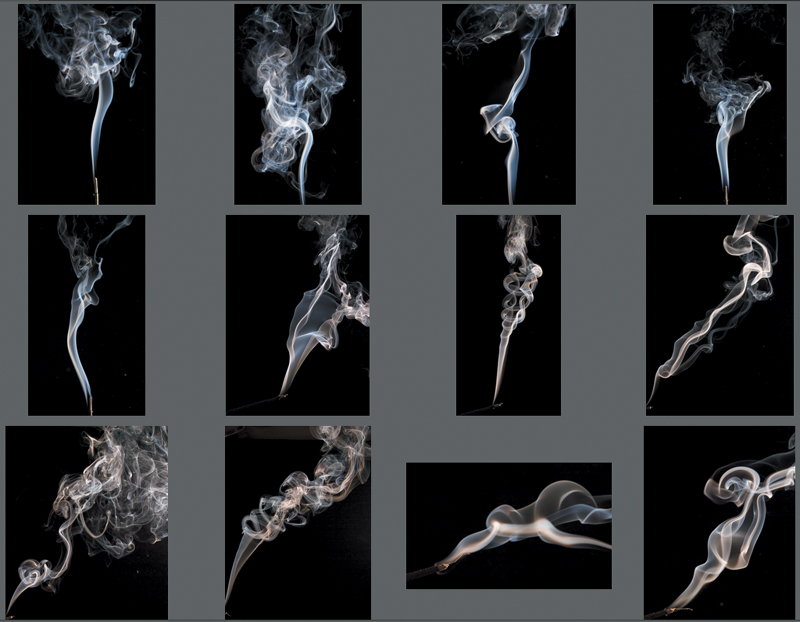
The secret to masking transparency is to plan the shoot! Smoke is a seductive and appealing subject that is practically impossible to mask with standard selection techniques. To photograph smoke, use a nonreflective backdrop (such as black velvet), sidelight the smoke to bring out its swirls, and set the camera to Manual focus. In our shoot, we shot at f/16 with studio strobes to catch the many whirls of the incense (FIGURE 11.91).
Figure 11.91. Thumbnails from the smoke shoot.
![]() ch11_smoke.jpg © Marko Kovacevic
ch11_smoke.jpg © Marko Kovacevic
ch11_burntwood.jpg © KE
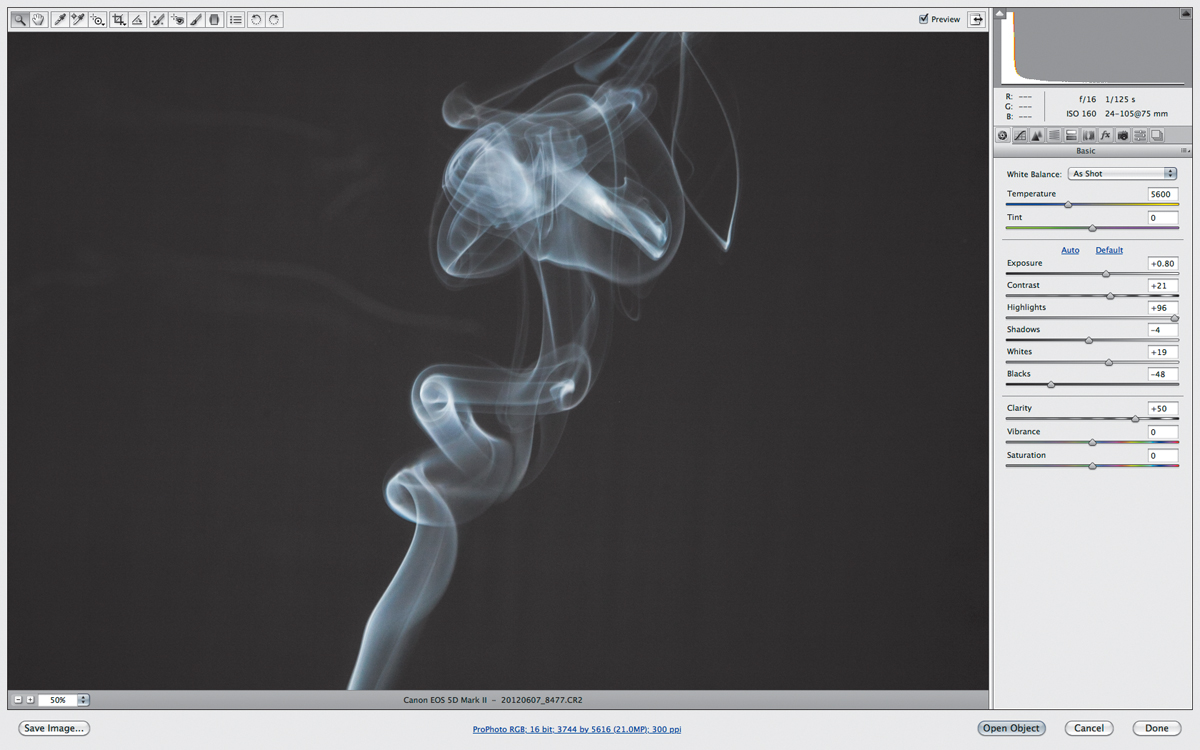
1. In Adobe Camera Raw or Lightroom, process the image to brighten the highlights and deepen the blacks. Increase the Contrast and Clarity sliders to add definition (FIGURE 11.92). Note that Katrin has already processed the tutorial web file for you.
Figure 11.92. Process the smoke images to enhance the highlights and deepen the shadows.
2. Open the image and drag the smoke image to a new background.
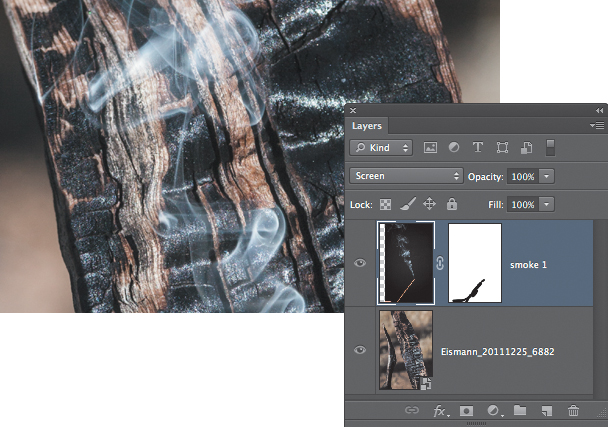
3. Change the layer blending mode to Screen to conceal the black background. Add a layer mask and paint with black to block out the stick of incense (FIGURE 11.93). Duplicating the smoke layer strengthens the smoke.
Figure 11.93. The Screen blending mode conceals the black background.
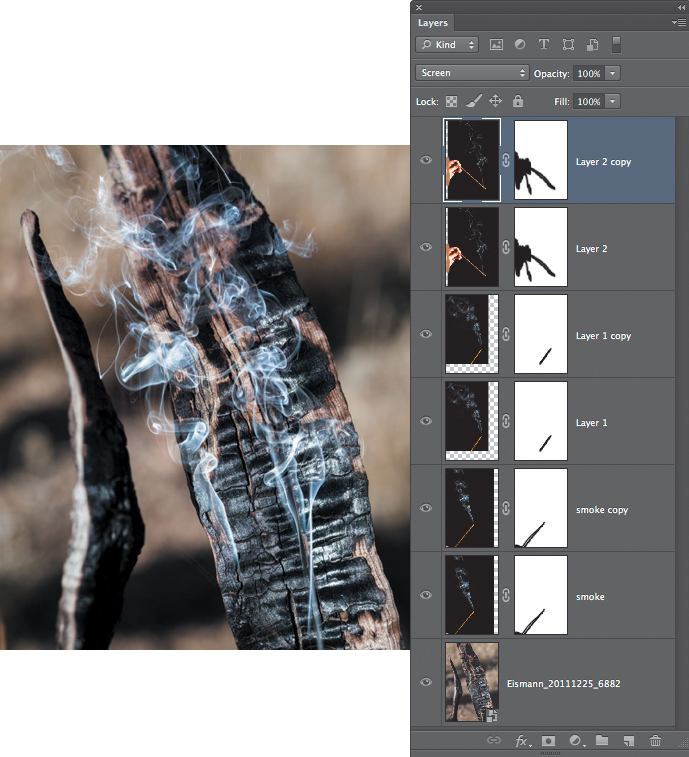
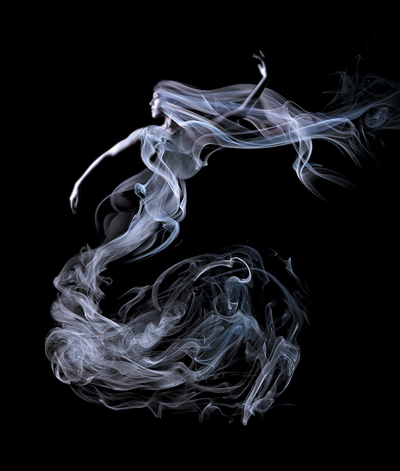
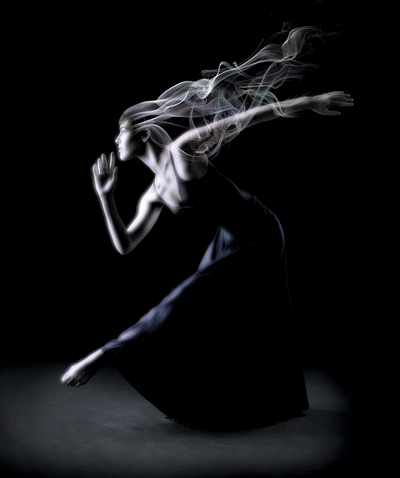
Katrin practiced compositing smoke by adding a number of different smoke images to the charred wood (FIGURE 11.94), and Mark Beckelman created even more inspiring images with smoke and dancers (FIGURE 11.95 and FIGURE 11.96).
Figure 11.94. Duplicating the smoke layers strengthens the effect.
© Mark Beckelman
Figure 11.95. “Smoke Dancer 1.”
© Mark Beckelman
Figure 11.96. “Smoke Dancer 2.”
Closing Thoughts
If you’ve made it this far without ripping out your own hair, you are well on your way to being a true Photoshop meister. Just keep in mind that each image you toil over is an opportunity to perfect your own masking techniques, which can only serve you better as you tackle your next image. But remember that when you’re selecting hair, a one-stop button that does a perfect job does not exist. A high-quality mask is always one that you’ve invested time and care into. Believe us; it’s worth it—the better the mask in the first place, the less retouching you’ll do later on in the compositing process.

