Chapter 10. The Power of Channel Masking

Ask two New Yorkers how to get to Central Park and you’ll probably get four different answers. For a first-time tourist, the many options—go on foot, take the subway, hop a bus, or hail an uptown cab—can quickly become confusing and overwhelming. Likewise, working with channel masks for the first time may feel as disorienting as the deepest, darkest subway system you can imagine—especially when all you want to do is get back to your hotel room—I mean, create an image. One reason for the confusion is that just as you can get around New York City via many different kinds of transportation, you can also achieve a particular result in Photoshop many different ways.
This chapter is your guide to the very foundations of image structure and masking. It will help you understand the different approaches you can take to Photoshop masking by learning about the following topics:
• Types of image channels
• Types of Photoshop masks
• The five steps to successful masking
• Applying image and luminance masking techniques
• Refining masks and composites
As selection tools improve, some people have forgotten or turned away from the power of channel masking. But that is like coming to New York and only seeing Times Square. There’s a lot more to New York City, and there’s a lot more you can do once you understand the power of channel masking.
Let’s go explore!
Types of Image Channels
Every photographic image is made up of image channels—one for grayscale images, three for RGB (red, green, blue) and Lab (luminance and two color channels), and four for CMYK (cyan, magenta, yellow, and black)—and can support 52–55 alpha channels, as listed in TABLE 10.1. Images in grayscale mode can only be black and white, whereas color images generally use RGB, CMYK, or Lab Color mode.
Table 10.1. Image and Alpha Channels
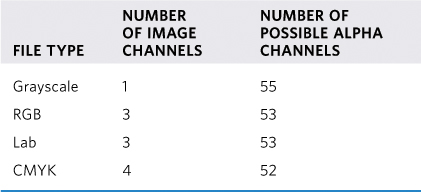
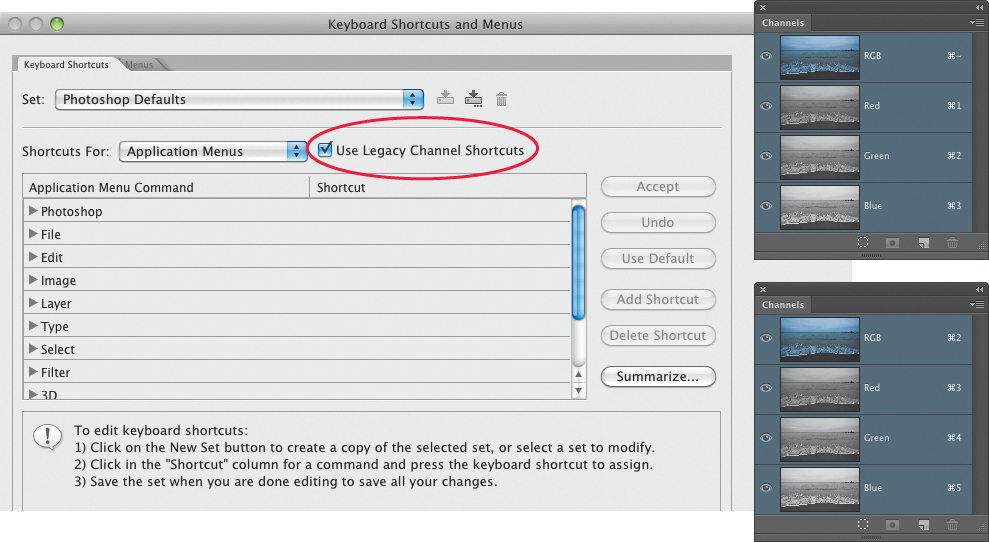
The image channels create the picture you see when you open a file, whereas alpha channels are added as needed and reside behind the image channels. Additionally, alpha channels do not change the look of the image and are inert until you activate them, that is, load the alpha mask as an active selection as addressed in Chapter 7, “The Essential Select Menu,” and done throughout this chapter. Alpha channels are not visible unless you click on their name in the Channels panel or press Command+[alpha-channel number] (Ctrl+[alpha-channel number up to 9]). Press Command+2 (Ctrl+2) to return to viewing the image. If you’ve worked with Photoshop for many years and prefer the legacy channel navigation keyboard strokes (as Katrin does), choose Window > Workspace > Keyboard & Menus and select Use Legacy Channel Shortcuts so that image channels start with number 1 and pressing Command+~ (Ctrl+~) returns to the full image. The command keys are compared in FIGURE 10.1. But more important, to be efficient, learn to navigate to and between channels via keystrokes versus arm-numbing mouse clicks.
Figure 10.1. Setting and learning the Channel Shortcuts preferences to be more efficient.
Inspect/view the individual image channels to identify the channel to serve as the start of a fine-edged alpha channel. The best image channel to create an alpha channel with has strong contrast differentiation between the subject and the background, and is sharp and noise free.
As photographers, we would be remiss to only work in or take advantage of the standard RGB color mode, because the Lab and CMYK image channels may contain useful image information when facing a gnarly color correction, sharpening, or masking challenge. Please refer to Dan Margulis’s book Photoshop LAB Color: The Canyon Conundrum and Other Adventures in the Most Powerful Colorspace (Peachpit Press, 2005) and Lee Varis’s online tutorials 10 Channel Workflow (www.varis.com/video-tutorials) to learn more about using image channels to master a wide variety of imaging challenges. All three of us authors create alpha channels from image channels, as shown throughout this chapter and in Chapter 11, “Fine-edged Selections,” to solve the gnarliest masking challenges.
Types of Photoshop Masks
All types of masks serve the same purpose—controlling which image areas you want to reveal or affect and which image areas you want to conceal or not affect. The two most common masks are the layer and the channel mask, but many more features in Photoshop can act as masks, including layer opacity, layer blending modes, layer clipping, and the advanced blending options. Although some of them may not fit the classic definition of a mask, any Photoshop control that reveals, conceals, or influences where an image effect takes place is just another type of mask. Most important, working with layer and channel masks lets you create fine-edged selections and combine images creatively and nondestructively, which encourages greater experimentation and discovery.
The Eraser tool can also reveal or conceal image information, but it does so destructively and permanently. The Eraser tool is a shortcut to regret, because once the information is deleted, it is lost forever.
The Masking Decoder Ring
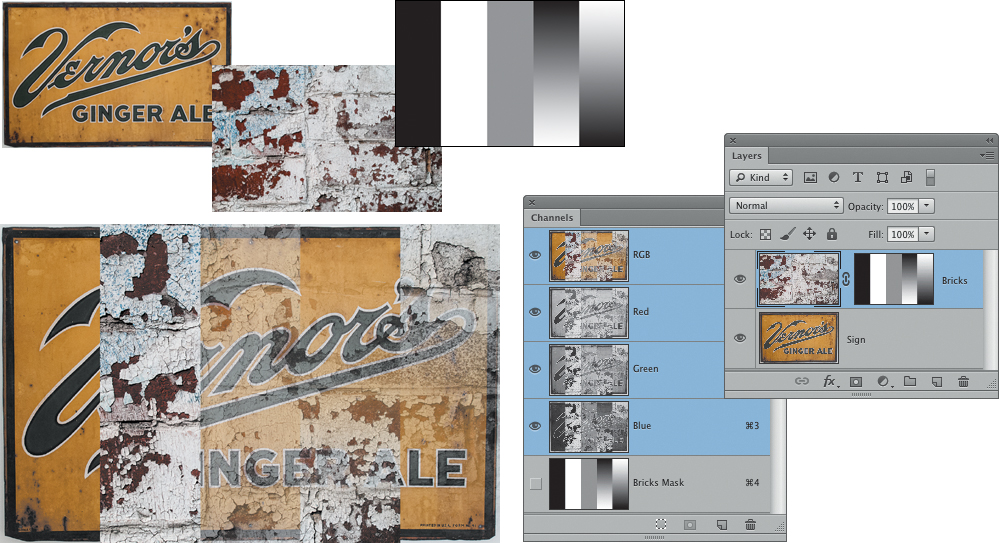
Photoshop takes many different approaches to masking—from the straightforward active selection to the more involved alpha mask. Alpha masking teaches that “white is active and black is inactive,” which translates to “white reveals and black conceals.” In other words, wherever you want to see an image or apply an effect, the mask needs to be white; wherever you want to hide an image or effect, the mask needs to be black, as illustrated in FIGURE 10.2. Shades of gray allow more or less image to show, with darker shades of gray hiding more than the lighter shades of gray.
© KE
Figure 10.2. The two source images and the resulting image with the layer mask and channel mask that control how the images blend together.
Working with Alpha Channels
Adding alpha channels increases file size, but because most alpha channels entail large areas of black or white, alpha channels are more efficient than standard image channels, which contain many, many shades of gray. Depending upon their complexity—from a simple geometric shape to the more complex fine-detail masks—each alpha channel can add between 10 percent and 25 percent to the file size. Although this may still seem like a significant increase, the good news is that when you save and close the file, the channels are encoded very efficiently, and the file size increase is negligible.
When to Use Alpha Masks
With so many masking options to work with, choosing the best one may sometimes feel more like a toss of the die rather than a precise decision. In fact, because layers and layer masks work so well together, many people have (wrongfully) relegated alpha channels to the scrap bin of Photoshop history.
The three of us use layer masks every day—well at least every time we launch Photoshop. Seeing changes occur to the image as we work on the layer mask is essential in refining composites. But we also rely on alpha masks a great deal, especially when making complex selections. Use alpha masks in the following situations, which are addressed throughout this chapter and in Chapter 11:
• While making an involved selection, choose Select > Save Selection to save your selection in progress into an alpha channel. If you make a mistake, choose Select > Load Selection to reactivate the selection to the point you saved it as an alpha channel and continue working.
• After making an intricate selection, choose Select > Save Selection, especially if making the selection required a lot of time. You won’t have to redo the selection the next time you open the document.
• Often, building the best selection requires multiple steps, including painting, filtering, and combining a solution with a Pen tool path. When you’re working with the Image Calculations command, saving the primary steps as alpha channels is essential in building the final mask.
• When in the same image different tools or techniques are required to mask out dissimilar edge types, such as hard and fine-detailed edges.
• To build luminance masks to mask out hair and fine detail, and also to apply subtle, yet powerful digital darkroom effects as addressed later in this chapter in “Dimensional Shading.”
• To save even simple selections if you plan to reuse the selection more than once.
In essence, save the alpha channel whenever you’ve spent more than a few minutes making a selection or when you are building professional masks based on image information. It only takes a split second to save a selection as an alpha channel, whereas redoing a complex selection will certainly take a lot longer. We’ve never regretted having one mask too many. Not having them when we needed them always resulted in extra work of redoing a previously made but not saved selection.
Layer Masks vs. Alpha Masks
We’re often asked when it is appropriate to use a layer mask versus an alpha mask. To distinguish the two:
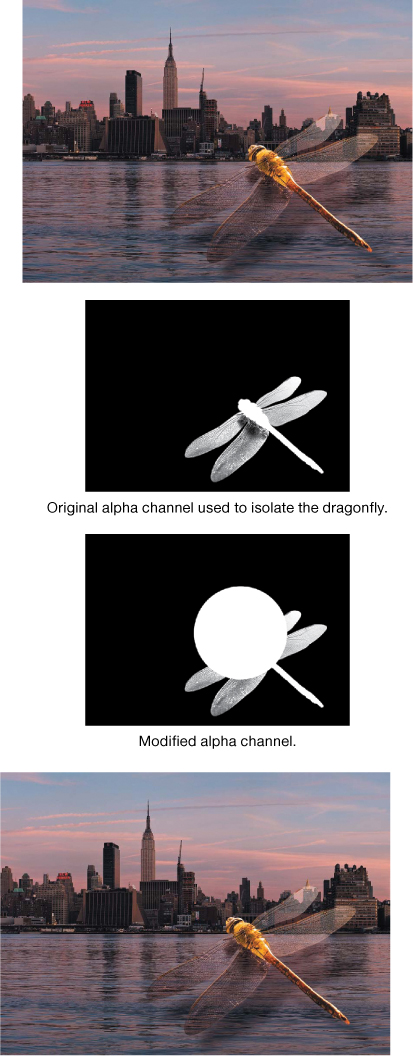
• Alpha masks are created and loaded before applying an image modification. Changing alpha masks after modifying the image has no effect on the image modification. For example, after creating the composite in FIGURE 10.3, Katrin filled an oval selection on the alpha mask with white, but this didn’t change the actual image at all.
© KE
Figure 10.3. Applying a change to an alpha channel after applying an effect does not impact the image.
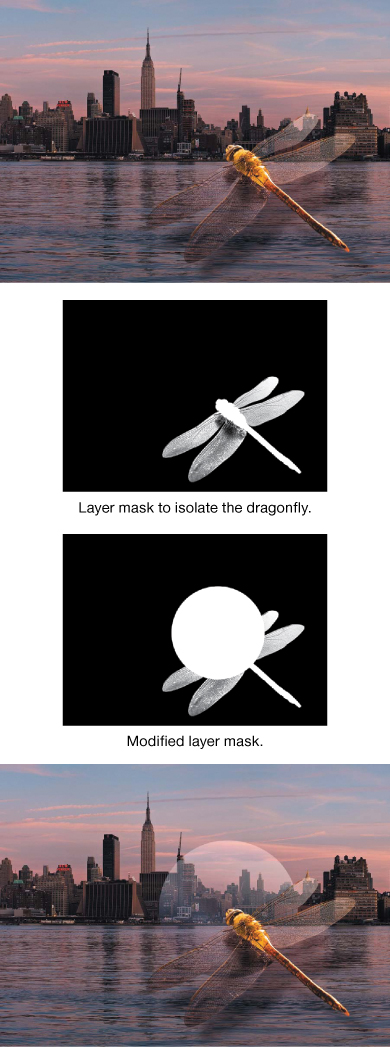
• Changing a layer mask after applying a change affects the image, as demonstrated in FIGURE 10.4. After making the composite, Katrin filled an oval selection on the layer mask with white, which most definitely did change the image.
Figure 10.4. Applying a change to a layer mask does impact or change the image.
• A layer mask correlates to a specific layer; whereas an alpha mask correlates to the entire image. Although you can Command-click (Ctrl-click) on a layer mask to activate it and use it on a different layer, its influence is primarily dedicated to the layer or layer group with which it is associated.
• In the Channels panel, alpha masks are in plain text and are always visible, whereas layer masks are in italics and only visible when their specific layer is active. On the other hand, many people prefer seeing the masks in the Layers panel, which once again shows that there are several ways to interact with Photoshop.
In a nutshell, alpha masks are created and used before you make a change to the image, and layer masks are used to interactively fine-tune the composite after a change or effect has been added. Use alpha masks to create complex selections before changing an image, and use layer masks to refine images and composites, as addressed in Chapter 9, “Layer Masks” and in Chapter 11, “Fine-edged Selections.”
Managing Alpha Masks
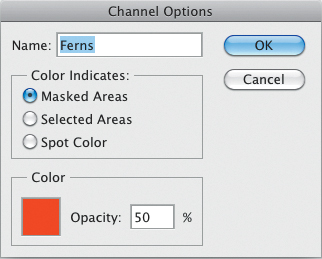
Because each file can support up to 55 channels, we recommend giving your alpha channels descriptive names so you can easily find what you’re looking for in the Channels panel. Double-click on the channel name to rename it or double-click the Alpha Channel icon to open the Channel Options dialog (FIGURE 10.5), which gives you the ability not only to rename the channel, but also to change mask indicators and behaviors.
Figure 10.5. Use Channel Options to rename and control alpha channel behavior.
Three options in the Color Indicates section of the dialog control how the mask behaves in relation to the masked areas:
• Masked Areas is the default in which active areas are white and inactive areas are black. We strongly recommend using this default behavior.
• Selected Areas reverses the standard behavior of the mask. If your alpha mask is acting exactly the opposite of how you expect, this is a good place to verify that Masked Areas is selected.
• Spot Color adds channels to print additional colors other than the standard CMYK process colors. For example, you might use it to print a logo or graphic in specific premixed ink. Each spot color requires its own plate on the press. To print an image with spot colors, you need to create spot channels to store the colors and save the file in EPS or PDF file format. Command-click (Ctrl-click) on the New Channel button to add a Spot channel.
The Color and Opacity settings in the dialog only determine the translucency when viewing the alpha channel through the image. It does not impact how the alpha channels function. We normally use the default red color, which harkens back to the days of working with red rubylith film, unless we need to mask out a red subject, which is when using a different contrast color is helpful.
Creating Alpha Channels
Let’s create alpha channels in three different ways:
• Starting with a selection
• Starting with an image channel
• Using Image Calculations
Learning when to use which method requires some experimentation, and often we’ll combine them to tease the best alpha mask out of an image. Always choose the easiest method with the least number of steps. It doesn’t make any sense to use many convoluted steps when easier methods or tools do just as good a job; faster is better. In other words, there is no shame in using Color Range or the Quick Selection tool. They are often the fastest and best place to start a complex selection.
Starting with a Selection
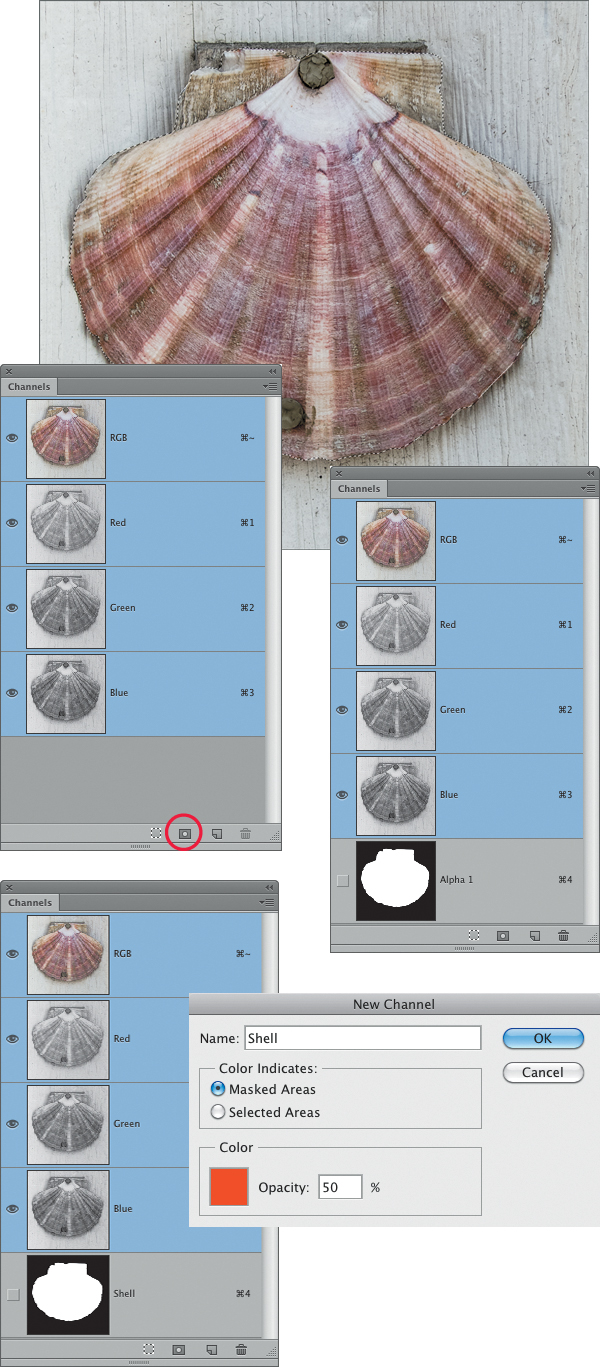
To save an active selection, open the Channels panel and click the New Channel button (FIGURE 10.6) or Option-click (Alt-click) on the New Channel button to open the New Channel dialog. See Chapter 7 for more information on saving active selections and activating masks.
© KE
Figure 10.6. Quickly save active selections via the Save Selection as Channel button. Option-clicking (Alt-clicking) on the Save Selection as Channel button allows you to simultaneously name the channel.
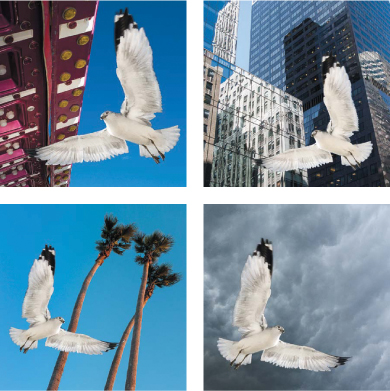
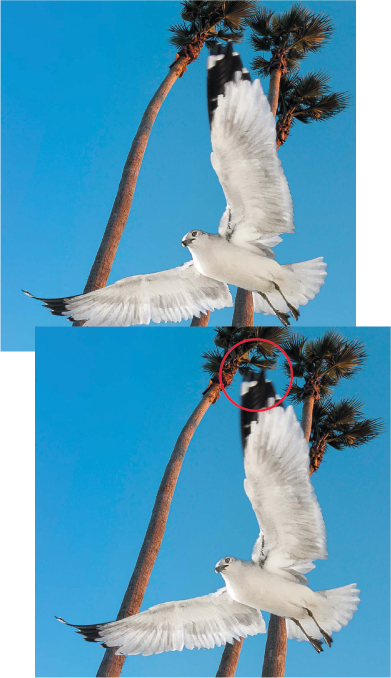
As homage to Alfred Hitchcock’s The Birds, Katrin took the “killer” seagull and placed it into a variety of backgrounds from her image library (FIGURE 10.7). By creating a high-quality initial alpha channel, she had more time to experiment with a variety of backgrounds.
© KE
Figure 10.7. Photoshop doodling is a great way to practice your skills, as Katrin did with this seagull!
Creating an alpha channel mask via a selection is summed up in three steps: make selection, save selection as channel, refine alpha channel and will work well on most images that are photographed on a simple background. To separate the seagull from the blue sky, Katrin used a combination of Color Range and channel masking as outlined in the following exercise.
![]() ch10_seagull.jpg
ch10_seagull.jpg
ch10_palmtrees.jpg
ch10_citybackground.jpg
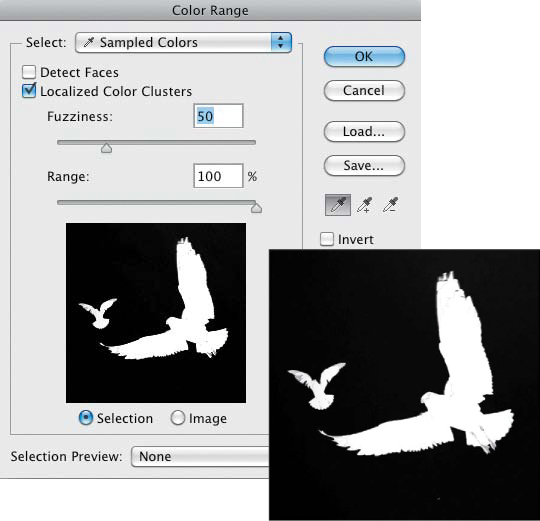
1. Choose Select > Color Range and drag across the larger seagull. Adjust the fuzziness so the subject, in this example the seagull, is white. Due to density variability in the sky and the dark markings on the seagull’s wings, the selection will not be perfect. This Color Range step completes 80 percent of the task without a lot of effort (FIGURE 10.8).
Figure 10.8. Use Color Range to create high-quality initial selections.
2. In the Channels panel, Option-click (Alt-click) on the Save Selection as Channel button (second from the left) and name it seagull. Choose Select > Deselect (Command+D) [Ctrl+D].
3. To fine-tune the alpha mask, you need to make sure that the large seagull is white and that the unwanted areas (in this example, the sky and smaller seagull) are pure black. Start by selecting the large, unneeded areas first. Use the Lasso tool to roughly encircle the smaller seagull followed by choosing Edit > Fill > Black and Select > Deselect (Command+D [Ctrl +D]).
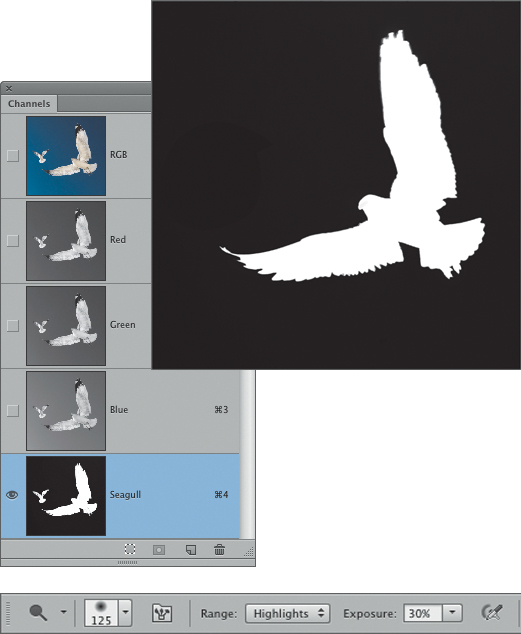
4. To clean up the interior of the larger seagull, use the Dodge tool set to Highlights and 30% Exposure, and paint over the gray areas within the seagull (FIGURE 10.9). On a similar note, when you are refining masks, use the Burn tool set to Shadows to increase density.
Figure 10.9. Filling a selection with black is the fastest way to removed unwanted artifacts or image elements that could cause problems later on in the compositing process.
Use the Dodge tool set to Highlights to lighten mask density and the Burn tool set to Shadows to darken density.
5. Use a small, black brush to hide any unwanted specks on the sky area.
6. Because the bird was moving, the areas by its upper wings are slightly translucent and have shades of gray. That is a good thing, because the translucency will make for a more believable seagull composite.
7. Return to RGB by clicking on the letters RGB in the Channels panel and save the file.
Inspect/view the alpha mask in black and white view to find and correct missed details, such as specks of noise, dust, and density differences, that should not be part of the mask and could potentially interfere with a clean composite.
To add the seagull to a variety of backgrounds, follow these steps.
1. Activate the seagull alpha mask by Command-clicking (Ctrl-clicking) on the alpha mask.
2. Return to the Layers panel and click the Add a Mask button.
3. Using the Move tool, drag the seagull from the Layers panel to the desired background. For this to work smoothly, it is imperative that you click and drag the seagull image icon, not the mask icon.
4. If needed, to refine the edges of the seagull, click on the layer mask and choose Select > Refine Mask. To remove telltale halos, use the Refine Radius Tool (E) and paint along the bird’s edges (FIGURE 10.10). For additional information on Refine Mask, see Chapter 11.
Figure 10.10. Using the Refine Mask command improves the transitions between the seagull and background.
Combining images with similar backgrounds, color, perspective, and focus allows for more realistic composites.
Learn to fill selections with keyboard shortcuts to speed up your masking workflow.
On Windows:
Press Alt+Backspace to fill with white or the foreground color.
Press Ctrl+Backspace to fill with black or the background color.
On a Mac:
Press Option+Delete to fill with white or the foreground color.
Press Command+Delete to fill with black or the background color.
Starting with an Image Channel
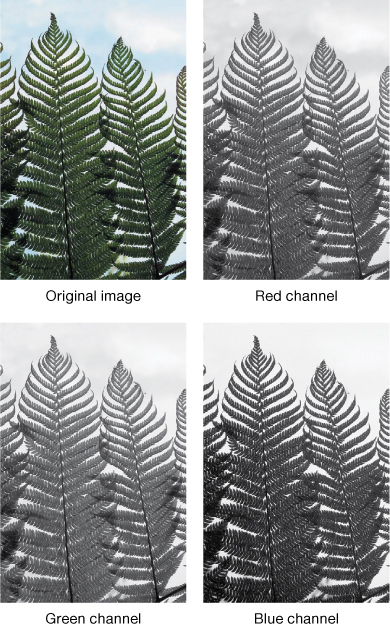
All image channels are grayscale images, and alpha channels are also grayscale. Often, one of the image channels can serve as an excellent starting point to create an alpha channel that maintains fine detail, as illustrated in FIGURE 10.11, which shows the three RGB channels and the resulting alpha channel.
© KE
Figure 10.11. Inspect the image channels to find the one with the best contrast and sharpness.
The two most important steps to success are to start with the best channel and use a light hand when adding contrast so that the fine details are not forced to pure black and white. Maintaining the transitional shades of gray will create more believable transitions in your composite. Additional techniques on refining alpha channels with brushes, blending modes, and filters are addressed later in this chapter.
Starting with a high-quality image will yield the best masks and final results. Use properly exposed images that are sharp, show little to no noise, and have not been saved with JPEG compression that may cause artifacts that will interfere with creating finely detailed masks.
This technique takes a bit of practice, and one setting that will work with every image simply doesn’t exist. Learn to think ahead and “see” the alpha channel in progress, and you’ll soon master this classic technique.
![]() ch10_ferns.jpg
ch10_ferns.jpg
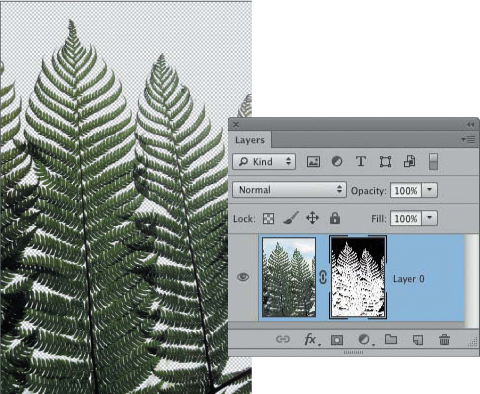
1. To make a mask that maintains the fine detail of the ferns, you need to take advantage of the potential mask within the image. Inspect the three image channels to find the one with the greatest difference between the ferns and the sky.
2. In this example, the Blue channel shows the greatest contrast. Drag the Blue channel down to the Create New Channel button to create a new alpha channel called Blue copy.
To avoid confusion when working on your own projects, we highly recommend renaming the alpha channels with a meaningful name.
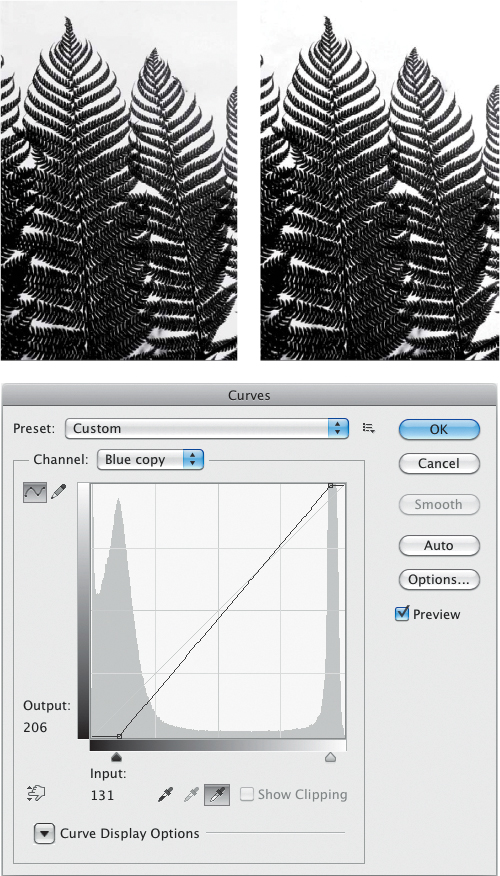
3. Choose Image > Adjustments > Curves (Command+M [Ctrl+M]), use the black target eye-dropper, and click on an area in the fern that should be black. Use the white target eyedropper and click on an area that needs to be white (FIGURE 10.12). In some cases, manually adjusting the Highlight and Shadow sliders and midtone curve can be helpful to improve the contrast.
Figure 10.12. Defining a new black and white point to increase contrast and improve mask density.
4. Click OK to apply the Curve. In the Channels panel, click on the letters RGB and return to the Layers panel to continue with the project.
Refining Fine Details with Blending Modes
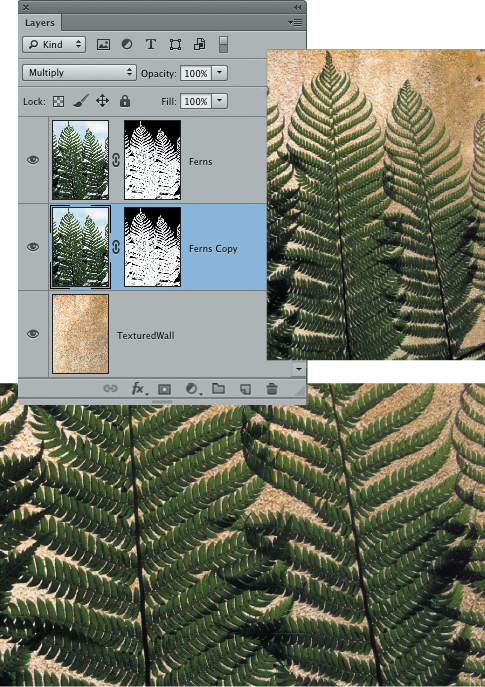
In this example, Katrin placed the ferns onto a new textured background and then used blending modes to refine the transitions of the ferns. Duplicating layers with fine-detailed information and setting the lower layer to the Multiply blending mode emphasizes the darker values. It is also a quick and easy way to hide unsightly white halos, and works well on images with fine detail, such as hair, tree branches, or in this example of ferns.
![]() ch10_texturedwall.jpg
ch10_texturedwall.jpg
1. Activate the desired alpha channel with the Command key combination Command+Option+alpha # (Ctrl+Alt+alpha #)—in this case #4 to create an active selection.
2. On the Layers panel, click on the Add layer mask. In this example the mask is concealing the ferns, which is exactly the opposite of the desired effect. Choose Image > Adjustments > Invert or press Command+I (Ctrl+I) to invert the mask, which isolates the ferns (FIGURE 10.13).
Figure 10.13. Learn the command keystrokes to instantly invert mask values.
3. Drag the Fern layer with mask to the Textured Wall.
4. Upon careful inspection in Actual Pixel view, you may notice some white halos around the edges of the ferns (FIGURE 10.14).
Figure 10.14. Always view the image at 100% or 200% view to identify problems.
5. Duplicate the Fern layer, return to the lower Fern layer, and change the layer blending mode to Multiply.
Many times, this useful duplicate and multiply technique is all you need to hide unsightly light edges. If you still see some halos, experiment with contracting the Multiply layer mask as follows.
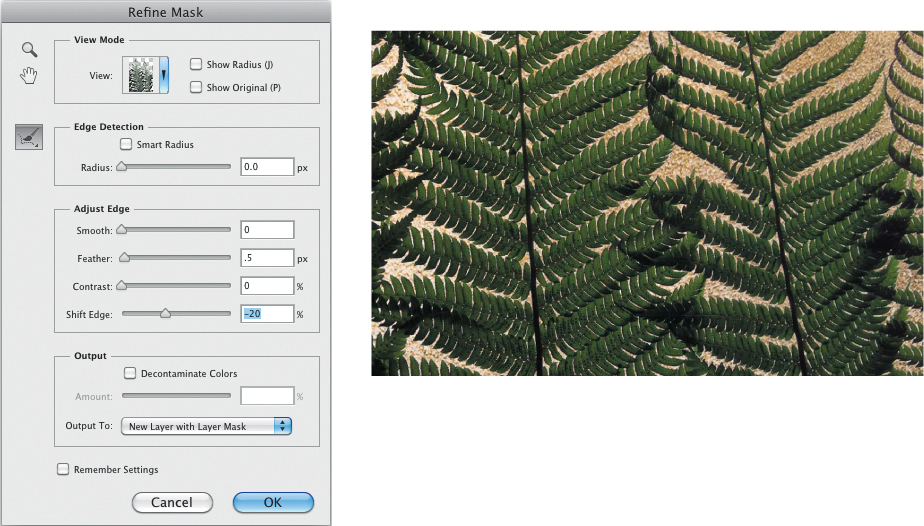
6. Click on the Multiply layer mask, choose Select > Refine Mask (Command+Option+R [Ctrl+Alt+R]), and move the Shift Edge slider to the left by –20. As with all things Photoshop, your mileage may vary, and you’ll need to experiment with negative Shift Edge settings. Katrin often also applies a very slight feather of .5 and increases the contrast to tighten the mask to hide light edges (FIGURE 10.15).
Figure 10.15. Shifting and softening the layer mask refines the transitions.
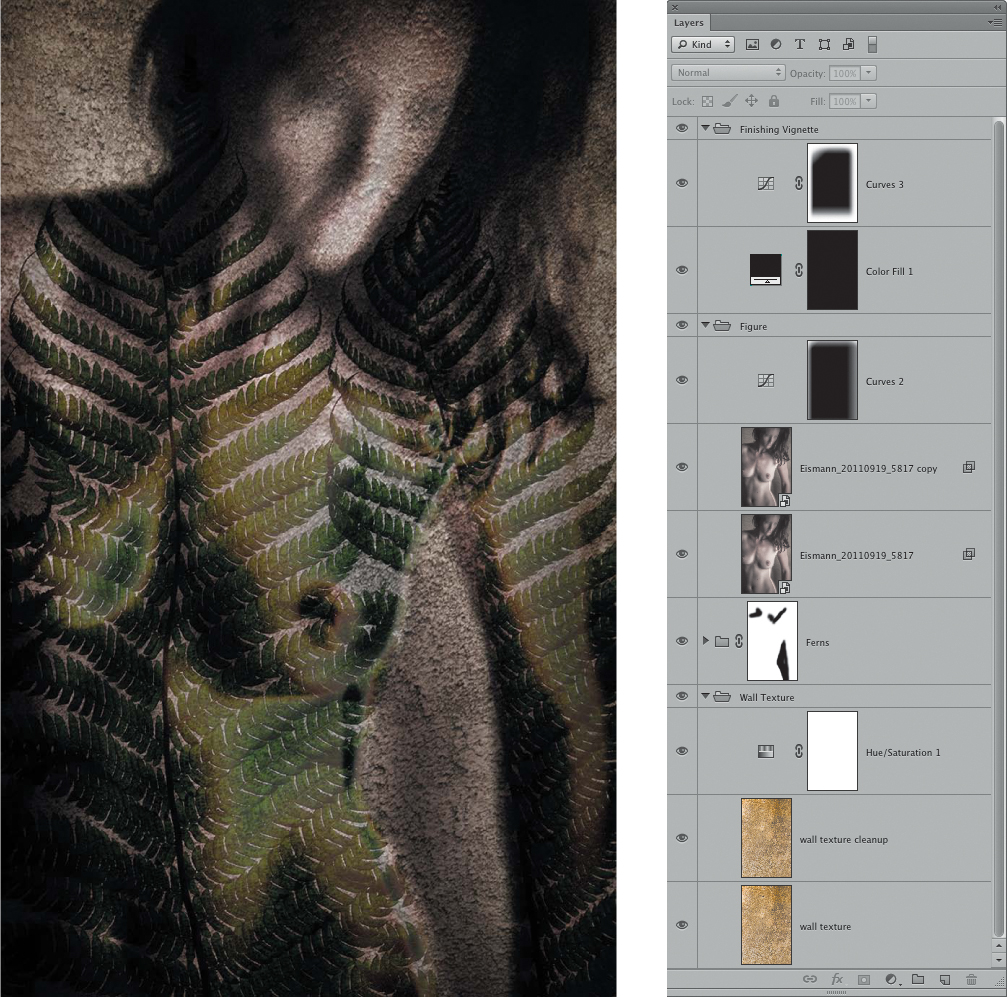
As FIGURE 10.16 shows, Katrin took the time to experiment with blending modes and textures to create this subtle image; although it seems soft and dreamy, it is based on very accurate masks.
© KE
Figure 10.16. The final image was created with ten layers and a variety of channel and layer masks.
Working with Apply Image
With the myriad of options that Photoshop offers, how do you know when to use which one? Well, you have to start by knowing the possibilities and having an open mind. Three of the longest-lasting features in Photoshop are located on the Image menu—Duplicate, Apply Image, and Calculations. Before the introduction of layers in Photoshop 3, to do image compositing and control effects, you had to rely heavily on channel masking, and the most advanced method to create fine-edged masks was to use the Image Calculation commands to combine and refine images and channels. Today—with the use of layers, layer masking, and the Refine Edge command—many of their results can be achieved more easily and quickly. But when the newer kids in town aren’t working, try working with Apply Image to build fine-detailed channel masks to create masks that maintain fine detail. Because Image Calculations use interchannel math that compares channel values to create the results, they are often called chops (channel operations).
The Apply Image Settings
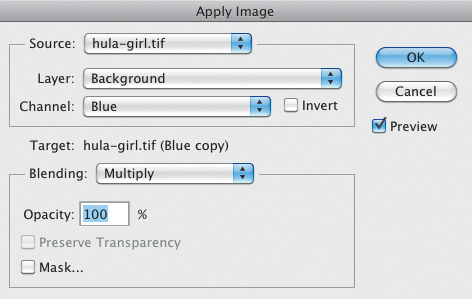
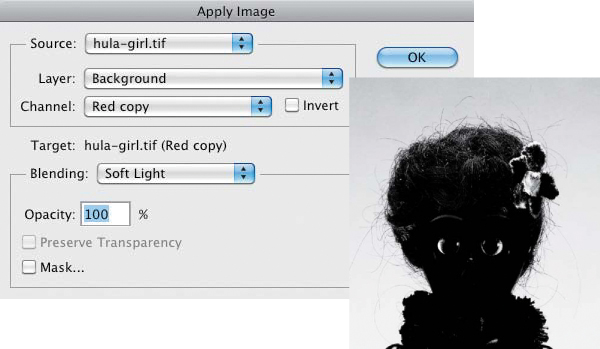
Apply Image always uses the active image or channel as its target, meaning the image that is active when you choose Image > Apply Image will always be on the receiving end of the Apply Image command. Before you use Apply Image to make masks, an overview of the terms shown in FIGURE 10.17 will be helpful:
• Source. Use the menu to select from the other open images to be processed with the active image.
• Layer. Determines which individual layer or merged layers of the source will be used. Merged is only available if both files are in the same color mode.
• Channel. Determines if the results will go into the merged color file or into one individual channel. If the layer you choose has transparency (such as a text layer), transparency will also be a choice.
• Target. Is always the document that was active when you invoked the Apply Image command. When making masks (as you’ll do later in this section), the name of the active channel will appear here.
Figure 10.17. The Apply Image interface.
• Blending. The mathematical formulas used to combine the layers or channels.
• Scale and Offset. Only active when Add or Subtract are chosen in the Blending option. The Scale factor is any number between 1.000 and 2.000—a higher Scale value darkens the image. The Offset value lets you lighten or darken the pixels in the destination channel by any brightness value between +255 and –255. Negative values darken the image; positive values lighten the image.
• Opacity. Controls the percentage of the source used in the calculation process. The lower the percentage, the more the target is used.
• Preserve Transparency. If the target layer has transparency, select this check box to protect it from being affected.
• Mask. Lets you control where the calculation takes place with a mask from any open image that has the same pixel resolution.
• Invert. Switches tonal values from within the Apply Image command.
• Preview. Lets you monitor the effect of all the preceding settings. Thank goodness!
Before using the Apply Image command, in the Channels panel, duplicate the image channel with the most contrast by dragging it down to the New Channel button, and then make sure the alpha channel is active.
Blending Mode Guide
The Calculate commands apply the math of the blend to the layer, channel, or composite to create the desired effect. It is essential to remember that 0 is the equivalent of black, 128 is the equivalent of gray, 255 is the equivalent of white, and that all blends compare pixel values to calculate the result. The following list consists of each blending mode and a brief description:
• Normal. Combines the two sources based on opacity.
Darkening Group. Neutral to white; will have no effect on light areas; the effect will be progressively stronger as the tones become darker:
• Darken. Dark pixel values replace light values.
• Multiply. Multiplies values less than 50 percent gray times each other, resulting in darker values; light areas are not affected.
• Color Burn. Results in a darker channel with increased contrast.
• Linear Burn. Is a strong combination of Multiply and Color Burn, and forces dark values to pure black.
• Darker Color. Compares the total of all channel values for the blend and base color, and displays the lower value color without creating new colors as Darken sometimes does.
Lightening Group. Neutral to black; will have no effect on dark areas; the effect will be progressively stronger as the tones become lighter:
• Lighten. The opposite of Darken; it compares the two sources and replaces the darker pixels with lighter pixels.
• Screen. The opposite of Multiply; results in a lighter channel and reduces contrast; dark areas are not affected.
• Color Dodge. Increases contrast of areas lighter than 50 percent gray while preserving black values.
• Linear Dodge (Add). Is a combination of Screen and Color Dodge, and forces light areas to pure white.
• Lighter Color. Compares the total of all channel values for the blend and base color, and displays the highest value color without creating new colors as Lighten sometimes does.
Contrast Group. Neutral to 50 percent gray; will have no effect on 50 percent gray areas and are all good for adding contrast—specifically, for making the dark values darker and the light values lighter:
• Overlay. Multiplies dark values and screens light values, which increases contrast but without clipping to pure white or black.
• Soft Light. A combination of Dodge, which lightens the light values, and Burn, which darkens the dark values. Adds less contrast than Overlay or Hard Light.
• Hard Light. Multiplies the darks and screens the light values, and increases contrast dramatically.
• Vivid Light. Lightens the values above 50 percent gray by decreasing the contrast, and darkens the values below 50 percent gray by increasing contrast.
• Linear Light. Combining Linear Burn and Linear Dodge, this blending mode lightens the values above 50 percent gray by increasing the brightness, and it darkens the values below 50 percent gray by decreasing brightness.
• Pin Light. Combines Darken and Lighten to replace pixel values. Always very contrasty. Used for special effects and more infrequently to create masks.
• Hard Mix. Lighter values lighten and darker values darken to the point of threshold and posterization.
Combination Group. Found only in the Apply Image and Calculate commands:
• Add. Adding light values results in lighter to bright white values. Black value areas remain black (0+0=0). The Scale factor is any number between 1.000 and 2.000. The Offset value lets you lighten or darken the pixels in the destination channel by any brightness value between -255 and +255. Negative values darken the image; positive values lighten the image.
• Subtract. Subtracts the pixel values from the corresponding pixel values and uses Scale and Offset as in Add.
Comparative Group. Neutral to black:
• Difference. Reveals identical pixel values as black, similar values as dark, and opposite values as light to white values.
• Exclusion. Similar to Difference but with less contrast. Blending with black produces no change, and white inverts the compared values.
• Divide. Looks at the color information in each channel and divides the blend color from the base color. Useful in animation projects to divide hard-and soft-edged masks to create dimensional effects.
Have we memorized all of these blending modes? No. But we do know which general group to start with to darken, lighten, enhance contrast, and so on. Often, just getting into the tonal ballpark makes for a good start, and then you can choose a related blending mode to see if the effect is creating the desired result.
Using Every Trick in the Book
A one-size-fits-all, miracle-cure tool that makes the perfect mask every time on every type of image simply does not exist. More often than not, to make a mask that maintains fine detail, you’ll need to be a creative problem solver and be willing to experiment with a variety of techniques to create the best results. In the following exercise you’ll learn how to use image adjustments, Apply Image, Refine Edge, blending modes, and painting skills to create a composite that maintains the finest details.
![]() ch10_hulagirl.jpg
ch10_hulagirl.jpg
ch10_beach.jpg
To create the initial alpha mask:
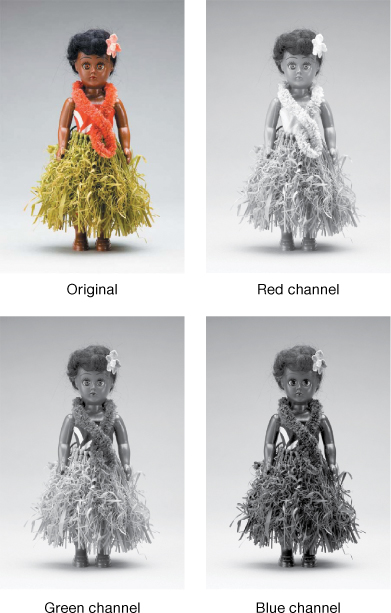
1. Inspect the three image channels—Red, Green, and Blue—and you’ll notice that in this Hula Girl example the Blue channel is darkest (FIGURE 10.18).
© Mark Beckelman
Figure 10.18. Identifying the best image channel is the first step in creating an alpha channel from an image.
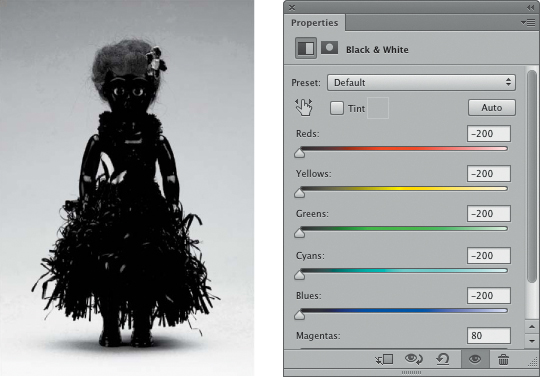
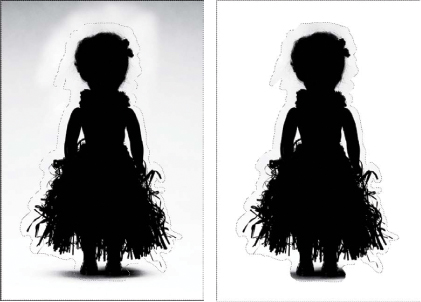
2. To enhance the initial contrast, in the Layers panel add a Black & White image adjustment layer and move all six sliders to the far left (FIGURE 10.19), which creates a dark, contrasty image with good differentiation between the doll and the background.
Figure 10.19. Using a Black & White adjustment layer to temporarily increase density and contrast.
3. In the Channels panel you’ll notice that all image channels are now identical. Duplicate any of the channels by dragging the word, for example, Red, down to the New Channel button.
4. Return to the Layers panel and delete the Black & White adjustment layer.
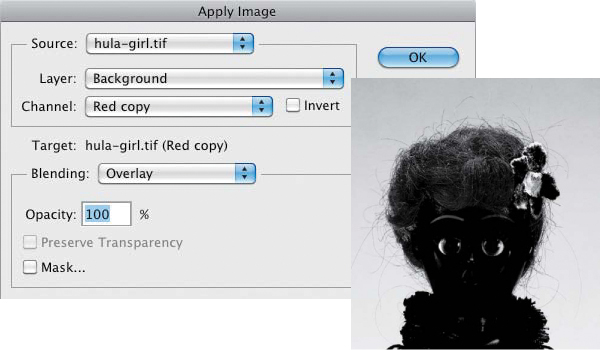
5. Return to the Channels panel and click on the newly created alpha channel. To create additional contrast, choose Image > Apply Image and blend the Red copy with the active alpha channel with Overlay (FIGURE 10.20).
Figure 10.20. The Apply Image command set to Overlay increases contrast.
6. In this example, Katrin opted to add a tad more contrast, which may or may not be necessary on your images. Choose Image > Apply Image and blend the Red copy with the active alpha channel with Softlight (FIGURE 10.21) to build up the contrast again but not as harshly as repeating the Overlay blending mode would.
Figure 10.21. The Apply Image command set to Softlight increases contrast more subtly.
After the initial alpha channel is created, it will be necessary to manually enhance the differentiation between the subject and the background. This often requires painting, selective blurring, filtering, and working with Levels or Curves to set the black and white points.
1. It is a good idea to create a backup copy of the initial mask to return to in case any number of the following steps goes awry. Duplicate the alpha channel and continue working on either the original or the duplicate alpha channel.
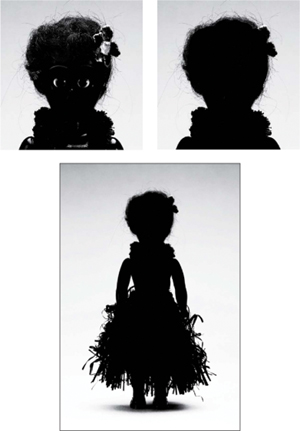
2. To clean up the remaining white areas within the Hula Girl’s body, use a black, small, hard-edged brush in Normal blending mode to paint away the white areas by her eyes and in her body. At this stage, stay away from the image edges; the Normal brush is just a clean-up tool, not a refine tool (FIGURE 10.22).
Figure 10.22. Refine the interior of the mask by painting with a small, hard, black brush.
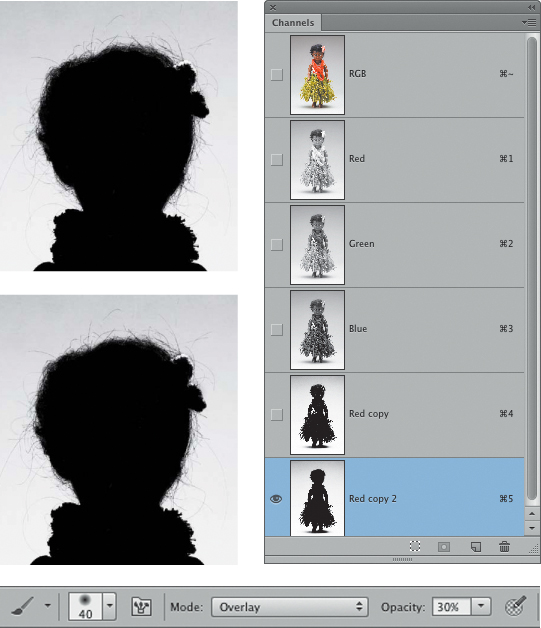
3. To darken down the transitional edges, change the brush blending mode from Normal to Overlay, reduce the brush opacity to 25–35%, and paint with a soft-edged black brush to darken the dark transitions (FIGURE 10.23).
Figure 10.23. Refine the channel mask with a low-opacity, black brush set to Overlay to carefully darken transitions.
By reducing the brush opacity, you may need to make a few more strokes; it is better to “sneak up” on the mask rather than trying to get the best results with one heavy brush stroke.
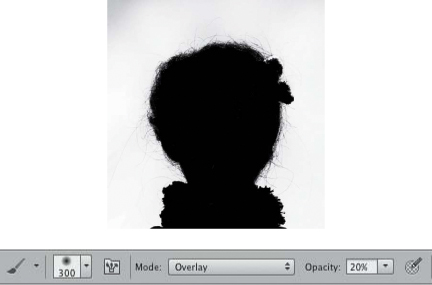
4. To lighten the edges, use a 25–40% opacity, soft-edged brush set to Overlay, and paint with white to lighten the transitions around her head. At this stage, it is important to be patient and brush from the outside in as pointed out in FIGURE 10.24. Working outside to inside allows you to build up the contrast without losing too many important hairs, some of which will be resurrected later on in the process via layer blending modes.
Figure 10.24. The Overlay blending mode allows you to work with black and white to refine delicate details.
5. The background is still very gray and needs to be much whiter. Because the background is unessential, the fastest method is also the best method to force it to white. Use a zero-feather Lasso tool to roughly select the Hula Girl, invert the selection by choosing Select > Inverse (Command+Shift+I [Ctrl+Shift+I]), and fill the selection with white (Edit > Fill > White). Deselect the active selection (Command+D [Ctrl+D]) (FIGURE 10.25).
Figure 10.25. Filling large, unimportant image areas with white is quick and effective.
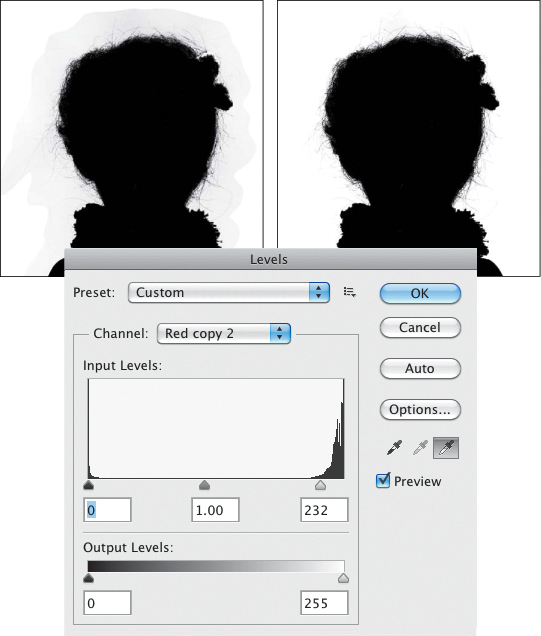
6. To eliminate the unwanted gray tones in the whites of the mask, choose Image > Adjustment > Levels, select the white eye dropper, and click on an area that appears to be light gray in tone. This will force that area to white and clean up the mask (FIGURE 10.26).
Figure 10.26. Use the white eyedropper to change light gray to white in the mask.
To include hard-edge areas:
Channel masking did a great job on the body, but in this example and many others that we’ve worked on it is necessary to mask out both fine-edge detail—such as hair or grass skirts—and simultaneously, hard-edged areas—such as clothing or in this example her feet—which due to the original shadow are not clearly defined.
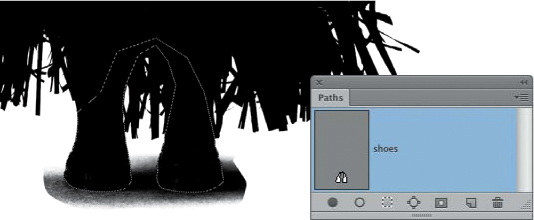
1. Outline her shoes and ankles with the Pen tool, which is ideal for the hard edges of the shoes, or use the path that we’ve provided in the work-along file (FIGURE 10.27).
Figure 10.27. Paths create a well-defined selection for hard edges or, as in this example, the shoes.
2. In the Paths panel, turn the path into an active selection by clicking the menu and choosing Make Selection. To soften the hard Pen tool edges ever so slightly, use a .5 pixel Feather Radius.
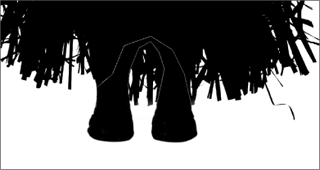
3. Invert the selection by choosing Select > Inverse (Command+Shift+I [Ctrl+Shift+I]), and use a white brush set to Normal and 100% opacity to paint away the original shadow (FIGURE 10.28).
Figure 10.28. Removing the original shadow to create a clean mask.
4. Deselect the active selection by pressing Command+D (Ctrl+D).
5. In the Channels panel, Command-click (Ctrl-click) on the Red Copy alpha channel to convert it, that is, load it as a selection.
To refine the composite using layer masking:
After creating the best possible alpha channel, it’s time to work with the layers, layer mask, Refine Edge, and blending modes to create the final image.
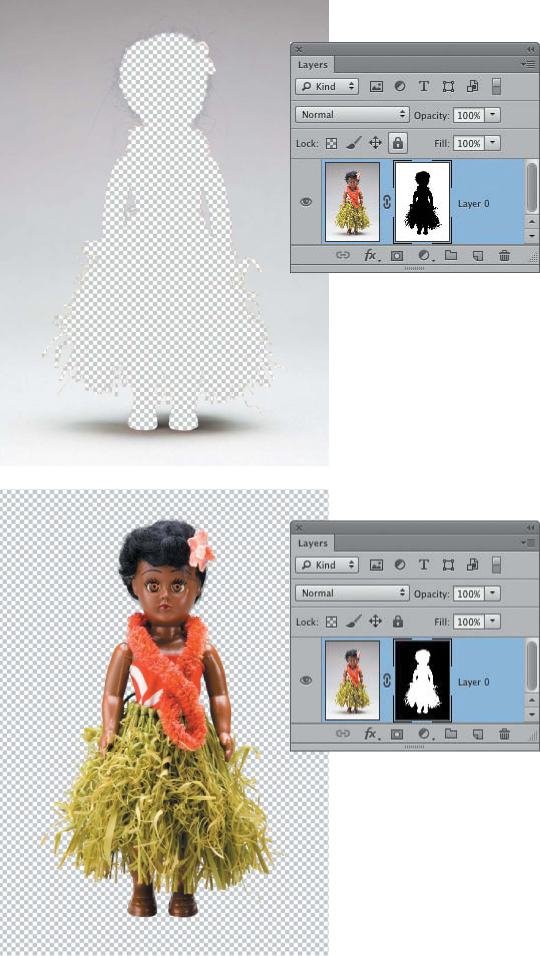
1. In the Layers panel, click the Add a Pixel Mask icon, which creates the exact opposite effect than desired. Invert the layer mask (Command+I (Ctrl+I]) to reveal the Hula Girl in all her fine-detailed glory (FIGURE 10.29).
Figure 10.29. Inverting the layer mask creates the desired results and reveals Hula Girl.
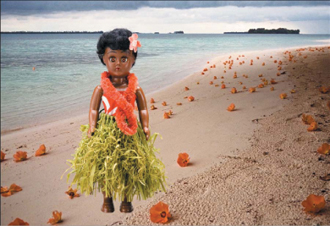
2. To see how well or not the mask is functioning, let’s move the Hula Girl from the photo studio onto the beach. Open the provided beach image (Ch10_Beach.jpg) and drag the Hula Girl onto her vacation photo (FIGURE 10.30).
Figure 10.30. Placing Hula Girl onto the new background image is the start of the compositing process.
To drag layers with masks efficiently, always use the Move tool. Click the layer icon and drag from the Layers panel to the new image.
Pay special attention to the image edges to identify telltale signs of a poor composite, such as missing hair or unnatural, inaccurate, or white edges. To refine isolated problems, such as the light edges, use selective corrections. To refine hair or fine detail, the Refine Edge panel is the best choice.
If you’re wondering how we know which tool or technique to use to solve a specific masking challenge, the answer is simple. We spend a lot of time in Photoshop experimenting and admittedly using the Undo command even more often. Every time you solve a problem in Photoshop, you’re learning for the next image, and you’ll become better and more efficient.
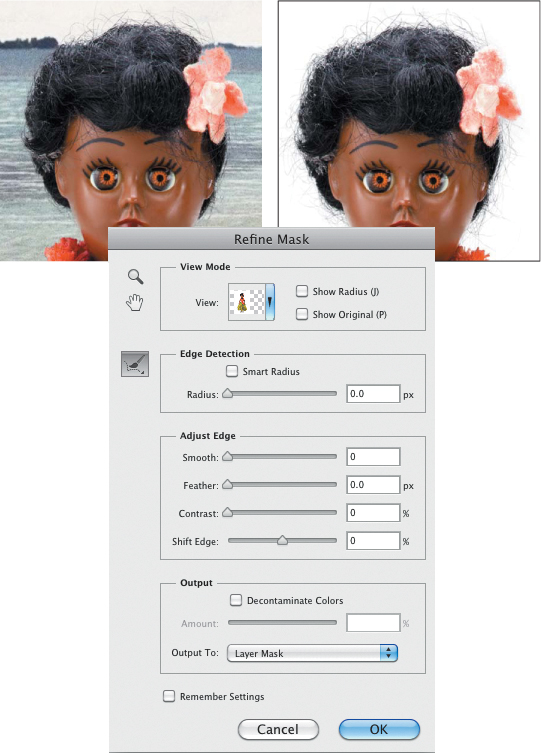
3. To refine her hair, click on the Hula Girl layer mask and choose Select > Refine Mask (Command+ Option+R [Ctrl+Alt+R]).
4. Using the Refine Radius brush, paint along the Hula Girl’s hair. Switching the View mode to White allows you to see how the subtle hair detail is being restored (FIGURE 10.31).
Figure 10.31. Change the View mode to see how effective the mask is.
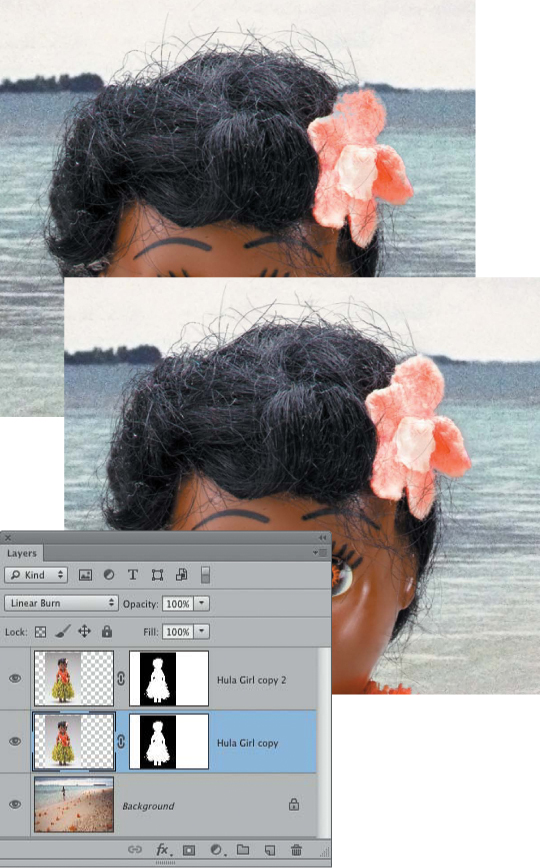
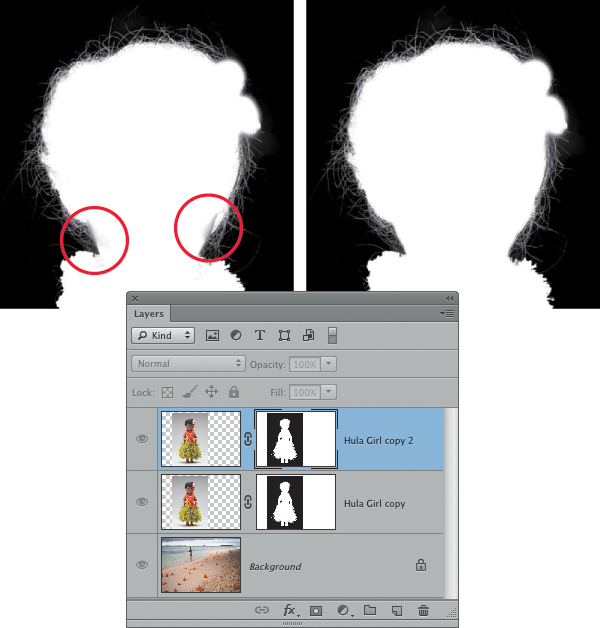
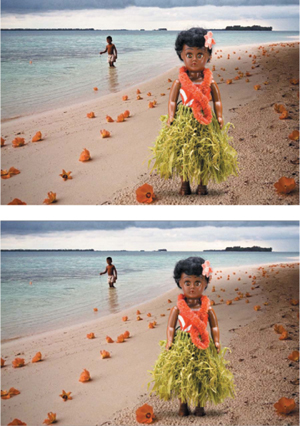
5. To build up additional hair detail, use this simple, yet effective trick: Duplicate the entire Hula Girl layer, and then drop down to the original layer and change the layer blending mode to Multiply or Linear Burn to see which darkening blending mode works best for your images.
6. In this example, you may notice a few missing areas, such as the flower in her hair. Use a small, 50% hardness white brush on the upper layer mask to restore the flower details (FIGURE 10.32).
Figure 10.32. Refining subtle details with a white brush to restore the flower.
7. Always check the quality of the layer mask by Option-clicking (Alt-clicking) on the mask to see it in black and white to determine if any telltale artifacts remain that need to be addressed (FIGURE 10.33).
Figure 10.33. Viewing the layer mask in black and white helps to identify where imperfections are that can cause problems in the final composite.
Check the quality of layer and channel masks by viewing them in black and white. Small details that are easier to see and repair in black and white will impact the final quality of the composite.
To add the shadow:
The image is shaping up nicely, but the lack of a drop shadow makes the Hula Girl look pasted into the scene. Fortunately, we have a great-looking shadow we can borrow from the original Hula Girl image (one of the benefits of photographing against a neutral, smooth background!).
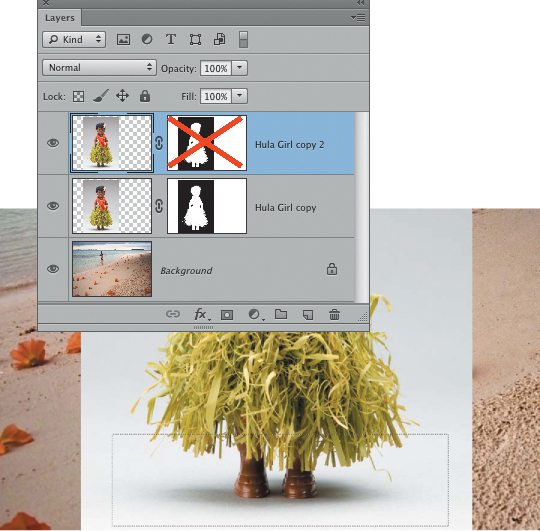
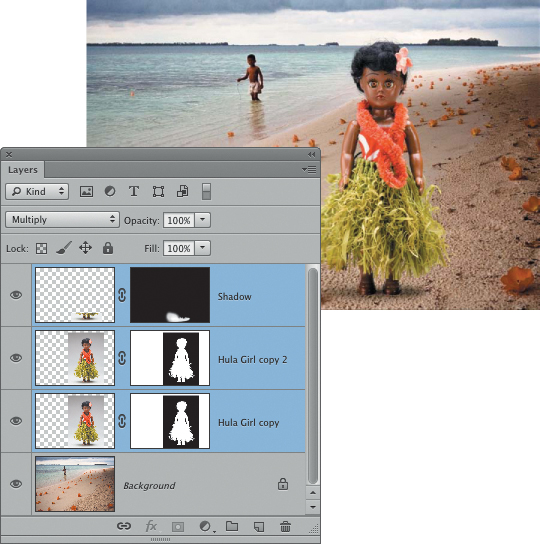
1. Working on the upper Hula Girl layer, disable the layer mask by Shift-clicking on the layer mask, and then click the layer icon and make a wide rectangular selection around the drop shadow and her shoes (FIGURE 10.34).
Figure 10.34. Take advantage of natural drop shadows to create more natural effects.
2. Copy the rectangular selected area to a new layer by pressing Command+J (Ctrl+J). Shift-click on the Hula Girl layer mask to turn it back on.
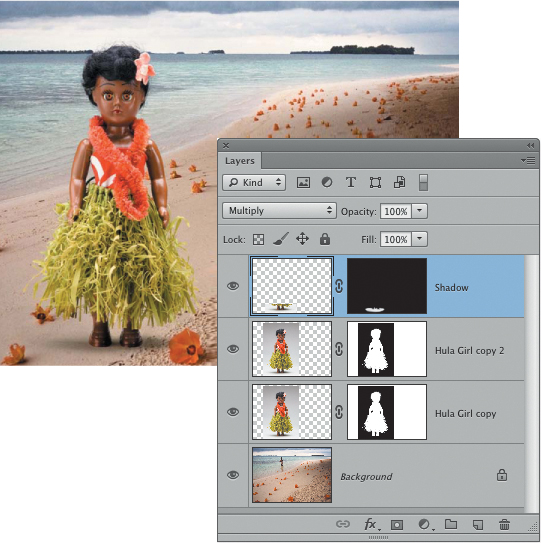
3. Change the shadow layer blending mode to Multiply and add a black layer mask to the layer by Option-clicking (Alt-clicking) on the layer mask button.
4. Working on the black layer mask, use a soft white brush at 70% opacity to paint back the shadow and darken down her shoes (FIGURE 10.35).
Figure 10.35. Use the Multiply blending mode to show only the darker shadow information without affecting the lighter sand.
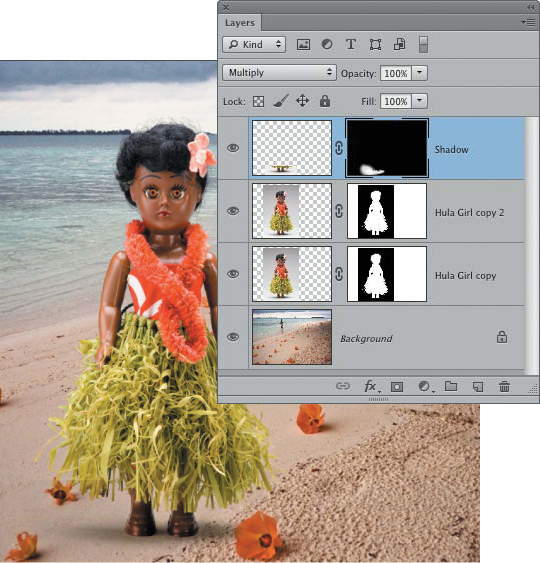
5. Adjust the shadow layer opacity and choose a Gaussian Blur (Filter > Blur > Gaussian Blur) of 10–20 to soften the shadow (FIGURE 10.36).
Figure 10.36. Blur the layer mask to conceal any telltale brush strokes or inaccurate transactions.
6. To move the Hula Girl in her vacation photo with all of her layers, Shift-click on the top and bottom of the Hula Girl layer (FIGURE 10.37).
Figure 10.37. Shift-click on the topmost and bottom layer to move them together.
7. To fit the Hula Girl into the scene, take a cue from the boy who serves as a reference in the scene. Her head needs to be at the same height as his (FIGURE 10.38), which is achieved by transforming Hula Girl to match the boy’s height.
Figure 10.38. Match the scale of added subjects with existing subjects to enhance believability.
As you’ve seen here, when it comes to masking fine details like hair and grass skirts, there are many approaches, tools, and techniques to try and combine. Try not to get locked into the notion that you should be able to create a quality mask using just one technique. There are certainly times when the stars align and one or the other masking technique will work quickly and simply, but more often than not, a mix of techniques will yield the best results.
Dimensional Shading
Channel masks and selections are also very important in digital darkroom work where subtle tonal, color, and contrast control is required to make an image pop. Taking the time to nurture and enhance delicate transitions allows your images to be rounder, fuller, and visually more satisfying.
The very act of photographing the wide-gamut, three-dimensional world and flattening it onto a two-dimensional surface (film or digital sensor) often produces images with fewer subtle transitions that are visually less satisfying than the original subject. Or said another way; sometimes it just seems that images lack the snap, details, and dimensions that caught our eye in the first place and motivated us to take the picture. Maintaining fine transitions and shading will set your images apart because they will be more dimensional and intriguing.
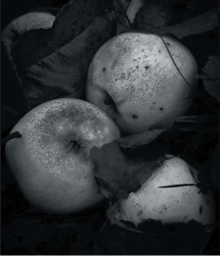
As a meditation on mortality and regeneration, Katrin photographed abandoned apple orchards on a quiet, cool, early morning. In her photographs she captured aged trees and fallen fruit nestled in deathly, dark, damp leaves. The overcast skies created a beautiful soft light, and the fallen fruit seemed to glow from within. One apple or mouse nibbled pear was more beautiful than the previous one. As it turned out, the images were perfect to use as an example to illustrate how to build a highlight mask.
Building a Subtle Highlight Mask
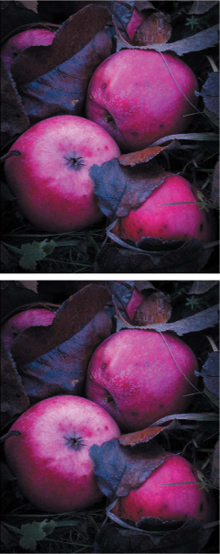
After processing the images, Katrin noticed that the visual satisfaction of the subject was not in the images, and it took her a few months to realize that the glow, the light, and the dimension of the fruit that had initially drawn her into the orchards was missing. By building a very subtle highlight mask and working with Hue/Saturation adjustment layers and blending modes, she was able to restore the dimensional detail (FIGURE 10.43) as follows.
Figure 10.43. Subtle enhancement of tonality yields better definition and depth.
![]() ch10_apples.jpg
ch10_apples.jpg
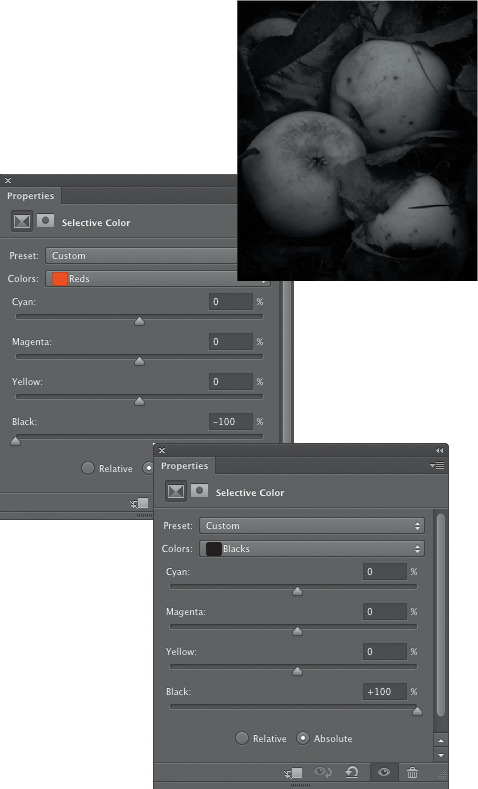
1. Add a Selective Color adjustment layer, and click the Absolute radio button.
2. In the Reds, Yellows, Greens, Cyans, Blues, and Magentas pull-down menus, reduce Black to –100%.
3. In the Whites, Neutrals, and Blacks, increase Black to +100% (FIGURE 10.44).
Figure 10.44. Building a tonal mask with a combination of minus and plus Black moves on a Selective Color adjustment layer.
4. In the Channels panel, drag the Green channel to the “Load channel as selection” button to create the rather abstract selection (FIGURE 10.45).
Figure 10.45. The resulting selection of the delicate highlights.
5. Return to the Layers panel and turn off or delete the Selective Color adjustment layer.
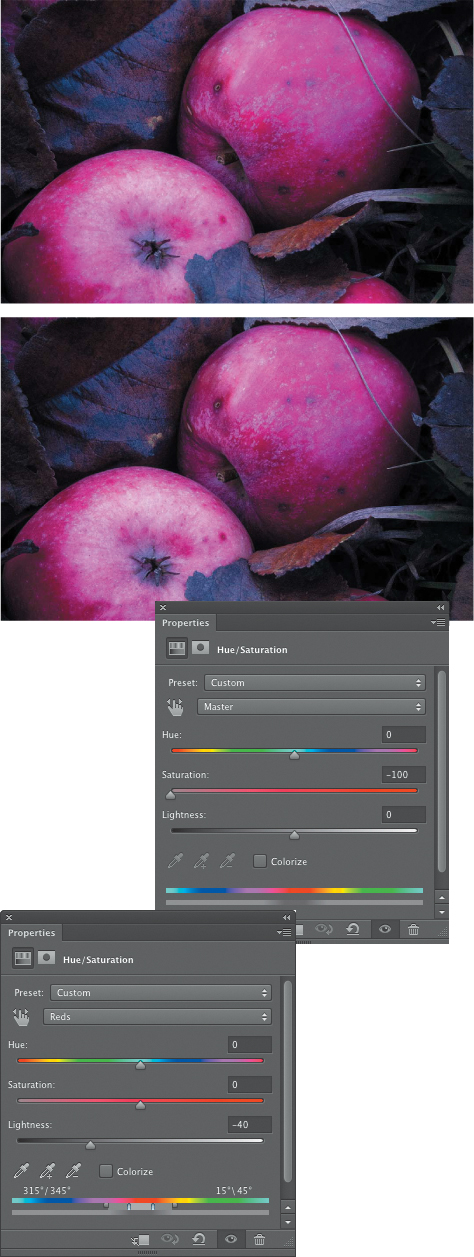
6. Add a Hue/Saturation adjustment layer, and change the blending mode to Softlight or Hardlight. In this example, Katrin used Hardlight for a more dramatic effect.
7. To refine the effect, reduce the Master saturation to –100, and because the primary subject is red, reduce the Red lightness to –40% (FIGURE 10.46).
Figure 10.46. The before and after images show how effective adjusting the Hue/Saturation in Hardlight blending mode can be.
Enhancing Dimension with Curves and Sharpening
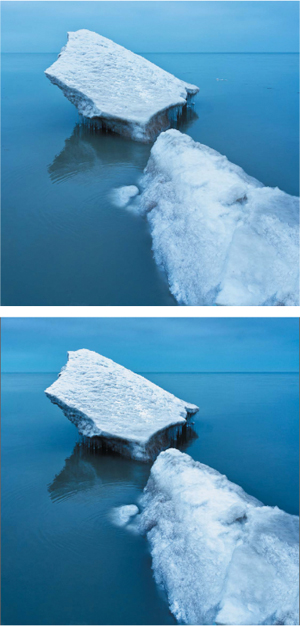
Finessing highlight and shadows away from one another with Curves and Unsharp Masking creates effective dimension without sacrificing important detail (FIGURE 10.47). To create a highlight mask for the ice in this exercise, Katrin used the following technique to add delicate tonal differentiation.
Figure 10.47. The subtler the enhancements, the more the true image is revealed.
![]() ch10_iceberg.jpg
ch10_iceberg.jpg
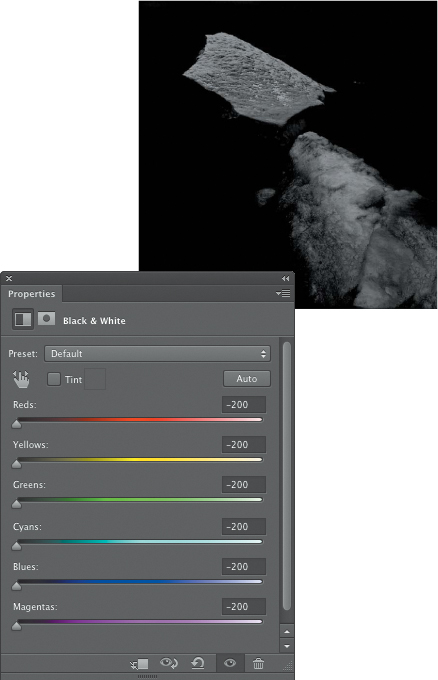
1. Add a Black & White adjustment layer, and move all of the sliders to –200 (FIGURE 10.48).
Figure 10.48. Move all of the Black & White adjustment layer sliders to –200 to start the mask.
2. In the Channels panel, drag the Green channel down to the “Load channel as selection” button to activate the mask.
All channels will look identical, but in most cases the Green channel has the greatest original tonal information and least noise, which is why we often opt to use it to create a mask selection.
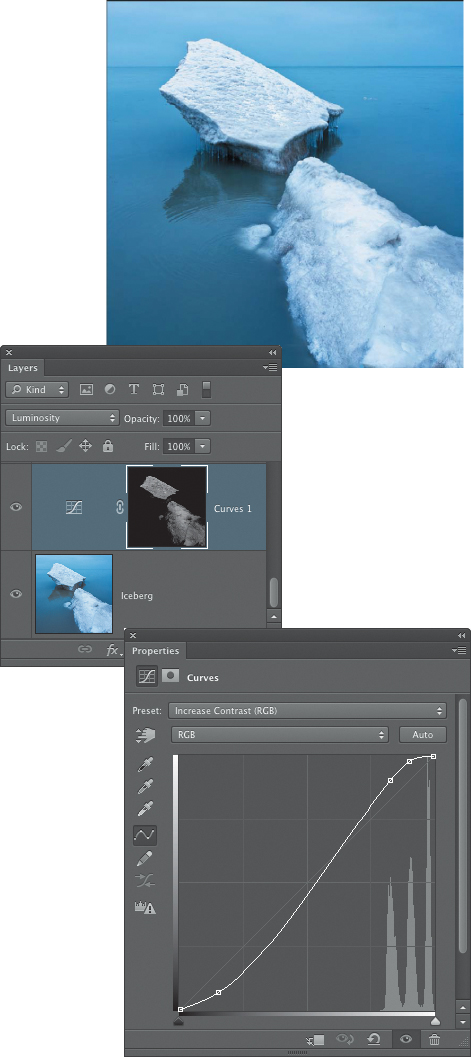
3. To pop the iceberg highlights, add a Curves adjustment layer, use the Increase Contrast preset, and very importantly, change the Curves layer blending mode to Luminosity to ensure that only the tonality is changed and the color remains unchanged (FIGURE 10.49).
Figure 10.49. Increasing contrast through a highlight mask.
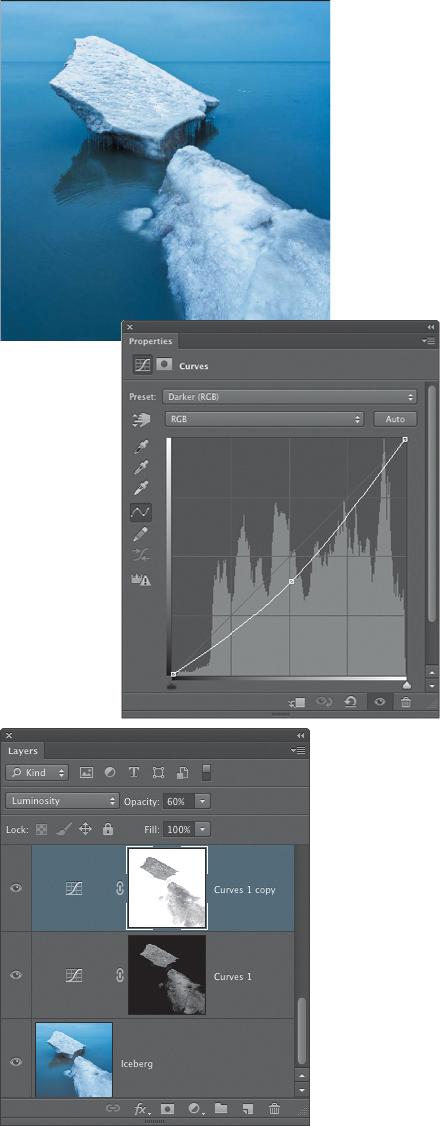
4. To deepen the shadows, duplicate the Curves layer, invert the layer mask (Command+I [Ctrl+I]) and use the Curves preset Darken (FIGURE 10.50). Of course, you can manually adjust the Curves to best enhance your own images.
Figure 10.50. Darkening the shadows and water creates additional simultaneous contrast to make the iceberg pop.
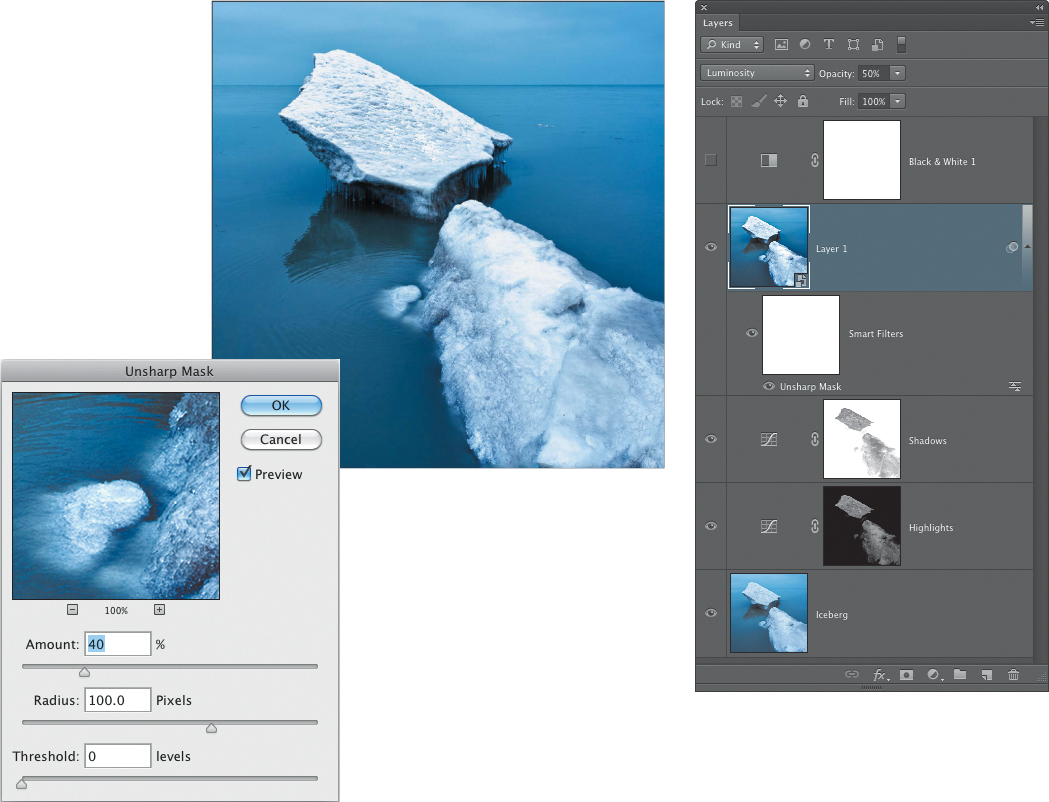
5. To create a layer for the Unsharp Mask boost, press Option (Alt) and choose Layer > Merge Visible followed by Filter > Convert for Smart Filters.
6. Choose Filter > Sharpen > Unsharp Mask and start with 20/50/0 on low-resolution (such as from a camera phone) files or 40/100/0 on larger files to increase contrast without creating unsightly halos (FIGURE 10.51).
Figure 10.51. A low Amount and high Radius create an effective midtone contrast boost.
7. To protect the highlights from appearing too crunchy, Katrin added a layer mask and painted away the contrast sharpening from the highlights.
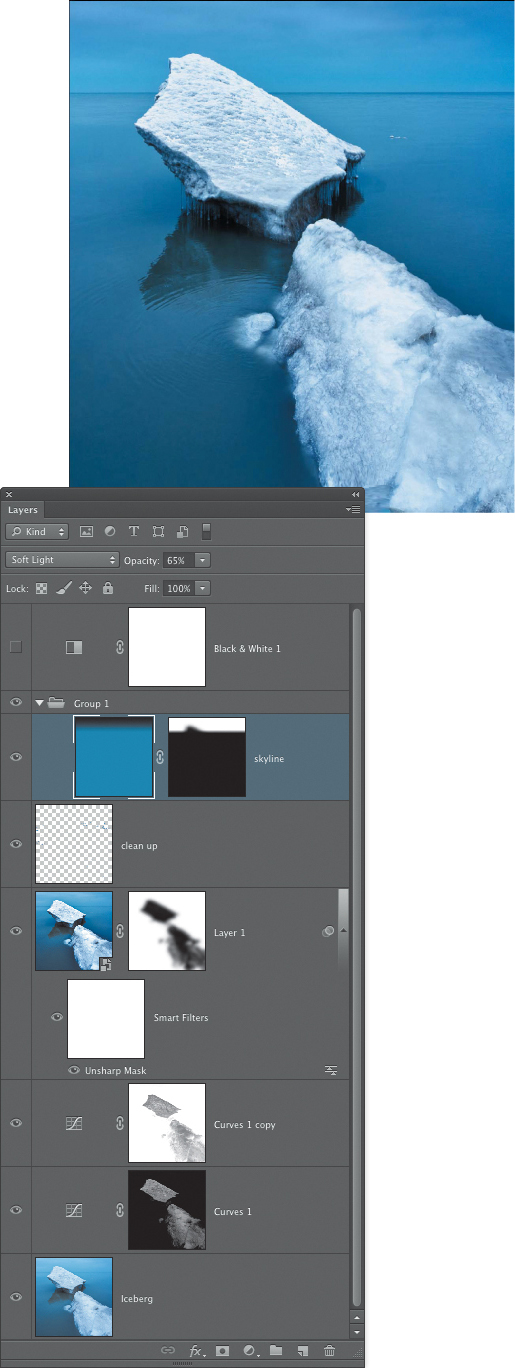
8. To keep the viewer’s eye in the image frame, Katrin darkened down the sky with a black to blue gradient later set to Softlight at 65% that she masked out so that it only affected the sky above and along the horizon line (FIGURE 10.52).
Figure 10.52. The final version with a slightly darker sky to keep the viewer’s eye in the image.
In all honesty, we do not go through all of these steps for every image, but we do pay careful attention to the subtle transitions and dimensions when preparing to make a valuable fine art print where every detail does matter.
Business professionals calculate the return on investment (ROI) before making important decisions. As image professionals, we need to do the same thing. Taking the time to refine your most important images with masking and numerous layers will yield a high image quality and personal satisfaction return.
Refining Layer and Channel Masks
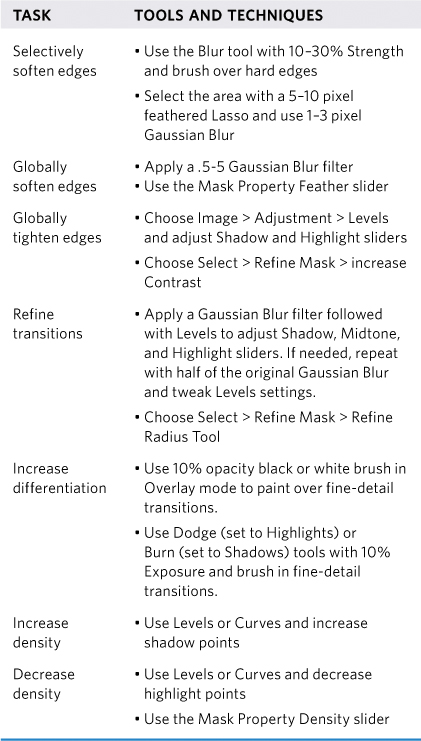
Spider-Man’s spidey sense allowed him to feel if something wasn’t right or if he was in a dangerous or suspicious situation. It seems that experienced Photoshop superheros also have a sixth sense of knowing which tool or technique to use to create a certain effect, or in our context, to refine layer and channel masks. Unlike Spider-Man, a radioactive spider hasn’t bitten talented Photoshop artists; rather, they have learned from many more mistakes than the casual Photoshop user has had the time to do. TABLE 10.2 lists the challenges and the tools and techniques that we’ve added to our mask refinement arsenal.
Table 10.2. Masking Challenges and Solutions
Closing Thoughts
We all need to have the right attitude when approaching professional, masking and photo compositing challenges. Work nondestructively and flexibly, and you’ll soon learn not to avoid channel masking but to revel in its power. In the next chapter we’ll continue our exploration of professional masking of hair, fine detail, and translucency.

