
6. Accounting for Project Costs
In this chapter, you learn about costs, budgets, and overtime in Project 2010.
Project costs are calculated using the planned and actual work values for resource assignments in your project. You can also set up budgets within your project using Project 2010 and then compare your budgeted costs with the planned and actual costs. This helps you to track how closely you’re sticking to your budget, so that you can determine the next steps, if necessary. You can also plan for and track overtime costs in your project using Project 2010.
Understanding Types of Costs
Project 2010 supports three different types of costs:
• Rate-based costs— These costs are incurred by a resource’s pay rate (for example, an employee’s hourly wages, or a daily rate for a machine rental).
• Per-use costs— These are one-time costs that may be incurred each time the resource is used within your project, or within a task in your project. For example, each time you rent a piece of equipment, there is an upfront per-use cost for the rental. It may be possible for a resource to have an associated per-use cost and rate-based cost.
• Fixed costs— These costs are associated with tasks, not resources, and they are incurred only once per task. For example, if a task in your project requires you to set up a temporary office in another location, the rent on that office space would be a fixed cost for that task.
These types of costs can be captured using work, material, and cost resources, as discussed in Chapter 5, “Working with Resources.” Each resource can have an associated cost, and that cost is incurred when the resource is used within your project.
Note that these cost types are different from cost resources. Cost resources capture fees associated with getting tasks done, such as airfare or lodging. Rate-based, per-use, and fixed costs are associated with work and material resources, and are incurred based on when a resource is assigned to work, and how much work that resource completes.
Show Me: Media 6.1—Understand Types of Costs

Access this video file through your registered Web Edition at my.safaribooksonline.com/9780132182461/media.
In addition to these cost types, Project also enables you to do some basic budgeting. You can provide some high-level budget figures and compare the actual costs incurred by tasks in your project with the budgeted costs you outlined during the planning process. The following section walks you through the budgeting process.
Creating a Budget for Your Project
Creating a project budget is a three-step process. First, you create budget resources and assign them to the project summary task, then you identify the budget values for the project (costs or number of hours), and finally, you match up each of your project’s resources with a budget type, so you can compare budgeted values with actual values as your project progresses.
Show Me: Media 6.2—Set Up a Budget
Access this video file through your registered Web Edition at my.safaribooksonline.com/9780132182461/media.
 LET ME TRY IT
Creating and Assigning Budget Resources
The first step to creating a budget for your project is to create resources that represent each budget category in your organization. For example, your organization may have one budget for training costs and another budget for travel costs. To track these budgets in Project 2010, create two separate resources that represent each of these budgets in your project.
To create a budget resource, follow these steps:
- On the View tab, in the Resource Views group, click Resource Sheet.
- Type the name of the budget resource in the Resource Name column.
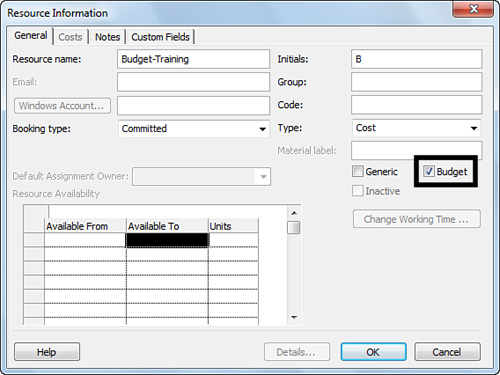
- Double-click the name of the budget resource to display the Resource Information dialog box.
- Choose the resource type for the budget resource from the Type list.
- Select the Budget check box, as shown in Figure 6.1.
Figure 6.1. The Budget check box appears below the Material Label field.
- Click OK to add the budget resource to your project.
After you create the resources, the next step is to assign them to the project summary task.
To assign a budget resource to the project summary task, follow these steps:
- Click the File tab and then click Options.
- Click Advanced on the left portion of the window.
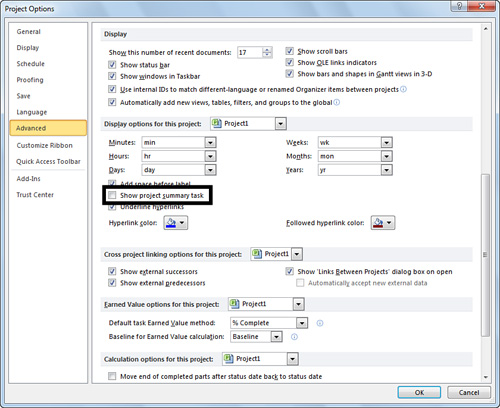
- Under Display options for this project, select the Show project summary task check box (shown in Figure 6.2), and then click OK.
Figure 6.2. The Show project summary task check box is highlighted.
- On the View tab, in the Task Views group, click Gantt Chart.
- Double-click the first row in the Gantt Chart view to display the Summary Task Information dialog box for the project summary task.
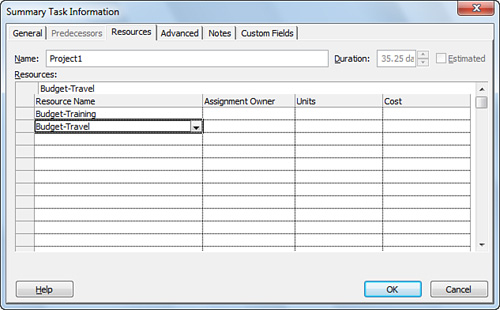
- Click the Resources tab and then select the budget resource from the drop-down list in the Resource Name column, as shown in Figure 6.3.
Figure 6.3. Assigning the budget resources to the project summary task.
- Click OK to assign the budget resource to the project summary task.
Adding Values to Budget Resources
Right now, you have placeholders in your project for each budget in your organization, but we haven’t identified values for those budgets. For example, if you added a resource called “Budget-Training,” you’ve basically said that yes, there is a training budget, but you haven’t said how much money there is in that budget. This is the next step in budgeting your project using Project 2010.
Follow these steps to provide values for your budget resources:
- On the View tab, in Resource Views group, click Resource Usage.
- Click the arrow on the right side of the Add New Column header and then click Budget Cost.
- Click the arrow on the right side of the Add New Column header and then click Budget Work.
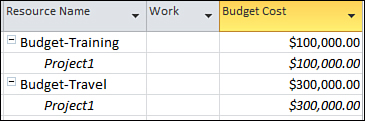
- Scroll down in the left portion of the Resource Usage view to display the budget resources for your project. If your budget is measured as a cost, type the cost value for the budget in the Budget Cost column, as shown in Figure 6.4. If your budget is measured as an amount of work, type the work amount in the Budget Work column.
Figure 6.4. These two budgets have assigned budget costs.
LET ME TRY IT
Pairing Resources with Budgets
Now that you have your budgets defined for your organization, you can choose to go through each work, material, and cost resource in your project and give each a budget assignment. This step is not necessary for using budget resources, but it enables you to easily compare budgeted values against actual values as your project progresses. This comparison lets you see whether you’re overspending, on track, or under-spending.
To match resources with budgets, follow these steps:
- On the View tab, in Resource Views group, click Resource Sheet.
- On the Format tab, in the Columns group, click Custom Fields.
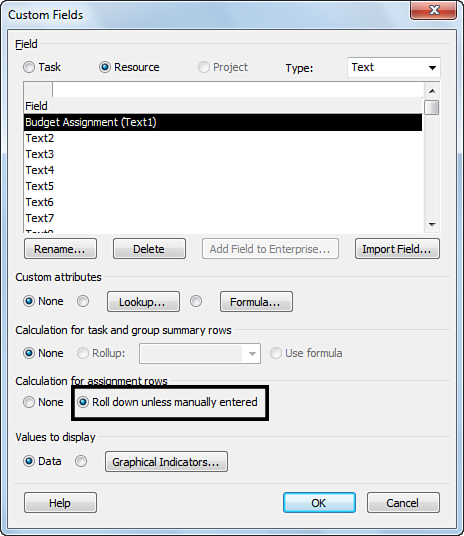
- Make sure that the Resource option is selected at the top of the Custom Fields dialog box, choose Text from the Type list, and then click Text1 to select it.
- Click Rename, type Budget Assignment in the New name for ‘Text1’ box, and then click OK.
- Under Calculation for assignment rows, select Roll down unless manually entered, as shown in Figure 6.5.
Figure 6.5. Select the Roll down unless manually entered option.
- Click OK to finish defining the Budget Assignment custom field.
- In the Resource Sheet view, click the arrow on the right side of the Add New Column header, and then click Budget Assignment (Text1).
- In the Budget Assignment column for each resource in the Resource Sheet view, type the name of the budget to which you want the resource’s actual values to be attributed. For example, if one of the resources in your project is a travel coordinator, you may want to attribute all costs that the travel coordinator incurs on your project to the Travel budget. Be sure to type values in the Budget Assignment column for each budget resource, as well.
Comparing Actual Cost and Work Values with the Project Budget
After work on your project has started, and resources have begun recording the actual work, costs, and other values for tasks in your project, you’ll likely want to check in on how those actual values are comparing with the budgeted values you identified when you were planning the project. If you’ve done the work to set up the budget correctly in Project 2010, comparing actual values with budgeted values is relatively easy.
Show Me: Media 6.3—Project Spending Versus Budget
Access this video file through your registered Web Edition at my.safaribooksonline.com/9780132182461/media.
To compare actual values with budgeted values, follow these steps:
- On the View tab, in the Resource Views group, click Resource Usage.
- On the View tab, in the Data group, click Group by and then click New Group By.
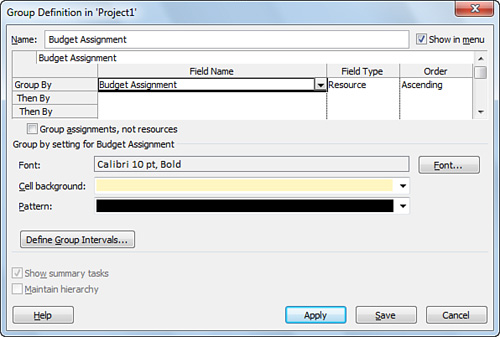
- Type Budget Assignment in the Name box.
- Click Budget Assignment (Text1) in the Field Name column for the Group By row, as shown in Figure 6.6.
Figure 6.6. Creating the Budget Assignment grouping for the Resource Usage view.
- Click Apply.
- In the Resource Usage view, click the arrow on the right side of the Add New Column header and then click Actual Cost.
- Click the arrow on the right side of the Add New Column header and then click Actual Work.
- Compare the rolled-up values in the Actual Cost and Actual Work columns for each grouping with the rolled-up values in Budget Cost and Budget Work.
Accounting for Overtime Spent on Project Tasks
Overtime work isn’t defined the same way in every organization. In some organizations, overtime is considered any work totaling more than 40 hours in one week. In other organizations, overtime is considered any work beyond eight hours in one day. Overtime sometimes is calculated on a monthly basis, and other times, extra hours don’t count as overtime costs because the resources are salaried. Even within one organization, there may not be a single hard-and-fast rule about overtime. Some resources may be salaried; other resources may record overtime on a daily basis; and others may account for overtime weekly.
Because of this, Project makes no assumptions about overtime. If a resource reports that he or she has worked 10 hours in one day, Project records those 10 hours as regular work. It’s up to the project manager to determine whether two of those 10 hours are actually overtime work. After the project manager has manually changed the reported work to eight hours of regular work and two hours of overtime work, the overtime rate for the resource will apply for those two hours, and costs will be accounted for correctly.
LET ME TRY IT
Planning for Overtime Work and Costs
If you know that some of the work on your project will be done as overtime work, you can plan for that overtime work before it actually happens. This enables you to more accurately estimate project costs by including overtime rates for resources during the planning process.
Follow these steps to plan for overtime work in Project 2010:
- On the View tab, in the Task Views group, click Task Usage.
- On the View tab, in the Data group, click Tables and then click Work.
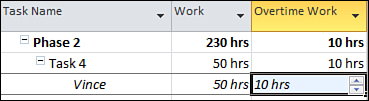
- On the left portion of the Task Usage view, click the Add New Column header and then click Overtime Work.
- Type the amount of overtime you want to plan for in the Overtime Work column for an italicized resource assignment, as shown in Figure 6.7.
Figure 6.7. Adding planned overtime to a resource assignment.
LET ME TRY IT
Recording Actual Overtime Work and Costs
As resources on your project begin work on tasks, their actual work hours will begin rolling in. As the project manager, you’ll need to be recording how much of each resource’s time is actually overtime.
To add actual overtime work to your project, follow these steps:
- On the View menu, in the Task Views group, click Task Usage.
- On the View tab, in the Data group, click Tables and then click Work.
- On the Format tab, in the Details group, click Add Details.
- In the Available fields box, click Actual Overtime Work and then press Ctrl and click Actual Work.
- Click Show to move the selected fields to the Show these fields box.
- Click Actual Work in the Show these fields box to select it and then click the up arrow button on the right side of the box to move the Actual Work field above the Actual Overtime Work field.
- Click OK to add these fields to the time-phased (right) portion of the Task Usage view.
- Scroll through the list of tasks and resource assignments to display the resource assignment that has overtime and then click the row header to select the row.
- On the View tab, in the Zoom group, click Zoom Selected Tasks, as shown in Figure 6.8.
Figure 6.8. Click Zoom Selected Tasks in the Zoom group on the View tab.

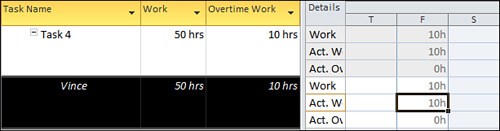
- For each resource assignment, look at the Actual Work row in the time-phased portion of the view and watch for reported work that exceeds the resource’s standard amount of work. For example, look at Figure 6.9. The highlighted resource normally works eight hour days, and I see 10 hours of actual work reported in one day, so I know that resource has worked some overtime on that day, according to company policy.
Figure 6.9. This resource normally works eight hour days, so this 10-hour day includes overtime work.
- Determine how much of the reported Actual Work is overtime work and subtract that from the work total. For example, if my resource reported 10 hours of work, I know that two of those hours are overtime, so I subtract 2 from 10 to get eight hours.
- Type the new work total, minus the overtime work, in the corresponding cell in the Actual Work row.
- In the corresponding Actual Overtime Work row, type the amount of overtime work that the resource reported and then press Enter. The Actual Work row will be updated to add back the overtime work.
After the actual overtime work has been correctly recorded in your project, the resource’s overtime rate will be used to calculate the overtime costs.