
Chapter 8. Effective Motion Tracking
I’m sick of following my dreams. I’m just going to ask them where they’re going and hook up with them later.
—Mitch Hedberg
There is more to matchmoving than simply sampling the motion of one layer and applying it to another, even though that’s fundamentally what motion tracking is. Because of the number of available tracking methods, whether standard or customized hacks, applications of the basic data go a bit beyond the obvious.
There’s also more to motion tracking in After Effects than the built-in point tracker. Mocha-AE from Imagineer Systems is a planar tracker, a fundamentally different approach that solves a problem (corner pinning) that had been somewhere between difficult and impossible with the After Effects tracker. The latest version of mocha-AE adds shape tracking as an alternative to Roto Brush.
It is even possible to use third-party 3D tracking software to match real-world camera motion in After Effects. At this writing, the Foundry has released a plug-in to do just that, right in the software.
All of these automated trackers sample motion at a detail level that would be very difficult to replicate by hand. It’s not a fully automated process, however, and so it helps to develop expertise in order to
• choose effective track regions to begin
• customize settings based on the particular scene or situation
• fix tracks that go astray
• work with blurred or soft selections
This chapter offers you a leg up. Once you grasp these, you can use tracking to go beyond the ordinary to
• match an entire scene using a single track applied once
• stabilize a handheld shot while preserving camera movement
• continue truncated tracks that leave the visible frame
• make use of 3D tracking data
There are many cases where effective tracking can help accomplish the seemingly impossible. The human eye, meanwhile, is extraordinarily sensitive to anomalies in motion, which is quite possibly related to some basic survival instinct.
Point Tracker
Step one for those learning to track is to lock in a good basic track right in After Effects. You may find your tracks going astray after reviewing the clear After Effects documentation on how to use the tracker. Here are some background fundamentals.
Tracking is a two-step process: The tracker analyzes the clip and stores its analysis as a set of layer properties that don’t actually do anything. The properties are then applied to take effect. Both steps, setting the tracking target and applying the track, occur in the Tracker panel when matching or stabilizing motion in After Effects, although there are also ways to work with raw unapplied tracking data, typically with the use of expressions.
Choose a Feature
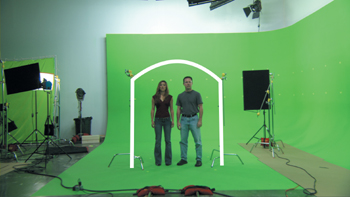
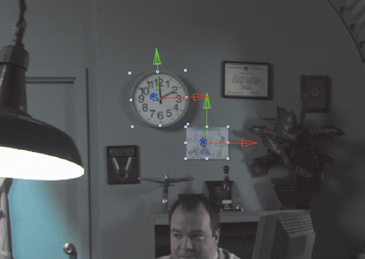
Success with the After Effects tracker relies on your ability to choose a feature that will track effectively (Figure 8.1).
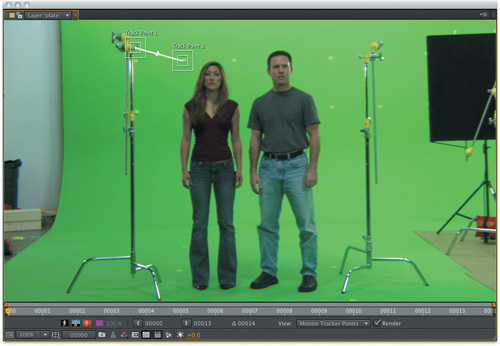
Figure 8.1. Objects with clear contours, definition, and contrast make the best track targets. The tracking markers on the wall were added for this purpose and could be used on a separate pass to track the distant background; the combination of tracking markers and foreground c-stands shown here creates the parallax needed for an effective 3D track.
![]()
Tip

Search and feature regions don’t have to be square! Widen the feature region to match a wide, short target feature. With unidirectional motion—say, a right-to-left pan—widen and offset the search region in the direction of the pan.
Ideally, the feature you plan to track
• is unique from its surroundings
• has high-contrast edges—typically a corner or point—entirely within the feature region
• is identifiable throughout the shot
• does not have to compete with similar distinct features within the search region at any point during the track
• is close to the area where the tracked object or objects will be added
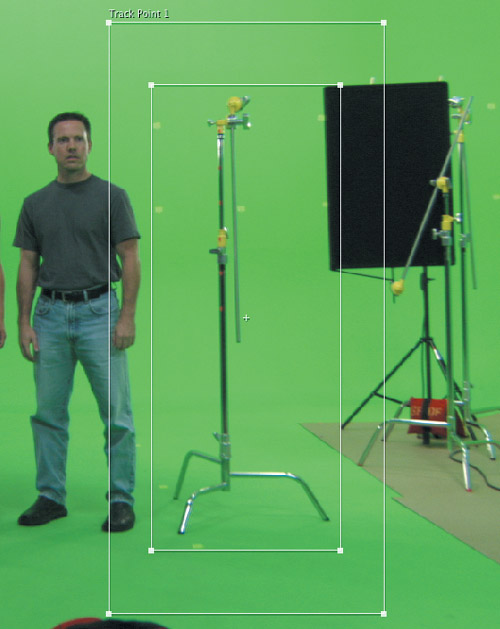
Check out 08_01_track_basic. This shot was designed to be tracked, with c-stands left adjacent to the talent (but not overlapping, so as to be easily garbage matted out of the shot). Let’s suppose that the scene to be added around the actors includes a set piece—say, a door frame or portal—coplanar to those stands. You can make a temporary one with a shape layer, as in Figure 8.2.
Figure 8.2. A crude portal drawn in simply with a shape layer helps visualize a layer that might replace the c-stands.
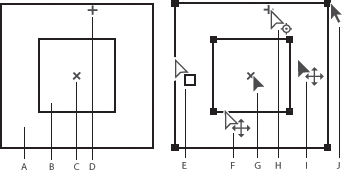
Right-click the plate layer, or under the Animation menu, choose Track Motion. This opens the Layer panel—where tracking is done in After Effects—and reveals the Tracker panel with a default tracker. Double-check that you’re on the first frame (for simplicity), then carefully drag the middle of the feature region (the smaller square, identified in Figure 8.3) so that the whole control moves as one, and place it over the target feature. It’s very easy to grab the wrong thing, so pay close attention to the icon under your cursor before you drag.
Figure 8.3. Many interactive controls are clustered close together in the tracker. Identified here are: A. Search region; B. Feature region; C. Keyframe marker; D. Attach point; E. Move search region; F. Move both regions; G. Move entire track point; H. Move attach point; I. Move entire track point; J. Resize region. Zoom in to ensure you’re clicking the right one.
I suggest selecting one of the yellow joints on a stand as a target feature, because the detail is most consistent. If you choose a shinier detail on the chrome part of the stand, that specular detail will shift as the lighting angle shifts. The joints have a clearly definable shape that fits nicely in a modest-sized feature region, as in Figure 8.2, and doesn’t change over the course of the shot.
Click ![]() in the Tracker panel and watch as After Effects tracks the feature from frame to frame. The Track Point icon only moves in whole pixel increments, so don’t assume you have a bad track if you see it jittering a bit. Assuming you chose a well-defined feature with edges inside the feature region, you should quickly derive a successful track automatically.
in the Tracker panel and watch as After Effects tracks the feature from frame to frame. The Track Point icon only moves in whole pixel increments, so don’t assume you have a bad track if you see it jittering a bit. Assuming you chose a well-defined feature with edges inside the feature region, you should quickly derive a successful track automatically.
Now the only thing left to do is to apply it. Click the Apply button in the Tracker panel, then OK to the inevitable Motion Tracker Apply Options (to specify that this track does indeed apply to X and Y). Back in the Composition viewer, there are a couple of problems with this otherwise locked track: The object is shifted from its original position, and it doesn’t scale up with the camera dolly. The next two sections solve these problems.
Before we move on, though, the main decisions when setting up a track regard the size and shape of the search and feature regions. Keep the following in mind:
• A large feature region averages pixel data, producing a smoother but possibly less accurate track (Figure 8.4).
Figure 8.4. Thinking of tracking the entire c-stand? This will make the track smoother, because it averages more data, but less accurate (for the same reason). There’s also the problem of the camera dolly in this shot, which will cause the whole stand to scale and change perspective quite a bit, a source of further inaccuracy.
• A small feature region may pick up noise and grain as much as trackable detail. This will lead to an accurate but jittery and therefore unusable track.
• The bigger the search region, the slower the track.
• The feature region doesn’t have to contain the area of frame you want to match. One way to offset a track is to move the attach point—that little x at the center of the tracker. A better solution is to apply the track to a null, (discussed later).
Tracked features can often be unreliable, changing perspective, lighting, or color throughout the course of the shot. The following sections solve the initial difficulty experienced in this first attempt, and explain what to do when you don’t have a constant, trackable feature exactly where you want the target to go, as was the case here.
Tweak the Tracker
There are five types of track listed under the Track Type menu in the Tracker panel. Before moving further one at a time, here is an overview of what each does. Stabilize and Transform tracks are created identically but applied uniquely. Edit Target shows the singular difference between them: Stabilize tracks are always applied to the anchor point of the tracked layer. Transform tracks are applied to the position of a layer other than the tracked layer (or the effect point control of any effect in any layer).
Using Stabilize, the animated anchor point (located at the center of the image by default) moves the layer in opposition to Position. Increasing the anchor point’s X value (assuming Position remains the same, which it does when you adjust the Anchor Point value directly in the Timeline) moves the layer to the left, just as decreasing the Position value does.
Corner Pin tracks are very different; in After Effects these require three or four points to be tracked, and the data is applied to a Corner Pin plug-in to essentially distort the perspective of the target layer. Because these tracks are notoriously difficult and unreliable, the happy truth is that mocha-AE, which also generates data that can be applied to a corner pin, has more or less superseded Corner Pin tracking.
Tip
![]()
Keep in mind that you can track in reverse, for situations where the feature being tracked is larger, more prominent, or more clearly visible at the end of shot.
A Raw track generates track data only, graying out the Edit Target button. It’s simply a track that isn’t applied directly as Transform keyframes. What good is unapplied track data? For one thing it can be used to drive expressions or saved to be applied later. It’s no different than simply never clicking Edit Target; the raw track data is stored within the source layer (Figure 8.5).
Figure 8.5. Tracker data is stored under the tracked layer, where it can be accessed at any time.
Position, Rotation, and Scale
You can’t uncheck the Position toggle in the Tracker panel (thus avoiding the unsolvable riddle, what is a motion track without Position data?), but you can add Rotation and Scale. Enable either toggle, and a second track point is automatically added.
Additionally tracking rotation and scale data is straightforward enough, employing two track points instead of one. Typically, the two points should be roughly equidistant from the camera due to the phenomenon of parallax (Figure 8.6).
Figure 8.6. A scale/rotation track will not succeed with two points that rest at completely different distances from the camera.
This, then, is the solution to one of the difficulties in the 08_01_track_basic example. Click Reset in the Tracker panel and check Scale, and there are two track points (the same occurs if you check Rotation, which isn’t too applicable in this shot). The distance and angle between those points is used to determine rotation and/or scale, so they should be placed at two points that are equidistant from camera and far enough from one another to yield accurate data. The c-stands were clearly placed with this in mind, so choose similar features on each, retrack, and reapply. The target layer still shifts position, but it now scales with the movement of the shot. One down, one to go.
Solve Problems with Nulls
You may have already tried simply moving the target layer after tracking data was applied to it. Because there is a keyframe on each tracked frame, moving the object at any point moves only that keyframe, causing a jump. You can instead select all Position keyframes by clicking that property in the Timeline panel, then moving, but it’s easy to forget to do this or for the keyframes to become deselected as you attempt it.
Choosing instead to apply track data to a null object layer and then parenting to apply the motion gains you the following advantages:
• Freely reposition tracked layers: It doesn’t matter whether the track attach point is in the right location; the null picks up the relative motion, and any layer parented to it can be repositioned or animated on its own (Figure 8.7).
Figure 8.7. The null contains the applied motion data and is not touched. The foreground portal layer is parented and contains no keyframes, so you are free to move, scale, and rotate it without worrying about disrupting the track.

• Once a track is set you can lock the tracked layer so that it’s not inadvertently nudged out of position.
• A Stabilization track can be used to peg multiple objects to a scene (next section).
• One set of motion data can be parented to another to build tracks, parenting one to the next.
To fully solve 08_01_track_basic, then, take the following steps:
- Create a null object (under the Layer menu).
- Track Position and Scale using equidistant points on either tracking target (the c-stands that are there for this purpose).
- Click Edit Target to make certain the null is selected, then apply the track to the null.
- Parent the layer to the null (Shift+F4 toggles the Parent column in the timeline); then select the null as the target from the foreground object being tracked.
Track a Difficult Feature
A shot with rotation or scale of more than a few degrees typically requires that you track a feature that does not look at all the same within the Feature Region box from the start to the end of the frame (Figure 8.8). For just such situations, Tracker > Options contains the Adapt Feature on Every Frame toggle.
Figure 8.8. To the naked eye, the pattern being tracked in these two frames is nearly identical, but to a point tracker, which does not understand context, the two might seem almost unrelated due to changes in angle, blur, and scale. The solution with a point that changes due to rotation, scale, blur, or light changes may be to toggle Adapt Feature on Every Frame and have the tracker stop each time Confidence goes below the default threshold of 80%.
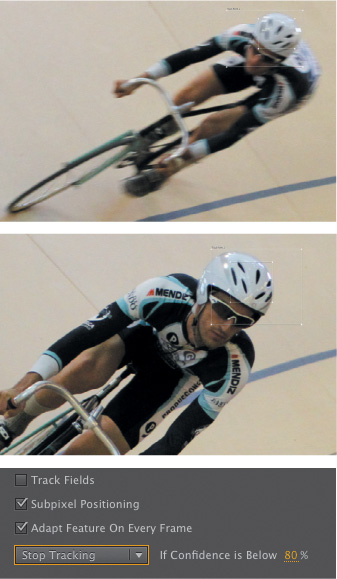
By default, the tracker is set to adapt the track feature if the Confidence setting slips below 80%. Adapt Feature on Every Frame is like restarting the track on each and every frame, comparing each frame to the previous one instead of the one you originally chose. For ordinary tracks this adds an unwanted margin of error, but in a case where a feature is in constant flux anyway, this can help.
Tip
Stopping and restarting a track resets Feature Region at the frame where you restart. Use this to your advantage by restarting a track that slips at the last good frame; it often works.
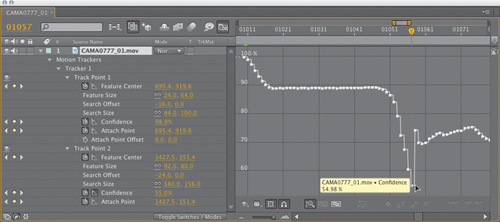
Confidence
At the bottom of Motion Tracker Options is a submenu of options related to After Effects’ mysterious Confidence settings. Every tracked frame gets a Confidence setting, an evaluation of how accurate the track was at that frame. This may or may not be indicative of the actual accuracy, but my experience is that you’re almost guaranteed to be fine with values above 90%, and real problems will cause this value to drop way, way down, to 30% or less (Figure 8.9).
Figure 8.9. The Confidence graph clearly indicates where this track has lost its target.
Depending on this setting, you can
• continue Tracking. Power ahead no matter what happens!
• stop Tracking. Reset the tracker manually right at the problem frame.
• extrapolate Motion. Allow After Effects to guess based on the motion of previously tracked frames, for cases where the tracked item disappears for a few frames.
• adapt Feature. Change the reference Feature Region to the previous frame if Confidence is low.
Tip
To reveal the current track in the Timeline with the Track Controls active, use the SS (Show Selected) shortcut.
Whichever you choose, you also have the option to go back to the frame where a track went wrong, reset Feature Region by hand, and restart the track.
Script
![]()
TrackerViz by Charles Bordenave (http://aescripts.com/trackerviz/) originated as a tool to average motion data, so that several track attempts could be averaged together to make a single animation. Additional new features allow you to use mask shapes and tracker points interchangeably, or link a mask shape to the position of selected layers.
Motion Blur
Motion blur is also essential to matchmoving. A good track won’t look right until its motion blur also matches that of the background plate. If you don’t know the shutter speed with which a shot was taken, you can match it by eye, most often zooming in to an area of the frame where it is apparent in both the foreground and background. If you know, for example, that the shutter speed was one-half of the frame rate (the standard setting for a cinematic look), use a 180-degree shutter, and be sure to set the Shutter Phase to –0.5 of that number, or –90.
Close-up: Subpixel Motion
![]()
The key feature of the After Effects tracker is subpixel positioning, on by default in Motion Tracker Options. You could never achieve this degree of accuracy manually; most supposedly “locked off” scenes require stabilization despite the fact that the range of motion is less than a full pixel; your vision is actually far more acute than that.
As you watch a track in progress, the trackers move in whole pixel values, bouncing around crudely, but unless you disable subpixel positioning. This does not reflect the final track, which is accurate to ![]() of a pixel (four places below the decimal point).
of a pixel (four places below the decimal point).
Motion blur settings reside in Composition Settings (Ctrl+K/Cmd+K) > Advanced, and if you enable the Preview toggle at the lower left, you can see them update as you adjust them for eye matching. As described back in Chapter 2, adjust Shutter Angle and Shutter Phase until you see a good match, raising (or in the odd case, lowering) Samples per Frame and Adaptive Sample Limit to match (Figure 8.10).
Figure 8.10. Motion tracking can’t work without matching motion blur (right). This shot uses the standard film camera blur: a 180-degree shutter angle, with a phase of –90.
If it’s necessary to stabilize a scene that contains heavy motion blur, that’s a bigger problem that needs to be avoided when shooting (even by boosting the shutter speed of the camera, where possible). Figure 8.11 shows a case in which it’s preferable to smooth camera motion rather than lock the stabilization (see “Smooth a Camera Move” later in this chapter for a shot that works much better).
Figure 8.11. If shooting with the intention of stabilizing later, raise the film shutter speed and reduce camera motion to minimize motion blur and a huge empty gutter around the image.. Otherwise, you end up with an image like this, which while fully trackable, won’t look sharp enough completely stabilized.
Track a Scene
In the real world, objects sit in an environment, and if that environment or the point of view changes, they remain in place. You knew this. You may not know how to make a 2D After Effects track re-create it.
Notes
![]()
The 08_stabilize_basic folder on the book’s disc contains this simple tracking and stabilization example.
The key is to stabilize the background layer and then parent a camera to that stabilization, restoring the motion. The motion of the source camera is captured and applied to a virtual camera so that any elements you add to the scene pick up on that motion. It’s quite cool.
The AE Camera as a Tracking Tool
Suppose you have an arbitrary number of foreground layers to match to a background plate: not just objects, but color corrections, effects with holdout masks, you name it. Applying track data to each of those layers individually is a time-consuming headache, and even parenting them all to a tracked null may not work properly if there is rotation or scale data, as that null then becomes the center of those translations.
Instead, the following method allows you to stabilize the background scene, add static foreground elements, and then reapply the scene motion.
- With the background layer selected, choose Stabilize Motion (either by context-clicking the layer or by choosing it from the Animation menu).
- Stabilize the layer for Position, Rotation, and Scale, using two points equidistant from the camera.
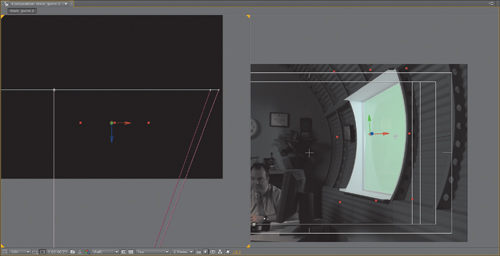
- The stabilized layer offsets and rotates in the frame (Figure 8.12). Return to the first frame of the track (quite possibly frame 0 of the comp). Turn on the stabilized layer’s 3D switch.
Figure 8.12. Gaps open up around the edges of the image as the track points are held in place.
- Add a 3D camera (context-click in an empty area of the Timeline panel); in the Camera Settings, give it a name like trackerCam, use the 50mm preset, and click OK.
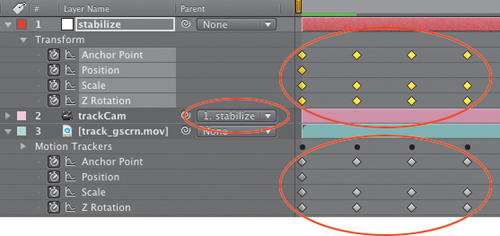
- Parent the camera layer to the stabilized layer (Figure 8.13).
Figure 8.13. The relevant Transform properties are copied and pasted to a null, to which the camera is then parented.
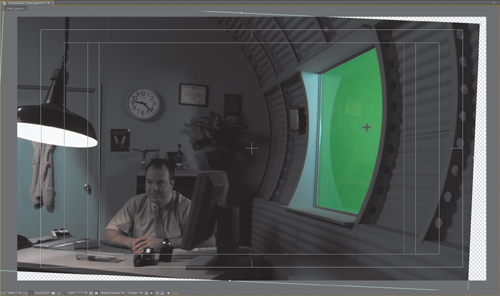
Everything now appears back to normal, with one intriguing twist: Any new item added to the scene picks up the scene motion as soon as you toggle its 3D switch. All you have to do is drop it in and enable 3D. Any layer that shouldn’t follow the track, such as an adjustment layer, can remain 2D (Figure 8.14).
Figure 8.14. Extra layers for a new clock face and child’s artwork along with a shadow are added as 3D layers, so they pick up the motion of the scene as captured by the tracked camera.
2.5D Tracking
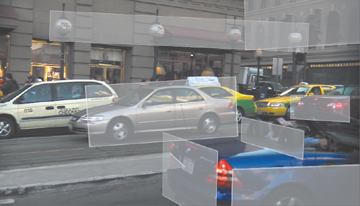
You can even fake 3D parallax by offsetting layers in Z space. Any layer that is equidistant from the camera with the motion track points has a Z-depth value of 0. Offsetting layers is tricky as there is no frame of reference for where they should be placed in Z space—not even a grid (Figure 8.15).
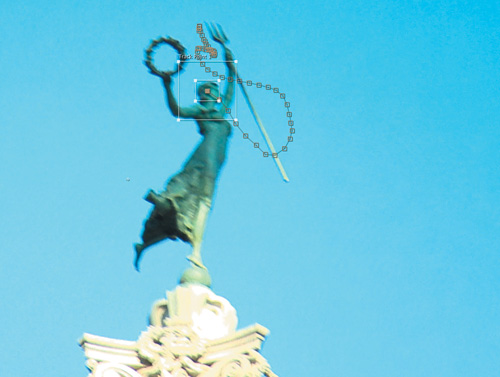
Figure 8.15. Rotoscoped shapes can be tracked so that they “stick” in a scene; you don’t have to animate the shape itself unless it is also a matte that needs to be articulated around a moving figure. Here it is even offset in 3D to match the parallax of the wall nearer camera.
This can be referred to as “2.5D tracking”: a 3D camera paired with two-dimensional tracking points and layers. Any 3D offset derived from a 2D track is only approximately accurate, so this is a total hack. If your scene has areas of frame closer or further than the track points that you wish to match, guess where in 3D space to place a layer and you may just get lucky via a little trial and error.
Notes
![]()
2.5D tracking will even stick fore-ground layers to a zoomed shot; the Scale stabilization scales the parented camera, making it appear to zoom.
If a shot tracks (the camera moves instead of zooming, creating changes in perspective), it probably requires a real 3D camera track (see “Try It Out for Yourself” at the end of this chapter).
Smooth a Camera Move
It’s even possible to stabilize a shot in which the camera moves—handheld, aerial, crane, or dolly—smoothing bumps in the motion while retaining the move, although this feature is not built in to After Effects. Even if you don’t have this immediate need—and with the number of shots these days coming from unstable DSLR cameras, I wouldn’t be surprised if you do sometime soon—this exercise also contains some tips about tracking that apply elsewhere.
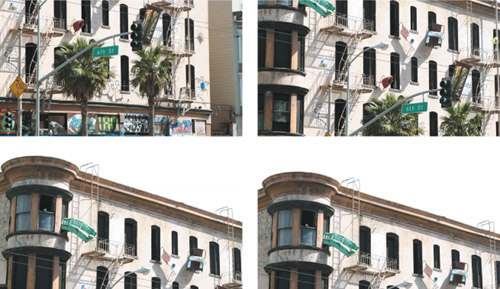
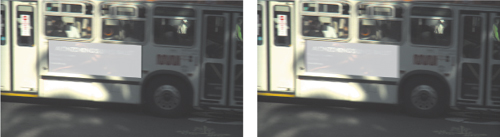
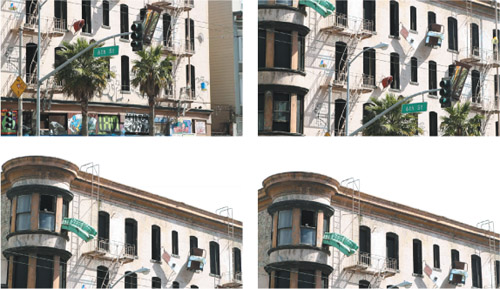
Figure 8.16 shows the panning action of a background plate shot that will be used in the final chapter of the book, in which the building depicted is set on fire. The camera was stabilized (suspended with a magic arm), but a small camera with a long lens is difficult to keep steady without a professional tripod while shooting lightly and guerrilla-style. The law where I live states that you only need a permit to shoot footage if you put down sticks (a tripod), offering an economical reason to set up this way and fix it in post.
Figure 8.16. Notice that no part of the first frame of the sequence (top left) is contained in the end of the shot (bottom right). Check the shot itself and you’ll see that its motion is as smooth as possible but jittery enough to be distracting.
All of the steps from the “AE Camera as a Tracking Tool” section apply here, with a couple of additions:
- To stabilize motion on this shot requires one extra step because, as shown in Figure 8.16, no one point appears in frame from start to finish.
There is, however, a great solution for that. Try the following with 08_stabilize_moving_camera.aep from the book’s disc:
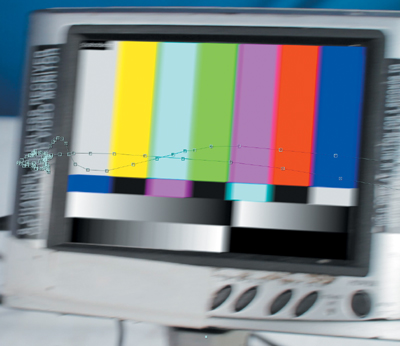
• Track the shot starting at the beginning using a target in the upper-left corner (so that it will remain in frame through as much of the pan as possible). The multicolored lampshade above the fire escape is perfect. Be sure to enlarge the feature region and offset it down and to the right to cover the panning motion.
• The target reaches the edge of frame at frame 45. Go to the last good frame.
• Press UU to reveal keyframes for the layer, and then Alt-drag (Opt-drag) the tracker to a new target higher in frame (such as the green sofa).
Notice that the Feature Center value changes in the timeline, but the Attach Point does not.
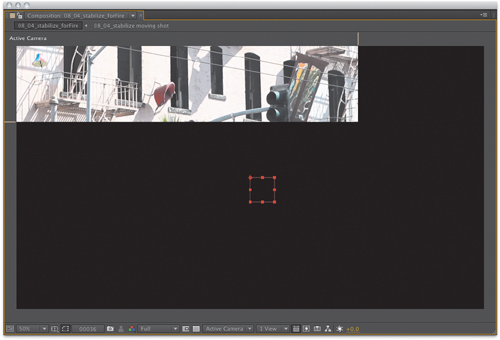
- As in the previous “AE Camera as a Tracking Tool” section, set up the frame that has disappeared from view (Figure 8.17) to stabilize: Make the layer 3D, copy the anchor point animation to a null, and parent the camera to that null.
Figure 8.17. Stabilizing a layer with a full pan around that lamp in the upper-left corner causes it to leave frame completely, but this is only an interim step.
- Alt-click (Opt-click) on the Anchor Point stopwatch of the layer to which the camera is parented. This sets the default expression
transform.anchorPoint. - With the default expression (
anchorPoint) still highlighted, go to the Expressions menu icon , and under Property choose the smooth default:
 smooth(width = .2, samples = 5, t = time).
This works, but as a starting setting, I recommend discarding the third argument (“t = time”) and the other hints (“width =” and “samples =”), then change the values to something like smooth(2, 48).
Next to the Anchor Point property is a toggle to graph the expression ![]() , and under the graph type and options menu
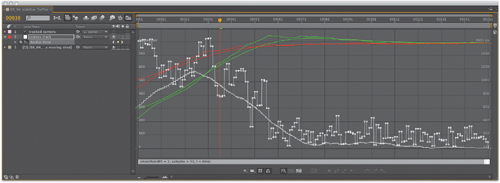
, and under the graph type and options menu ![]() you can choose Show Reference Graph and Show Expression Editor (Figure 8.18).
you can choose Show Reference Graph and Show Expression Editor (Figure 8.18).
Figure 8.18. The result of smoothing can be seen in the Graph Editor—there is a second red and green line for the new x and y, a white line down the middle of the white keyframe velocity graph, and the expression is shown at the bottom.
The expression works as follows: It gives a command (smooth()) followed by three settings known as arguments. The third one, time, is used only to offset the result, and it’s optional, so deleting it gets it out of the way. The hints for the other two (width = and samples =) are also not needed to make the expression work—they are there just to remind you of what they do.
Width determines how much time (before and after the current time) is averaged to create the result. A setting of 2 samples 2 seconds means 1 second before and 1 second after the current time. The samples argument determines how many individual points within that range are actually sampled for the result; generally, the more samples, the smoother the curve. A setting of 48 means that over 2 seconds, 48 individual frame values will be averaged (the maximum for 24-fps footage).
Notes
![]()
The shot used in this example was taken with a high shutter speed, so there is very little motion blur, which is good for a handheld shot to be stabilized. However, check Chapter 2 for a tip on adding the appropriate amount of motion blur after the fact.
It’s also possible to smooth rotation in this manner, although I find a lighter touch (fewer samples) works best with rotation. However, the best way to find out for your individual shot is by trying different settings, looking at how smooth the resulting curve (not to mention the actual motion) appears.
It’s a little hard to imagine that you can smooth the motion data for the camera, causing it to go out of sync with the background, and not have a mismatch. What is actually happening, though, is that the scene motion is removed completely, then restored in a smoother state.
Planar Tracker: mocha-AE
There is, in fact, a more powerful option than the tracker built in to the After Effects UI, and it’s included with every copy of After Effects CS5: mocha for After Effects, or mocha-AE, which is now in its own version 2. It is found adjacent to the After Effects application—standalone software designed to integrate directly with After Effects. It can be used to replace the functionality of the After Effects tracker, but it also adds capabilities not found with any point tracker.
Notes
![]()
Imagineer also offers mocha, a standalone version of the same software designed to integrate with other compositing and animation applications besides After Effects.
Mocha is a planar tracker, which is truly and fundamentally different from a point tracker such as the one in After Effects. A planar tracker assumes that the area defined by the feature region is a plane in 3D space, and looks for that plane to change not only its position, rotation, and scale but its orientation while remaining a consistent surface. The result is 2D data that can be used to emulate 3D, in particular corner pin and shape tracks. A tracked plane can also be averaged to generate the same type of track data that the After Effects tracker creates.
Look around the environment where you are right now and you may notice numerous two-dimensional planes: walls, tabletops, the backs of chairs, the sides of hard-surface objects such as automobiles (Figure 8.19), even the trunk of a tree or a face. If you were sitting on the moon reading this book, the surface of Earth, though curved, would track more or less as a single unified plane as the camera passed across it.
Figure 8.19. A plane does not have to be flat and rectilinear in order for mocha to track it; look around and you will see many coplanar objects.
The plainest use for mocha-AE—pun very much intended—is Corner Pin tracking, replacement of a surface defined by a rectangle with another such surface. This type of track has long been the Achilles’ heel of the After Effects tracker, whose use is now discouraged for this purpose, given the free availability of mocha-AE.
Mocha can, in fact, be used for just about any type of 2D tracking. The extra precision is often worth the extra steps of leaving the After Effects environment. I find nowadays that I rely on the After Effects tracker only for the most basic and foolproof tracks. As soon as I run into trouble, I look for a way to accomplish the shot in mocha-AE.
The Basics
Mocha is an application unto itself. Its manual is quite an easy read and longer than this entire chapter (just click Guide on the Mocha Welcome dialog). It’s not a bad read. Because it’s a new feature, here’s an example with a few highlights.
Notes
![]()
The footage and projects used for this mocha AE example can be found in 08_mocha_corner_pin_basic on the book’s disc.
- Begin with a New Project by clicking
 at the upper left.
 - Choose the source clip, a TIFF sequence called 08_mocha_corner_pin_applied.
- This is an image sequence, so be certain about setting the frame rate here and in After Effects. This footage was shot at 23.976 fps; if, for example, you instead choose 24, just make sure you do so in both applications (and remember that a new copy of After Effects defaults to 30).
- Allow the clip to load, then drag the black time indicator below the viewer to some frame at the middle of the clip where you can clearly see the screen.
In this shot, the camera pans on and off the screen, so it will be necessary to begin in the middle and track both forward and backward.
- With the X-spline
 tool (or if you prefer, Bezier splines
  x), click four corner points in succession just outside the monitor’s boundaries (Figure 8.20), and then press C to close the shape.
Figure 8.20. Four corners are positioned outside the bounds of the item being tracked, without even taking the trouble to tighten the X-splines. The image on the monitor is washed-out enough that there’s no need to hold that out (which would be done more carefully and is thoroughly explained in the mocha-AE manual).
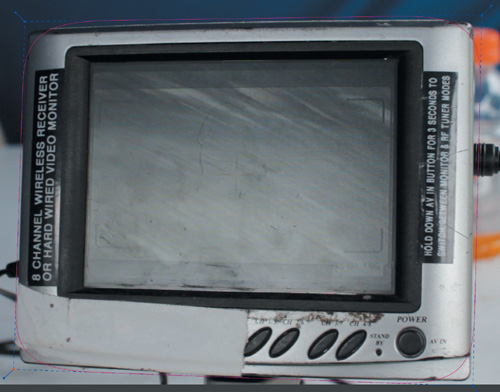
Note that the boundaries don’t really matter here. Capturing most of the foreground monitor, including its edges and even a bit of what’s behind it, is fine.
- Now track the shot, first forward
 to the end of the clip, then drag back to the beginning of the blue line of tracked frames and
  track backward to the opening of the shot.
Note that mocha-AE has no trouble with motion blur, the moving content on the screen (because it’s so faint in this case—see the mocha-AE manual for an example where it’s necessary to hold out the screen), and most remarkably (compared with the After Effects tracker) it’s no problem for the track area to exit frame.
- Go back to the middle of the clip and enable the Surface button to the right of the viewer. Drag the four blue corners so that the shape aligns with the edges of the screen.
- Click on the AdjustTrack tab below the viewer, then scrub or play
 the clip to see how well the corners hold.
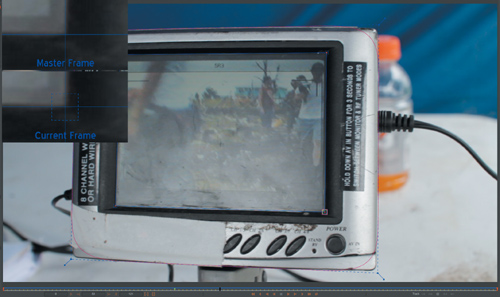
 - Zoom Window picture-in-picture views helpfully appear (Figure 8.21) with a given corner selected; use the Nudge controls under AdjustTrack to gently push them back into place anywhere you see them slipping, or simply try the Auto button at the center of those controls.
Figure 8.21. When it comes time to fine-tune the positions of the surface corners, mocha looks like a point tracker, but the crosshairs are only there to fine-tune the completed planar track.
- Once you are satisfied that the surface is locked in place, click Export Tracking Data from the lower right of the UI. From the dialog that appears, choose After Effects Corner Pin [supports motion blur] and click Copy to Clipboard (Figure 8.22).
Figure 8.22. The most straightforward approach to an ordinary corner pin.
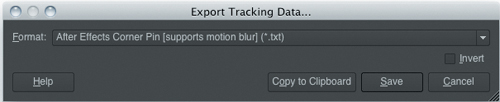
If you instead choose to save a text file, you can then copy and paste its data from an ordinary text editor.
- Back in After Effects, at the same starting frame, paste the keyframes to the target layer to be added (if you don’t have one, create a new solid or placeholder layer).
- Enable Motion Blur for both the layer and the Composition in the Timeline.
Script
![]()
MochaImport by Mathias Möhl (http://aescripts.com/mochaimport/) simplifies the process of applying mocha-AE tracking data in After Effects. You can track or stabilize a layer without intermediate nulls or other steps, and even set up a scene track or camera move stabilization as shown earlier in this chapter.
This track now has everything you need: an entry, exit, and motion blur, and it even matches the skewing caused by the Canon 7D CMOS sensor (Figure 8.23).
Figure 8.23. Mocha-AE v2’s use of position data makes corner pinning a heavily motion-blurred scene just work with the right settings.
Notes
![]()
Mocha is typically used for corner pinning, but you can instead choose to export After Effects Transform Data and use it like regular tracker data.
The Nitty-Gritty
It’s normal for a track to be slightly more complicated than this, usually due to motion or perspective shifts within the track area. This can be the result of foreground objects passing across the track region or the appearance of the region itself changing over time.
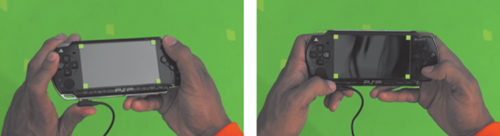
Figure 8.24 shows an otherwise straightforward track—a screen, like the last one—with the following challenges: flares and reflections play across the screen, the hands move back and forth across the unit, and the perspective of the screen changes dramatically.
Figure 8.24. The tracking markers on the screen are not necessary for mocha to track this handheld unit for screen replacement; it’s the reflective screen itself and the movement of the thumbs across it that present mocha with a challenge.
There are two standard solutions to any track that slips:
• Sudden slippage is often the result of foreground motion (or light shifts) changing the appearance of the tracked area; the solution is to mask out the area containing the disturbance.
• Small, gradual slippage is often the result of shifts in perspective and can be keyframed.
The clip shown in Figure 8.23 requires both techniques. A track of the entire face of the unit shifts slightly as it is tilted and it shifts a lot as the thumbs move across the track area and reflections play across the screen.
Big shifts in the track region are caused by changes in the track area, so I fix those first, adding an additional spline (or splines) containing the interruptive motion. The Add X-spline ![]() and Add Bezier Spline
and Add Bezier Spline ![]() create a subtractive shape (or shapes) around the areas of the first region that contain any kind of motion. Figure 8.25 shows that these can be oddly defined; they track right along with the main planar track.
create a subtractive shape (or shapes) around the areas of the first region that contain any kind of motion. Figure 8.25 shows that these can be oddly defined; they track right along with the main planar track.
Figure 8.25. Holdout masks are added to eliminate areas where the screen picks up reflections and the left thumb moves around. Notice that the tracking markers aren’t even used; there is plenty of other detail for mocha to track without them.
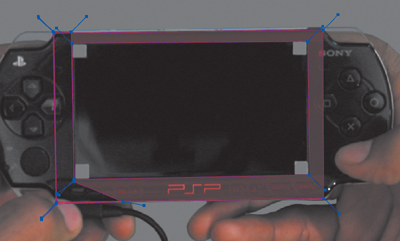
Retracking with these additional holdout masks improves the track; all that is required to perfect this track is a single keyframe (at a point where the unit is tilted about 15 degrees toward camera), this time to the track mask itself, which creates a green keyframe along the main timeline. Mocha uses these keyframes as extra points of comparison, rather than simply averaging their positions.
In this example it’s also helpful to check Perspective under Motion in the Track tab; this allows the change in proportions from the tilting of the screen to be included in the Corner Pin export.
If you get into trouble, you’ll want to know how to delete keys (under Keyframe Controls) or reference points (in the AdjustTrack tab). You also need to know a few new keyboard shortcuts, such as X for the hand tool and arrow keys to navigate forward and backward one frame.
Notes
![]()
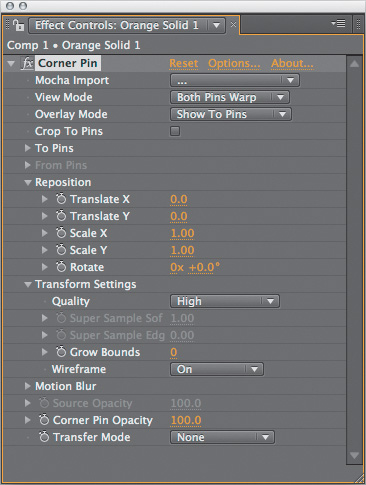
The Red Giant Corner Pin effect included in the Warp collection (available on the book’s disc) is designed specifically to be used with mocha-AE (Figure 8.26).
Figure 8.26. The Red Giant Corner Pin effect not only includes a Mocha Import function, it allows “from” as well as “to” pins—so your Corner Pin content can be tracked from a moving source as well.
Track Roto/Paint
Expressions and tracking data go together like Lennon and McCartney: harmoniously, sometimes with difficulty, but to great effect. You don’t even have to apply raw tracking data in order to put expressions to use; the expressions pick whip can be used to link any property containing X and Y position data directly to the X and Y of a motion track.
Close-up: Shape Tracking
![]()
Mocha-AE version 2 also adds shape tracking via the new mocha shape effect. There are a couple of features that are unique to it:
• Shapes tracked in mocha-AE can be pasted into After Effects as mask shapes.
• Mocha shapes support adding feather to mask vectors (if applied with the mocha shape effect).
However, it has to be said that shape tracking is not the prime directive, if you will, of mocha-AE, and it can be challenging to set up the track (read the manual, as it involves linking shapes) and then to get the splines to conform to the actual contours of the item being tracked. Your mileage may vary.
For example, to track in a paint clone operation in a single layer:
- Set up a track with the paint target as the feature center (the center of the feature region).
- Move the attach point to the area from which you wish to clone.
- Track motion; you can set Track Type to Raw or simply don’t apply it.
- Add a clone stroke with appropriate settings.
- Pick whip Stroke Options > Clone Position to Attach Point and Transform: Clone 1 > Position to Feature Center.
This technique can just as easily be applied to any layer that can be placed within visible range for pick whipping.
Notes
![]()
The techniques revealed earlier in the chapter to Track a Scene can also be used to place paint and roto, just as you would any comped and tracked object.
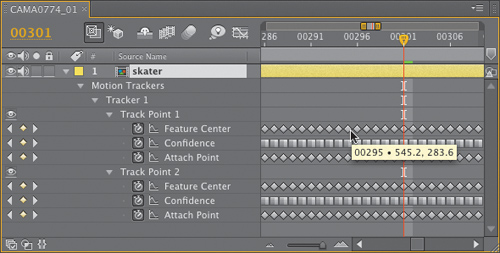
Continue Loop
Sometimes a track point will disappear before the track is completed, either because it is obscured by a foreground object or because it has moved offscreen. As shown above, mocha-AE generally has no problem with this—any part of the tracked plane that remains in frame is tracked.
Nonetheless, there are many cases in which you’ll want to continue a track or other motion-matched animation right in After Effects. First make certain there are no unwanted extra tracking keyframes beyond which the point was still correctly tracked; this expression uses the difference between the final two keyframes to estimate what will happen next.
Reveal the property that needs extending (Position in this case), and Alt-click (Opt-click) on its stopwatch. In the text field that is revealed, replace the text (position) by typing loopOut("continue"). Yes, that’s right, typing; don’t worry, you’re not less of an artist for doing it (Figure 8.27).
Figure 8.27. A continue loop is handy anywhere you have motion that should continue at the pace and in the direction at the first or last keyframe. Notice in this example that although it could help as the skater disappears behind the post, the loop doesn’t do curves; motion continues along a linear vector.
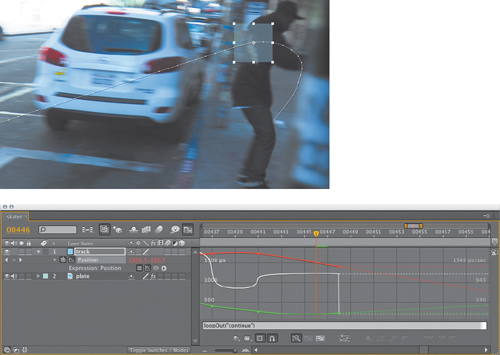
This expression uses the delta (velocity and direction) of the last two frames. It creates matching linear motion (not a curve) moving at a steady rate, so it works well if those last two frames are representative of the overall rate and direction of motion.
Script
![]()
Tracker2Mask by Mathias Möhl (http://aescripts.com/tracker2mask/) uses tracker data to track masks without the need for a one-to-one correspondence between the tracked points and the mask points. This script is a fantastic roto shortcut for cases where a rigid body in the scene is changing position or perspective.
Chapter 10 offers many more ideas about how to go beyond these simple expressions and to customize them according to specific needs.
3D Tracking
After Effects can make use of 3D tracking data. Many leading third-party motion tracking applications, including Pixel Farm’s PF Track and SynthEyes, from Andersson Technologies, export 3D tracks specifically for After Effects. And CameraTracker, a new 3D tracking plug-in from the Foundry, make the process of incorporating a match-moved camera into an After Effects scene much more straightforward (Figure 8.28). The following discussion assumes you are not working with this plug-in, although much of the same information applies.
Figure 8.28. The Foundry’s CameraTracker looks set to bring real 3D tracking right into the After Effects Composition viewer.
![]()
Generally, the 3D tracking workflow operates as follows:
- Track the scene with a 3D tracking application. The generated 3D camera data and any associated nulls or center point can be exported as a Maya .ma file for After Effects.
- Optionally, import the camera data into a 3D animation program and render 3D elements to be composited. Working with Maya, you can also create a 3D animation and camera data from scratch, and export that.
- Import the camera data into After Effects; you’ll see a composition with an animated 3D camera and nulls (potentially dozens if they haven’t been managed beforehand). A 2D background plate with the original camera motion can be freely matched with 3D layers.
Script
![]()
You probably know that it’s also possible to import Cinema 4D 3D data into After Effects via a Cinema 4D plug-in from Maxon, but using the pt_AEtoC4D script by Paul Tuersley (http://www.btinternet.com/~paul.tuersley/scripts/pt_AEtoC4D_v1.4.zip) you can also work the other direction with 3D camera animations, exporting them from After Effects to Cinema 4D.
Figure 8.29 shows a shot that also began with a 3D track in Boujou. The fires that you see in the after shot are actually dozens of individual 2D fire and smoke layers, staggered and angled in 3D space as the camera flies over to give the sense of perspective. More on this shot and how to set up a shot like this is found in Chapter 14.
Figure 8.29. Just because you’re stuck with 2D layers in After Effects doesn’t mean you can’t stagger them all over 3D space to give the illusion of depth, as with this fly-by shot. Tracking nulls from Boujou helped get the relative scale of the scene; this was important because the depth of the elements had to be to exact scale for the parallax illusion (right) to work.
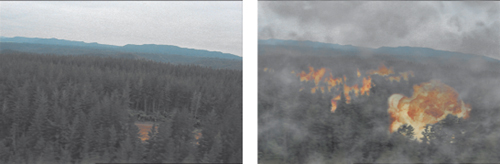
(Final fire image courtesy of ABC-TV.)
Notes
![]()
After Effects can also extract camera data embedded in an RPF sequence (and typically generated in 3ds Max or Flame). Place the sequence containing the 3D camera data in a comp and choose Animation > Keyframe Assistant > RPF Camera Import.
3D Tracking Data
After Effects can import Maya scenes (.ma files) provided they are properly prepped and include only rendering cameras (with translation and lens data) and nulls. The camera data should be “baked,” with a keyframe at every frame (search on “baking Maya camera data” in the online help for specifics on this).
3D trackers operate a bit differently than the After Effects tracker. Generally you do not begin by setting tracking points with these; instead, the software creates a swarm of hundreds of points that come and go throughout the shot, and it “solves” the camera using a subset of them.
Tip
Because After Effects offers no proportional 3D grids in the viewers, nulls imported with a 3D scene are a huge help when scaling and positioning elements in 3D.
Besides Position and Rotation, Camera may also contain Zoom keyframes. Unless Sergio Leone has started making spaghetti westerns again, zoom shots are not the norm and any zoom animation should be checked against a camera report (or any available anecdotal data) and eliminated if bogus (it indicates a push or even an unstable camera). Most 3D trackers allow you to specify that a shot was taken with a prime lens (no zoom).
Work with a Maya Scene
A .ma scene is imported just like a separate .aep project; make sure it is named with the .ma extension. You may see one or two compositions: two in the case of nonsquare pixels (including a nested square pixel version). The camera may be single-node (in which case the camera holds all of the animation data) or targeted, in which case the transformation data resides in a parent node to which the camera is attached.
The first challenge is that any null object with the word “null” in its name is also imported. Unedited, the scene may become massive and cumbersome. Any composition with 500 layers of any kind is slow and unwieldy, so eliminate all but the nulls that correspond to significant objects in the scene. If possible, do this in the tracking software or 3D program so you never have to see the excess in After Effects.
Close-up: 3D Tracking Software
![]()
The book’s disc includes a demo of SynthEyes, a reasonably priced 3D tracker from Andersson Technologies which is no less accurate than more expensive options, provided you read the manual and learn how to use it beyond the big green tracking button (which often works even if you don’t know much else).
If too many nulls make their way into After Effects, once you’ve selected the dozen or two useful ones, context-click on them and choose Invert Selection to select the potentially hundreds of other unused nulls. Delete them, or if that makes you nervous, at least turn off their visibility and enable them as Shy layers.
The next challenge is that nulls often come in with tiny values in the low single digits, which also means that they have 0, 0, 0 as a center point (standard in 3D but not in After Effects, which uses the coordinates at the center of the comp, such as 960, 540, 0).
Here’s the honest truth: 0, 0, 0 is a much more sensible center point for anything 3D. If you think you can keep track of it and deal with the camera and other elements clustered around the upper-left corner in the orthographic views, it’s more straightforward to handle a 3D scene with this center point and to reposition 2D layers to that point when they are converted to 3D.
Tip
The complex art of matchmoving is detailed in Matchmoving: The Invisible Art of Camera Tracking (Sybex Inc.) by Tim Dobbert.
This is also a way to tackle the problem of the tiny world of single-digit position values. Add a 3D null positioned at 0, 0, 0, then parent all layers of the imported Maya comp to it. Now raise the Scale values of the null. Once you have the scene at a healthier size, you can Alt-unparent (Opt-unparent) all of those layers, and the scaled values stick. This method will also invert a scene that comes in upside-down (as happens with After Effects, since its Y axis is centered in the upper-left corner and is thus itself upside-down).
3D matchmoving relies on the After Effects camera to track 3D data, and that feature and how it compares with the optics and behavior of a real-world camera is the subject of the next chapter.