
Chapter 9. Implementing Authentication and Authorization
In This Chapter
• Understanding Authentication
• Implementing Windows Authentication
• Implementing Forms Authentication
• Permission Elevation on Server Code
Security is a key topic in the world of software development. Think of websites: These generally offer areas available to the general public but also reserved areas for which users need to enter their credentials (username and password) to access private information. In this example, the user must be authenticated, which means that the application needs to recognize the user’s identity. As another example, think of business applications built for a company in which there are different user roles; information cannot be indiscriminately available to all users, but only the piece of information related to the users’ job should be visible. For example, the sales manager should not be able to see data that the personnel manager is working on. In this second example, we assume that the company’s employees are authenticated when they access the application, but they also must be authorized to see only a specific data set. As a developer, you must be aware of security when building applications, and you are also responsible for choosing the best authentication and authorization mechanisms possible according to the scenario that your applications are going to cover.
Fortunately, Visual Studio LightSwitch continues the tradition of making things easier even with regard to security. The security mechanism is based on the ASP.NET membership provider model. The logic you follow in implementing authentication and authorization is easy to understand and, more important, does not require knowledge of what happens behind the scenes in the ASP.NET. In addition, it is not uncommon that in real-world scenarios the developer is not responsible for authorizing users of a company to access specific resources. This makes sense for two reasons:
• A company might not have an internal development team, and so it needs to buy a program from a software house and later let an internal user do the work of managing authentication and authorization policies.
• The company has an internal development team but also has system administrators who are responsible for managing user permissions.
The commonality between the two examples is that the developer and the administrator are not the same person, so the latter needs tools to manage security policies, and the developer must create these kinds of tools for the administrator.
Visual Studio LightSwitch provides a complete environment for both the developer and the system administrator for implementing security in modern business applications. In fact, LightSwitch offers a solid security framework based on user roles and permissions per role. This has a huge benefit: Via specific administration screens in the application, the system administrator has tools to manage users, roles, and permissions after the application has been deployed. This is the perfect situation when the developer and the administrator are not the same person.
In this chapter, you learn to secure your LightSwitch applications by implementing both Windows and Forms (ASP.NET) authentication modes. You also learn how to implement authorization rules by designing permissions that are assigned to user roles. We also cover how to deploy a LightSwitch application so that you can see the administration tools in action. You also learn how users with different permissions see only the information that they are authorized for. In many tutorials on LightSwitch, Forms authentication is covered first. In this book, however, Windows authentication is discussed first because its security mechanism is easier to understand and implement.
To complete the examples explained in this chapter, open the Invoice Management application as it was completed back in the first part of Chapter 8, “Aggregating Data from Different Data Sources.”
Understanding Authentication
Authentication is the process that checks user identity and enables the user to access resources in the application. Typical examples of authentication are applications or websites in which you need to enter a valid username and password to access private content. LightSwitch applications support authentication mechanisms provided by the .NET Framework, so high-quality security features are granted. Because these kinds of applications work within a Silverlight context, the security mechanism in LightSwitch relies on the ASP.NET engine. In particular, Visual Studio LightSwitch supports three authentication levels:
• No authentication
• Windows authentication
• Forms authentication
When you create a LightSwitch application, authentication is disabled by default, so all users can freely access any resource in the application. This can be good while debugging, but in real-world applications this might not be a good choice. In fact, you might want to restrict access to the application to authenticated users only, especially when your LightSwitch applications work with sensitive information.
To enable or edit authentication rules in LightSwitch, display the Access Control tab in the Application Designer. To do so, in Solution Explorer, double-click Properties. When the project properties designer appears, select the Access Control tab. At this point, the designer shows the current authentication option (disabled) and the available choices (see Figure 9.1).
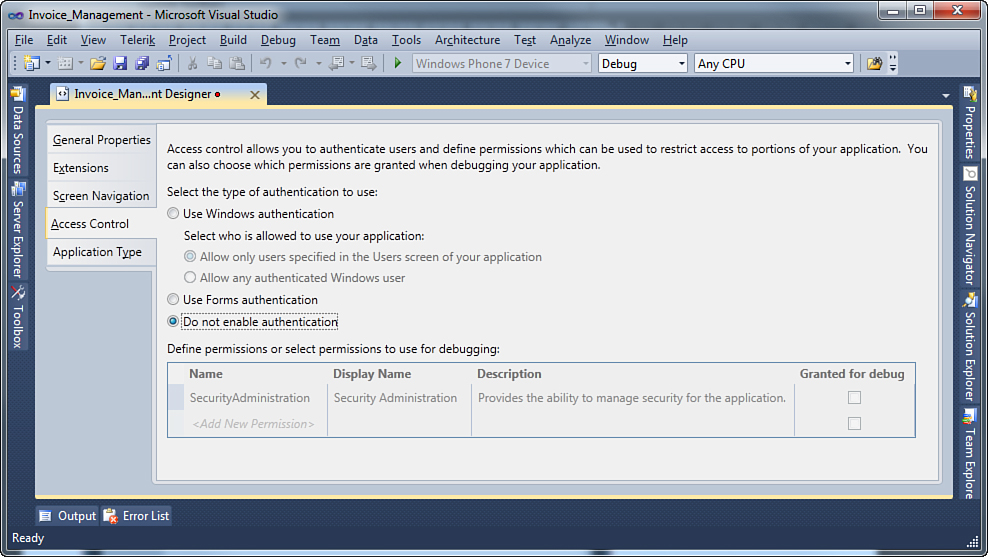
Figure 9.1. You can configure authentication settings on the Access Control tab.
Now you must select the most appropriate authentication mechanism for your needs. Your choice depends on several factors, but here is some general advice about what to choose:
• Windows authentication when your application runs within a Windows network domain (such as a corporate Intranet) and the user is actually authenticated by using the same login credentials entered when logging in to the Windows operating system. This avoids the need to display a login form and does not require the user to enter again a username and password. This also avoids the storing of passwords outside Windows, which makes this the most secure option, but it assumes that the user who logged in to the operating system is the same who is using the application.
• Forms authentication when you want users to enter credentials (username and password) each time they run the application. This choice is preferred for applications that do not run within a network domain, such as retail packages available to the general public or web applications offered through the Internet in which the user needs to provide the supplied credentials to access resources. With Forms authentication, the supplied credentials are stored inside the application’s database, and the security mechanisms check such values against that database.
In this chapter, you learn to implement both Windows and Forms authentication rules. This discussion covers Windows authentication first. During that discussion, you learn several concepts that are the same for Forms authentication and that are not repeated, so read the next section carefully.
Implementing Windows Authentication
If you are building business applications that will be used internally within your organization, it is not uncommon that they will run within a network domain based on Windows, such as a corporate intranet. In a few words, a domain is a group of computers based on the Windows operating system and connected to one another through a server that is responsible for sharing user account information and security policies. To access the domain, each computer connects to the network by sending the user credentials entered when logging in to the Windows operating system. Typically, the username is assigned by the network administrator and cannot be changed. However, users can modify their password. Using Windows authentication for internal applications is a convenient choice because you, as a developer, can reach three objectives easily:
• Applications are obviously unavailable unless users log in to the operating system with valid credentials.
• Credentials are entered only once, and applications using the Windows authentication mechanism do not need to require entering credentials yet. They just trust that the user is authenticated by Windows.
• Security policies offered by the Windows operating systems enable you to easily create and manage user roles. Administrators, users on a specific computer, data entry—these are examples of user roles. By implementing and taking advantage of roles, you can easily restrict access to specific resources to users depending on the role to which they belong. These are the reasons why, together with previously mentioned objectives, Windows authentication is the most secure option.
In LightSwitch, you have two options for enabling Windows authentication:
• Allow only specific users: The application trusts users based on their Windows credentials and gives special permissions and roles to users who are administered within the application.
• Allow any authenticated users: This works like the previous one, but it also allows any Windows user to access the unprotected parts of the application.
Both choices are available under the Use Windows Authentication option in the Application Designer. Figure 9.2 shows what the selection looks like.
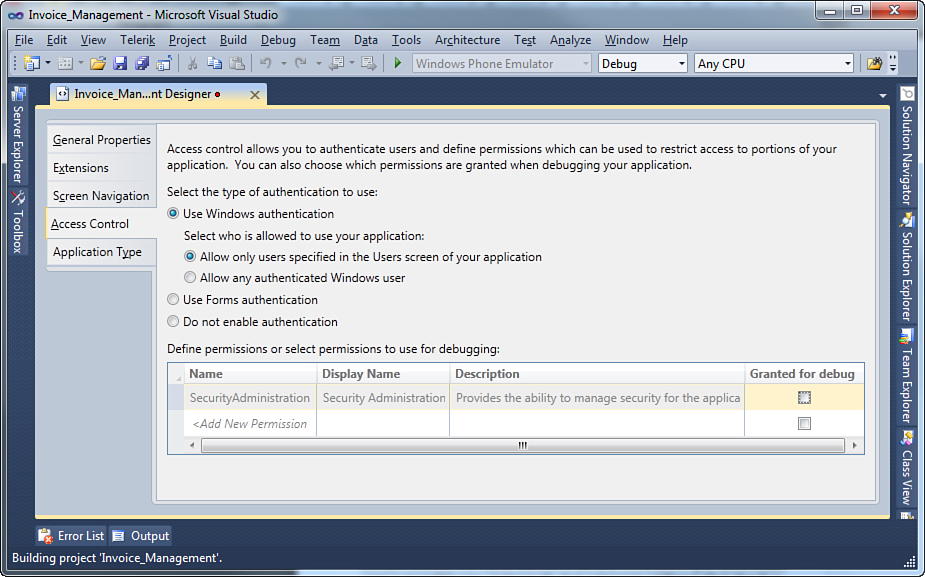
Figure 9.2. Setting Windows authentication.
As you can see, setting Windows authentication as the security mechanism could not be easier.
Choosing an Authentication Strategy
In this chapter, examples allow specific users, instead of allowing all authenticated users. Although we expect that many readers work within corporate domain networks, the reason behind this decision is that allowing all authenticated users is incredibly easy and basically does not require additional effort other than setting permissions. In contrast, allowing only specific users requires explanations about managing users from the application administrator point of view, which is also required to complete the section about Forms authentication, discussed later in this chapter.
Setting the authentication in LightSwitch is just the first step. In fact, LightSwitch also requires that user roles and permissions be established per role (called authorization). In other words, this means specifying which resources (including data and screens) can be accessed by specific user roles. For example, think of users working in the shipping department of a company. These users do not manage and also edit employees’ personal information, so their access to the application’s resources could be restricted to the only area of interest (and vice versa).
In this example, there are two user roles (people working in the shipping department and people working in the personnel management department), each with specific permissions. The first role can only run screens accessing shipment information from the database, whereas the second role can run screens accessing employee information as the data source. In LightSwitch, you implement roles and permissions as follows:
1. You establish a number of permissions. Each permission allows access to the specified resources by specific user roles.
2. You write code that ensures that the resource is accessible only if the currently authenticated user belongs to a role that has permission to access that resource.
3. You create roles and assign permissions to each role.
You might expect that creating roles and assigning permissions would happen before writing code that ensures that the user has permission to access a specified resource. The LightSwitch approach makes sense for at least the following reasons:
• You write the security logic independently from the roles. If the user is authenticated and if the user has permissions, the resource is available. This intermediate layer makes the security level independent from the user role so that the same permission can be easily shared across multiple roles.
• Roles and permissions (even by users who are not on the development team) can be managed via a convenient user interface after the application has been deployed to production. So, an application administrator can be named who is responsible for managing users and permissions within the application (and so a dedicated developer is unnecessary). This provides great flexibility, especially if you produce applications that are sold to the general public, and gives your intended audience significant freedom to administer the application.
After this brief overview, you learn in detail all these steps: setting permissions, writing security logic, and administering the application.
Setting Up the Development Environment
To demonstrate how the Windows authentication works, you need more than one user account configured on your system. Because reproducing every scenario is impossible, this chapter explains things based on a client computer running Microsoft Windows 7. This chapter assumes that your user account, as the developer, will be the application administrator with regard to the examples demonstrated here. So, other than your user account on the development machine, create three standard user accounts whose names are taken from the Northwind database’s Employees table: Davolio, Fuller, Leverling. These employees will be useful to simulate user roles and permissions. If you already have multiple user accounts configured on your system and you do not want to add new accounts, just replace these names with usernames on your system when required. If you need help creating new user accounts, press F1 in Windows and search for “create a user account.” The first search result is what you are looking for.
Authorization: Settings Permissions
The Invoice Management application allows working against a number of different data sources and involves several potential user roles. For example, a sales manager could have full access to both products and orders lists but limited access to employee information. In contrast, a personnel manager could have full access to employee information but restricted access to customer information. Finally, the company’s CEO should have unrestricted access to any resources. In this subsection, you learn to design access permissions that will be handled in code in the next subsection. To add a new permission, click Add New Permission in the Define Permissions or Select Permissions to Use for Debugging box (see Figure 9.2).
Security Administration Permission
Note the presence of a built-in, read-only permission called SecurityAdministration, which grants rights to the application administrator (later, when deployed to production) to manage user roles and permissions. This permission cannot be modified or deleted.
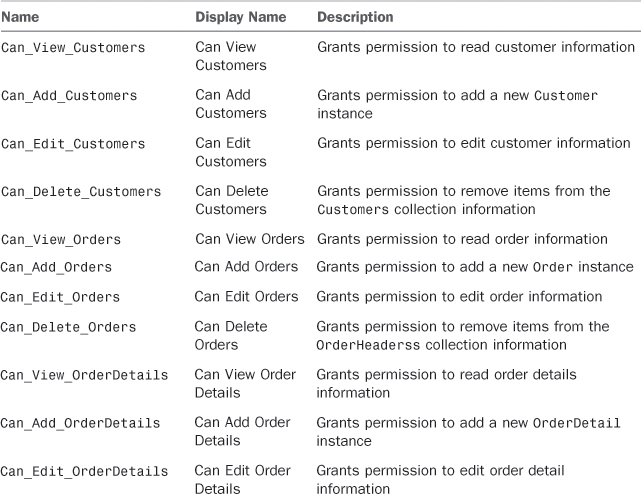
When adding a new permission, you need to supply the information summarized in Table 9.1. Notice that Description is an optional field.
Table 9.1. New Permissions Information

We can start by setting permissions for viewing and editing information about employees, which is related to a hypothetical Personnel Manager role that will be implemented later at the administration level. Enter the information exactly as shown in Figure 9.3.

Figure 9.3. Setting new permissions.
For now, all the permissions have been granted for debug, meaning that you can fully test the permissions in the application without logging in. Later in this chapter, however, after you understand how to implement the permission logic, you will also see how permissions work in reality, which instead requires logging in. It is important to grant permissions for debugging because when you debug the application and attempt to access a resource that you do not have permission for, the runtime throws an exception. So far, you have added a number of permissions, but there is no actual association between permissions and entities/screens. It is now time to write the permission logic and examine security methods in LightSwitch.
Writing the Permission Logic
To make a resource in the application available to the currently logged-in user, you write simple code that ensures that the user has permission to access the specified resource. This is accomplished by writing security method hooks on entities, queries, and screens.
First, you determine whether the user has permission to access data (entities, queries). If the user does not have permission, the request is rejected (for example, querying a collection of entities). If the user does have permission, the request is accepted, and the user is allowed to access data. As a double-check, you write procedures that determine whether the current user has permission to run a particular screen.
Entities and entity collections can be accessed from multiple screens. So, on one hand, it is useful to determine whether the user has permission to run a particular screen. On the other hand, however, it is important to determine whether the user has permissions to access a particular entity or collection independently from the screen that invokes the resource. This is why it is a good practice to handle permissions on both data and screens. For your information, permissions checks about data access run on the middle tier (the ApplicationDataService class), whereas permissions to run screens are checked on the client.
As mentioned previously, permissions not only influence entities and entity collections, but also all queries (as explained in this chapter).
Permission Logic on Entities
You might want to check whether the user has permission to display employee information. To do so in LightSwitch, you handle the so-called security methods, which you can reach easily from the designers.
Security Methods and Data Sources
As commonly happens in LightSwitch, you use the same approach for access control regardless of the data source. Therefore, the way you handle security methods is the same if you work with SQL Server, SQL Azure, SharePoint 2010, and WCF RIA Services. This is, of course, a great benefit because you use the same techniques and skills regardless of the data source.
With regard to security methods that run on entities and queries, LightSwitch enables developers to do the following:
• Delete entities
• Add entities
• Update entities
• Read entities
• Execute queries
• Save changes
All security method names starts with the entity name followed by the underscore character, the Can literal, and the name of the action. With regard to saving changes, the security method is always called SaveChanges_CanExecute. For executing queries, the method name is consists of the query name plus the _CanExecute literal. For example, here is the list of available security methods for the Employee entity:
• Employees_CanDelete
• Employees_CanInsert
• Employees_CanRead
• Employees_CanUpdate
• SaveChanges_CanExecute
As you can, see the method names are self-explanatory. In real-world applications, you should check permissions for each action possible, even if you can actually handle just the methods you want. For example, you could handle all these methods or just some of them. The good news is that checking permissions is incredibly easy. Suppose you want to enable users to display the list of employees in your company only if they have the appropriate permission. In Solution Explorer, double-click the Employees table. When the Employee entity is displayed in the Entity Designer, expand the Write Code drop-down list. This lists the available methods for the selected entity, including security methods, which are always part of the Access Control Methods group, as shown in Figure 9.4.
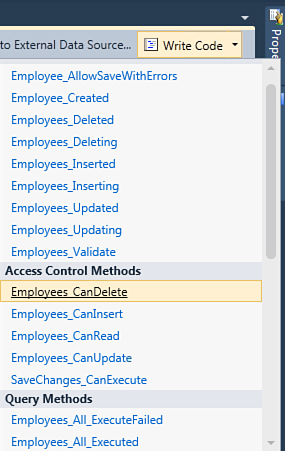
Figure 9.4. Listing server-side security methods.
When you select the desired security method, LightSwitch displays the code editor pointing to the data service class that serves the data source exposing the selected entity.
Because we are now working on the Employee entity, the code editor points to the NorthwindDataService class. For example, start by selecting the Employees_CanRead method, which is responsible for checking permissions for querying the content of the Employees table. When you select the method, LightSwitch generates the following method stub:
Private Sub Employees_CanRead(ByRef result As Boolean)
End Sub
So, in the method body, you need to evaluate the current user’s permissions for reading from the Employees table and assign the result of the evaluation as a Boolean value to the result variable. The Application class, which represents the instance of your application, has a property called User. This property represents the current authenticated user and, among other things, exposes a method named HasPermission that receives the name of the permission to check as an argument. The name of the permission passed as a parameter is nothing but a String representation of the permission that you defined in the Access Control Designer and that LightSwitch translated in code into a constant expression. Consequently, the Employees_CanRead method can be implemented as follows:
Private Sub Employees_CanRead(ByRef result As Boolean)
result = Me.Application.User.HasPermission(Can_View_Employees)
End Sub
Note how the Application.User.HasPermission method takes as an argument the constant expression representing the permission name that you provided at the beginning of this section. If the method returns True, it means that the user has permission to view the list of employees. So, True is also assigned to the result variable. Of course, if HasPermission returns False, the current user does not have permission to read the list of employees. So, result is assigned with False. This is all you have to do to ensure that the current user has permission to access the specified resource. Following this logic, it becomes easy to write methods that handle security for other data operations, such as insert, delete, and update:
Private Sub Employees_CanDelete(ByRef result As Boolean)
result = Me.Application.User.HasPermission(Can_Delete_Employees)
End Sub
Private Sub Employees_CanInsert(ByRef result As Boolean)
result = Me.Application.User.HasPermission(Can_Add_Employees)
End Sub
Private Sub Employees_CanUpdate(ByRef result As Boolean)
result = Me.Application.User.HasPermission(Can_Edit_Employees)
End Sub
The last method that you could handle is SaveChanges_CanExecute. As its name implies, this method is where you can put additional logic to determine whether the Save command can run. It is important to understand that you should always put permission checks on the entities. LightSwitch automatically enables or disables buttons on the user interface based on these entity checks, including the Save button. For this reason, here you only see the method stub:
Private Sub SaveChanges_CanExecute(ByRef result As Boolean)
'Set result with True or False according to your logic
End If
End Sub
Handle SaveChanges_CanExecute only to place additional logic. Do not use it in place of individual checks over entities.
Now that you know how to create and handle permissions, it is a good idea to add new permissions for a new role that will be applied later. For example, suppose you want to add specific permissions for the sales manager in the company. You want the sales manager to be able to access customers, orders, order details, products, and invoices information, but not employee information.
Permissions That are Not Explicitly Handled
Be aware that permissions that are not explicitly handled are assumed as granted. For example, if you do not handle permissions for the Shipper entity, every user will be able to access shipper information. Take care of this assumption when architecting your security logic.
Open the Access Control Designer and add the permissions described in Table 9.2. Note that at the moment all permissions should be granted for debug.
Table 9.2. Permissions for Customer, Order, OrderDetail, Product, and Invoice Entities
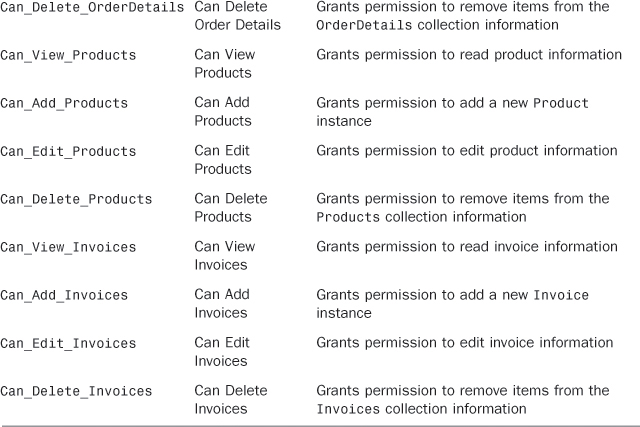
After you have added the specified permissions, you just need to handle them the way you did before with the Employee entity. The difference in this case is that the code is implemented in the ApplicationDataService class related to the intrinsic database, whereas for the Employee entity the code was added to the NorthwindDataService class (as mentioned previously). To add the appropriate code, you select the entity in Solution Explorer and click Write Code and the security method name you want to handle from the Entity Designer. Listing 9.1 shows the code you need to add for each permission.
Listing 9.1. Implementing Security Methods for Multiple Entities
Private Sub Customers_CanDelete(ByRef result As Boolean)
result = Me.Application.User.HasPermission(Can_Delete_Customers)
End Sub
Private Sub Customers_CanInsert(ByRef result As Boolean)
result = Me.Application.User.HasPermission(Can_Add_Customers)
End Sub
Private Sub Customers_CanRead(ByRef result As Boolean)
result = Me.Application.User.HasPermission(Can_View_Customers)
End Sub
Private Sub Customers_CanUpdate(ByRef result As Boolean)
result = Me.Application.User.HasPermission(Can_Edit_Customers)
End Sub
Private Sub OrderHeaders_CanDelete(ByRef result As Boolean)
result = Me.Application.User.HasPermission(Can_Delete_Orders)
End Sub
Private Sub OrderHeaders_CanInsert(ByRef result As Boolean)
result = Me.Application.User.HasPermission(Can_Add_Orders)
End Sub
Private Sub OrderHeaders_CanRead(ByRef result As Boolean)
result = Me.Application.User.HasPermission(Can_View_Orders)
End Sub
Private Sub OrderHeaders_CanUpdate(ByRef result As Boolean)
result = Me.Application.User.HasPermission(Can_Edit_Orders)
End Sub
Private Sub OrderDetails_CanDelete(ByRef result As Boolean)
result = Me.Application.User.HasPermission(Can_Delete_OrderDetails)
End Sub
Private Sub OrderDetails_CanInsert(ByRef result As Boolean)
result = Me.Application.User.HasPermission(Can_Add_OrderDetails)
End Sub
Private Sub OrderDetails_CanRead(ByRef result As Boolean)
result = Me.Application.User.HasPermission(Can_View_OrderDetails)
End Sub
Private Sub OrderDetails_CanUpdate(ByRef result As Boolean)
result = Me.Application.User.HasPermission(Can_Edit_OrderDetails)
End Sub
Private Sub Products_CanDelete(ByRef result As Boolean)
result = Me.Application.User.HasPermission(Can_Delete_Products)
End Sub
Private Sub Products_CanInsert(ByRef result As Boolean)
result = Me.Application.User.HasPermission(Can_Add_Products)
End Sub
Private Sub Products_CanRead(ByRef result As Boolean)
result = Me.Application.User.HasPermission(Can_View_Products)
End Sub
Private Sub Products_CanUpdate(ByRef result As Boolean)
result = Me.Application.User.HasPermission(Can_Edit_Products)
End Sub
Private Sub Invoices_CanDelete(ByRef result As Boolean)
result = Me.Application.User.HasPermission(Can_Delete_Invoices)
End Sub
Private Sub Invoices_CanInsert(ByRef result As Boolean)
result = Me.Application.User.HasPermission(Can_Add_Invoices)
End Sub
Private Sub Invoices_CanRead(ByRef result As Boolean)
result = Me.Application.User.HasPermission(Can_View_Invoices)
End Sub
Private Sub Invoices_CanUpdate(ByRef result As Boolean)
result = Me.Application.User.HasPermission(Can_Edit_Invoices)
End Sub
Now you have written all the necessary code to handle permissions over entities. Actually, there is another step in handling permissions on the server, which is setting rules for custom queries that you implemented back in Chapter 5, “Customizing Data Validation.” Basically, queries just return specific filtered sets of data and are used only for display purposes. This implies that you might just check whether the current user has permissions to view that data set, and this is quite simple because you can just reuse existing permissions.
For example, if you want to restrict access to the result of the MostActiveCustomers query in the sample application, you do not need to write a dedicated rule. You just take advantage of the existing Can_View_Customers permission. After all, the query returns nothing but a list of customers. As it is for entities, accessing security methods for queries is an easy task. In Solution Explorer, you double-click the desired query, and then when it becomes available in the Query Designer, you click the arrow near the Write Code button. In the drop-down list, you will find one security method available in the Access Control Methods group, which is the method that you need to populate with your security logic. As the starting point in Solution Explorer, double-click the MostActiveCustomers query. Expand the drop-down list for the Write Code button and click MostActiveCustomers_CanExecute. At this point, the code editor will display again the ApplicationDataService.vb code file pointing to the new method. You can implement the security logic as follows:
Private Sub MostActiveCustomers_CanExecute(ByRef result As Boolean)
result = Me.Application.User.HasPermission(Can_View_Customers)
End Sub
As you can see, there is no difference in implementing the security logic over queries as compared to entities. The HasPermission method just checks for the Can_View_Customers existing permission, which avoids the need to create a dedicated rule. Listing 9.2 shows the full list of security methods for each query in the application.
Listing 9.2. Implementing Security Methods on Custom Queries
Private Sub DiscountedOrderDetails_CanExecute(ByRef result As Boolean)
result = Me.Application.User.HasPermission(Can_View_OrderDetails)
End Sub
Private Sub MostActiveCustomers_CanExecute(ByRef result As Boolean)
result = Me.Application.User.HasPermission(Can_View_Customers)
End Sub
Private Sub SortedCustomersQuery_CanExecute(ByRef result As Boolean)
result = Me.Application.User.HasPermission(Can_View_Customers)
End Sub
Private Sub OrdersByCustomerIdQuery_CanExecute(ByRef result As Boolean)
result = Me.Application.User.HasPermission(Can_View_Orders) AndAlso
Me.Application.User.HasPermission(Can_View_Customers)
End Sub
Private Sub OrdersFromTheUnitedStatesQuery_CanExecute(ByRef result _
As Boolean)
result = Me.Application.User.HasPermission(Can_View_Orders)
End Sub
Private Sub ShipCitiesDifferentThanCustomerCity_CanExecute(ByRef _
result As Boolean)
result = Me.Application.User.HasPermission(Can_View_Customers)
End Sub
Listing 9.2 also demonstrates how you can combine multiple permissions checks. Take a look at the OrdersByCustomerIdQuery_CanExecute method; you can see how permissions for viewing both orders and customers are required to run the query. This also means that you can use logical operators to combine multiple permissions.
By implementing security checks on queries, you complete the server side part of writing the permission logic. The next step is to write security methods that run on the client and that allow running only the specified screens according to the user’s permissions.
Permission Logic on the User Interface
Each screen exposes a security method whose name ends with the _CanRun literal and that allows controlling whether the logged-in user can run the screen. In the Invoice Management application, the CreateNewCustomer screen exposes a method called CreateNewCustomer_CanRun, the SearchCustomers screen exposes a method called SearchCustomers_CanRun, and so on. You handle this kind of method exactly as you did in the previous subsection about permissions over entities and queries.
Having such kind of validation is really useful because you can decide to make screens available only to specific user roles. For example, a sales agent might need to view the list of employees who are currently managing a particular order, but the same sales agent should not be able to add or edit employees because this is not part of the job.
Unauthorized Screens are Hidden
When the runtime detects that the current user has no permission to run a screen, such a screen is not visible in the navigation panel. This is demonstrated later, but now it is important to understand how useful for debugging the granting of permissions is. In fact, this ensures that all permissions are available to the developer so that all screens can be fully tested.
So, in scenarios such as this, you might want to prevent some user roles from seeing (and thus accessing) some screens. However, remember that screen security permissions merely hide or show a screen; the most important things to secure are your entities and queries (the data).
To check for security permissions at the screen level, just double-click the screen in Solution Explorer and expand the Write Code button in the Screen Designer to locate the security method. For example, in Solution Explorer, double-click the CreateNewCustomer screen. When this is available in the Screen Designer, in the upper-right corner click the down arrow near the Write Code button and click the CreateNewCustomer_CanRun method in the Access Control Methods group. Figure 9.5 shows how to locate the method.
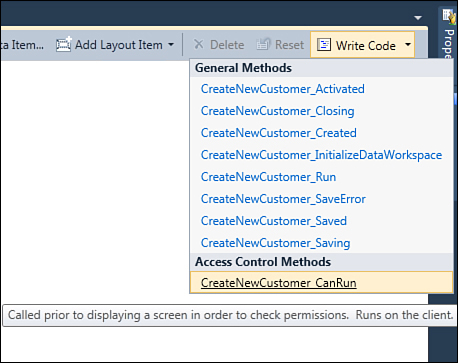
Figure 9.5. Selecting the screen’s security methods.
When you click this method, Visual Studio LightSwitch displays the code editor pointing to the Application class. As you know, the instance of this class represents the running client application, so it is where screens are invoked. For this reason, it also represents the appropriate place to handle security permissions for screens. The code you write to handle the CreateNewCustomer_CanRun method is as follows:
Private Sub CreateNewCustomer_CanRun(ByRef result As Boolean)
' Set result to the desired field value
result = Me.User.HasPermission(Can_Add_Customers)
End Sub
Now you can write additional security methods for screens related to the entities described in the previous subsection. Listing 9.3 shows how to accomplish this. (See further explanations at the bottom of the listing.)
Listing 9.3. Setting Security Permissions at the Screen Level
Private Sub SearchEmployees_CanRun(ByRef result As Boolean)
' Set result to the desired field value
result = Me.User.HasPermission(Can_View_Employees)
End Sub
Private Sub CreateNewCustomer_CanRun(ByRef result As Boolean)
result = Me.User.HasPermission(Can_Add_Customers)
End Sub
Private Sub CreateNewEmployee_CanRun(ByRef result As Boolean)
result = Me.User.HasPermission(Can_Add_Employees)
End Sub
Private Sub CreateNewInvoice_CanRun(ByRef result As Boolean)
result = Me.User.HasPermission(Can_Add_Invoices)
End Sub
Private Sub CreateNewOrderHeader_CanRun(ByRef result As Boolean)
result = Me.User.HasPermission(Can_Add_Orders)
End Sub
Private Sub CreateNewProduct_CanRun(ByRef result As Boolean)
result = Me.User.HasPermission(Can_Add_Products)
End Sub
Private Sub CustomerOrdersListDetail_CanRun(ByRef result As Boolean)
result = Me.User.HasPermission(Can_Add_Customers) AndAlso _
Me.User.HasPermission(Can_Delete_Cutomers) AndAlso _
Me.User.HasPermission(Can_Edit_Customers) AndAlso _
Me.User.HasPermission(Can_View_Customers) AndAlso _
Me.User.HasPermission(Can_Add_Orders) AndAlso _
Me.User.HasPermission(Can_Edit_Orders) AndAlso _
Me.User.HasPermission(Can_Delete_Orders) AndAlso _
Me.User.HasPermission(Can_View_Orders)
End Sub
Private Sub CustomersListDetail_CanRun(ByRef result As Boolean)
result = Me.User.HasPermission(Can_Add_Customers) AndAlso _
Me.User.HasPermission(Can_Delete_Cutomers) AndAlso _
Me.User.HasPermission(Can_Edit_Customers) AndAlso _
Me.User.HasPermission(Can_View_Customers)
End Sub
Private Sub EditableProductsGrid_CanRun(ByRef result As Boolean)
result = Me.User.HasPermission(Can_Add_Products) _
AndAlso Me.User.HasPermission(Can_Delete_Products) _
AndAlso Me.User.HasPermission(Can_Edit_Products) _
AndAlso Me.User.HasPermission(Can_View_Products)
End Sub
Private Sub EmployeesListDetail_CanRun(ByRef result As Boolean)
result = Me.User.HasPermission(Can_Add_Employees) AndAlso _
Me.User.HasPermission(Can_Edit_Employees) AndAlso _
Me.User.HasPermission(Can_Delete_Employees) AndAlso _
Me.User.HasPermission(Can_View_Employees)
End Sub
Private Sub InvoicesListDetail_CanRun(ByRef result As Boolean)
result = Me.User.HasPermission(Can_Add_Invoices) AndAlso _
Me.User.HasPermission(Can_Edit_Invoices) AndAlso _
Me.User.HasPermission(Can_View_Invoices) AndAlso _
Me.User.HasPermission(Can_Delete_Invoices) AndAlso _
Me.User.HasPermission(Can_View_Orders)
End Sub
Private Sub OrderHeadersListDetail_CanRun(ByRef result As Boolean)
result = Me.User.HasPermission(Can_Add_Orders) AndAlso _
Me.User.HasPermission(Can_Edit_Orders) AndAlso _
Me.User.HasPermission(Can_View_Orders) AndAlso _
Me.User.HasPermission(Can_Delete_Orders) AndAlso _
Me.User.HasPermission(Can_View_OrderDetails) AndAlso _
Me.User.HasPermission(Can_Add_OrderDetails) AndAlso _
Me.User.HasPermission(Can_Edit_OrderDetails) AndAlso _
Me.User.HasPermission(Can_Delete_OrderDetails)
End Sub
Private Sub SearchCustomers_CanRun(ByRef result As Boolean)
result = Me.User.HasPermission(Can_View_Customers)
End Sub
Private Sub SearchDiscountedOrderDetails_CanRun(ByRef result As Boolean)
result = Me.User.HasPermission(Can_View_OrderDetails)
End Sub
Private Sub SearchInvoices_CanRun(ByRef result As Boolean)
result = Me.User.HasPermission(Can_View_Invoices)
End Sub
Private Sub SearchOrderHeadersByCustomerCountry_CanRun(ByRef result As Boolean)
result = Me.User.HasPermission(Can_View_Customers) _
And Me.User.HasPermission(Can_View_Orders)
End Sub
Private Sub SearchOrderHeadersByCustomerIdQuery_CanRun(ByRef result As Boolean)
result = Me.User.HasPermission(Can_View_Orders) AndAlso _
Me.User.HasPermission(Can_View_Customers)
End Sub
Private Sub SearchOrderHeadersFromTheUnitedStatesQuery_CanRun(ByRef _
result As Boolean)
result = Me.User.HasPermission(Can_View_Orders)
End Sub
Private Sub SearchProducts_CanRun(ByRef result As Boolean)
result = Me.User.HasPermission(Can_View_Products)
End Sub
Private Sub SearchMostActiveCustomers_CanRun(ByRef result As Boolean)
result = Me.User.HasPermission(Can_View_Customers)
End Sub
Private Sub SearchSortedCustomersQuery_CanRun(ByRef result As Boolean)
result = Me.User.HasPermission(Can_View_Customers)
End Sub
Private Sub SearchOrdersFromTheUSA_CanRun(ByRef result As Boolean)
result = Me.User.HasPermission(Can_View_Orders)
End Sub
Private Sub SearchOrdersByCustomerCountry_CanRun(ByRef result As Boolean)
result = Me.User.HasPermission(Can_View_Orders) AndAlso Me.User.HasPermission(Can_View_Customers)
End Sub
Private Sub EditableOrdersByCustomerIdQueryGrid_CanRun(ByRef _
result As Boolean)
result = Me.User.HasPermission(Can_View_Orders)
AndAlso Me.User.HasPermission(Can_View_Customers)
End Sub
Private Sub SearchShipCitiesDifferentThanCustomerCity_CanRun(ByRef _
result As Boolean)
result = Me.User.HasPermission(Can_View_Customers)
End Sub
By analyzing Listing 9.3, you can see how permissions are assigned according to the screen elements. For example, the CreateNewCustomer screen enables users to add new customers, so the only permission required is Can_Add_Customers. If you instead consider the CustomerOrdersListDetails screen, because this enables users to view, create, update, and delete both customers and orders, multiple permissions are required, as you can see by examining the CustomerOrdersListDetails_CanRun method. If you use the AndAlso logical operator (&& in C#), the current user must have all the specified permissions to run the screen.
Handling a Button’s CanExecute Method
In Chapter 7, “Customizing Applications with Buttons, COM Automation, and Extensions,” you learned how to write the CanExecute method for buttons so that these controls were enabled only if at least one element in the collection of data was selected. Actually, CanExecute can also be used to check whether the user has permission to click a button. The code you write in such a situation is equal to the code shown so far. Typically, you might want to handle a button’s CanExecute when you have a screen that can be accessed by users with different permissions. For instance, both the sales managers and sales agents can view a list of orders, but the latter should see some buttons disabled.
Debugging the Application
Now that you set permissions, you can still run the application for debugging and test it with no limitations. In fact, the runtime at this point will not check for permissions, because you granted them all for debugging in the Access Control Designer. This is very important, because when you run the application for debugging, you run under a test user, and if you do not grant permissions for debugging, you cannot access any resource. The reason is that when you set both the authentication mode and permissions, you should also create user roles and assign permissions per role, but this cannot be done at debugging time because it is part of the deployment process. For example, if you do not grant permissions that code checks at the screen level, the application’s affected screens will not be visible when debugging. If you do not grant permissions that are checked at the entities level, the associated screens are available but your data is protected (which is the most important point). You can try this behavior by first running the application with all permissions granted for debugging and then by restarting the application with only a limited set of debugging permissions. Figure9.6 shows what the Invoice Management application looks like when running in debug mode with no permissions granted.
As you can see, the only screens available are those that are not checking permissions (in the example, screens related to the Shipper entity). Now you know how to debug an application in which permissions have been granted. But the real world is another story. So, this is the point at which you need to create user roles and administer the application.
Creating User Roles and Administering the Application
Creating user roles and administration requires deploying the application. Deployment is discussed in detail in the next chapter, but here you get a small taste of how it works so that you can understand how permissions work on the end-user machine. Although we just touch on deployment here, you will gain a good understanding about how easy it is to publish LightSwitch applications. Of course, because this discussion focuses on security, the deployment process is discussed just briefly. In the next chapter, however, you learn in detail how to publish applications to different hosts.
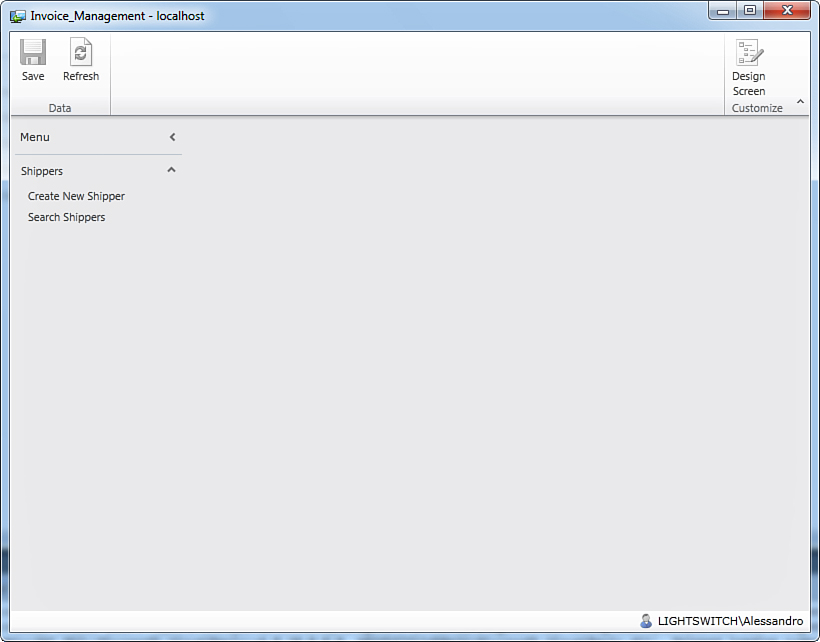
Figure 9.6. Attempting to debug the application with no permissions granted.
The LightSwitch security mechanism is based on users and roles. A comparison with the Windows operating system can be useful for a better understanding, even though the two mechanisms do differ.
In networks based on the Windows operating system security mechanism, users belong to roles.
Each role has permissions to access specific resources. For example, the Administrators role can access any resource and can do anything on networked computers. This role usually includes a few people whose job is to control the domain. Another example is the Users role. People belonging to this role have limited access to system resources. For instance, they cannot install applications (that is allowed to Administrators only), nor can they change certain system settings such as the Windows clock. Users have access to their Documents folder, but they cannot access folders of other users on the machine. In contrast, Administrators can access any folder on any computer. The LightSwitch security mechanism works in a similar way to the Windows mechanism. An application administrator can create user roles and manage permissions per role. The administrator will usually create roles based on the user’s job. For example, the application administrator could create roles such as these: Sales Department, Personnel Management, Shipping Department, and so on.
User Roles Not Only for Business Applications
Because you can use Visual Studio LightSwitch to build a variety of line-of-business applications, you are not limited to programs running within companies. For example, you might build a student-tracking application, and you could decide to make resources visible to particular roles (such as Teachers, Parents, Students, and so on). The examples here identify common setups, but you are not limited to these.
It is your responsibility as a developer to specify in LightSwitch the user who will be the application administrator. This can be someone in the company or it can be you. After you specify the application administrator, the information is included in the deployment package. Then, after you install the application, the administrator can create roles and manage permissions at the first run. Specifying the application administrator is accomplished when you ask the IDE to publish the application, which is explained in the next subsections.
Publishing the Application and Specifying the Administrator
This section assumes that your user account in Windows has permissions to create and manage SQL Server databases.
Publishing applications is the process that puts the application files into a setup package so that it can be installed onto multiple machines. As you discover in detail in Chapter 10, “Deploying LightSwitch Applications,” publishing a LightSwitch program is an easy task. For the sake of clarity, this chapter focuses on deploying and administering a 2-tier desktop client, but the steps explained here are basically the same in other kinds of applications. The first thing to do is select the Publish command from the Build menu. Figure 9.7 shows how to reach this command.
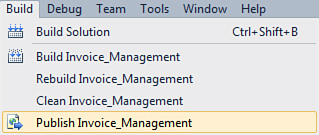
Figure 9.7. The Build, Publish command.
At this point, the LightSwitch Publish Application Wizard dialog displays, as shown in Figure 9.8.
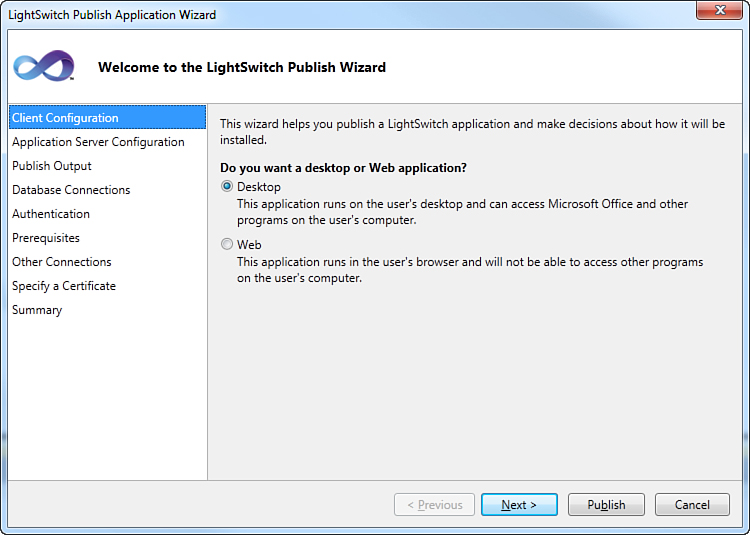
Figure 9.8. The LightSwitch Publish Application Wizard’s first step.
As you can see, in the first form you can specify how the application should be deployed. Leave unchanged the default selection (Desktop). There are a number of forms that are useful to customize the application deployment, but at the moment you do not need to know how they work (this is explained in next chapter), and the default settings are good enough for our purposes. What you need to know here is that with the default options unchanged
• The application’s services will be hosted locally.
• The deployment package will be generated into a subfolder called Publish that resides in the project’s folder.
• The database for the application will be automatically created within SQL Server.
• Runtime prerequisites will be downloaded from the Internet if not found on the target machine.
• Connections to external data sources are managed automatically by LightSwitch.
You must manually change two settings: the database login credentials and the application’s administrator credentials. The way you enter the latter changes depends on the authentication type you are using. If you use the Windows authentication, as in the current example, you have to enter only the Windows username. If you use Forms authentication, which is explained later, you must enter both the username and the password. So, starting from the first form, called Client Configuration, click Next until you get to the Database Connections form. This requires you to enter two connection strings: The first one is an administrator connection used to create the database, and the second one is the user connection that does not (and must not) have elevated privileges and simply allows accessing data. Figure 9.9 shows this form.
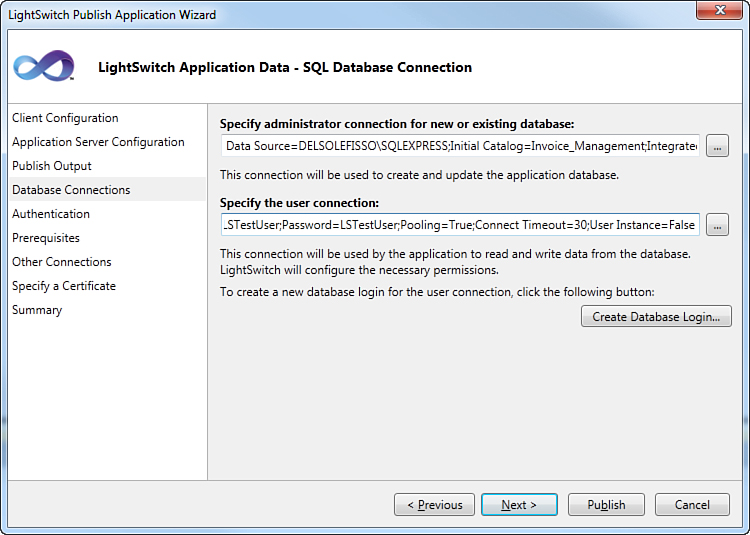
Figure 9.9. Specifying database connections.
In the current example, the database administrator connection is using Windows authentication. The user connection, in contrast, uses SQL credentials, as you can see by examining the connection string. You can specify an existing SQL login or create a database login via the Create Database Login button.
If you use SQL credentials, you do not have to grant database access to specific Windows users. When done, click Next to access the Authentication form (or simply select Authentication on the navigation bar on the left). When you open this form, you will see that you can enter the administrator’s username or just use an existing administrator account. You must specify the administrator’s credentials only the first time you are deploying an application, as in the current case. Because you use the same tooling to deploy updated packages, in next versions of the packages you do not need to enter the administrator’s credentials again because LightSwitch stores them in the project’s information. You can still enter the administrator’s credentials if you choose a different user as the application administrator, but as a simplification, you do not do this if the administrator remains unchanged. If you try to enter again the same administrator’s credentials, the publish procedure will complete successfully, but you will get a warning message informing that the supplied administrator username is already in use; LightSwitch just ignores the information you entered again and picks up the previously entered information. The administrator’s credentials must be entered in the form of DOMAINUsername. Figure 9.10 shows an example based on my machine’s settings.
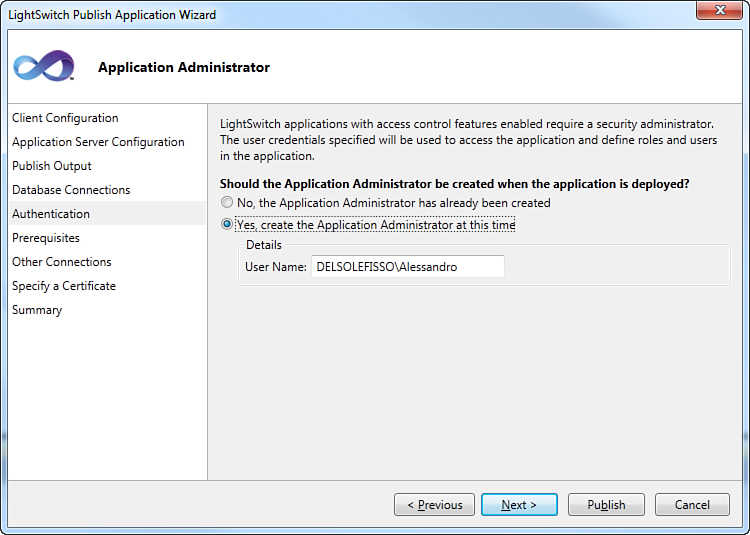
Figure 9.10. Entering the application administrator information.
Now leave unchanged all the other options and click Publish. After a few seconds, the setup package is available in the Publish folder within the project’s folder, which you can easily locate via Windows Explorer, as shown in Figure 9.11. Remember that if you plan to make the application’s setup available to other users on the machine, those users must have permission to access the folder.
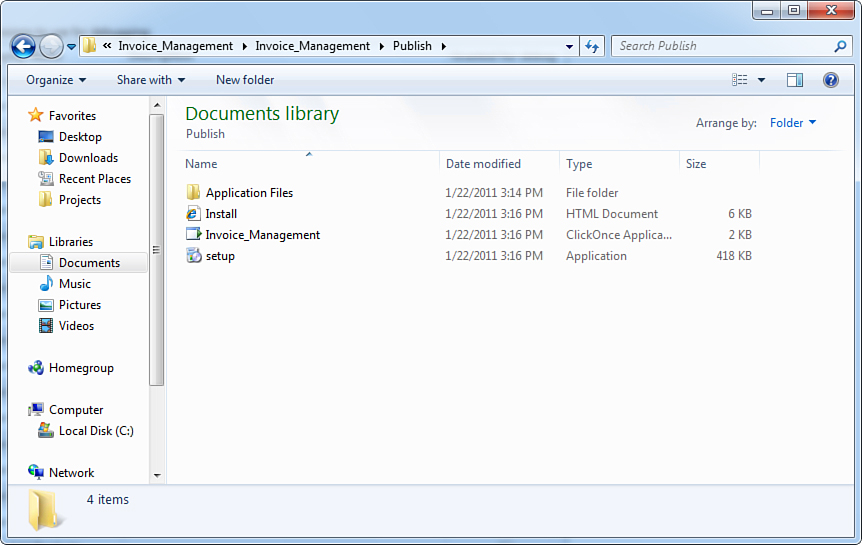
Figure 9.11. The setup package in Windows Explorer.
Before installing the application, if you try to publish the application again LightSwitch will offer to use the existing settings for the administrator credentials in the Authentication form (as mentioned previously). This is shown in Figure 9.12 and is the same when working with Forms authentication.
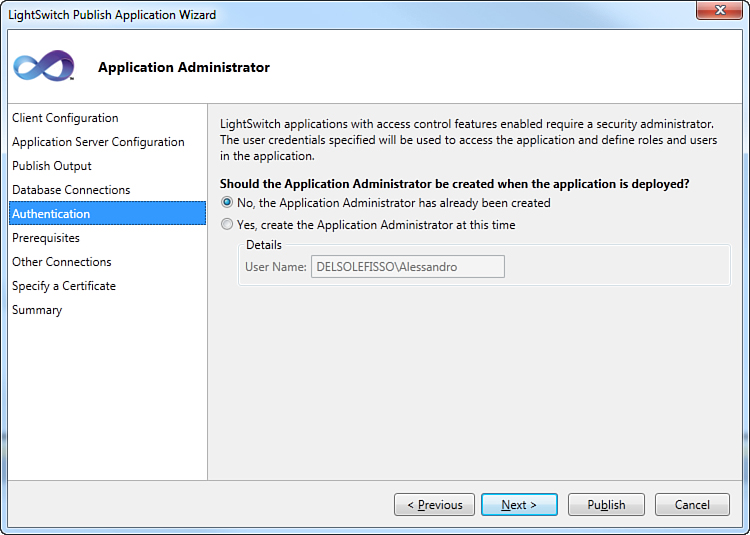
Figure 9.12. If an administrator was previously specified, this becomes the default.
If you want to replace the current administrator with another user, you must change the selection and enter new credentials. Now in Windows Explorer, click Setup.exe to start installing the application. When the installation program asks for your confirmation before proceeding, click Install (see Figure 9.13).
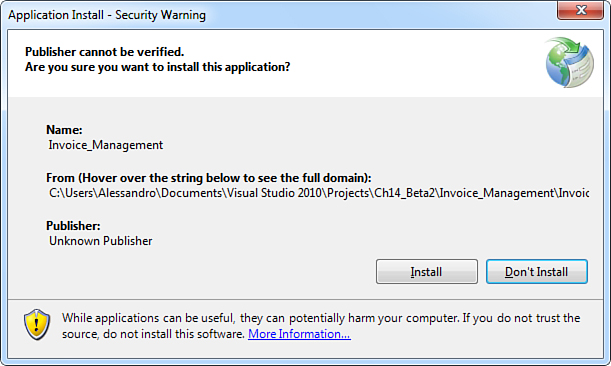
Figure 9.13. Installing the application.
When you install the application for the first time, this is also launched automatically after a few seconds. Once started, you can immediately notice two things:
• The Shippers panel, with related screens, is the only visible item at the moment. This makes sense because the Shipper entity and related screens have not been affected by any permission, and so they are available to anyone.
• A new panel called Administration is available. Only the application administrator can see this panel. This groups two screens, Roles and Users. As their names imply, the administrator creates user roles and manages permissions via the Roles screen and assigns users to roles via the Users screen.
Information About the Current Logged-in User
Common to both Windows and Forms authentication, the main screen in the application shows the username of the currently logged-in user in the lower-right corner (see Figure 9.14).
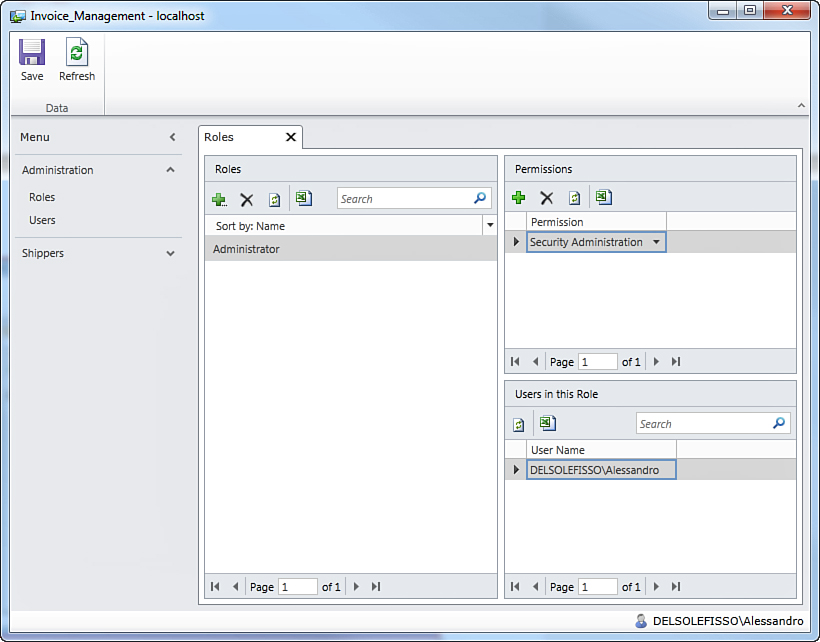
Figure 9.14. The Roles screen enables you to create user roles.
Creating User Roles
As the application administrator, the first thing you have to do at this point is create roles. When you create roles, you also assign permissions that you choose from the list that you created in the IDE. You create roles by running the Roles screen, shown in Figure 9.14.
The Roles screen looks like a List and Details Screen in which you have a list of roles and the details of permissions per role. By default, the roles list contains at this point just one role: Administrator. This is a built-in role, and you are allowed to edit it by specifying more permission.
On the right side of the screen, the list of permissions is at the top. By default, there is one permission called Security Administration. This is a built-in permission that cannot be edited but can be removed. Of course, you should never remove this permission for the Administrator role. At the bottom of the screen, you can see the list of users who belong to the current role. In this case, there is only the application administrator username. All this information can be exported to Microsoft Excel. We can now start adding a new role by clicking the Add button (the + symbol) in the Roles box. A pop-up dialog at this point prompts you for the new role name, as shown in Figure 9.15.
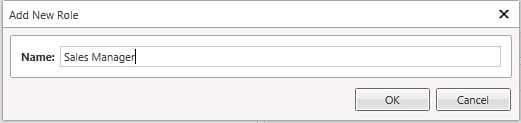
Figure 9.15. Adding a new user role.
Enter Sales Managers as the new role name and click OK. This role will contain the list of users who have full access to resources related to sales, such as products, customers, orders, and invoices. At this point, the new role is added to the list and is available under the Administrator role (see Figure 9.16).

Figure 9.16. The newly added role is available in the list.
Now add two new roles: Sales Agents, which will contain the list of users that can view and edit only a subset of sales information (such as orders, order details, and products but not invoices); and Personnel Department, which will store the list of users whose job is managing employees. After you finish adding the required user roles, save your changes. This is important to store the role information into the application’s database. At this point, you can set permission for each role.
Setting Permissions per Role
Click the Personnel Department role, and then click the Add button in the Permissions box. A new empty permission is added to the role, and you just need to expand the drop-down list for the combo box. This will show the full list of permissions that you designed in Visual Studio LightSwitch, as shown in Figure 9.17. Notice that values in the list are the representation of the Display Name property of each permission as set in the Access Control Designer.

Figure 9.17. Showing the list of available permissions.
The first permission you might want to add for this particular role is Can View Employees, so select this item in the list. The permission is added to the role, but it is not stored until you click Save. When you save changes, the permission looks disabled, but you can still remove it if you do not need it anymore. Follow the same steps again to add the following permissions: Can Add Employees, Can Delete Employees, and Can Edit Employees. Figure 9.18 shows what the screen looks like when you finish adding these permissions for the Personnel Department role.
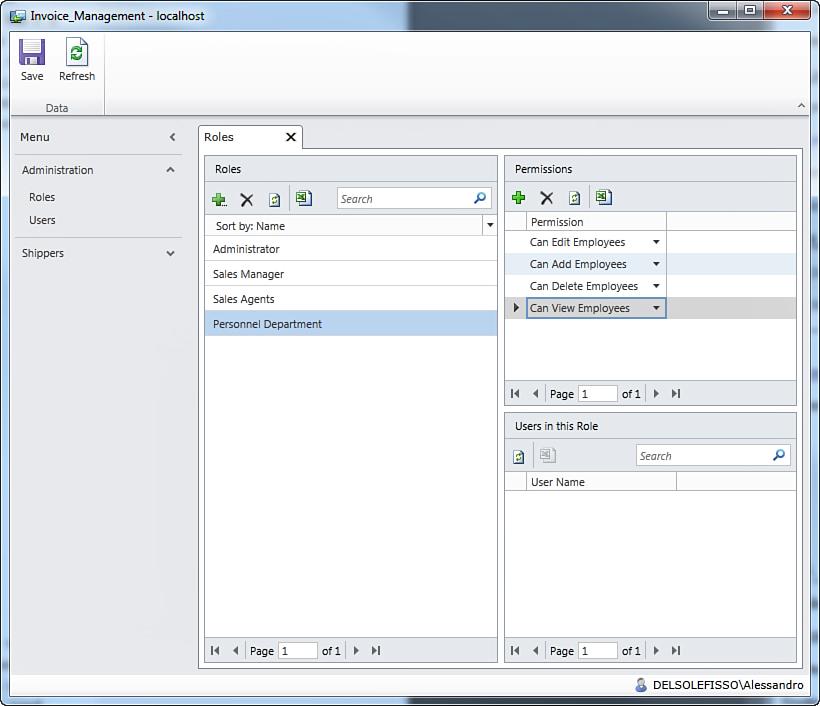
Figure 9.18. The list of permissions for the selected role.
Now select the Sales Agents role. This is intended to represent those people who execute orders of their sales managers and that have relationships with customers but do not use the application to store information and use it to stay up to date with customers, orders, and product information. Basically, this role just needs permission to view information. So, repeat the steps you learned for the Personnel Department role and add the following permissions: Can View Customers, Can View Orders, Can View Order Details, Can View Products. Figure 9.19 shows what the list of permissions looks like.
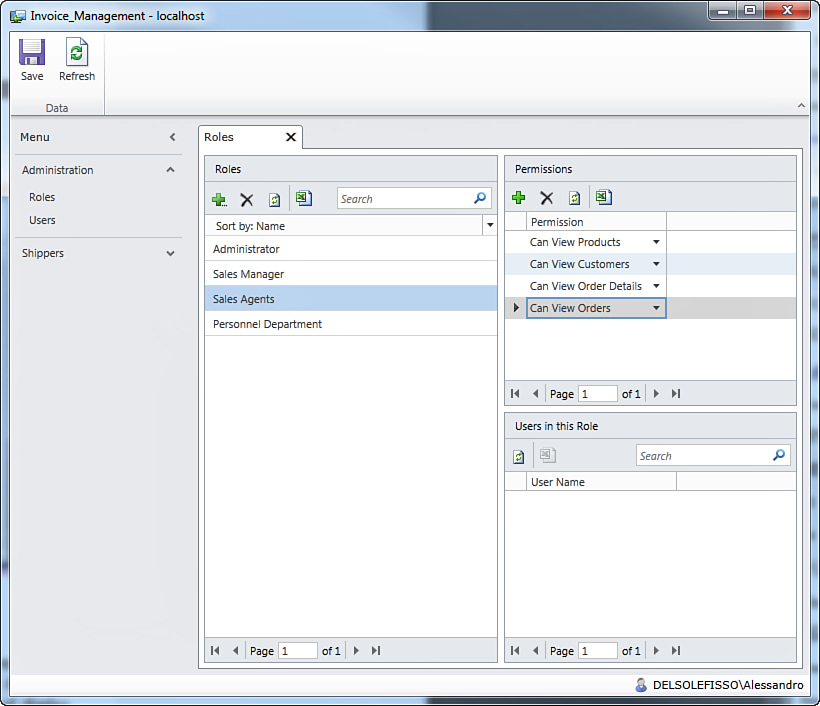
Figure 9.19. Setting permissions to the Sales Agents role.
The last role to manage permissions for is Sales Managers. This role is responsible for sales, so it needs full permissions over customers, orders, products, order details, and invoices. Full permissions means assigning create, read, update, delete, and display permissions. So, assign the Can Add, Can Delete, Can Edit, and Can View permissions for the Customers, OrderHeaders, Order Details, Products, and Invoices collections. When done, save your changes. The first step in the application administration is now complete, and you are now ready to assign users to roles.
Assigning Users to Roles
Assigning users to roles is a crucial step in administering the application. Before learning how to assign a user to roles, take a moment to remember how permissions were handled in code. For example, consider the following method, which checks whether a user has permissions to add new invoices:
Private Sub Invoices_CanInsert(ByRef result As Boolean)
result = Me.Application.User.HasPermission(Can_Add_Invoices)
End Sub
This code can be translated into the following sentence: Check whether the role that the current user belongs to has the specified permission. So far, you have created roles and assigned permissions to roles, so the next step is giving the application a way to understand if the current user belongs to a role that has that permission. In the application administration, you accomplish this by opening the Users screen, which is another screen of type List and Details, as shown in Figure 9.20.
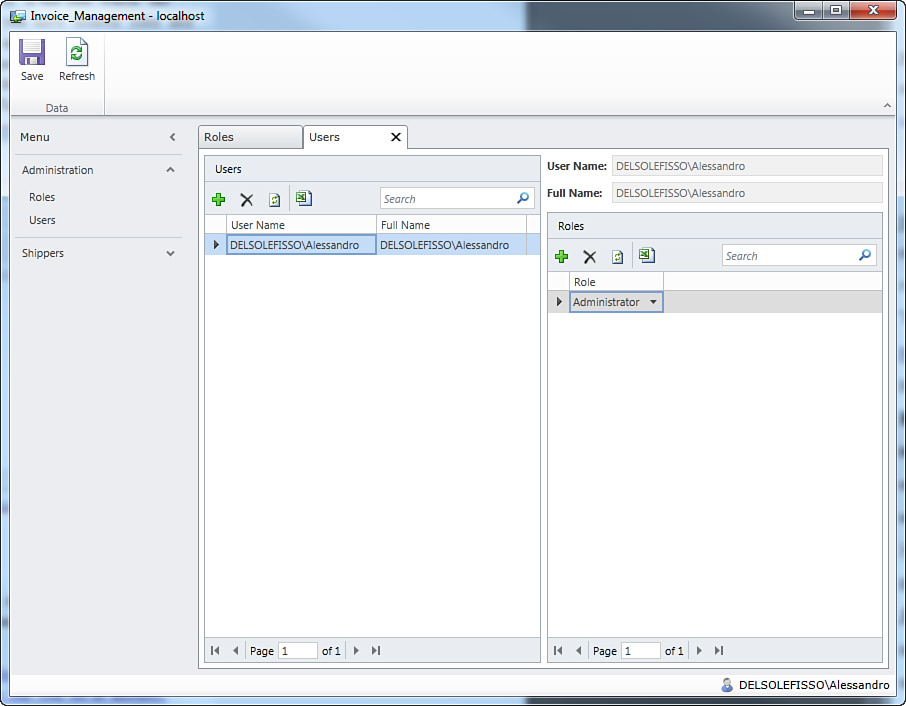
Figure 9.20. The Users management screen.
On the left side of the screen, you get a list of users. On the right side of the screen, you have a list of roles that the specified users belong to. Each user can belong to more than one role.
A user can be added to multiple roles. This implies that if you assign a user to a role that does not grant permissions to access a resource, but you also assign the same user to another role that grants permissions to the same resource, the user will have permission to access the resource. Be extremely careful about this when assigning user to roles.
When you run this screen for the first time, you notice the availability only of the administrator. Now suppose you want to add the three users as they were described at the beginning of this section. To add a new user, click the Add button. When created, you need to supply the username, which must be in the form of DOMAINUsername, in the User Name box. So, at this point, enter your machine’s name and the name of one of the users you created for demonstration purpose. On my machine, I have one user called LIGHTSWITCHFuller. You can also enter the username without the machine name or domain, and the application will try to find the username within the current domain. Once that is entered, just press Tab so that the application automatically populates the Full Name box and adds the new user to the list on the left, as shown in Figure 9.21.

Figure 9.21. Adding a new user to the list.
The Users screen has a built-in validation mechanism that checks whether the entered username is valid. For example, if the username is not found, a validation issue appears onscreen explaining what it is going wrong (see Figure 9.22). This is why you must be connected to the domain while defining users when using Windows authentication.
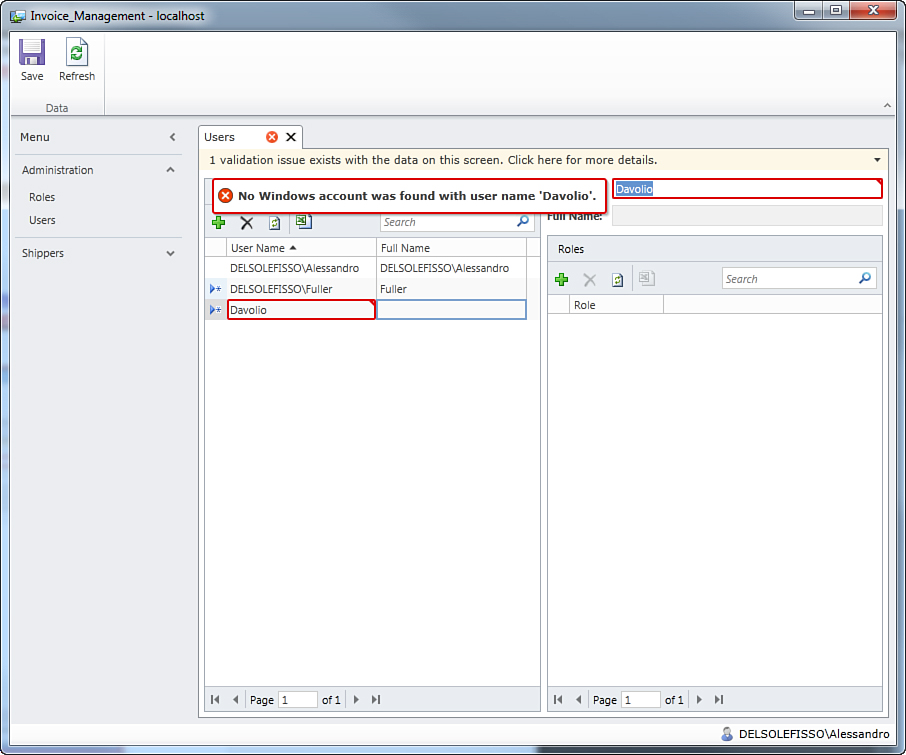
Figure 9.22. Username validation fails if no domain is specified.
At this point, you can specify the roles to which the new user belongs. In the Roles group, click Add and select one of the available roles from the drop-down list, as shown in Figure 9.23.
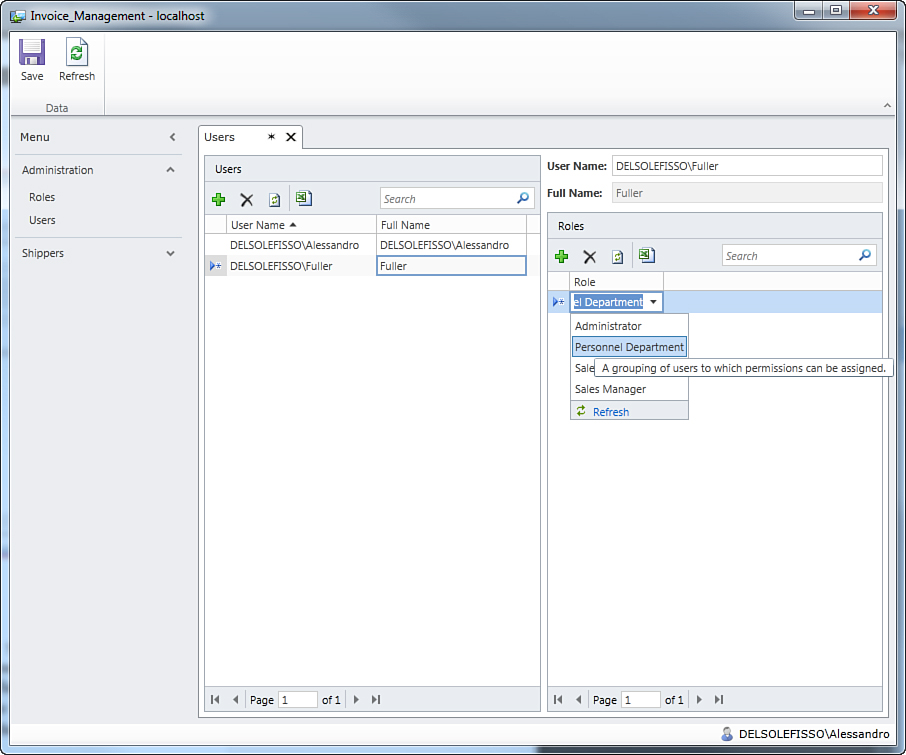
Figure 9.23. Assigning the user to roles.
As you can easily imagine, by using buttons on the toolbar you can assign the user to other roles or you can remove roles. Now add a new user named Davolio (or another user available on your system) and assign this user to the Sales Managers role. Then add a new user named Leverling (or another user available on your system) and assign this user to the Sales Agents role. When done, save your changes and close the application.
Where are Roles and Users Information Saved?
The SQL Server database for the application has some built-in tables expressly dedicated to saving information about roles, users, and permissions. If you try to investigate the database with either SQL Server Management Studio Express or with Server Explorer in Visual Studio LightSwitch, you can find the aspnet_Roles table, which stores role names; the aspnet_Users table, which stores accepted usernames; the aspnet_UsersInRoles table, which stores the roles that users belong to; and the RolePermissions table, which stores both the list of permissions you set at design time and the role that is the target of each permission. When you save changes from the Administration screen, all your security information is saved to these tables.
Testing the Application Under Different Credentials
You are now ready to test the application under different credentials and see how permissions work in reality. Log off from Windows and log on again with a new username, such as the sample user called Davolio. Because the application was deployed as a desktop client, you need to install it for each user who logs in to the system. So, locate the Publish folder where the setup package resides, open it, and launch Setup.exe. When the installation completes, the application is automatically started and displays information available only to the role to which the logged-in user belongs. (Note that the username is visible in the lower-right corner of the main screen.)
Notice that every standard user who logs in to Windows has permissions to manage the Shippers collection. The reason is simply that for the sake of simplicity this was not handled at design time, meaning that each user will have permissions to view resources as established for the appropriate role but also permissions to manage shippers. This will not be repeated again during the explanation.
The user Davolio belongs to the Sales Managers role and therefore has permissions to create, read, delete, and update information about customers, orders, order details, products, and invoices. Figure 9.24 demonstrates this.

Figure 9.24. Only resources established via permissions are available to the logged user.
You can play with the application if you want, to see how the current user can effectively manage data according to available permissions. Now log off from Windows and log on again as a different user, such as the user called Leverling and, once logged on, install the application to this user. This particular user belongs to the Sales Agents role, so such a user has permissions just to view information about customers, orders, order details, products, and invoices, but no kind of edit is possible. This is exactly what happens and is demonstrated in Figure 9.25.
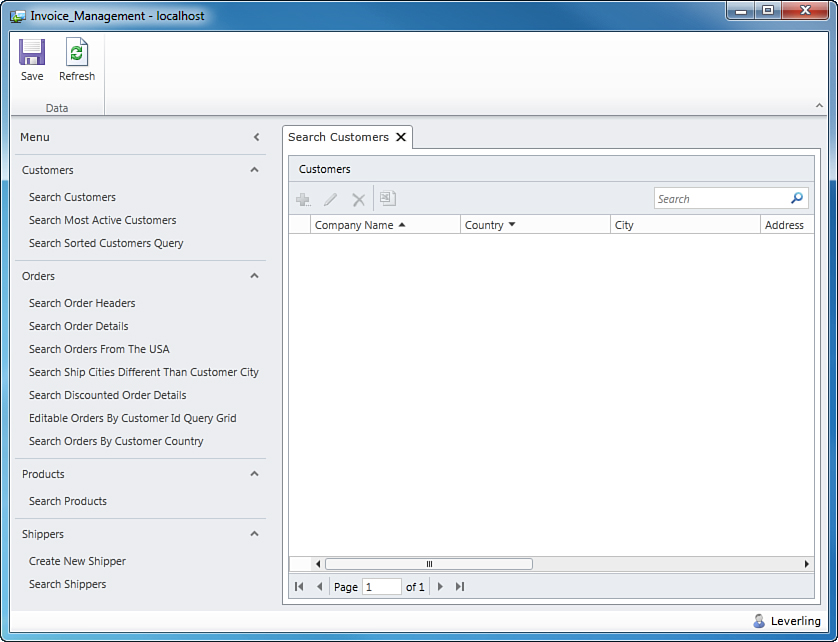
Figure 9.25. The current user has permissions to view just a limited set of entities.
Log off and reenter with the last username, Fuller. This user belongs to the Personnel Management role, so now permissions are available for viewing, editing, adding, and removing employees, but no other entity or screen is accessible. Figure 9.26 shows this.
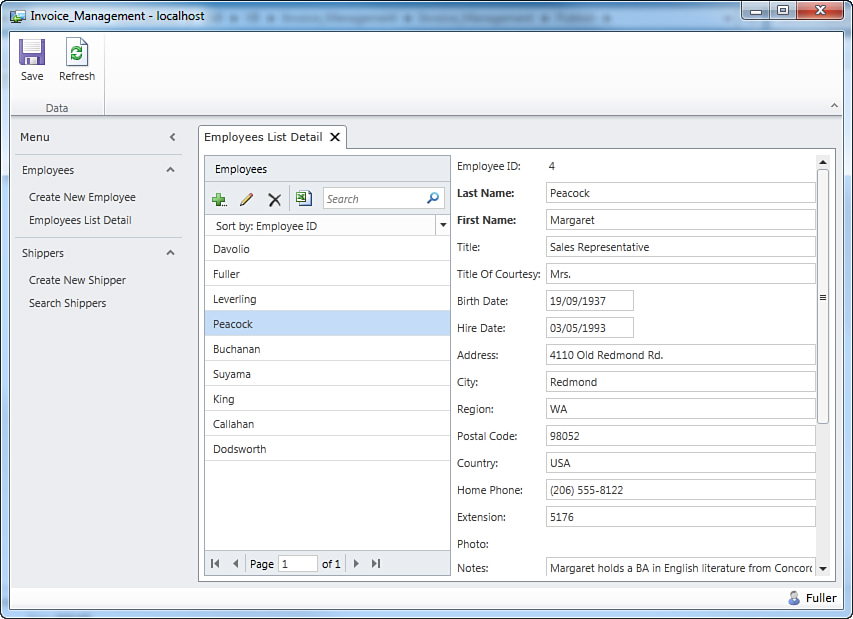
Figure 9.26. The current user has only permissions for the Employees collection.
By completing this step, you have secured your LightSwitch application so that only users authenticated within the network domain can access the application itself, ensuring that each user has just the permissions available for the role to which it belongs.
Windows authentication is just one of the possible security modes. Another efficient way to secure LightSwitch applications is Forms authentication, as covered in the next section.
Implementing Forms Authentication
In some situations, Windows authentication is not a good choice. For example, if your application is available as a 3-tier web client from the Internet or as a retail package, you cannot base your security policy on the Windows authentication mechanism. Instead, you need to ask users to log in to the application by entering their unique username and password. Visual Studio LightSwitch makes it easy to implement this kind of authentication by using the so-called Forms authentication, which relies heavily on the ASP.NET security mechanism. With Forms authentication, the application requires users to enter their credentials each time it runs. To understand how this works, you need to set the Forms authentication as the security mechanism in the Access Control Designer. Here you just click the Use Forms Authentication radio button, as shown in Figure 9.27.
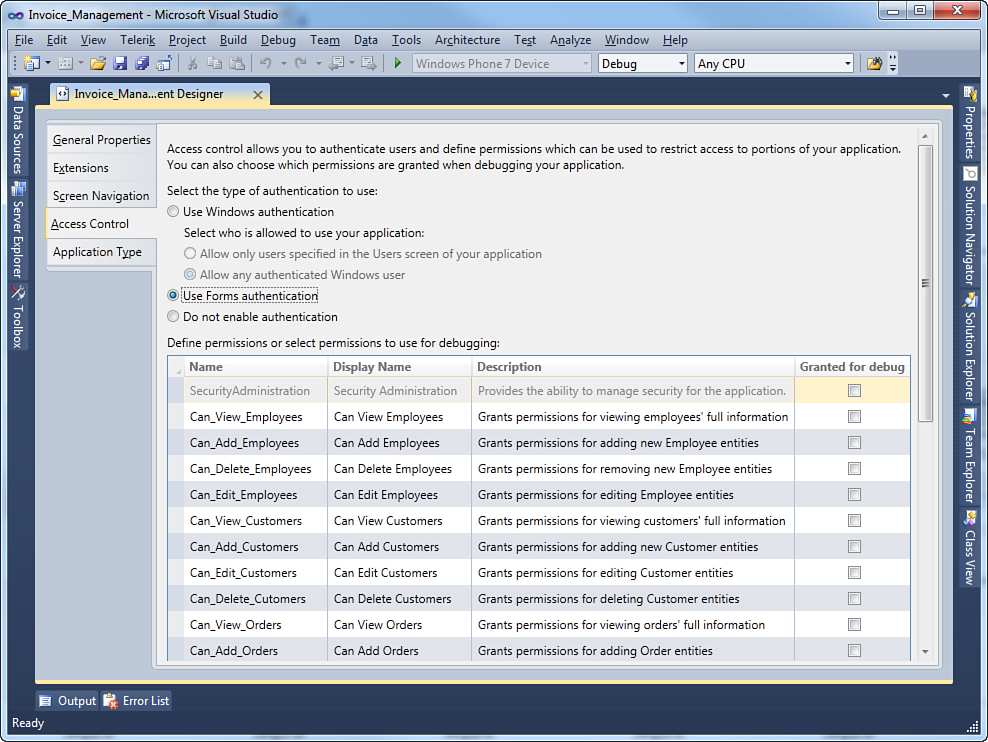
Figure 9.27. Setting Forms authentication as the security mechanism.
At this point, you should add permissions exactly as you did previously for Windows authentication. Because the previous permissions are good enough for demonstration purposes, you can leave unchanged those permissions (but you can also add new ones). The same consideration applies to handling permissions in code. There is basically no difference in the way you handle permissions in code between Windows and Forms authentication, and this is a huge benefit in LightSwitch. In this particular case, you can simply reuse the code shown in Listings 9.1 and 9.2, which can remain unchanged.
Publishing Applications with Forms Authentication
The first big difference that you encounter when implementing Forms authentication is at the deployment level. Assuming that all the previous permissions and code remain unchanged, click Build, Publish to start publishing the application with Forms authentication enabled. When the LightSwitch Publish Application Wizard starts, focus on the Authentication element. (Again, all other steps are described in detail in the next chapter.) You must specify the application administrator credentials, but this time you also have to specify the password, as shown in Figure 9.28.

Figure 9.28. Setting the application administrator’s username and password.
You must do the following:
1. Specify the username. This will be used to log in.
2. Specify the user’s full name. This is used to show more detailed information about the user, but it is not required to log in.
3. Provide an alphanumeric password containing at least one special character.
4. Confirm your password.
Do not worry right now about the other steps in the wizard; just click Publish. At this point, you can simply run the application by launching the shortcut in the Start, Programs menu in Windows. The application detects that there are new updates in the publish location and updates automatically to reflect changes. (You can even uninstall the previous version of the application and install the new version from scratch.) Once ready and running, the application asks for user credentials, as shown in Figure 9.29.
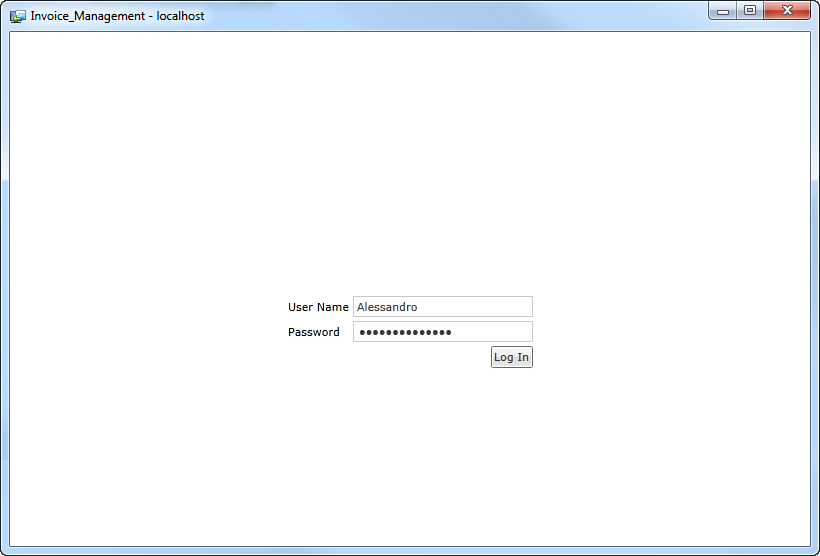
Figure 9.29. With Forms authentication, users must first enter credentials.
At this point, you can simply add your administrator credentials, which means entering your username (not the full name asked in the Publish Wizard) and your password. Once logged in to the application, similar to what happened with Windows authentication, you access the Administration page, where you can find the Roles and Users screens. There is a difference between Windows and Forms authentication, which is how the username appears at the lower-right corner of the main screen. This shows the current username without the domain/machine name and offers the possibility of changing the user’s password (see Figure 9.30). This is common to all users who log in to the application and is very useful so that users can replace the password assigned from the administrator with a custom one, for privacy reasons.
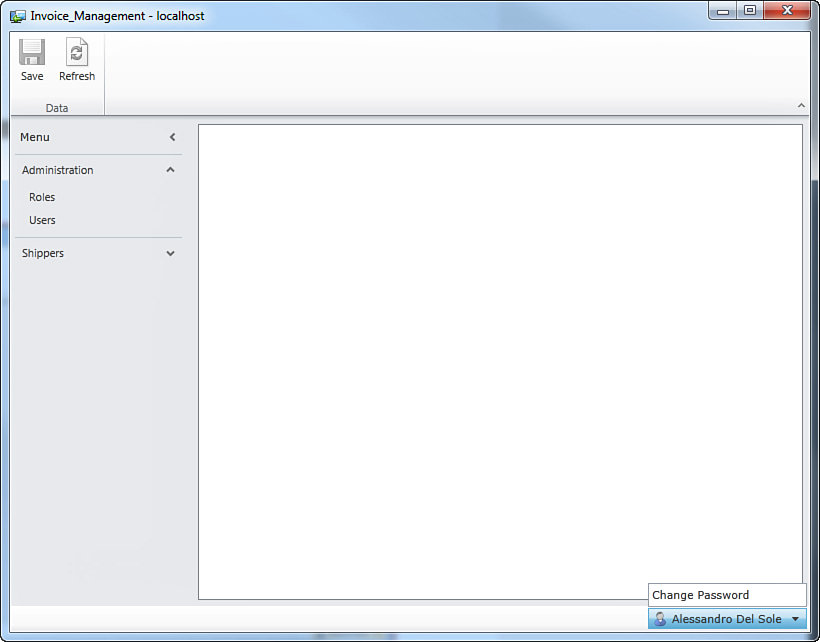
Figure 9.30. The Administration page available when you log in with Forms authentication.
Exactly as you did previously with Windows authentication, you now have to set up roles and users. By following the instructions explained in the “Creating User Roles and Administering the Application” subsection, create again the roles Sales Managers, Sales Agents, and Personnel Management and assign to each role the same permissions used when discussing Windows authentication (see Figure 9.31).
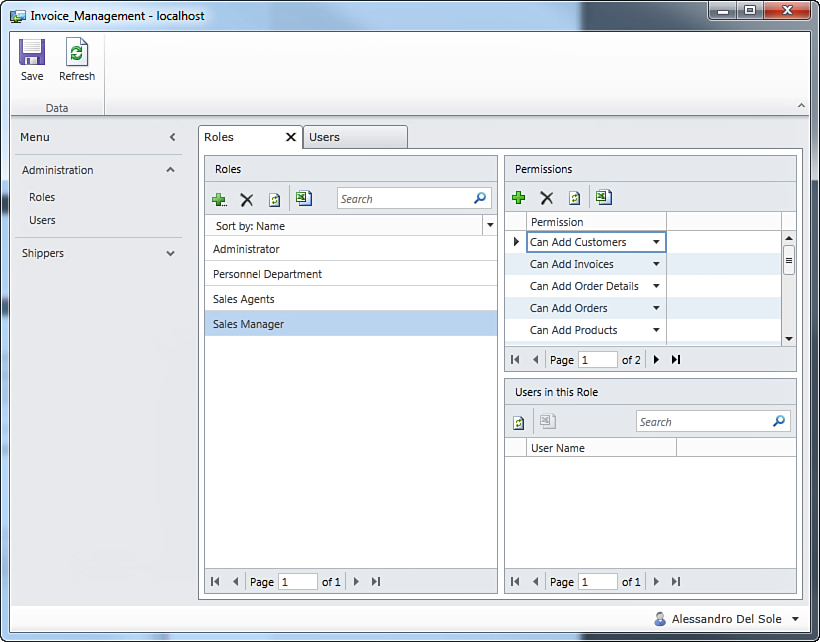
Figure 9.31. Setting up user roles in the Roles screen.
As you can see, you use the same approach to create roles and to assign permissions in both forms and Windows authentication. At this point, you need to set up users and assign users to roles. You do so just as you did with Windows authentication. The only difference is that you must enter information into four fields:
• User Name: In the form of any string
• Full Name: The username, without the domain or machine name
• Password: The password used to log in to the application
• Confirm Password: The same password as entered in the Password field.
Now you might want to add the three sample usernames created previously (Davolio, Fuller, and Leverling) to the list of authorized users. To authorize users under Forms authentication, follow these steps:
1. Click the Add button on the toolbar of the Users box.
2. When a new row is added to the list of users, enter the user information in the appropriate text boxes (as described in the preceding bulleted list).
3. Click the Add button on the toolbar of the Roles box and pick up a role to assign to the new user.
Figure 9.32 shows what the window looks like when you are adding a new user.
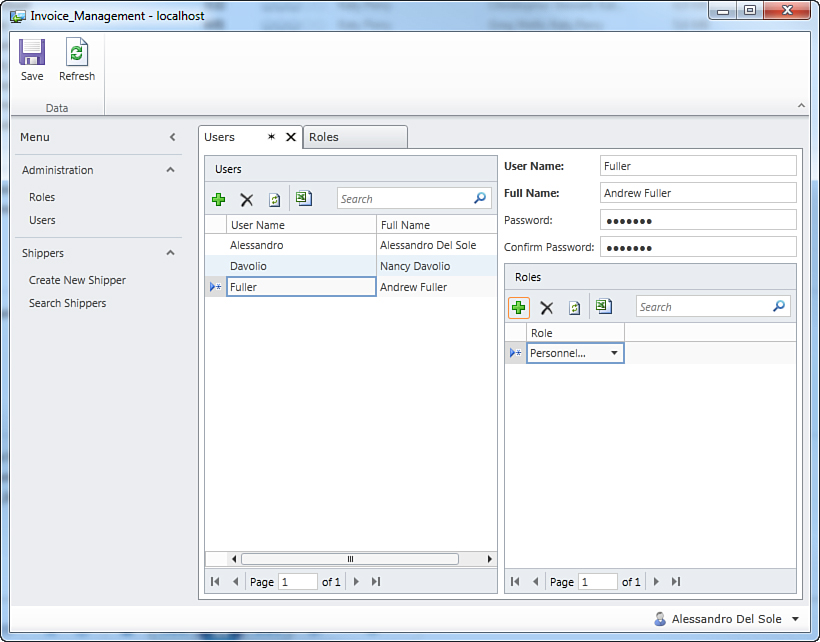
Figure 9.32. Creating users and assigning users to roles.
When you are done, just click Save to store your settings in the application’s database. Notice that when you save changes both the Password and Confirm Password boxes become empty. This prevents accidental changes to the password (while still allowing you to replace the current password without getting confused).
Testing the Application with Different Credentials
Close the application, restart it, and log in with different credentials. For example, try to enter with credentials of the user Fuller. You will get a list of available resources according to the role the current user belongs to. Continuing the current example, the Fuller user has permissions to work with employee information only, so only the list of screens related to this area is available, as shown in Figure 9.33.
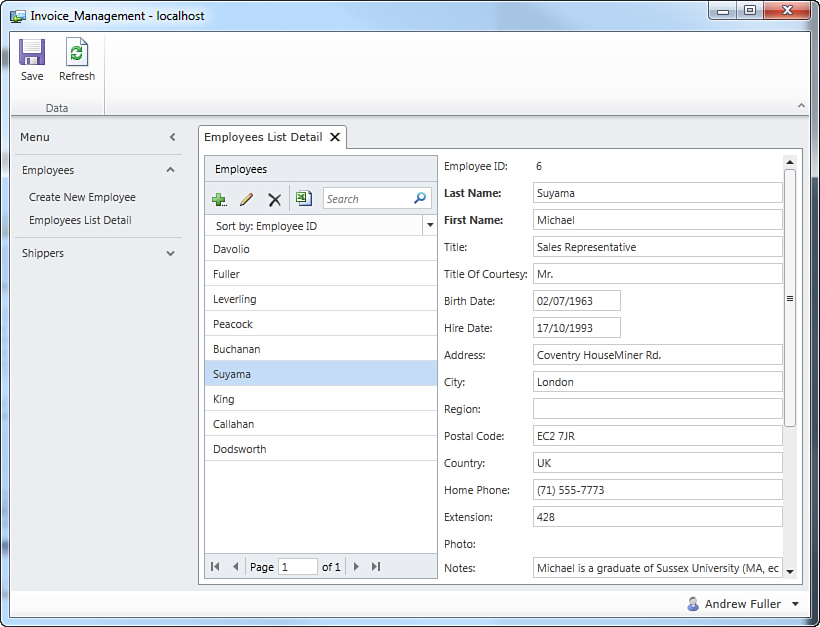
Figure 9.33. The current user has permissions to work with employee information only.
If you repeat these steps and enter credentials of other users, you will see that users have permissions according to the role they belong to.
Where are Roles and Users Information Saved?
As in Windows authentication, when you use Forms authentication, the application’s database is where security information is stored. Tables where this information is saved are the same: aspnet_Roles, aspnet_Users, aspnet_UsersInRoles, and RolePermissions. Another piece of information is stored in the aspnet_Membership table, which also contains users’ passwords, which of course are encrypted. Because of this kind of password protection, when you open the Users screen to edit user’s details you see only the user name, not the password. However, you can change the password if you forgot it by using the appropriate button on the same screen.
Permission Elevation on Server Code
So far, you have seen how to set up permissions, users, and roles, and how to assign permissions to roles. A role (and users belonging to the role) has only the permissions that the application administrator set up, and these cannot be changed. However, in real-world applications, in some situations a user might need elevated permissions to complete a particular task.
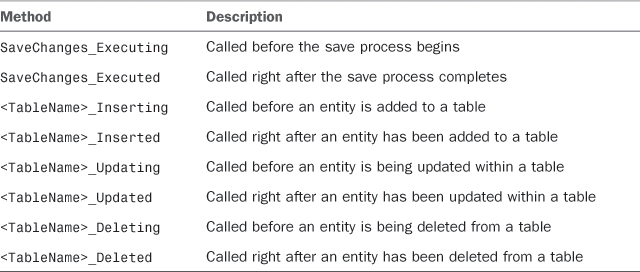
LightSwitch introduces a feature called permission elevation. This feature enables you to assign in code one or more permissions to a particular role, so that users in the role can complete the task, and then it enables you to remove those permissions after the task has been completed. Permission elevation can be done only on code that runs on the server, and it works only with save methods and table methods for inserting, updating, or deleting entities. Table 9.3 describes the methods that support permission elevation. All other methods do not support this feature and will throw an InvalidOperationException if you erroneously place elevation there. Methods described in Table 9.3 are discussed in more detail later in this book. For now, just focus on their description and on when they are invoked at runtime.
Table 9.3. Methods That Can Receive Permission Elevation
Inside the body of the server methods listed in Table 9.3, you can elevate permissions by invoking the Application.Current.User.AddPermissions method, and you revoke permissions by calling Application.Current.User.RemovePermissions. Both methods receive an array of string as an argument; such an array allows calling string constants that map permissions you defined in the Access Control Designer, plus a constant called AllPermissions that grants all the available permissions concurrently. Following are examples of permission elevations:
Application.Current.User.AddPermissions(Permissions.Can_Add_Customers, Permissions.Can_Add_Orders)
Application.Current.User.AddPermissions(Permissions.AllPermissions)
Application.Current.User.RemovePermissions(Permissions.Can_Add_Customers, Permissions.Can_Add_Orders)
Application.Current.User.RemovePermissions(Permissions.AllPermissions)
Continuing the previous application example, suppose that you have several users in the Sales Agents role. Now suppose that only one user in that role needs permissions required to add new customers (so that when the sales manager is on vacation, someone can still add new customers). This user cannot be added to the Sales Manager role; otherwise, that user would get unnecessary permissions. To satisfy the requirements of this scenario, you first need to control permissions on the user interface. For instance, you can change the CreateNewCustomer_CanRun method, as follows:
Private Sub CreateNewCustomer_CanRun(ByRef result As Boolean)
If Me.User.HasPermission(Can_Add_Customers) Or
Application.Current.User.Name = "Leverling" Then
result = True
Else
result = False
End If
End Sub
This will make available the new customer screen to users who have the appropriate permission and to the user called Leverling. However, this is only to make a screen visible, but any attempt to save changes would fail. For this reason, you also need to elevate permissions for the user Leverling on the Customer entity when such a user requests to save changes. For the sake of simplicity, we are handling only the permission elevation about inserting new customers, but you can easily handle the update scenario with similar code. This can be done by handling the SaveChanges_Executing method, which resides in the ApplicationDataService class. The simplest way to access the code for this class is to right-click the ApplicationData source in Solution Explorer and select View Code. The sample code looks like this:
Private Sub SaveChanges_Executing()
If Application.Current.User.Name = "Leverling" Then
Application.Current.User.AddPermissions(Permissions.Can_Add_Customers)
End If
End Sub
As you can see, the code detects the user name and grants the Can_Add_Customers permission if the user is actually the one allowed to create new Customer entities. In addition, in this particular case, you do not need to explicitly remove the permission with RemovePermission because this happens implicitly when the save pipeline completes. If you need to make changes to or get information from the entity that is being added, updated, or deleted, you must grant permissions in the Inserting, Updating, and Deleting methods for the table, as well. In addition, when working at the table methods level, remember that you then need to remove permissions manually.
Summary
Security is a key topic in every development scenario, and Visual Studio LightSwitch simplifies the process of securing applications. In LightSwitch, the security mechanism is based on user roles. Each role has permission to access only specified resources; then you create a list of allowed users and assign them to roles to let them get the appropriate permissions. In LightSwitch, you can take advantage of either Windows or Forms authentication modes. Regardless of the mode you choose, here is the process you follow:
1. Design permissions per role.
2. Write code that checks whether the current user belongs to a role that has permission to access the specified resource.
3. Deploy the application by providing credentials for the application administrator.
4. Run the application as the administrator, creating user roles, assigning permissions to roles, and assigning users to roles.
After you set up all the required information, users just need to enter the application with their login credentials. If you are using Windows authentication mode, the user credentials are taken from the user information entered when logging in to the Windows operating system. When you are using the Forms authentication mode, the user credentials are explicitly entered by the user who provides the username and the password. The application’s runtime can automatically detect permissions for the logged-in user, and then only resources for which the user has permissions will be made available.
Now that you know how to secure your applications, you are ready for another step in the LightSwitch development life cycle: deploying applications to the end users.