Chapter 2. Exploring the IDE
In This Chapter
• Getting Started with Visual Studio LightSwitch
• Visual Studio 2010 with LightSwitch
The integrated development environment (IDE) is the place where you design, create, and build applications; therefore, it is where you will spend most of your developer life with LightSwitch. It is essential to understand what the most important tools in the IDE are, how they are organized, and what instruments you need to create professional applications. This chapter examines the Visual Studio LightSwitch IDE, providing necessary information to developers from different backgrounds (for example, Visual Basic 6, Visual Studio 2010, or absolute beginners).
Getting Started with Visual Studio LightSwitch
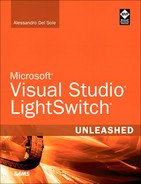
Visual Studio LightSwitch is a full-feature development environment for building rich business applications. It is built upon the shell of Visual Studio 2010, and this is something you immediately notice when you run it for the first time. Figure 2.1 shows what Visual Studio LightSwitch looks like.
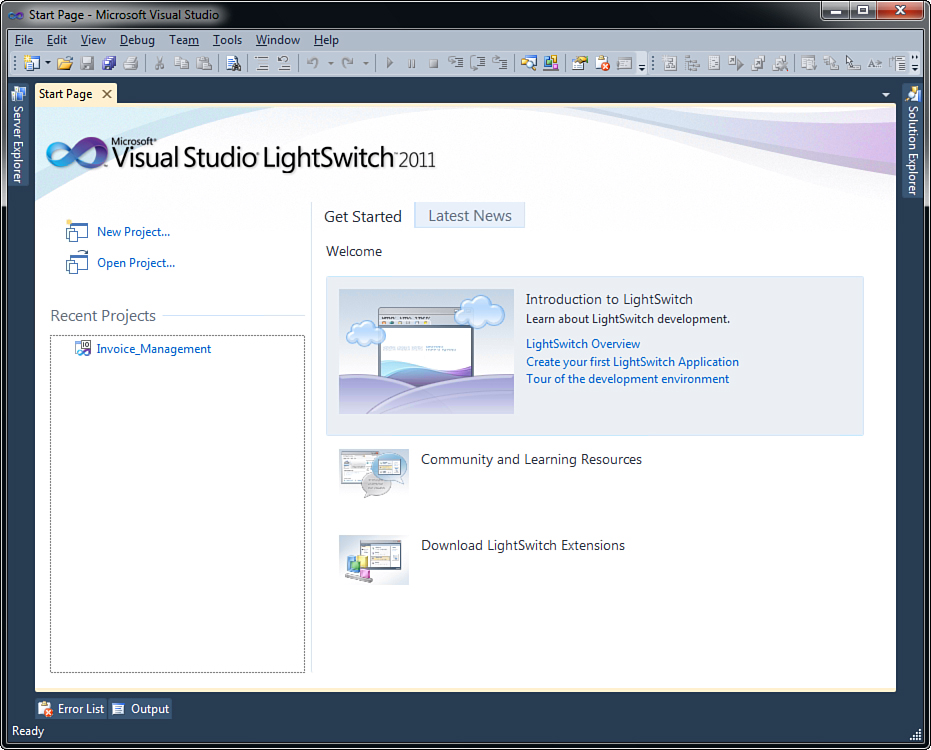
Figure 2.1. Visual Studio LightSwitch is running.
In the next sections, you learn the most important features in Visual Studio LightSwitch that you need to know to get familiar with the development environment.
Note for Experienced Developers
If you are an experienced developer working on Visual Studio 2010 or earlier, you might find some information in this chapter repetitive. Visual Studio LightSwitch is intended for both experts and novices, so a short description of common tasks and of the Visual Studio terminology is sometimes required to point novices in the right direction. For example, as an expert, you know that pressing F5 starts the application with an instance of the debugger attached, but novices do not. (In some cases, they do not know what a debugger is.) Be patient and read the chapter anyway, because there is also some news for you. Starting with the next chapter, you will no longer be annoyed by things that you already know.
This chapter provides an overview of the most important tools that you will use to build applications with LightSwitch. Here you do not find in-depth discussions or examples of each tool because those are available throughout the rest of this book. Instead, here you learn about various tools (including its quick reference name, what it is used for, and how to enable it). Starting from Chapter 3, “Building Data-Centric Applications,” you begin to use all the tools described in this chapter, and in the process learn how to get the most out of them. As one example, in this chapter, you learn what the Properties window is, what its purpose is, and how you enable it. Then, in the following chapters, you can grab it quickly when required.
Introducing the Start Page
The first thing that LightSwitch shows is the Start Page (see Figure 2.1). The left side of the Start page is about projects. You create a new project via the New Project link, or you can open an existing project by clicking the Open Project link.
If you are new to programming, you need to know that a project is basically a set of source code files and resource files (strings, images, and so on) that the compiler builds all into one executable file. In Visual Studio (including LightSwitch), you can create complex applications by organizing multiple projects into one solution. You can think of a solution as a container of projects. This is the case when you create a class library and a client application that consumes such a class library. In this case, you have two projects, both included in one solution. By default, Visual Studio creates a solution each time you create a new project, so a solution can definitely contain one or more projects. Later in this book, you will see a lot of solution and project examples, so do not be afraid if this terminology looks confusing right now.
The Recent Projects group shows a list of the most recently used projects. You can open a recently used project by clicking its name; also, you can remove a project from the list by simply right-clicking the project name and then selecting Remove from List in the pop-up menu that appears. The right side of the Start Page provides quick access to documentation and online resources and is divided into tabs. The Get Started tab shows a series of items, each providing links to learning resources. For example, the first item (Introduction to LightSwitch) includes links to the MSDN documentation that introduces LightSwitch, and the second item (Community and Learning Resources) provides links to the Visual Studio LightSwitch Developer Center at http://msdn.com/lightswitch, official forums, an official team blog, and code examples from Microsoft. The third item (Download LightSwitch Extensions) shows the Extension Manager, which is a tool capable of downloading, installing, and managing extensions for the IDE. (See Chapter 18, “LightSwitch Extensibility: Themes, Shells, Controls, and Screens,” for further discussion on the extensibility in LightSwitch.) The second tab is called Latest News and shows the latest news from the Visual Studio LightSwitch Developer Center via an RSS feed. Figure 2.2 shows what this looks like.
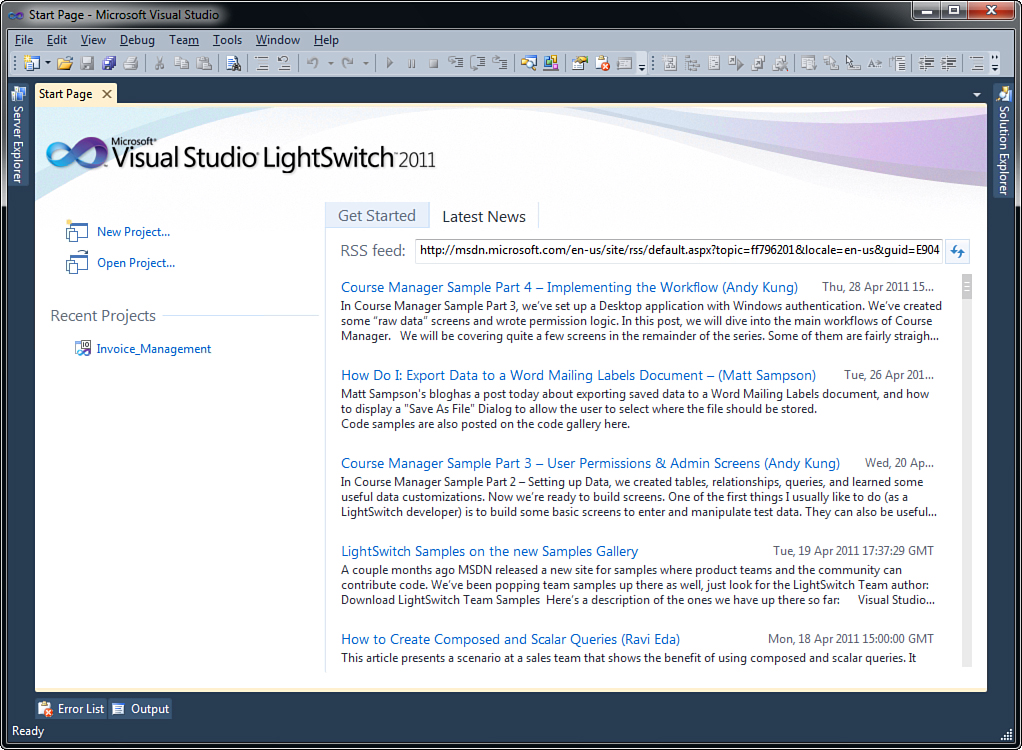
Figure 2.2. The Latest News tab in the Start Page.
LightSwitch points to the LightSwitch Developer Center’s RSS feed by default, but you can replace it with a different valid RSS link.
Other than with keyboard shortcuts, each action you take inside Visual Studio LightSwitch is invoked via a menu command or a toolbar button. This chapter does not list all available menu commands and toolbar buttons; instead, a description of specific commands is provided when discussing the related topic.
Creating New Projects and Exploring Solutions
To create a new LightSwitch application, you click the New Project link on the Start Page or select File, New Project.
At this point, the New Project dialog displays (see Figure 2.3).
Figure 2.3. From the New Project dialog, users can create a new LightSwitch application.
The choice for a new project is really simple because there is just one project template and you only need to decide the programming language you want to create your application with: Visual Basic or Visual C#. It is worth mentioning that this is true if you run Visual Studio LightSwitch standalone. If you have Visual Studio 2010 Professional or higher, you will have more templates available.
Then you provide the project name in the Name text box. Visual Studio LightSwitch places new projects in the default projects folder, which is automatically specified in the Location text box (but you can change that via the Browse button).
Replacing the Default Projects Folder
If you want to replace the default projects folder with a different one for all projects, click Tools, Options, and then in the Options dialog, select the Projects and Solutions node. Finally, replace the content of the project’s Location text box with your favorite folder.
If you have Microsoft Team Foundation Server 2010 installed (or you have the possibility to reach an instance on a server) and you want to add the new project to source control, just check the Add to Source Control check box. Then, simply click OK to create the new project after you have specified the required information.
Introducing Solution Explorer
LightSwitch projects are composed of several different items, such as tables, screens, resources, and source code files. Visual Studio LightSwitch provides an easy way to switch between project items via the Solution Explorer tool window. This window provides a visual hierarchical representation of the solution and of the projects belonging to the solution itself and enables users to move from one item to another by just double-clicking the desired item. For example, you can move to editing a data source by right-clicking the data source name and then move to a screen by double-clicking the screen name. Figure 2.4 illustrates the Solution Explorer tool window showing items from an existing solution containing one project. In particular, it shows data sources and screens.
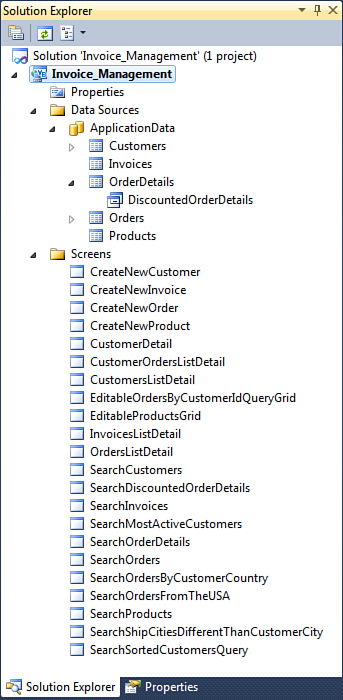
Figure 2.4. Solution Explorer provides a simple way to show and browse project items.
The View menu provides shortcuts to a number of useful windows other than Solution Explorer, such as the Output window and the Error List window. These are explained in this book when they are first used.
If you are not new to development with Microsoft Visual Studio, you probably immediately noticed how Solution Explorer looks different from other Visual Studio editions. Basically, Solution Explorer in LightSwitch has been revisited to best fit the simplified development approach to business applications, which is all about data and screens.
Note About Solutions in Lightswitch
Visual Studio LightSwitch supports solutions with multiple projects, but this is limited to multiple LightSwitch projects only, which is uncommon. Most often, you will likely create solutions that include different project types (for example, a LightSwitch application and a Silverlight user control). In such situations, you need to install Visual Studio LightSwitch on a machine where Visual Studio 2010 Professional or higher is already installed. This is the only way to include different project types in LightSwitch solutions and is covered in Chapter 7, “Customizing Applications with Buttons, COM Automation, and Extensions.”
You do not need to browse any other kind of items (LightSwitch handles them for you), so this is the reason why you now see only Data Sources, Screens, and Properties. The Data Sources item lists entities and queries under entities.
Actually, you can tell Solution Explorer to show every single item comprising your solution, but this still happens in a different way than in other Visual Studio editions (as discussed in Chapter 12, “Dissecting a LightSwitch Application”).
The LightSwitch Designer
When you create a new project, the first requirement is to define a new data source. A data source is represented by a data table and can be designed from scratch or imported from an existing data store (such as a SQL Server database available on premise or in the cloud, WCF RIA Services, or SharePoint 2010). To help you decide how to create a data source, Visual Studio LightSwitch displays the LightSwitch Designer, the first contact you have with the newly created project. Figure 2.5 shows what it looks like.
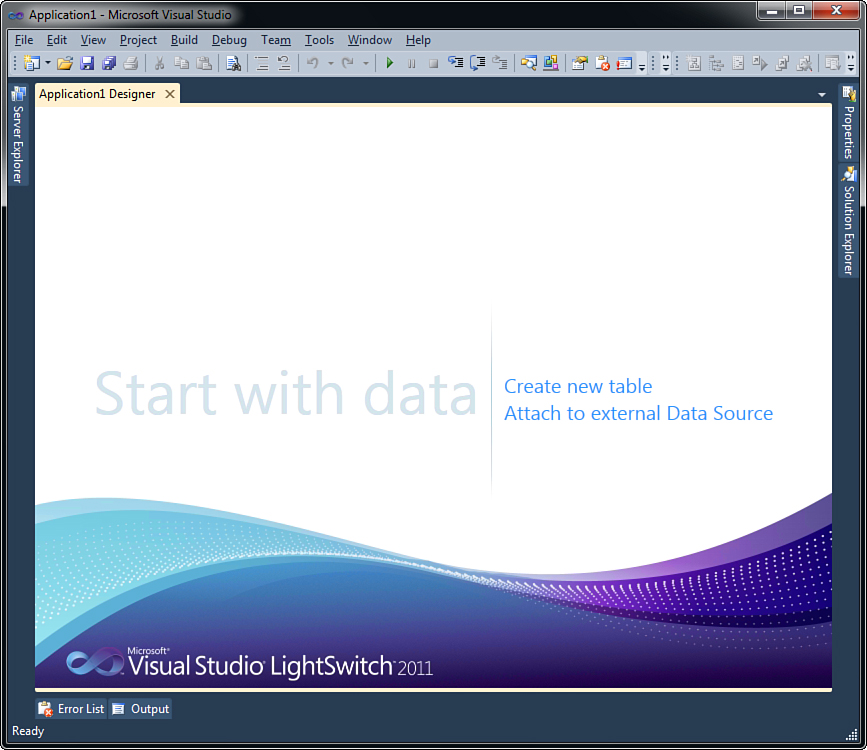
Figure 2.5. The LightSwitch Designer.
Once enabled, you can create a new table from scratch by clicking Create New Table or create a new table and import existing data from an external database by selecting Attach to External Database.
The Entity Designer
The Entity Designer is where you define tables, table columns, and column data types. Figure 2.6 shows the Entity Designer while editing an existing table.
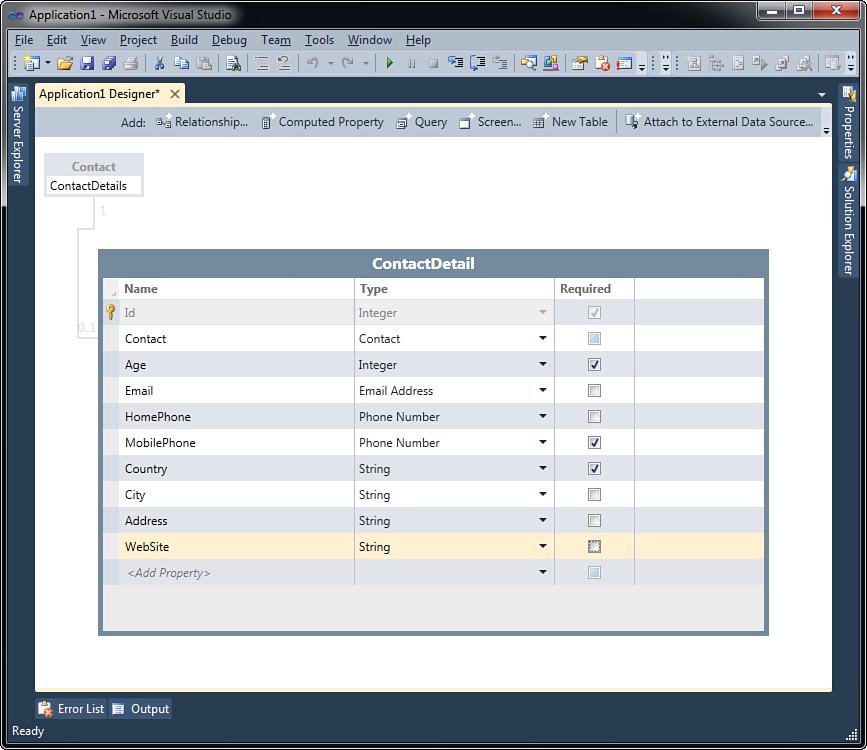
Figure 2.6. The Entity Designer enables users to define tables and columns and to assign data types.
As you discover in the next chapter, an entity represents a single row within a table (which is a single record), and the name of a table should be the pluralized version of the entity name.
The Screen Designer
The Screen Designer is the tool that you use to create and edit screens. In contrast to other development tools, including Visual Studio 2010, in LightSwitch you do not have a visual representation of the screen and therefore you cannot manipulate controls directly on the form surface. In Visual Studio LightSwitch, you just have a hierarchical representation of the controls that comprise the graphical user interface for your screens. Figure 2.7 shows what the Screen Designer looks like.

Figure 2.7. The Screen Designer enables users to manage the user interface for screens.
Although this might seem like a tedious limitation, it isn’t, for at least two reasons (which you read more about later in this book):
• Screens are based on predefined templates and therefore you do not have to rearrange controls on the user interface. Basically, the Screen Designer shows a hierarchical representation of the controls on the screen and the data to which they are bound. You do not need to specify the data-binding details, nor do you have to go through the rather tedious process of positioning controls on the screen, because all this is handled automatically for you when you select a screen template. That said, you still have complete control over the screen layouts using grouping controls.
• LightSwitch provides a Customization Mode feature that enables users to rearrange the user interface while the application is running, as demonstrated in Chapter 4, “Building More-Complex Applications with Relationships and Details Screens.” In a few words, you can customize the application’s user interface while the application is running so that you can see how changes may better fit your real needs.
The Properties Window
Tables are made of columns and rows, and screens are made of controls. All these items (rows, columns, controls) are represented by properties. In LightSwitch, properties are objects of a given type (such as String, Integer, collections, and so on) that allow callers to access information. Every property has some characteristics, such as name, data type, validation rules, and description. Every characteristic is also referred to as property and can be customized to accomplish specific tasks or to respond to specific requisites. The LightSwitch design experience offers the Properties window to facilitate setting properties in tables, screens, and queries. Figure 2.8 shows how you can use the Properties Window to set properties for a column of type String from a table.
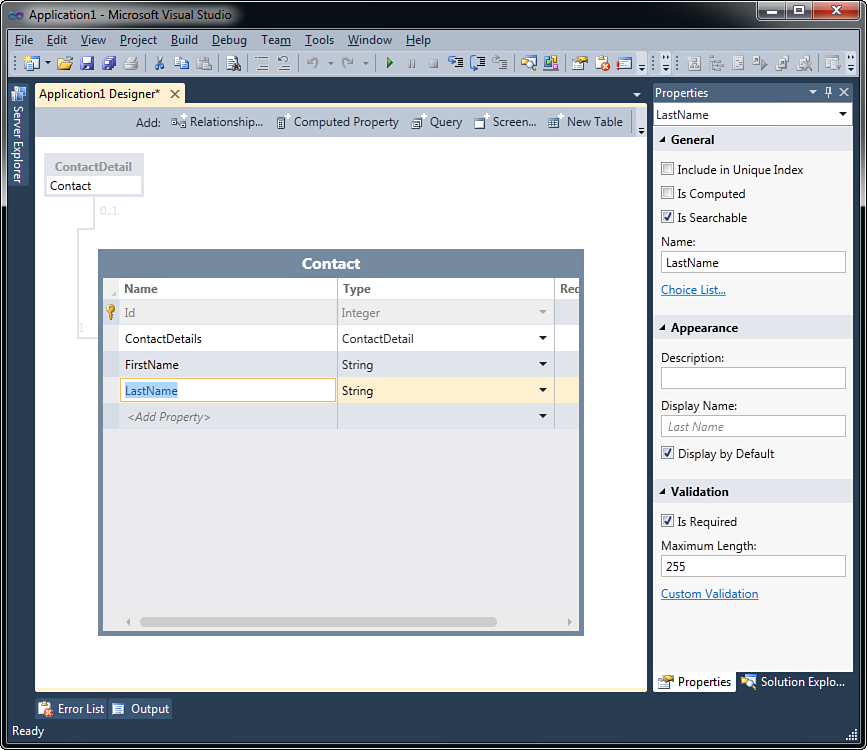
Figure 2.8. In the Properties window, users can customize elements’ properties.
You can enable the Properties window by pressing F4 or by right-clicking the element you want to customize and selecting Properties from the pop-up menu. Similar to Solution Explorer, the Properties window is a well-known tool for experienced developers, but in LightSwitch, it has been revisited to offer more-appropriate settings with regard to table and screen properties.
The Query Designer
Screens and tables in LightSwitch applications can be instructed to return only a specified set of data. You can do this by applying filters, sorting logic, and query parameters. This is an easy task that can be accomplished by using the Query Designer tool. This is a great tool because you can apply filters directly to the data source or you can apply filters to a screen. The latter case is useful when you need a screen displaying the entire set of data and another screen displaying a filtered set of data, keeping unchanged the data source. Figure 2.9 shows how a screen can be customized with filters, sorting, and parameters.
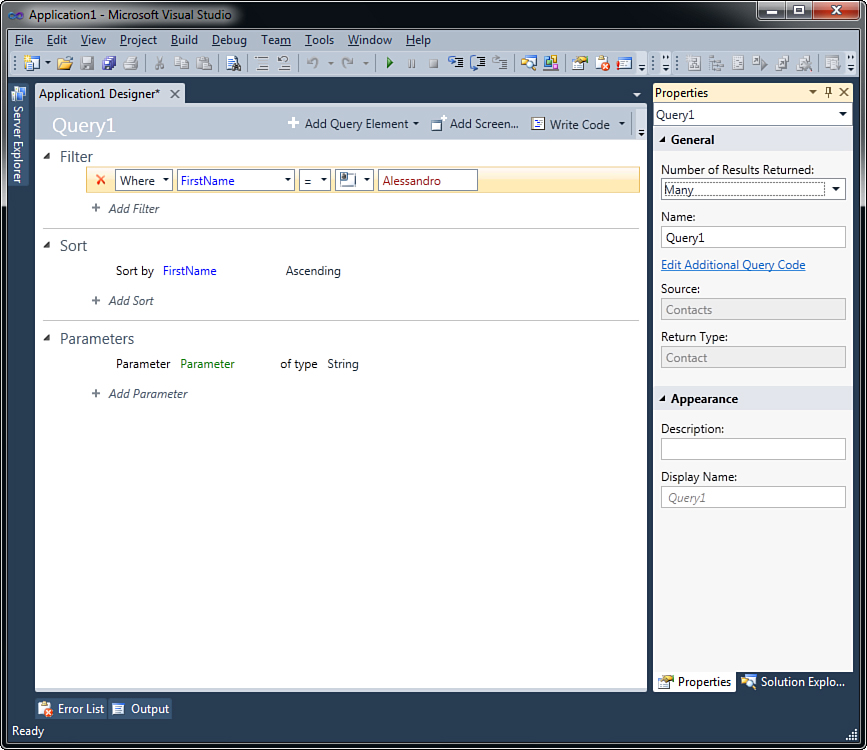
Figure 2.9. The Query Designer enables users to apply filters directly at the screen level.
To enable the Query Designer, you have different options, depending on whether you want to apply filters to a table or to a screen. When working with tables, you select a table in Solution Explorer and then you can
• Select Project, Add Query.
• Right-click the table in Solution Explorer and then select Add Query in the pop-up menu.
• Click the Query button in the Entity Designer.
Queries that you create by applying filters to tables have global visibility and can be accessed anywhere in the application. This includes basing screens on such queries. When working with screens, however, you just click the Edit Query link. Notice that queries at the screen level are available only when the screen is data-bound to a collection of items; this is the case of a screen that shows a list of elements. If a screen is data-bound to a single object (for example, a data entry screen), the tool is not available because there is nothing to filter. Usually, you modify a screen query when you have a specific screen parameter or a specialized screen. Both scenarios are covered in Chapter 6, “Querying, Filtering, and Sorting Data.”
The Application Designer
The Application Designer is where you set global application properties. You enable the Application Designer by selecting Project, Properties or by double-clicking Properties in Solution Explorer. Figure 2.10 shows the Application Designer.
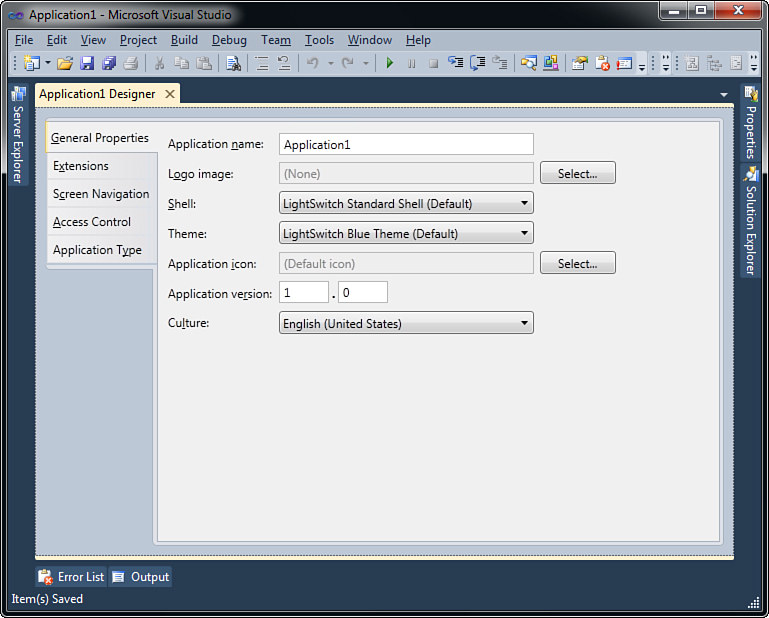
Figure 2.10. The Application Designer.
The Application Designer is organized in tabs, and you use it to set the following application properties:
• General application information such as name, logo image, version, culture and UI theme (General tab).
• LightSwitch extensions that you want to use in your application (Extensions tab).
• Screen navigation order and arrangement; for example, the first screen that you want to be launched (Screen Navigation tab).
• Authentication type and specific permission rules (Access Control tab).
• Application type and deployment strategy. In particular, you can create desktop client applications and web client applications. You can also decide how to host the application services, which means on the end user’s machine, on a web server running Internet Information Services, or using Windows Azure.
The Application Designer is an important tool, and you will use it in many situations to determine your application’s behavior and deployment strategy.
The Code Editor
One of the greatest benefits of Visual Studio LightSwitch is that it provides a complete infrastructure for building fully functional business applications without writing a single line of code. This is one reason why this tool is so convenient for nonexperienced developers. However, in some situations, you need special customizations on both data and screens that the design tools cannot accomplish. In such situations, you can write code to reach more-complex objectives by using the programming language (Visual Basic or C#) you selected when creating the new project. Generally, you write custom code in the following scenarios:
• Writing custom validation rules
• Writing custom queries
• Enhancing entities security
• Customizing data access operations, such as insert/update/delete
• Interacting with the application infrastructure
• Interacting with custom controls
• Customizing the user interface’s behavior
Starting from Chapter 5, “Customizing Data Validation,” you begin writing custom code when required. Figure 2.11 shows what the code editor looks like while writing a custom validation rule for an entity.
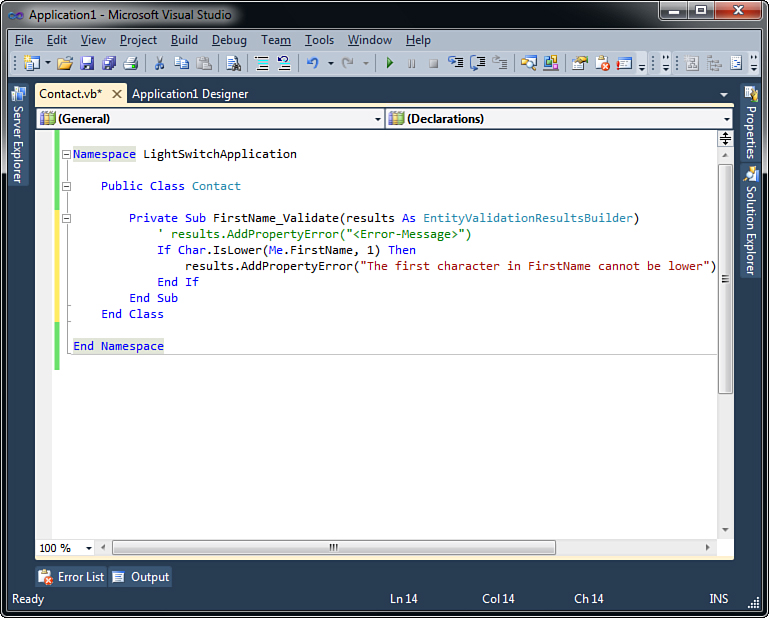
Figure 2.11. The LightSwitch code editor is where you write custom code.
Building, Running, and Debugging Applications
With the word building, we indicate the process of compiling all the projects in the solution into an executable application. As with Visual Studio 2010, in Visual Studio LightSwitch, you build your solutions by pressing Ctrl+Shift+B or by selecting Build, Build Solution. The Build menu also offers other options, such as Rebuild Solution, which recompiles every single item in the solution, and Clean Solution, which cleans the building process output so that a new build effectively refreshes everything. Once built, the application is ready to run, and you can start it by pressing F5. This starts the application in debugging mode, with an instance of the Visual Studio debugger attached.
In contrast to what is available in Visual Studio 2010 and earlier, Visual Studio LightSwitch does not have debug and release configurations. Therefore, when you run an application from within the IDE, it always starts as if in debug mode. If you have Visual Studio 2010 Professional or higher with LightSwitch, you can still press Shift+F5 to start the application, but the result is (again) that it runs in debug mode by default.
Debugging an application means analyzing the application execution to check whether it has errors, where errors are, and why they occur so that they can be fixed. While following code examples provided in this book, you will usually run applications by pressing F5, meaning that execution occurs in debugging mode. This can also prove useful to understand how the application actually works. The Debug menu provides commands for executing complex debugging tasks, and Chapter 14, “Debugging LightSwitch Applications,” explains such tools in detail.
Managing and Arranging Windows
So far, you have seen a number of designers, tabbed windows, and tool windows that are available in Visual Studio LightSwitch. An important thing you have to know about such tools is how they can be arranged within the IDE’s user interface. Let’s start by describing how to move and place tool windows.
Arranging Tool Windows
Tool windows are floating windows that can be docked to the IDE interface. To dock a tool window to the desired position in the IDE, just click the window and move it onto the most appropriate arrow in the graphical cross that you see on the IDE, and then release the left button of the mouse (see Figure 2.12).
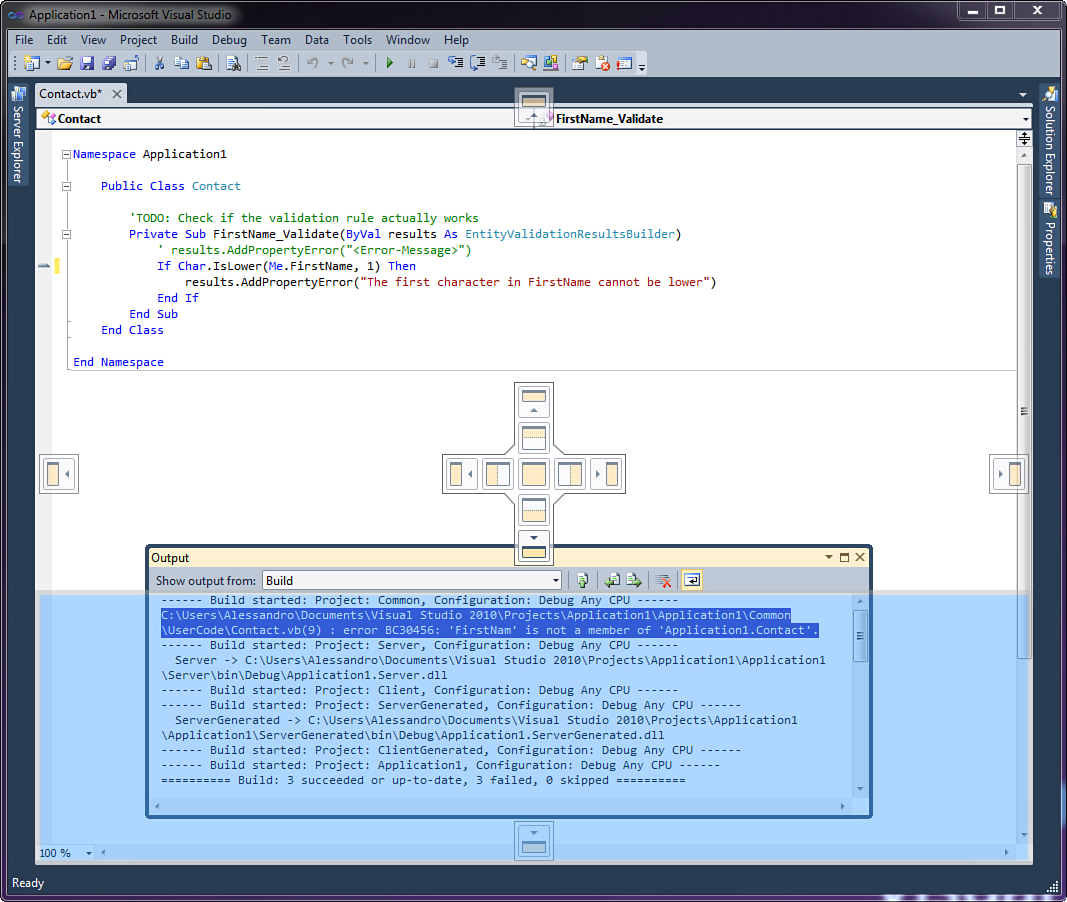
Figure 2.12. Docking a floating tool window to the IDE’s user interface.
Arranging Tabbed Windows
Tabbed windows are special windows that contain designers or the code editor. Their peculiarity is a tab on their top that shows the window title and a close button. You generally have two ways to arrange tabbed windows:
• Organizing their position by clicking the window title and moving to the left or right of another tabbed window.
• Undocking them from the IDE and making them float inside or outside LightSwitch by clicking the window title and dragging the window. In the latter case, you treat them like classic windows in the operating system. (This was first introduced with the release of Visual Studio 2010.) This proves particularly useful if you want to work with multiple windows concurrently. Figure 2.13 shows an example.
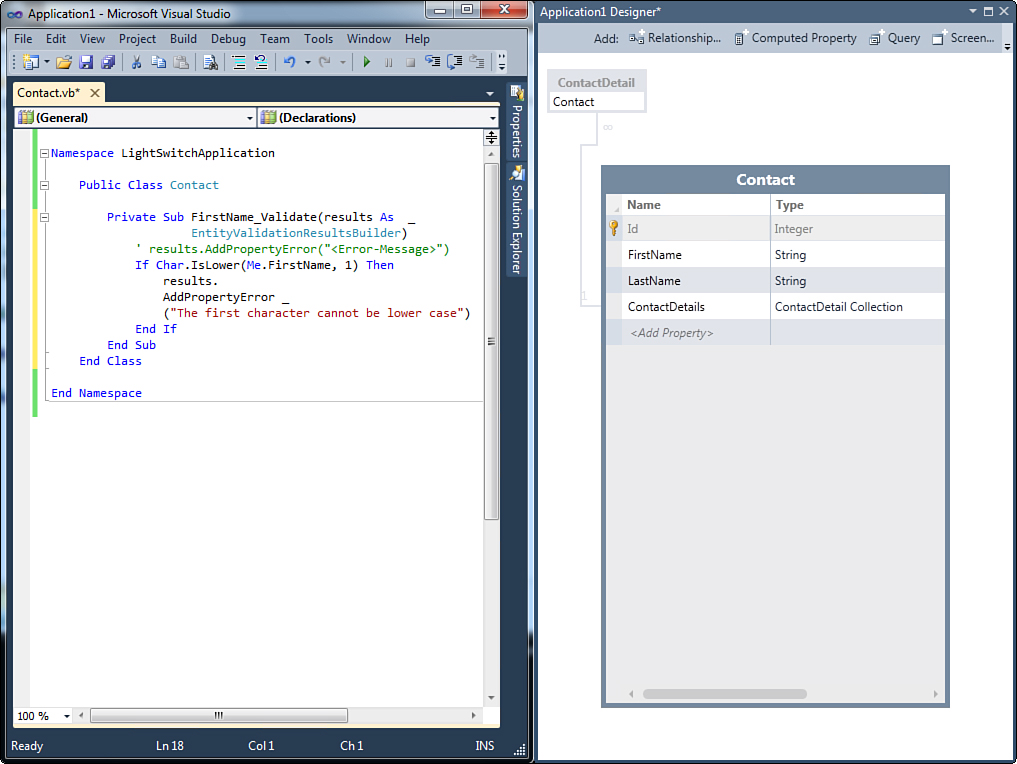
Figure 2.13. Undocking a tabbed window from the IDE.
Notice that in LightSwitch, you can open one designer at a time, so undocking tabbed windows is limited to one designer window and code editing windows. To redock the tabbed window inside the IDE, you just drag it inside the IDE and release it in the appropriate position, similar to what Figure 2.13 shows.
The Window menu provides several alternatives for arranging tabbed and tool windows inside the IDE. For example, you can use it to close all open documents or to make a docked window floating; in the latter case, however, you cannot move it to a specified position unless you use the technique shown in this and the previous section.
Getting Help
Visual Studio LightSwitch ships with documentation covering the most important aspects of developing applications with LightSwitch. You access the documentation either online or offline by simply pressing F1 on whatever tool or code element you are using. By default, Visual Studio LightSwitch is configured to display the documentation installed locally. The Visual Studio LightSwitch local help system is based on the Microsoft Help 3.0 technology, first introduced with Visual Studio 2010. When you press F1, the documentation is shown inside the Help Viewer application, as demonstrated in Figure 2.14.
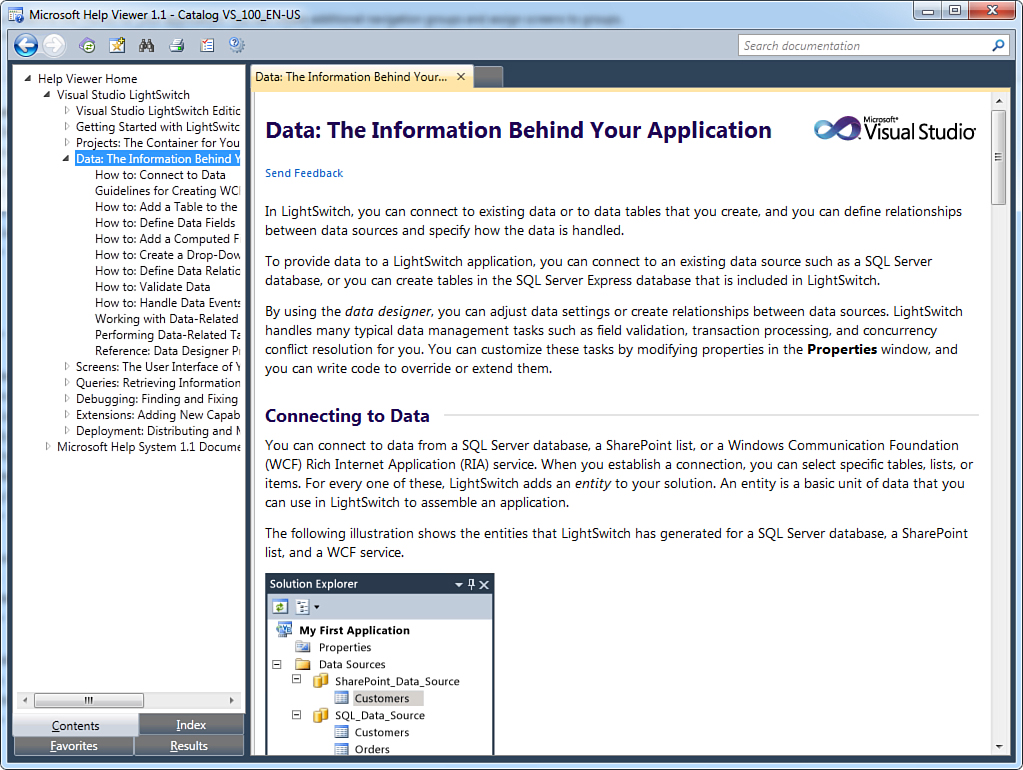
Figure 2.14. Browsing the local documentation with the Help Viewer.
On the upper-left side of the window, you have a hierarchical view of contents that you can easily browse. The lower side of the window shows a list of content related to the topic for which you requested help. In addition, you can take advantage of the Search box to search for a specific topic. If you prefer to view the online documentation, you can configure LightSwitch by selecting Help, Manage Help Settings and then clicking the Choose Online or Local Help command in the Help Library Manager dialog. The Help Library Manager also allows you to check for documentation updates and to download and install additional content from the Internet or from Visual Studio installation media.
Visual Studio 2010 with LightSwitch
As you know from Chapter 1, “Introducing Visual Studio LightSwitch,” Visual Studio LightSwitch is also available as an add-on for existing editions of Visual Studio 2010 (except for Express editions). Therefore, when Visual Studio LightSwitch is installed, the setup program integrates the LightSwitch tooling inside the Visual Studio 2010 edition that is found on your machine. Installing LightSwitch as an add-on for Visual Studio 2010 is a powerful option for at least three reasons:
• It is required if you want to enrich your LightSwitch applications with other types of projects, such as custom Silverlight user controls. Also, you could create a class library with a different programming language (such as Visual F#), which can be consumed by the LightSwitch application, managing everything in one development environment.
• You can use additional tools specific for your Visual Studio edition, such as modeling tools, the IntelliTrace historical debugger in Visual Studio 2010 Ultimate, or analysis features.
• You can use a rich development environment, which can take advantage of additional extensions that are not limited to the LightSwitch development.
Figure 2.15 shows how you create a new LightSwitch project in a higher edition of Visual Studio 2010.
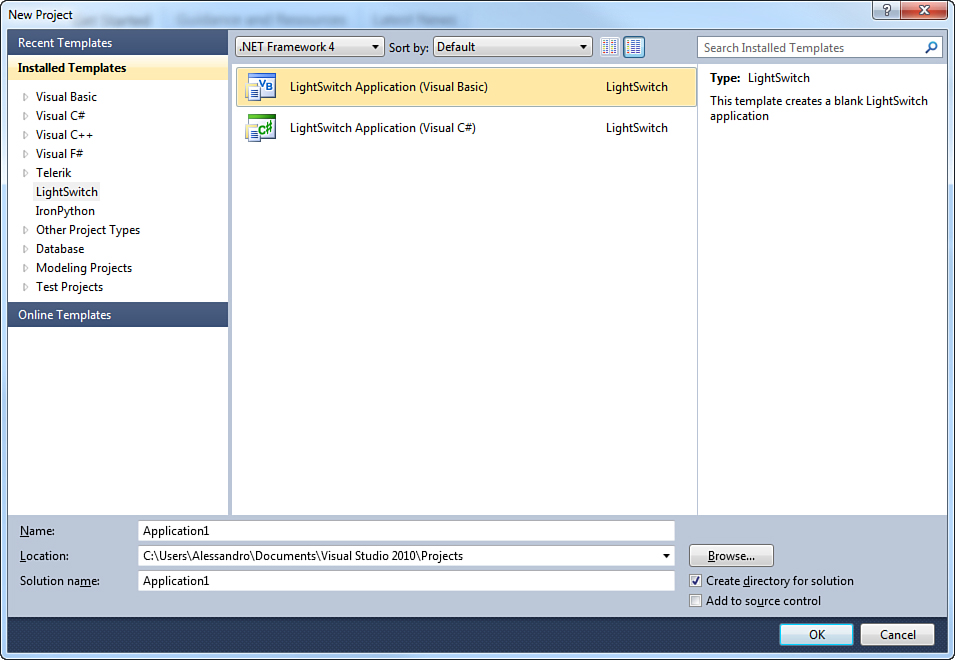
Figure 2.15. Creating a new LightSwitch project in Visual Studio 2010.
Notice how the LightSwitch projects folder is integrated inside default project folders. Figure 2.16 shows how you can create complex solutions with Visual Studio 2010, including different project types. In this figure, there is a LightSwitch project, a Visual F# class library, and a Silverlight WCF RIA Service. Also notice how you can use all of Visual Studio 2010’s available instrumentation.
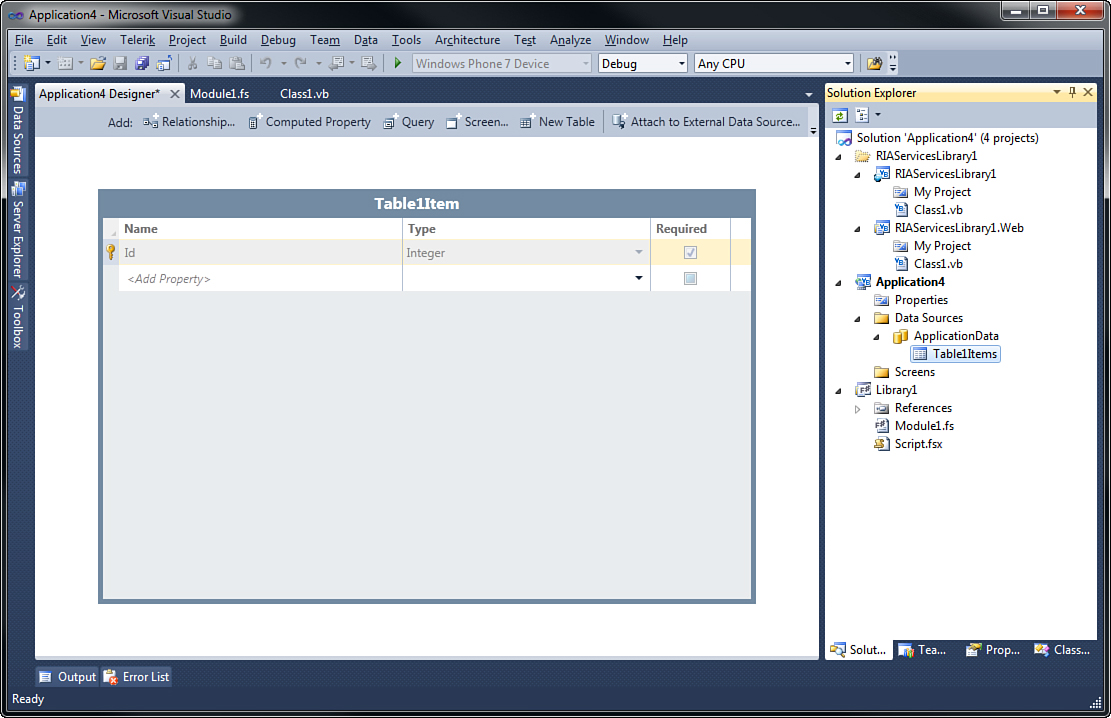
Figure 2.16. Using Visual Studio 2010 with LightSwitch.
Summary
Understanding the Visual Studio LightSwitch development environment is vital. After all, it is where you will spend the most of your time as a developer. From this chapter, you learned how the IDE is composed and organized, and you got an overview of common tasks such as creating and accessing projects and of the most important tools, such as designers and the code editor. You also saw how to invoke the LightSwitch help system and how LightSwitch integrates with existing editions of Visual Studio 2010. Starting in the next chapter, you learn how LightSwitch makes the process really straightforward as you develop data-centric applications.