Chapter 19. LightSwitch Extensibility: Data and Extension Deployment
In This Chapter
• Creating and Using Custom Data Sources with WCF RIA Services
• Deploying Extensions to Others
In this chapter, you continue your journey through the LightSwitch extensibility points. Many concepts described in the previous chapter are repeated in this one, especially about creating, building, and testing extensions. This chapter discusses extensibility points related to data, such as custom business types and custom data sources. At the end of this chapter, you also learn how to distribute extensions to other developers via VSIX packages and through Visual Studio Gallery.
Creating Business Types
The journey through the LightSwitch extensibility points continues with business types. You already learned the concept of business types in Chapter 3, “Building Data-Centric Applications,” and you used them in LightSwitch several times in this book. As you know, LightSwitch offers four built-in business types, each to solve specific business problems: Money, Email Address, Phone Number, and Image. In this chapter, you learn how to create a new, custom business type called Web Address that will be used to represent website addresses the appropriate way, by taking advantage of the System.Uri type in .NET. You learn how to implement validation rules and how to build Silverlight controls to represent the new type. Now, create a new extensibility project called WebAddressExtension.
Implementing a New Business Type
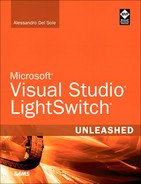
The next step is to tell Visual Studio that you want to create a new business type. As you learned in the previous chapter, in Solution Explorer, right-click the LsPkg project, and then click Project, Add New Item. When the Add New Item dialog appears, select the LightSwitch Business Type template, as shown in Figure 19.1. The new item’s name reflects the new business type name—in this case, WebAddress.lsml.
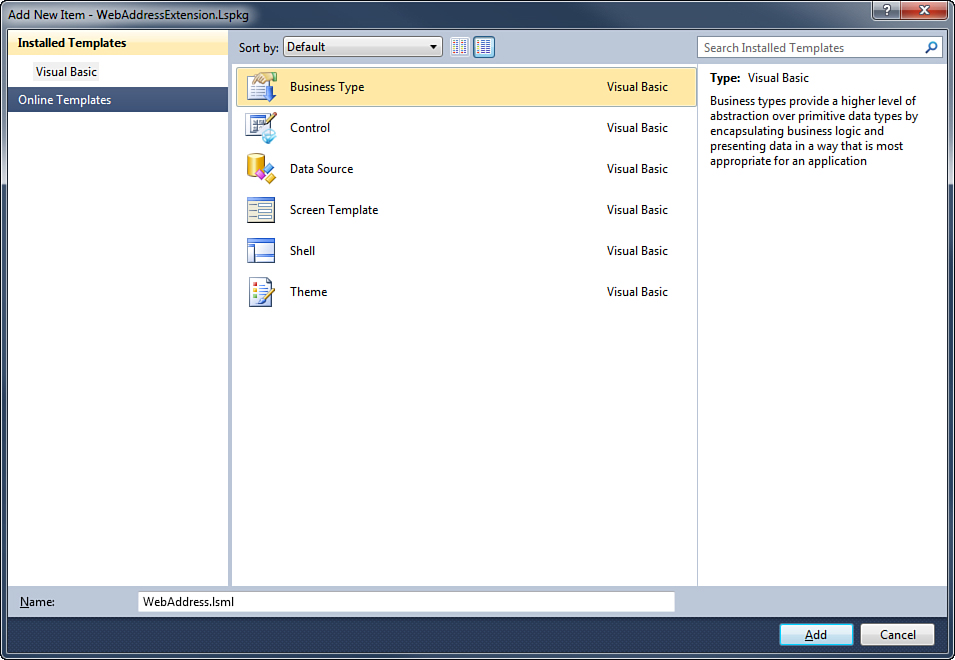
Figure 19.1. Selecting a business type as the extension type.
At this point, Visual Studio adds a default definition for the new business type that you need to replace with your own implementation.
Implementing the Data Type Definition
When you create a new business type, the new type relies on an existing type in LightSwitch. In the current example, the Web Address type that is going to be defined represents nothing but a string. So, String is the underlying type for Web Address. Specifying the underlying type is the first task to complete. To do so, in Solution Explorer, locate the WebAddressExtension.Common project, expand the Types node, and then double-click the WebAddress.lsml file. This file has XML structure and contains the definition for the business type, the references to validation rules, and the mapping to the default user control that represents the type. So, here you have to override the UnderlyingType attribute for the SemanticType element, as follows:
<SemanticType Name="WebAddress"
UnderlyingType=":String">
<SemanticType.Attributes>
<DisplayName Value="Web Address" />
</SemanticType.Attributes>
</SemanticType>
The SemanticType element contains, in other words, the definition of the new business type. In this way, the definition file tells LightSwitch that the WebAddress type relies on the String type and provides a meaningful description (DisplayName). As it happens for other built-in business types (think of Email Address), the new business type must implement some validation rules, so that it can automatically validate a web address entered by the user and throw an error if the input format is invalid. On one side, the validation logic is implemented in Visual Basic or Visual C# code by writing the so-called validator classes, as explained in the next subsection. On the other side, the definition file must map the business type to its corresponding validator classes. Supposing that the validator class for the WebAddress type will be called WebAddressValidation, you first need to add an XML element called AttributeClass that declares the specified class as the validator for the new type. The code to add is the following:
<AttributeClass Name="WebAddressValidation">
<AttributeClass.Attributes>
<Validator />
<SupportedType Type="WebAddress" />
</AttributeClass.Attributes>
</AttributeClass>
The AttributeClass.Attributes node contains the specification of the validator class, including both a Validator and a SupportedType element. Now you have an XML specification for the validator class, but you need to point to that specification in the SemanticType node, to associate the business type to its validator. This is accomplished by adding an Attribute element to the SemanticType.Attributes node and assigning its Class attribute with the name of the previously added AttributeClass. The following code demonstrates this:
<Attribute Class="@WebAddressValidation"/>
For your convenience, Listing 19.1 shows the full code for the WebAddress.lsml definition file.
Listing 19.1. The WebAddress.lsml Definition File
<?xml version="1.0" encoding="utf-8" ?>
<ModelFragment
xmlns="http://schemas.microsoft.com/LightSwitch/2010/xaml/model"
xmlns:x="http://schemas.microsoft.com/winfx/2006/xaml">
<SemanticType Name="WebAddress"
UnderlyingType=":String">
<SemanticType.Attributes>
<DisplayName Value="Web Address Editor" />
<Attribute Class="@WebAddressValidation"/>
</SemanticType.Attributes>
</SemanticType>
<AttributeClass Name="WebAddressValidation">
<AttributeClass.Attributes>
<Validator />
<SupportedType Type="WebAddress" />
</AttributeClass.Attributes>
</AttributeClass>
<DefaultViewMapping
ContentItemKind="Value"
DataType="WebAddress"
View="WebAddressControl"/>
</ModelFragment>
The next step is to write a couple of classes to support validation rules.
Implementing Data Validation
As a developer, you are responsible for validating the user input against your custom business types. Validating the user input is performed in Visual Basic or C# code. It is a best practice to enforce the validation on both the client and the middle tier. To reach this objective easily, you place the code for your validation rules in the Common project. As its name implies, this project contains code that runs on both the client and the server. In the current example, the project’s name is WebAddressExtension.Common and is the same that you processed in the previous section. In basic terms, you need to add two classes to the project. A first class contains the .NET definition for the business type, including constants, and makes it easier to access the type’s metadata from the second class, which is the actual validator. So, add a new class to the project and name it WebAddressExtensionModule.vb. This class contains the .NET representation for the business type. By convention, the name for this kind of class is made of the name of the solution (not the project) plus the Module literal. Listing 19.2 shows the code that you have to write for this class.
Listing 19.2. Representing the New Business Type in a .NET Manner
Friend Module WebAddressExtensionModule
Private Const Name As String = "WebAddressExtension"
Private Const ModulePrefix As String = Name + ":"
Private Const AttributePrefix As String = ModulePrefix + "@"
Friend NotInheritable Class WebAddress
Private Sub New()
End Sub
Private Const Name As String = "WebAddress"
Public Const GlobalName As String = ModulePrefix + Name
Friend NotInheritable Class ValidationAttribute
Private Sub New()
End Sub
Private Const Name As String = "WebAddressValidation"
Public Const GlobalName As String = AttributePrefix + Name
End Class
End Class
End Module
• The class must be included in the extension’s root namespace. This ensures that the business type is usable correctly. In Visual Basic, the root namespace is defined implicitly, whereas in Visual C# it is defined explicitly in code under the form of a namespace block (in this case, namespace WebAddressExtensionModule { }).
• The business type is represented by the WebAddress class. This defines a Name constant that also contains the type name. You can use this code to create your own types; just replace the WebAddress name with your own type name.
• All constants in the code represent XML attributes from the WebAddress.lsml definition file.
The next class that you must implement at this point is the so-called validator, which is responsible of validating the user input. This kind of class must implement the IAttachedPropertyValidation interface, which exposes just one method called Validate. This method receives two arguments: value, of type Object, which contains the information to be validated; and results, of type Microsoft.LightSwitch.IPropertyValidationResultsBuilder. Basically, within this method body, you write your validation logic and then add a validation error to the results variable, which is exactly what you learned in Chapter 5, “Customizing Data Validation.” Listing 19.3 shows how to implement the validator class.
Listing 19.3. Implementing a Validator Class for the WebAddress Type
Imports System.Collections.Generic
Imports System.ComponentModel.Composition
Imports System.Linq
Imports Microsoft.LightSwitch
Imports Microsoft.LightSwitch.Model
Imports Microsoft.LightSwitch.Runtime.Rules
Public Class WebAddressValidator
Implements IAttachedPropertyValidation
Public Sub New(attributes As IEnumerable(Of IAttribute))
_attributes = attributes
End Sub
Private _attributes As IEnumerable(Of IAttribute)
Public Sub Validate(value As Object, results As Microsoft.
LightSwitch.IPropertyValidationResultsBuilder) _
Implements Microsoft.LightSwitch.Runtime.
Rules.IAttachedPropertyValidation.Validate
If value IsNot Nothing Then
' Ensure the value type is String
If GetType(String) IsNot value.GetType Then
Throw New InvalidOperationException("Unsupported data type.")
End If
'Converts the user input into a String
Dim actualValue As String = CStr(value)
'Validation rule: checks that the Web address is well formed
If Uri.IsWellFormedUriString(actualValue,
UriKind.Absolute) = False Then
results.AddPropertyError("The Web Address format is invalid")
End If
End If
End Sub
End Class
The Validate method first checks whether the supplied information is of the required type. If true, the code converts value from Object to String. After the conversion, the code implements one validation rule that simply checks whether the web address is valid via the System.Uri.IsWellFormedUriString method. If the web address is not valid, the code adds a property error to the collection of validation results, which is used by both the client and the middle tier.
Notice that the constructor of the class receives an argument of type IEnumerable(Of IAttribute). The reason is that LightSwitch does not invoke the validator class directly; instead, it invokes a class called Validator Factory, and that implements the IValidationCodeFactory interface, which is responsible of invoking the validator, passing as the constructor argument the number of attributes retrieved by the definition (.lsml) file. For the sake of simplicity, you can place the code for the new class in the same code file of the previous one, but you can create a separate code file if you prefer. Just remember that the Validator Factory must be enclosed in the extension’s root namespace. Listing 19.4 shows the full code for the factory class.
Listing 19.4. Implementing the Validator Factory Class
Imports Microsoft.LightSwitch.Runtime.Rules
Imports WebAddressExtension.WebAddressExtension
Imports Microsoft.LightSwitch.Model
Imports System.ComponentModel.Composition
<Export(GetType(IValidationCodeFactory))> _
<ValidationCodeFactory(WebAddressExtensionModule.
WebAddress.ValidationAttribute.GlobalName)> _
Public Class WebAddressValidatorFactory
Implements IValidationCodeFactory
Public Function Create(modelItem As IStructuralItem,
attributes As IEnumerable(Of IAttribute)) As _
IAttachedValidation _
Implements IValidationCodeFactory.Create
' Ensure that the type model item is a Web Address semantic type
If Not IsValid(modelItem) Then
Throw New InvalidOperationException("Unsupported data type.")
End If
Return New WebAddressValidator(attributes)
End Function
Public Function IsValid(modelItem As IStructuralItem) As _
Boolean Implements IValidationCodeFactory.IsValid
Dim nullableType As INullableType = TryCast(modelItem, INullableType)
' Get underlying type if it is a INullableType
modelItem = If(nullableType IsNot Nothing,
nullableType.UnderlyingType, modelItem)
' Ensure type is a Web Address semantic type, or derived.
While TypeOf modelItem Is ISemanticType
If String.Equals(DirectCast(modelItem, ISemanticType).Id,
WebAddressExtensionModule.WebAddress.GlobalName,
StringComparison.Ordinal) Then
Return True
End If
modelItem = DirectCast(modelItem, ISemanticType).UnderlyingType
End While
Return False
End Function
End Class
The code is quite complex and uses a lot of the LightSwitch infrastructure. You do not need to understand it in detail, except for the following considerations:
• In the Create method, the code first checks whether the item to be validated is of the expected type. This is performed via the IsValid method.
• IsValid performs some comparisons between information in the item’s type and the custom business type information. Such a comparison walks through constants implemented previously in the WebAddressExtensionModule class and in any derived type.
• Once validated, Create instantiates the validator class passing to its constructor a list of attributes received by the runtime and picked up from the .lsml file.
Lightswitch Infrastructure and Extensibility Samples
In this book, it is not possible to explain in detail how the LightSwitch infrastructure works behind the scenes. However, you can find further information on the Extensibility page of the LightSwitch Developer Center at http://msdn.microsoft.com/en-us/lightswitch/hh304488.
You can easily reuse the code in the previous listing in other custom types by just replacing the custom type references.
Designing Controls
The last step in building a business type is to create Silverlight user controls that LightSwitch will use to present and edit data items of that type. You usually provide two user controls: one for presenting data (known as viewer) and one for editing data (known as editor) of the business type. If you think of the built-in business types, you can easily remember how both a viewer and an editor are offered per type, so you should implement a similar logic. Implementing both controls is not mandatory. For example you might have a business type that represents read-only information, and so a viewer control is enough in that particular scenario.
Creating an Editor Control
The first control that you are going to create now is an editor for the WebAddress type. Defining a user control is performed by doing what you learned in the “Sharing Custom Controls” section of Chapter 18, “LightSwitch Extensibility: Themes, Shells, Controls, and Screens,” and includes all the notions related to that task.
Controls reside in the project called Client. This project contains a folder called Presentation and, within this folder, another one called Controls. As you can see, LightSwitch already generated a control stub, calling it WebAddressControl.xaml. The code-behind for this file is autogenerated, and you do not need to make any edits. Instead, you just focus on the XAML code to define your user control. Because the Web Address type relies on the String type, you can simply show this data with a Silverlight TextBox. The difference in the usual Silverlight approach is that you need to attach the new user control to the validation engine, so you need an instance of the ValidatableContentControl element, from the Microsoft.LightSwitch.Client namespace. Listing 19.5 shows the full code for the user control.
Listing 19.5. Creating a User Control for the WebAddress Type
<UserControl
x:Class="WebAddressExtension.Presentation.Controls.WebAddressControl"
xmlns="http://schemas.microsoft.com/winfx/2006/xaml/presentation"
xmlns:slu="clr-namespace:Microsoft.LightSwitch.Utilities.
SilverlightUtilities;assembly=Microsoft.LightSwitch.Client"
xmlns:x="http://schemas.microsoft.com/winfx/2006/xaml"
ToolTipService.ToolTip="{Binding Description}">
<Grid>
<TextBox x:Name="UrlTextBox" Text="{Binding StringValue, Mode=TwoWay}" />
<slu:ValidatableContentControl ValidationDataSource="{Binding StringValue}" />
</Grid>
</UserControl>
Notice how the Text property of the TextBox is data-bound to a property called StringValue. This property is exposed by all business types’ instances and makes it easier to data-bind controls to the user input. Also note how the ValidatableContentControl is data-bound to StringValue via the ValidationDataSource property. This attaches the business type instance to the validation engine in LightSwitch. You will see the result of this attachment in the next section, about testing the extension. Of course, you are not limited to one control as in the current example; you might want to create complex control trees according to how you need to edit information from your business type.
Creating a Viewer Control
To create a new viewer control, add a new control extension to the current solution, exactly as you learned in the previous section of this chapter. Follow these steps:
1. In Solution Explorer, right-click the Lspkg project name.
2. Select Add New Item.
3. In the Add New Item dialog, select the Control template and name the new control WebAddressViewerControl.xaml.
As you can imagine, this action adds a number of other items, such as images for the new control and a definition file. The first thing you want to do is set the control’s properties in the definition file, which is called WebAddressViewerControl.lsml and which you can find in the MetadataControls subfolder of the Common project. In particular, you need to perform two edits:
• Specify that the new control is a viewer. You can do so by assigning the IsViewer attribute of the Control definition with True and by providing a different display name.
• Specify that the supported data type is the custom type (WebAddress).
Listing 19.6 shows the full XML code for the definition file with the required edits.
Listing 19.6. Editing the Control’s Definition File
<?xml version="1.0" encoding="utf-8" ?>
<ModelFragment
xmlns="http://schemas.microsoft.com/LightSwitch/2010/xaml/model"
xmlns:x="http://schemas.microsoft.com/winfx/2006/xaml">
<Control Name="WebAddressViewerControl" IsViewer="True"
SupportedContentItemKind="Value"
DesignerImageResource="WebAddressExtension.WebAddressViewerControl::ControlImage">
<Control.Attributes>
<DisplayName Value="WebAddress Viewer" />
</Control.Attributes>
<Control.SupportedDataTypes>
<SupportedDataType DataType="WebAddress"/>
</Control.SupportedDataTypes>
</Control>
</ModelFragment>
The next step is to implement the viewer control in XAML code. Because the viewer control for the current example will represent an URL, it is a good idea to implement a control template that uses a HyperlinkButton control. This will show a hyperlink under the URL and will also launch the default web browser on the system. So, open the WebAddressViewerControl.xaml file and replace the code with the content of Listing 19.7.
Listing 19.7. Implementing the Viewer Control
<UserControl _ x:Class="WebAddressExtension.Presentation.Controls.WebAddressViewerControl"
xmlns="http://schemas.microsoft.com/winfx/2006/xaml/presentation"
xmlns:x="http://schemas.microsoft.com/winfx/2006/xaml">
<Grid>
<TextBox Text="{Binding StringValue, Mode=OneWay}">
<TextBox.Template>
<ControlTemplate TargetType="TextBox">
<HyperlinkButton Content="{TemplateBinding Text}"
NavigateUri="{Binding StringValue}" TargetName="_blank">
</HyperlinkButton>
</ControlTemplate>
</TextBox.Template>
</TextBox>
</Grid>
</UserControl>
As you can see, the content of the TextBox control is data-bound to the StringValue property, which represents the URL. Notice that the binding is of type OneWay, because this is a viewer control and therefore the information is shown as read-only. The control template of the TextBox control is overridden via a HyperlinkButton, whose Content and NavigateUri are data-bound to the same StringValue property. Because you assign the TargetName property with _blank, the code will simply launch an instance of the default web browser that will show the URL contained in the NavigateUri property. You do not need to do any additional operations because most of the UI infrastructure for the business type was defined when you created the extensibility project. By designing user controls, you have completed all the required steps to build a custom business type.
Adding Control Properties for Design-Time Support
As you have seen, creating controls for business types involves concepts learned about custom control extensions in LightSwitch. Therefore, you can also implement design-time support for controls for your business types by adding control properties. Refer to the “Sharing Custom Controls” section of Chapter 18 to see how to do so.
Testing the Extension
Press F5 to start testing the custom business type, and then follow these steps:
1. Create a new LightSwitch project (or open an existing project if you prefer) and name it WebSiteInventory.
2. Open the Application Designer and display the Extensions tab. Your custom extension is visible in the list of available extensions, so select it (see Figure 19.2). Now you understand better why you had to edit the VSIX package properties before testing.
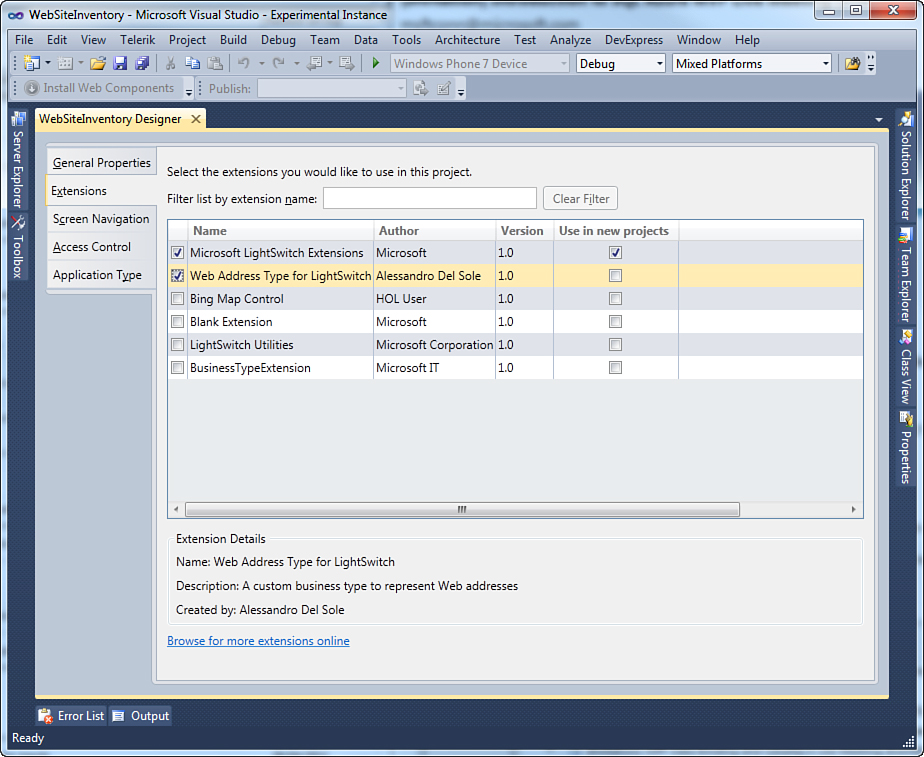
Figure 19.2. Selecting the custom business type in the list of available extensions.
3. Create a new entity called WebSite.
4. Add two properties: Name, of type String; and Url, of type WebAddress (both required).
5. Add a new data entry screen for the WebSite entity.
6. Add a new List and Details screen for the WebSite entity.
As you can see in Figure 19.3, the Screen Designer provides a default control selection, and you can choose between the editor and viewer controls by expanding the drop-down box near the URL property’s name.
Figure 19.3. The Screen Designer shows different icons for custom controls and allows control selection.
You can replace default control icons by changing the .png image files contained in the ResourcesControlImages subfolder of both the WebAddressExtension.Design and WebAddressExtension.Client.Design projects, exactly as you learned with regard to custom controls.
Open the Screen Designer for the List and Details screen and ensure that the WebAddress Viewer control is selected for the URL item. What happens when you do so is described momentarily. At this point, take a look at the output configuration, which will probably be set to Mixed Platforms, as you can see in Figure 19.3. This is incorrect and would cause compile errors, so always remember to change it to Any CPU. Run the sample application from within the experimental instance and, when the data-entry screen appears, enter an invalid web address. As you can see, the validation mechanism rejects the user input and provides detailed error information in the usual way, as shown in Figure 19.4.
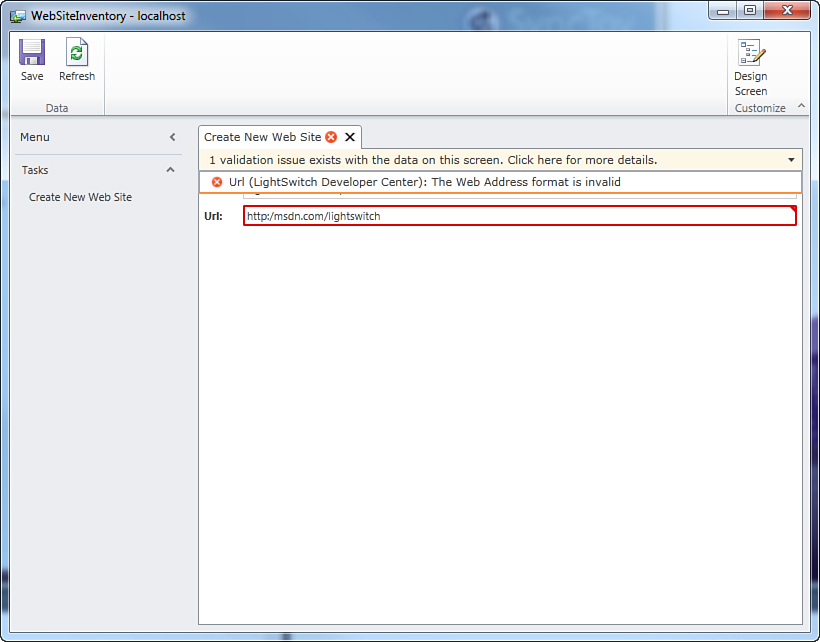
Figure 19.4. Invalid information is rejected due to the web address type validation rules.
Fix the error and try to save your changes to ensure that everything works correctly. Now open the List and Details screen so that you can see how the viewer control correctly represents the WebAddress business type via a hyperlink (see Figure 19.5).
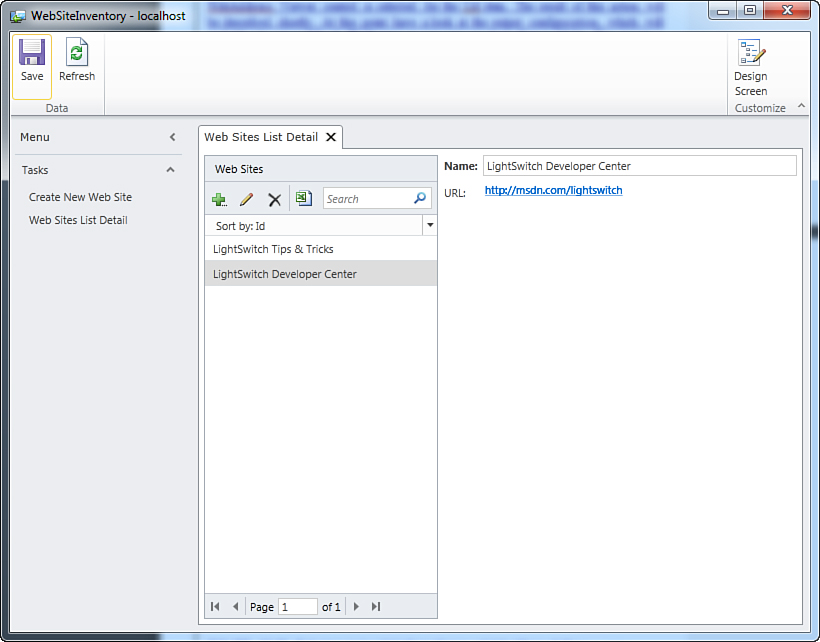
Figure 19.5. The business types presented via the viewer control’s hyperlink.
If you click such a hyperlink, you can open the related web address inside your favorite web browser. Now that you know how to create custom business types, you can customize your applications with a data structure that satisfies specific needs of your company.
Creating and Using Custom Data Sources with WCF RIA Services
With the release of Silverlight 4 and of the developer tools for Visual Studio 2010, Microsoft also released version 1.0 of the WCF RIA Services for Silverlight. Important updates for the WCF RIA Services runtime were also released together with Visual Studio 2010 Service Pack 1.
Formerly known as .NET RIA Services (back in beta versions available on Silverlight 3), WCF RIA Services are a recent data platform based on the Windows Communication Foundation (WCF) technology, which simplifies the development of n-tier, data-centric Silverlight applications.
If you have ever worked with web services in the past, you can compare a WCF service to a specialized web service based on a unified programming model for communications among distributed applications. WCF simplifies the way distributed applications are developed in that the programmer writes the same managed code independently from the communication protocol and from the required approach (such as REST, SOAP, and so on).
WCF is the underlying technology for several different flavors, each for a specific context. In the case of Silverlight, WCF offers the infrastructure for specialized services that can be used from within rich Internet applications (RIAs). These specialized services for Silverlight are usually referred to as WCF RIA Services (or simply RIA Services). Visual Studio LightSwitch generates WCF RIA Services under the hood every time you add a new data source or connect to an existing data source and are used for communications between the client and the data service on the middle tier. So, this means that you should have a reason for building custom RIA Services when you need to support a data source that LightSwitch does not support out of the box or when you need to integrate with an enterprise service.
With WCF RIA Services, you move the application logic to the middle tier because they provide a framework that is responsible for operations against data (such as queries and CRUD [create, read, update, delete] operations) and for the business logic. Having all this infrastructure on the middle tier is particularly useful when you need to release updates; in this case, you update the application logic only on the middle tier, and then recompiling the clients will just take advantage of new updates without affecting the client logic. You can think of an RIA Service as an Internet application that includes server components such as the data access layer and the middle tier. Also, WCF RIA Services provide built-in mechanisms for user authentication and for data validation. Figure 19.6 shows a WCF RIA Service’s architecture.
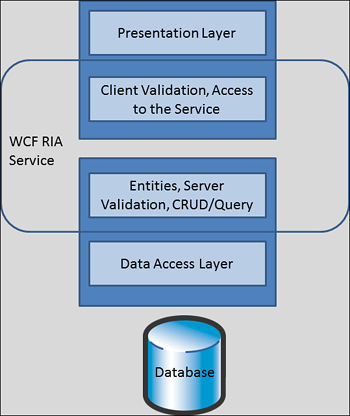
Figure 19.6. A WCF RIA Service’s architecture.
Although Visual Studio LightSwitch enables you to easily design data and entities, using WCF RIA Services as the data source can be a good choice for the following reasons:
• RIA Services produce compiled (DLL) class libraries that can be offered to the external world, so you are not limited to a LightSwitch context.
• Therefore, you can connect to services produced by other developers inside or outside your organization. Because this is a common scenario, RIA Services bring more power and flexibility to your LightSwitch applications. In fact, you are not limited to connecting to databases; you can also reference libraries that may include more sophisticated data processing.
• RIA Services are not limited to work against SQL Server databases. They can access databases based on different engines, but they also provide a place for processing different kinds of data sources (such as Microsoft Excel spreadsheets or XML files). As a result, an application using a WCF RIA Service can manipulate data sources other than databases.
• RIA Services are the only way to import stored procedures in LightSwitch from existing SQL Server databases. The last section of this chapter covers this topic.
• You can build your services and offer them to other developers, thus increasing your business opportunities.
Visual Studio 2010 offers a number of project templates to get started quickly with RIA Services. The Silverlight Business Application template is probably the most interesting because it builds an RIA Service class library for data exchange and a Silverlight client application that can use data coming from the service. The Silverlight application uses, by default, the Navigation Framework, which makes it easier to divide the UI in pages, and other important features such as user authentication and data validation. The other template is the WCF RIA Services Class Library template, which enables you to create a WCF RIA Service that will be used later from an external client application.
LightSwitch itself uses RIA Services under the hood for communication in the middle tier, and applications built with LightSwitch rely heavily on this framework. The pattern provided by WCF RIA Services perfectly suits the LightSwitch architecture, providing the best experience in separating the application logic from the data-access tier and the presentation tier. Because of this perfect integration with the LightSwitch architecture, external WCF RIA Services exposing data can be used from within your LightSwitch applications.
One benefit of WCF RIA Services is that they expose .NET objects. This implies the possibility of exposing data models like Entity Data Models in the ADO.NET Entity Framework, and OData sources, but also custom business objects. This is certainly important because it means that you can use an incredible number of data sources in your LightSwitch applications.
To create WCF RIA Services, you need Visual Studio 2010 Professional or higher if you want to integrate LightSwitch projects and RIA Services in one place. Alternatively, you can use the free Microsoft Visual Web Developer 2010 Express Edition to create and build WCF RIA Services that you can later reference from Visual Studio LightSwitch standalone. This is possible because WCF RIA Services generate compiled class libraries that can be easily referenced in other projects. For the sake of consistency, in this chapter Microsoft Visual Studio 2010 Professional or higher is the preferred choice. To create WCF RIA Services, you also need the Silverlight 4 Tools for Visual Studio 2010, but these were installed together with LightSwitch. Finally, creating WCF RIA Services involves writing code and some knowledge of .NET programming concepts, such as object-oriented programming (particularly business objects), attributes, and .NET platforms like the ADO.NET Entity Framework.
WCF RIA Service are an incredibly important topic in the LightSwitch advanced development, so the discussion is split into two parts: The first part explains how to create and use a custom data source through WCF RIA Services in LightSwitch applications; the second part explains how to share custom data sources and expose WCF RIA Services to others via an extension. The main reason for this division is so that you can build and use your own WCF RIA Services in your application without having to build an extension, which is what you must do when sharing a custom data source with other developers.
The .NET Framework for WCF RIA Services
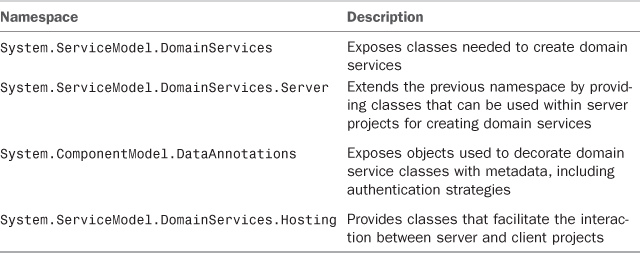
Windows Communication Foundation (WCF) is an extensible technology, in that it can be customized with additional communication functionalities. The RIA Services are the perfect example of WCF extensibility because they take advantage of the entire existing WCF infrastructure and add features that are specific to the Silverlight environment. This is easily demonstrated by the several namespaces that extend System.ServiceModel, which is the root namespace in WCF. If you have experiences in programming for the .NET Framework, you might be interested in knowing which namespaces and classes are important in RIA Services. Of course, a detailed explanation is beyond the scope of this chapter and would require an entire book. However, some basic information can be useful, and so Table 19.1 describes the most important namespaces.
Table 19.1. The Most Important Namespaces in the RIA Services Reference
The full list of available namespaces is in the official MSDN reference that you can find at http://bit.ly/dWTr5f. Table 19.2 describes the most important classes used in RIA Services development.
Table 19.2. The Most Important Classes in the RIA Services Reference
The full list of available classes per namespace can be reached via the previously mentioned URL for the MSDN documentation. What you actually need to know in this book is that the DomainService class is the main entry point within an RIA Service; this class exposes methods that can edit, query, and submit changes to the data source, and it is the place in this chapter where you write (a few lines) code related to the data-access strategy. If you are interested in further information about WCF RIA Services or code examples, check out the official Silverlight website from Microsoft at www.silverlight.net.
Creating WCF RIA Services to Work with XML Data
You can create and use WCF RIA Services to exchange different kinds of data, including business objects and SQL Server databases. In this section, you learn how to create a WCF RIA Service that exposes XML data, which is a common scenario in real-world applications. In particular, the sample service can download Really Simple Syndication (RSS) feeds from any website offering this kind of information; RSS feeds are XML data that informs users about news and updates on a website. Such XML data is exposed to LightSwitch clients and used in the form of entities.
Guidelines for Creating WCF RIA Services
The MSDN official documentation about Visual Studio LightSwitch includes a page titled “Guidelines for Creating WCF RIA Services for LightSwitch,” available at http://goo.gl/2EBD6. This page contains all requirements that a RIA Service must satisfy to be correctly used from LightSwitch applications, and it is important for you to read it. To avoid redundancy, this chapter does not repeat the contents of the page; instead, here we just highlight the requirements that the sample code satisfies, according to the documentation. As a general rule, remember that you must respect those requirements if you plan to write custom RIA Services that will be used inside LightSwitch applications.
Creating WCF RIA Services in Visual Studio 2010 is not a difficult task. The IDE is, in fact, responsible for generating most of the code you will need to expose and edit data, especially when you expose Entity Data Models based on the ADO.NET Entity Framework, although a few edits are certainly necessary. So, open Visual Studio 2010 and follow these steps:
1. Select File, Add, New Project.
2. When the Add New Project dialog appears, in the left of the box locate the Silverlight projects folder under the root Visual Basic container.
3. Select the WCF RIA Services Class Library template, name the new project RSSFeedReaderService, and click OK.
Figure 19.7 shows what the dialog looks like at this point.
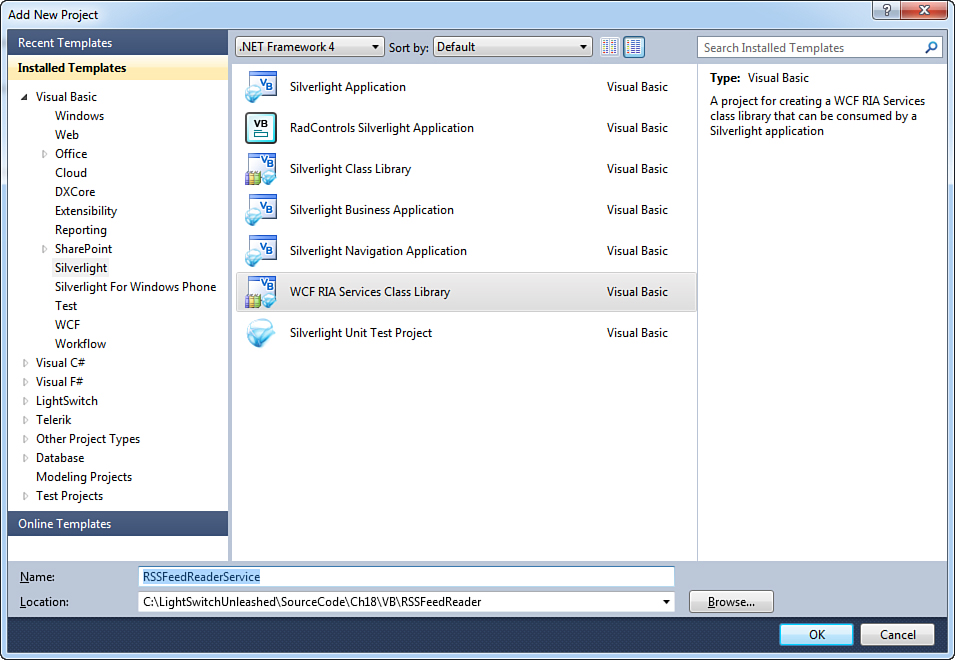
Figure 19.7. Creating a new WCF RIA Service library.
When the operation completes, two projects appear in Solution Explorer: RSSFeedReaderService and RSSFeedReaderService.Web. The latter is the most interesting because it actually generates the service that will be hosted in the middle tier and that contains the data-processing logic. You can now remove the autogenerated Class1.vb code file (or Class1.cs if C# is your choice). Next, ensure that a reference to the System.ComponentModel.DataAnnotations assembly is added. If not, add it manually. The first thing you want to do at this point is to create a new class to represent an XML feed, which later in LightSwitch will be mapped as an entity; such a business object will expose some properties, each representing a piece of information coming from the feed, such as the content link, the author, and so on. To accomplish this, in the Web project add a new code file called FeedItem.vb. When ready, add the code shown in Listing 19.8.
Listing 19.8. Implementing a Business Object to Represent a Single Feed
Imports System.ComponentModel.DataAnnotations
Public Class FeedItem
'Content's title (you can compare this to a blog post title)
Public Property Title As String
'Date published
Public Property PubDate As Date
'Link to the content
<Key()> Public Property Link As String
'Content's creator
Public Property Creator As String
<Key()> Public Property RssAddress As String
End Class
As you can see, the code is importing the System.ComponentModel.DataAnnotations namespace, which is required to use some attributes that will make your business objects recognizable by the RIA Service.
The most important attribute that you must assign is Key. Properties decorated with this attribute can be compared to a primary key of a database table. As you can imagine, decorating one property with Key is required because LightSwitch needs one when generating entities from your business objects. In this case, a link can be reasonably considered as a unique item, and therefore it is appropriate to set this as the key.
In this particular scenario, another property called RssAddress stores the full URL of the RSS feed. This is useful when mapping queries to LightSwitch screens and is also marked as Key so that it can be used as a query parameter in the LightSwitch Screen Designer.
Now that you have successfully designed the business objects that will represent your data, it is now time to add a class responsible for exposing the data source through the network, offering the benefits of the WCF RIA Services, such as queries, CRUD operations, authentication, and so on. This type of class is called Domain Service. To add this class to the project, in Solution Explorer right-click the project name and select Add, New Item. In the Add New Item dialog, locate the Domain Service Class template under the Visual Basic root node, as shown in Figure 19.8.
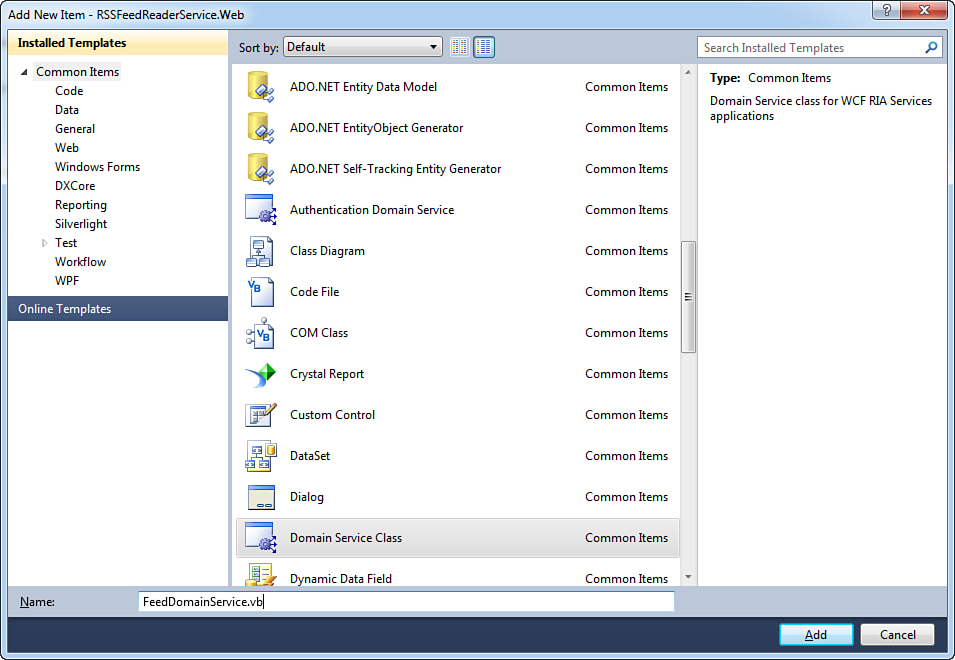
Figure 19.8. Adding a new Domain Service class to the project.
When you click Add, Visual Studio asks you to specify which entities you want to be part of the RIA Service, also asking you to specify whether you want to provide editing capabilities other than querying. You can do so inside a window called Add New Domain Service Class (see Figure 19.9). In this window, you can add the new Domain Service class to the project. If you are working with an Entity Data Model, it shows the list of available entities, and you can enable entity editing, which will autogenerate code for CRUD operations. In this case, you are not working with the Entity Framework. Instead, you are working with custom business objects, so you cannot take advantage of autogeneration, and you can only click OK to add a new, empty Domain Service class that you will then populate with your code.
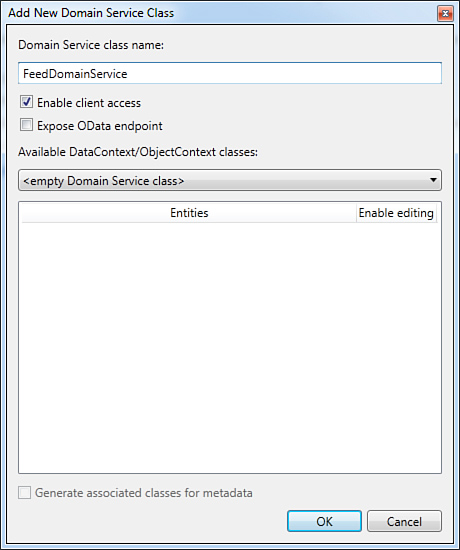
Figure 19.9. Adding a new Domain Service class.
OData (also known as WCF Data Services) is a set of extensions that makes sharing data over a network easier, offering a managed way to work with the REST approach. You can find more information at www.odata.org. If you think that it might be important for you to share data in your WCF RIA Service with OData, check the Expose OData Endpoint check box.
The new class is added to the project and inherits from System.ServiceModel.DomainServices.Server.DomainService, which implements base factory methods to interact with data. The code that you need to write inside the Domain Service class will be responsible for fetching XML data from the specified RSS feed address. Listing 19.9 contains the code for the Domain Service class. Some considerations follow after the code listing.
Listing 19.9. Implementing a Domain Service Class
Option Compare Binary
Option Infer On
Option Strict On
Option Explicit On
Imports System
Imports System.Collections.Generic
Imports System.ComponentModel
Imports System.ComponentModel.DataAnnotations
Imports System.Linq
Imports System.ServiceModel.DomainServices.Hosting
Imports System.ServiceModel.DomainServices.Server
Imports System.Net
Imports <xmlns:dc="http://purl.org/dc/elements/1.1/">
'TODO: Create methods containing your application logic.
'TODO: add the EnableClientAccessAttribute to this class to expose this _DomainService to clients.
'<EnableClientAccess()>
'<RequiresAuthentication()>
Public Class FeedDomainService
Inherits DomainService
Protected Overrides Function Count(Of T)(query As System.Linq.IQueryable(Of T))
As Integer
Return query.Count
End Function
<Query(isdefault:=False)>
Public Function GetFeeds(address As String) As IQueryable(Of FeedItem)
If String.IsNullOrEmpty(address) = True Then
Return Nothing
Else
Dim xdoc As XDocument = XDocument.Load(address)
' take results from each item element in the XML feed
Dim rssFeedsItems = (From item In xdoc...<item>
Let published = CStr(CDate(item.<pubDate>.Value).
ToLocalTime)
Let title = item.<title>.Value
Let postLink = item.<link>.Value
Let author = item.<dc:creator>.Value
Select New FeedItem With {.Link = postLink,
.PubDate = Convert.
ToDateTime(published),
.Creator = author,
.Title = title}).ToList
Return rssFeedsItems.AsQueryable
End If
End Function
<Query(IsDefault:=True)>
Public Function GetAllFeeds() As IQueryable(Of FeedItem)
Return Nothing
End Function
<Query(IsComposable:=False)>
Public Function GetFeed(id As String, address As String) As FeedItem
If String.IsNullOrEmpty(address) = True Then
Return Nothing
Else
Dim xdoc As XDocument = XDocument.Load(address)
' take results from each item element in the XML feed
Dim rssFeedsItem = (From item In xdoc...<item>
Where item...<link>.Value = id
Let published = CStr(CDate(item.<pubDate>.
Value).ToLocalTime)
Let title = item.<title>.Value
Let postLink = item.<link>.Value
Let author = item.<dc:creator>.Value
Select New FeedItem With {.Link = postLink,
.RssAddress = address,
.PubDate = Convert.ToDateTime(published),
.Creator = author,
.Title = title}).FirstOrDefault
Return rssFeedsItem
End If
End Function
End Class
The RSS feed information adheres to a specific XML schema, and this is why the code imports such a schema with the following line:
Imports <xmlns:dc="http://purl.org/dc/elements/1.1/">
Then, notice the methods GetAllFeeds and GetFeeds. The second one takes a parameter, which is the web address of the syndication service to query. Both are decorated with the Query attribute, and GetAllFeeds is set to be the default query (IsDefault:=True). A requirement when building WCF RIA Services for LightSwitch is that a service must expose one default query, which usually returns all the items in a data source and which corresponds to the _All built-in query that LightSwitch generates when you create a new table. In this particular case, you do not return all the items from a data source; you only return items from the given feed address. You would argue that the default query should be the GetFeeds method, but methods accepting parameters cannot be set as default queries. The trick is implementing a default query that will be never used, like GetAllFeeds, and then implementing a nondefault query that can accept parameters and that executes the specified tasks such as retrieving XML feeds from the given address. The method executes a LINQ query based on LINQ to XML and returns all the XML elements called Item from the feed; for each item, it generates a new instance of the FeedItem class and assigns properties with attribute values from the Item element. The result of the query is returned in the form of an IQueryable(Of FeedItem). The last method in the code, GetFeed, returns a single instance of the FeedItem class and will be useful in LightSwitch to show details of a selected feed inside a Search screen. This method receives two arguments: id, of type String, which is the value of the Link property of the specified feed from the starting list in LightSwitch; and address, which is the URL of the feed service. (Both are passed by the LightSwitch client.) The method body executes the same query in the GetFeeds method but returns a single item whose link is equal to the method parameter.
Authentication Mechanisms for RIA Services
Note in Listing 19.9 a comment that encloses an attribute called <RequiresAuthentication>. If you uncomment this attribute, the data exposed by the class will be available only if the user who attempts to access data is authenticated. If not, the service throws a System.ServiceModel.DomainServices.Client.DomainOperationException. WCF RIA Services support both Windows and Forms (ASP.NET) authentication. You select the desired authentication mechanism by first adding an authentication element in the App.config file and then by specifying the authentication type (Windows or Forms)—for example, <authentication mode="Windows"/>.
In reality, defining the authentication strategy in this way is not enough and requires a certain amount of work. In fact, you need to enable security mechanisms in client applications so that they meet the RIA Services’ requirements. The Silverlight Business Application project template in Visual Studio 2010 simplifies this by providing an advanced and ready-to-use authentication framework on both sides. So, you should prefer this kind of project template when working outside of LightSwitch. Also, you should care about authentication if you want to make your services available to other developers. If you intend to use them only in your LightSwitch applications, however, you can provide security mechanisms by setting the appropriate properties just at the LightSwitch level. This is why authentication is not explained in detail in this context; authentication in LightSwitch is further explained in Chapter 9, “Implementing Authentication and Authorization.”
In your WCF RIA Services, you will usually want to implement code to execute CRUD operations and save data back. Such operations will be still placed in the Domain Service class, and you are required to implement three methods (Insert, Update, Delete), followed by the name of the entity, such as InsertFeedItem, UpdateFeedItem, and DeleteFeedItem. Also, you must override the Submit method from the DomainService base class. Here the service is executing some read-only operations, so we do not need the previously mentioned methods. In addition, you are responsible just for writing the code that implements them (unless you are working with the ADO.NET Entity Framework and Visual Studio will generate it for you).
The next step is to add a metadata class to the Web project. A metadata class extends the data source definition with additional metadata, which is typically used to provide data annotations and custom validation. Also, if your WCF RIA service is querying entities from an entity data model, you can use metadata classes to set entities’ eager loading (which allows loading all entities and their related collections). To extend the data source definition, you assign attributes from the System.ComponentModel.DataAnnotations namespace to properties of classes you want to extend. To create a new metadata class, add a new code file called FeedDomainService.Metadata.vb to the Web project. Remember that the word Metadata enclosed between two dots is required when naming metadata class code files. Listing 19.10 shows how to implement the class.
Listing 19.10. Implementing a Metadata Class for the Domain Service
Imports System.ComponentModel.DataAnnotations
<MetadataType(GetType(FeedDomainService.FeedDomainServiceMetadata))>
Partial Public Class FeedDomainService
Friend NotInheritable Class FeedDomainServiceMetadata
Private Sub New()
MyBase.New()
End Sub
'This class allows you to attach custom attributes to properties
' of the FeedItem class.
'
'For example, the following marks the Title property as a
' required property and specifies the format for valid values:
' <Required()>
' <RegularExpression("[A-Z][A-Za-z0-9]*")>
' <StringLength(32)>
Public Property Title As String
<Key()> Public Property Link As String
<Key()> Public Property RssAddress As String
Public Property PubDate As Date
Public Property Creator As String
End Class
End Class
As you can understand by reading the comments in the code, metadata classes are meant to extend the entity definitions. In fact, these are declared as Partial, which means merging the current code with the original definition that resides in a different file (in this particular scenario, in the file that declares entities generated by the Entity Framework’s engine). You usually use the metadata classes to implement custom validation. As mentioned previously, this is not necessary here because the current WCF RIA Service has been built just to be used in your own application, and you will eventually implement custom data validation in LightSwitch. If a WCF RIA Service is developed by a different programmer and is meant to be reached by different kinds of applications across the network, however, this is a good place to provide validation rules that run on the middle tier. The comments within the autogenerated code help you understand how data validation can be performed by adding some special attributes to properties; you can then find more information in the MSDN documentation by searching for the mentioned attributes. After all this work, you have a WCF RIA Service that exposes through the network information about RSS feeds fetched from the specified web address. At this point, you need to build your project. This task generates a .NET (DLL) assembly that can be later easily referenced and used as a class library based on Silverlight. After you have built the project, you are ready to use the service in a LightSwitch application.
Typically, a WCF RIA Service has to be deployed by following the rules available for general WCF services. In this particular case, this is not necessary because the compiled Dll library will be included as part of the LightSwitch application deployment (see Chapter 10, “Deploying LightSwitch Applications,” for details about deployment).
Calling WCF RIA Services from LightSwitch Applications
To call and use a WCF RIA Service in a LightSwitch application, you need to add a reference to the service. In contrast to other kinds of services, such as web services or WCF services, you do not add a so-called service reference. Instead, you add a reference to the assembly as you would do against any class library, and you do this by requesting to connect to an external data source as you did for other data sources. To understand how it works, you now create a new LightSwitch application that will display feed items from the specified web address. Select File, Add, New Project, and then in the New Project dialog select the LightSwitch application template and name it LightSwitchRSSReader. When the new project is available, in Solution Explorer right-click Data Sources, and then select Add Data Source to open the Attach Data Source Wizard. Select WCF RIA Service as the data source (see Figure 19.10), and then click Next.
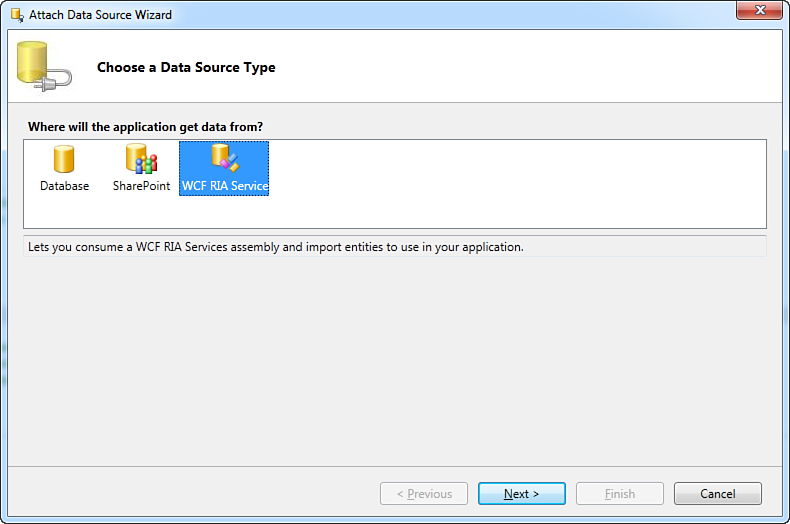
Figure 19.10. Selecting a WCF RIA Service as the data source.
Standardizing the Connection to External Data Sources
WCF RIA Services are the fourth (and last) external data source that you can access from a LightSwitch application. In this chapter, you saw that regardless of the data source you want to access, the tools you use to select the data source are always the same. This standardizes the way you connect the application to external data sources and provides a simplified approach to using data sources other than the intrinsic database. This is a great benefit because you will perform the same steps to connect to any data source regardless of its type.
In the next screen of the wizard, LightSwitch shows a list of available services; you can also add new ones. Click Add Reference. When the Add Reference Dialog appears, select the RSSFeedReaderService.Web project on the Projects tab. After a few seconds, the selected service appears in the dialog, as shown in Figure 19.11.
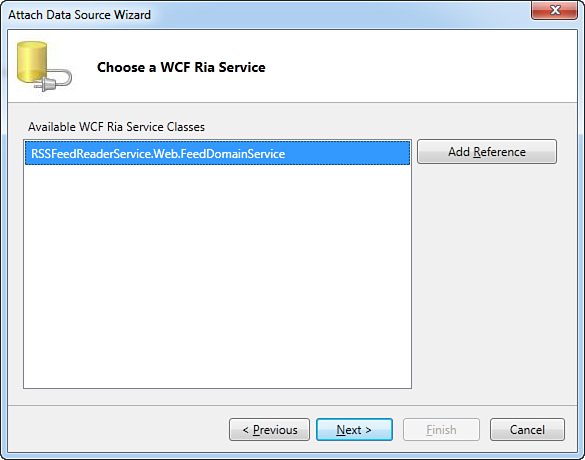
Figure 19.11. Selecting the desired WCF RIA Service.
When you click Next, you are asked to specify the entities that will be included as the data source (see Figure 19.12). Select the FeedItem entity, which is the only one available in this service, and then click Finish.
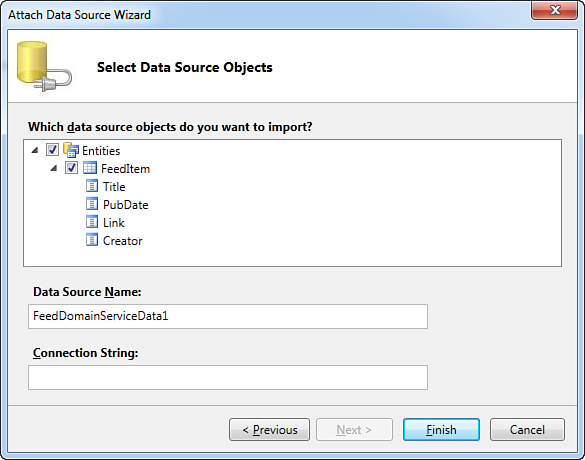
Figure 19.12. Selecting available entities from the WCF RIA Service.
It is worth noting that in this particular case, the Connection String field that you see in Figure 19.12 does not need to be filled because the WCF RIA Service is included in the solution. If you are adding a reference to a WCF RIA Service that was deployed previously to a web server, then the Connection String field contains the web address of the service. At this particular point, LightSwitch imports the required entities, checking for any issues. Once completed, you get the usual entity definitions in the Entity Designer. Figure 19.13 shows how the FeedItem entity has been defined.
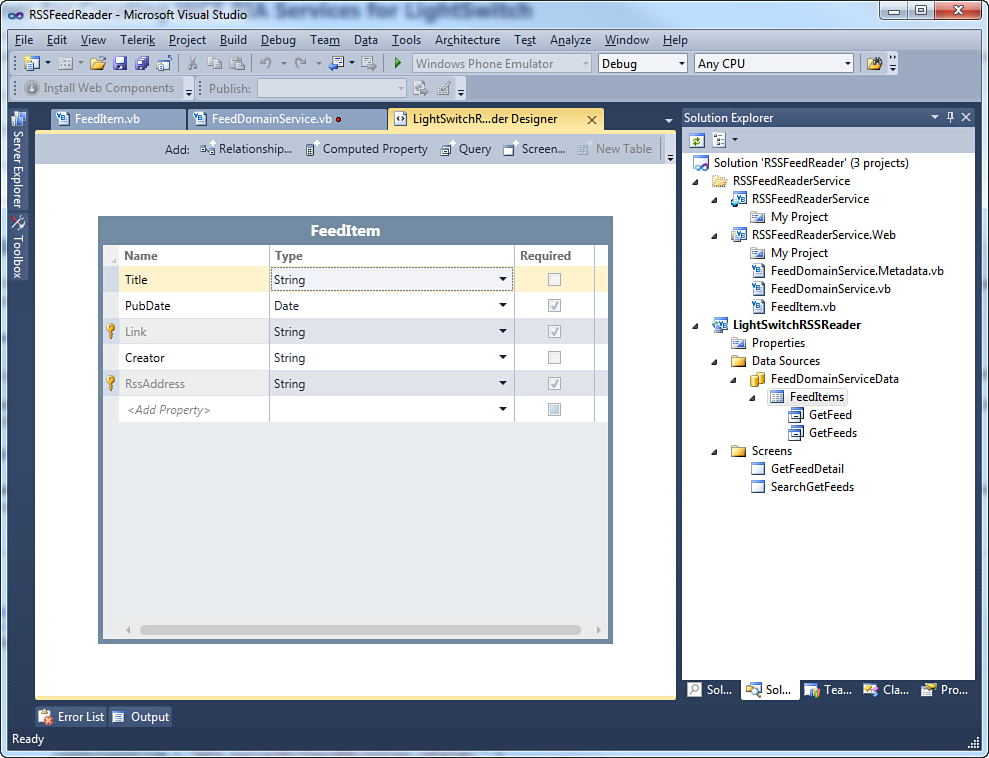
Figure 19.13. The imported entities in the Entity Designer.
The result of the entity mapping that you see in the Entity Designer is exactly as you would expect and definitely shows how Visual Studio LightSwitch enables you to use the same approach with four different types of data sources (from SQL databases to WCF RIA Services). To provide the best user experience, replace the DateTime type for the PubDate entity property with Date. This ensures that screens that you create later use the appropriate user controls when displaying data to the end user. Another important thing to emphasize is that LightSwitch can recognize parameterized methods in the WCF RIA Service and it now offers such methods in the form of queries, as you can see in Solution Explorer (see Figure 19.14). More precisely, these particular queries are parameterized queries (see Chapter 6, “Querying, Filtering, and Sorting Data”).
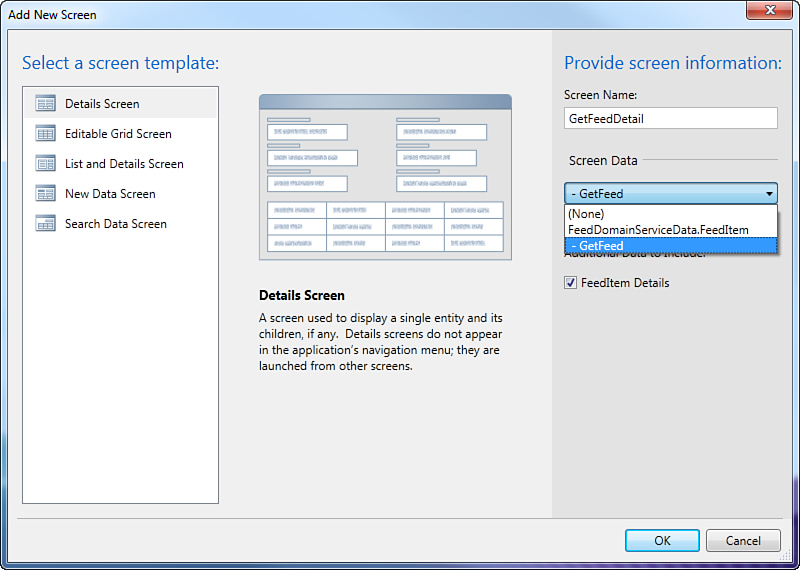
Figure 19.14. Creating a new Details screen to show a single feed.
Imported Queries Cannot be Edited
Queries such as the GetFeeds and GetFeed of the sample application, which are generated based on external WCF RIA Services, cannot be edited in LightSwitch, as you learned in Chapter 6. This makes sense because LightSwitch has no direct access to the original source. In this case, the only way to edit the query is to modify the source code of the Domain Service class. In fact, if you double-click the query in Solution Explorer, you receive an error message saying that imported queries cannot be edited in LightSwitch.
Creating the UI and Testing the Service
To demonstrate how the WCF RIA Service works, it is enough to add one Search screen that takes the GetFeeds query as the data source. Then, create a custom Details screen that shows the information related to the selected feed in the list and that displays when the user clicks the hyperlink. To do so, follow these steps:
1. Create a new Details screen, and from the Screen Data combo box of the Add New Screen dialog, select the GetFeed query, as shown in Figure 19.14.
2. When the new screen has been added to the project, go back to the SearchGetFeeds screen.
3. Select the Title property and in the Properties window, check the Show As Link box and select the GetFeedDetail screen (or whichever name you gave to the custom details screen) from the Target Screen combo box (see Figure 19.15).
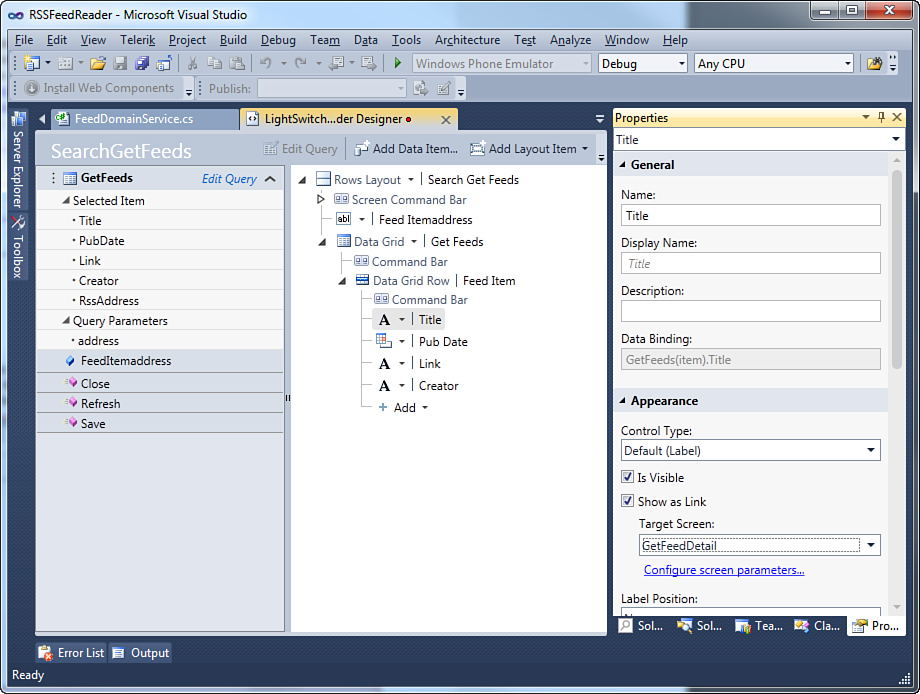
Figure 19.15. Selecting the target Details screen for the Title property.
4. Click the Configure Screen Parameters hyperlink to launch the same-named dialog, where you can see how screen parameters have been mapped to table fields. You can also change mapping if the autogenerated selection is incorrect, as shown in Figure 19.16.
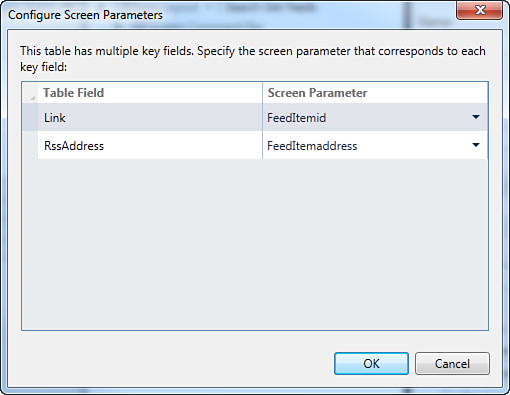
Figure 19.16. Configuring screen parameters.
Note that this is an undocumented feature, so here you are learning how to get the most out of parameterized queries with design-time tooling.
If you now run the application, the Search screen shows a text box where you can type the RSS feed web address, and the Data Grid control shows the list of feeds that have been fetched by the service, as shown in Figure 19.17.
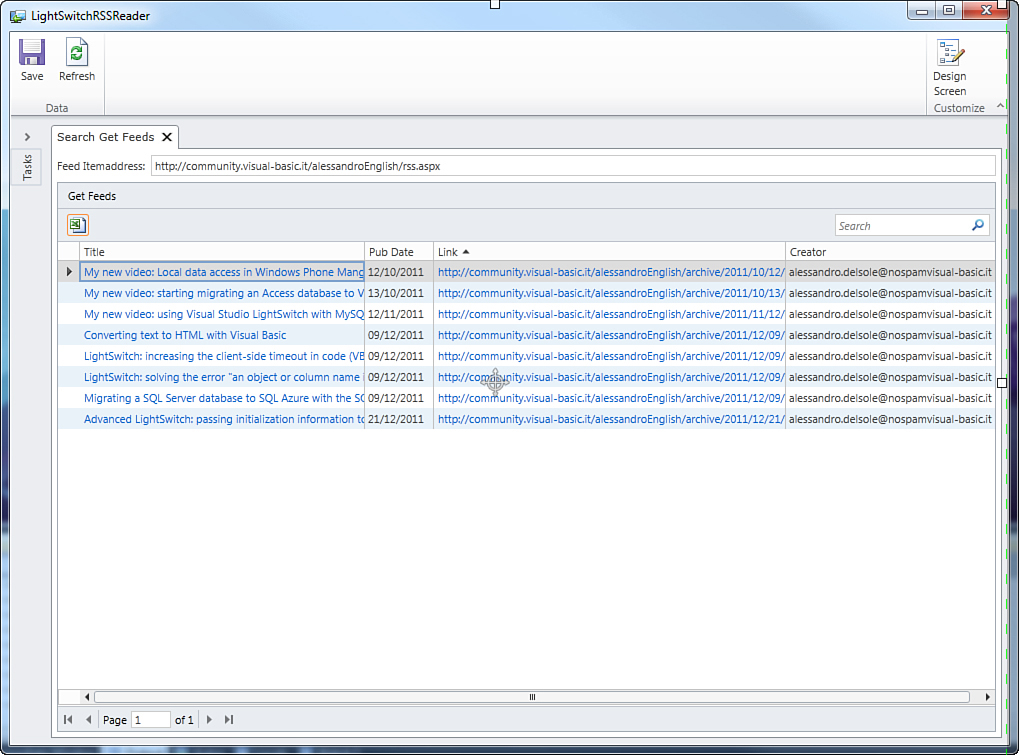
Figure 19.17. The list of feeds from a given RSS address are shown correctly.
If you also click the hyperlink for the selected feed, a Details screen shows information related to the current item. In contrast to other external data sources, with WCF RIA Services you need some more interaction with code, but you do have more flexibility because you can expose to LightSwitch a number of different data sources, plus an opportunity to use libraries produced by other developers (or to make your library available to others).
Debugging Versus Deployment
It is important to understand how and where a WCF RIA Service is hosted to make it usable from LightSwitch applications. Based on its nature, an RIA Service has to be hosted on a web server, such as Internet Information Services, so that it can be reached by multiple clients. If you are not referencing an existing service and are instead referencing a RIA Service that is part of your solution (as in the current case), when you debug the application from within the IDE by pressing F5, LightSwitch publishes the WCF RIA Services in the solution to the ASP.NET development server running on the machine. This makes the service reachable from the application. This is important to know, because if LightSwitch did not temporarily publish the service for debugging purposes to the development server, you would need to deploy the service to a web server before debugging. This is why the application runs correctly when you press F5. However, deploying a LightSwitch application together with WCF RIA Services included in the solution is really simple, because LightSwitch is also responsible for deploying the services to the web server and so you do not have to do anything.
2-Tier Desktop Clients and WCF RIA Services
You have been told several times that publishing a 2-tier desktop client does not involve Internet Information Services as the web server and that services run locally on the end-user machine. You might be wondering at this point how it is possible that a 2-tier desktop client can hold a reference to a WCF RIA Service that is not already hosted on an external web server. The LightSwitch runtime infrastructure uses the ASP.NET web server called Cassini, which relies on the .NET Framework 4 and allows running WCF RIA Services locally.
Calling Stored Procedures Through WCF RIA Services
So far, you have seen how Visual Studio LightSwitch is a powerful environment for rapidly building business applications, where tables can be constructed from scratch or imported from existing data sources. In real-world scenarios, a common requirement is accessing existing production databases; in most cases, such databases contain stored procedures that the developer needs to invoke to perform efficient data-processing operations. If you are new to development, you need to know that a stored procedure is a function written in the SQL language and stored within the database. Stored procedures are particularly fast because they execute pure SQL code directly against the database, without intermediate layers (such as the ADO.NET Entity Framework). Version 1.0 of Visual Studio LightSwitch allows direct access only to database objects like tables and views, not stored procedures. Fortunately, you can still invoke stored procedures, exposing them as managed objects through a WCF RIA Service; this is possible because the ADO.NET Entity Framework enables you to map stored procedures into methods that are handled by the Entity Data Models and that can be exposed to clients via the Domain Service class. Additional technical details are provided during the next explanations.
This section demonstrates how to import two stored procedures from the Northwind database into a WCF RIA Service and how to make such procedures available to LightSwitch clients. One stored procedure is simple and does not require parameters, so it is a good example to understand how the process works. The second stored procedure requires parameters and is useful to demonstrate more-complex scenarios about both the import step and the data-binding process in LightSwitch.
Creating a Sample Application
In this section, you create a business application that connects to the Northwind database via a WCF RIA Service and import the following two stored procedures:
• Ten Most Expensive Products. As its name implies, this stored procedure returns the 10 most expensive items from the Products table.
• CustOrdersOrders. This procedure returns the full list of orders for the specified customer, given the customer identifier.
The first procedure returns a list of items and does not require any parameters, whereas the second one requires a parameter, the customer identifier. Now it is time to use your skills to create a new LightSwitch application called NorthwindStoredProcedures. When the new project is ready in Visual Studio, you can then create the WCF RIA Service, as explained in the next subsection.
Creating the WCF RIA Service
Based on the previous considerations, the new WCF RIA Service needs to expose Customers, Orders, and Products tables and the previously mentioned stored procedures through an Entity Data Model created upon the Northwind database. Based on the lesson learned in the introductory section about WCF RIA Services, follow these steps to create a new one:
1. Select File, Add, New Project.
2. When the Add New Project dialog appears, select the WCF RIA Services Class Library project template and name the new project NorthwindServiceLibrary.
3. In the Web project, select Project, Add, New Item and select the ADO.NET Entity Data Model template. Name the new EDM Northwind.edmx.
4. When the EDM Wizard starts, select the Northwind database as an existing connection and leave unchanged the connection string properties. Finally, proceed through the wizard until you have to select the database objects.
When the Entity Data Model Wizard displays a list of available database objects, select the Products, Customers, and Orders tables and the Ten Most Expensive Products and CustOrdersOrders stored procedures, as shown in Figure 19.18.
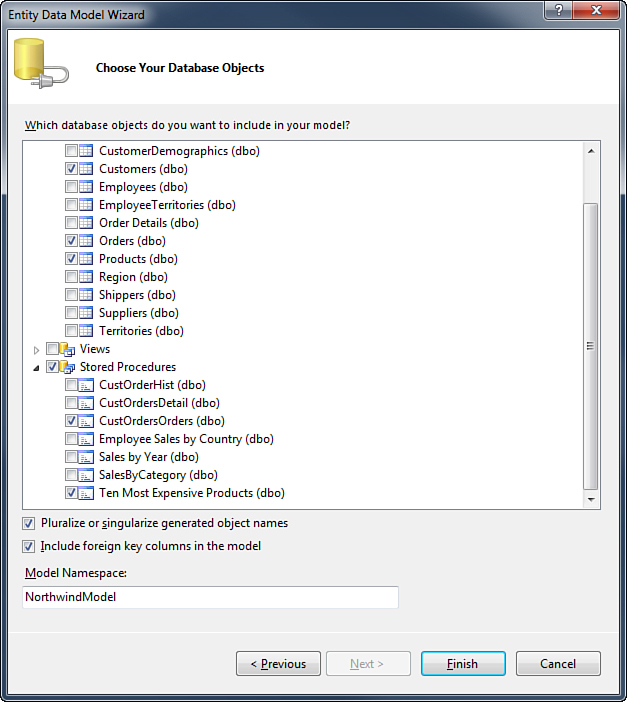
Figure 19.18. Specifying tables and stored procedures for the new Entity Data Model.
When you click Finish, the Entity Data Model is generated, and entities are visible in the Entity Framework Designer in Visual Studio. It is important to emphasize that by selecting stored procedures, there is actually no .NET mapping, but only function definitions. So the next step is to create .NET methods that invoke the stored procedures behind the scenes and that will be available to LightSwitch clients.
Function Imports: Mapping Stored Procedures to .NET Methods
A stored procedure needs to be mapped to a method that is recognizable by .NET platforms, including LightSwitch. You can do this via the Entity Framework Designer in Visual Studio 2010, which enables you to map stored procedures to methods via a so-called function import. When you define a function import, you are creating a new method that executes operations directly against the database and returns the specified data type. There is a very important consideration at this point. Stored procedures, just like functions, return information. There are several ways for stored procedures to return information. A stored procedure can usually return the following:
• Primitive types: For instance, if a stored procedure returns only the OrderID of each item in the Orders table, it returns a list of items of the int SQL type (which correspond to the Integer type in LightSwitch).
• A set of rows from a table: The return type of this operation is the same type as the table because the result is actually only a data set from the table.
• Result sets: For instance, a stored procedure can return only a number of columns from a table or it can join information coming from multiple tables into a single result. As you will see momentarily, the Ten Most Expensive Products stored procedure returns only the product name and unit price for each item in the Products table. Therefore, the return result is aggregated into a result set.
This is what happens from the database perspective. On the .NET side (including Entity Framework and LightSwitch), the runtime needs a way to represent not only stored procedures as methods but also their return result with appropriate .NET types. With regard to this, when you map a stored procedure with a function import, the generated method can return one of the following:
• No type: The imported function is a procedure that returns no result.
• Scalars: This is the choice when the function returns a primitive type, such as Integer, Boolean, Decimal, String, and so on.
• Entities: This is the choice when the function returns only a set of rows from a table.
• Complex types: These act as temporary types that handle result sets coming from one or more tables.
The Entity Framework can handle all of these return types.
Full support for complex types has been added to the Entity Framework with Visual Studio 2010 Service Pack 1. This is one reason why this is a prerequisite when working with Visual Studio 2010 Professional or higher.
In this section, you learn how to create complex types to handle mixed information coming from one or more tables in the Northwind database, and then you learn how LightSwitch can manage complex types as if they were entities. Before discussing stored procedure from the LightSwitch point of view, it is necessary to add function imports to the Entity Data Model for the specified stored procedures. The first stored procedure that is going to be added to the Entity Data Model is Ten Most Expensive Products. To accomplish this, right-click in the Entity Framework Designer and select Add, Function Import, as shown in Figure 19.19.
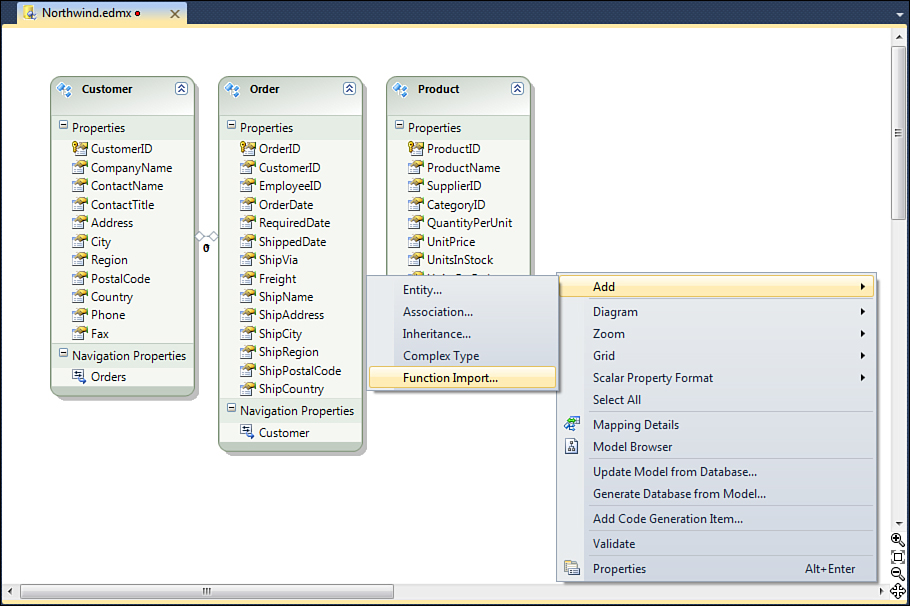
Figure 19.19. Adding a function import.
This action opens the Add Function Import dialog (see Figure 19.20). Here the first thing you have to do is select the stored procedure you want to map from the Stored Procedure Name combo box. So, the first selection is Ten_Most_Expensive_Products. The underscore character has been automatically added by Visual Studio to form a valid identifier.
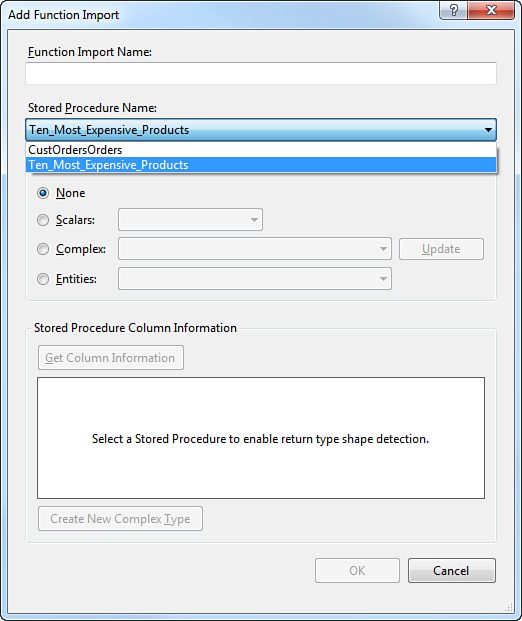
Figure 19.20. The Add Function Import dialog and the stored procedure selection.
Next, you specify a name for the method. A good idea is to name it GetTenMostExpensiveProducts. Notice that this name is used to represent the stored procedure within the Entity Data Model, but it is not the name that will be invoked by clients, which is instead defined in the WCF RIA Service. Now you specify the return type; as you can see in the Return Type box, the list of available return types reflects the considerations made before, about scalar, entities, and complex types.
To make it easier to decide what kind of return type you have to choose, Visual Studio offers the Get Column Information button, which gives you information about columns that the stored procedure returns. If you click this button, you see the list of columns and their types that are returned by Ten_Most_Expensive_Products (see Figure 19.21). You can see that this procedure returns a column called TenMostExpensiveProducts, of type NVarChar, and one column called UnitPrice, of type Decimal. Both columns are from the Products table, and TenMostExpensiveProducts stores the value for the ProductName column.
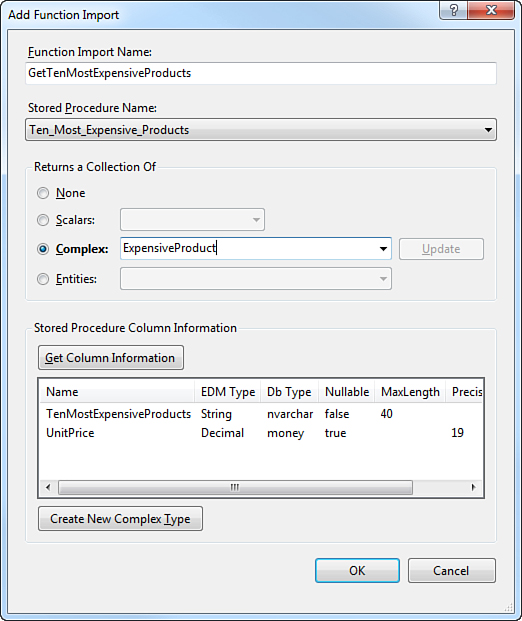
Figure 19.21. Getting column information and creating a new complex type.
Based on the returned information, it is time to decide the return type. The imported function cannot return a scalar because this is a primitive type, whereas the return result is made of two types; it cannot return an entity type because it just takes two columns from the table. Returning an entity is valid only if you return all the columns from a table. Attempting to return an entity for this stored procedure would result in an exception. So, the appropriate choice in this scenario is to generate a complex type. A complex type is generated only for storing specific return results and is nothing but a class that Visual Studio handles as if it were an entity, but the difference is that it is used to handle in-memory data and there is no mapping with any database table.
Click Create Complex Type and replace the autogenerated identifier with ExpensiveProduct. The name of the complex type thus represents a single item in the stored procedure return result. Figure 19.21 shows how the new complex type appears in the Add Function Import dialog.
At this point, click OK. Neither the generated function nor complex type are visible in the Entity Framework Designer, and this makes sense, because they are used only at runtime. The imported function is visible only in the Model Browser window, as shown in Figure 19.22.
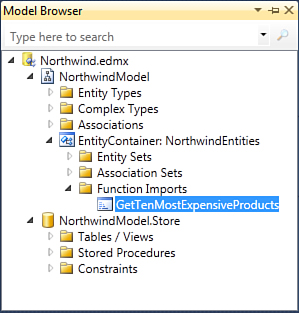
Figure 19.22. The new function import visible in the Model Browser window.
Repeat the same steps to add a new function import for the CustOrdersOrders stored procedure; use Figure 19.23 as a reference. This function returns all orders for each customer, given the customer identifier.
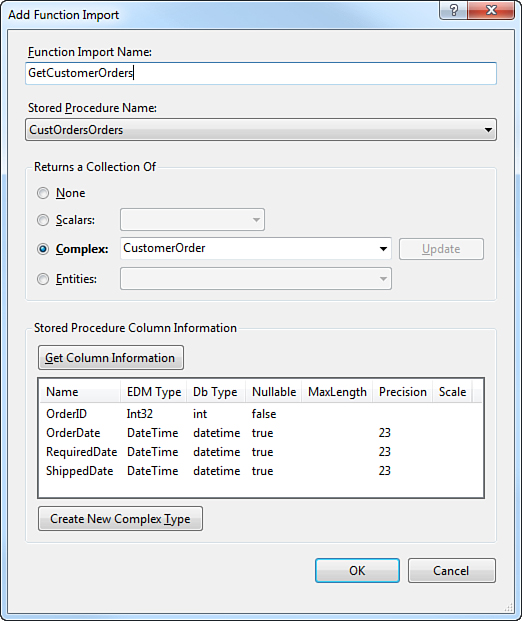
Figure 19.23. Importing the CustOrdersOrders stored procedure.
This function still needs to use a complex type to store partial information coming from the Orders table, so create a complex type called CustomerOrder. It also has another requirement, which is a parameter of type string. In fact, the original stored procedure requires the customer identifier as a parameter, which is also mapped to the function import. Managing the method parameter is not accomplished in the Entity Data Model definition because the parameter is supplied by clients and then it is the responsibility of the WCF RIA Service passing the appropriate argument to the imported function. The Entity Data Model only receives the function parameter and makes an invocation to the stored procedures passing the supplied argument. By adding function imports, you have finished designing the Entity Data Model. The next step is to write code to expose data objects to clients in the WCF RIA Service. Ensure you rebuild the solution before going on.
Creating the Domain Service Class and Defining Metadata
As you know from the previous discussion about WCF RIA Services, the project must expose a Domain Service class that implements methods for querying, adding, removing, and updating data. So, select Project, Add New Item, and then in the Add New Item dialog select the Domain Service Class template. Name the new class NorthwindDomainService and click OK. The Add New Domain Service dialog now appears and prompts you with the list of available entities, as shown in Figure 19.24. Select all entities and enable editing; this is useful if you want to enable your users to add new data or edit existing data.
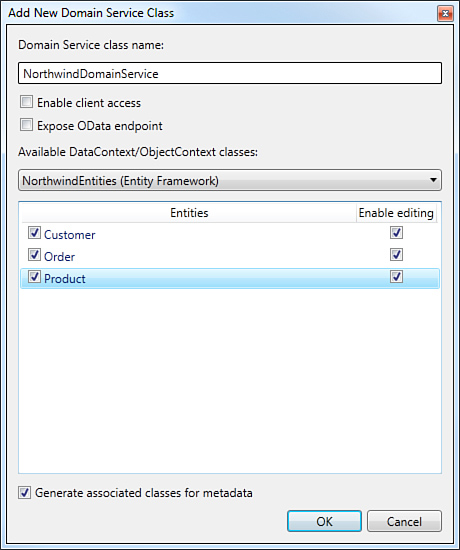
Figure 19.24. Creating the new Domain Service class.
When you click OK, Visual Studio generates the code for the NorthwindDomainService class, which includes methods for querying and editing the specified entities, as you learned in the previous section. Because Visual Studio generates code only for entities that are part of the Entity Data Model, the code that works with complex types must be written by the developer. From a code perspective, complex types are treated exactly like entities; this means that you have to write query methods over the complex type exactly as you would do for entities. For instance, you can write a method that retrieves the 10 most expensive products, by invoking the stored procedures through the Entity Data Model, like this:
<Query(IsDefault:=True)>
Public Function GetTenMostExpensiveProducts() As _
IList(Of ExpensiveProduct)
Return Me.ObjectContext.GetTenMostExpensiveProducts.ToList
End Function
It is important to note a few things about the method:
• It is decorated with the Query attribute whose IsDefault property is set to True. This is important because each entity or complex type must implement a default query method to satisfy the related LightSwitch requirement. This is required because LightSwitch does a lot of autogeneration based on types, so it needs default queries defined to retrieve data for these.
• The code invokes the appropriate method exposed by the ObjectContext class; such a method invokes the stored procedure behind the scenes.
• The method returns a generic collection (IList) rather than an IQueryable type, as you saw in the previous section about WCF RIA Services. What basically happens is that the result of the stored procedure invocation is of type ObjectQuery(Of T), which is not accepted by LightSwitch and therefore must be converted into an IQueryable(Of T) type. The problem is that LightSwitch does not correctly handle the IQueryable result of a conversion from a stored procedure, and the only way to handle data correctly is to convert the result into a List(Of T)—in this case, using the ToList method. This applies to default queries. As you see later with regard to the second stored procedure, nondefault queries must be returned as IQueryable (another requirement in the guidelines), but they must be converted to List before they are returned.
The second step is to define the code to invoke the CustOrdersOrders stored procedure from the WCF RIA Service. The first problem you encounter in this context is that the method that you must write needs a parameter that will be passed to the stored procedure, which is the customerID, but methods with parameters cannot be defined as default queries. This is a problem because you know that you must define a default query for each entity or complex type to satisfy a LightSwitch requirement. You can solve this particular problem by creating a default query that will never be invoked and then define a second query method that performs the required invocation and that will be used in LightSwitch. The code that accomplishes this is the following:
'Just a fake default query to satisfy the IsDefault requirement
<Query(IsDefault:=True)>
Public Function GetCustomerOrders() As IQueryable(Of CustomerOrder)
Return Nothing
End Function
<Query()>
Public Function GetOrdersByCustomerID(customerID As String) As _
IQueryable(Of CustomerOrder)
Return Me.ObjectContext.GetCustomerOrders(customerID).
.AsQueryable
End Function
• Different from the usual .NET tradition but as common to web services, WCF RIA Services do not accept method name overloading, so you need to write two completely different methods.
• The first method is created just to satisfy the LightSwitch requirement for the default query, but it actually does nothing and will never be used.
• The second method is marked with the Query attribute with no properties set. Marking a method in the WCF RIA Services as a query is really important because LightSwitch can generate a query over the method, as demonstrated in the next subsection.
No different from what you did in the introductory section about WCF RIA Services, the next step is to add metadata for business objects. The conceptual difference is that in the first scenario, you saw how to define metadata classes for entity types, whereas in this scenario, you define metadata classes for complex types (although in practice no real difference exists). To accomplish this, in Solution Explorer double-click the NorthwindDomainService.metadata.vb file; there you can see the autogenerated code about entity types. What you have to do is write similar classes for complex types, based on the columns returned by the stored procedures. You need to write the following code:
<MetadataType(GetType(ExpensiveProduct.ExpensiveProductMetadata))>
Partial Public Class ExpensiveProduct
Friend NotInheritable Class ExpensiveProductMetadata
Private Sub New()
MyBase.new()
End Sub
<Key()>
Public Property TenMostExpensiveProducts As String
Public Property UnitPrice As Decimal?
End Class
End Class
<MetadataType(GetType(CustomerOrder.CustomerOrderMetadata))>
Partial Public Class CustomerOrder
Friend NotInheritable Class CustomerOrderMetadata
Private Sub New()
MyBase.New()
End Sub
<Key()>
Public Property OrderID As Integer
Public Property OrderDate As Date?
Public Property RequiredDate As Date?
Public Property ShippedDate As Date?
End Class
End Class
You map the metadata of complex types just as you do for entity types. Now that you have finished creating the WCF RIA Service, you can rebuild the project and move to the next section, where you learn how to use stored procedures in LightSwitch client applications.
Creating the LightSwitch Client
As you learned previously, to use a WCF RIA Service from a LightSwitch application, you need to add a new data source of type WCF RIA Service. To do so, follow these steps:
1. In Solution Explorer, right-click Data Sources in the LightSwitch project and select Add Data Source.
2. When the Attach Data Source Wizard appears, select WCF RIA Service and click Next.
3. When available, click the Add Reference button. At this point, you select the NorthwindServiceLibrary.Web project in the Projects tab, as shown in Figure 19.25. When you have done so, click OK.
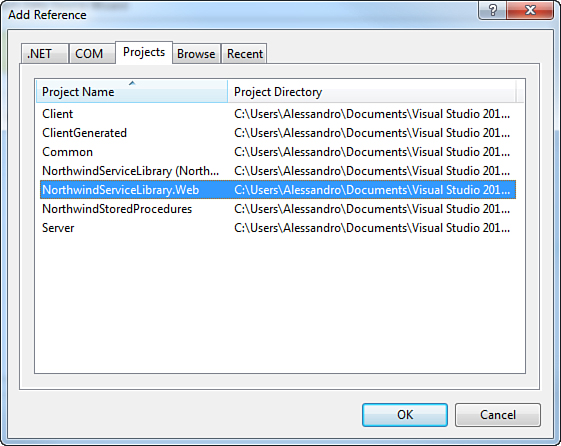
Figure 19.25. Adding a reference to the WCF RIA Service.
4. When the list of available objects appears, select them all. Notice that complex types are recognized by LightSwitch as if they were entities, as shown in Figure 19.26. This is a great advantage because you can work with complex types the same way you work with entities.
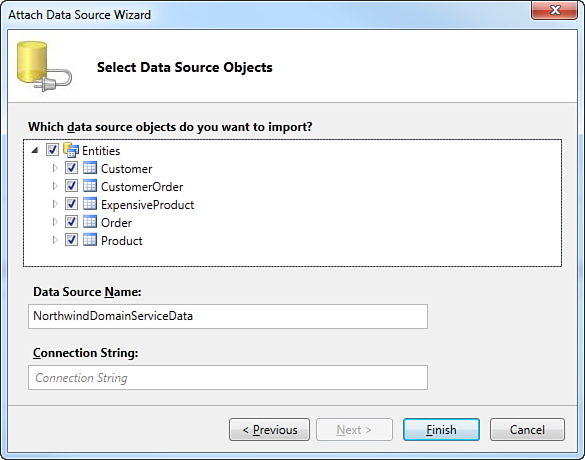
Figure 19.26. Selecting objects from the WCF RIA Service, including complex types.
The last sentence can be easily demonstrated by opening both the ExpensiveProduct (see Figure 19.27) and CustomerOrder (see Figure 19.28) objects in the Entity Designer. Note how LightSwitch translated complex types into entities that it treats the usual way; this is a great benefit because there is no difference in how you map data types and create screens to work with entities. For this reason, from now on we refer to complex types as entities, because LightSwitch does not differentiate between them.
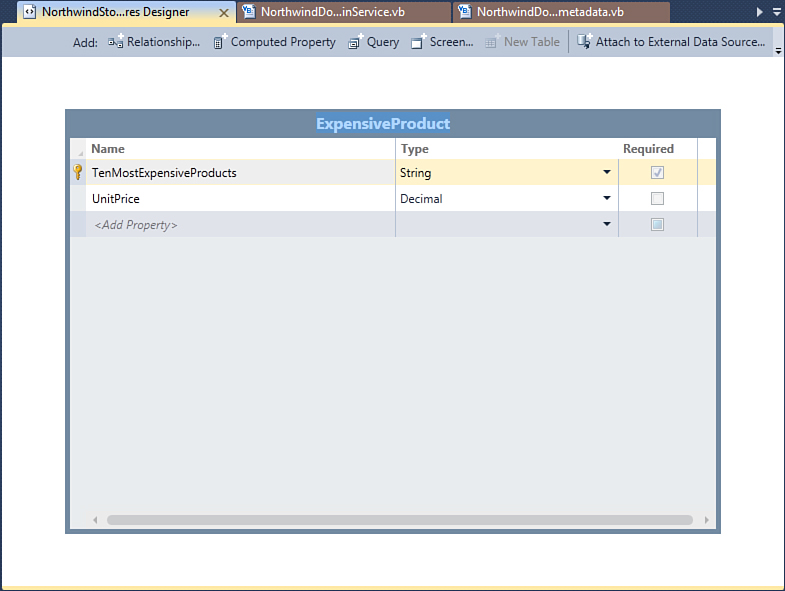
Figure 19.27. The ExpensiveProduct complex type appears as an entity in LightSwitch.
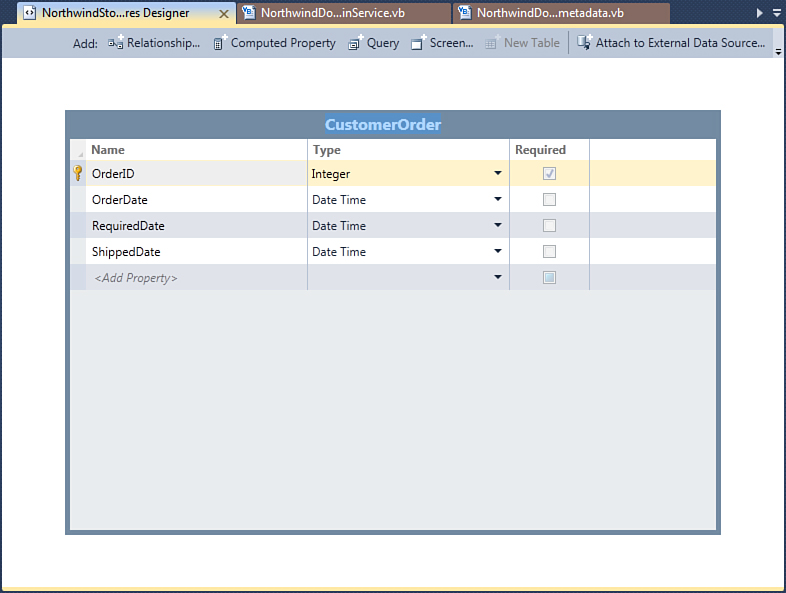
Figure 19.28. The CustomerOrder complex type is also treated like an entity.
To provide a more appropriate behavior, in the ExpensiveProduct entity, replace the Decimal type for UnitPrice with Money, and in the CustomerOrder entity, replace all the Date Time types with Date. Another important point makes it even clearer why LightSwitch is a great environment. Look at the Data Sources node in Solution Explorer. You can see that under the CustomerOrders collection LightSwitch automatically generated a query called GetOrdersByCustomerID, which is exactly the name of the query method with parameter that was previously declared inside the WCF RIA Service. Figure 19.29 shows this. You now understand why it was so important to decorate the method with the Query attribute. Without this, that method would not be automatically recognized as a query, and you would therefore be unable to continue with the upcoming steps.

Figure 19.29. Query methods in WCF RIA Services are imported into LightSwitch queries.
Before adding screens to the application, it is necessary to import the connection string from the WCF RIA Service into the LightSwitch project. This was explained in the previous section, but the required steps are summarized again here for your convenience:
1. In the NorthwindServiceLibrary.Web project, open the App.config file.
2. Locate the ConnectionStrings node and copy the nested connection string to the Clipboard by selecting the line of code and pressing Ctrl+C.
3. In Solution Explorer, select the LightSwitch projects and enable the File View and the All Files visualization.
4. Expand the ServerGenerated project, open the Web.config file and paste (Ctrl+V) the connection string inside the ConnectionStrings node.
After you have completed these steps, restore the logical view for the LightSwitch project. At this point, you can add screens. You are free to add the screens you want for the Customer, Order, and Product entities. To understand how to retrieve information via stored procedures, the simplest way is to start with the ExpensiveProduct entity by adding a Search screen pointing to this object, as shown in Figure 19.30.

Figure 19.30. Adding a new Search screen for the ExpensiveProducts collection.
What it is important to emphasize here is that LightSwitch treats the result coming from the stored procedure as a collection of entities. Therefore, you just need to add a Search screen pointing to the collection as you would do against normal entities. Run the application after adding the screen. As you can see in Figure 19.31, the Search screen displays the 10 most expensive products from the Products table, which is the expected result from the stored procedure.

Figure 19.31. Displaying the result of a stored procedure in LightSwitch.
Showing the result of stored procedures in LightSwitch is easy because the hard work is done in the WCF RIA Service. Complex types are handled by LightSwitch as if they were entities, and the result of query methods is handled the usual way. This approach makes it simple to add screens that manipulate the desired data. At this point, the last step is to add a screen that can display orders by the specified customer identifier. The screen will invoke the GetOrdersByCustomerID query method defined in the WCF RIA Service, which is responsible for calling the CustOrdersOrders stored procedure. The difference from the previous example is that now the query requires a parameter. The result that will be reached is similar to the example of parameterized queries explained in Chapter 6. However, now the same result is obtained through a stored procedure. From the LightSwitch side, you do not need to write code, but you need to correctly bind data sources to screen elements. To make things easier, the best approach is to create an empty Search screen. So far, you have always created screens bound to a particular data source, but LightSwitch also enables you to create empty screens where data can be bound manually. If you want more information about what will be created now, take a quick look at Figure 19.37. First, add a new Search screen that has no source associated and name it SearchCustomerOrders, as shown in Figure 19.32.
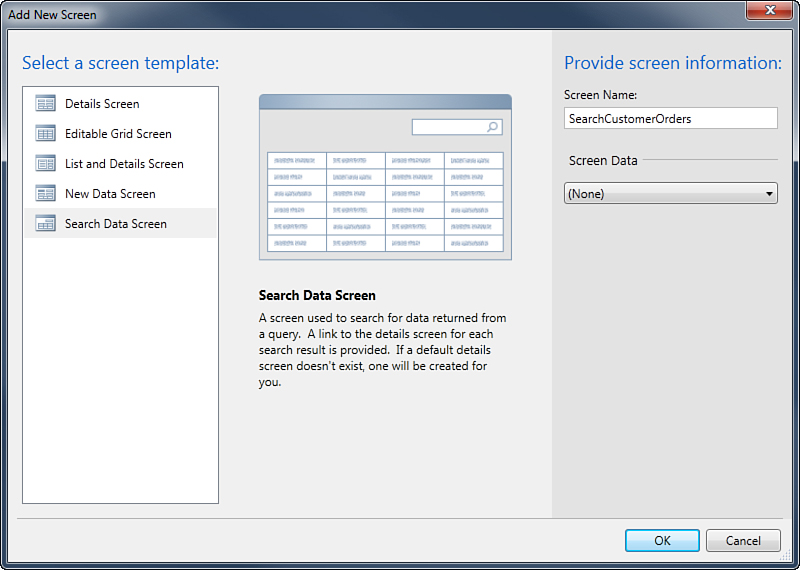
Figure 19.32. Creating an empty Search screen.
When you click OK, Visual Studio shows the Screen Designer, which contains no elements except for the standard Screen Command Bar. The first thing you need at this point is the full list of customers, because your users will need to pick up a customer ID from the list. This requires you to add a data item that is basically the All query. To do so, follow these steps:
1. In the Screen Designer, click Add Data Item.
2. When the Add Data Item dialog appears, select the Query option, and then select NorthwindDomainServiceData.Customers, which returns the full list of customers (see Figure 19.33).
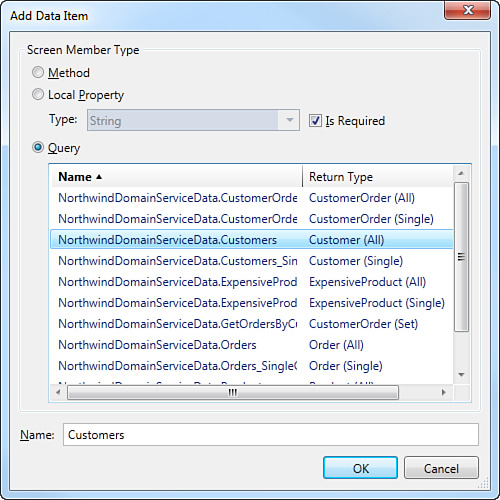
Figure 19.33. Selecting the full list of customers under the form of a query.
3. Ensure that the name for the query is Customers and click OK.
Now the Customers query element is available on the left side of the designer. The query will be requested when necessary at runtime, so you do not need to do anything else with it. To provide users with an easy way to select customers, a good idea is to display a combo box where they can pick an identifier from the full list. So, click Add Data Item again, select Local Property in the Add Data Item dialog, and then select NorthwindDomainServiceData.Customer (see Figure 19.34). Rename the new property SelectedCustomer and click OK. All you have to do at this point is drag the SelectedCustomer query element from the left side of the screen onto the designer’s surface, under the Screen Command Bar element. At this point, Visual Studio LightSwitch automatically generates an AutoCompleteBox control that displays the full list of customers. This is possible because the control is populated via the Customers query added earlier.
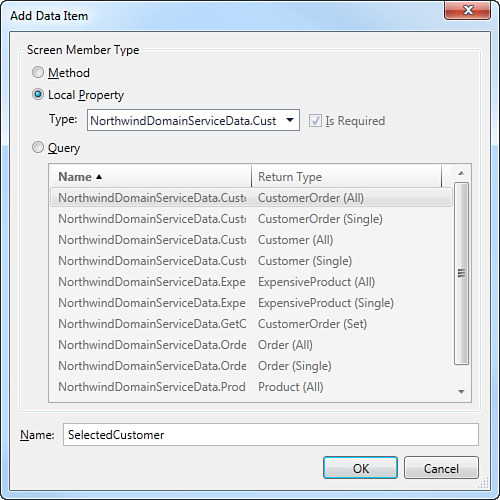
Figure 19.34. Adding a new local property to represent the selected customer in the list.
The last data item that you have to add is the query method exposed by the WCF RIA Service. Again, click Add Data Item in the Screen Designer and, in the dialog, select Query and then NorthwindDomainServiceData.GetOrdersByCustomerID, as shown in Figure 19.35. Then, click OK. This query method works similarly to a parameterized query that you would define in the LightSwitch Query Designer, so you need to set a binding between the list of customers and the query itself.

Figure 19.35. Adding the query method as a data item to the screen.
Now drag the GetOrdersByCustomerID query definition from the left side of Visual Studio onto the Screen Designer, under the Selected Customer element. Figure 19.36 shows how the UI definition looks at this point. A last step is required to finalize the screen, which is binding the GetOrdersByCustomerID query to the customer identifier of the selected item in the customers list. Take a look at the query definition. You can see the customerID parameter, which is highlighted in Figure 19.36. This parameter must be bound to the Selected Customer’s identifier. This is not new to you; a similar technique was explained in Chapter 6. To bind the parameter to the appropriate property of the current element in the list, follow these steps:
1. Select the customerID parameter in the query definition.
2. Open the Properties window (press F4 as a shortcut).
3. Fill the Parameter Binding field with SelectedCustomer.CustomerID, where SelectedCustomer is the local property that you added before and CustomerID is the value that will be passed to the query and that, behind the scenes, will be passed to the stored procedure through the WCF RIA Service.
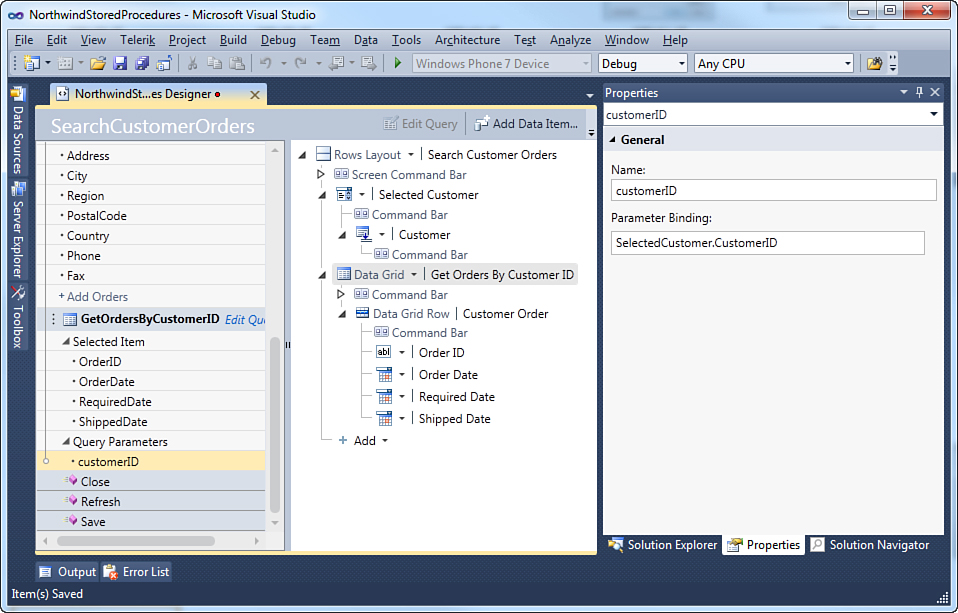
Figure 19.36. Setting the parameter’s binding and finalizing the screen’s UI.
You can now finally run the application and open the Search Customer Orders screen. You will see at this point how the application returns the list of orders for the selected customer, based on the identifier selected in the appropriate box, as shown in Figure 19.37.
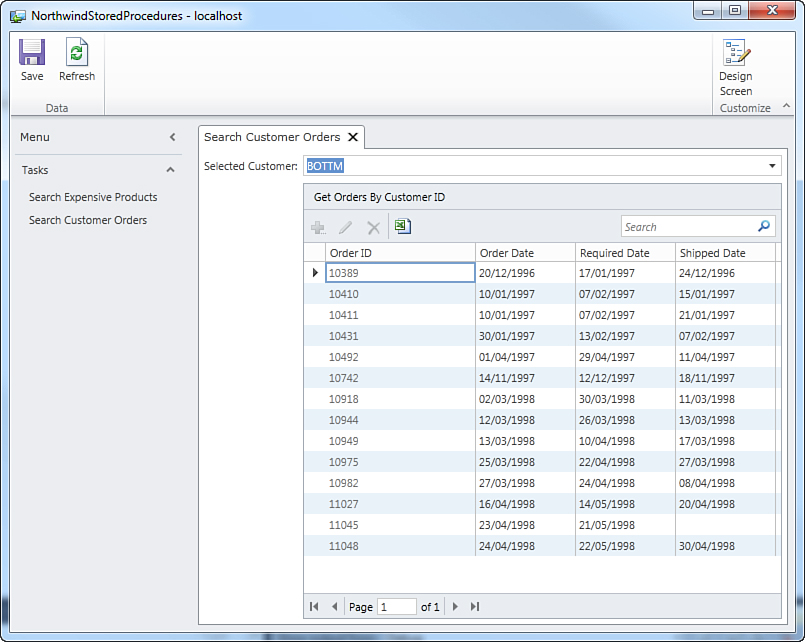
Figure 19.37. Displaying the result of a stored procedure with parameters in LightSwitch.
So, the result that you see in the Search Customer Orders screen has been retrieved by passing a parameter to a stored procedure. This is a common scenario in real-world business applications, and this section demonstrated how this task can be completed with limited effort in LightSwitch, using WCF RIA Services as the bridge.
Sharing Custom Data Sources
The Difference Between Sharing and Creating
The title of the this section begins with the word sharing rather than creating because you can actually create custom data sources (WCF RIA Services) outside the Extensibility Toolkit; you just use existing, specific templates in Visual Studio 2010. You use the Extensibility Toolkit only if you want to share with (or sell to) other developers your extensions of the specified types, so that they can be used within the development environment. If you do not plan to share them with others and only need them in your own applications, just remember that WCF RIA Services must be deployed to a web server or Azure.
In the previous section, you saw how to create WCF RIA Services to access different data sources. With the Extensibility Toolkit, you can take it a step further: packaging your services into extensions so that you can share your custom data sources with other developers. By installing the package, developers will be able to use data sources directly within the IDE. This also makes it easier to reuse services across multiple applications. For example, think of the application that was created in the previous section to demonstrate how you can use WCF RIA Services to wrap XML data. In future applications, you might need to reuse the same service, or other development teams in your company might need that particular service. By packaging a WCF RIA Service into an extension, developers can use an existing service without owning the code. To understand how this works, create a new extensibility project called RSSFeedServiceExtension. When the solution is available in Visual Studio, right-click the Lspkg project in Solution Explorer and select Add, New Item. When the Add New Item dialog appears, select the LightSwitch Data Source template and name the new item RSSFeedDataSource.vb, as shown in Figure 19.38.

Figure 19.38. Adding a custom data source to the extensibility solution.
Now focus your attention on the Server project. This now contains a folder called DataSources and one code file that implements an empty WCF RIA Service, as you can easily verify by opening such a code file in the editor. Notice that the RSSFeedDataSource class inherits from DomainService, which is the base class for WCF RIA Services. Also, and very important, the class definition is enclosed within the DataSources namespace. This is important because this is the place where LightSwitch searches for custom data sources. Now open inside another instance of Visual Studio 2010 the RSSFeedReader sample solution created back in the previous section. Next, in the custom data source solution, follow these previously explained steps:
1. Copy the definition of the FeedItem class from the RSSFeedReader example to the current solution, adding the code inside the Server project.
2. Replace the content of the RSSFeedDataSource.vb code file with the content of the FeedDomainService.vb code file from the previous sample. For the sake of consistency, rename the service class RSSFeedDataSource and enclose it within a Namespace DataSource .. End Namespace block.
3. Add a new code file called FeedDomainService.metadata.vb and copy into it the content of the FeedDomainService.metadata.vb code file from the RSSFeedReader example. Make sure you rename the class in the metadata file RSSFeedDataSource.
You can now edit the VSIX manifest as you did for previous extensions. Figure 19.39 shows an example.
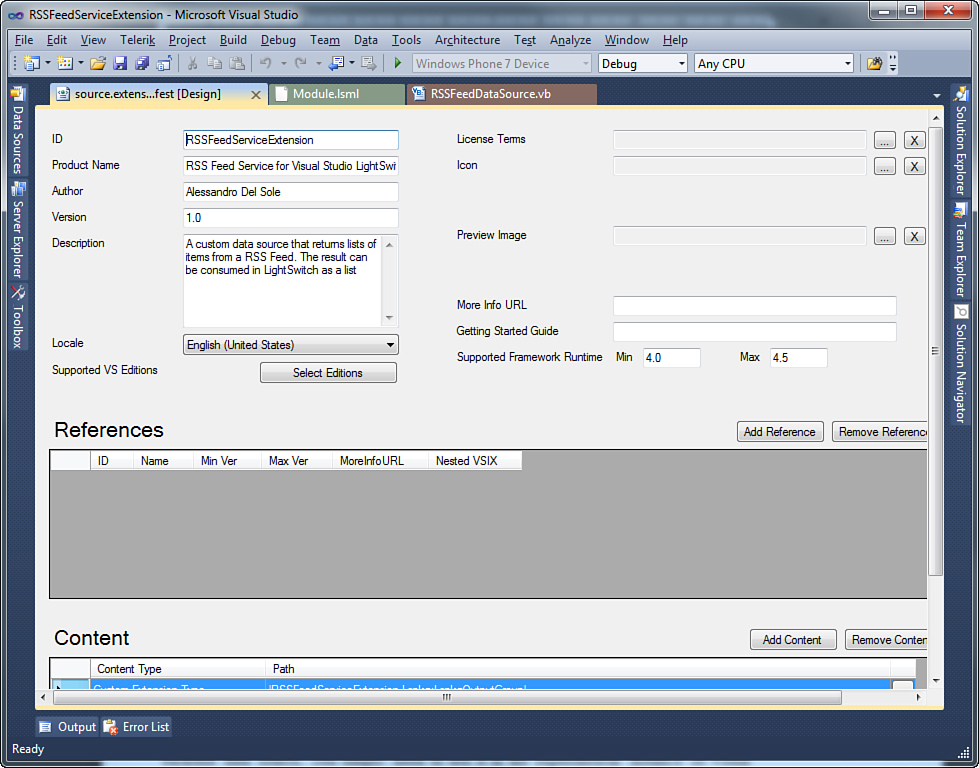
Figure 19.39. Specifying settings for the VSIX manifest.
When you finish writing your WCF RIA Service, regardless of the target back-end data source, you need to test it in an experimental instance of Visual Studio 2010.
Testing Custom Data Sources
After you press F5 to start Visual Studio 2010 in the experimental mode, you first create a new LightSwitch application. In the Application Designer, display the Extensions tab to enable the custom data source, as shown in Figure 19.40.
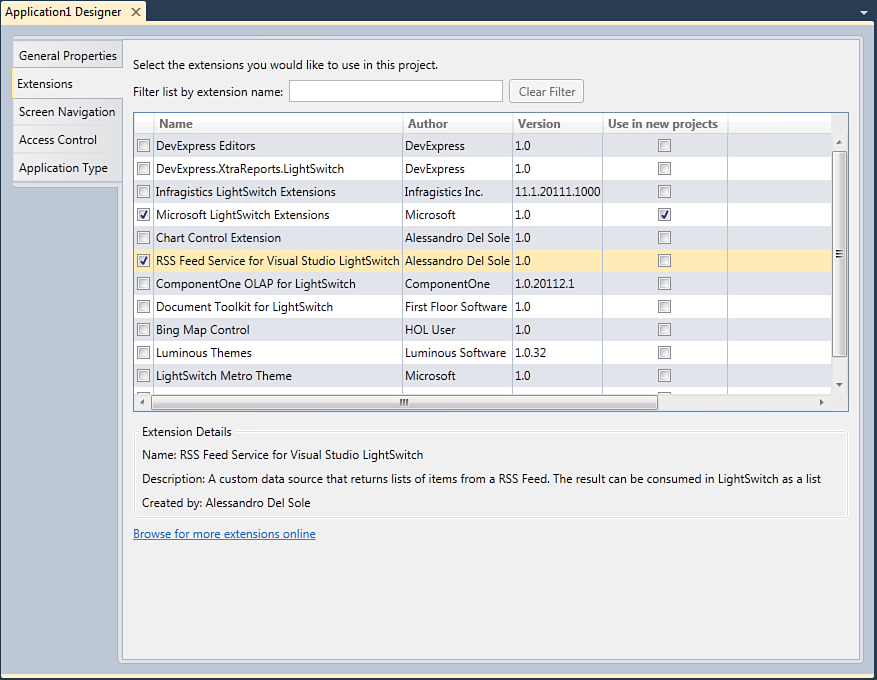
Figure 19.40. Enabling the custom data source in the Application Designer.
After you enable the custom data source, you can reach it by right-clicking Data Sources in Solution Explorer and selecting Add Data Source. This launches the well-known Attach Data Source Wizard, where you have to select the WCF RIA Service type, as shown in Figure 19.41.
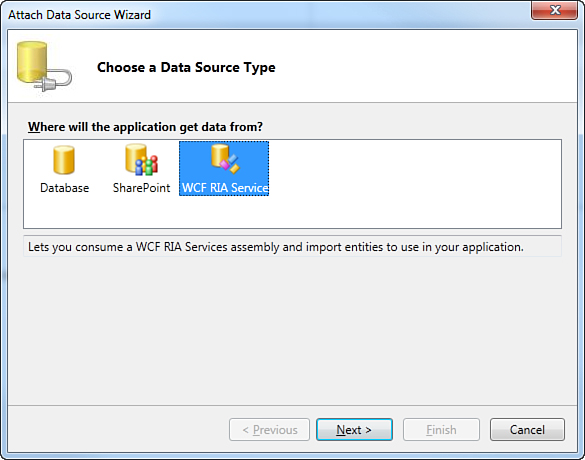
Figure 19.41. Select the WCF RIA Service to attach an external data source.
When you click Next, LightSwitch lists the RIA Service exposed by the extension, as shown in Figure 19.42.
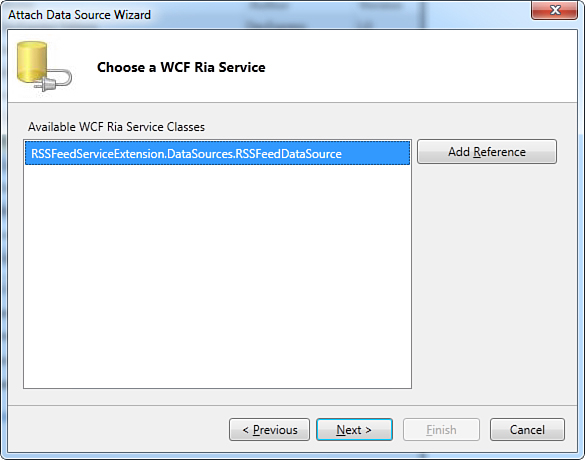
Figure 19.42. The custom data source is listed among the available RIA Services.
To finish using the custom extension, go ahead and select all available entities. When these are imported into LightSwitch, you will see that they are correctly listed in Solution Explorer as you would expect (see Figure 19.43) and that you can now bind them to some screens.
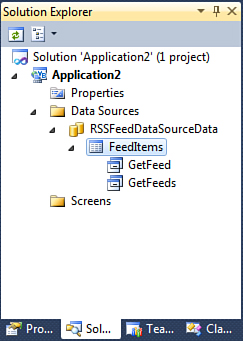
Figure 19.43. Entities exposed by the custom data source are correctly available.
Writing custom data sources simplifies the way you can reuse existing WCF RIA Services and opens up new and interesting scenarios if you plan to provide access to data sources other than SQL Server and Azure databases or SharePoint web portals.
Handling Connection Strings
When you work with a custom data source, you can supply a connection string in the Attach Data Source Wizard. This piece of information is typically used in the following circumstances:
• The WCF RIA Service packaged as a custom data source needs to work against a database, so a connection string to the database is required.
• The custom data source needs to pass startup information to the WCF RIA Service, such as initializing some properties or fields in the service’s code. This information is something you would usually pass to the constructor of the WCF RIA Service, but in LightSwitch you have no direct access to the constructor. So, a connection string can be used to pass information.
If your service works with a database, you need to handle the connection string. It is not uncommon to store the connection string inside the Web.config file and the runtime to automatically search for a connection string in that file. However you can handle the connection string in code (for example, if you are using the SQL authentication). If this is your case, you first need to implement an Initialize method that generates the connection string programmatically and that stores it to the configuration file. The following code snippet shows an example of how you can store the connection string for the Northwind database:
Public Overrides Sub Initialize _
(context As System.ServiceModel.
DomainServices.Server.DomainServiceContext)
If (WebConfigurationManager.ConnectionStrings.Item(Me.
[GetType]().FullName) _
Is Nothing) OrElse [String].IsNullOrWhiteSpace _
(WebConfigurationManager.ConnectionStrings.Item _
(Me.[GetType]().FullName).ConnectionString) Then
_connectionString = "data source=NorthwindDB;initial catalog= " _
& "Northwind;user id=myID;password=myPassword"
Else
_connectionString = WebConfigurationManager.ConnectionStrings.Item _
(Me.[GetType]().FullName).ConnectionString
End If
MyBase.Initialize(context)
End Sub
In contrast, the following code demonstrates how to return a connection string programmatically:
Private Function CreateObjectContext() As NorthwindEntities
Dim Connection As New EntityConnectionStringBuilder()
Connection.ProviderConnectionString = _connectionString
Connection.Provider = "System.Data.SqlClient"
Connection.Metadata = "res://*/NorthwindModel.csdl|" & _
"res://*/NorthwindModel.ssdl|" & _
"res://*/NorthwindModel.msl"
Return New NorthwindEntities(Connection.ToString)
End Function
About the second scenario, imagine that you need to initialize some properties or fields in the WCF RIA Service with values that must be supplied by the developer. In different scenarios, you might implement a constructor that receives some arguments, and then you could assign properties and fields in your code with values received by the constructor. Because you cannot directly access the constructor of a WCF RIA Service in code, you can pass the required values to the WCF RIA Service via the connection string. For example, the following code shows how to initialize a property of the custom data source with a value passed to the WCF RIA Service when this starts up via the connection string:
'The description will be shown in the Connection String field
'of the Attach Data Source wizard
<Description("Enter your name here")>
Public Class PeopleDataSource
Inherits DomainService
Private _connectionString As String
Public Property PersonName As String
Public Overrides Sub Initialize(context As System.
ServiceModel.DomainServices.Server.DomainServiceContext)
MyBase.Initialize(context)
'Retrieve the instance of the connection string
'for the current data source
If WebConfigurationManager.ConnectionStrings(GetType _
(PeopleDataSource).FullName) IsNot Nothing Then
'If it is not null, assign the content of
'the connection string to a variable
_connectionString = WebConfigurationManager.
ConnectionStrings(GetType(PeopleDataSource).FullName).
ConnectionString
End If
'If the connection string is neither null nor empty,
If String.IsNullOrEmpty(_connectionString) = False Then
'Initialize the desired property with the value
'of the connection string
Me.PersonName = _connectionString
End If
End Sub
End Class
In this way, you can initialize any member in your service with values that the developer must supply. Also note how the Description attribute can be used to show a text message inside the Connection String field of the Attach Data Source Wizard, so that the developer will better understand how the required information must be supplied.
Handling the connection string is the very last topic on custom data sources. The next extensibility point is all about the UI: screen templates.
Deploying Extensions to Others
Whether you enjoy sharing your work with the developer community or it is for your business, after you have completed building your LightSwitch extensions, you need to distribute them. As a general rule, you first switch to the Release configuration in Visual Studio 2010 and then build the solution. This produces a VSIX package ready for deployment. Such a package is available in the BinRelease subfolder within the Vsix project. You have two options to deploy LightSwitch extensions:
• Upload the VSIX package to the Visual Studio Gallery. This makes the package available for download through the Gallery website and via the Extension Manager tool in Visual Studio.
• Share the VSIX package via the Internet (for example, as a download from your website).
The latter is the simplest way of deploying your extensions in that you are free to choose how to share VSIX packages (email, a website, media, and so on). The first way requires you to execute a number of steps, but it is interesting because it can leverage all the power of the Extension Manager, especially when you want to release updates.
In this section, you learn how to upload your LightSwitch extensions to the Visual Studio Gallery and how to enable users to receive them via Extension Manager.
Preparing the Deployment Manifest
In Chapter 18 and then again in this chapter, you saw that a VSIX package includes a deployment manifest that contains metadata useful to identify the extension. The deployment manifest is represented by a file called source.extension.vsixmanifest, available in the Vsix project. Visual Studio 2010 offers a convenient designer that makes it easy to specify the manifest metadata, such as the author, extension description, external references, and so on. You can take a look at Figure 19.39 for an example. Specifying the extension metadata is important because both Visual Studio (via the Extension Manager) and the user will be able to identify your extensions by the information that you entered. So, setting VSIX metadata was important not only for debugging purposes, as you saw in the various examples, but it is also especially important for deployment. However, before publishing your extension, a couple of additional steps are required: signing the package and specifying a license agreement.
Signing VSIX Packages
Signing a VSIX package with a digital signature is not only best practice, but it also makes your extensions trustable by others. It is not mandatory, and not to sign a package can be okay if you simply release free extensions. Digital certificates can be purchased from one of the certification authorities, such as VeriSign. Because of their format, VSIX packages cannot be signed using the well-known SignTool.exe tool, so you need to make a different choice. You have a couple of options to sign your package:
• Invoking the Sign method from the System.IO.Packaging.PackageDigitalSignatureManager class. This involves writing some lines of code and requires some knowledge about how X509 certificates work in .NET. The MSDN Library has a specific document about this topic: http://msdn.microsoft.com/en-us/library/system.io.packaging.packagedigitalsignaturemanager.sign.aspx.
• Use third-party tools that perform this task for you.
As a suggestion, you can try out a free tool called SignExtension from Jeff Wilcox. Jeff is a senior development lead on the Windows Phone team at Microsoft and has discussed this tool in a blog post at www.jeff.wilcox.name/2010/03/vsixcodesigning/.
SignExtension makes signing VSIX packages very easy and requires only a few mouse clicks. For the sake of simplicity, in this chapter the sample extension will not be signed, but you are strongly encouraged to sign your extensions, especially if they are available for sale.
Adding a License Agreement
A license agreement for your extension is not mandatory for the IDE, but it is information that you are strongly encouraged to provide every time you publish an extension, as well as for any other kind of software you produce. Keep in mind that a license agreement is not just for paid software but also for free or open source productions and is very important because it establishes terms of use for your software. To add a license agreement to your extension, click the specific button on the right side of the License Agreement box in the VSIX designer, which is shown in Figure 18.4. Supported formats are plain text (.txt files) and Rich Text Format (.rtf files). Now that you know how to provide a license agreement, and assuming that you have specified appropriate metadata information for every example, it is time to learn how to make extensions available to others.
Uploading VSIX Packages to the Visual Studio Gallery
In your web browser, open the Visual Studio Gallery website, available at http://visualstudiogallery.msdn.microsoft.com. Notice that you need to sign in with a valid Windows Live ID to upload your contributions. When opened, the Gallery looks like Figure 19.44.
Figure 19.44. The home page of the Visual Studio Gallery.
You can easily search for different kinds of extensions for Visual Studio 2010, not only LightSwitch. Browsing the Gallery is left to you; we now focus on uploading the VSIX package. The custom business type example is used. At this point, click Upload. The first question you must answer is the type of extension you want to upload. Select Control, as shown in Figure 19.45.
Figure 19.45. Selecting the extension type.
Notice how a tooltip on the right side of the page explains the information you are required to enter. Even though your extension is not a control, at the time of this writing the Visual Studio Gallery can upload LightSwitch extensions only if Control is selected. When you click Next, you are asked to specify how you want to share your extension. You can choose between uploading a VSIX package or simply share a link to an external resource. The latter choice is useful if you want to give visibility to an extension hosted on a completely different platform. So, select I Would Like To Upload My Tool, and then browse to the VSIX package in the BinRelease subfolder of the WebAddressExtension project created previously. Your browser should now look similar to Figure 19.46.
Figure 19.46. Specifying how you want to share your extension.
Again, click Next. You are prompted to enter a detailed description for your extension, at least 280 characters. Notice how all the information that you provided in the manifest metadata is visible at this point. Figure 19.47 shows what your browser looks like.
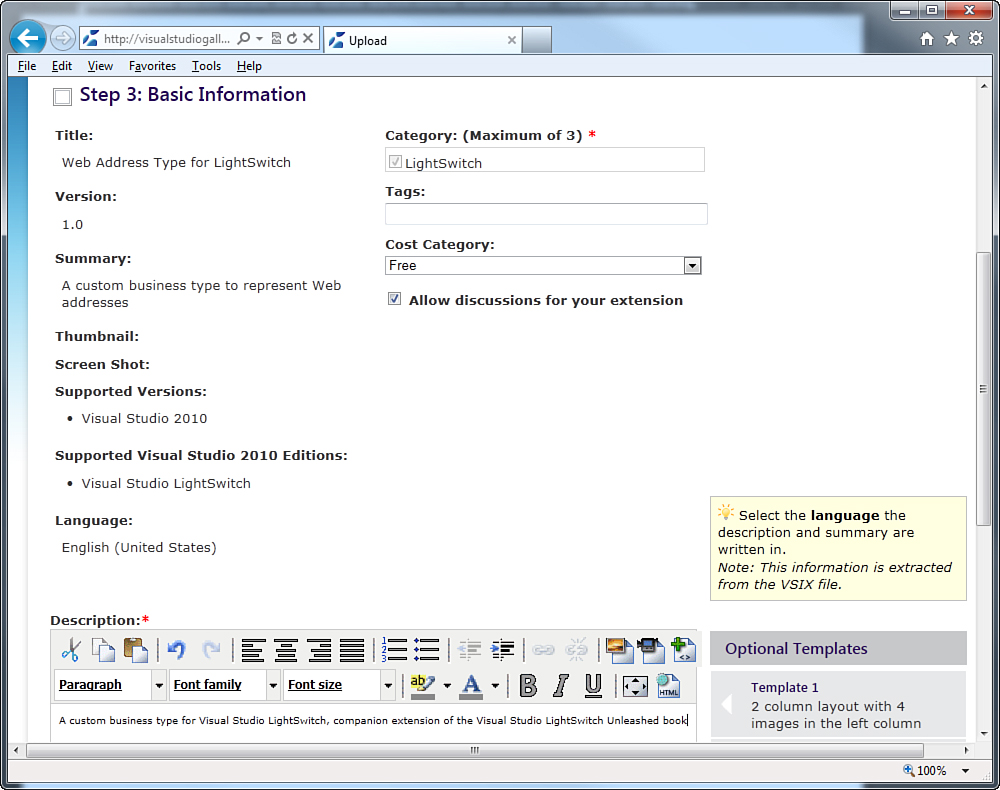
Figure 19.47. Extension summary information.
You can also specify the extension cost. By default, the Cost Category box is filled with Free, but you can change it to Trial or Paid. You have to specify purchase information if you decide to sell the extension (that is, it will not be available for free). Also, you can set tags so that the extension can be found easier. A list of tags appears when you begin typing, and multiple tags can be added and separated by commas. After you enter a description for your extension, scroll the page to the bottom. Ensure you read the contribution agreement and flag the agreement check box. Then click Create Contribution. At this point, the Gallery generates a home page for your new extension, as shown in Figure 19.48.
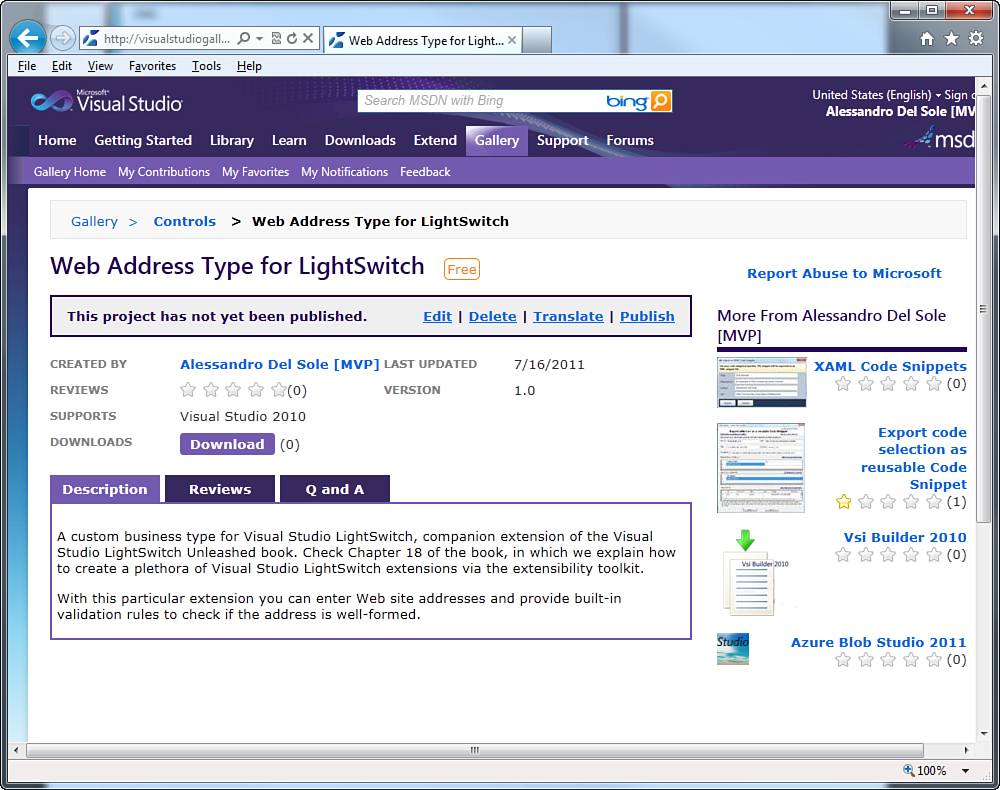
Figure 19.48. The new extension’s home page.
Bookmark the extension’s home page URL so that you can share it with others to provide full extension information or to point them here to download the extension outside Visual Studio LightSwitch. Notice that the extension is not publicly available until you explicitly click Publish. This is to provide you with an opportunity to review the extension information before making it available to other developers. When you are sure that all details are okay, click Publish. Your extension is immediately available in the Visual Studio Gallery, and it should be in the Extension Manager, as well. In some cases, it could require a few minutes for the extension to propagate through the servers. Your users can now download the extension from both the Gallery and Visual Studio LightSwitch. If you want to check how this works within the IDE, launch Visual Studio LightSwitch (or Visual Studio 2010), open the Extension Manager, and follow the instructions explained in Chapter 7, “Customizing Applications with Buttons, COM Automation, and Extensions,” to download the extension. You can remove your extensions any time from the Visual Studio Gallery by just clicking Delete, and you can also edit your contributions, as explained next.
Releasing Extension Updates
One of the biggest benefits of deploying extensions through the Visual Studio Gallery is that you can easily release extension updates; then later in Visual Studio, users will be notified of the update availability and can download the new version with just one click. To mark an extension as an update, you must change the version number in the Visual Studio VSIX designer. Figure 19.49 shows how the version number from the current extension sample goes from 1.0 to 1.1 and how a new description has been provided.
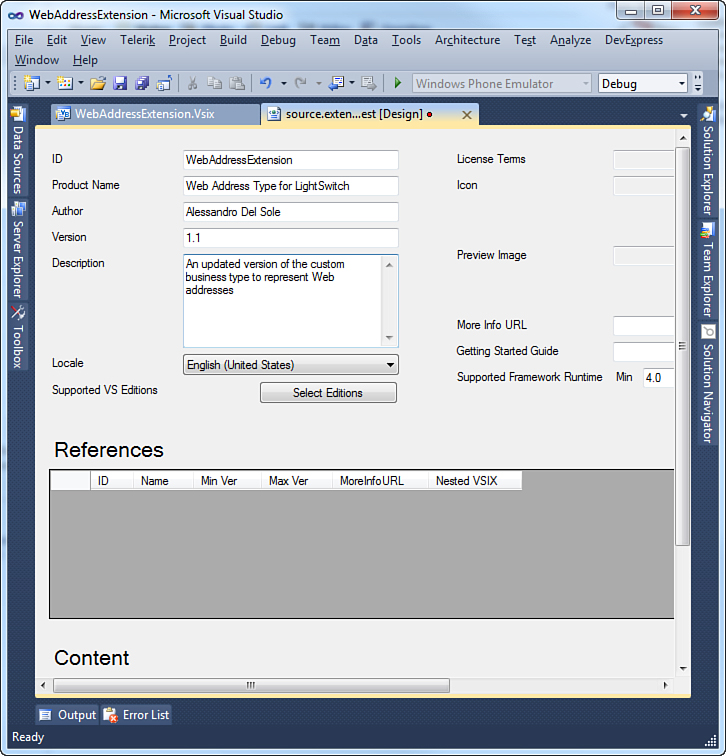
Figure 19.49. Changing the extension’s version number enables easy updates through the Gallery.
This is enough to mark an extension as an update. To release the update, go back to the Visual Studio Gallery, particularly to your extension’s home page, and then click Edit (see Figure 19.46). At this point, you are redirected to the extension’s details that you can change, but what you actually want to do is upload a different VSIX package. So, click the Change hyperlink near the Upload item. Notice that if you proceed, you will lose any edits to the Basic Information group, except for the detailed description. Repeat the steps learned in the previous subsection to upload the new version of the VSIX package and, when ready, notice how version 1.1 appears as the current one (see Figure 19.50).
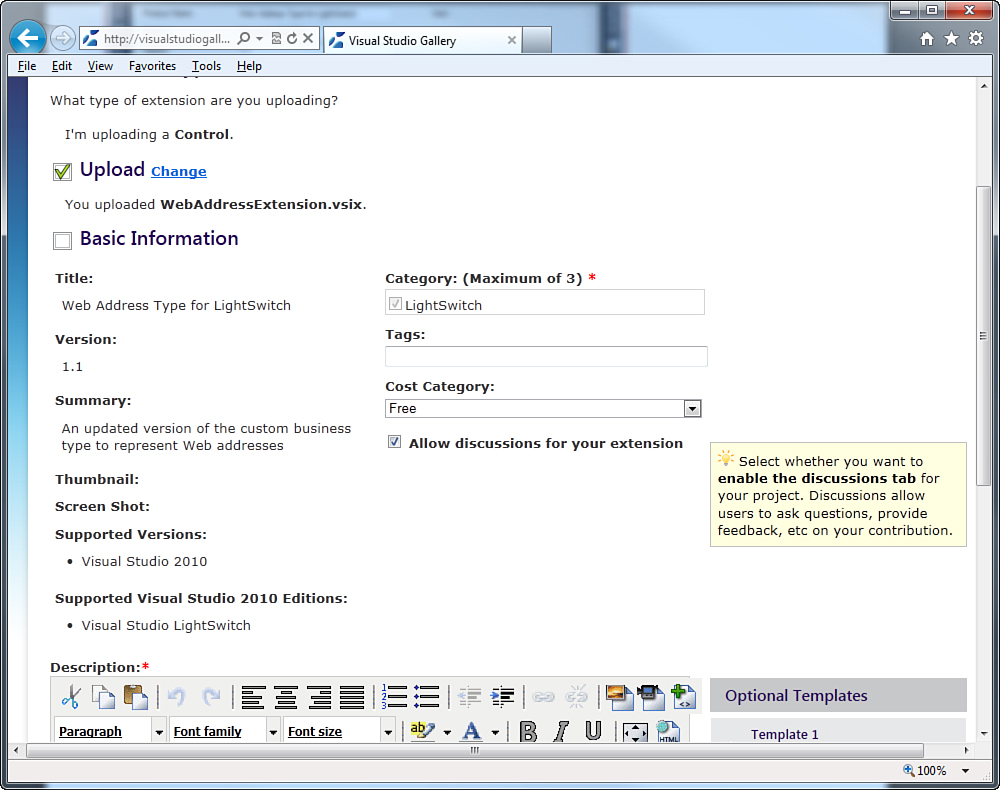
Figure 19.50. Updating the extension.
To finalize the update process, click Create Contribution again, and then click Publish on the extension’s home page. When Visual Studio LightSwitch (or Visual Studio 2010) is launched, the Extension Manager automatically notifies users about the availability of the new version.
Summary
This chapter completed the overview of extensibility points in LightSwitch by explaining how to extend applications and the LightSwitch environment with custom business types and custom data sources. You reused lots of concepts from Chapter 18, and you saw how both business types and data sources can solve specific business requirements that are not supported out of the box.
The journey has come to an end. You now have a deep knowledge of Visual Studio LightSwitch 2011 and of how you can get the most out of both the development environment and the generated applications. You are now ready to build the next generation of business applications for the desktop, the Web, and the cloud.