Chapter 10. Deploying LightSwitch Applications
In This Chapter
• Preparing the Application for Deployment
• Deploying 2-Tier Applications
• Deploying 3-Tier Applications
Building applications with Visual Studio LightSwitch is fun, but the moment arrives in which you complete your work and you have to deliver the application to customers or to your company. This moment is called deployment. LightSwitch offers a fully featured and easy-to-use deployment environment that perfectly fits in today’s scenarios for several reasons. First, you can target all the most common platforms for today’s business applications with one click; this means that you choose to deploy applications to a local computer, to a web server, and to Windows Azure with a single click. Second, you can take advantage of a guided procedure that unifies most of the required tasks, so that what actually changes in deploying to different hosting platforms is only connection information and the way you specify the application’s administrator. In addition, you do not need to manually configure the hosting Internet Information Services (IIS) server; LightSwitch does the entire job for you. (Later in the chapter, you see that you are required to configure the web server, but not IIS.) Finally, with particular regard for desktop clients, LightSwitch generates professional setup packages with an essential user interface that makes it easier to install and update applications, even for inexperienced users. This chapter provides a full understanding of the deployment mechanisms available in LightSwitch, covering all the supported scenarios and application types.
Deployment Fundamentals
The general goal of Visual Studio LightSwitch is to make application development easier (including their deployment). With LightSwitch, as you have already learned, you essentially build Silverlight-based applications, but these can be of different types (2-tier desktop, 3-tier desktop, 3-tier browser), so you should understand the mechanism of deploying both out-of-browser and in-browser applications. Fortunately, this is not actually required, because LightSwitch provides a unified deployment mechanism that requires you to set just a few options and a number of steps that are common to all application types.
One-click deployment, first introduced in Visual Studio 2005 with particular regard to client applications, has been dramatically improved and extended to web applications in Visual Studio 2010. From the one-click deployment perspective, the developer just follows a simple wizard through guided steps and clicks the Next button to progress through the wizard. The end user can install applications with a few mouse clicks and with minimal interaction. This experience has been brought to LightSwitch, too. From a technical point of view, one-click deployment in LightSwitch is distinguished as follows:
• 2-tier desktop clients: Applications are packaged and deployed via the ClickOnce technology. This not only includes the user interface (the Silverlight client), but also the data services; both run on the end-user machine.
• 3-tier desktop and browser clients: Applications are packaged and deployed to the web server via the Web Deploy tool.
The huge benefit of LightSwitch is that, regardless of the type of application, you follow the same steps to create the setup package. LightSwitch is responsible just for the appropriate tools according to the selected options. In addition, as you discovered in Chapter 2, “Exploring the IDE,” switching between n-tier modes requires just one mouse click. Note that Internet Information Services and a Windows Azure subscription are required to test samples in this chapter related to 3-tier applications.
ClickOnce was first introduced back in Visual Studio 2005 and provides a free deployment mechanism that is still included in Visual Studio today, including the Express editions. Different from other deployment technologies, such as Windows Installer, ClickOnce makes it easy to deploy smart clients.
ClickOnce dramatically simplifies the way developers can release application updates and the way end users install (by following a few guided steps) applications on their machines. Moreover, ClickOnce is not managed by the operating system (as Windows Installer is). It is managed by the .NET Framework, which means that applications deployed via ClickOnce are installed to a sandboxed cache that can leverage the security mechanisms from the .NET Framework, including the fact that users who are not administrators can install .NET applications under their user profile.
ClickOnce has some limitations, too, such as limited access to the target system. For instance, ClickOnce can neither access the Windows Registry nor install assemblies to the Global Assembly Cache. The reason is that ClickOnce’s context is specific to applications that will be frequently updated and whose system requirements typically rely on the .NET Framework resources.
Because ClickOnce is not new in the .NET Framework, it is not discussed further in this chapter. If you need more information about this technology, check out the appropriate MSDN documentation: http://msdn.microsoft.com/en-us/library/t71a733d(v=VS.100).aspx. This chapter instead provides more information about the Web Deploy tool, which is new and which requires some more steps to configure web servers.
Understanding 2-Tier and 3-Tier Applications
Visual Studio LightSwitch generates business applications whose architecture is of type n-tier for better maintainability, better communications, and better data processing. In particular, LightSwitch applications can be of type 2-tier or 3-tier. If you are not familiar with n-tier architectures, a 2-tier is a typical client/server application where the user interface and business logic runs on the client machine and the data is stored on the server. The 3-tier architecture is again a client/server scenario, but there is an intermediate layer known as middle tier. The user interface runs on the client, the data is stored on the server, and the data-processing logic runs in the middle tier, which is interposed between the client and the server and is responsible for (other than processing data) handling communications between the user interface and the data.
For at least the following reasons, best practice is to use a middle tier when you have a large number of clients:
• Better scalability
• Support for multiple client operating systems
• Ease of update deployment
You should consider 2-tier architectures for a small number of users or if you do not need the application services to be independent from the operating system.
Although in the development environment you are asked to answer just two questions (what type of client you want to deploy and where the hosted services will be published), it can be useful to understand how LightSwitch takes advantage of n-tier architectures. Basically, it generates business applications that can run (and can be deployed) in three different modes:
• 2-tier desktop client
• 3-tier desktop client
• 3-tier browser client
The 2-tier desktop client mode produces a rich desktop application in which the user interface can access the local file system and storage and can communicate with other applications on the Windows desktop. The user interface runs on the end user’s Windows operating system, while the data is stored on the same machine or on a computer available on the network, via an instance of the SQL Server engine. This can include a client machine visible in the network, as well. The data-processing logic runs on the client side. When you deploy applications as 2-tier clients, Visual Studio LightSwitch generates a ClickOnce installation package, which is made of a Setup.exe bootstrapper, the application and deployment manifests, and the application’s files folder.
The 3-tier desktop client mode produces a rich desktop application in which the user interface can access the local file system and storage and can communicate with other applications on the Windows desktop. While the user interface runs on the end user’s Windows operating system, however, a middle tier based on Microsoft IIS is responsible for processing data and for communications between the user interface and the data. The database is stored on a server that can be the same server that runs IIS (but they can also be two completely different servers) and is available via SQL Server. Under the hood, IIS hosts the WCF RIA Services that propagate data from SQL Server through the network and that actually process data with queries and CRUD (create, read, update, delete) operations. The 3-tier browser client works similarly to the 3-tier desktop one, but it differs in that the user interface runs inside the end user’s web browser, such as Microsoft Internet Explorer or Mozilla Firefox (or any other web browser that supports Microsoft Silverlight 4). Because Silverlight is also a cross-platform plug-in, a web application can also run on operating systems other than Windows (such as Mac OS), but it cannot access the local client storage or other applications via COM interoperability.
In real-world enterprise scenarios, you will have a large number of users, so a 3-tier architecture is optimal for better scalability. Your data is stored in SQL Server and eventually the IIS infrastructure on a server running a dedicated version of the Windows operating system (such as Windows Server 2003, 2008, or 2008 R2) or is hosted in the cloud via SQL Azure databases and Windows Azure as the operating system. The LightSwitch client application runs on one or more clients hosting client versions of the Windows operating system (such as Windows 7, Vista, or XP with Service Pack 3 or higher). With regard to Windows Azure, this is discussed near the end of this chapter. For now, though, you can think of Azure as an alternative off-premise hosting option in the cloud-computing platforms from Microsoft.
In addition, because you can install Microsoft SQL Server on a home desktop machine running a client operating system, you can build and run LightSwitch applications on single-user, desktop machines, as well.
IIS on Client Operating Systems
Internet Information Services is available on some client operating systems, but using IIS for a single user is not recommended and so this scenario is not discussed (and is highly discouraged).
In summary, you choose
• A 2-tier deployment for single-user environments or those with a small number of users. This is also appropriate for applications that do not have remote access (in-office applications) and that run only on a Windows operating system.
• A 3-tier deployment if you have a large number of users and you need better scalability, or if the application is going to be used in a distributed environment such as a corporate intranet. You will choose the 3-tier web deployment if the application is going to target operating systems other than Windows.
When you deploy 3-tier applications, there are some important differences as compared to 2-tier clients. The first difference is that you use IIS as the application server required to handle communication services. The second difference is a consequence of the first one and requires applications to be deployed in a way that is acceptable by IIS. Starting from Visual Studio 2010, Microsoft introduced a new tool that simplifies deploying IIS-based applications: the Web Deployment tool or MSDeploy (from the name of the MSDeploy.exe command-line tool).
MSDeploy is specifically dedicated to web application deployment and simplifies the way developers publish their programs to web servers. In fact, with MSDeploy, the developer can choose one of the following options:
• Package the web application into a single zip archive that must be later imported manually into IIS
• Publish the web application directly to the web server
The first choice is preferred when the developer is not an administrator of the web server, so a package can be passed to an administrator that can manually configure some application settings (including moving the application to a different application pool). The second choice is appropriate if the developer has access to the web server, so no additional configurations have to be done manually. (Of course, a system administrator can still change configuration settings later.) It is important to emphasize that the second choice is possible because MSDeploy turns on a new service that listens to a specific port (8172 by default) within IIS and can receive requests from Visual Studio LightSwitch; this allows the IDE to publish applications directly to IIS. Configuration of IIS is not always easy, and so MSDeploy creates a number of settings that are good enough for the developer to publish web applications to IIS successfully and without having to configure IIS manually.
MSDeploy is not just a developer tool that simplifies publishing web applications to IIS. Instead, it is a sophisticated tool for system administrators, who can both synchronize applications between web servers and move web applications to higher versions of IIS. MSDeploy is basically a command-line tool that can receive scripts for performing complex operations against IIS.
That said, this book is not intended for system administrators, so the only features required to know from the developer perspective are discussed in this chapter. As you work through this chapter, you will discover how MSDeploy dramatically simplifies the way you interact with IIS and that you do not need to understand how it works internally. After all, LightSwitch makes things easier, and this is why you do not need to know MSDeploy in detail.
What MSDeploy does is create a point of contact between the application server (IIS in this scenario) and the development environment so that the latter can easily point to the application server and publish both the application and data. MSDeploy is one of the LightSwitch server prerequisites; therefore, it is installed together with the environment and you do not need to install it manually on your development machine. You do not have to install it manually onto a web server, either, because the LightSwitch server prerequisite setup does it all for you.
Preparing the Application for Deployment
While developing your application, you generally focus on important aspects such as designing entities, creating screens, binding data to custom user controls, debugging, and so on. When you do need to deploy your application to other users, there are some other interesting aspects to consider, such as the application version, icon, and other properties that make the application more easily discoverable on the target system and more appealing visually. In LightSwitch, you customize the application properties in the Application Designer, which you have already used in this book. In Solution Explorer, double-click Properties to open the Application Designer, and then focus on the General Properties tab in the designer, as shown in Figure 10.1.
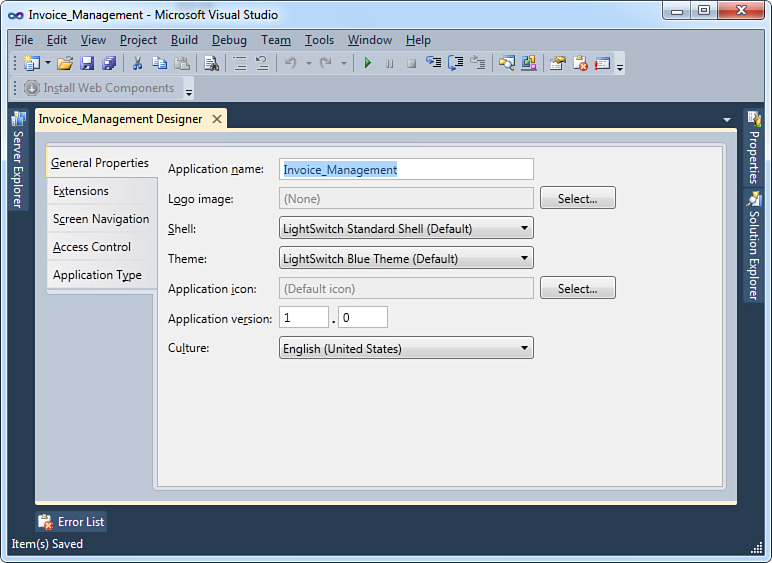
Figure 10.1. The General Properties tab in the Application Designer.
Here is where you customize information about your application, such as the name, logo, themes, version, and supported language. Table 10.1 summarizes all the available options and describes them based on area of interest, instead of following the order in the Application Designer.
Table 10.1. General Properties
Note that some information, such as application name, the application icon, and the logo image, is also visible at debugging time. In the following subsections, you learn how to customize these settings to enhance the user experience.
Specifying the Application Name and Logo
When you create a new project, LightSwitch provides a default name and a standard icon for the application. Both the application name and the icon will appear in the Windows Start menu for desktop applications, while only the application name will appear in the web browser’s page title for web applications. Because LightSwitch-provided values are not generally user friendly, you should replace them with more appropriate values to enable users to quickly recognize your applications on their machines.
So, you want to provide cool icons and logo images and a name that describes the application.
The Invoice Management application that you have created so far is a good starting point to understand how to customize application settings. LightSwitch supplied a default application name (Invoice_Management) that is too generic and is not helpful to see within the Windows Start menu or in the web browser’s title bar. Also by default, a standard icon is provided, but this does not represent what the application actually does. So, you need to replace some default information with custom information that enables the user to immediately recognize the application’s goals.
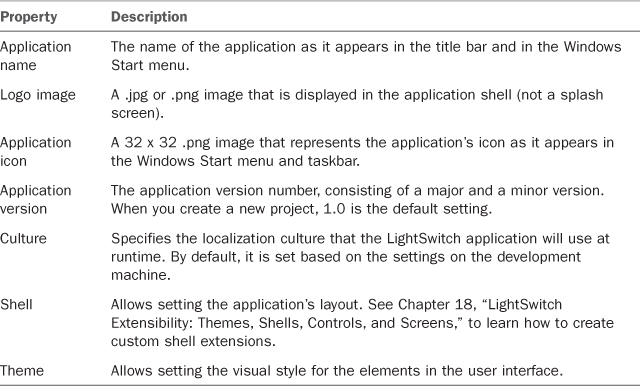
First, you want to supply a more appropriate name for the application. So in the Application Name box, replace Invoice_Management with a descriptive text. (On the development machine used for this book, the name has been replaced with Del Sole Invoice Management.) When you run the application, the new name is visible on the title bar and on the Windows taskbar, as shown in Figure 10.2.
Figure 10.2. The new application’s name is visible on the title bar and the Windows taskbar.
Second, you specify the logo image. As stated in Table 10.1, this must be an image of type .jpg or .png; no limitations are established for its size. The logo image is shown in the shell of the application, but only with custom shells, as you see in Chapter 18. This is intended to explain how to enable a logo image. So, this is not available with the default shell. To specify a logo image, click the Select button near the Logo Image box. When the Select Image dialog appears, click Import, and then select the image you want to add as the application’s logo. Once selected, the image is listed in the dialog, and a preview is also shown (see Figure 10.3).
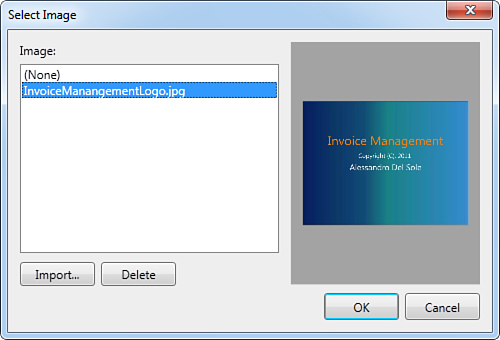
Figure 10.3. Selecting a logo image.
When you click OK, the image is imported and stored in the application’s resources, meaning that it will be compiled into the application metadata. When you run the application, the logo image is visible in the custom shell.
Next, you set the application icon. Click the Select button in the Application Designer near the Application Icon box. The application icon must be a 32 x 32-pixel, .png image file. When you click Select, the Select Image dialog appears. This dialog looks familiar, because you saw it in action when adding a logo image. The difference now is that the dialog accepts only images in the specified format, but it still shows a preview of the image when selected. Figure 10.4 shows what the dialog looks like with a sample icon that has been prepared for the current application.
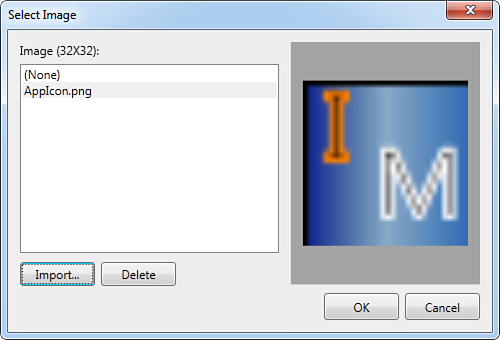
Figure 10.4. Specifying an icon for the application.
If you run the application, you can see how the new icon appears on both the title bar and the Windows taskbar, as shown in Figure 10.5.
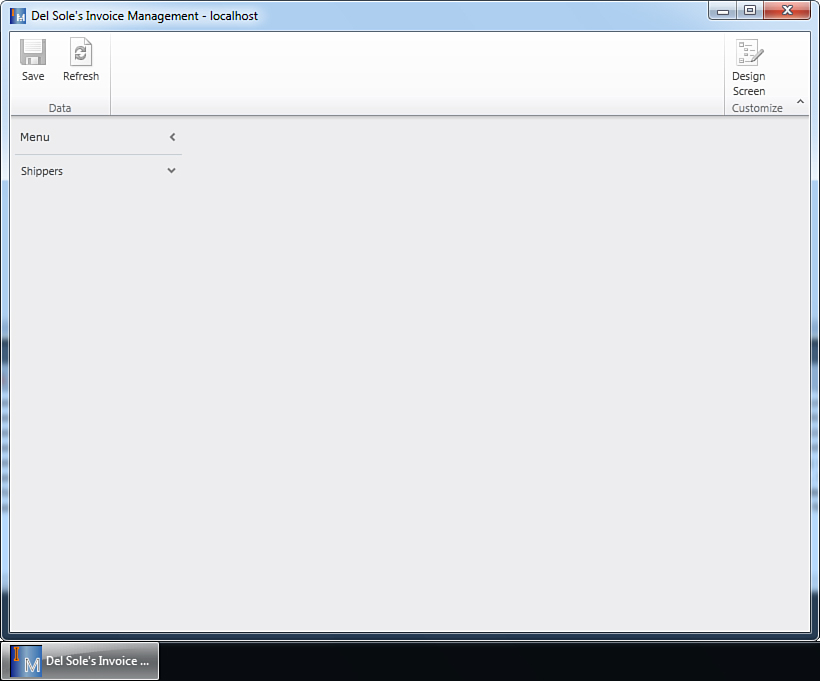
Figure 10.5. The new application icon is visible on the title bar and on the Windows taskbar.
Like the logo image, the icon is embedded in the application’s metadata and will identify the application (after it has been deployed) within the Windows Start menu and in your web browser.
Styling the Application
Several times in this book already, you have read that LightSwitch applications are nothing but Silverlight 4 clients. Among other reasons, this is important because the application shell and user interface elements can be styled with different themes without losing the original control’s behavior, which means you can supply the UI with a completely different (and possibly more appealing) look. From a pure Silverlight perspective, the appearance of visual elements relies on styles and control templates. Both concepts will be familiar if you have some experience with this technology.
Behind the scenes, LightSwitch enables you to add new extensions that expose reusable styles and themes to your applications. In LightSwitch, you have two options for changing the aesthetic layout of the application:
• Shell extensions, which apply to the application’s layout and changes the appearance of the application shell
• Themes, which affects the appearance of visual elements in the user interface
In both cases, you can use the Extension Manager tool to download extensions made by other developers (see Chapter 7, “Customizing Applications with Buttons, COM Automation, and Extensions”). If you want to develop your own extensions and themes, you need to understand some concepts about extensibility in LightSwitch. This particular topic is covered in Chapter 18. Assuming you used Extension Manager and downloaded some existing shell extension and themes, now it is time to focus on how to apply these kinds of extensions to the current application. When you install extensions to LightSwitch, these are available in the Shell and Theme combo boxes in the Application Designer, as shown in Figure 10.6.
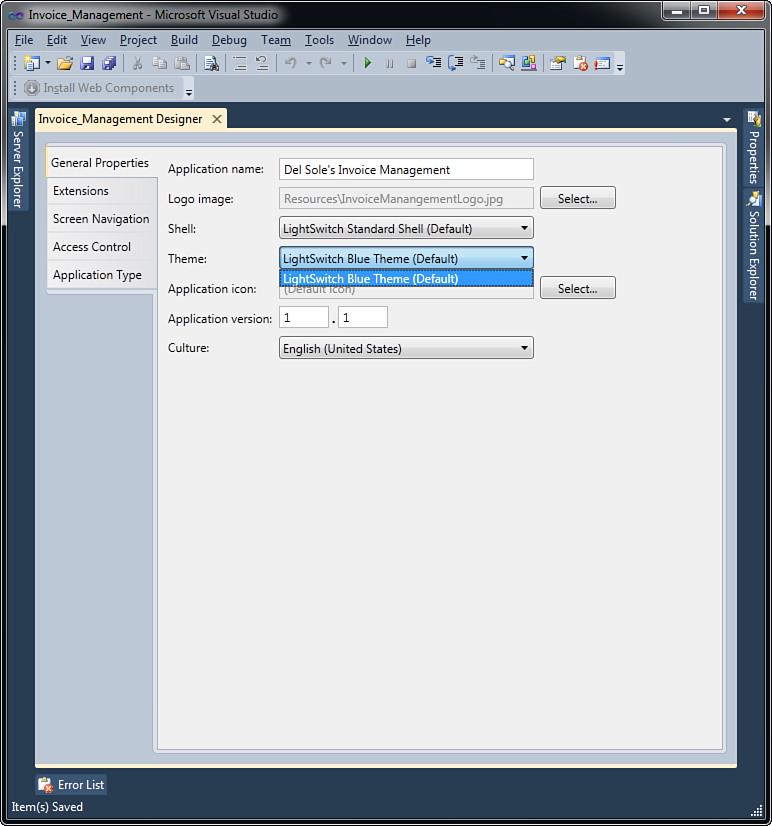
Figure 10.6. Selecting shell extensions and themes for the application.
When you run the application, you can see how it appears with a completely different look, as shown in Figure 10.7.
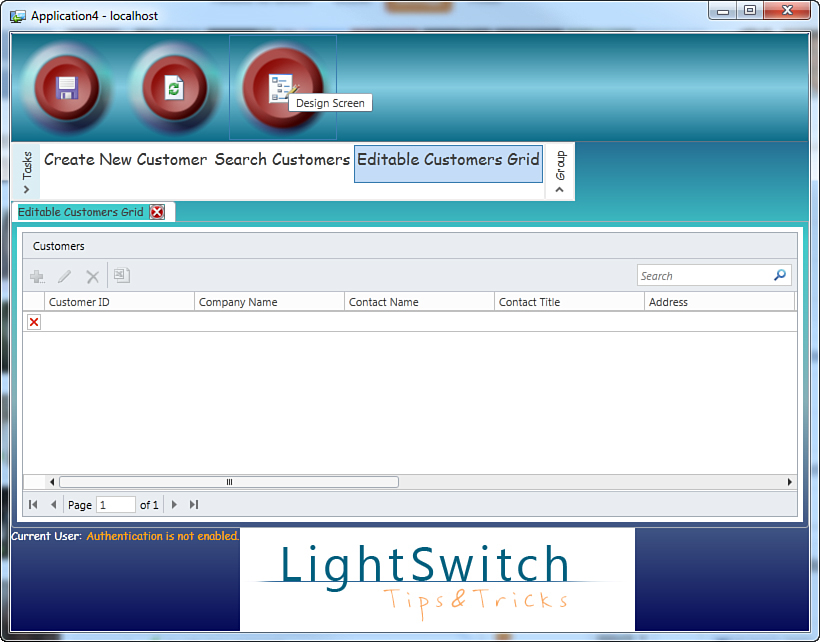
Figure 10.7. Applying shell extensions and themes to the application.
As you can see, by editing the shell and theme, you can get a completely different layout, which can enhance the user interface appearance and make your application more appealing to your customers or colleagues.
Runtime Settings
Every application has a version number that describes the state of releases. When you create a new project in LightSwitch, by default the version number assigned to the compiled application is 1.0. As you release new updates for your application, you can replace the version number by changing values in the Application Version setting, which offers two text boxes, one for the major number and one for the minor (see Figure 10.8). It is important to note that the version number does not affect automatic updates; this means that every time you publish the application again, the .NET Framework can update previous versions, even if you do not change the version number. The reason for this is that the publishing system uses its own versioning mechanism that is independent from the application’s version. You will usually change the version number when you make major changes to your application and want to release a new version. If you just make some minor changes (such as bug fixes), you can leave this number unchanged; when you publish the application again, clients can receive updates. This concept is not new to you if you have experience deploying .NET applications with ClickOnce, but it is important to understand if you are using Visual Studio (including LightSwitch) and .NET for the first time.
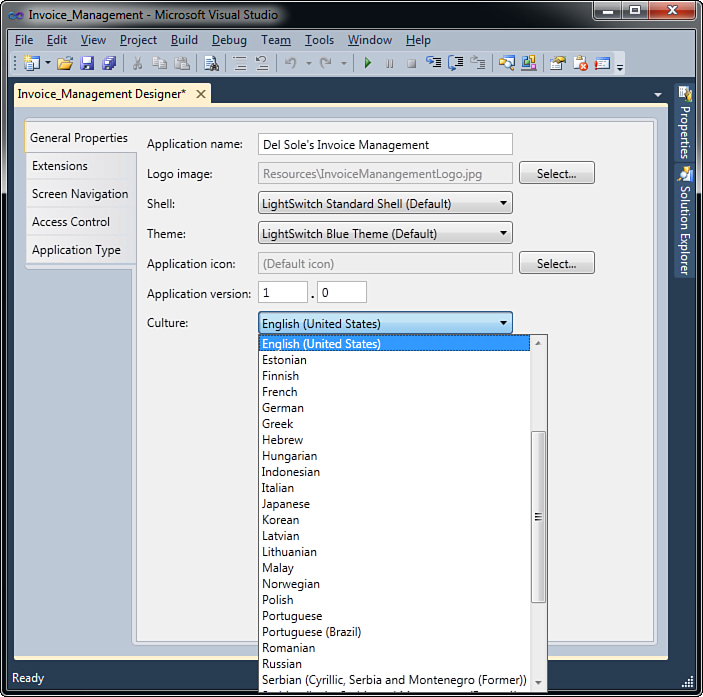
Figure 10.8. Choosing a different culture.
Localizing an Application
Localization is the process of translating parts of applications into different languages, including symbols that are typical of a specific culture, such as currency symbol, punctuation symbols, date formatting, and so on. Localization includes translating common parts of the user interface, such as text inside buttons, tooltips, error messages, and so on. By default, LightSwitch assigns a culture that is based on the Windows regional settings of the development machine, but you can replace such a setting with a culture that better fits your end-user requirements. Note that this affects only symbols for the current regional settings; the user interface is not translated. To accomplish both user interface translation and setting the appropriate culture symbols, you choose one of the available cultures from the Culture combo box. For example, if your company is based in Italy, the Culture setting should be Italian. Figure 10.9 shows how to pick a different culture.
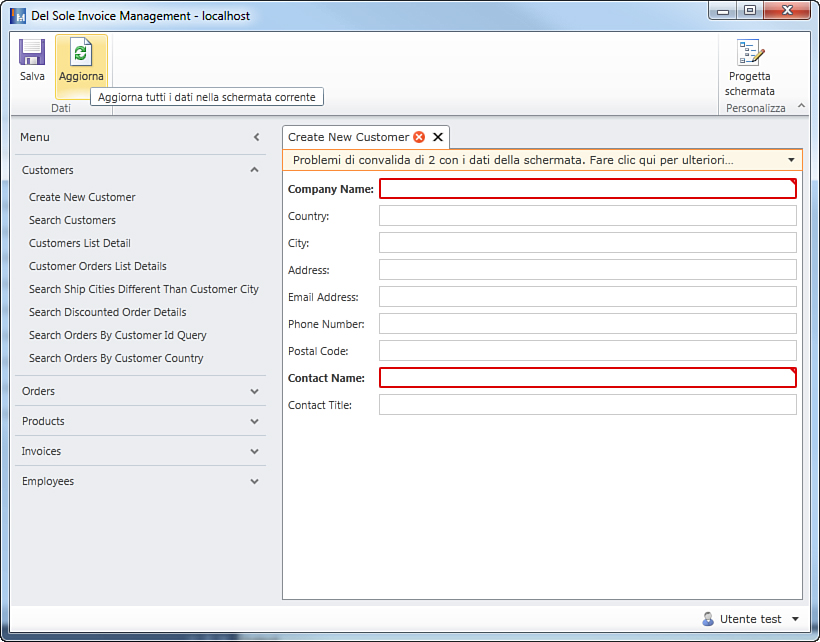
Figure 10.9. Automatic localization in the user interface.
If you run the application after setting a different culture and language, you will see how common parts of the user interface have been correctly translated. Figure 10.9 shows how text for buttons, validation errors, and tooltips has been translated into Italian. In addition, LightSwitch translates text for other error messages, warnings, and dialog boxes.
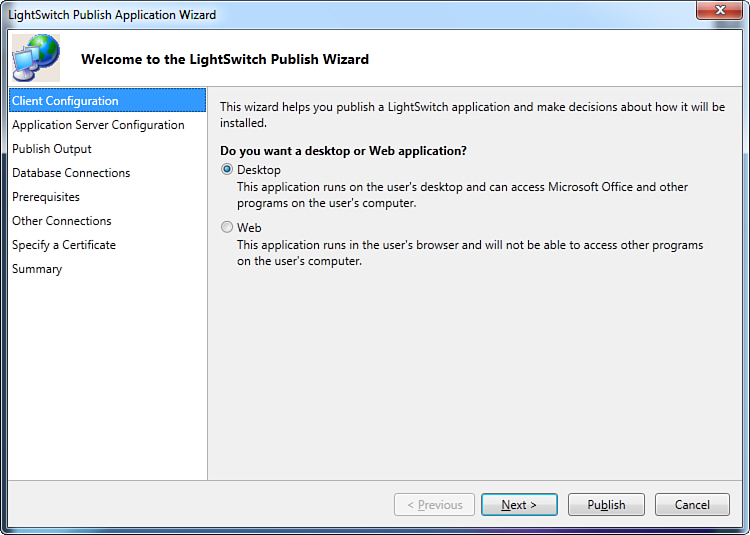
Figure 10.10. Selecting the deployment typology.
Obviously, LightSwitch cannot translate everything. For instance, it cannot translate screen names or parts of the user interface built upon the name of entities or queries. These are the only parts of the user interface that you need to translate manually. So, localization in LightSwitch is an easy process because it requires just one click. Now all the application properties have been set and you are ready to deploy the application.
Version 1.0 of LightSwitch supports only one localization per release. In other words, you cannot add multiple localizations within a single application package. If you need to translate the user interface for your applications into multiple languages, you must create as many packages as languages that you need.
Deploying 2-Tier Applications
All 2-tier desktop clients need services used for communications to be included in .NET libraries available in the same location of the application, because they do not rely on an application server such as IIS. This is important because it affects how the application is packaged for deployment. So, when you are preparing a 2-tier application for deployment, LightSwitch puts together all the application files (including configuration files) and service libraries into one folder; then it creates a Setup.exe bootstrapper that is responsible for installing the application onto target machines. This particular kind of deployment can be compared to publishing applications to the file system via ClickOnce in other editions of Visual Studio and is particularly useful if you plan (or need) to deploy your applications to systems that do not run IIS or when your package must be handled by other people. Basically, deploying 2-tier desktop clients is the simplest kind of deployment because it does not require configuring any server. In fact, you follow a common process with all kinds of deployments to publish your application and make it available to others. Remember that a 2-tier deployment still needs to specify a machine where the database resides; this can be the same machine of the application, another client machine in the network (if it is a small application), or an external server.
Lightswitch: A Unified Approach to Deployment
One of the biggest benefits of LightSwitch is that the environment offers unified approaches for solving different types of problems. For example, back in Chapter 8, “Aggregating Data from Different Data Sources,” you saw how LightSwitch offers a unified model to access data, no matter what the underlying data source is. With regard to deployment, the philosophy is similar: LightSwitch offers a unified set of steps to deploy applications, no matter what the target is (2-tier or 3-tier, desktop or web). What actually changes between 2-tier and 3-tier applications is some information related to the IIS configuration, but the good news is that you use the same wizard and the same tools. This makes deploying applications really simple.
Let’s now deploy the Invoice Management application as a 2-tier desktop client so that you can see how deployment actually works. Whatever type of application you deploy, you select Publish from the Build menu. Doing so launches the LightSwitch Publish Application Wizard, which you read about briefly in Chapter 9, “Implementing Authentication and Authorization.” The following sections explain each step in the wizard.
Client Configuration
The first step in the wizard (Client Configuration) asks you to specify what kind of application you want to deploy, desktop or web (see Figure 10.10). Note that 2-tier applications can be deployed only as desktop; if you chose web, all the options specific to 2-tier deployment are disabled. Also note that selecting between desktop and web is an option available for both 2-tier and 3-tier applications and that you can change the architecture that was possibly chosen in the Application Designer; you learn later how to manage these scenarios. For now, select Desktop and click Next.
Application Server Configuration
The second step of the wizard (Application Server Configuration) requires you to specify how the application services need to be hosted. As stated before, in 2-tier client services run on the local machine, so you need to select Local, as shown in Figure 10.11.
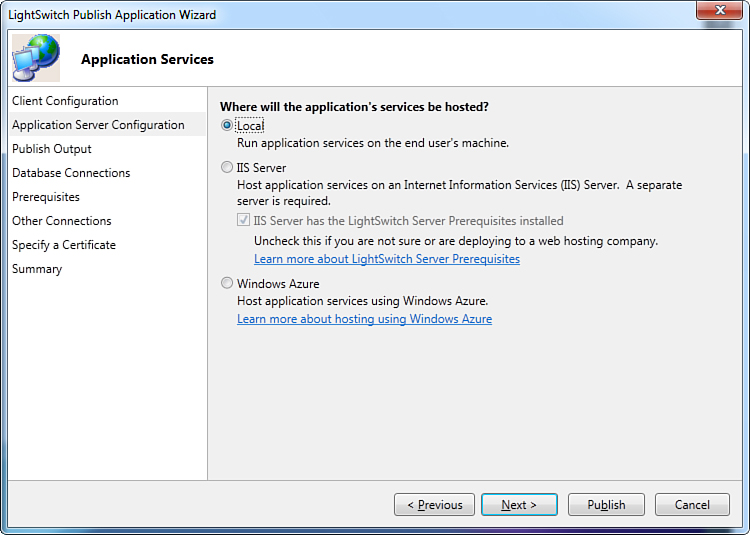
Figure 10.11. In 2-tier application services run on the local machine.
As you can see, the Application Server Configuration screen is where you specify how the application services are hosted, and this is also where you can tell LightSwitch to deploy the application to the desktop, the web (IIS server), and the cloud (Windows Azure).
Publish Output
By clicking Next, you move to the Publish Output screen, which is shown in Figure 10.12. At this particular point, you specify a folder that will contain the generated package. By default, LightSwitch proposes a folder named Publish, which is contained within the project’s folder, but you can choose a different location. For the sake of simplicity, leave the default suggestion unchanged.
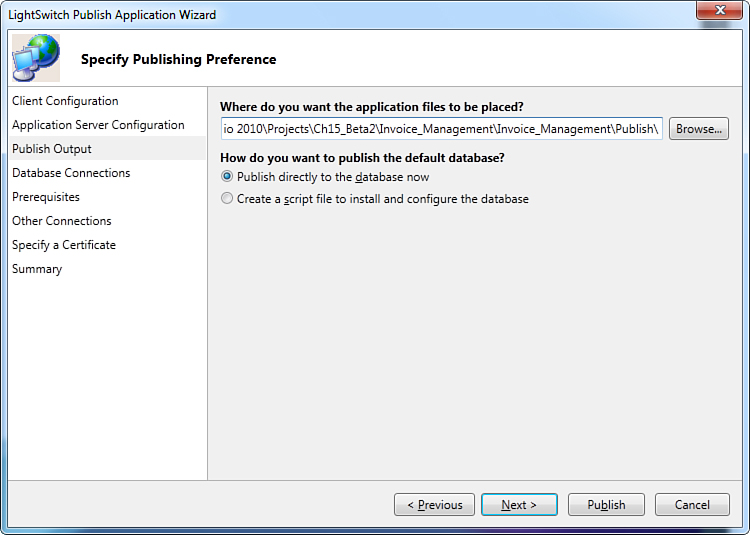
Figure 10.12. Publish settings.
Shared Network Paths as the Publish Output
Instead of a folder on your system, you can choose to publish your application to a shared network path on a file server. If you work within a corporate intranet, this provides a huge advantage: End users install the application from the same, common location. So, when you release application updates, they are available from the same location; therefore, end users just need to run the application and wait for it to be updated.
You also have to specify how you want the database to be deployed. The two available options are as follows:
• Publish Directly the Database Now: If you select this option, LightSwitch automatically generates a new SQL Server database for the application onto the target machine. The target SQL Server instance is the one specified in the connection string, which you can edit in the next screen. Using this option implies that you have permissions to access the target SQL Server instance and is appropriate when your setup package will not be handled by people other than you; for instance, this can be the optimal choice when testing deployments on the development machine.
• Create a Script File to Install and Configure the Database: If you select this option, LightSwitch generates a new .sql script file that contains all the necessary Transact-SQL instructions required to create and attach the application database to an instance of SQL Server. You then need SQL Server Management Studio or Visual Studio (including LightSwitch) to run the .sql script and generate the database. This option is particularly useful if the application package will be handled by other people and if you cannot predict what server and what instance of SQL Server will host the database.
For the sake of completeness, this chapter explains the use of both options, but as the first choice leave unchanged the default selection, which automatically publishes the database for you, and then click Next.
Database Connections
The next screen is called Database Connections, and you can use it to specify the connection string for both the application administrator and the end user. The connection string is used by the application to read and write data from the database and consists of the following information:
• Data Source: This contains the name of the instance of the SQL Server that hosts the database.
• Initial Catalog: This contains the database name.
• Integrated Security: This contains a True or False value and establishes if the application connects to the database with Windows authentication (True) or with SQL authentication (False). If you use integrated security, you do not specify a username and password.
• User Name: As the name implies, this represents the username in the SQL credentials used to connect to the database and is set only when integrated security is set to False.
• Password: Like the username, this is set only when integrated security is set to False and represents the password for the SQL credentials used to connect to the database.
Generally, you need to edit the connection string if you plan to use SQL authentication to access the database or if you need to ensure that the database name does not contain invalid characters. Figure 10.13 shows this screen.

Figure 10.13. Specifying the database connection string for the administrator and the end user.
Supported SQL Server Versions for Deployment
Remember that whichever deployment you choose (2-tier or 3-tier), LightSwitch 2011 can deploy to SQL Server 2005, 2008, and 2008 R2.
From this screen, you can also create new SQL logins by clicking the Create Database Login button, which accepts a username and a password for the new login. This is important when using SQL authentication because by creating a new standard login you ensure that at runtime, the end user has permissions to read and write data correctly. Assuming that users will access the database via their Windows credentials, you can proceed by clicking Next. Of course, you can later use SQL Server Management Studio to manage database security and logins. Going ahead, you access the Authentication screen, which you already saw in Chapter 9 (see Figure 10.14).
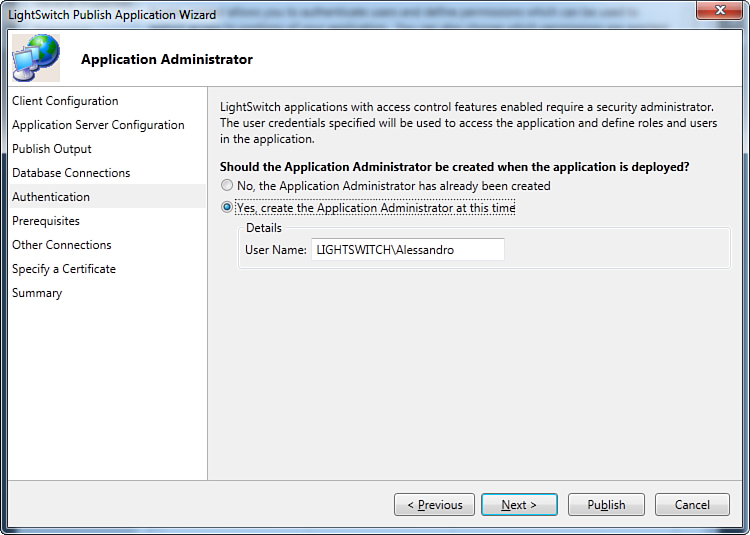
Figure 10.14. Specifying credentials for the application administrator.
If it is the first time that you deploy your application, you need to select the Yes, Create the Application Administrator at This Time option and enter the administrator’s username in the form of DOMAINNAMEUserName (as shown in Figure 10.15). This option has to be set only the first time that you deploy your application. So if you are publishing an update, select No, the Application Administrator Has Already Been Created. Take a look back at Chapter 9 if you need a reminder about these settings.
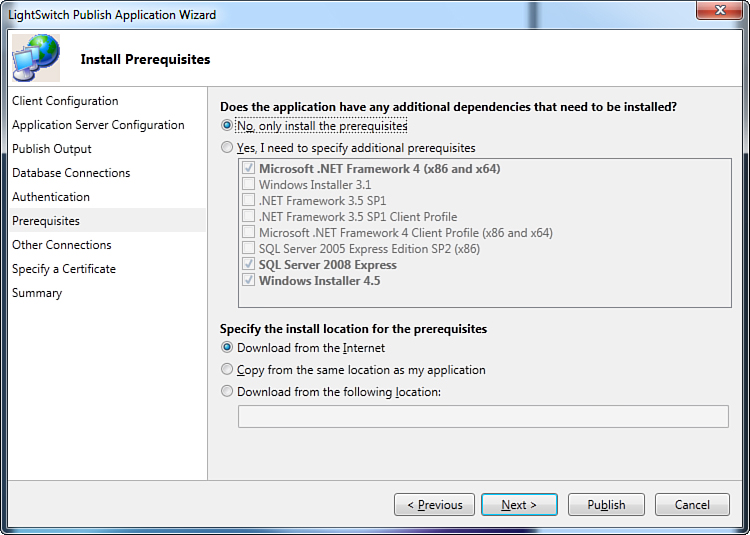
Figure 10.15. The Prerequisites screen.
Prerequisites
When you click Next, the Prerequisites screen displays (see Figure 10.15).
In the Prerequisites screen, you can specify all runtime components that are required by your application and that will be installed before the application itself. The screen is divided into two groups. In the first group, you can specify which prerequisites should be installed together with your application; particularly, it asks whether you need additional prerequisites other than the default ones. By default, when you deploy a LightSwitch application, the IDE ensures that the deployment package includes either locally or via a reference both the .NET Framework 4 full and Windows Installer 3.1. This is actually what happens when you leave selected the default option, which is No, Only Install the Prerequisites. Generally, the default selection satisfies all requirements because typically your LightSwitch application will reach an instance of SQL Server that is located on a server and not on the target machine. By the way, you will sometimes want to ensure that additional prerequisites are installed on the end user’s machine. To accomplish this, select the Yes, I Need to Specify Additional Prerequisites option. This can be useful not only to add an instance of SQL Server Express but also if you have included in your application custom user controls or WCF RIA Services that require external libraries that rely on the .NET Framework 3.5 SP 1 or that require Windows Installer 4.5. Figure 10.16 shows what the Prerequisites screen looks like when you select the second option and when you specify prerequisites different from the default ones.
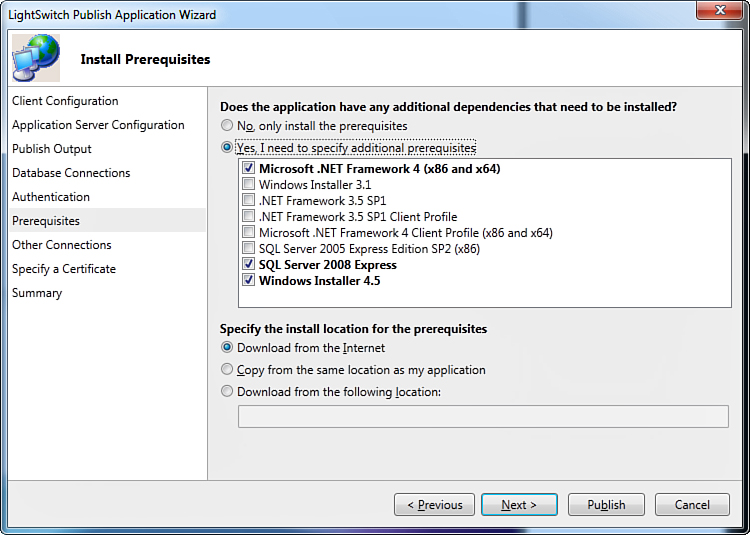
Figure 10.16. Selecting additional prerequisites.
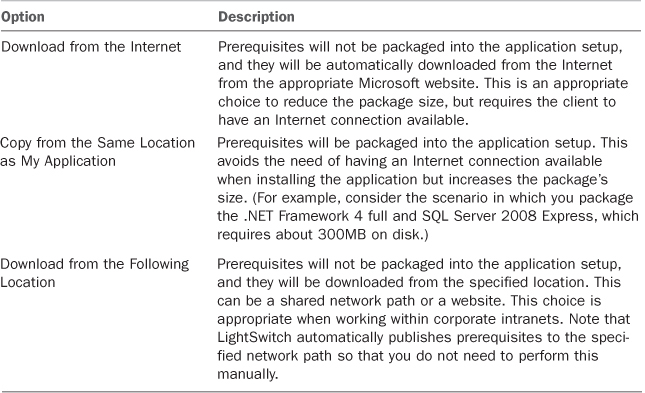
Assuming that you will deploy the sample application to a computer where SQL Server is already installed, leave unchanged the default selection so that only the default prerequisites are installed together with the application. In the second group of the screen, you can specify the install location for the prerequisites (see Figure 10.16). Here you have three possible choices, as summarized in Table 10.2.
Table 10.2. Install Locations for Prerequisites
Leave unchanged the default selection (Download from the Internet) and continue.
Other Connections
The next screen is called Other Connections and is important because it summarizes all the data sources other than the intrinsic database that the application connects to and allows editing connection strings to such sources. You know that the version of the Invoice Management application used at this point is the one created in Chapter 8 and that connects to the Northwind database available on a local instance of SQL Server, to the InvoiceManagementEcosystem database available on an instance of SQL Azure, and to the EmployeesVacation list exposed from a SharePoint 2010 website. Figure 10.17 shows what the screen looks like at this point.
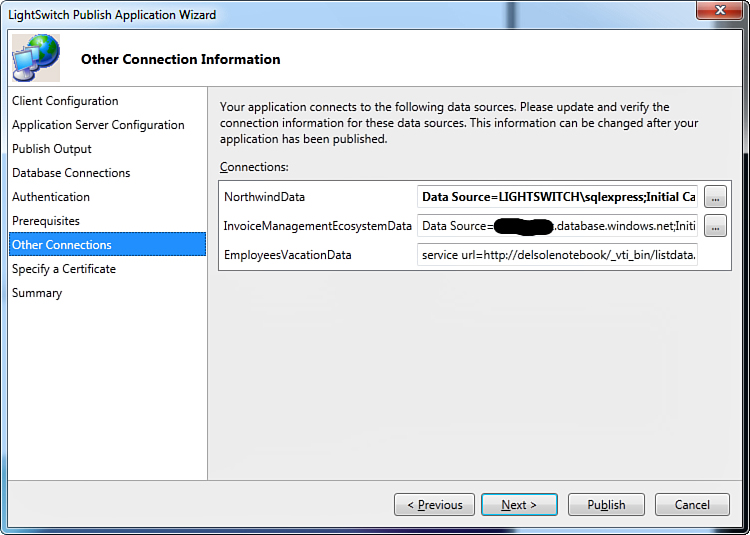
Figure 10.17. Editing connection strings to connect to external data sources.
Here you need to modify the connection strings proposed by LightSwitch to match production locations of your data sources.
You also have the opportunity to replace some settings in the connection string to accomplish needs that you discover at a later point. For example, you decide to use SQL authentication to access the Northwind database instead of the Windows authentication. You can edit the connection string and provide the SQL credentials. Note that setting up connections using SQL authentication is preferable because it is the easiest way: You just create a login user who has a username and a password. In contrast, Windows authentication requires some management operations, such as adding users to the database and setting permissions per user, which can be difficult sometimes. However, if you work in a Windows network domain, this can be an appropriate choice, so some tips are provided in the next section.
Windows Authentication: Administering Database Users
Development and Production Configurations
The information here explains how to configure database logins on the development machine and is appropriate to reproduce the examples in a test environment. In production, you need more appropriate database administration, especially if the application runs within a network domain. Usually, this is the job of the database administrator, who knows how to set up the best configuration possible. However, if you need to set up the production environment on your own, refer to the Microsoft SQL Server Books Online at http://msdn.microsoft.com/en-us/library/ms130214.aspx.
This section explains how to configure shared access to networked folders, which is necessary for testing the application. This is usually the job of the network administrator or server administrator, so ask this person for the best configuration possible within network domains.
As you saw previously, in the Publish Wizard you decide whether the application will connect to the database using Windows authentication or SQL authentication. Windows authentication is a little bit more complex because you must administer users in SQL Server Management Studio and users you enable depend on the application architecture (2-tier or 3-tier). If you deploy the application as a ClickOnce application (2-tier), you need to enable every single user (or groups). To understand how this is accomplished, open Microsoft SQL Server Management Studio Express. Now consider the Windows user accounts that you created in Chapter 9 to demonstrate permissions (sample names were Davolio, Fuller, and Leverling). Once connected to the SQL Server instance, follow these steps:
1. Expand the Security node, and then expand the Logins node.
2. Right-click Logins, and then select New Login. This is required to configure user accounts for connections to SQL Server.
3. When the Login Properties dialog appears you can either specify the full user name or click Search and type the username without the domain (and the tool will find the username for you when you click Check Names). Figure 10.18 shows how to add one of the required accounts. Click OK to return to the Login properties.
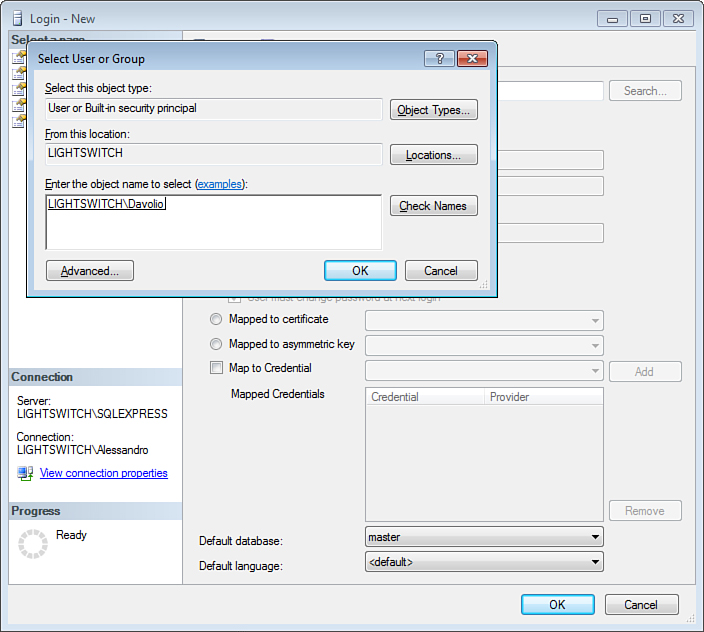
Figure 10.18. Choosing a user account in SQL Server logins.
4. Click User Mapping, and in the list of installed databases, select both the Invoice_Management and Northwind database (see Figure 10.19). At this point, you must grant permissions for the new user to access databases.
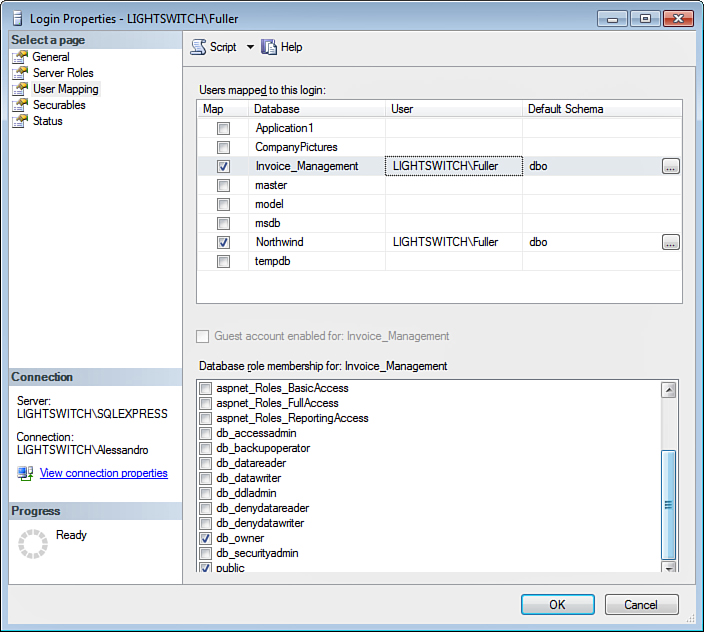
Figure 10.19. Specifying user mappings to databases.
5. Ensure that the db_owner and public database role membership are selected, and then click OK (see Figure 10.19).
Repeat the same steps for the remaining two users so that all users within the domain have permissions to access the databases. If you decide to deploy the application to a web server as a 3-tier deployment, you must configure the IIS application pool’s identity. This special identity impersonates a Windows user when the middle tier connects to the database, and so it must be configured like any other Windows user. Repeat the steps described before to add a new login. Once the Login dialog is running, you must specify the username in the following form: IIS APPPoolAppPoolName, where AppPoolName is the name of the application pool that your LightSwitch application is running under (and, by default, the default application pool for LightSwitch is ASP.NET 4.0). For now, focus on how you enable an application pool’s identity. Later, you learn in detail how to deploy to a web server. Figure 10.20 shows how to enter the default application pool’s identity for LightSwitch.
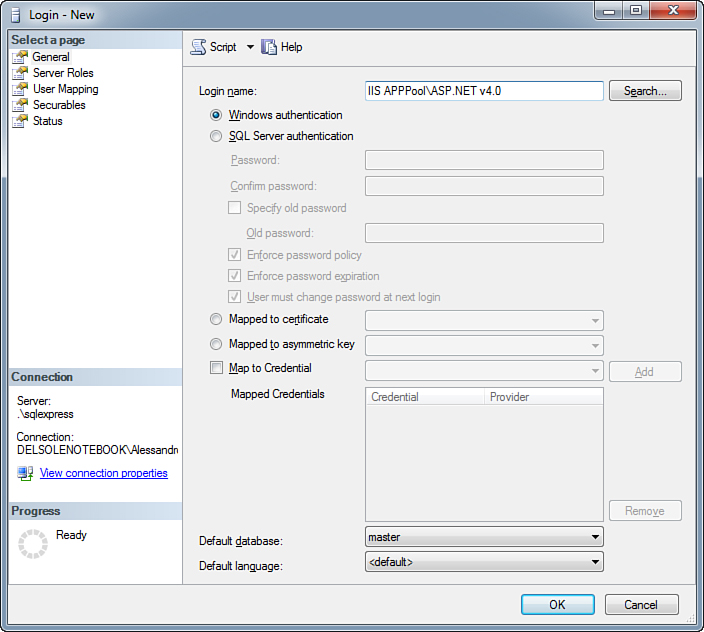
Figure 10.20. Configuring the IIS application pool’s identity.
After creating the new login, you specify user mappings exactly as you did previously for specific Windows users. After this brief discussion about Windows authentication in SQL Server, you can go back to the Publish Wizard in Visual Studio LightSwitch.
Specifying a Certificate
When you click Next, you access the Specify a Certificate screen. Here, you can sign the output .xap file (that is your application) with a digital signature issued by one of the recognized certification authorities. Before learning how to sign your application, however, it is important for you to understand some Silverlight security policies.
As you know, Silverlight (and therefore LightSwitch) applications can be both web clients (running inside the browser) and out-of-browser applications. Web clients always run in a sandboxed environment, and this prevents the application from accessing local resources. This makes sense because the browser should never trust applications that attempt to access resources on the local computer, because this could be potentially dangerous. In contrast, out-of-browser clients run with elevated permissions (known as full trust) and have the possibility of accessing local resources, which is new in Silverlight 4 and makes advanced development scenarios possible (such as interacting with Microsoft Office via COM interoperability). Because out-of-browser clients can run with elevated permissions, when they are deployed they need to reassure the user that they are authentic and trustable. In Silverlight, you accomplish this by signing the .xap package with a digital certificate. By doing so, you meet the following objectives:
• You make the application authentic, ensuring users of its source.
• You allow out-of-browser applications to receive automatic updates, which would be impossible if unsigned.
Out-of-Browser Applications at Debugging Time
Signing the .xap package applies only to deploying the application to other computers. When you debug the application on your development machine, it has the same permissions that it would have on a real client machine. Therefore, a 3-tier web client runs in a partial trust environment, whereas 3-tier and 2-tier desktop clients run in a full trust environment.
At this point, you might wonder why signing the .xap package in the LightSwitch Deployment Wizard is optional. It’s optional because
• 3-tier web clients always run as partial trust, even if they are signed. So, a certificate is not required, but you still need one if you want your application to run over SSL (which is recommended for applications available through the Internet or hosted on Windows Azure).
• 2-tier desktop clients are deployed via the ClickOnce manifest, which is not signed. By default, 2-tier clients run with full trust permissions because the ClickOnce manifest allows this. However, if you do not sign a ClickOnce package, the application shows a warning during install, and automatic updates are disabled.
Actually, the only situation in which you always need to sign a .xap file is with 3-tier desktop clients. In this scenario, you need a valid code-signing certificate because LightSwitch marks 3-tier desktop clients as out-of-browser applications requiring full trust. (These are not deployed via ClickOnce, and so full trust must be granted explicitly.) This will ensure that the application will be installed securely and upgrades will be correctly supported. You can still deploy a 3-tier desktop client without signing the .xap file and Silverlight will still allow the application install. In this particular case, the user receives the following warning message when attempting to install the application:
This application does not have a valid digital signature that verifies the publisher. You should only run software from publishers you trust.
At this point, the end user is responsible for deciding whether to install the application. This is not a best practice with unsigned applications because these could be potentially dangerous. Also, providing information about your identity as the publisher is much more professional. Finally, deploying an untrusted application disables automatic application updates (thus disabling one of the biggest benefits of the LightSwitch deployment mechanism).
Partial Trust and Full Trust Policies in Lightswitch
To make things easier, as a developer you do not need to manually set the trust policy for your application, because LightSwitch has a built-in policy that automatically gives full trust permissions to desktop applications and partial trust permissions to web applications. Full trust permission settings in desktop clients are specified in the OutOfBrowserSettings.xml file, which is located within the folder called .ClientGeneratedMy Project for Visual Basic or .ClientGeneratedProperties for C# (where the dot stands for the project’s folder). Of course, this is another file that you should never edit manually but that is useful to know.
Now that you know why you should sign your application, it is time to understand how to do so. As you learned earlier, it is not necessary to sign a 2-tier client. In the current example, however, a digital certificate is supplied so that the same steps that you learn here will apply to 3-tier applications. First, you must check the Specify a Certificate check box. Then you have to choose one of the following options:
• Select a certificate from your computer’s store. This is useful if you have already obtained and installed a valid digital certificate on your machine. You select a certificate from the computer’s store by clicking the Select a Certificate from This Computer’s Store button. If no valid certificate is found, LightSwitch shows an error message, and you must choose one of the other options.
• Browse for a certificate file on your system. Note that only .pfx certificates are accepted. When you click the Browse for a Certificate, button LightSwitch shows a dialog that enables you to browse the file system and select the appropriate file.
• Create a test certificate. This is useful for testing purposes if you do not own a valid certificate. When you click the Create a Test Certificate button, LightSwitch generates a test certificate for you that you can use to sign the application. Such a certificate works correctly but should never be used in production.
To make things easier to understand, here you use a test certificate. If you prefer using your own certificate, just browse the file system for the related .pfx file or choose it from the certificates store. When you create a new test certificate, you are prompted to enter a password for the signature, as shown in Figure 10.21.
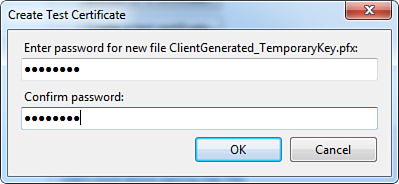
Figure 10.21. Setting a password for the new test certificate.
Confirm the password and click OK. The screen now shows summary information for the new certificate, including the expiration date (see Figure 10.22). Keep track of the expiration date. When the certificate expires, you must supply a new one; otherwise, the application will no longer be deployed or updated.
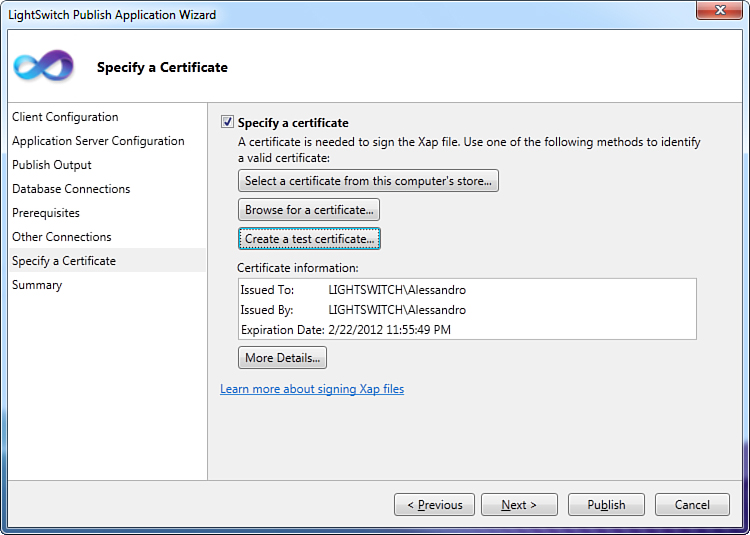
Figure 10.22. Specifying a test certificate.
If you want to get detailed information about the certificate, click the More Details button. This is common to all kinds of certificates and displays the Certificate dialog, which is not new to you if you have ever used digital certificates in the past. By browsing this dialog, you can learn details about the certificate such as the issuer, signature algorithm, signature hash, public key, and so on. Figure 10.23 shows certificate information about a newly created test certificate.
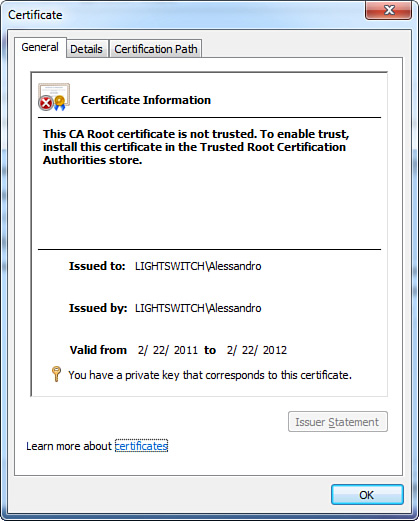
Figure 10.23. Getting detailed information on the new certificate.
Publish Summary
After specifying a digital certificate, you are almost ready to deploy the application. By clicking Next, you access the final screen, which is called Summary. As its name implies, this screen summarizes the most important information about the package, as shown in Figure 10.24.
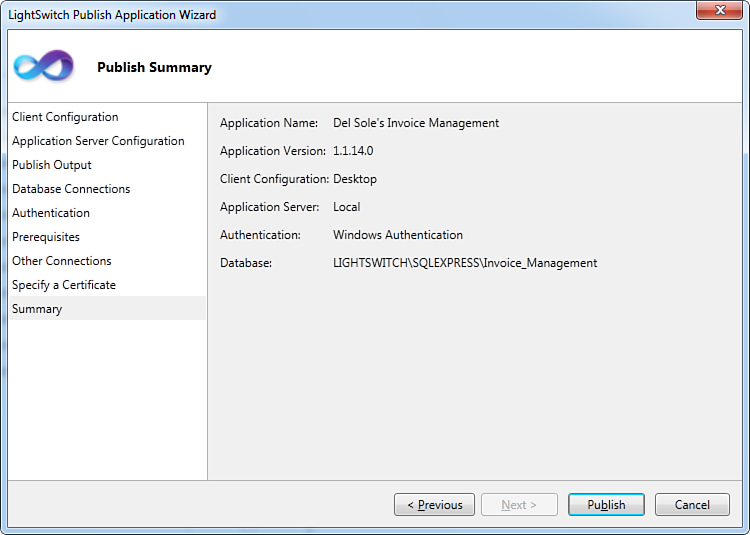
Figure 10.24. Summary information offered before publishing the application.
Earlier in this chapter, you learned that the application version number is different from the publish version. Although the name might sound confusing, this is demonstrated by the Application Version item in the Summary screen. As you can see in Figure 10.24, the application version includes a third value indicating the number of times that the application has been published, incremented by one unit. In this figure, the version number 1.1.14.0 means that the application has already been published 13 times and that the version number refers to the new release. This version number is automatically incremented by LightSwitch every time you publish the application, and LightSwitch uses it to check the availability of new updates.
Now you have completed all the required steps to configure the application deployment. Publishing and deploying is explained in next section, and you will also get information about some alternative options that were not selected in the current scenario.
Publishing and Deploying the Application
To publish your setup package to the file system, click the Publish button (see Figure 10.25). When you click this button, LightSwitch starts the packaging process. It is a good idea to leave the Output window open (Ctrl+Alt+O) because the IDE displays informational messages about the process. When the process starts, LightSwitch also recompiles all the projects in the solution so that all references are correctly updated. If the process completes successfully, you are notified with messages in both the LightSwitch status bar and the Output window. Figure 10.25 shows the Output window upon successful completion of the publish process.
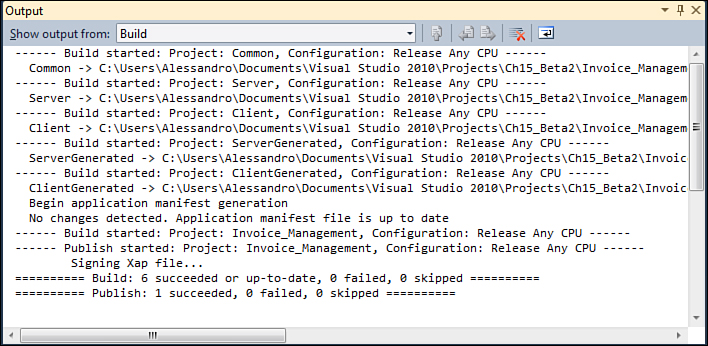
Figure 10.25. The publish process completed successfully.
You can usually ignore the detailed messages in the Output window, but it is useful to understand the publish progress and to get notified about its completion. If the process completes with errors, these are listed in the Error List window, and you need to fix them before retrying. In the current scenario, you are deploying a 2-tier desktop client, which is packaged into a subfolder called Publish, available inside the project’s folder, so you need to open this folder in Windows Explorer to see the result of the process. If you selected a different output folder in the wizard, open the custom publish folder. When you open the output folder in Windows Explorer, you will find the following items:
• Setup.exe: This is the bootstrapper that will launch the installer.
• Install.html: This is a document that describes the steps required to configure SQL Server Express on one of the target machines, according to what was specified in the connection string.
• ApplicationName.application, where ApplicationName is the name of your application (in the current example, Invoice_Management.application): This the ClickOnce Application Deployment Manifest and contains all the information that ClickOnce needs to deploy the application (for example, the version number).
• Application Files: This is actually a subfolder that contains all files required to run the application.
When installing the application to a target system, you need to distribute all these items. You can test how the installation works on your development machine by launching Setup.exe. After a few seconds, you are prompted with a security warning that displays information about the application’s name, location, and publisher and that requires the user’s confirmation before installing the application (see Figure 10.26).
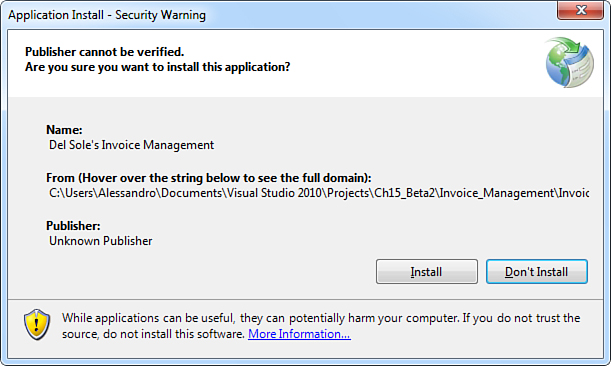
Figure 10.26. The security warning asks for your confirmation before installing the application.
Because you digitally signed the .xap file, you might expect at this point to see information about the publisher. Remember that signing a 2-tier client is totally optional, so the publisher is considered as unknown even if the .xap package is signed.
The user interface of the security warning is not new to you if you have ever deployed (or installed) applications via the ClickOnce technology. When you click Install, the installer begins downloading the application files from the publish output folder and copies them to the appropriate location. You can see the progress of the operation within a convenient window, as shown in Figure 10.27.

Figure 10.27. The progress of the application deployment.
The application is automatically started when the installation completes. You will find a shortcut to the application in the Windows Start menu, and you can remove the application the usual way via the Programs and Features tool in the Windows Control Panel. Do not expect to find a folder under C:Program Files for your application; the .NET Framework installs applications deployed via ClickOnce into a sandboxed folder that the runtime is responsible for handling. This is also why users cannot change the target folder during the installation.
Because of the publish settings used so far, the deployment mechanism also created the application database whose name was established in the connection string in the wizard. Such a database has been automatically created and attached to the specified instance of SQL Server for you. This can be easily demonstrated by running SQL Server Management Studio or through Server Explorer in LightSwitch. This simplifies the deployment process and readies users to use the application without configuring the back-end storage.
Application Updates
One of the biggest benefits of the deployment mechanism in LightSwitch is that releasing application updates is dramatically easy because you simply need to republish the application to the same output location after your edits. This also works with 2-tier desktop clients published to the file system, as in the previous example. For example, you can make any edit you like to the Invoice Management application and then republish it by following the instruction explained before. The important thing is that you do not change the output location; otherwise, clients installed on the end users’ machine will no longer be able to search for updates. Also remember that you do not need to change the publish version manually; LightSwitch does it for you. After you publish new updates, the application installed on the target machine looks for updates in the location from which it was installed. If it finds any updates, it automatically gets updated, with no interaction from the end user, and so updating is dramatically simplified. You can try this yourself by publishing again the sample application and launching the version installed previously. Because publishing to the file system also supports shared network paths as the publish output, you can publish your application and updates to a shared directory on your web server; and when end users run the application, this will be updated from a common location, which is a common scenario within companies.
A Different Scenario: Generating a Script for the Database
Previously in the Publish Output screen, you saw how to set the option of automatically generating the application database and attaching this to the specified instance of SQL Server. This setting is optimal when you do not need further configurations on the database and if you want to simplify the deployment the best way possible. In some situations, however, you or the system administrator in your company might need to perform complex database configuration tasks. For this reason, LightSwitch offers another option: Create a Script File to Install and Configure the Database. If you select this option, the intrinsic database for the application will not be generated automatically and, as a consequence, it will not be attached to SQL Server. When you select this option and publish the application, LightSwitch generates two .sql files that can be opened and manipulated within SQL Server Management Studio Express and Visual Studio LightSwitch. The first .sql script is called CreateUser.sql and contains Transact-SQL instructions that will create a new user that can access the database. This is particularly useful with Forms authentication. Listing 10.1 shows the content of this file.
Listing 10.1. The Autogenerated CreateUser.sql Script
:setvar DatabaseName "Invoice_Management"
:setvar DatabaseUserName ""
:setvar DatabaseUserPassword ""
GO
USE [$(DatabaseName)]
DECLARE @usercount int
SELECT @usercount=COUNT(name) FROM sys.database_principals WHERE name = '$(DatabaseUserName)'
IF @usercount = 0
CREATE USER $(DatabaseUserName) FOR LOGIN $(DatabaseUserName)
GO
EXEC sp_addrolemember db_datareader, $(DatabaseUserName)
EXEC sp_addrolemember db_datawriter, $(DatabaseUserName)
EXEC sp_addrolemember aspnet_Membership_FullAccess, $(DatabaseUserName)
EXEC sp_addrolemember aspnet_Roles_FullAccess, $(DatabaseUserName)
GO
If you take a closer look at the code, you can see how the first line contains the name of the database, whereas the second and third lines specify the username and password for the new user. As you can see, both properties are empty, and you will need to fill them with your own values.
The second .sql script takes the name from the database, so in the current example it is called Invoice_Management.sql. This script contains all the Transact-SQL code that is necessary for creating the database and tables. This last sentence means not only generating tables based on entities designed within the development environment but also tables required for users’ management according to the ASP.NET security rules. (The code that performs this task is actually the largest part in the script.) It is not possible to include the full source code for the script here because it would run to more than 200 printed pages. However, it is included in the companion source code for this chapter so that you can examine it within SQL Server Management Studio or Visual Studio LightSwitch with the help of syntax colorization. Having a source SQL script is useful to the database administrator who needs to replace default settings for the database with custom ones, based on the company’s policies. This can be accomplished by editing the source code instead of managing the attached database later. All the operations described so far relate to 2-tier desktop applications, but a lot of concepts are reused in the next sections, which are all about deploying 3-tier applications to the web and the cloud.
Did You Get an Error When Running Scripts in SSMS?
If you run the generated SQL scripts in Microsoft SQL Server Management Studio, you might get the following error message:
An object or column name is missing or empty. For SELECT INTO statements, verify each column has a name. For other statements, look for empty alias names. Aliases defined as "" or [] are not allowed. Add a name or single space as the alias name.
If this is the case, simply go to the Query menu and enable the SQLCMD Mode. This allows you to run scripts correctly.
Deploying 3-Tier Applications
Deploying a 3-tier client means publishing the application to a web server that can be reached from different locations, such as computers within a corporate intranet or from the Internet. This scenario basically involves steps that are common to both desktop and web clients. Keep in mind some key concepts when deploying 3-tier applications:
• IIS is required, as the physical middle tier, to host application services. IIS is required on your development machine if you want to use this for testing purposes, whereas you need a separate server with IIS installed to publish the application to production.
• The server running IIS also needs the LightSwitch deployment prerequisites installed. See the next subsection for details.
• You need to digitally sign the .xap package if your application is a desktop client and you are using a SLL (recommended).
Before learning how to deploy 3-tier applications, it is important to configure the target server by installing LightSwitch server prerequisites and by configuring the web server.
This chapter provides configuration and deployment examples based on Windows Server 2008. However, LightSwitch can deploy applications to Windows Server 2008 R2 and Windows Server 2003, and therefore it supports IIS 6, 7, and 7.5.
Configuring the Target Web Server
Configuring a web server to host LightSwitch applications is not a difficult task, but it does require a number of steps. To make things easy, you can download and install the Microsoft Web Platform Installer onto the target server and download the so-called LightSwitch server prerequisites. In addition, you need to configure SQL Server services to accept incoming connections.
All these steps are explained in the next subsections.
Installing the LightSwitch Server Prerequisites
The web server that will host your LightSwitch applications can be configured with some components that make the deployment experience easier.
LightSwitch server prerequisites are also installed onto the development machine when you install the development environment. So, if you want to deploy your applications to your development machine for testing purposes, you will not need to install the prerequisites. This is instead required on the external server that you use for production.
These components are known as Visual Studio LightSwitch 2011 Server Runtime and are available through the Microsoft Web Platform Installer.
The Microsoft Web Platform Installer (www.microsoft.com/web/downloads/platform.aspx) is a lightweight tool that enables finding, downloading, and installing a number of free products for web development. When you run this tool, just select the Products tab and then select the Visual Studio LightSwitch 2011 Server Runtime element for download, as shown in Figure 10.28.
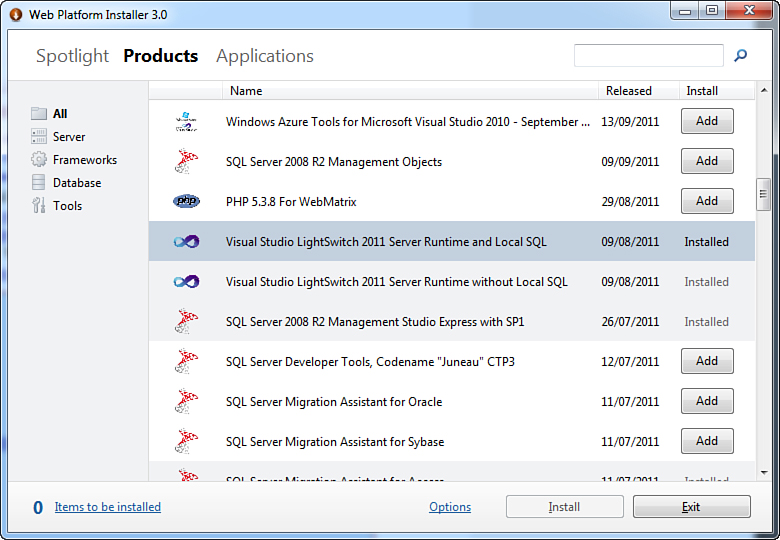
Figure 10.28. Selecting the LightSwitch Server Runtime in the Platform Installer.
As you can see, two packages are available, one including SQL Server 2008 R2 Express Edition and one not. Choose the second one if the database engine is already available on your web server. When you select the appropriate package, prerequisites are automatically downloaded and installed for you. This process makes available on your web server the following dependencies:
• IIS 7 with the correct features turned on, such as ASP.NET, Windows Authentication, Management Services
• .NET Framework 4 + SP1
• The Web Deployment Tool 1.1 and the MSDeploy provider so that you can deploy directly from the LightSwitch development environment to the server
If you select to install the Local SQL, SQL Server Express 2008 R2 (engine & dependencies) is also installed. Installing server prerequisites is also optimal because when you deploy from LightSwitch to an IIS 7 server they will automatically ensure that
• The application is running under the ASP.NET 4.0 application pool.
• The matching authentication type has been selected for the web application.
• An application administrator is added when the application requires one.
After the prerequisites have been installed, you are ready to publish applications to the web server.
Enabling the Windows Firewall
IIS must accept incoming connections, so the Windows firewall must be configured to allow the World Wide Web Services (HTTP) service on the server where the middle-tier lives. By default, this is already enabled in Windows Server 2008, but it is important to ensure that it is actually enabled. Click Start, Control Panel, Windows Firewall. When the Windows Firewall management tool is running, click Allow a Program Through Windows Firewall. Locate this service and ensure that it is checked, as shown in Figure 10.29.
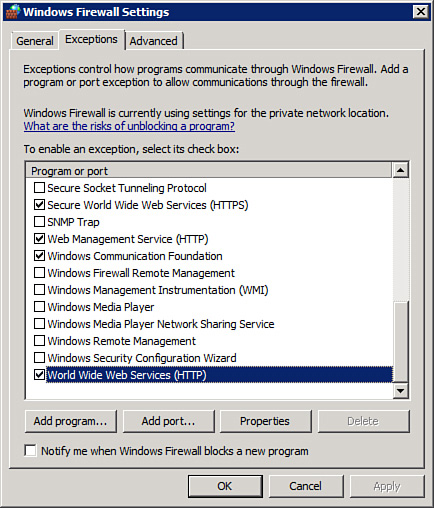
Figure 10.29. Enabling the HTTP service in Windows Firewall.
You must also enable access for the following applications on the server where the instance of SQL Server hosting your database resides:
• C:Program FilesMicrosoft SQL ServerMSSQL10.SQLEXPRESSMSSQLBinn SqlServer.exe
• C:Program FilesMicrosoft SQL Server90SharedSqlBrowser.exe
These steps are required to accept incoming connections to the instance of SQL Server.
Configuring SQL Server Services
The very last step in setting up Windows Server 2008 for hosting LightSwitch applications is to configure services for SQL Server, regardless of the database engine version and edition.
Basically, what you must do is make the instance of SQL Server discoverable through the network and allow incoming connections. To do so, follow these steps:
1. Click Start, All Programs, Microsoft SQL Server 2008, Configuration Tools, SQL Server Configuration Manager. Doing so launches the services configuration tool for SQL Server.
2. Click SQL Server Services. Ensure that the service called SQL Server Browser is running (see Figure 10.30). If not, right-click the service name and select Start. This service makes the instance of SQL Server discoverable through the network.
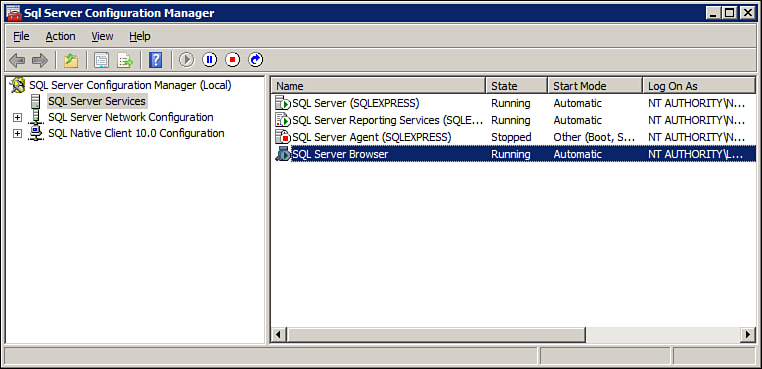
Figure 10.30. Starting the SQL Server Browser service.
3. Click SQL Server Network Configuration, Protocols for SQLEXPRESS. Right-click the Named Pipes element and click Enable. Repeat this operation for the element named Client Protocols under SQL Native Client 10.0 Configuration, as shown in Figure 10.31.

Figure 10.31. Enabling the Named Pipes protocol for SQL Server.
Now you have successfully completed the required configuration for your web server and are ready to deploy your 3-tier client.
Publishing the Application
The steps required to publish a 3-tier application are the same for both desktop and web clients. In the upcoming demonstration, you learn how to deploy a 3-tier web client; deploying a desktop client is left to you as an exercise. In Visual Studio LightSwitch, you have two choices, both described further in this chapter. The first is to create a package to be imported later into IIS. The second choice is publishing directly to the web server with LightSwitch. You will get detailed information about both possibilities when appropriate. For now, though, what you have to know is some steps are common to both choices. So, now we walk through the common steps. In the next subsections, you see in action how to deploy both Forms and Windows authentication. With that said, click Build, Publish, and in the Client Configuration screen, select Web, as shown in Figure 10.32.

Figure 10.32. Selecting Web as the target client type.
When you click Next, you access the Application Server Configuration screen, which you already know from 2-tier clients. As you can see, at this point the Local option is disabled, and you can decide to deploy your application to an IIS Server or to Windows Azure. The latter is discussed in the next section, so click IIS Server and ensure that the check box about the LightSwitch prerequisites is also checked (see Figure 10.33).
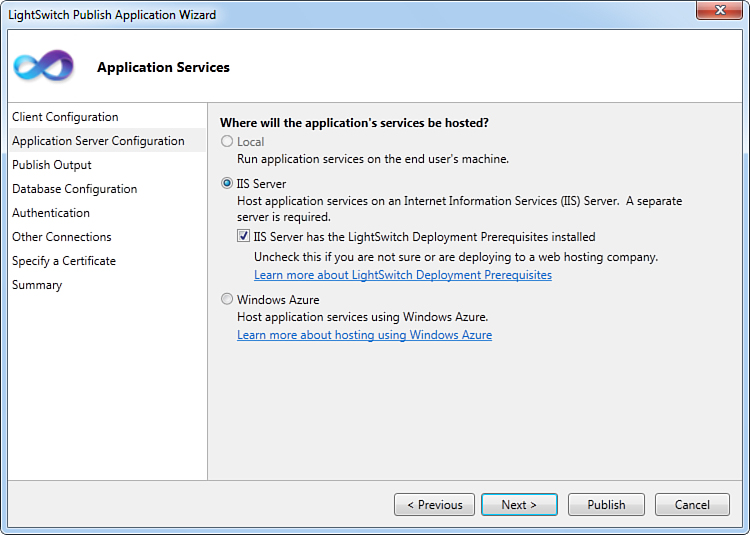
Figure 10.33. Selecting an IIS server as the host.
The steps common to remotely publish and to create packages ends here. From now on, you make decisions based on the deployment methodology that you choose. You will try all the available ways in a role-based application, so do not be afraid if it seems that you are missing something. Now click Next to open the Publish Output screen. This is a crucial screen because it asks you to specify how the application will be deployed. You have two options:
• Create a Package on Disk: If you select this option, LightSwitch generates a zip package that you must import manually into IIS or through the Web Deployment tool. This option is really useful when you do not have direct access to the web server and you need to pass the application package to an administrator.
• Remotely Publish to a Server Now: This option allows publishing directly to a web server in which the web deployment service (which is part of MSDeploy) is available and configured. Permissions to access the web server for your login are required.
The look of the Publish Output screen varies depending on your choice. You now learn how to directly deploy the application to a web server, first with Forms authentication and then with Windows authentication. In the second part of this section, you learn to deploy the application to a web server by generating packages on disk, again with both authentication types.
Remotely Publishing to a Web Server
The first part of this section explains how to direct publish using Forms authentication, so ensure that this is enabled before going on. Later in the chapter, you are asked to switch to Windows authentication. You will discover that there are no differences in the Publish Wizard between the two authentication types and that you just need one click to switch from one to the other.
One of the biggest benefits to deploying applications with Visual Studio LightSwitch is that you can publish the application directly to a web server with a very few steps. This simplifies the deployment process but requires you to be in the Administrators group of the web server. If you are, you can take advantage of direct publish and save time. In the Publish Output screen, select Remotely Publish to a Web Server Now. After you do so, follow these steps (see Figure 10.34):
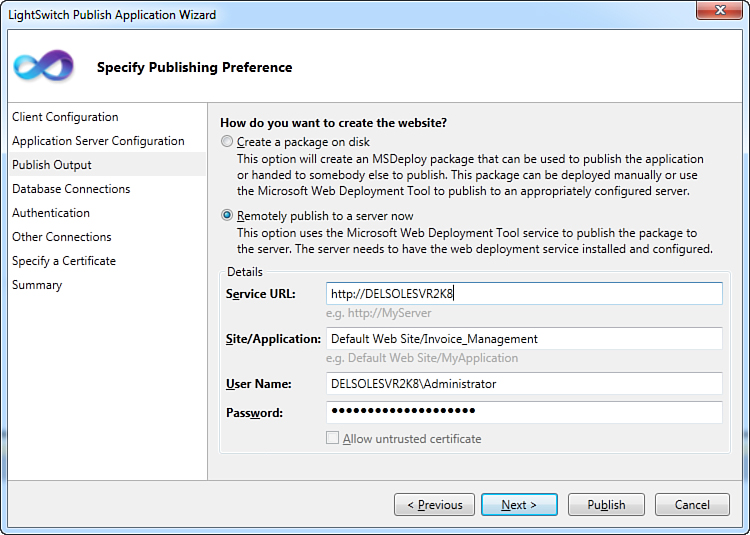
Figure 10.34. Configuring direct publish to a web server.
1. In the Service URL box, type the URL to the web server, which represents the root level of IIS. This can be the server address or simply http://localhost if you are testing the application deployment on your development machine.
2. In the Site/Application box, enter the path for your application. You can leave unchanged the Default Web Site part of the address, which represents the root folder in IIS unless you have created another subfolder. The second part of the URL is made of the application name; you can leave unchanged the default one or enter a different name.
3. In the User Name and Password boxes, enter administrator credentials to access the web server.
Publish to Localhost Requires Administrator Privileges
If you want to publish directly to a local instance of IIS (the so-called localhost), you need to launch Visual Studio LightSwitch under administrator privileges.
Now click Next to access the Database Connections string. Here you have to specify two connection strings. The first string is used by LightSwitch to create and update the application’s intrinsic database and necessarily requires credentials of a user that in SQL Server has permissions of type dbcreator. Both Windows and SQL authentication are permitted; the only requirement is that the login has the appropriate permissions to create and maintain the database. Note that you can enter manually the database name in the Connection Properties dialog if it does not exist on the web server. The second connection string is used at runtime. This should never be based on the Windows integrated security because the application is going to be set up in the ASP.NET 4.0 application pool, which impersonates a default identity that does not have permission to access the database, so a SQL login is more appropriate. LightSwitch automatically populates the user connection box with the administrator connection string, so you need to click Create Database Login to ensure that the administrator login is replaced with a least-privileged account. To complete this step, ensure that the Windows user running LightSwitch has permission to access SQL Server on the target server. Otherwise, you must ask the server administrator to create a least-privileged account for you and provide credentials. Figure 10.35 shows how you create a new login.
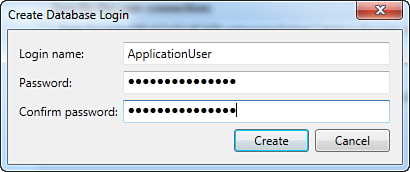
Figure 10.35. Creating a new database login.
After you have configured the runtime database login, click Next. You access at this point the Authentication screen, in which you have to enter credentials for the application administrator. You already saw this screen when we discussed 2-tier application deployment, so it should look familiar to you. Figure 10.36 shows how to configure this screen.
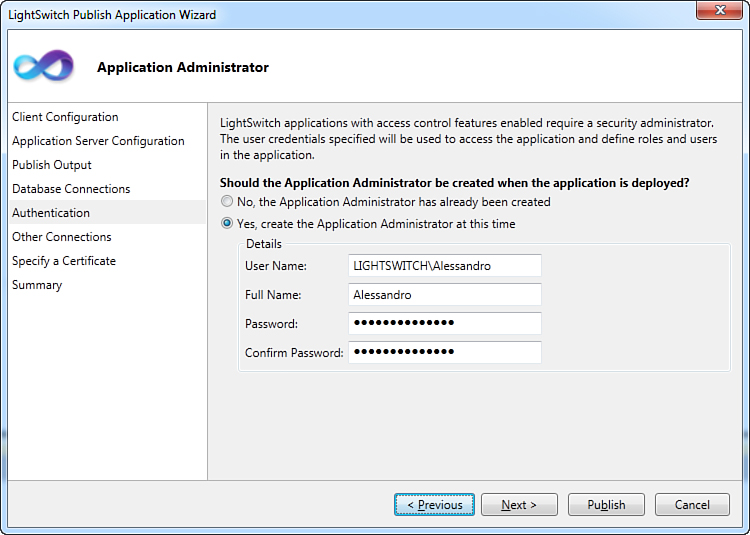
Figure 10.36. Configuring the application administrator credentials.
There is another key step in authenticating users to access data, which is the Other Connections screen. If your application uses only the intrinsic database, this screen will not appear. In this particular scenario, however, you are accessing three external data sources: the Northwind database on the target server, the InvoiceManagementEcosystem database on SQL Azure, and the SharePoint 2010 website. With regard to databases, you have to enter connection strings, as you already know. The most important thing here is entering valid credentials for the Northwind database, because you have already configured the other connections previously. For instance, you might use the same runtime user created before for the application database. If you decide to do this, you need to map user credentials to the Northwind database in SQL Server Management Studio. By the way, you can supply any credentials having permissions to access the database as a dbdatareader and dbdatawriter user. Figure 10.37 shows what the screen looks like after you enter the required connection strings.
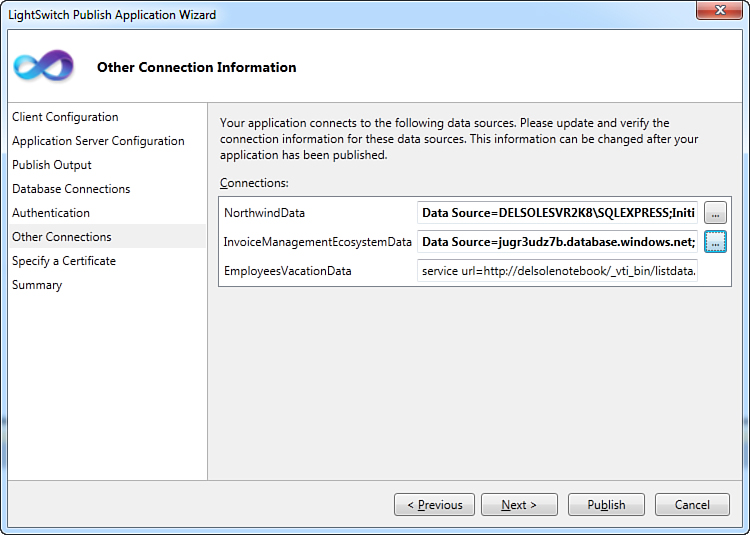
Figure 10.37. Supplying connections to external sources.
At this point, click Next. In the Specify a Certificate screen, you can specify a digital certificate to sign the application (.xap) file. This is not required for web clients, so here we skip this step. Remember, though, that it is required if you are using Secure Socket Layers (SSL) and for desktop clients. (If you do not provide a certificate, the application will run the same, but users will not be able to receive automatic updates and they will receive a warning message.) Click Next to access the Summary screen and see summary information about the process. When ready, click Publish. At this point, Visual Studio LightSwitch publishes all the required files to the specified web server, also creating the intrinsic database. The Output window keeps you informed on the deployment progress, so it is easy to see when it completes. When completed, you can reach the application by typing its web address. Figure 10.38 shows the application running in the web browser.
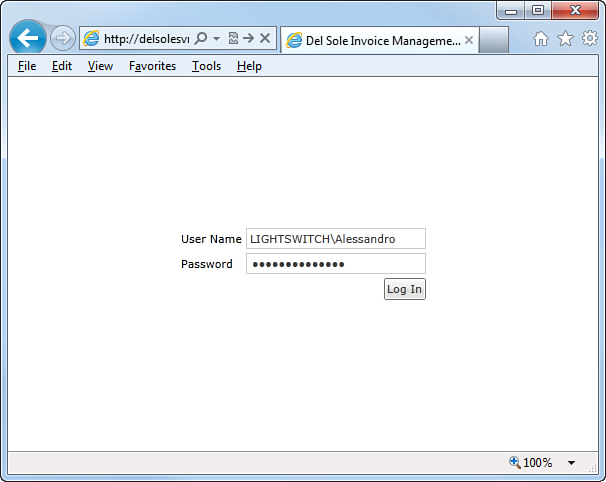
Figure 10.38. Running the application in the web browser after deployment.
At this point, you just need to log in by using the administrator credentials that you entered in the Publish Wizard. Then you can administer the users and roles, as you learned in Chapter 9.
Publish to a Web Server Using Windows Authentication
Directly publishing to a web server using Windows authentication works similarly to Forms authentication. The only difference is in the Authentication screen of the Publish Wizard. If you select Windows authentication in the Access Control tab of the Application Designer, when you publish the application, you are prompted to enter the Windows login for the application administrator, as shown in Figure 10.39.
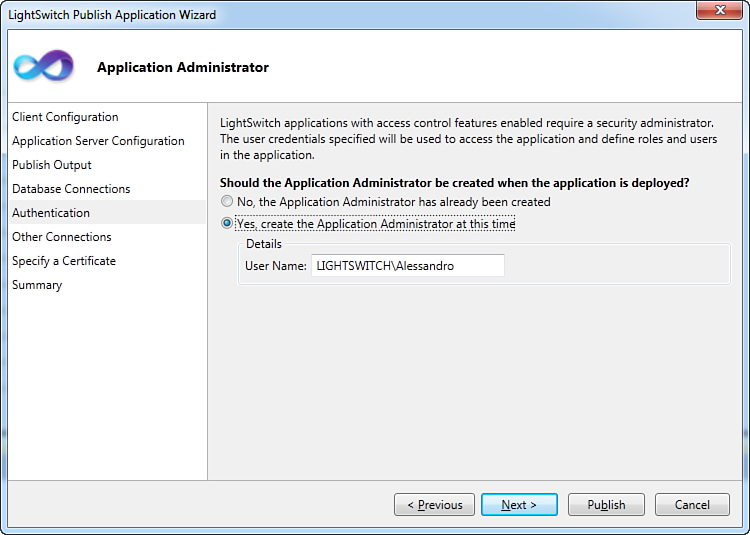
Figure 10.39. Specifying administrator credentials with Windows authentication.
When you launch the application, you are not required to enter a username and password as in Forms authentication, because the application recognizes Windows credentials. Therefore, the application administrator can immediately access the administration screens, as shown in Figure 10.40.
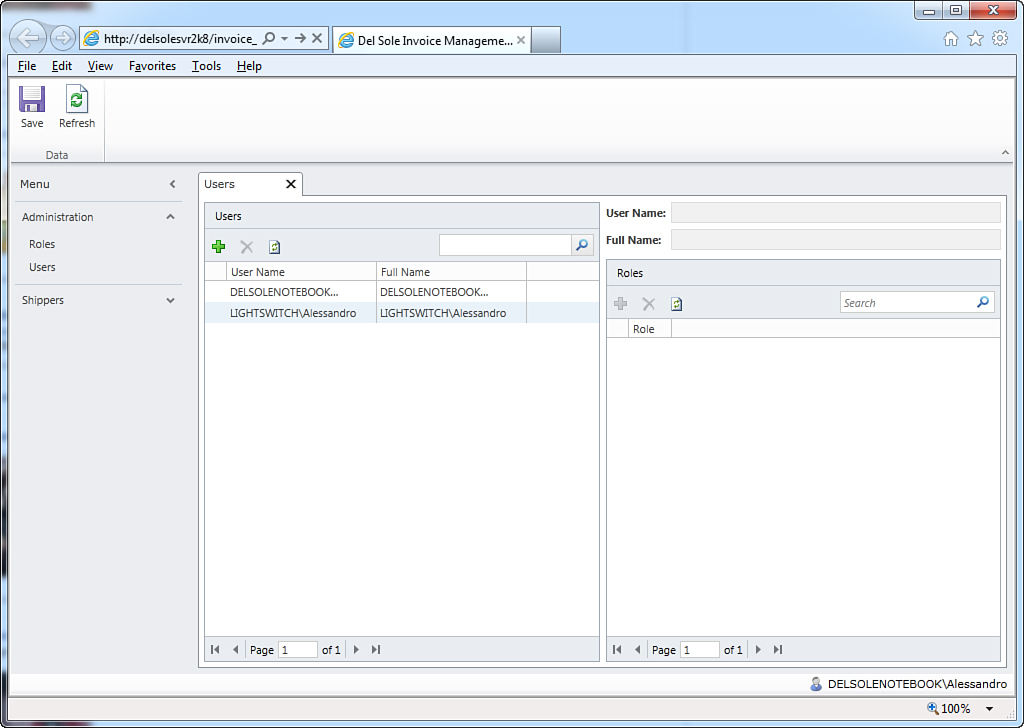
Figure 10.40. The application launched under Windows authentication.
So, directly publishing to a remote server is an easy task in LightSwitch. You do not need to know how the web deployment service works, and you do not need to make additional configurations to IIS, because the IDE does the entire job for you. Things get quite different when creating packages on disk, although this allows further control over administration, as explained in the next section.
Creating and Importing Packages into IIS
The second choice in deploying 3-tier clients, both desktop and web, is creating MSDeploy packages on disk. Basically, an MSDeploy package is a zip archive containing all the required files and connections to the database, but the difference is that the package must be imported manually into IIS.
This is an appropriate choice when you are not an administrator of the web server and therefore you cannot use directly publish from LightSwitch. By generating a single zip package on disk, you can pass this to the server administrator, who will be able to import the packaged application into IIS. In this section, you learn to deploy LightSwitch applications by creating packages with both Forms and Windows authentication. Before going on, enable Forms authentication in the Access Control tab of the Application Designer. Note that required steps in LightSwitch are basically the same if you deploy applications with anonymous authentication. What actually changes are security settings when importing the application into IIS. Start by clicking Build, Publish. You can skip to the Publish output screen because the first two screens are the same as with the direct publish option. Here you have to select the first option, Create Package on Disk. Then you specify a name for your website and the publish location.
Choose a Different Web Site Name
Remember that on the target instance of IIS, there is still the previous deployment for the application, which has the same name as the default one provided by LightSwitch in the Publish Output screen. So, enter a different name. If you want to use the current name, you have to delete the previous version of the application from IIS via the IIS Management Console.
Note that by default, LightSwitch creates a subfolder called Publish, within the project’s folder. You can replace it with a custom one; for example, C:Publish. Figure 10.41 shows what the screen looks like.
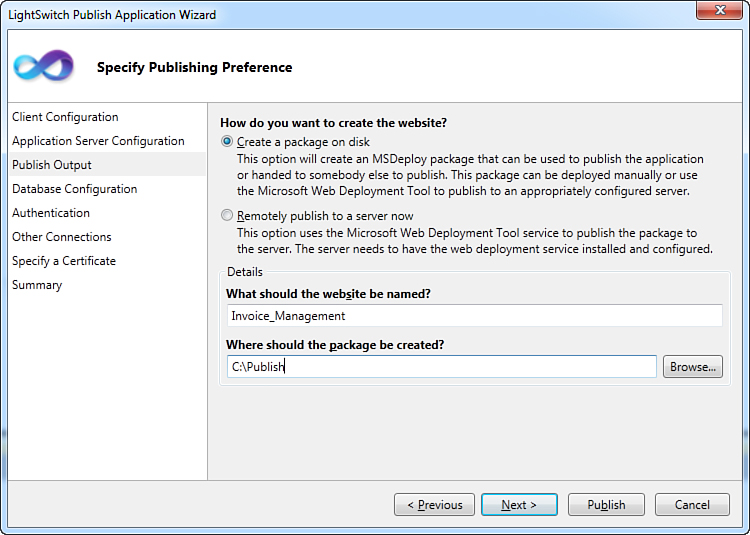
Figure 10.41. Selecting the package on disk as the deployment method.
Now click Next to access the Database Configuration screen. Here you have two choices:
• Generate a New Database: When you select this option, LightSwitch generates onto the target server a new database for the application.
• The Application Needs to Update an Existing Database: Use this option if you do not want to create a new database but you want to update an existing one. Notice that in this case, you must specify the connection string to the current database, because LightSwitch generates a SQL script based on the database’s schema.
Leave unchanged the default selection on Generate a New Database, and then click Next. In the Authentication screen, indicate whether administrator credentials must be created for the first time or if they have already been deployed. Notice how you are not required to enter an administrator username and password (in contrast to direct publishing). The reason is that you are asked to enter credentials when importing the package. Figure 10.42 shows the Authentication screen.
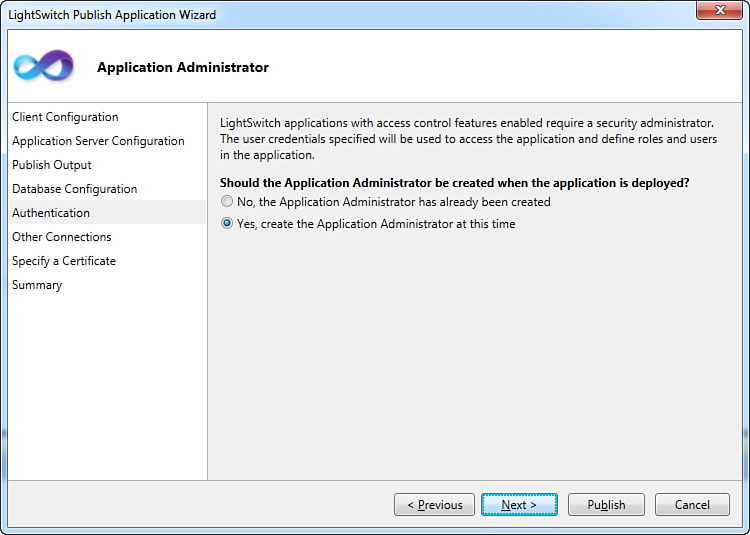
Figure 10.42. The Authentication screen does not require credentials with packages.
Go ahead and check that connections to external data sources are correct. You should not see any changes since the latest demonstration on direct publish, so take a look at Figure 10.37, and then select Summary in the list of screens in the wizard. (Remember that specifying certificates is required only when deploying desktop clients.) Check that all the information listed in the summary is correct. For example, ensure that the current authentication is Forms and that the deployment process generates a new database. When ready, click Publish. After a short time, LightSwitch completes the publish process and you see a new file called Invoice_Management.zip in the selected output folder. (If you chose a different filename, you will see the name you entered plus the .zip extension.) Now it is time to import the package into IIS.
Importing the Package into IIS
To deploy a LightSwitch application from a package on disk, you need to log in to the web server as an administrator and launch the Internet Information Services Manager. A shortcut is available in Start, Administrative Tools. When it is running, follow these steps:
1. Expand the server’s root node.
2. Expand the All Sites node.
3. Right-click Default Web Site, and then select Deploy, Import Application (see Figure 10.43).
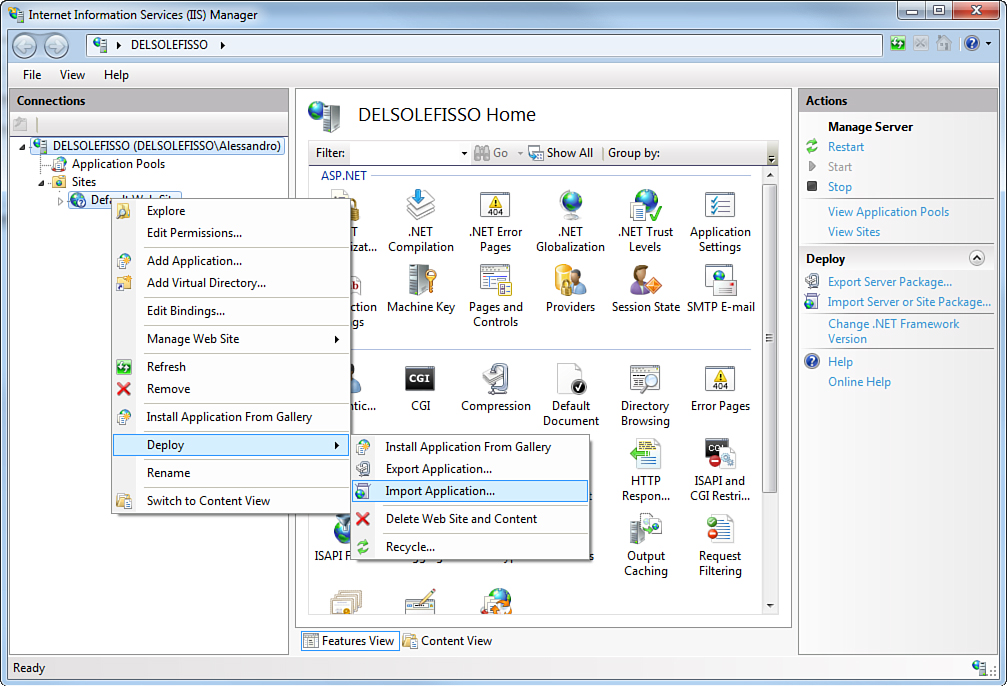
Figure 10.43. Selecting to import a package in the IIS Manager.
This action launches the Import Application Package dialog, in which you have to specify the full pathname for the package. This includes the name of the directory in which the package was generated and the package filename. Figure 10.44 shows the Import Application Package screen.
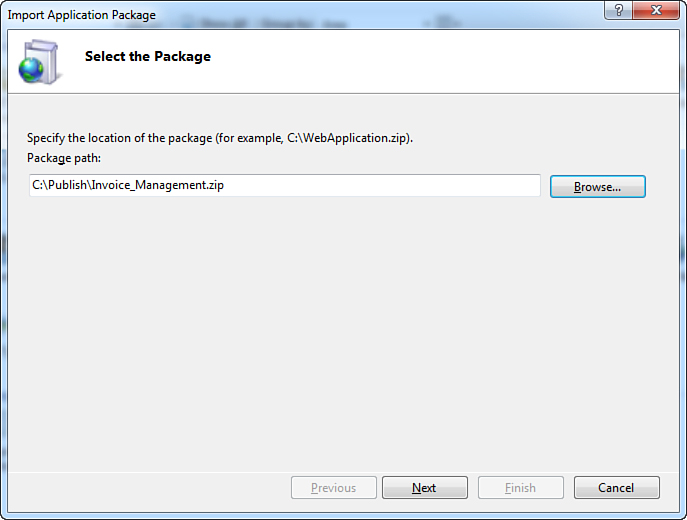
Figure 10.44. Specifying the package to import.
When you click Next, you are prompted with the list of the contents stored within the package, as shown in Figure 10.45. In particular, you can see a script for deploying the SQL database, files comprising the application, and policies to configure IIS to host the application and to add an administrative user to the application.
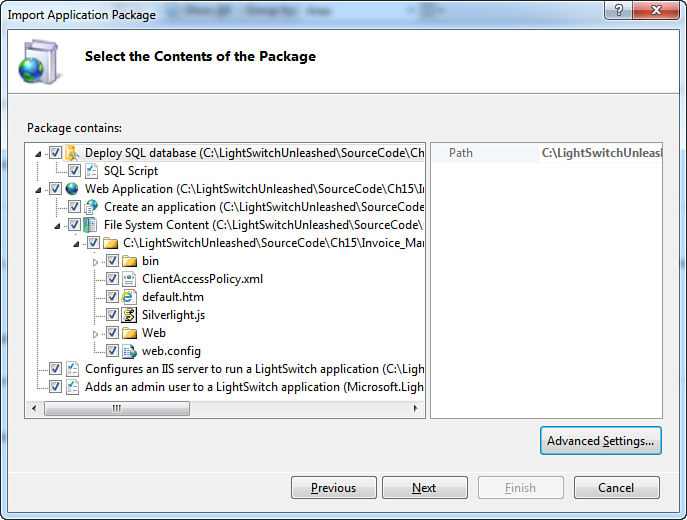
Figure 10.45. Package contents selection.
You should consider this dialog just a summary, although you are allowed to select or unselect features. You need all the listed features, so do not change the default selection. Click Next. The wizard requires you to enter some important information, and the dialog has to be discussed in two different parts. The first thing to do is enter the connection string required to create the database. This requires a login that has administrator privileges over the SQL Server instance and must be supplied in the Edit Connection Strings dialog that you reach by clicking the button near the Connection String box (see Figure 10.46).

Figure 10.46. Entering the connection string for creating the database.
You must enter the server full name and the database name. You can also use Windows integrated security if your Windows login is in the Administrators group of SQL Server, as in the current example. When you are done, click OK to return to the wizard. Note that the DatabaseServer and DatabaseName fields will be automatically filled in. Now scroll the dialog, and you will see that you will have to enter the runtime login for the database exactly as you did in the Publish Wizard within LightSwitch for direct publish. Because you have already configured such a login previously, you can reuse it (see Figure 10.47).
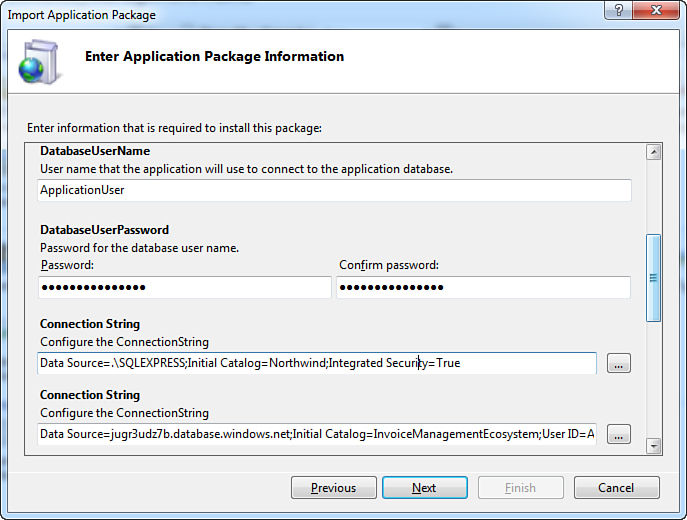
Figure 10.47. Entering the database username used at runtime.
Scroll down the dialog and ensure that connection strings to external sources are correct (including the Northwind database on SQL Server, SQL Azure, and SharePoint connections). Scroll the dialog again to the end to see the last fields to fill in.
If you are importing an application that uses anonymous authentication, the following information is not required.
These fields require that you specify the application administrator credentials and need to reflect the information entered in the Publish Wizard in LightSwitch. Figure 10.48 shows an example.
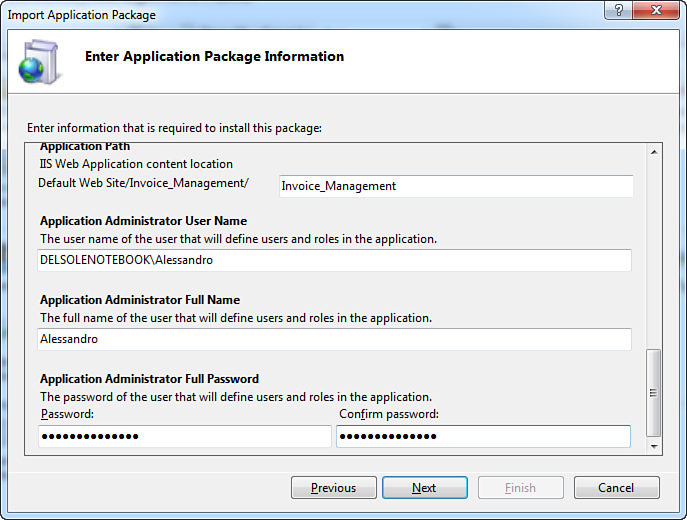
Figure 10.48. Entering the application administrator’s credentials.
Click Next to begin the import process. When IIS Manager completes importing the package, you will see summary information in the final dialog of the wizard. At this point, click Finish. The application can be now launched via the URL and will appear as it was previously shown in Figure 10.38.
Based on settings in the generated package, IIS Manager should automatically enable the appropriate authentication settings. In some situations, however, this does not happen. If that is the case, click Authentication under the IIS group and ensure that both Anonymous and Forms options are enabled.
Creating and Importing Packages with Windows Authentication
In the previous example, you saw how to deploy a LightSwitch application in which the access control is set to Forms authentication. Things are not different when using Windows authentication. To demonstrate this scenario, set Windows authentication for the Invoice Management application. Then launch the Publish Wizard and repeat all the steps explained in the previous example (no differences so far with Windows authentication). Now enter Internet Information Services Manager and delete the previous deployment. Finally, repeat the steps to import the package. The only difference that you encounter is about the application administrator username, which does not require specifying a password, but only the Windows username, as shown in Figure 10.49.
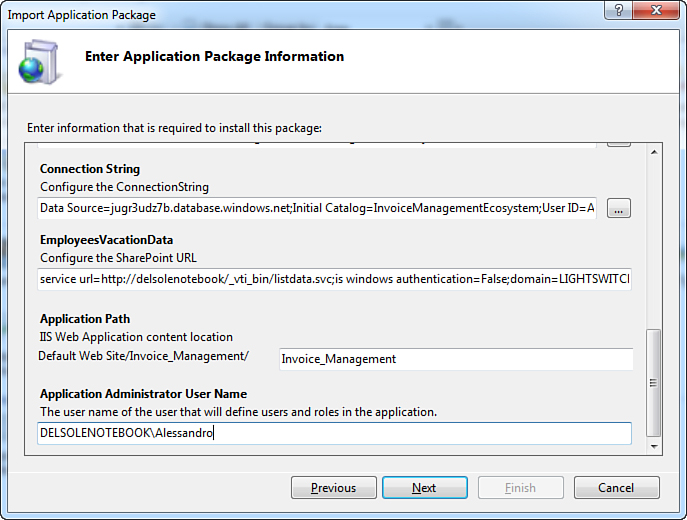
Figure 10.49. Entering the Windows login for the application administrator.
Before launching the application, ensure that the Windows authentication is enabled in the Authentication element of the IIS group in IIS Manager. When you launch the application, it will appear as shown previously in Figure 10.40. So, the biggest benefit here is that you can switch between Forms and Windows authentication without changing the way you deploy the application and with only one difference, which is about specifying the application administrator’s credentials. Making things easy is a mission in LightSwitch, and this also applies to publishing applications to Windows Azure, as explained in the following section.
Application Pools and Security Considerations
The philosophy behind LightSwitch is that you run things easily without the need to know what happens behind the scenes. This assumption is valid for data, screens, and for deployment. Both LightSwitch and the IIS Manager set up the hosting environment for you the best way possible so that you do not need to do this manually, neither do you need to know how things work within IIS. Sometimes, however, understanding application pools and Windows identities in IIS is very useful, especially when you encounter problems that you have to troubleshoot. For the sake of simplicity, these concepts are not explained here. If you do want to learn more, though, Beth Massi, from the Visual Studio LightSwitch team at Microsoft, has written an interesting blog post in which she discusses application deployment and explains important concepts about application pools, security, and database authentication based on impersonation and identities. Beth’s blog post is available at http://bit.ly/dX4wHo. This is recommended reading; but if you are not interested in understanding IIS security, or if you already have experience with IIS troubleshooting, you can skip this reading.
Deploying to Windows Azure
The Windows Azure Platform is the platform-as-a-service offer from Microsoft for cloud computing. The main benefit of Windows Azure (and, more generally, of cloud-based solutions) is that you only pay for services you use and for resources you actually consume. In addition, you focus on your main business, which is building and deploying applications. The operating system, maintenance, and administration are all handled by Microsoft as part of the offer. Of course, cloud-based solutions rely on Internet connectivity.
The Windows Azure platform is made of several components (including SQL Azure, discussed in Chapter 8), but discussing them is not the goal of this chapter. For further information, visit www.windowsazure.com. In this chapter, you learn how to deploy LightSwitch applications to the Windows Azure platform, particularly to that layer of the platform constituted by the Windows Azure operating system. You will be often required to access the Windows Azure Management Portal to complete some tasks, so go to Windows.Azure.com and leave open your web browser once you have accessed the Azure portal.
A Windows Azure subscription is required to complete the examples in this chapter. Microsoft offers Windows Azure as a paid service, so carefully check out all the available offers and read the subscription terms. You can activate your Windows Azure subscription by accessing http://windows.azure.com with your Windows Live ID.
Applications published to Windows Azure are always 3-tier clients, and you can still decide whether to publish as a desktop client or a web client.
Preparing Applications to Deployment
To keep things simple, a good idea is to use the Contacts Manager application created back in Chapter 3 as the example for Windows Azure deployment. So, open the solution in Visual Studio LightSwitch 2011.
Migrating Existing Databases to SQL Azure
If you need to move existing SQL Server databases to SQL Azure, you might be interested in a free tool called SQL Azure Migration Wizard. This is an open source tool available on CodePlex: http://sqlazuremw.codeplex.com. This tool can analyze existing databases and create T-SQL scripts to generate a corresponding database in the cloud, according to syntax limitations in SQL Azure.
The first thing you need to do before publishing your application to Windows Azure is to enable Forms authentication. This is a requirement and makes sense because applications in the cloud are reachable via the Internet, so the Windows authentication cannot be supported. You are instead allowed to enable anonymous authentication if you do not need to restrict access to the application data. You already know how to enable Forms authentication, so do so in the Access Control tab of the Properties Designer. After you set Forms authentication, you can begin publishing the application.
As for other hosts, you publish a LightSwitch application to Windows Azure by selecting Build, Publish. When the LightSwitch Publish Application Wizard starts, ensure that Web is selected as the client type in the Client Configuration screen. Next, move to the Application Server Configuration screen and select Windows Azure as the hosting platform. Figure 10.50 shows what the screen looks like.
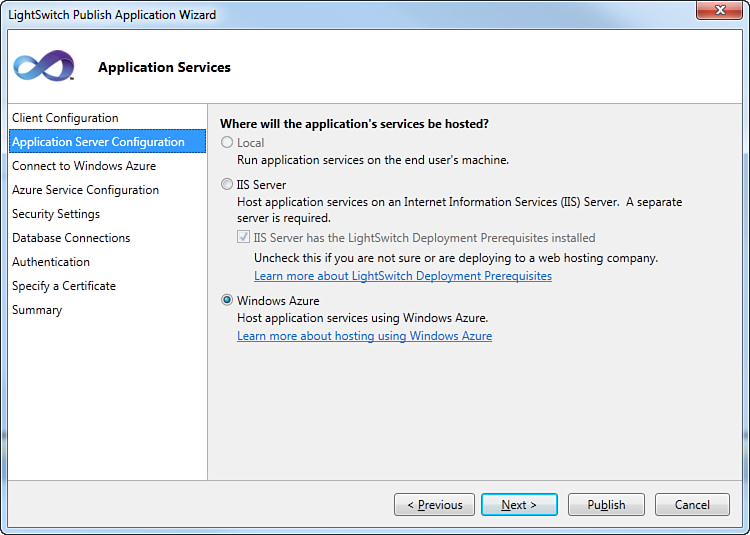
Figure 10.50. Selecting Windows Azure as the host platform.
Now move to the Connect to Windows Azure screen. This is where you have to specify how to connect to the platform.
Connecting to Windows Azure
The first information you need to connect to Windows Azure from Visual Studio LightSwitch is your subscription ID. This information is available in the Windows Azure Management Portal, as you can see in Figure 10.51.
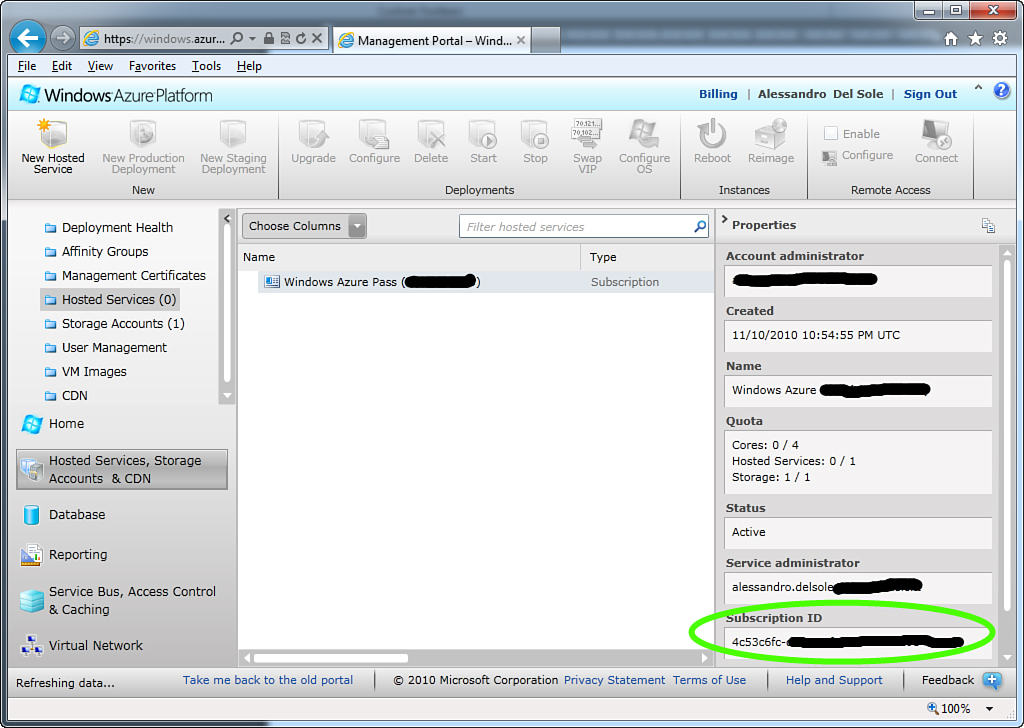
Figure 10.51. Locating the subscription ID.
Copy your ID to the Clipboard (Ctrl+C) and return to Visual Studio. Enter the information into the appropriate text box, as shown in Figure 10.52.
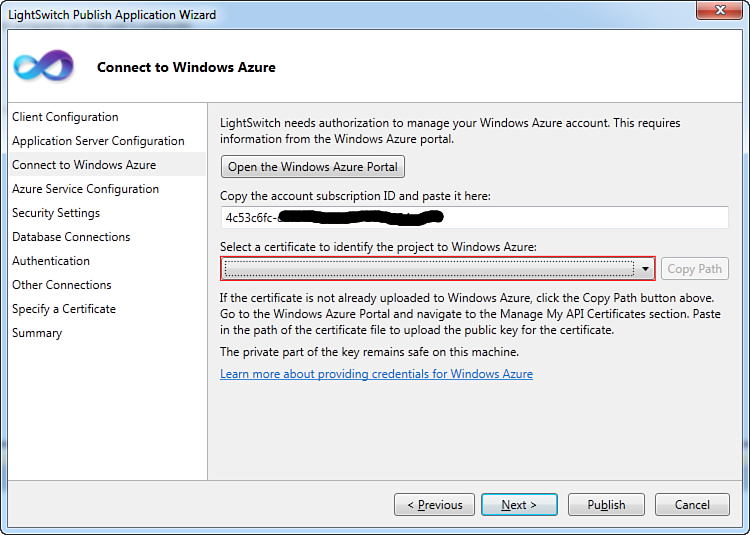
Figure 10.52. Entering the subscription ID.
Next, you must upload a management certificate to your Windows Azure subscription. A digital certificate is required so that your machine is trusted by Azure to deploy the application. You select a certificate via the dedicated combo box in the current dialog. Here you have a couple of alternatives: picking up an existing certificate or creating a new self-signed certificate. The combo box lists all available certificates on your machine, but they might be in use for other purposes. The best choice (especially for trust reasons) is to purchase a digital certificate from one of the authorities. For this example, create a new self-signed certificate by selecting the last element in the list. The New Management Certificate dialog will ask you to enter a friendly name for your certificate, as shown in Figure 10.53.
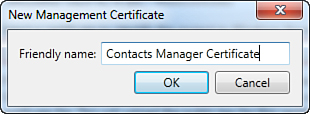
Figure 10.53. Creating a new self-signed certificate.
When you click OK, the information about the new certificate is visible in the combo box, and LightSwitch can now use it. Figure 10.54 shows what the dialog looks like now.
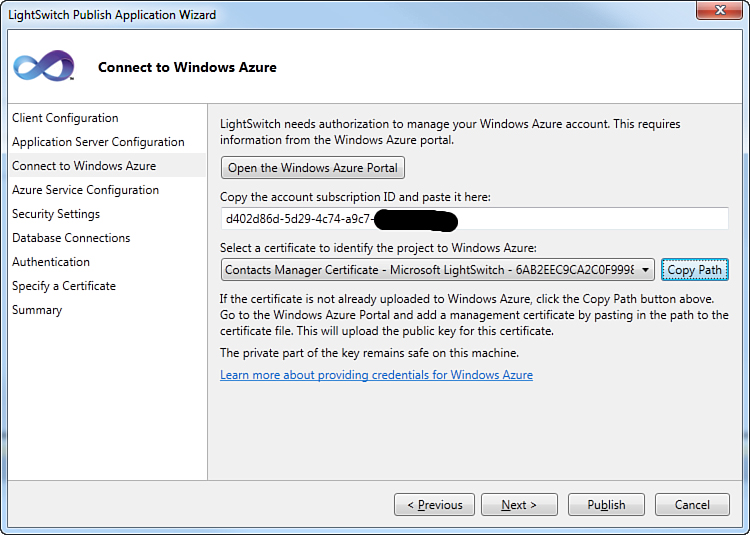
Figure 10.54. The new certificate is now available in LightSwitch.
At this point, you need to upload the certificate to the Windows Azure Management Portal. Follow these steps:
1. Click Copy Path. This stores to the Clipboard the path in which the certificate was generated.
2. Go to the Windows Azure Management Portal and, from the list of available services on the left side of the portal, select Management Certificates. This action allows managing certificates for your subscription.
3. Click Add Certificate on the toolbar. At this point, the Add New Management Certificate dialog appears and asks you to specify the path of the certificate (see Figure 10.55).
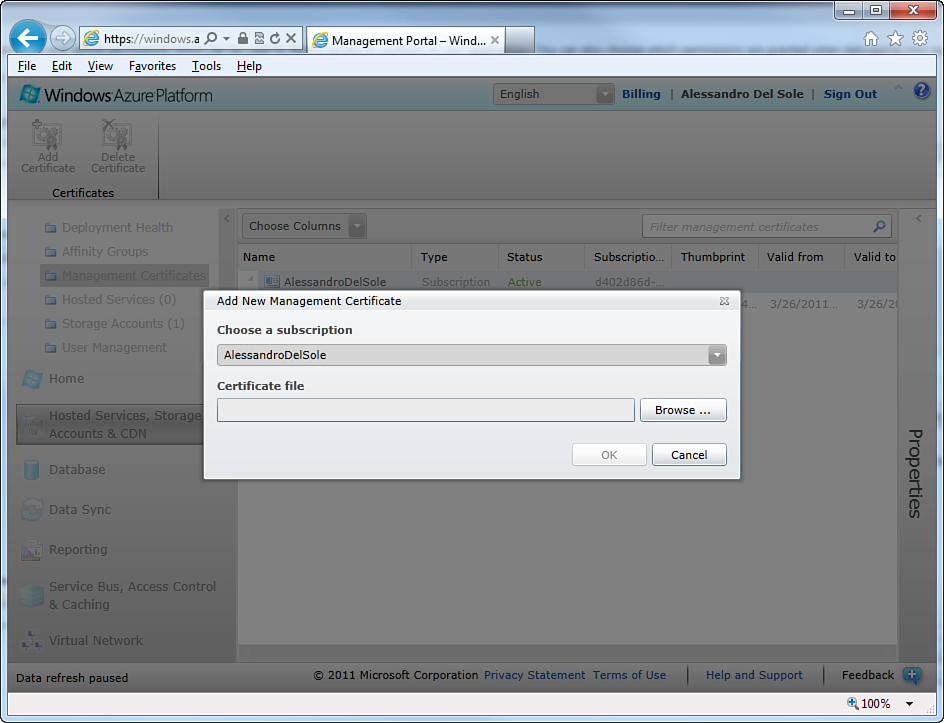
Figure 10.55. The Add New Management Certificate dialog.
4. Click Browse, and in the File Name text box, press Ctrl+V to paste the certificate path. Figure 10.56 shows an example.
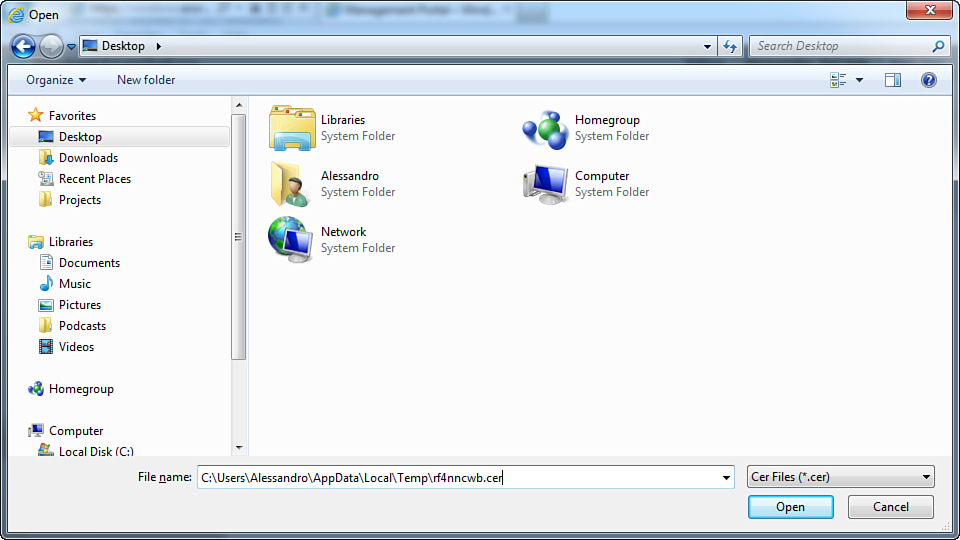
Figure 10.56. Selecting the certificate from disk.
5. Click Open, so that the certificate filename is added to the management dialog. Click Done; the certificate will now be uploaded to the portal. At the end of the process, the Azure portal looks like Figure 10.57.
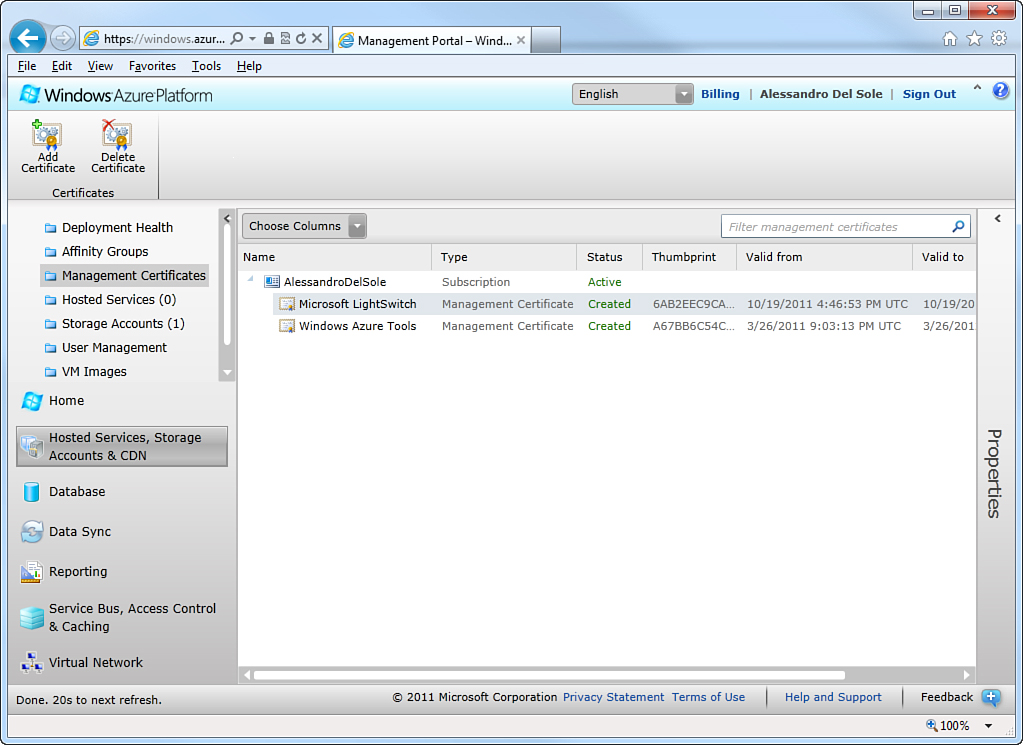
Figure 10.57. The certificate is available in the Windows Azure portal.
6. Go back to Visual Studio LightSwitch and click Next. If all the previous steps were completed successfully, the IDE shows the Azure Service Configuration screen.
Uploading Certificates Only Once
You do not need to repeat the steps for uploading a certificate to Azure every time you deploy an application from the same machine. The certificate that you are using in LightSwitch can serve multiple applications, and so it is sufficient to select one of the certificates you uploaded previously.
This is a crucial moment in the deployment process. In fact, you need to configure services required to host the application.
Configuring Azure Services
A LightSwitch application running in the cloud needs a place to stay and storage to access information. To host a LightSwitch application, you need to create the following in your Windows Azure subscription:
• A hosted service: This kind of service is basically a boundary for a related set of compute resources. Its primary job is hosting and exposing the LightSwitch application through roles. There are several kinds of roles; the most important are Web role, Worker role, and Virtual Machine role. You may think of a Web role as an ASP.NET front end, whereas a Worker role can be easily compared to a Windows service. The Virtual Machine role is new in Windows Azure and allows importing existing .vhd files. About LightSwitch, applications will be managed as Web roles. You do not need to worry about roles, though, because LightSwitch does the entire job for you. It just needs an empty hosted service that will fill with the appropriate resources.
• A storage account: The Windows Azure platform provides a storage service so that you can store different kinds of data the cloud, such as files (blob storage), unstructured tabular data (table storage), messages (queue storage), and virtual hard disks (drive storage). Each storage type can be accessed by applications via its own address through HTTP. You can find detailed information about storage and related web addresses at www.microsoft.com/windowsazure/storage/.
To create an empty hosted service, follow these steps:
1. In the Windows Azure Management Portal, click Hosted Services in the list of available features in the left side of the portal.
2. Click New Hosted Service on the toolbar.
3. When the dialog called Created a New Hosted Service appears, enter the information summarized in Table 10.3.
Table 10.3. Hosted Service Settings
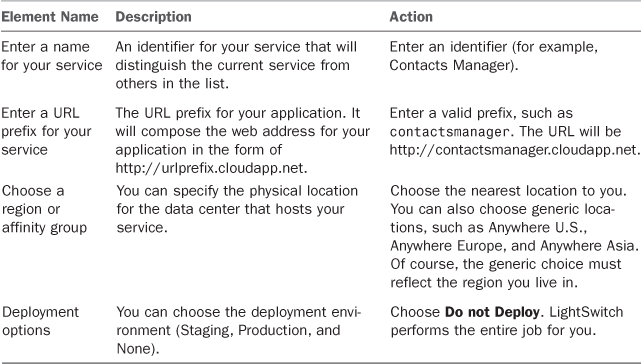
Figure 10.58 shows what the dialog looks like.
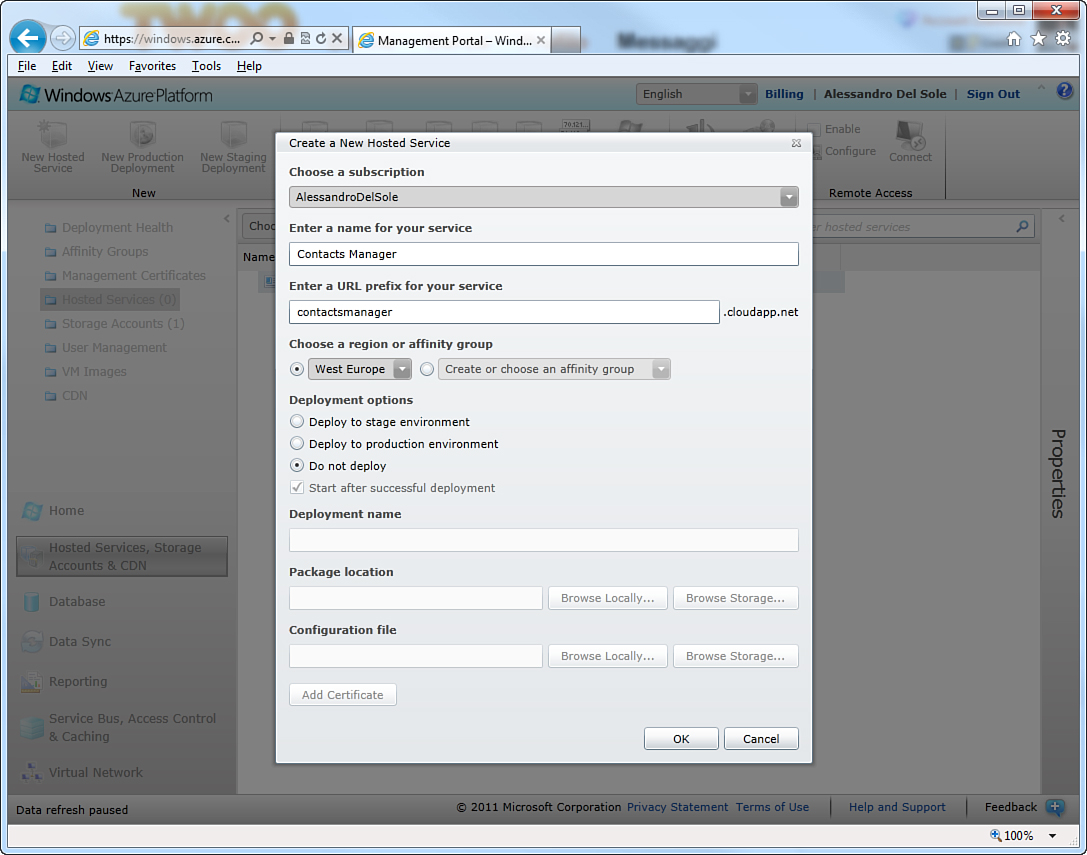
Figure 10.58. Settings for the new hosted service.
Note that while you type the URL prefix, you will get notification if it has already been chosen by other users. If that occurs, you must select a different one. Click OK and wait for the operation to complete. The service status changes to Created when ready.
You begin paying according to your subscription plans from the moment at which the hosted service is created, no matter if no application is up and running. In addition, you still pay if your application has been deployed but it is stopped. The reason is that when creating a new hosted service, a bunch of resources are allocated in the server farm and are not available for others.
At this point, select the Storage Accounts item in the list of available services. When ready, click New Storage Account on the toolbar. At this point, the dialog called Create a New Storage Account appears. Here you have to enter the URL prefix and a region. You can choose the same URL prefix as for the hosted service, and you must select the nearest location to you. Figure 10.59 shows a configuration example.
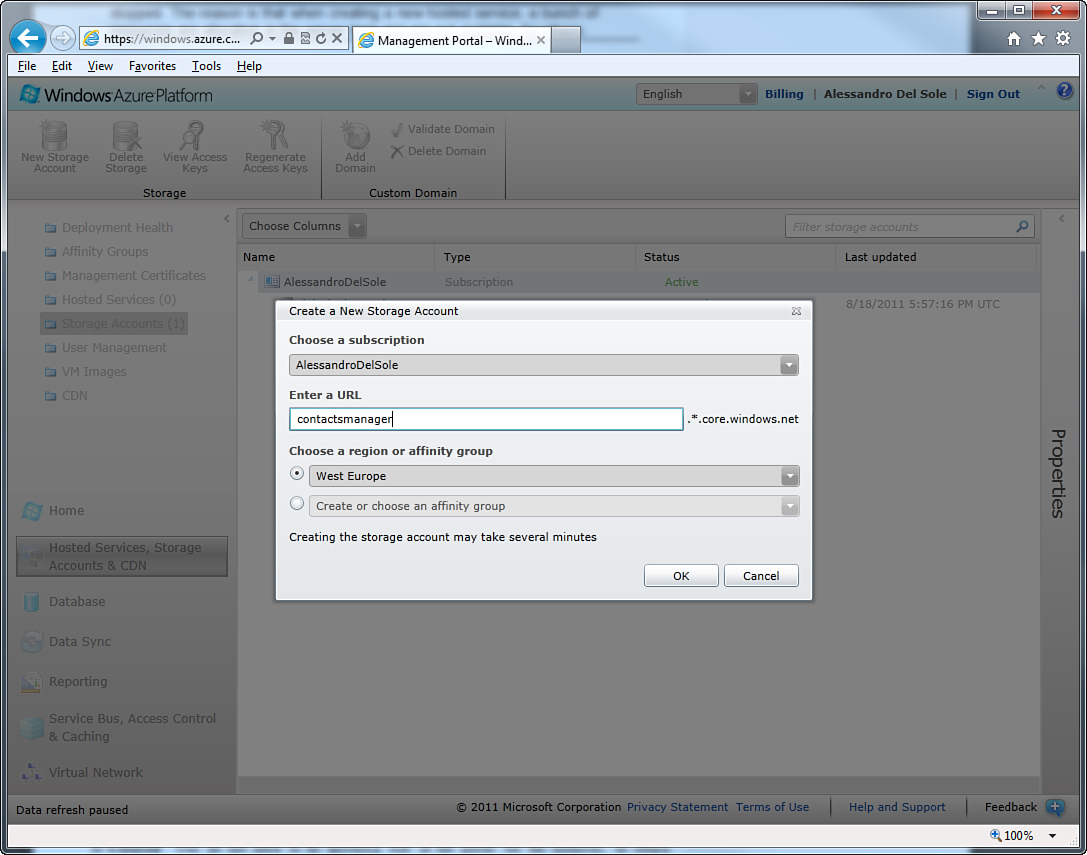
Figure 10.59. Settings for the new storage account.
Similarly, for the hosted service, the creation completes when the service status changes to Created. You do not need to do anything else in the portal for the moment, so return to LightSwitch. In the Azure Service Configuration screen, choose the newly created services, respectively, in the Service and Storage combo boxes. You must also choose the deployment environment (either Staging or Production). The staging environment enables you to test your cloud application before it is available publicly so that you can check whether everything is working correctly, including compute resources consumption. Applications deployed to the staging environment are reachable via a temporary web address that you can find in the Azure Management Portal. For the sake of simplicity, choose the Production environment so that the application will be immediately available publicly once deployed. At this point, the Publish Wizard looks like Figure 10.60.
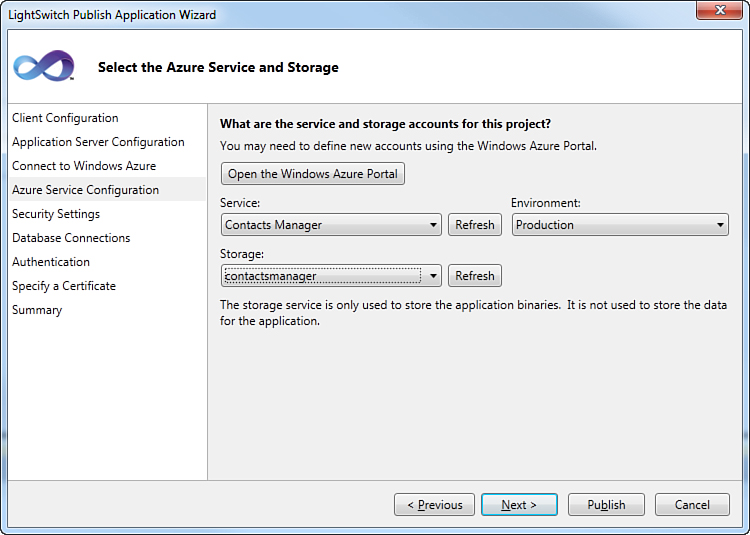
Figure 10.60. Services settings in the Publish Wizard.
Now click Next to enter the Security Settings screen. Here you have to specify another digital certificate, this time of type SLL (.pfx file) by clicking the Upload a PFX File button. The reason for this second certificate is explained in the dialog, and basically this requirement is important for communications over the HTTPS, so that application data and login credentials have deeper protection. If you do not own an SSL certificate, you can still create a self-signed one for testing purposes.
As suggested in the Publish Wizard, this is optimal for testing purposes. However, you should purchase a valid certificate from a licensed vendor when deploying applications to production, especially because a test certificate accepts certificate errors in the browser and because it will not be valid for desktop applications. (Only web applications can be tested with a self-signed certificate.) To create a self-signed certificate, expand the combo box and select the option to create a new certificate. This action launches the New Self-Signed Certificate dialog that you must fill with the required information. Figure 10.61 shows an example.
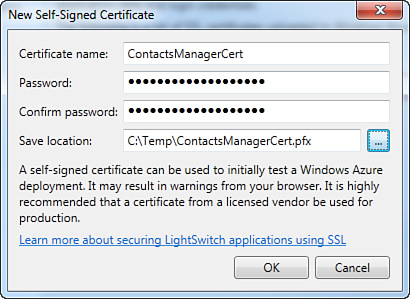
Figure 10.61. Creating a new self-signed SSL certificate.
You can specify whichever name and password you want. It is important to supply a save location for later reuse. When you click OK, the new certificate becomes visible in the Publish Wizard, as shown in Figure 10.62.
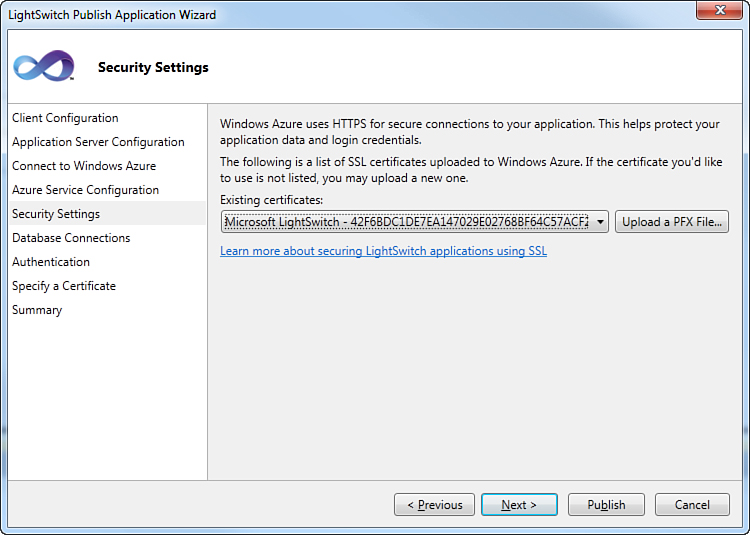
Figure 10.62. Setting the PFX certificate for deployment.
At this point, you have completed the steps required to configure Windows Azure’s service hosting for the LightSwitch application. You can now complete the rest of the process, so click Next.
Database Connection: Configuring SQL Azure
At the beginning of this section about publishing applications to Windows Azure, you learned that in this particular scenario, all databases must stay on a SQL Azure server. The intrinsic database is created by LightSwitch for you. In the Database Connections screen of the Publish Wizard, you must specify two connection strings to the intrinsic database. Figure 10.63 shows what the dialog looks like.
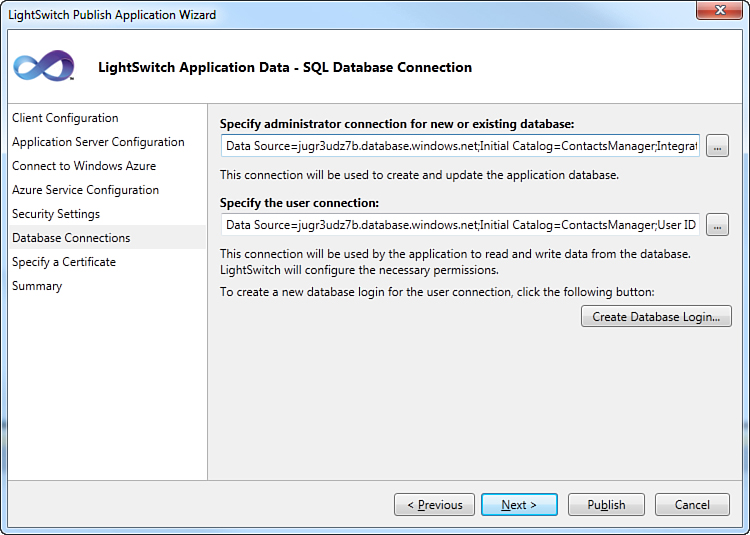
Figure 10.63. Specifying connection strings to the intrinsic database.
The first connection string is for administration purposes and requires specifying the server administrator’s username and password. To specify this, click the browsing (...) button, and then follow these steps to configure the Connection Properties dialog that appears:
1. In the Server Name text box, enter the fully qualified for your SQL Azure server. (You can retrieve this in the Management Portal.)
2. In the Log On To server box, specify your administrator credentials.
3. In the Connect to a Database box, type InvoiceManagement.
Figure 10.64 shows a connection example.
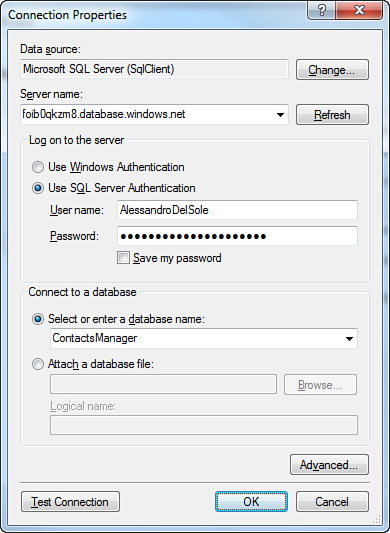
Figure 10.64. Specifying administrator login information.
Now you have to specify login credentials for the standard user. Basically, the standard user is any user accessing the database with SQL credentials, different from administrator ones. Click Create Database Login, and in the same-named dialog box, enter the new username and password for the standard user, as shown in Figure 10.65.
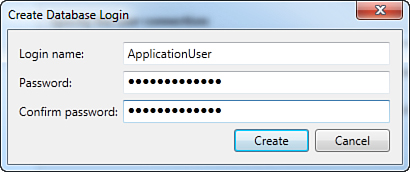
Figure 10.65. Creating a new standard user.
After the standard user has been created, repeat the steps for configuring the Connection Properties dialog, this time for the second connection string by entering credentials of the standard user. When ready, click Next.
Authentication Settings
In the Authentication Settings screen, you just need to enter login settings for the application administrator, as you learned previously. So, enter the required information and go ahead.
Other Connections
If you have multiple data sources other than the intrinsic database, an Other Connections screen will show. In this screen, you specify the connection strings required to access external data sources. This is not new to you; you configured this dialog previously. What you have to do when deploying to Azure is just specify the appropriate connection string to a database in the cloud or to a SharePoint or WCF RIA Service that your application needs to connect to.
Accessing Sharepoint 2010 From the Cloud
Because of some security restrictions, connecting to SharePoint 2010 from an application running on Windows Azure might not be successful. If this is your situation, you could build a Virtual Machine role that allows you to install additional components, including SharePoint 2010, onto your Azure server.
Deployment Summary
You can skip the Specify a Certificate screen, which is not required for web clients (but it is for desktop clients), so go to the Summary screen. As demonstrated in Figure 10.66, this screen provides summary information about the deployment process.
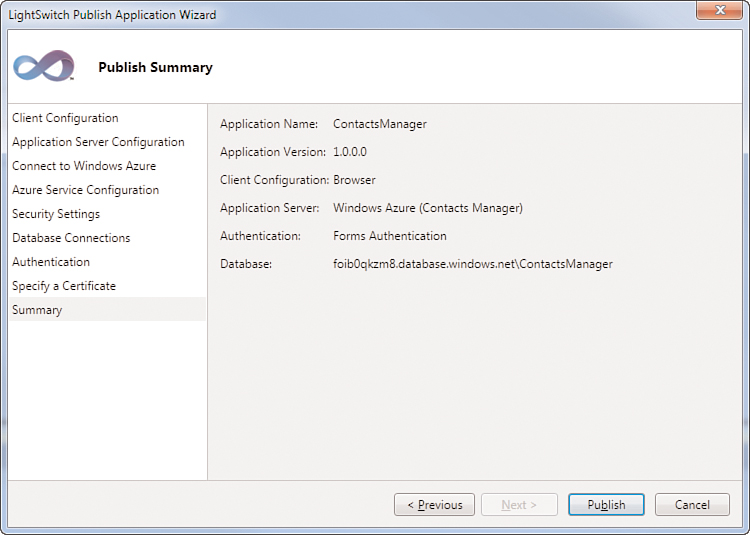
Figure 10.66. Summary information before publishing.
At this point, you are ready to publish your application to Windows Azure.
Publishing to Windows Azure
All you have to do now is click Publish. At this point, Visual Studio LightSwitch starts the publish process, which can require up to 15 minutes. Other than in the Output window, you can stay informed about the publish progress by checking the hosted service state in the Windows Azure Management Portal, as shown in Figure 10.67.
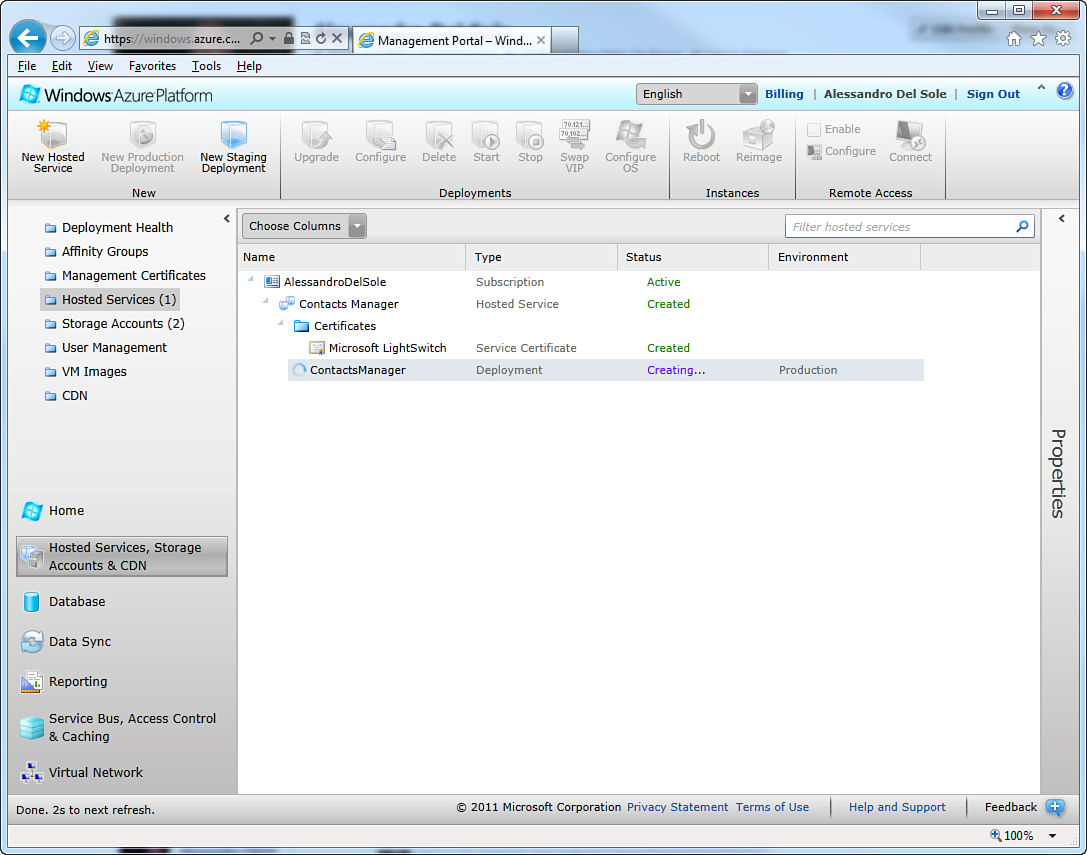
Figure 10.67. Checking the publish process in the Windows Azure Management Portal.
At the end of the process, you will see that in the Management Portal the hosted service, the Web role, and the role instance change their status to Started. When this happens, the application is available to end users. You can type the web address in your browser’s bar to reach the application, as shown in Figure 10.68.
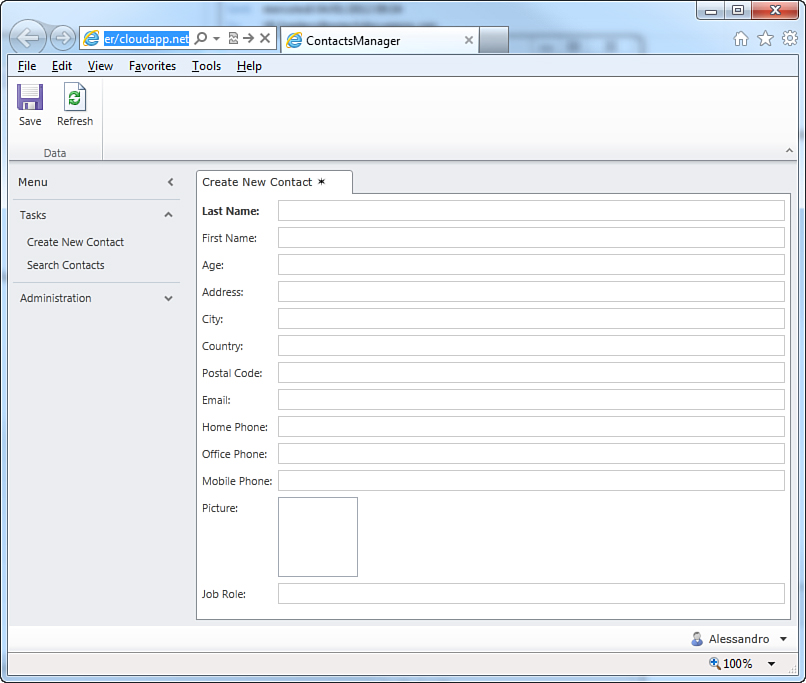
Figure 10.68. The Contacts Manager application is running, hosted by Windows Azure.
So, it is easy to publish LightSwitch applications to Windows Azure with just a few steps. Your customers or colleagues in the organization will be able to reach the application via the Internet by simply typing the web address in their web browser.
Configuring Role Instances
When you publish applications to Windows Azure, by default Visual Studio LightSwitch configures the Web role to be hosted in a small size compute instance. Pay particular attention to this, because you save money only if you use the compute instance size that is suggested in your subscription. For example, if you are an MSDN subscriber, you have 1500 hours/month of one small compute instance or, alternatively, 750 hours/month of two small compute instances. So, if this is your case, the default setting is good for you. By the way, there are some kinds of introductory subscriptions offering 750 hours/month of extra small compute instances or 25 hours/month of small compute instances. If this is your case, hosting the application in a small size instance means paying extra money after only 25 hours of computing service. So, you need to change the compute instance size within the ServiceDefinition.csdef file. This file is required by the Windows Azure platform and is generated by LightSwitch when you request publishing. To reach this file, you have to enable the File View in Solution Explorer after deploying the application. Double-click the file to open it in the code editor. As you can see, it is nothing but an XML file containing configuration settings for the Web role. You do not need to know how the file is structured at this point; you just need to change the value of the vmsize property to the appropriate compute instance size. For example, you can replace Small with ExtraSmall. Of course, you can choose a high-performance compute instance size if this is your requirement. About this, other supported values are Medium, Large, and ExtraLarge. After you complete your edits, you have to rebuild the application and deploy the updated service definition file to your Windows Azure subscription. You do not need to deploy the application from Visual Studio LightSwitch again. You can just replace the hosted service’s content in the Management Portal with the updated file or edit this file directly through the Management Portal.
Getting the “Powered by Windows Azure” Logo
Microsoft created a web portal where developers can certify (at no charge) their application over a number of technologies, including Windows Azure. This web portal enables developers to test a number of features in the application to see whether they run correctly on the specified technologies. If all tests pass, the developer receives logos that can be placed on the application.
If you successfully test a LightSwitch application against Windows Azure and SQL Azure, you receive the Powered by Windows Azure logo. Of course, the certification process is not mandatory. It is free, though; so if you want to take a closer look, check out my blog post at http://goo.gl/pkZab.
Summary
Visual Studio LightSwitch makes it really easy to deploy both desktop and web clients to end users. In the Application Designer, you can set properties such as icon, logo, shell extensions, and themes to prepare your application for deployment. You can also localize common parts of the user interface easily with just one click. After accomplishing this, to deploy your application, select Build, Publish regardless of the target host. The LightSwitch Publish Wizard guides you with common steps to configure your deployment package according to both the application type and hosting service, including local services, IIS hosting, and Windows Azure hosting. By following the guided procedure, you save a lot of time because you do not need to have deep knowledge about configuring hosting services, except for a limited number of easy steps. This chapter completes an important part of the book, but now you are ready for something very interesting, which is architecture.