
Chapter 10. Configuration Files
In this chapter, you will learn the following:
• Structure of XML configuration files
• Process of exporting and importing XML configuration files
• Editing complete or partial XML configuration files
ESA and the XML Configuration Format
Every Email Security Appliance (ESA) maintains an internal configuration repository that’s minimally exposed to administrators. The only interface to this configuration is through the supported XML configuration format provided in files by export from a running ESA. This XML document is defined by the Document Type Definition (DTD) file config.dtd on the ESA filesystem in the configuration directory.
The XML configuration file contains all the configuration settings for that particular appliance. It does not contain any of the data on the system, namely messages in queue or in any quarantine, or any files on the ESA filesystem. It records the log subscriptions and options, but not any logging data. In other words, if you’re replacing an ESA, you need to take separate steps to get the messages delivered and log files transferred away from the ESA. It stores the settings for the end user Safelist and Blocklist (SLBL), but not the actual entries, so if you’re using that feature, you need to export that table.
The configuration file from an appliance is suitable for use as a complete backup for restoring to the same appliance, or to another appliance, including different models of ESA. Because of that, you can use it when replacing appliances or upgrading to new hardware models, and if you’re willing to tinker with the files, you can even propagate a single appliance configuration across multiple appliances.
Configuration File Structure
The XML format that the ESA uses is well-formed XML that should be parsable by any browser or editor capable of handling the format, but it’s often easier to treat it as plain text and open it in a text editor. The ESA uses UNIX-style line endings, so some Windows editors (like Notepad) won’t display it legibly. Most web browsers can display XML data, too, but may require that the DTD document be available. Because they don’t allow editing of XML, web browsers are of limited use for config files.
Being XML, the configuration file structure is hierarchical. If you plan on editing the configuration files, you need to maintain this hierarchy. Like all XML format files, the configuration begins with the XML header:
<?xml version="1.0" encoding="ISO-8859-1"?>
<!DOCTYPE config SYSTEM "config.dtd">
The next section is information about the specific appliance that the file was exported from, contained in a multiline XML comment. The ESA ignores these comments when importing a configuration, so this section is just for your reference. When editing XML, you don’t need to preserve the comments. Example 10-1 shows a sample configuration comments section.
Example 10-1. XML Configuration Comments
<!--
Product: IronPort C670 Messaging Gateway(tm) Appliance
Model Number: C670
Version: 7.1.3-010
Serial Number: 11C09F3AEB36-1005CR41
Number of CPUs: 8
Memory (GB): 4
Current Time: Thu Nov 17 14:05:16 2011
Feature "IronPort Anti-Spam": Quantity = 1, Time Remaining = "30 days"
Feature "Sophos": Quantity = 1, Time Remaining = "30 days"
Feature "Virus Outbreak Filters": Quantity = 1, Time Remaining = "30 days"
Feature "Bounce Verification": Quantity = 1, Time Remaining = "Perpetual"
-->
The actual ESA configuration data starts and ends with the config element that is the root of the document tree. Every configuration import must have this top-level config element, even if you’re only importing a partial configuration, which is a subject discussed later in this chapter. From there, the subelements of the configuration are grouped logically. The first portion of the config is demarcated by the XML comment header that reads Network Configuration. This section is chiefly concerned with local-machine settings: hostnames, interfaces, Domain Name System (DNS), gateways, routing, and other network settings. If you were comparing configuration files from different ESAs that are similarly configured, this is where you would see all the differences. By contrast, the remainder of the configuration is less machine-specific: policy, logging, delivery, and so on. The organization is similar to the way machine versus group or cluster settings are managed in a centralized management cluster, and that’s not just coincidence. The goal of the XML structure was to clearly separate per-machine configuration from global policy settings, a fact that we put to use later in this chapter when we modify and import configuration files.
Here are the major sections of the configuration (in order):
1. Network Configuration: Basic IP networking and host-specific settings. In this section, you’ll find all the configured IP interfaces, your DNS settings, the default gateway and any static routes, and the configuration of the physical Ethernet ports.
2. System Configuration: Miscellaneous appliance configurations, other than policy. NTP server settings, all TLS certificates, local user accounts, and service update rules are stored in this section. Most of these are considered cluster-level settings because they would be identical across multiple appliances, but TLS certificates are more often configured per ESA. You would only use the same TLS certificates across multiple ESAs if they were load balanced with a shared VIP.
3. Mail Configuration: The bulk of the policy, filtering, and email routing configuration is stored in this section. All listener configuration and subcomponents, like HAT and RAT, are here. Also includes LDAP, bounce profiles, system quarantines, destination controls, SMTP routes, dictionaries, message filters, DKIM signing profiles and keys, and SPF policies.
4. Log File and Alert Configuration: As its name suggests, this section starts with log subscriptions and system alerts, but also includes masquerading, global security services settings, SNMP, and text resources (like notifications and bounce templates). It also contains all the incoming and outgoing mail policies and their associated content filters.
5. End User Quarantine Configuration: A short section with just the <euq> element. Contains the configuration settings for the end-user quarantine, whether enabled or not. If you’re using the centralized quarantine on an SMA, this section contains only the ESA portion of that configuration. The SMA side of the configuration is stored in the SMA’s configuration file.
6. Bounce Verification: As you’d expect, this section contains the configuration for the bounce verification feature, but also includes global reporting settings and a record for all the periodic scheduled reports configuration on this appliance.
7. Security Management: Includes the configuration settings for centralized reporting and tracking when those SMA features are in use. Also includes SSL cipher settings and envelope encryption profiles.
8. RSA Email Data Loss Prevention: Settings for the local RSA DLP engine. Includes all the enabled policies, custom classifiers, custom dictionaries, and DLP actions.
9. System Packet Capture: A single element, <system_packet_trace>, includes the settings for recording packets passing through the ESA.
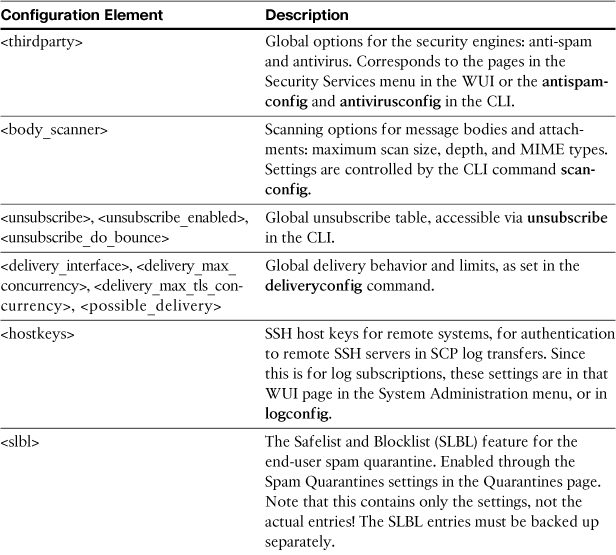
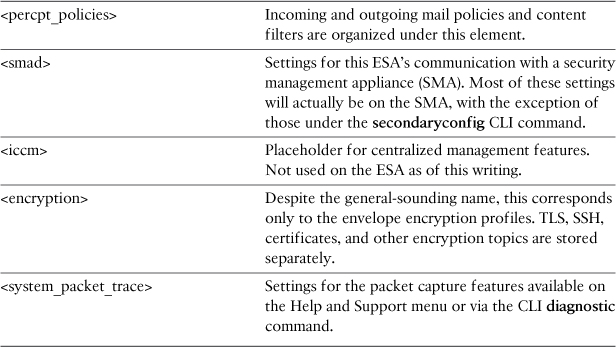
The XML element names are usually self-explanatory, and you’ll be able to tell which configuration sections correspond to which CLI command or WUI pages. The <listeners> element corresponds to the listenerconfig CLI command or the Listeners page under the Network menu in the WUI. <log_subscriptions> correspond to logconfig or the Log Subscriptions page. Not all are quite so easily correlated. Table 10-1 lists these elements and their corresponding CLI command or WUI page.
Table 10-1. Obscure XML Configuration Elements
Importing and Exporting Configuration Files
The chief purpose of the XML configuration format is for backup and restoration of configuration settings, either on the same appliance or when copying configurations to another appliance. You can export the configuration to the ESA filesystem or to your local workstation from the tools in the WUI, and the ESA can, naturally, send you a copy via email. In the WUI, configuration file management is all available in the Configuration File page of the System Administration menu. In the CLI, the commands are saveconfig, mailconfig, and loadconfig.
When you perform an AsyncOS upgrade, the ESA automatically preserves all configuration settings, so there’s no need to import and export manually as part of the upgrade process. Existing settings will be preserved, and any new features introduced in the new AsyncOS version will have a default configuration applied. In some cases, when a feature is overhauled, your older settings will be maintained as close to the original interpretation as possible. If such a translation between versions will affect operation of the appliance, the change will be noted in the release notes for the new version.
If you don’t need to export the configuration for upgrade, what reasons would you have for exporting and importing the XML configuration files? There are a few reasons:
• In the event of hardware failure, you can easily replace one ESA hardware chassis with a new one by importing the configuration into the new device. Having recent configuration files for all of your ESAs makes the individual appliances easier to replace.
• Backing out configuration changes. If a configuration change has undesirable affects, it’s easy to revert to an earlier configuration, if you’ve saved one. The ESA does not have an automatic configuration revert process.
• Modifying portions of the configuration. If you want to make bulk changes to a configuration, or import just a portion of a configuration, you can directly edit the XML file.
In general, I recommend exporting the configuration file on a regular basis (see the section “Automating Configuration File Backup” later in this chapter), or at least on each of these events:
• Before any upgrade: Having a configuration export at your current AsyncOS version allows you to restore the configuration if you had to roll back the upgrade with the revert command. The revert process clears the ESA configuration.
• After any upgrade: You should save a copy of the new configuration immediately after an upgrade just to have an original at the new version. It’s usually difficult to restore a configuration from a different version of AsyncOS.
• Before and after any major configuration changes: If you’re changing IP addresses and hostnames, altering security settings, or other high-impact changes, having a pre-change configuration file allows for easy back-out should something go wrong. This should be a part of every change control process.
Exporting
Exporting the configuration file from the ESA is trivial from either the WUI Configuration File page in the System Administration menu, or the CLI commands mailconfig or saveconfig. From the WUI, you can choose to save the exported configuration directly to your computer. Other options are to have the ESA email you the configuration (of course) or save it to the ESA’s filesystem. If you’re saving a configuration for archive or backup purposes, you can use the email or local appliance save, but if you’re planning to manipulate the configuration file, save it to your local workstation to save the extra steps.
There’s really only one thing to decide during export: whether to mask passwords or not. This description is misleading, because choosing to exclude passwords actually does the following:
• Replaces the password strings for all local accounts with a line of asterisks. Local user accounts are MD5 hashed in unmasked configuration files anyway, but masking passwords removes the hashes.
• Replaces the private key portion of any installed certificates with asterisks.
• Replaces any DKIM private (signing) keys with asterisks.
• Replaces the password strings for credentials to external systems, like LDAP and FTP, with asterisks. These are stored in the clear in unmasked configuration files.
The purpose of masking passwords is to exclude the sensitive information in this list when sharing configuration files with others. Whenever you export a configuration for a human audience, or when you plan to send the file outside of your department or organization, it’s a good idea to use the Mask Passwords option.
If you expect to import the configuration file at some later date, you must choose to include passwords by unchecking the box marked Mask passwords in the configuration files. Without the passwords and other secret information, the import process will fail.
It is possible to hand-edit and restore a masked-password configuration file so that it can be imported, but you really don’t want that hassle.
In recent AsyncOS versions, the upgrade wizard prompts you to save a copy of the configuration before upgrade. I recommend that you do this, but you should also save a copy of the configuration immediately after upgrade. The ESA doesn’t prompt you for this post-upgrade export, but it’s extremely valuable to have. In all likelihood, you won’t be able to easily import an older configuration file on a new AsyncOS version.
Importing
If you’re completely replacing one ESA with another, you can simply import the entire thing without editing. If the two ESAs are running the same version, the configuration will import without errors. For ESAs running the same major/minor version on different builds, it will probably import cleanly, but it varies depending on releases. For ESAs with different major/minor versions, it’s unlikely to import cleanly.
If the import process encounters an error parsing the loaded configuration file, the entire import fails and an error message is displayed. No portion of the configuration file is loaded unless the entire configuration is valid. Once imported, the changes are not committed automatically and you must commit for the configuration to take effect. Before committing changes, you can view the imported configuration settings in all WUI pages, which is a good idea for validating the new configuration before commit.
If the file does not import cleanly, the import page will display an error and indicate the line number of the configuration file where the error occurred, as shown in Figure 10-1.

Figure 10-1. Configuration File Import Error
The WUI will only show the first error, as the import process bails out after the first parse problem. There’s no way to know ahead of time about each error, so you have to continually fix, upload, and import to correct all the errors.
Note these things that are not imported by this process:
• Interface MAC addresses: The ESA won’t change the hardware addresses of the physical interfaces. The MACs are fixed on each appliance.
• Hardware serial number: The ESA won’t change its serial number.
• License keys: Keys are tied to a specific hardware serial number and must be issued independently for each appliance. You can import configuration settings for an engine, like anti-spam, into an appliance that does not have a feature key for it, but that will not import a valid key for it.
• Spam quarantine SLBL entries: If you’re using this quarantine feature that allows end users to manage their own list of senders, the database is stored separately from the configuration and has its own backup.
If present in the imported configuration file, these elements will just be ignored. All other settings will be replaced by the values in the configuration file.
If you’re importing a configuration file that has enabled security services into a new appliance that has those security engines disabled, the import will not enable the engines. The configuration will be imported, but the engine will still be disabled. You’ll have to manually enable the engine, including accepting the license agreement, but at that point, the configuration you imported will be intact.
In other words, if your new appliance hasn’t been set up yet, or has its feature keys expired, or for some other reason, has engines like anti-spam or antivirus disabled, importing a configuration won’t fix that. For this reason, I recommend that brand-new appliances be set up using the System Setup Wizard before you import an existing configuration.
If you’re importing a configuration on a different appliance model than the one that produced the file, you have to deal with the potential differences in the hardware. For models in the same class (such as C660 and C670), the configuration should import cleanly. The 1U units like the C160 only have two physical Ethernet interfaces, Data 1 and Data 2, and importing a C670 configuration with a management interface results in an error. Simply delete the section of the configuration for the management interface. The same holds true of appliances with fiber interfaces (Data 3 and Data 4). You might have to move the IP address and hostname settings from one interface to another, or even rethink your network installation.
Editing Configuration Files
Up to this point, we discussed exporting and importing complete configuration files, and that’s adequate for basic ESA backup and restore. If you simply want to revert to an older configuration or replace one appliance with another in a one-for-one swap, you shouldn’t have to dig any deeper.
For other tasks, such as duplicating configuration from one appliance to many or copying settings for a specific feature from one appliance to another, you need to delve into the configuration file and edit the values stored in the XML elements.
Duplicating a Configuration
When you have a stable master configuration on one ESA, but need an identical configuration on other target appliances, you can manually create a configuration file for the new ESA by editing this master configuration. Conveniently, the XML elements in the configuration that need editing in such a situation are grouped near the top. To start, export a configuration from your master ESA and open the file for editing. After the XML header and system comments, you’ll come across the Network Configuration section, where you’ll need to edit these elements, at a minimum:
• <hostname>: The global hostname for the appliance, which is displayed in the WUI and CLI and used as an identifier in reporting, tracking, and centralized management.
• <interfaces>: You need to change the <ip>, <interface_hostname>, and <netmask> subelements to change this ESA’s network information. Don’t change the <phys_interface> value, because this needs to be consistent with the <port_name> element that defines the name of the physical Ethernet jacks on the ESA.
• <ethernet_settings>: Best practice is to leave all the interfaces set to autoselect, but if you have specific settings, you may need to modify this between appliances. Don’t worry about the <macaddr> element, because the target ESA will not import this.
• <dns>: If your master and target ESA will have different DNS server settings, you can modify them here. You can also modify this after the import.
• <default_gateway>: The default route for all packets destined for nonlocal networks. It’s critical that this be correct for the target machine.
• <routes>: The static routing table, critical in multiinterface network deployments.
You need to modify these basic elements to give your target ESA a network identity that differs from the master. Take care—if you import a configuration with an invalid network setting, you could lose connectivity to the new ESA. If the network settings conflict with another, like a duplicate IP address, you’ll cause both appliances to be unavailable. You can certainly edit other elements in the XML, but I prefer to modify only the critical network elements, and then import the configuration. Before I commit, I review the imported network settings and make any other required changes.
If your target ESA is a brand-new appliance, start by running the System Setup Wizard (SSW), even if you plan on completely overwriting the configuration. For one reason, the full WUI of the ESA won’t even be available until you complete the wizard and install the basic configuration. For another, the SSW also takes care of basic setup tasks that a configuration import will not do, like enabling security engines.
Remember that importing a configuration imports every setting that’s present in the file. Existing settings are overwritten completely. Because this process falls into the category of major configuration change, I recommend saving the existing ESA configuration before importing another.
Partial Configuration Files
If you want to duplicate the settings for a single feature of the ESA, most of the time, the right approach is to export the relevant table, copy the exported file, and import into the target ESA using the WUI Configuration File page or the CLI command loadconfig. This works perfectly for tables like HAT, RAT, SMPTRoutes, and Destination Controls, but it’s simply unavailable for other features that don’t support an individual import/export.
One good example is the table of administrative users. In the WUI, controls are provided for creating, editing, and deleting user accounts, but you can’t import/export en masse. Further, without knowing what each user’s account password is, you can’t even manually recreate the accounts on another ESA, because the password strings are not stored directly, but as MD5 hashes. User accounts will certainly be duplicated if you export the entire XML configuration file, but let’s suppose that you only want to duplicate the user account information and not the entire appliance configuration. You can accomplish this with a partial configuration file.
As the name suggests, a partial configuration doesn’t have every single XML element present. To be imported, it must be valid XML, include the declarations at the top, and must include the top level <config> element. In fact, that’s technically all that’s required for a minimal partial configuration, as shown in Example 10-2.
Example 10-2. Absolutely Minimal Partial Configuration
<?xml version="1.0" encoding="ISO-8859-1"?>
<!DOCTYPE config SYSTEM "config.dtd">
<config>
</config>
Of course, that partial configuration contains no actual configuration settings, and so it isn’t much use to us as is. The ESA runs the import process and notes that there are no settings changed. However, we can use it as a framework to build more useful files for import.
To accomplish the goal of importing only user account information, you can create a partial configuration from scratch or by taking an exported configuration and deleting the unnecessary elements. In the case of the user accounts, I simply copied that section of a configuration file into my framework. You must include the entire second-level <users> element and all of its subelements, even if those elements have no value. Example 10-3 shows the resulting partial config file.
Example 10-3. Partial XML Config File for Users
<?xml version="1.0" encoding="ISO-8859-1"?>
<!DOCTYPE config SYSTEM "config.dtd">
<config>
<users>
<user>
<username>admin</username>
<fullname>Administrator</fullname>
<group>admin</group>
<enc_password>$1$VvOyFxKd$OF2Cs/W0ZTWuGTtMvT5zc/</enc_password>
</user>
<user>
<username>chriport</username>
<fullname>Chris Porter</fullname>
<group>operators</group>
<enc_password>$1$fv.kJkLL$0SFOluOghTpr2u1ibXjqU/</enc_password>
</user>
<user>
<username>reports</username>
<fullname>Report Scripts</fullname>
<group>guest</group>
<enc_password>$1$M614l0Ia$d2bxYzjRFJGT84mYB.hmr0</enc_password>
</user>
</users>
</config>
Importing this configuration file completely replaces the table of users. Any config section not represented in the imported XML configuration is simply ignored; the target appliance retains its configuration for those settings. As with any other configuration import, you can view the updated configuration before you commit the changes.
This approach works for a variety of configuration settings, but you must include the element hierarchy all the way back to the root <config> element, and you must include all the subelements of every element. This set of requirements makes it impractical to partial-import certain settings.
For example, I might want to copy just the incoming content filters from one ESA to another. However, incoming content filters are grouped in the element <content_filters>, whose parent element is <inbound_policies>. That element’s immediate parent is <perrcpt_policies>, which is a direct subelement of <config>. To have a valid configuration, you need to include that entire hierarchy, including all incoming and outgoing mail policy settings and all incoming and outgoing content filters.
Automating Configuration File Backup
Good ESA management practices include keeping recent backups of all of your appliance configurations to enable appliance replacement or roll back configuration changes. In many environments, asking the administrators to follow backup best practices simply isn’t enough, and you must have an automated backup facility.
You must have an external system capable of running CLI commands or connecting to the WUI to back up the configuration on a regular schedule, as the ESA has no capabilities for running commands at arbitrary times.
Automatic configuration history is recorded when changes are committed if you enabled a Configuration History log subscription, but as discussed in Chapter 6, “Additional Management Services,” restoring a configuration from an exported file is much easier than from the log subscription.
The simplest means of regularly exporting the configuration is to use an external SSH or Telnet client to connect to the ESA and issue the mailconfig CLI command to have the ESA send the configuration file as an attachment to a specified email address:
mailconfig [email protected] y
The y argument at the end tells the ESA to include passwords and private keys in the exported configuration.
Configuration Backup via CLI
Using mailconfig to email the configuration on regular intervals is adequate in most cases, but if you prefer a method that does not rely on SMTP (in the event of outages), there is another approach: Export the configuration to the ESA filesystem and the retrieve the file via FTP or SCP.
The CLI saveconfig command can be batch scripted, but unfortunately, the ESA chooses the export filename based on the ESA serial number and the current timestamp. You have to parse the output of this command to get the filename. Here’s what the saveconfig command output looks like when run in batch mode:
ssh [email protected] "saveconfig n"
File written on machine "esa02.cisco.com" to the location
"/configuration/C160-00221D61A91-4ZPTNK1-20111126T212236.xml".
Configuration saved.
The output includes the full path and filename, which makes it convenient to script. A simple regex parse on the script output gives the full path to use with scp. Like other scripts that use SSH, you need to install SSH keys on the ESA for this script to run without being prompted for passwords, as described in Chapter 5, “Command-Line Interface.”
Example 10-4 shows the complete Perl script.
Example 10-4. Perl Script to Save and Retrieve XML Configuration Files
#!/usr/bin/perl
use strict;
my $hostname = "esa.example.com";
my $username = "admin";
my $port = 22;
my $fname;
open SSH, "ssh -p $port $username@$hostname "saveconfig y"|";
while (<SSH>) {
if (/"(/configuration/.*.xml)"/) {
$fname = $1;
print "found config file $fname
";
system "scp -P $port $username@$hostname:$fname .";
}
}
close SSH;
It would be easy to extend this script to copy the configuration file to network storage, a database, or to use a version-control system to check in the configuration file. For multiple ESAs, you can run the script multiple times or modify it to loop through a list of ESAs.
Configuration Backup via WUI
Chapter 9, “Automating Tasks,” presented some scripts that used the HTTP WUI to make configuration changes to an ESA, automating the same steps a human user would with a browser. You can use the same technique to export configuration files via HTTP or HTTPS.
Using the HTTP WUI for this export might be preferable if you don’t have SSH access, or if exchanging SSH keys isn’t possible. This method is essentially the same as logging in with a browser—as long as you can reach the WUI, you can run this script. Like the examples in Chapter 9, the script has to log in so it can get an authentication session cookie; then, it can use the cookie for the subsequent request.
The complete listing is shown in Example 10-5.
Example 10-5. Configuration Backup via WUI
'''''''''''''''''''''''''''
' esaConfigRetrieve.vbs
'
' VBScript example for retrieving configuration file from ESA / SMA
' on Cisco IronPort ESA, WSA, and SMA appliances
' Created by: Chris Porter
' [email protected]
' Nov 2011
'
'
dim user
user = "admin"
dim pass
pass = "ironport"
dim loginURL
loginURL = "https://esa.example.com/login?username=" & user & "&password=" & pass &
"&action:Login=Login"
dim configURL
configURL = "https://esa.example.com/system_administration/configuration_file?
action=Save&operation=download&mask_passwords=0&load_from=from_appliance"
dim sidCookie
Set wget = WScript.CreateObject ("MSXML2.serverXMLHttp")
wget.open "GET", loginURL, False ' first, log in to the appliance
wget.setOption 2, 13056 'ignore HTTPS cert issues
wget.send ""
If err.Number = 0 Then
sidCookie = wget.getResponseHeader ("Set-Cookie") ' retrieve
the sid cookie if we logged in properly
Else
WScript.Echo "Error: " & err.Number & ": " & err.Description
End If
wget.open "GET", configURL, False
wget.setRequestHeader "Cookie", sidCookie ' return the sid value we got
when logging in
wget.send
If err.Number = 0 Then
WScript.Echo wget.responseText ' dump the config
to stdout
Else
WScript.Echo "Error: " & err.Number & ": " & err.Description
End If
WScript.Quit
Configuration Files in Centralized Management Clusters
The ESA peer-to-peer centralized management features mostly obviate the need for saving configuration files. ESA CM was designed to have that level of configuration redundancy: Every appliance in the cluster has the entire configuration for all cluster, group, and machine settings. Replacing an individual appliance is a fairly simple process: Install the ESA on the network, upgrade it to the same AsyncOS version, and join the cluster. The collected cluster settings effectively back up all the policy and system settings. As long as you have at least one ESA in the cluster, all of your settings are preserved. In fact, it’s often easier to temporarily add machines to a cluster to duplicate configurations than it is to edit configuration files.
Still, you might want to have a valid configuration file, for all the reasons mentioned earlier in this chapter. When you use the saveconfig command, however, this message is displayed after the configuration file is saved:
WARNING: Clustered machines do not support loadconfig. Your configuration file
has complete data for the entire cluster, but cannot be used to restore a con-
figuration.
Likewise, the WUI has a similar message on the Configuration File page under the Load Configuration section. Exporting the configuration works, but the resulting file differs from a normal ESA XML file in that it adds a number of elements specifically for supporting clusters. You’ll see, right from the top, some of the differences:
<?xml version="1.0" encoding="ISO-8859-1"?>
<!DOCTYPE cluster_config SYSTEM "cluster_config.dtd">
<cluster_config>
<cluster>
The XML for CM uses a different DTD altogether. This configuration file actually has multiple <config> elements: one for the cluster, one for each group, and one for each machine. The child elements of <config> are the normal configuration settings, arranged under machine, group, and cluster level as appropriate. Because settings can exist at multiple levels, you may see the same child elements in different sections. For example, if DNS servers are configured at the cluster level, you’ll see the <dns> element near the top of the file, in the <cluster_config>.
This presents a big problem for restoring configurations: Restoring with loadconfig isn’t supported, and the cluster config file you have can’t be used for that purpose anyway. To export and import a single-system ESA configuration file, you must remove the machine from the cluster, which forces the ESA to flatten the configuration to a single-system version. Temporarily disconnecting from the cluster won’t do this—you must remove the machine. In fact, if your intent is to restore an earlier configuration, you have to take all the machines out and destroy the cluster, because an ESA that joins the cluster takes its settings from the other machines in the cluster, so it will lose the configuration you just imported.
The ultimate lesson is not to rely on configuration export for backup of clustered machines. You should, under normal circumstances, never need a backup—even replacing entire machines can be done without the manual configuration file process.
However, if you find yourself in a situation with nothing but a clustered ESA configuration file and a need to restore that file to an individual ESA, it is possible to construct a single-system configuration. Here are the steps to follow:
1. Start by creating a template for the single-system configuration, including the XML header, DTD, and the top-level <config> element.
2. From the <machine> element, copy the network configuration elements (like <hostname> and <interfaces>) into your template.
3. From the <clustergroup> and <cluster> elements, copy the relevant settings (like <listeners> and <perrcpt_policies>) into your template. Don’t copy any elements with names that start with “cluster.” Remember that, if an element isn’t included, the current ESA settings are retained, so you don’t necessarily have to copy it all.
4. Import the configuration file, read the ESA’s error message (if any), and correct the error. You’ll likely have XML parse errors and missing required elements the first few times. Repeat this step until the configuration imports successfully. Examine the configuration in the WUI before committing.
This should only be a last resort. The work involved varies depending on the AsyncOS version. You’ll have much more difficulty if the source and target ESAs are on different versions, so do yourself a favor and make sure that they’re the same before you start. In a CM environment, once this ESA configuration is imported and everything is to your liking, use this master ESA to create a new cluster.
Summary
This chapter examined the XML configuration file format thoroughly, including using the basic WUI and CLI features and some advanced techniques, like partial-configuration files. Because it’s strongly recommended that you back up your configuration files on a regular basis, we covered a variety of ways to automate this. Finally, we covered the limitations of configuration files in centralized management clusters.
In the next chapter, we dive into message and content filters, a versatile tool for security, acceptable use filtering, and message modification. Because there are two similar engines, we examine both and cover their similarities and differences.