Chapter 2. Customizing and Configuring Your NOOKcolor
Your NOOKcolor has many features that enable you to easily customize it and make it your own. There are also many settings that control how your NOOKcolor operates. In this chapter, you examine how to customize and configure your NOOKcolor.
Using Custom Wallpaper
You can customize your NOOKcolor by using custom wallpaper images. Wallpaper appears on the Home pages when you are on the Home screen.
Choosing a Wallpaper
The easiest place to change your NOOKcolor’s wallpaper is to go to the Home screen. Here’s how:
- Make sure your NOOKcolor is at the Home screen by pressing the Home button.
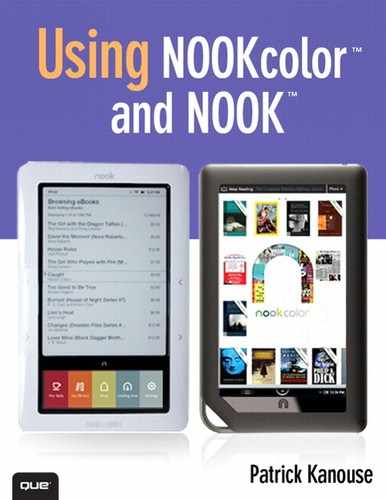
- In an area of the Home page without a cover, press and hold. A pop-up menu appears (see Figure 2.1).
Figure 2.1. This menu appears when you press and hold on a blank area of the Home page.
- Tap Change Wallpaper.
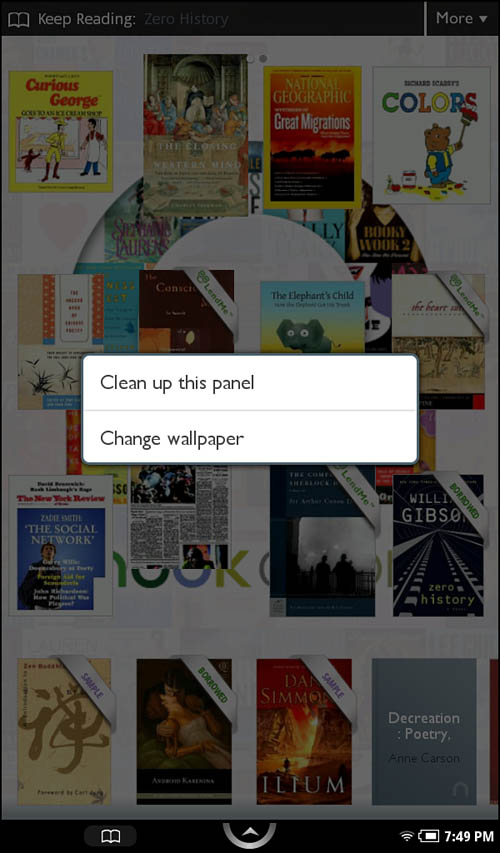
- Tap either Wallpaper or Photo Gallery (see Figure 2.2). Wallpaper are images provided by B&N or images you have loaded into the Wallpaper folder. Photo Gallery displays any photographs in JPG, PNG, or GIF formats you have placed on your NOOKcolor.
Figure 2.2. Make use of B&N provided image, add your own, or browse the Photo Gallery.
- If you chose Wallpaper, choose the wallpaper you want, and you are taken back to the Home screen with that image as the wallpaper. If you chose Photo Gallery, choose the photo you want. An enlarged version of the photo appears with an orange outlined box and two buttons: Save and Discard.
Tip
You can place images you want to use for wallpaper in the Wallpaper folder on your NOOKcolor. (Plug your NOOKcolor into your computer and navigate to that folder.) Because the Photo Gallery displays every JPG, GIF, and PNG file on your NOOKcolor, including cover images, the Photo Gallery list can quickly become lengthy.
- The orange outlined box is for cropping the image to the size of the wallpaper (see Figure 2.3). Whatever is inside the orange outlined box will be used for the wallpaper. To move that box, press and hold and then drag it around to wherever you want it. Tap Save to make it the wallpaper and return to the Home screen, or tap Discard to exit to the Home screen.
Figure 2.3. Pick the area of the image you want to use for your Home screen.

Following is a beneficial alternative method while you are browsing your photos:
- Tap the Nav Arrow.
- Tap Extras.
- Tap Gallery.
- Tap the photo you want to make your wallpaper. This makes that photo appear on the screen.
- Tap the photo and then tap Wallpaper in the menu options that appear at the bottom of the image.
- The orange outlined box is for cropping the image to the size of the wallpaper. Whatever is inside the orange outlined box appears as the wallpaper. To move that box, press and hold and then drag it around to wherever you want it. Tap Save to make it the wallpaper and return to the Home screen, or tap Discard to exit to the photo.
One Step Further—Decals
If you want to take the ultimate step in customizing your NOOKcolor, a DecalGirl skin (www.decalgirl.com) is the perfect addition. DecalGirl skins are vinyl skins with adhesive backing that you can easily apply. Many skins also include matching NOOKcolor wallpaper that provides a truly unique look.
Your NOOKcolor’s Settings
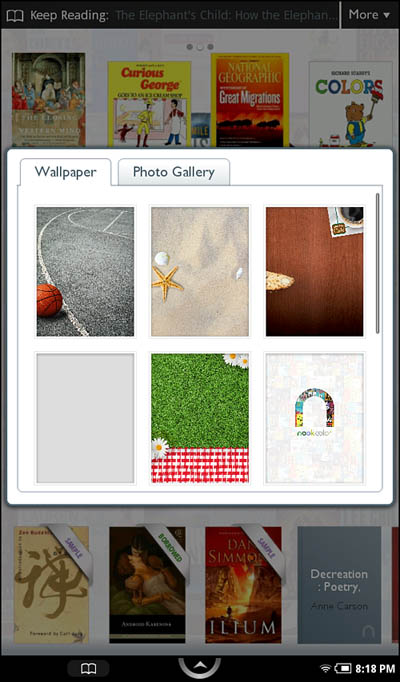
Your NOOKcolor offers configurable settings for controlling many of its features. Tap Settings on the Quick Nav Bar to access the Settings screen (see Figure 2.4).
Figure 2.4. The Settings screen contains many options.
Device Info Menu
The Device Info menu shown in Figure 2.5 displays battery charge, available storage on the NOOKcolor, microSD card storage, information about your NOOKcolor, legal information, and a way to deregister the device. For more information on adding a microSD card to your NOOKcolor, see “Adding and Using a microSD Card to Your NOOKcolor.” This screen also displays your NOOKcolor’s serial number along with your NOOKcolor’s MAC address—the hardware address of the Wi-Fi modem.
Figure 2.5. The Device Info menu.
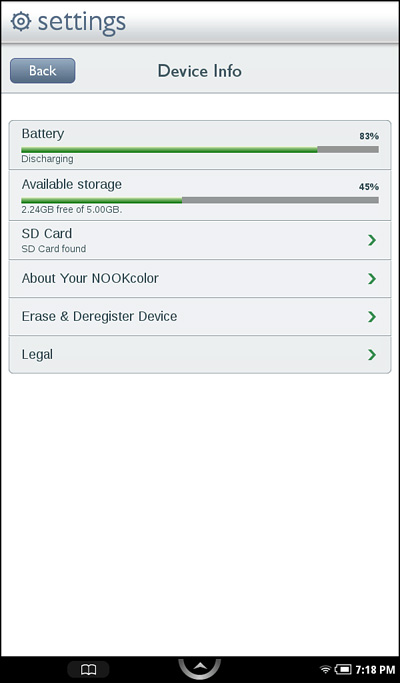
If you tap About Your NOOKcolor, you see your profile information: owner name, account ID, and so on. Here you can see the software version (called firmware) currently installed on your NOOKcolor. B&N releases periodic updates to the NOOKcolor to improve performance and fix known issues. As long as your NOOKcolor has a connection to a Wi-Fi connection, your NOOKcolor can automatically download any updates that B&N releases.
Not all NOOKcolor owners receive new firmware updates at the same time. B&N rolls out new firmware over a period of about a week. If you want to manually update your NOOKcolor, you can visit www.barnesandnoble.com/NOOKcolor/support where B&N typically provides instructions for manually updating your NOOKcolor to the latest firmware.
If you tap Erase & Deregister, you will be warned that doing so removes all books and files, including sideloaded content, and deregistering the device. Then you have a button to do just that. You should not do this except for potentially severe problems with the NOOKcolor. More likely, you will use this if you are done with the NOOKcolor and want to give it to a friend.
Note
Sideloaded content refers to all the ebooks from sources other than B&N and files you have placed on your NOOKcolor. The action of putting these files and ebooks on the NOOKcolor is called sideloading.
The Legal option provides more options to review the terms and conditions and such.
Wireless Menu
The Wireless menu provides options to turn the Wi-Fi on or off and to connect to Wi-Fi hotspots, which you have already done during the setup process in Chapter 1, “Getting Started with Your NOOKcolor,” in the “Using Wi-Fi Hotspots” section.
Screen Menu
The Screen menu contains several options for configuring your NOOKcolor’s display (see Figure 2.6).
Figure 2.6. The Screen menu.

• Orientation:This setting, on by default, enables switching from portrait to landscape mode automatically. Your NOOKcolor has an accelerometer in it that senses whether you hold the NOOKcolor upright or on its side. Much content can be viewed in either fashion (though not all). If you are reading or viewing content that can be in either, whenever you change from portrait to landscape or vice versa, the content adjusts its orientation as well.
Note
Some content, for example children’s ebooks, are set up for either portrait or landscape mode but not both. Turning off automatic orientation does not alter this.
Therefore, if you have automatic orientation off, hold the NOOKcolor in portrait mode, and open a children’s ebook, that ebook appears in landscape mode.
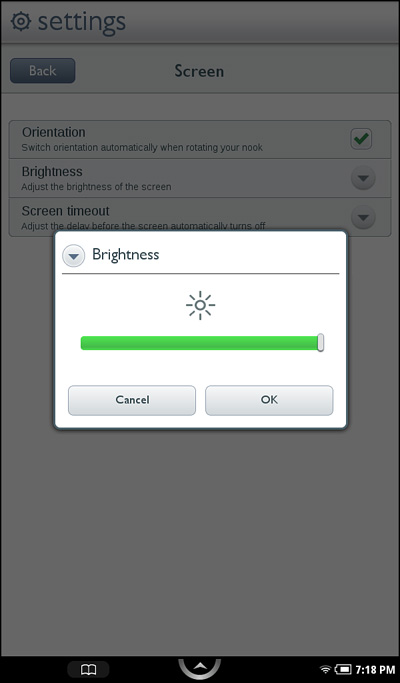
• Brightness:This setting controls the maximum brightness of the screen. To adjust the brightness, tap Brightness, and then drag your finger to adjust the slider (see Figure 2.7). When you are happy with the setting, tap OK to return to the menu.
Figure 2.7. Adjusting the brightness of your screen lower at night makes for easier reading.
• Screen Timeout:This controls the time interval after which your NOOKcolor puts itself to sleep. This timer is set to 2 minutes by default. To change the interval, tap Screen Timeout, and then tap the preferred time interval.
Tip
If you set the sleep timer to a time interval that is shorter than the amount of time it takes you to read a page on the reading screen, your NOOKcolor goes into sleep mode while you are reading. So be sure you set the interval appropriately for your reading speed.
Sounds Menu
The Sounds menu contains several options for configuring your NOOKcolor’s sound settings (see Figure 2.8).
Figure 2.8. The Sound menu.
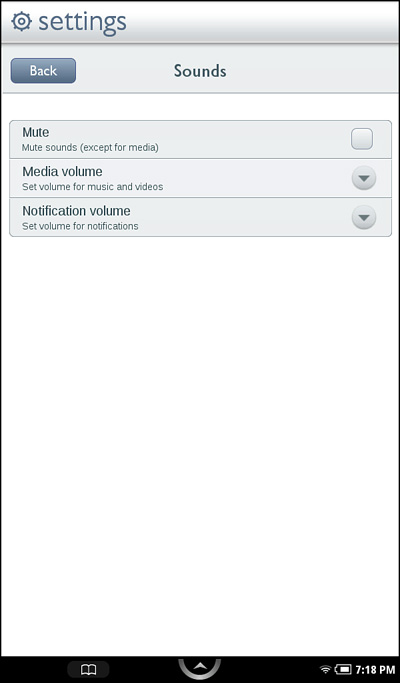
• Mute:This setting turns off all sound. Even though it says “except for media,” it mutes everything.
• Media Volume:This setting adjusts the volume for music, videos, and other media sound such as the reading segments of children’s ebooks. To adjust the volume, tap Media Volume, and then drag your finger to adjust the slider. When you are happy with the setting, tap OK to return to the menu.
• Notification Volume:This setting adjust the volume for notifications such as disconnecting the NOOKcolor from your computer. To adjust the volume, tap Notification Volume, and then drag your finger to adjust the slider. When you are happy with the setting, tap OK to return to the menu.
Time Menu
The Time menu contains several options for configuring your NOOKcolor’s time settings (see Figure 2.9).
Figure 2.9. The Time menu.
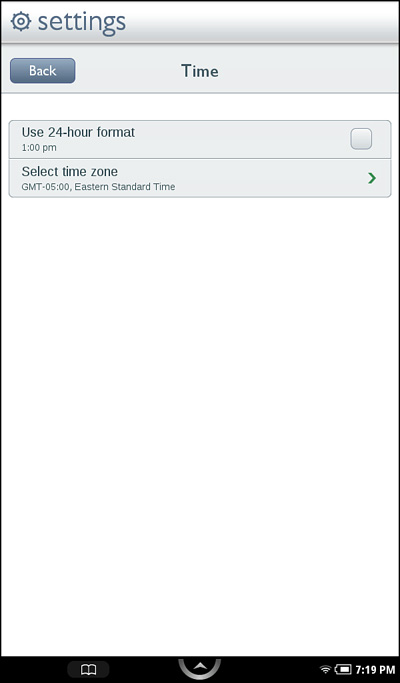
• Use 24-Hour Format:This enables you to choose between a 12-hour time format and a 24-hour time format.
• Select Time Zone:This setting enables you to select your current local time zone. Your NOOKcolor normally gets the current time using Wi-Fi access. However, if Wi-Fi service isn’t available, it still displays the current time, provided you have configured your time zone. If you do not see the time zone you need here, tap Show All World Time Zones to see a longer list.
Security Menu
The Security menu contains several options for configuring your NOOKcolor’s security settings (see Figure 2.10).
Figure 2.10. The Security menu.
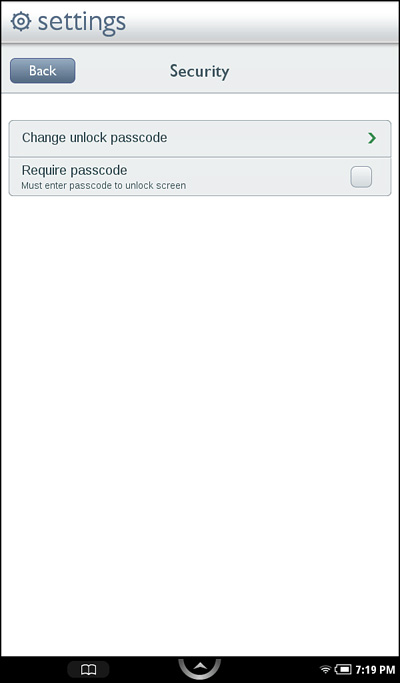
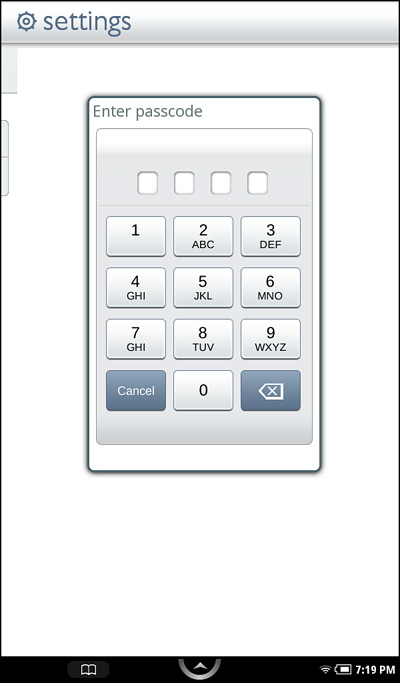
• Change Unlock Passcode:This enables you to choose a four-digit passcode (or PIN) to lock your NOOKcolor when it goes to sleep or powers off (see Figure 2.11). Changing the passcode requires entering the soon-to-be-old passcode.
Figure 2.11. The passcode is a PIN for your NOOKcolor.
• Require Passcode:This setting enables the use of a passcode or not when the NOOKcolor powers on or is awoken from sleep. To gain access to the content on the NOOKcolor, a person must correctly enter the passcode.
Keyboard Menu
The Keyboard menu contains several options for configuring your NOOKcolor’s keyboard settings (see Figure 2.12).
Figure 2.12. The Keyboard menu.
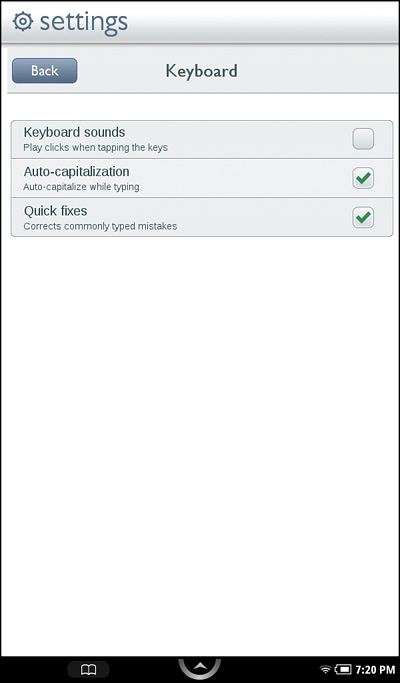
• Keyboard Sounds:This enables you to set whether, when you type on the virtual keyboard, you hear click sounds every time you tap a key.
• Auto-Capitalization:This setting enables the NOOKcolor to auto-capitalize while typing. For example, if you type a period, for the next letter you type, the NOOKcolor capitalizes it. (If you don’t want to capitalize that letter, tap the Shift key, which enables you to enter a lowercase letter.)
• Quick Fixes:This setting enables the NOOKcolor to correct common misspellings. For example, if you type “teh,” the NOOKcolor automatically changes that to “the.”
Home Menu
The Home menu contains several options for configuring your NOOKcolor’s Home Screen settings.
• Set Wallpaper:This enables you to set the wallpaper. For more information about setting your wallpaper, see “Choosing a Wallpaper.”
• Clear Keep Reading List:This setting enables you to clear the Keep Reading and More lists. The lists starts anew as you read content.
Shop Menu
The Shop menu contains several options for configuring your NOOKcolor’s Shop settings (see Figure 2.13).
Figure 2.13. The Shop menu.

• Require Password for Purchases:This enables you to require a password entry for every purchase made through the B&N Bookstore on the NOOKcolor. Leaving this option disabled means that when you click Buy in the bookstore, you purchase it without having to enter the password.
• Clear Shop Recent Searches:This setting enables you to clear the Shop Searches. Whenever you search the B&N Bookstore on the NOOKcolor, it saves the recent searches. The searches are saved to make it easier to conduct searches. For example, you can search for ebooks related to Sherlock Holmes but decide not to purchase now. When you go back to the B&N Bookstore on your NOOKcolor, you can type Sher, and Sherlock Holmes appears below the search text. You can then tap Sherlock Holmes and the search is performed.
Social Menu
The Social menu contains several options for configuring your NOOKcolor’s Social settings (see Figure 2.14). Basically, you can link your Facebook and Twitter accounts and Google Contacts lists to this NOOKcolor, which enables you to share quotes and recommendations directly to your and your friends’ Facebook walls and Twitter account.
Figure 2.14. Connect your Facebook, Twitter, and Google Contacts with your NOOKcolor here.
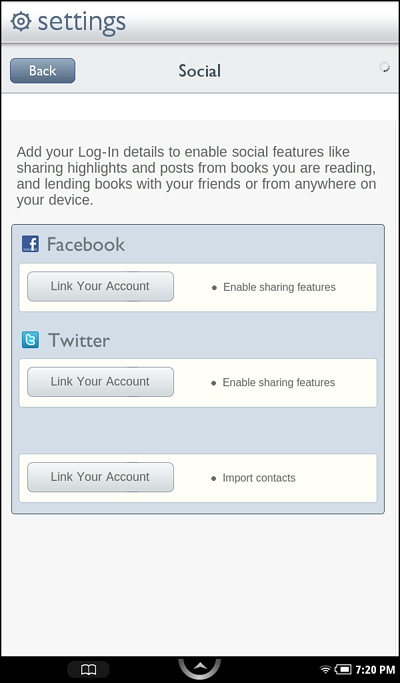
• Facebook:This enables you to link your Facebook account to your NOOKcolor. If you have already linked your Facebook account, you can unlink it. To link it, tap Link Your Account. Then enter the required information and tap Log In (see Figure 2.15). For more information about Facebook with your NOOKcolor, see Chapter 8, “Using the Social Features of Your NOOKcolor.”
Figure 2.15. Link your Facebook account to your NOOKcolor.

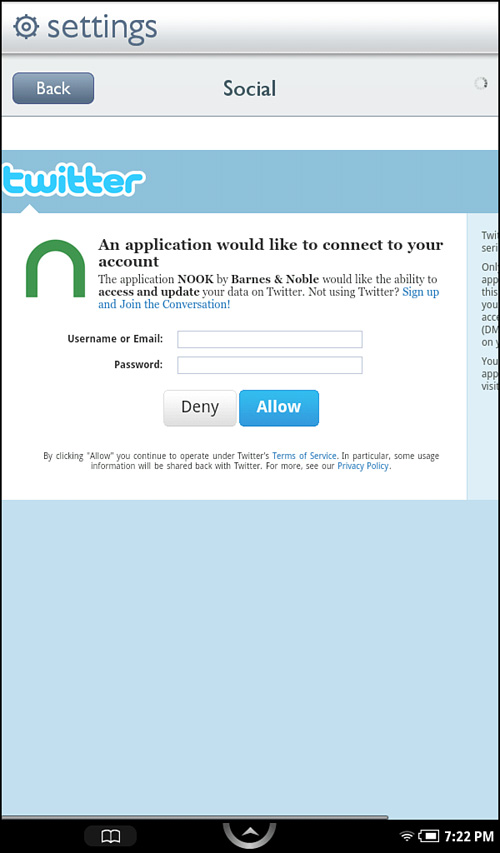
• Twitter:This enables you to link your Twitter account to your NOOKcolor. If you have already linked your Twitter account, you can unlink it. To link it, tap Link Your Account. Then enter the required information and tap Sign In. Twitter asks you to allow this linking to occur. Tap Allow to do so (see Figure 2.16). For more information about Twitter with your NOOKcolor, see Chapter 8, “Using the Social Features of Your NOOKcolor.”
Figure 2.16. Link your Twitter account to your NOOKcolor.
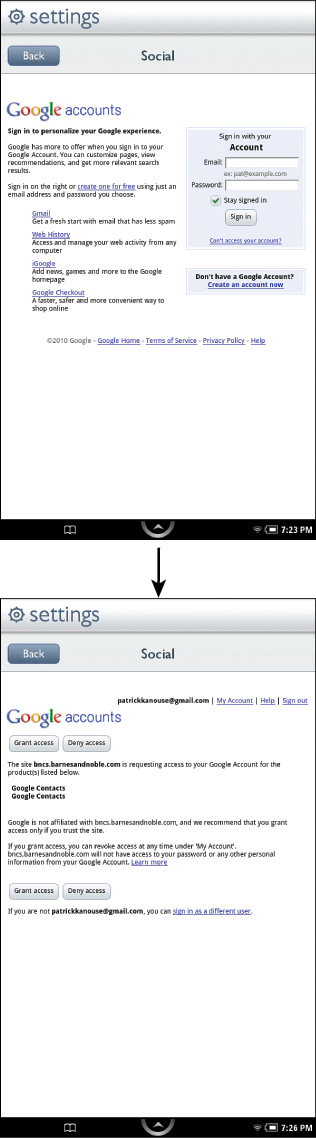
• Google Contacts:This enables you to link your Google Contacts list to this NOOKcolor. If you have already linked your Google Contacts list, you can unlink it. To link it, tap Link Your Account. Then enter the required information. If you want the NOOKcolor to remember this information should you come back to this screen, tap the Remember Me check box; then Tap Sign In. Google wants to know if you want to grant access to the NOOKcolor to do this linking. Tap Grant Access to do so (see Figure 2.17).
Figure 2.17. Link your Google Contacts account to your NOOKcolor.
Search Menu
The Search menu contains several options for configuring your NOOKcolor’s Search setting (see Figure 2.18).
Figure 2.18. Adjust search functions on your NOOKcolor.
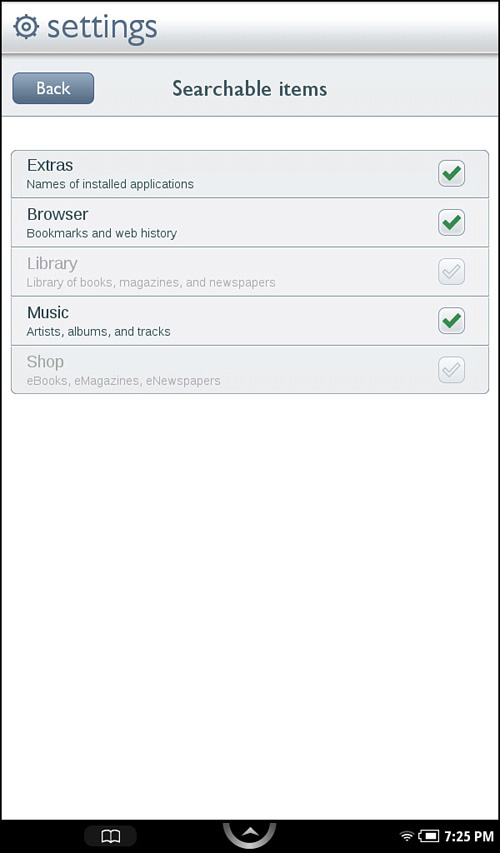
• Searchable Items:This enables you to adjust what searches are conducted on. When you tap Search from the Quick Nav Bar, you can search a variety of different categories. By default, Extras, Browser, Music, Library, and Shop are searched. You can turn off searching on Extras, Browser, and Music.
• Clear Search Shortcuts:This setting enables you to clear the list of recent searches. Whenever you search your NOOKcolor, it saves the recent searches. The searches are saved to make it easier to conduct searches.
Adding and Using a microSD Card to Your NOOKcolor
Your NOOKcolor has approximately 8GB of built-in usable memory. That’s enough memory for an enormous library of books. However, it might not be enough memory if you add pictures, music, videos, and audiobooks to your NOOKcolor. Therefore, your NOOKcolor’s memory is expandable using a microSD card.
Tip
A microSD card is not the same as an SD memory card like the kind typically used in digital cameras. A microSD card is approximately the size of your fingernail.
You will see both microSD and microSDHC. Your NOOKcolor can use either format—they are the same. The HC is used for microSD cards greater than 2GB in size.
Installing a microSD card in your NOOKcolor is easy—you don’t even need to turn off your NOOKcolor.
- Flip your NOOKcolor over so that the speaker is at the bottom. On the bottom right, flip up the metal plate (it’s kept in place by a couple of small magnets) and pull it so that the small plastic connectors keeping the plate attached to the NOOKcolor are fully extended.
- The microSD slot is the small opening. With the metal connectors of the microSD card facing the front of the NOOKcolor, slide the microSD card in, and push until it locks into place. The NOOKcolor automatically recognizes the card, and you hear a beep. Close the metal plate.
- If the microSD card has not yet been formatted, a screen appears letting you know that formatting it will erase everything on the disk. Tap Format Now. Tap Format Now again to confirm.
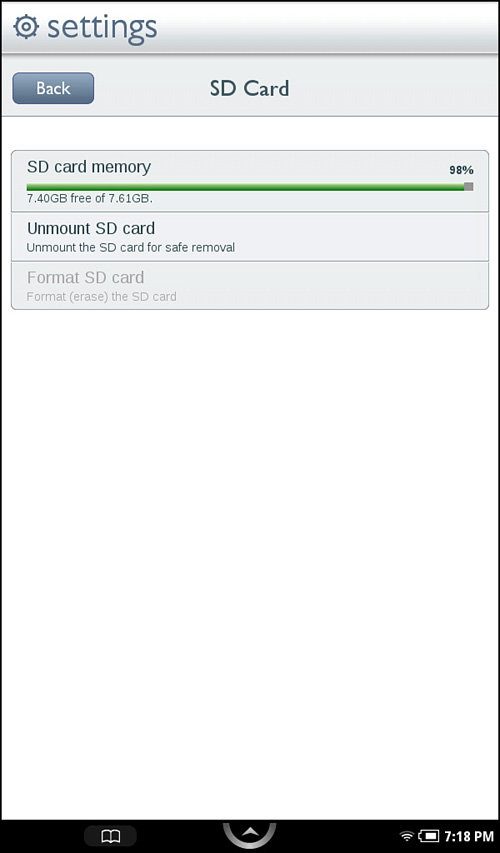
On the Device Info screen (from the Quick Nav Bar, tap Setting, and then tap Device Info), tap SD Card (only available to tap if a microSD card is installed). This opens the SD Card screen. Here, you can see information related to the amount of free memory available on the microSD card.
If you tap Format SD Card, you can format the microSD card, which erases everything on the card. (This option is only available after tapping Unmount SD Card.) A confirmation screen to format and erase all data on the micro SD card appears. Tap Format to do so. Tap OK when done.
- From the SD Card screen, tap Unmount SD Card (see Figure 2.19).
Figure 2.19. The SD Card menu where you can safely dismount the card before removing it from your NOOKcolor.
- Flip your NOOKcolor over so that the speaker is at the bottom. On the bottom right, flip up the metal plate (it’s kept in place by a couple of small magnets) and pull it so that the small plastic connectors keeping the plate attached to the NOOKcolor are fully extended.
- With your finger, push the microSD card further into the slot. The microSD card partially pops out, letting you get a grip on it to pull it out completely. Close the metal plate.
When you connect your NOOKcolor to your computer, you now see your microSD card in addition to your NOOKcolor’s built-in memory. (It is the drive called NO NAME.)
Note
You can add a microSD card that already has items loaded on it, but the NOOKcolor folder structure is necessary, so it is easiest to install a blank microSD card into the NOOKcolor and then plug the NOOKcolor into your computer and load files into the appropriate categories (documents, videos, and so on).
Now that you have a microSD card installed, how do you access those files? From the Quick Nav Bar, tap Library and then tap My Files. You see two options near the top that you do not see if you do not have a microSD card installed: My NOOKcolor and Memory Card. By default, you are looking at the My NOOKcolor files. Tap Memory Card to switch to seeing the files on the microSD card. (Tap My NOOKcolor to go back to the NOOKcolor files.) You can then tap the folders and such just as if you were working with the My Files category. (For basic instructions in interacting with these files, see “Reading Microsoft Office and Other Documents on Your NOOKcolor.”)