5. Tables
InDesign’s tables can be gorgeous. You might think you don’t need tables, but I guarantee that if you work through the tasks in this chapter, you will become enamored of tables and their possibilities. You will start thinking of work to do just so you can create a table to put it in.
One could write an entire book on the table feature in InDesign, but this chapter provides just an introduction to get you started. If you are a veteran table creator in a program like Microsoft Word, tables will make sense to you and you will perform wonders.
Any text you import from Word that includes tables will convert to InDesign text and tables just fine (you’ll need to do some design tweaking). Microsoft Excel data will import into tables as well.
There are no individual tasks in this chapter because everything builds on what went before. So I suggest you start at the beginning and carry on to the end, and then you will know how to build tables!
When to use a table
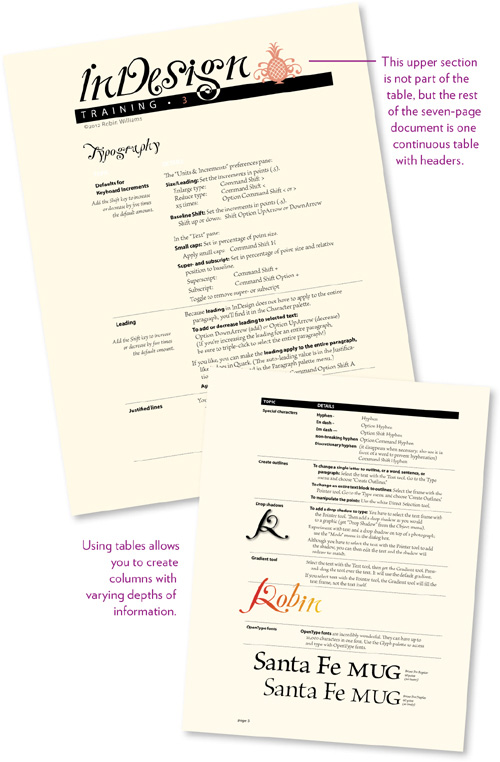
Tables are fabulous for when you need to create columns of data, but tabs are too limited. You can create an entire project in tables, as shown on the opposite page, or you might want to embed a small table into an existing document. An embedded table will move with the rest of the text as you edit it.
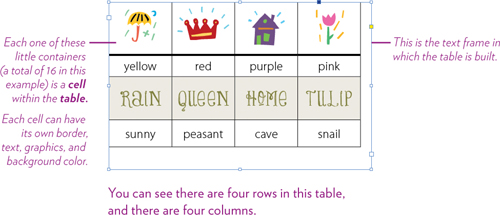
In a table, text is typed into individual cells, and these cells expand as you type. Within a cell you can put any amount of text, graphics, or even other tables. You can choose to have a wide variety of borders around individual cells, groups of cells, the entire table—or no borders at all.
A table must be inserted within a text frame; you cannot create a table without first creating a text frame.
The text in table cells is not threaded from one cell to the next (as text frames in a story are threaded, as you learned in Chapter 2), so you don’t have to worry when you edit text in one cell that it will affect the text in any other cell. As you add text, the cell grows deeper (not wider, but deeper).
At any point you can go back and format anything in the table, as you will see in the following tasks.
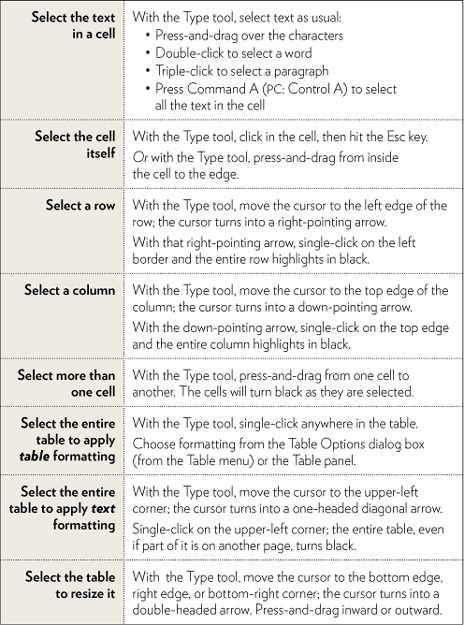
Selecting elements of a table
As you work through the table-building process in the rest of this chapter, refer to this page when you need to select the text or cells.
All selections use the Type tool. The only time you’ll use the black Selection tool is when you want to move the frame as an object or resize the text frame.
All cell selections are contiguous (touching); that is, you cannot select one cell in the bottom right plus one cell in the upper left at the same time.
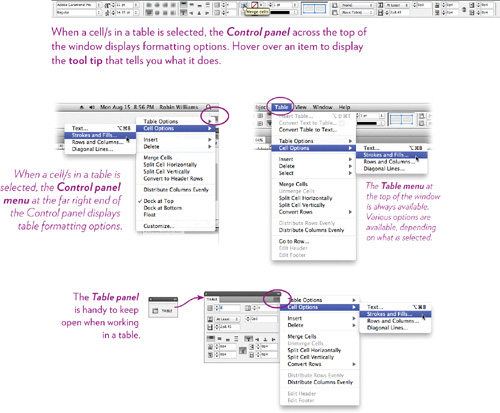
Panels and menus for formatting a table
The most important thing to understand is how to select what you want to format, as explained on the opposite page. Once the item is selected properly, you can access the table formatting in four different ways, as shown below, plus you can use contextual menus with a right-click or Control-click (too many options for my pea brain, methinks). Use whichever option feels most comfortable to you, or use a combination of them.
Tip
You can embed a table within a table—just set your insertion point inside a cell and begin a table as usual.
Table formatting and cell formatting
You learned in Chapter 2 that there is formatting that applies to the entire paragraph (paragraph-specific) and formatting that applies only to the selected characters (character-specific). The same is true of a table—there are table-specific options that will apply to the entire table, and cell-specific options that apply only to the selected cells. Selections are made according to the chart on the previous page. Poke around in these dialog boxes for a while to familiarize yourself with the possibilities.
Settings you choose in the Table Options dialog box apply to the entire table. Click anywhere in the table to select it, then go to the Table menu and choose “Table Options,” then “Table Setup....”

Settings you choose in the Cell options apply to the individual cells that are selected. Select a cell or cells, then go to the Table menu and choose “Cell Options,” then “Text....”
The following information about how to create and format tables will work most easily if you start here at the beginning and work your way through. Everything you learn in these tasks will apply to any table you create in the future.
Let’s build a simple table
There are two ways to build a table: from scratch, and from existing text (select the text, then from the Table menu, choose “Convert Text to Table”). In this chapter, we’re going to start from scratch.
1 With the Type tool, create a text frame about four inches across and eight inches deep.
2 From the Table menu at the top of the window, choose “Insert table....” You’ll see this dialog box:
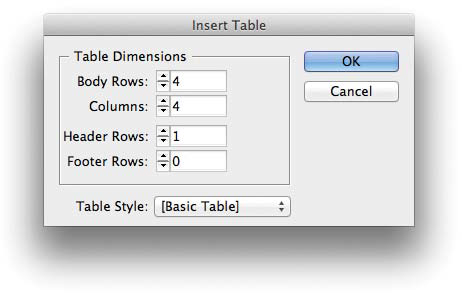
3 Enter the numbers you see above to create a table with 4 rows, 4 columns, and 1 header row.
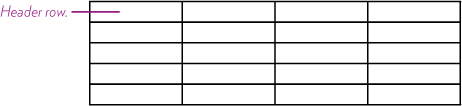
A header row is a special row that always appears at the top of the table. If your table spans several pages, this exact header will duplicate itself on each page.
Click OK. A table appears on your screen with these specifications (as shown below), and it is the width of the text frame you created.
Tip
If you have either the black or white Selection tool chosen, double-click in the text in any cell and it will switch to the Type tool.
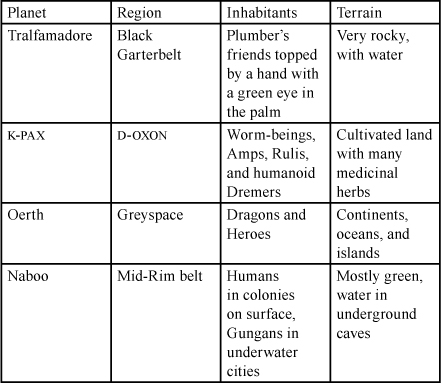
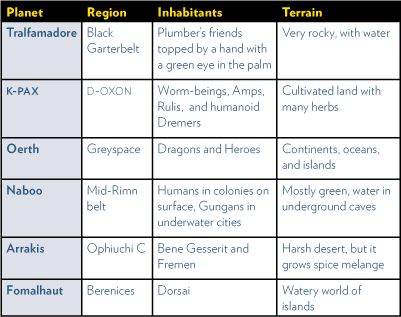
4 Enter the following information into your table, as shown below. You can, of course, enter any other data you prefer: sports teams, music groups, your relatives, favorite books, etc., with your own headings in the header row. Don’t worry about the text formatting for now, except to make sure your font is small enough to fit into the cells (10-point should be great).
If you run out of space, get the black Selection tool, click on the Table to show its text frame, and drag the bottom handle on the text frame as low as necessary.
To move the table, drag it with the black Selection tool.
If you end up with a red dot in a cell and all your text disappears, just press on that column edge and drag it to the right.
Tip
To resize a table and everything in it proportionally is exactly the same as resizing a graphic: Get the black Selection tool. Hold down the Command and Shift keys (PC: Control and Alt keys), then drag any handle.
Format the text in a table
Formatting the text is exactly the same as formatting text on any InDesign page: Select the text (see the table on page 92 for a reminder on how to select the text) and choose the formatting! When changing the color, select the text and then make sure the T is chosen in the Swatches or Color panel.
For now, just choose a font, a size, and a color. We’ll do other stuff later.
For clear communication, we want the text in the header (the first row, because we chose to have a header row) to be bolder than the rest, and perhaps in small caps. Your table might look something like the one below.
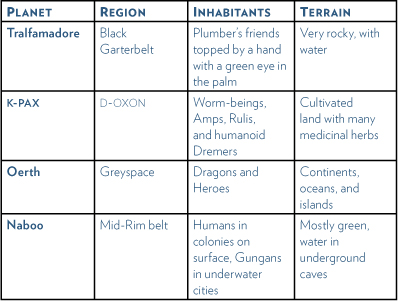
Format the header
Let’s format the header row with a black background fill and white text, as shown on the following page. Follow these instructions carefully.
1 With the Type tool, position the cursor on the left edge of the header row—it turns into a right-pointing arrow.
2 Single-click with the right-pointing arrow to select the row. The row turns black when selected.
3 In the Swatches panel, make sure the Fill box is selected (which it should be, by default). Choose “Black.”
![]()
4 Now click the T in the Swatches panel to change the selection to text; choose the “Paper” color. Click outside the table. It should look like the example on the following page.
Resize columns and rows
To resize any column or row, press-and-drag the column or row dividing line.
1 With the Type tool, press on any column edge, then drag left or right. Or press on any row edge, top or bottom, then drag up or down.
2 You’ll notice that when you drag a column or row edge, the columns to the right of or the rows below the one you select move as well.
To resize just your column or row without dragging another column or row along with it, hold down the Shift key and drag the edge. Try it!

Standardize the column or row sizes
Sometimes you want some or all the columns to be the same width, or some or all of the rows to be the same height. This is easy to do, although keep in mind it can affect the text flow in the cells.
1 With the Type tool, drag across the columns that you want to standardize or across the rows you want to standardize. You only need to select one cell in each of the columns or rows in order to tell InDesign which columns or rows you want to affect.
For instance, in the example above, select the two cells in the middle of the bottom row. Because these two cells are in two different columns, these are the only columns that will be affected.
2 Go to the Table menu and choose “Distribute Columns Evenly.”
Experiment with distributing rows and columns until you can predict what will happen.
Adjust the text frame
The table doesn’t really care whether it is wider or narrow than the text frame, but when the table gets to the bottom of the frame, the last row will disappear if it doesn’t have enough room. As usual, you’ll see a red plus sign in the Out Port of the frame, as shown below:
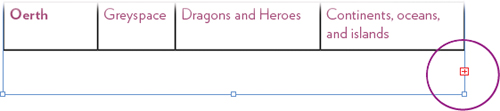
At that point, get the black Selection tool and adjust the text frame as you would any text frame—drag the bottom handle down to deepen the frame, or drag it upward to shorten the frame.
To divide up the table and put part of it on another page, treat it just like a text frame (because it is one): With the black Selection tool, shorten the frame, click in the Out Port (shown circled, above), and click on another page to set the rest of the frame.
But let’s get back to formatting the table.
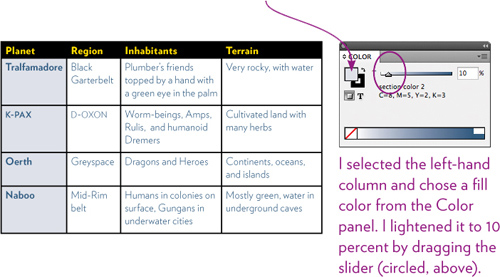
Apply color to cells
You probably already know how to change the fill color of a cell: Select the cells with the Type tool (see the chart on page 92 for selection tips) and choose a color from the Color panel or the Swatches panel. Try it on your table—make it look like the one below. Make sure the Fill box is selected before you choose the color.
Add rows at the end of a table as you type
If you are entering your data into a table, simply hit the Tab key at the end of the row and it automatically creates a new row with formatting that matches the one it came from.
1 Make sure your text frame is deep enough to hold at least two more rows. If not, use the black Selection tool to drag the window shade handle down a few inches, as you learned in Chapter 2.
2 With the Type tool, click at the end of the text in the last cell.
3 Hit the Tab key. You’ll see that a new row is automatically created.
Fill in the data for this row, as shown below (or make up your own).
4 At the end of that row, hit the Tab key again to start a new row and continue on.
Tip
To snap the text frame to the size of the table, click on the table with the black Selection tool. Go to the Object menu, choose “Fitting,” and then choose “Fit Frame to Content.” Learn the keyboard shortcut so you can do it easily.
Add rows or columns anywhere in a table
To add a row or column, first click in the row directly above or below where you want to insert a new row, or in a column directly to the left or right of where you want to insert a new column.
1 With the Type tool, click anywhere in the fourth column.
2 From the Table menu, choose “Insert,” and then “Column....”
3 Enter “1” and click the “Right” button. Click OK.
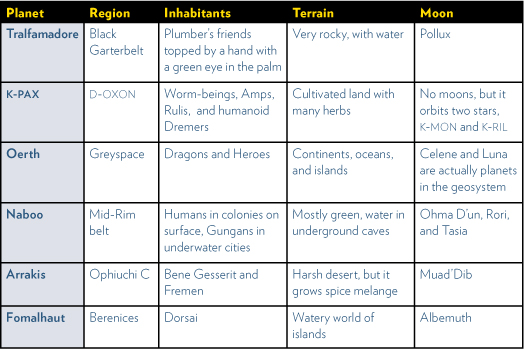
4 Add a new title in the header:
With the Type tool, click at the end of the word “Terrain.” Then hit the Tab key to move to the next cell. Type “Moon” and it will pick up the formatting in the header.
5 Add the rest of the data: At the end of entering the data into a cell, hit the DownArrow key to send the insertion point into the cell directly below, ready for typing the next bit of information.
(To move the insertion point to the next horizontal cell, hit the Tab key instead of the DownArrow.)
Delete rows or columns
Select the rows or columns you want to delete (see page 92 about selecting), then press Command Delete (PC: Control Backspace).
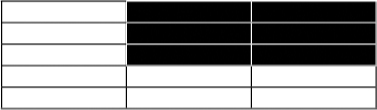
Add a pattern of color to rows or columns
When you have many rows or columns, alternating colors can make the information easier to read. InDesign lets you create this effect with the click of a button.
1 With the Type tool, click anywhere in the table.
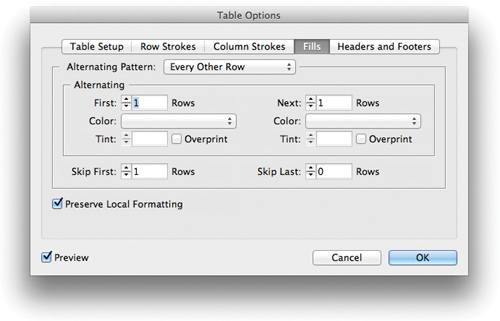
2 From the Table menu, choose “Table Options,” then choose “Alternating Fills....”
This opens the “Table Options” dialog, as explained on page 94, with the “Fills” pane showing, as shown below.
3 From the “Alternating Pattern” menu, choose “Every Other Row.”
Change “Skip First” to 1 Row.
Put a check in “Preserve Local Formatting” if you have already colored some cells and don’t want them to change. Click OK.
Discovery
Make a copy of your table and experiment with these options for a while! Change the colors, try coloring columns, use a tint, change the number of alternating rows or columns, etc.
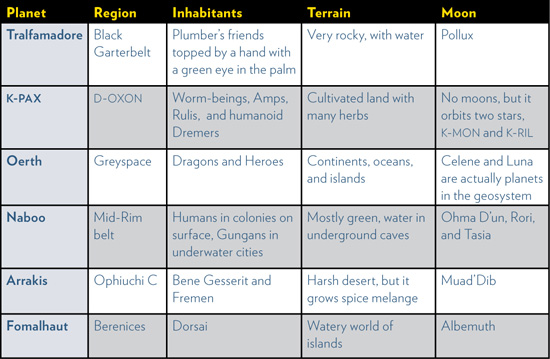
As you continue to add data to the table and come to the end of a row, hit the Tab key to create the next row. It will automatically pick up the fill color in the appropriate rows.
More text formatting
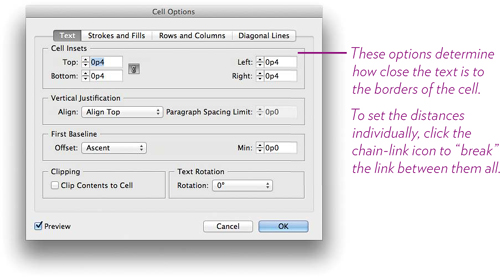
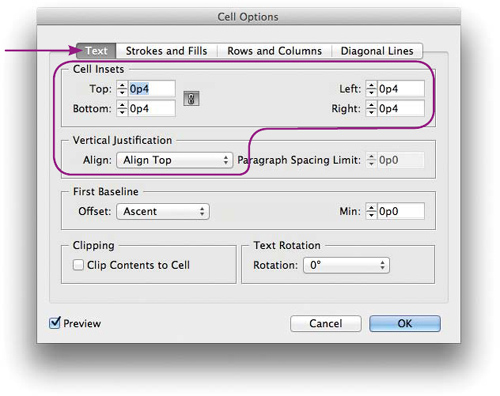
Earlier in this chapter you changed the font, the size, and the color of the type using the standard character formatting. You can also use leading, paragraph spacing, kerning, justification, and everything else you learned in Chapters 2 and 3. But tables have other special formatting you can take advantage of, using the “Cell Options” dialog box that I introduced on page 94.
To change any settings, be sure the insertion point is flashing within the cell that you want to affect, or select all the cells to which you want to apply the setting. Then go to the Table menu and choose “Cell Options,” and then “Text....”
To create a small space between the cell border and the text, use the “Cell Insets” fields. This moves the text a little away from the border (an example is on page 108). It’s an option you’ll use regularly. Unclick the chain icon to set different amounts in the fields. Experiment with this in the table you created: Select a column and change the “Cell Inset” for the text.
To align text left or right, use the Paragraph panel. But to align text vertically within the cell, use “Vertical Justification” in the “Cell Options” dialog box. Experiment with this in the table you created: Select a column and change the “Vertical Justification” for the text. For an example, see page 108.
Tip
You can start a table within your text; that is, a table does not have to stand alone. That way the table will move along with the other (non-table) text as you edit. Use the Table Setup dialog box as shown on page 94 to set a “Table Spacing” amount above and below the table, like paragraph spacing.
Customize the strokes
You can customize the strokes or borders around the cells to your heart’s content. Make them bold or invisible, dotted or striped, doubled or wavy, any color you like, or even two colors (color the “gap” a different color from the line itself).
Now, selecting the exact stroke so you can change it can be a wee bit tricky and crazy-making. Follow these steps to understand how to control them, and then you just have to spend time practicing until you can predict the results. It’s worth taking the time now so you won’t go crazy later!
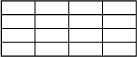
1 To practice, create a small table, 4 rows and 4 columns.
2 First, let’s put a border around the table:
With the Type tool, click inside any cell.
From the Table menu, choose “Table Options,” then “Table Setup....”
Under “Table Border,” change the “Weight” to 3 pts. Click OK.

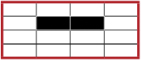
3 Select two cells in the middle, as shown here:
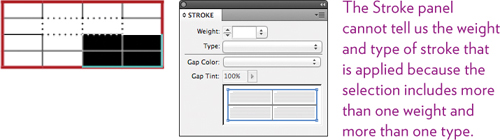
4 Get the Stroke panel (if it’s not on your screen, choose it from the Window menu), shown on the opposite page.
If your Stroke panel doesn’t look like that one, go to its panel menu (click on the tiny hash marks in the upper right of the panel) and choose “Show Options.”
You can also use the settings in the Control panel; they look like this:

5 In the Stroke panel, you see the formatting for the selected strokes, as shown below. Let’s look at these settings carefully.
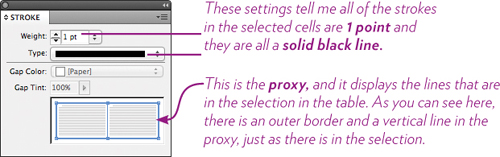
Any changes you make in the Stroke panel (or changes to the stroke color in the Color or Swatches panel) will apply to the strokes bordering the selected cells.
Try it: Change the “Weight” to 2 points and the “Type” to a dotted line. Click anywhere outside the selected cells to see what it looks like.

6 The tricky part is when you select a cell that has a custom stroke applied to one or more of its borders. See what happens: Select the four bottom corner cells, and look at the Stroke panel again.
7 So to change the stroke, you must very carefully choose the lines in the proxy that you want to change. In this example, let’s change the crossbar strokes in the middle of those four selected cells. Try it:
In the proxy, deselect the four lines around the outside (click each one, or double-click one to remove them all).
Select the two crossed lines inside the proxy (click each one, or double-click one to select them both).
Choose a dashed line type and a weight of .5 points.

Merge and split cells in a table
Tables don’t need to consist of only rows and columns like a spreadsheet—you can merge connecting cells to create shapes of all sorts to fit the needs of your data. You might want to merge several cells into one so you can insert a graphic into the space. Try this:
1 Create a new table, as you did on page 104, but make it 5 rows and 3 columns, no header or footer.
2 Select the cells as shown below (press-and-drag over them).
3 From the Table menu, choose “Merge Cells.” Those six cells are now one cell.
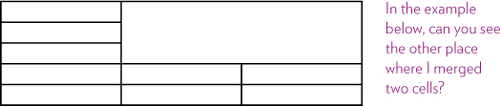
4 By merging cells, you can easily create tables such as this one:
Use a table instead of tabs and indents
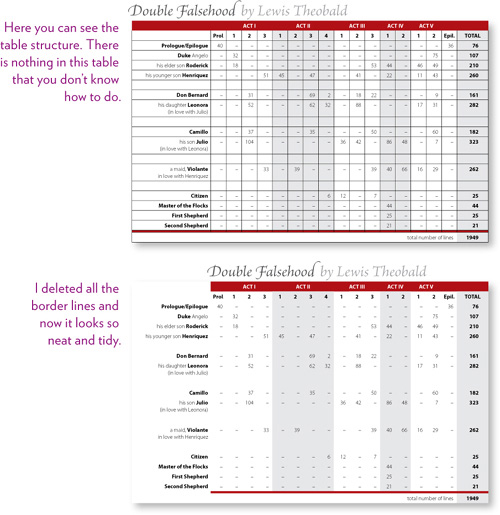
In the previous chapter I mentioned that some designers prefer to use tables instead of tabs. This is an example of where you could use either method, but the table format allows you to colorize columns and structure complex pieces of information quite easily.
If you plan to use numbers in your table, be sure to select those columns and give them a flush-right alignment.
To enter the data, use the Tab key to move the text insertion point to the next cell, and use Shift Tab to move it backwards to the left.
The Tab key, as you’ve probably noticed, does not create tabs—it moves the insertion point to the next cell. To use a tab setting within a cell, set it up as usual (using the Tabs panel) and just remember to type Option Tab in the cell when you want to move to a tab marker.
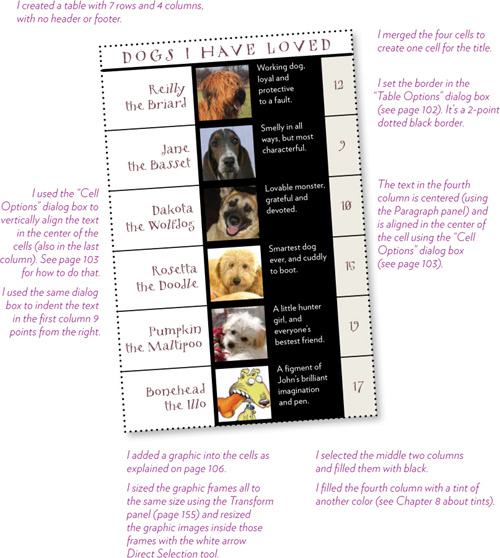
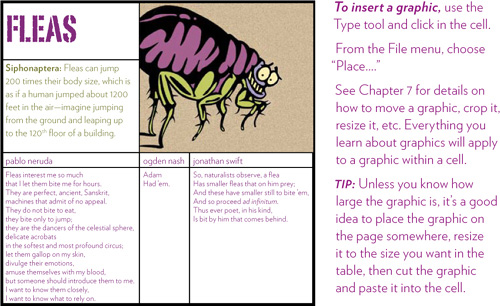
Try this!
Below is a table that incorporates many of the tasks you completed in this chapter. Can you recreate this—or something like it? Don’t forget you can use CreativeCommons.org to find images to use for your project.