4. Tabs and Indents
I realize that most people hate tabs and indents, mainly because they don’t quite understand how they work. You see, tabs and indents always do what you tell them to do! If you have trouble with tabs and indents, it is only because you don’t know what you are telling them! Don’t holler at those poor tabs—they are trying to do what you want; it’s your responsibility to figure out how to tell them what to do. They always work. They are extremely dependable and reliable and logical (yes, logical). So this chapter teaches you how to take advantage of their dependability.
Also check out Chapter 5 about the table feature because some designers prefer to use tables rather than tabs and indents.
Things you should know about tabs and indents
You must first understand how tabs and indents behave.
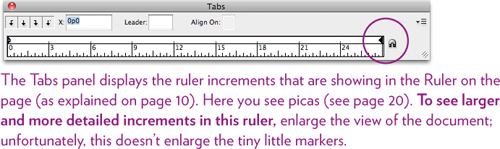
A The Tabs panel is where the tabs and indents are set and displayed, and every paragraph has its own ruler settings.
This is critical. Any tabs or indents you set in the Tabs panel will apply only to the paragraph that is currently selected; that is, tab settings are paragraph-specific, as explained on page 31.
Open the Tabs panel from the Type menu.
Task 1 Experiment with the Tabs panel and paragraphs
1 Create a text frame three or four inches wide and type several lines of text (do not hit a Return at the ends of the lines).
2 After a couple of lines, hit a Return (which creates a new paragraph) and type several more lines of text.
3 While the insertion point is at the end of the second paragraph, go to the Type menu and choose “tabs,” or if the tabs ruler is already on the screen, click the tiny magnet icon to snap it to the text frame.
4 Find the triangle at the far right end (that’s the Right Indent marker) and drag it inward (to the left) about an inch.
The right margin in the second paragraph indents an inch inward because that is the paragraph that is selected.
Notice that the first paragraph did not indent its right margin.
5 Now single-click in the first paragraph to set the insertion point within that paragraph.
In the Tabs panel, you see that the Right Indent marker (the triangle) is back in its original position. That’s because every paragraph has its own settings.
To change the settings of more than one paragraph at once, select all the paragraphs you want to change. (These paragraphs must be contiguous, or connected to each other, to select them.)
B The Tabs panel ruler has invisible tab settings every half inch.
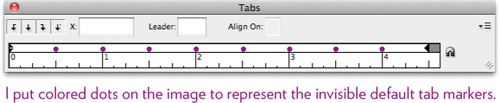
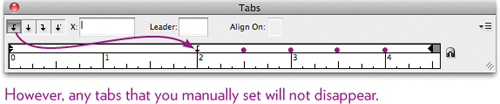
As soon as you set your own tab, every default tab setting to the left of that new tab disappears.
Task 2 Experiment with a tab marker
1 Make sure the Ruler across the top of the screen is showing (from the View menu).
Make sure the Ruler is in inches for now. If it isn’t displaying inches, you can change it: Control-click or right-click on the Ruler; from the menu that appears, choose “Inches.”
2 Create a text frame three or four inches wide.
3 Hit the Tab key, then type a silly word, such as Dogfood.
4 If the Tabs panel is open, single-click on its magnet icon to make it snap to the text frame you just made. Or open the Tabs panel (from the Type menu), and it will position itself directly over the text box. The word you typed is aligned with the half-inch mark.
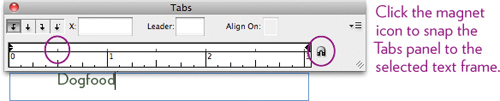
5 Single-click in the Tabs panel ruler near the 2-inch mark; the word you typed will instantly jump to that new marker because all the invisible default tab settings to its left have disappeared.
Drag that tab marker left or right and watch the word snap to that new position.
C Tabs are cumulative, and they accumulate in the word you type after you hit the Tab key.
Huh? Well, if you hit the Tab key three times and then type the word Rosalind, that word Rosalind holds onto those three tabs. Rosalind will jump over to the third tab she can find (which does not necessarily mean the third tab in the Tabs panel!).
If you then hit two more tabs and type the word Celia, the word Celia holds onto five tabs—the tabs accumulate. And again, Celia will jump to the fifth tab she can find.
I say “the fifth tab she can find” because perhaps Rosalind’s name is too long and extends past the fourth tab in the ruler; in that case, Celia doesn’t count that tab—she only counts two more beyond Rosalind, the two she can find.
This is probably the most crazy-making thing about tabs, so spend a couple of minutes to understand it and control it.
Task 3 Experiment with accumulating tabs
1 Create a text frame four to six inches wide.
2 Follow these directions precisely (that is, do not type more than one tab between words).
Hit the Tab key once.
Type Cat, then hit the Tab key once.
Type Dog, then hit the Tab key once.
Type Rhinoceros, then hit the Tab key once.
Type Ape, then hit the Tab key once.
Hit the Enter key to create a new paragraph.
Hit the Tab key once.
Type Rat, then hit the Tab key once.
Type Bird, then hit the Tab key once.
Type Shrew, then hit the Tab key once.
Type Monkey (even if it doesn’t line up!), then hit the Tab key once.
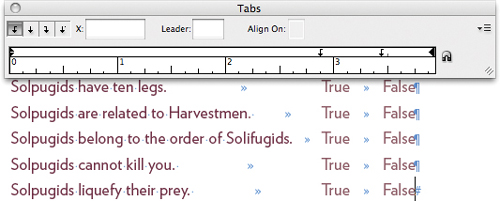
3 To see the tab markers, go to the Type menu and choose “Show Hidden Characters.” You will see one tab marker before each word.
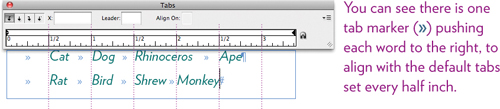
Here’s the critical thing to notice in the example:
Cat went to the first tab it could find, at ½ inch.
Dog went to the second tab it could find, at 1 inch.
Rhinoceros went to the third tab it could find, at 1.5 inches.
Ape went to the fourth tab it could find. Now, the fourth (default and invisible) tab in the Tabs panel ruler is at 2 inches, but Ape couldn’t get to that one because Rhinoceros is in the way. Thus it had to go to the next one it could find.
In the second paragraph, all four words are able to line up at the half-inch default tab markers.
To make all four columns align so you can carry on with your lists, all you need to do is create new tab markers that replace the defaults, giving the words room enough. Follow the steps below.
4 Select both paragraphs: With the Text tool, press-and-drag to select the text in both lines, or press Command A (PC: Control A). You don’t have to select every word in both lines, just a few letters in each.
5 Make sure the left-aligned tab marker is selected, as circled below.
Single-click in the Tabs panel ruler where you want the tab to be. For instance, put the first tab at ½ inch. Nothing will change.
Put the second tab at about 1.25 inches. The words that have accumulated two tabs, Dog and Bird, will move to that new second tab.
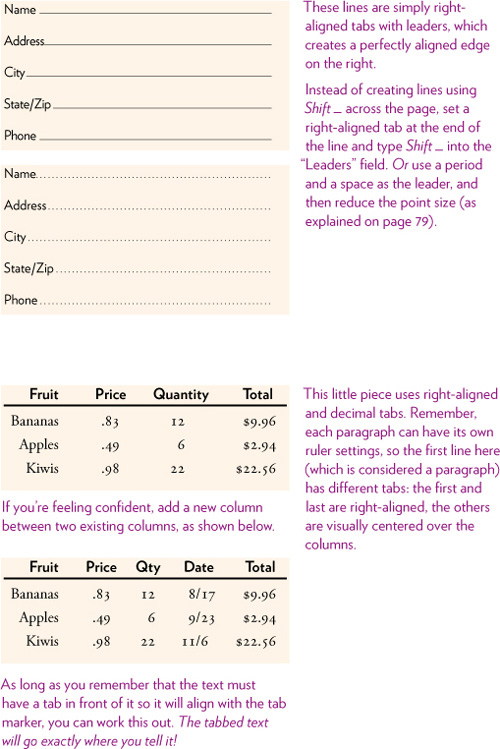
Put the third tab at about 2 inches. Put the fourth tab at about 3 inches. All of the words will instantly align with the tab they are looking for. They will go exactly where you tell them.
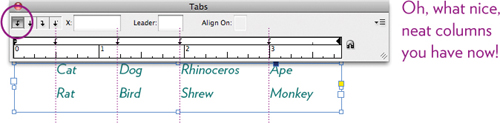
Notice that as you manually set a tab marker, the default and invisible markers every half-inch to the left disappear (they remain every half-inch to the right of the last manual tab marker). You can tell they are no longer in place because tabbed text doesn’t stop there.
Continue to experiment: Select both paragraphs, and drag the tab markers left and right; watch everything follow along. Hit Enter and type another line of four animals; adjust the tabs if necessary.
D You can remove extra tabs in the text just as if the tabs were characters.
One reason why tabs can be so confusing is that not only are the default tab markers in the ruler invisible, but the characters in the text are invisible. As you saw in Step 3, you can “Show Hidden Characters” to see them.
Even when you cannot see the actual tab characters, you can remove them just as if they were letters. If you had typed three periods in front of the words “James Clifton,” you know how to delete those periods. In exactly the same way, you can delete tab characters.
Task 4 Delete tabs from the text
1 Create a text frame about four or five inches wide.
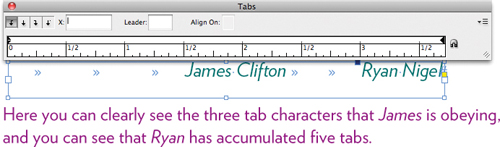
2 Hit the Tab key three times, then type James Clifton. Hit the Tab key two more times, then type Ryan Nigel.
3 Click to set the insertion point in front of James Clifton. Drag a wee bit to the left, just enough to select the chunk of tab. You will notice that you cannot select only a portion of that tab character—it’s all or nothing.

4 Hit the Delete key. Watch how James Clifton now goes to the second tab he can find. When you delete one tab from James, notice that Ryan also has one less tab; he now goes to the fourth tab he can find.

Tab alignments and symbols
InDesign provides four tab alignments, and each one has its own symbol.
When you hit the Tab key and it goes to a left-aligned tab, the insertion point goes to the tab marker and the text types to the right (it aligns on the left). Notice the visual clue of the direction of the tail on the symbol—it shows you which direction the type will head.
![]()
When you hit the Tab key and it goes to a right-aligned tab, the insertion point goes to the tab marker and the text types to the left (it aligns on the right).
![]()
When you hit the Tab key and it goes to a centered tab, the insertion point goes to the tab marker and the text types outward on both sides of the marker.
![]()
When you hit the Tab key and it goes to a decimal tab, the insertion point goes to the tab marker. The text extends to the left until you type a decimal (a period), then the text continues on the other side, typing to the right.
![]()
The following pages walk you through exercises to become familiar with these tabs. As I’ve mentioned before, it is worth your time to become proficient!
Tip
Before you do the exercises, make sure your Tabs panel has no prior defaults set. Use the panel menu to “Clear All” and “Restore Indents” if necessary.
Tab basics
• The ruler across the top of the document window has nothing to do with tabs. Do not try to align your text by measuring in that ruler! The only way the ruler across the top of the document and the Tabs panel ruler are related is that the horizontal measurement you choose in the document ruler changes the measurement in the Tabs panel ruler.
• The Tabs panel ruler applies to the selected text frame or the selected text.
• Every paragraph has its own tab settings.
• Always use a left alignment with tabs! If you set tabs and it’s all messed up, check to make sure the text alignment is left-aligned.
• You can set up tabs before you begin typing, or type some text and then add the tabs.
• To add a tab marker to the Tabs panel ruler, single-click the type of tab you want (explained on the previous page), then single-click in the Tabs panel ruler to set the tab marker.
• To move a tab marker, drag the marker left or right.
• To delete a tab marker, drag the marker off the ruler—up, down, or diagonally.
• To change the tab marker to another alignment, single-click on the marker you want to change. Then single-click on the symbol for the type of tab you want to replace it with.
• If you open the Tabs panel and set tab markers when there is no text selected and no frame selected, the tabs you set will be the new defaults. That is, any new text frame you create in that document will have those tab settings. Take advantage of this!
• To clear all tab markers and return the invisible defaults at every half inch, use the panel menu and choose “Clear tabs.”
Tip
When working with tabs, get in the habit of NEVER hitting more than one tab to get to the column you want. Trust me, typing extra tabs is only crazy-making when you want to format the text.

Left-aligned tabs
A left-aligned tab is the most commonly used, where the text aligns on the left side and moves out to the right, just as you expect when you type or write in English. If you did Task 3 on page 66, you were using left-aligned tabs. Here is another small exercise.
Task 5 Create a chart using left-aligned tabs
1 Create a new text frame about five or six inches wide.
2 Type the text below. Do NOT hit a tab at the beginning of each line; only hit the Tab key before the words True and False. As shown below, the text will not align, but that’s okay, as long as True has one tab and False has another tab.
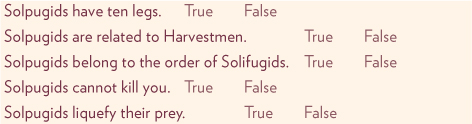
3 Select all the text.
4 Open the Tabs panel if it isn’t already. If necessary, click the magnet icon to snap the panel to the text frame.
5 Click the left-aligned tab marker.
6 Single-click in the ruler at a position beyond the end of the longest question. That new tab marker deletes all the default tabs to its left, so now all the Trues jump to that first tab marker.
All the Falses jump to the second tab marker, which will be the next default they can find. Click in the ruler to set another tab a little farther to the right. Feel free to move them around!
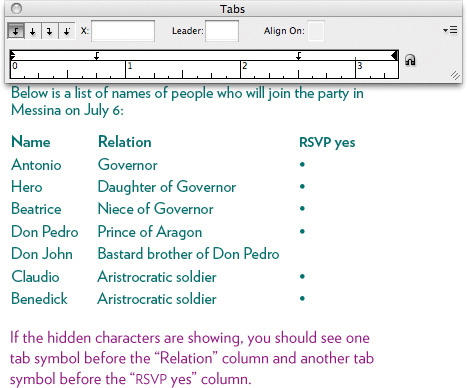
Task 6 Create another chart using left-aligned tabs
This exercise is different from the previous one only in that you are going to set the tabs before you begin typing.
1 Create a text frame about five inches wide.
2 With the insertion point flashing in the text frame (which means that text frame is selected), open the Tabs panel (from the Type menu, or use the keyboard shortcut (Command Shift T or PC: Control Shift T).
3 Set tabs at .75 inch and 2.5 inch.
4 Choose a font size of 10 point.
5 Type the text shown below.
After the first paragraph of body copy (“Below is a list . . .”), hit tabs before the headings and the entries in the “Relation” and “RSVP yes” columns.
Hit Enter at the end of each row.
At any point, select all of the text and move the tab markers as necessary.
Tip
If you want to center “RSVP yes” over the column of bullets, single-click with the Text tool in that line of type. Drag the tab marker to the left until the text is centered over that column.
Right-aligned tabs
Right-aligned tabs are useful for numbers that don’t have a decimal point, or for any items that you want to align on the right.
Task 7 Create a numbered chart using right-aligned tabs
This exercise involves whole numbers. You’ll type a few lines with tabs before you set up the markers.
1 Create a new text frame about five inches wide.
2 Type the following text in 10-point type, hitting the Tab key once to move to the next column, whether it aligns or not at this point. Hit Enter or Return at the end of each line.

3 Select all the text.
4 Open the Tabs panel. Or if it is already open, single-click the magnet icon so the panel snaps to the text frame.
5 If there are any tab markers in the ruler, click the tiny menu symbol at the right end of the panel (circled, below) and choose “Clear All” (this clears any tabs you added and restores the invisible defaults).
Single-click the right-aligned tab symbol (circled below, left).
6 Single-click six tab markers, starting at about 1 inch. Watch the text numbers align appropriately.
7 Continue typing to finish the chart, as shown below.
Decimal-aligned tabs
The decimal tab does not just align decimal points in numbers—you can assign any character to align. For instance, you might want the dollar signs to align, or the right brackets, or a bullet.
Task 8 Align text to a decimal point
This exercise involves numbers with the decimal point in various places.
1 Create a new text frame about five inches wide.
2 Type the following text in 10-point type, hitting the Tab key once to move to the next column, whether it aligns or not at this point. Hit Enter or Return at the end of each line.

3 Select the heading line (“Original Planet,” etc.) and set left-aligned tabs for the two headings that label the numbers columns.
4 Select the lines with numbers and set decimal tabs so the numbers are visually centered under their headings (choose the decimal tab symbol, then click in the ruler).

Task 9 Align text to a character
Don’t limit yourself to aligning text on a period. When you use a decimal tab, it actually aligns the text according to the symbol that is in the “Align On” field, which by default is a period. But you can type or paste any character into that little field and have your text align with it.
1 Create a text frame about 3 inches wide; choose 10-point type.
2 Type the text below, hitting a tab at the beginning of each line. At the moment, the tab will go to the default ½-inch marker. That’s okay.
To type the heart in Zapf Dingbats, see pages 36–37 on using the Glyphs panel (or feel free to use any dingbat you want).
3 Open the Tabs panel and click the magnet to snap it to the frame.
4 Select all the text.
5 Single-click on the decimal tab to select it. Once it is selected, the “Align On” field is available.
![]()
Copy the heart from the text; click in the “Align On” field and paste it in. All the heart symbols are aligned. (If they are not aligned, show the hidden characters to make sure you hit a tab at the beginning of each line.)
Tip
Once tabs are set in a line of text, you can hit the Enter key to type the next line and the tabs will continue to carry on in the same format.
Right-aligned tabs with leaders
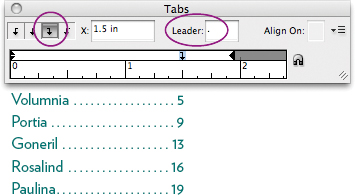
“Leaders” are the dots or lines that lead your eye from one column to another, most often seen in tables of contents. When working with leaders, remember that the tab marker holds on to the leader specs, so if you delete that tab, you delete the leaders.
Task 10 Create tabs with leaders
1 Create a text frame about 3 inches wide; choose 10-point type.
2 Type the first line or two of the list shown below, hitting a tab before the page number. Do not type the dots!
3 Select the text.
4 Open the Tabs panel and click the magnet to snap it to the frame.
5 Single-click the right-aligned tab; click in the Tabs panel ruler close to the right edge.
6 While that tab is still selected, type the leader character that you want to use in the “Leader” field. For now, type a period. You will instantly see the leaders connect from the name to the number, which is now right-aligned as well.
7 Click at the end of the last line (after the number) to put your insertion point in that position. Hit Enter to make a new paragraph.
Continue typing the rest of the list. As long as you keep hitting the Enter (or Return) key at the end of each line (which turns that line into a paragraph), the tab formatting will carry over to the next line.
Tip
You can type or paste any character into the “Leader” field. In fact, you can use up to eight characters. Experiment with this!
Task 11 Match the leaders
One sign of unprofessional typography is when the leaders in a list have differently sized dots. This happens because the leader automatically picks up the formatting from the last character before the tab, as shown below-left. You can see the consistent formatting for leaders and page numbers in the example, below-right.
1 Recreate the text above, using a heavy bold face for the headings. Set the right-aligned tab with leaders, as explained on the opposite page.
2 The leaders are simply formatted characters, so there are several ways to make the leaders match. Experiment with these options:
• Select the leaders in each line and change the formatting (to 8-point Light, for instance).
• Or select the smaller leaders in one of the lines.
Copy the leaders.
Select the larger leaders in one of the headings.
Paste. Paste to replace the others as well.
• Or create a style sheet for character formatting, as explained in Chapter 6. Assign a keyboard shortcut to it, then apply it to the selected leaders.
• Or create a paragraph style sheet with nested character styles, as explained in Chapter 6, so the leaders and the page numbers appear in the proper formatting automatically.
• Or if you use the Table of Contents feature (from the Layout menu), your paragraph and character style sheets will be applied automatically as InDesign generates your table of contents. You can see an example in this book’s contents—the entire table was formatted when I clicked the button. Unfortunately, I don’t have room in this small book to explain InDesign’s book features, but they are in the Adobe online manual.
Right- and left-align the text
Have you ever wanted to put a header across the top of a page where the text aligns both on the left and the right sides? Here’s the trick:
Task 12 Create a header aligned on both sides
1 Create a one-line text frame that stretches across the column.
2 Type the text you want to align on the left.
3 Hit a tab.
4 Type the text you want to align on the right.
5 Select the line (your insertion point in the line selects it).
6 Right-justify the line: In the Paragraph panel, single-click the Align right icon.

![]()
Now you can widen or narrow the frame and the text will always align. If you want this text on every page in your document, put the frame on the master page, as explained on pages 14–15.
The Repeat tab
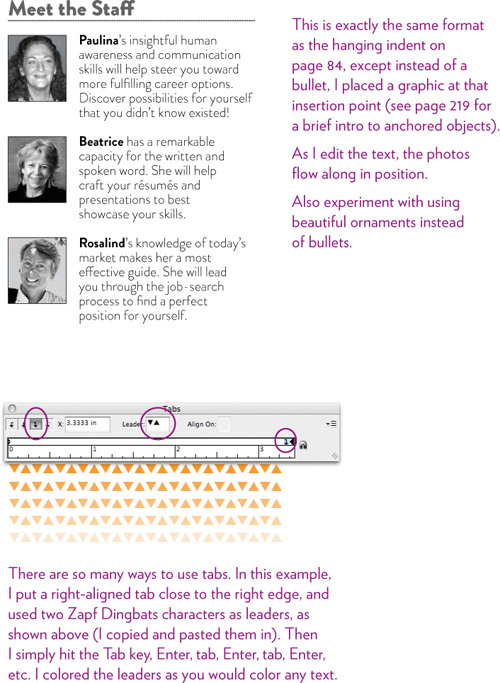
I love this feature. You can create a series of tabs across the frame that are exactly the same distance apart from each other. Try this small task:
Task 13 Repeat a typographic element
1 Type a bullet or an ornament over and over, hitting a tab between each one.
2 Set a tab in the Tabs panel ruler, and make sure it is selected.
3 From the panel menu on the right end of the ruler, choose “Repeat tab.” The distance between each tab will be the distance from the selected tab and the tab or margin to its left.
4 To change the spacing, select the tab, move it left or right, then choose “Repeat tab” again.

Try this!
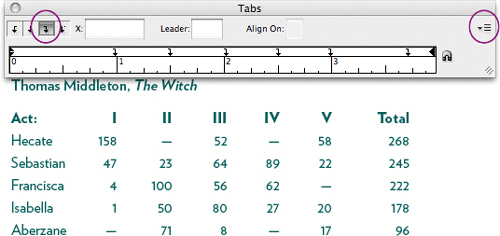
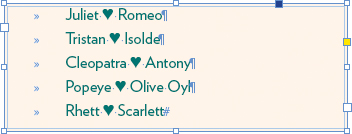
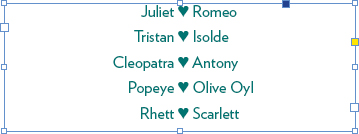
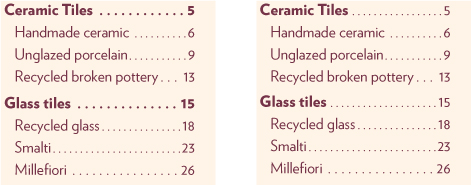
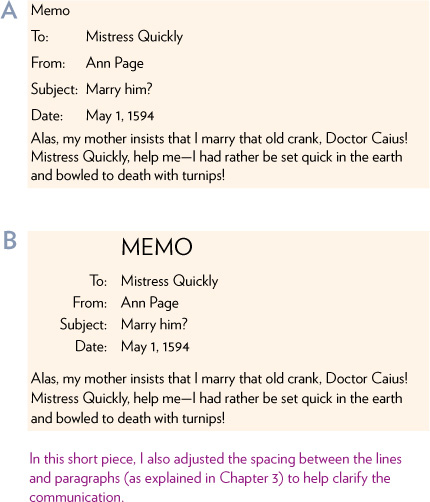
Here is a small exercise that utilizes both left- and right-aligned tabs in a practical situation. Format the text in A so it looks like the text in B.
Indent the text
Indents are easier to understand than tabs, as long as you know that each paragraph has its own Tabs panel ruler settings.
There are three indent markers:
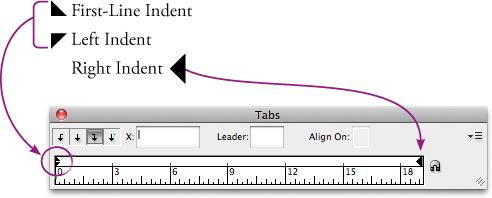
The Tabs panel ruler, as you know by now, snaps to the selected text frame (selected with either the black Selection tool or by clicking the Type tool inside the text frame). The text frame itself creates the margins. The left and right indents indent the text in relation to those margins, or edges, of the text frame. The indents have nothing to do with the ruler across the top of the window nor with the document margins!

The indents make perfect sense if you just remember this:
The text in a paragraph begins at the First-Line Indent marker.
As you type, the text moves to the right and at the end of the line bumps into the Right Indent marker (as long as you don’t hit a Return or the Enter key).
After it hits the Right Indent, the text bounces back to the Left Indent marker (the bottom triangle) and carries on, bouncing back and forth between the Right and Left Indent markers.
As soon as you hit Enter or Return, the line starts over again at the First-Line Indent marker.
Task 14 Experiment with the indents
This exercise involves playing with the indents. As you move the markers, watch the text move. Get to a point where you can predict what will happen as you move the markers.
1 Create a small text frame, about 3 × 3 inches.
2 Choose a font, choose 10-point type, and justify the text.
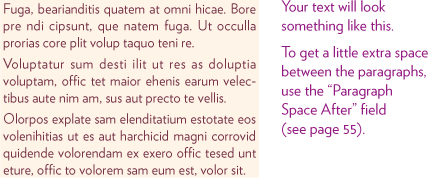
3 From the Type menu, choose “Fill with Placeholder Text” (it’s toward the bottom of the menu). Divide the text into three paragraphs (click to set the insertion point, then hit Enter).
4 Select all the text, then open the Tabs panel; if it’s already open, click the magnet icon to snap the ruler to the text frame.
5 Drag the First-Line Indent marker (the top triangle on the left) inward toward the right. Only the first lines will indent.
6 Drag the Right Indent marker in toward the left; the right side of the text will indent itself from the edge of the text frame.
Experiment with the margin: Choose the black Selection tool; single-click on the text frame. Drag the right edge of the text frame to the right, then to the left. Notice that the Right Indent is always the same proportional distance from the right edge of the text frame.
7 Get the Type tool again, and drag the Left Indent marker in toward the right. Notice it automatically drags the First-Line Indent marker with it! This is so the indent and margin remain in proportion.
To drag the Left Indent marker by itself, hold down the Shift key and drag the marker.
8 Now select individual paragraphs and change the indents.
9 When you can move a marker and predict what will happen, reset the indents: Select all the text, then from the Tabs panel menu, choose “Reset Indents.”
Task 15 Create a hanging indent
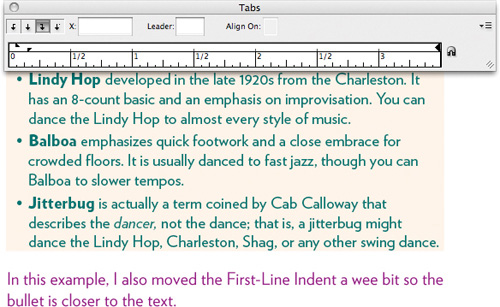
This is a setting you’ll use all the time, where you have something like a bullet or a name that begins the line, but you want the text to align with the main body copy, not under the bullet. It’s easier than you might think.
1 In a text frame, type something like the lines below. After the bullet, hit a tab to start the text.

2 Select all the text, then open the Tabs panel; if it’s already open, click the magnet icon to snap the panel to the frame.
3 You can see, above, that the first line, beginning with the bullet, starts where the Left Indent marker is set, all the way to the left. The text begins at the first tab stop, probably the default half-inch mark. What we want is for the text, after it bounces off the right edge, to align with the first words. All it takes is one small move.
Hold down the Shift key and drag the Left Indent marker, the lower triangle on the left, to about the ¼-inch mark on the ruler. (If a tab marker appears, drag it off the ruler and try again.) The Left Indent marker acts as the first tab, so everything lines up at once.
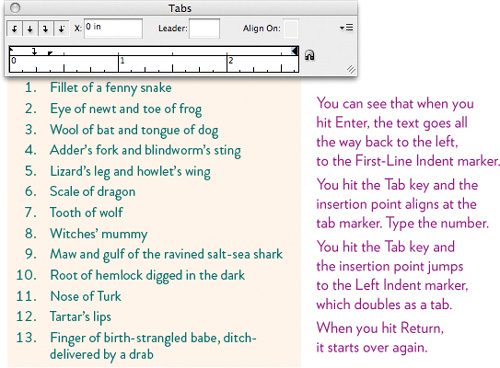
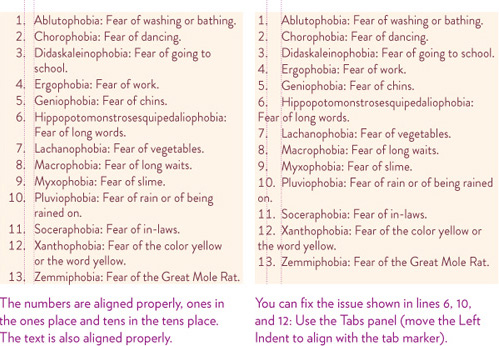
Task 16 Create a numbered indent
You can see that the setting on the opposite page will work for a numbered list, right? Type the number, hit the tab, type the text; after you hit Enter, start over again.
But when the list goes above 9 items, the numbers are no longer aligned properly. This is a sure sign of unprofessional type. The trick is that you must type a tab before the number so it aligns on the right, then type a tab after the number to get to the text.
1 In a text frame, type the first line of the list below. Make sure to hit the Tab key before you type the number, as well as after the number.
2 Select all the text, and open the Tabs panel.
3 Click the right-aligned or decimal tab symbol, then click in the ruler at about the ¼-inch mark.
4 Hold down the Shift key and drag the Left Indent marker a little way past the tab, to its right.
5 Hit a Return or Enter at the end of the first line of text, and carry on with typing the rest of the list. Don’t forget those two tabs!
6 At any point, select all the text and adjust the tab and indent markers as necessary.
Automatic bullets and numbering
InDesign has a Bullets and Numbering feature that will number a list for you automatically. This is enormously helpful because you can rearrange the list, add new items, delete items, and the entire list is automatically renumbered.
This feature does not align the numbers appropriately, as shown below-left, but this might be a small price to pay when you have a long list.
Task 17 Use automatic numbering
1 Create a text frame and type the first word or two in a list.
2 With the insertion point flashing in that first line, go to the Type menu and choose “Bulleted & Numbered Lists...,” then choose “Apply Numbers.”
3 The number 1 will appear at the beginning of the line. Hit Return or Enter and continue on with your list.
4 To remove the numbers or switch to a bulleted list, go back to the menu and choose the option you want.
5 For more control over the formatting, select all the text in the list. From the Paragraph panel menu, choose “Bullets and Numbering,” then experiment with the options.
Also use the formatting options you learned in this chapter!
Try this!
On this page and the next are examples of things you can do if you know how to control your tabs and indents. Use these as exercises to experiment with what you know!
Here are a couple more common uses of the tabs and indents. You already learned the basics of how to create these earlier in this chapter.