6. Style Sheets
Style sheets allow you to label, or tag, text with a style name. That style name calls on the style sheet to tell the text exactly what form to take. For instance, you might want all headings in your 24-page brochure to be 18-point Garamond Bold in small caps. So you create the style sheet, or definition, and as you build the brochure, you apply that style sheet (with a click) to all the headings so the formatting just appears as you type. Then your boss tells you, “No, no! The headings must be 16-point Myriad Black.” No need to put a hex on your boss—you merely change the style sheet definition and all the headings that had that style applied will instantly change.
Style sheets have got to be the most wonderful invention since the computer itself—it’s hard to imagine living without them. Even on a one-page document, style sheets can save time and frustration. If you are not using style sheets, you are not tapping into the power of InDesign.
A quick example of paragraph style sheets
Paragraph style sheets apply to entire paragraphs, but remember—every time you hit a Return or the Enter key, you create a paragraph, which means every headline is a paragraph. You can set up paragraph space before and after, hyphenation controls, and all other paragraph settings in a style sheet.
Don’t get style sheets confused with type styles. Type styles are things like bold, italic, underlined, etc.; you will apply type styles within the style sheet definition. Follow the steps below to create and use style sheets!
Task 1 Create a style sheet for body copy
This will be your “Body copy” style sheet for the main text. In the next task, you will create a Heading style sheet, and then apply it, and in the third task you will change the style sheets to understand why to use them.
1 Open a new, one-page document.
2 Choose the Type tool. Even though there is no text on your page yet, choose a readable font and a type size of 10 or 12 point. Make sure the alignment is flush left. These are now your defaults.
3 Type the text below, hitting Enter or Return at the end of each heading and after the periods you see in the copy.
4 Open the “Paragraph Styles” panel (you can open it from the Type menu if you can’t find it on your screen).
5 There are two main ways to make style sheets: From the dialog box, and from type that is already on the page. First, we’re going to make a style sheet from type already on the page.
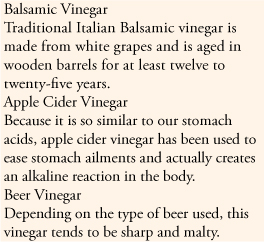
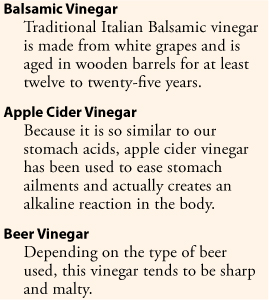
So single-click in the second paragraph, the one that begins with “Traditional Italian Balsamic vinegar is . . . .”
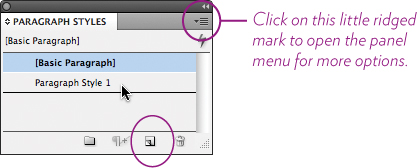
6 In the Paragraph Styles panel, shown below, single-click the Create new style icon at the bottom of the panel.
This creates a new style sheet called “Paragraph Style 1.” (If you already have a number of style sheets listed in that panel, you might not see this new one until you scroll through the list.)
7 Double-click on “Paragraph Style 1” to open the style sheet specifications dialog box, as shown below.
8 Name this style sheet “Description.”
Notice that the style sheet has picked up the formatting from the paragraph in which you had the insertion point flashing.
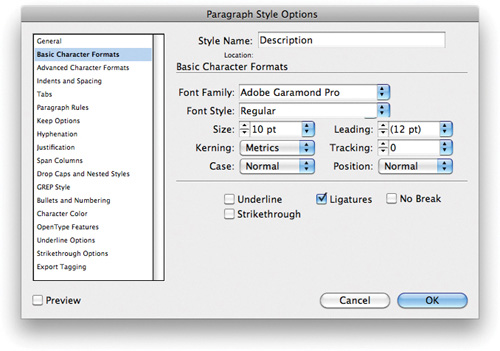
9 Add an extra point to the “Leading” value, both to open up the linespacing a bit and to make sure it’s not using Auto leading.
Use the Tabs pane to move both of the left indent markers about a quarter inch to the right, which will indent the text.
10 Click OK when you’re done. Now let’s make the Heading style sheet by going straight to the dialog box and choosing attributes (on the following page).
Task 2 Create a style sheet for the headings
I assume you completed the previous exercise to create the “Description” style sheet. This new one will be your “Heading” style sheet. If the description copy is a serif typeface, try a bold sans serif for the headings.
1 Open the Paragraph Styles panel, if it isn’t already.
2 Choose the black Selection tool and click on a blank spot on the page, just to make sure no text or text frame is selected.
3 Click the “Basic Paragraph” style at the top of the pane. (The new style sheet picks up the formatting from the selected style sheet. Later you will use this to your advantage.)
From the panel menu, choose “New Paragraph Style....”
You’ll get the same dialog box as on the previous page, but this time it’s not picking up the formatting of any selected text. It is, however, picking up the formatting of any style sheet in the list that may have been selected, which in this case is “Basic Paragraph.” That’s okay for now, or click the “Reset to Base” button.

4 Name this style sheeting “Heading.”
5 Select “Basic Character Formats” from the pane on the left; choose a bold sans serif font for the heading.
Choose a font size. (Since sans serifs are generally larger than serif fonts, you probably don’t need to make it any larger.)
Select “Indents and Spacing” and add about 8 points of space in the “Space Before” field (as explained in Chapter 4). You can type in 0p8, no matter what the current measurement system it’s using.
6 Check the other specs to see what your options are and to make sure there is no unnecessary formatting that you don’t want. Click OK.
Task 3 Apply the style sheets
Now you have two new styles in your Paragraph Styles panel, called “Description” and “Heading.” You need to apply them to the text.
1 Select the Type tool.
2 Single-click in the “Balsamic Vinegar” heading.
From the Paragraph Styles panel, single-click on the “Heading” style sheet. It should instantly change to the formatting you selected in Step 2. (If you see a plus sign in the style sheet name, that means there is an override; hold down the Shift and Option/Alt keys and click on the style sheet again. See page 124.)
3 Repeat the above steps to apply the Heading style sheet to the other two vinegar headings.
4 Single-click in the first paragraph of text under the first heading.
From the Paragraph Styles panel, single-click on “Description.”
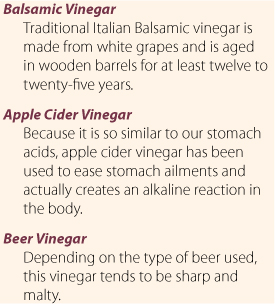
Repeat the above steps to apply the Description style sheet to the other two paragraphs. Your text should look something like this:
Now the best is yet to come. Not only do style sheets help keep your formatting consistent in your document, but they make it incredibly efficient to make changes and fine-tune your typography.
Carry on to the next page!
Task 4 Fine-tune the style sheets
This is the part that is so incredibly great about style sheets. Let’s say that the short piece you just created is actually a 12-page catalog with hundreds of listings, and your boss tells you to change the color and the size of the heading font throughout the entire document.
All you need to do is change the definition, the formatting specifications, of the style sheet. Every paragraph to which you had applied that style sheet reformats instantly.
1 From the Paragraph Styles panel, double-click the “Heading” style sheet name.
2 In the dialog box that opens, change the font, the color, the size, or whatever you want.
3 If the “Preview” box in the bottom-left corner is not checked, check it so you can view the changes.
4 When you’re finished making changes, click OK.
5 Follow the steps above to change the formatting for “Description.”
Your text should look something like the one below. Your specs are different, of course, but the point is that all the text reformatted when you changed the style sheet definition.
Tip
To create a new color while you’re in the process of making a new style sheet, Option–double-click (PC: Alt–double-click) on the color box in the upper-left of the Character Color pane.
The basic steps to create style sheets
If you followed the steps on the previous pages, you created style sheets using the two basic methods:
• Format a paragraph the way you want it to be, then create the style sheet based on that formatting:
With the Type tool, click in the formatted paragraph.
From the Paragraph Styles panel menu, choose “New Paragraph Style....”
Name the new style, then click OK.
Apply the style to selected paragraphs.
• Create a new paragraph style from scratch:
From the Paragraph Styles panel menu, choose “New Paragraph Style....”
Name the new style.
Select options in the side panel and make your formatting choices.
When finished, click OK.
Apply the style to selected paragraphs.
Everything you see in this entire book has style sheets applied, including the graphics (see Chapter 7 about “object styles”). For book-length projects such as this one where every chapter is a different file, InDesign lets me synchronize the style sheets across the files and import individual style sheets from any other InDesign document. When you import a word processing document in which you’ve used style sheets, InDesign adds those to the Paragraph Styles panel (see pages 126–127 for details about importing Microsoft Word files).
Tip
To end a line but not create a new paragraph, use Shift Return or Shift Enter. The line will break, but it won’t pick up all the paragraph formatting, such as space before or after, Next Style, etc. This is called a soft Return.
Take advantage of “Next Style”
If you’re typing your text directly into InDesign, you can take advantage of this great feature where the text automatically becomes a new style after you hit a Return or the Enter key.
For instance, use the text and the style sheet you created on pages 110–114 for the following exercise.
Task 5 Add a “next style” to the existing style sheets
1 In the Paragraph Styles panel, double-click on the “Heading” style sheet you made earlier.
2 In the “General” pane that appears, find the “Next Style” pop-up menu; choose the “Description” style sheet you created earlier.
Click OK.
3 In the Paragraph Styles panel, double-click on the “Description” style.
4 In the “General” pane that appears, from the “Next Style” pop-up menu, choose the “Heading” style sheet.
Click OK.
Task 6 Continue typing in the text
1 Get the text sample that you created earlier.
With the black Selection tool, enlarge the size of the text frame so it will easily hold more type.
2 Get the Type tool.
Click at the end of the last paragraph in that text frame.
3 Hit Enter or Return and type a new heading. It should be automatically formatted in the “Heading” style sheet!
4 At the end of the heading, hit Enter or Return and type a description. The text should appear in the “Description” formatting.
Hit Enter or Return at the end of the description text and type a new heading, repeating the process over and over.
The trick to using “Next Style,” obviously, is that you have to have the style sheets created so you can choose them.
Tip
Choosing a “Next Style” does not change any text that is already on the page—it only applies as you’re in the process of typing.
Here is another example of when the “Next Style” feature is useful. Let’s say you’re working on a newsletter and as you enter the text, you typically type a subhead, hit Enter, type the first paragraph which does not have an indent (because first paragraphs should not be indented), then you type the next paragraph which does have an indent. That makes three style sheets: one for the Subhead, one for the First Paragraph, and one for the Body Copy.
Task 7 Try another example of using “Next Style”
1 Create the Body Copy style sheet and include an indent (use either the “Indents and Spacing” pane or the “Tabs” pane for the indent). For “Next Style,” choose “Same Style.” Click OK.
2 In the Paragraph Styles panel, single-click to select “Body Copy,” then from the panel menu, choose “New Paragraph Style....”
3 Name this “Body Copy First Paragraph.”
Because “Body Copy” was chosen in the panel before you made this new style, this new style is automatically based on “Body Copy” and holds all the same formatting.
So in this new style sheet, delete the indent, which will be the only difference from “Body Copy.”
From the “Next Style” pop-up menu, choose “Body Copy.” Click OK.
4 Create a new style sheet, and name this one “Subhead.”
From the “Based on” pop-up menu, choose “No paragraph style.”
Format it as you wish, perhaps a bold sans serif.
From the “Next Style” pop-up menu, choose “Body Copy First Paragraph.” Click OK.
Task 8 Now type the text
1 Create a new text frame.
2 Choose the paragraph style called “Subhead”; type a short subhead and hit Enter or Return.
3 Type the first paragraph—notice the style changed and it is now “Body Copy First Paragraph”; hit Enter or Return.
4 Type the next couple of paragraphs—notice the style automatically changed to “Body Copy.” The Body Copy text will continue in the same style until you manually choose another.
Be careful with the “Based On” feature!
The option to base one style sheet on another can be great, as long as you are clear about what will happen. The basic idea is this: Let’s say you have a newsletter. For the body copy, you create a Body Copy style sheet that uses Garamond Regular, 11/14. For the captions, you create a Captions style sheet that is based on the Body Copy style sheet, but it uses Garamond Italic, 9/10. For the headlines, you create a Headlines style sheet that is based on the Body Copy style sheet, but it uses Garamond Bold 13/18.
Now let’s say your client tells you she doesn’t want to use Garamond; she wants you to change the font to Minion. All you need to do is change Body Copy to Minion Regular—the other styles that are based on Body Copy will change as well. The Captions will automatically change to Minion Italic and the Headlines to Minion Bold. They will maintain the specifications you set up that were different; that is, the Captions will still be 9/10 and the Headlines will still be 13/18. This is great!
The problem arises when you don’t realize that you based StyleB on StyleA, or you didn’t know what you were doing or you forget that you did that. Then when you change StyleA, you’re surprised when StyleB changes as well!
It is safest to only base one style on another when you are really clear about exactly why you are doing it and what the consequences might be. At any time, of course, you can change StyleB so it is no longer based on StyleA, but that’s a painful waste of time. Although, it will teach you not to do it again.
Task 9 Base one style on another
1 In the Paragraph Styles panel, create a new style (as explained on page 115 or pages 110–112).
Make sure the new style is not based on any style: In the “Based On” pop-up menu in the panel, choose “No paragraph style.” You might also want to click the “Reset to Base” button to get rid of any previous formatting.
Name this style “Headline,” and make it something like Calibri Bold (a sans serif), 18-point text with 20-point leading. Click OK.
2 In the Paragraph Styles panel, single-click on your new style, “Headline.” From the panel menu, choose “New Paragraph Style.”
Call this one “Subhead.” Notice it is already based on “Headline” because that is the style you had selected when you chose to make a new style.
Change the font size to 12 point, the leading value to 14, and make it Calibri Regular. Click OK.
3 If you still have the “Body copy” style sheet you created on page 96, skip to Step 4; if not, make a quick “Body copy” style sheet.
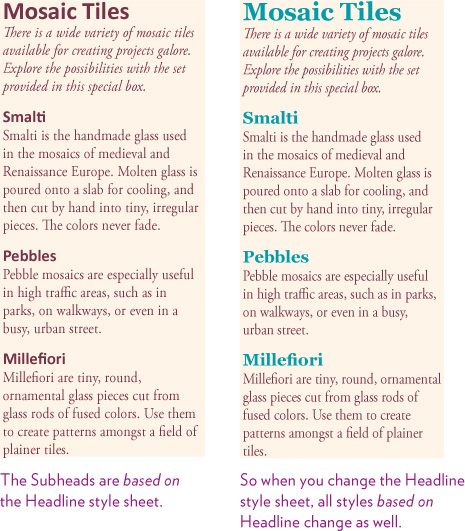
4 Okay. Now create a text frame and type something like the piece shown below, left.
5 When finished, open the “Headline” style sheet. Change the font to a serif face, such as Garamond or Georgia. Also change the color to something noticeable, such as bright blue or red. Click OK.
6 Your sample should have changed similar to the one below, right. The Body copy should not change because it was not based on the Headline, but the Subheads should reflect the font and color changes.
Can you imagine how this could mess up your entire project if you randomly base style sheets on other style sheets?
Create and use character styles
Character styles function in exactly the same way as paragraph styles, except they apply only to selected characters, not to the entire paragraph. You can choose basic text formatting, such as font, style, size, color, kerning or tracking values, and more.
Just like paragraph styles, once you have applied the styles to text, you can change the style sheet definition and all instances of that character style throughout the document will change. It’s miraculous. You’ve seen a lot of character styles throughout this book—the numbers of the steps in the tasks, the bullets, the task headings, etc. The bold sans serif that begins the paragraph above is a character style—all I did was select the text, then click the name of the style and voilà, the formatting changed. If I want to make all those bold words in this whole chapter a bright pink color, all it would take is a click in the style sheet definition.
Task 10 Create a character style
1 Open the Characters Styles panel.
2 From the panel menu, choose “New Character Style....”
3 Name the style something that will tell you what it will be used for.
4 Make sure “Based On” is “None” (for this example, anyway).
5 Click each of the options in the side pane and make your formatting choices. You don’t have to make a choice for every item—you might only have one or two formatting specifications. Anything you leave blank will be picked up by the paragraph formatting.
For instance, perhaps you want to highlight words in your report in bold magenta. In your character style, only change the “Font Style” to Bold and the “Character Color” to magenta. Do that for this task, and click OK.
Task 11 Apply a character style
1 Select text in a paragraph.
2 Click the style name you just created. That’s it!
To remove any character style, select the formatted text, go to the Character Styles panel, and choose “None.”
Oh boy—nested styles!
Nested styles are really amazing. Once you make a character style or two, you can set up a paragraph style that automatically applies a character style at certain points. For instance, when I type a task heading, as on the opposite page, the first words automatically appear in a tint of the blue color and in small caps; when I hit the Tab key, the formatting automatically changes to the paragraph style sheet.
You’re not limited to using only one character style—you can use many, surely more than you’ll ever want to use in one paragraph.
If you’re feeling confident in your ability to create style sheets that include tabs, indents, spacing, etc., let’s create a nested style that creates the format shown below; it is created automatically as you type.
![]()
Task 12 Create a nested style sheet
1 First, you need to create a character style sheet.
Create one new character style sheet called “Red Day.” Make it a sans serif bold font, 9 point, 10.2 leading, small caps. Choose a color of your choice (if you know how to create colors, as explained in Chapter 11, double-click on the color swatch in the “Character Color” section to create a new swatch).
2 Now create the paragraph style sheet.
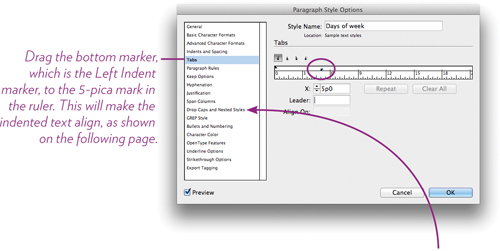
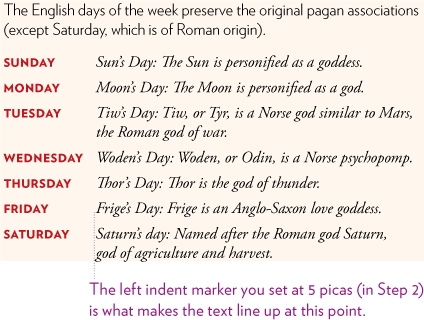
Name it “Days of week.” Choose a serif font, 10/12, left alignment, paragraph “Space After” of 0p4 (in the “Indents and Spacing” pane, as on page 112). Set the left indent marker at 5 picas, as shown below.
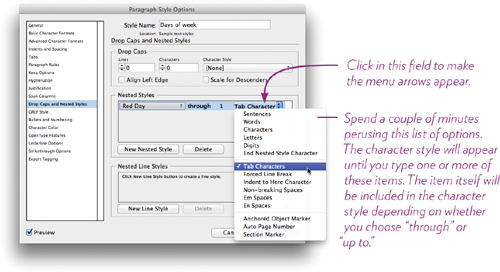
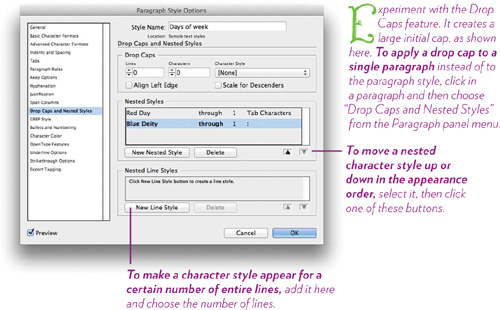
3 Click on “Drop Caps and Nested Styles” in the left pane.
4 Click the button, “New Nested Style.”
This puts a pop-up menu in the “Nested Styles” pane, as shown below. Click on it to choose your character style named “Red Day.”
Recreate the settings you see below (“through 1” and “Tab Characters”). This tells the style sheet to use that character style until you hit the first Tab key. Click OK.
5 Create a text frame and choose the paragraph style, “Days of week.”
Type the list below, typing the day of the week in all lowercase (the intro paragraph, obviously, has a different paragraph style!). Hit a Tab after the name of each day. Ta da!
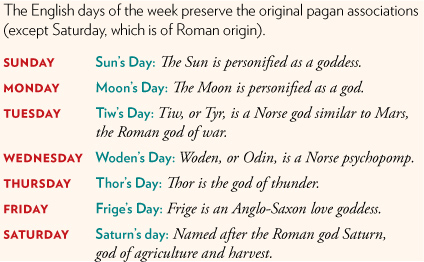
6 If you’re feeling sassy, create a second character style called “Blue Deity.” Make it the same sans serif, bold, 9/10.2. Choose (or create and choose) a teal color.
Add it to the same paragraph style, “Days of week.”
Make the second character style begin after you type a colon.
All the text with that paragraph style applied will automatically change. Amazing.
Here are some other tips about the nested styles and drop caps.
Know your overrides
Even though you’ve applied style sheets to just about everything, you can still change selected characters. For instance, this paragraph you’re reading has a “Body copy” style applied, but I can make selected characters italic. This is called an override, where I override the basic settings. You can override everything. InDesign considers a character style, such as the bold in the previous sentence, also an override, but recognizes it is a character style.
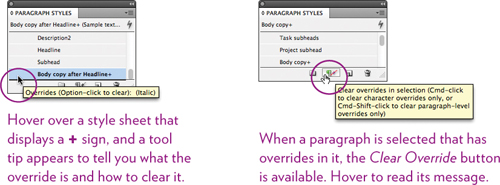
When you select an entire paragraph (triple-click in it) and see a + sign in the style name in the panel, as shown below, that means there is at least one override in that paragraph. Sometimes you don’t know even how they got there.
There are many ways to get rid of overrides, depending on what they are and what you want to do, but I’m just going to mention the two most useful. Check the Adobe Help files for all the complex ways of clearing local formatting!
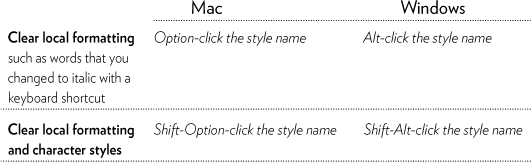
Keyboard shortcuts to remove overrides: With the Type tool, single-click in a paragraph, or press-and-drag to select more than one.
Discovery
Also experiment with contextual menus—right-click on a selected style name in the panel to see what your options are!
Tips for style sheets
Here are some tips that make using style sheets even easier:
• Give the style sheet a name that tells you what it does. That is, don’t randomly name them things like Body 1 and Body 2, or New Headline and Newer Headline. Be specific so you know exactly what you’ll be getting.
• Name the styles in related groups. For instance, if you have a quiz included in your handouts document, name the style sheets pertinent to that portion, something like Quiz Headings, Quiz Questions, Quiz Answers, etc. This way you can group them together in the panel so you can find them easily.
• Assign keyboard shortcuts to the styles you use the most: In the Style Options for either paragraph or characters styles, go to the “General” pane and click in the “Shortcut” field. Hold down the Command, Option, or Shift key (PC: Control, Alt, or Shift), then tap a number on the numeric keypad. You must use the numeric keypad for this—if your keyboard doesn’t have one, you can’t create a shortcut. Dang.
If you hear a beep when you try to type the shortcut, that means your Num Lock is not on. Cancel the dialog box, and turn on Num Lock (even if you don’t have a Num Lock key, the Clear key usually acts as one). Try again.
• When placing or pasting text, choose a style sheet before placing or pasting, and the text will appear on the page in that style. This is a particularly great feature.
• If you start typing with a style sheet and the text appears in completely different formatting from what you specified, it somehow grabbed some overrides. To fix this, use the keyboard shortcut on the opposite page to “Clear local formatting and character styles.” Also, click in an empty spot (not in a text frame) and then clear the overrides when nothing is selected; this prevents the problem from happening again.
Tip
At any point you can remove the style sheet from the text without removing the formatting. Select the text, go to the panel menu, and choose “Break Link to Style.”
Import style sheets along with a Word doc
If you use Microsoft Word, either you know how to use your style sheets, or you just type away and style sheets (some that include settings such as “Next Style”) are automatically applied for you (which I find really annoying).
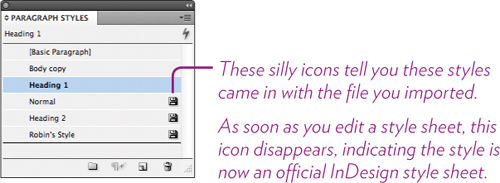
When you place a Word doc into InDesign, the default is set so Word’s style sheets are added to your Paragraph Styles panel. You’ll know they’re there because the panel displays old-fashioned floppy disk icons next to each imported style sheet name, as shown below.
Imported style sheets in InDesign
If a style sheet in Word is named exactly the same as a style sheet in your InDesign file, InDesign’s style takes over. For instance, the panel you see above included a style sheet named “Heading 1,” so when the Word style sheet was imported along with the text, my InDesign style sheet applied its settings to every paragraph tagged with “Heading 1.” This is great for me. :-)
Any style sheets in the Word doc that don’t find the exact name in the panel are imported and added to your panel. This is also great because it doesn’t really matter what the original formatting was—once it is tagged and in InDesign, you can format the entire document so easily.
More control over importing style sheets
Occasionally, however, someone has monkeyed with the defaults and weird things happen when you import a Word file, or perhaps the defaults simply don’t do just what you want. For instance, you might have spent a lot of time in Word creating exactly the style sheets you need for this project, and you want to make sure those don’t get overridden when you import the file to InDesign. In that case, follow the steps below.
Customize the import and map the style sheets
1 In the InDesign file, go to the File menu and choose “Place....”
2 Check the box in the lower-left of the Place window to “Show Import Options.”
3 Find and double-click the Word document that you want to import.
4 In the “Microsoft Word Import Options” dialog box that appears, carefully read the options and make decisions about the incoming file.
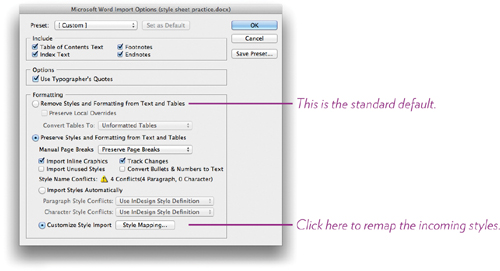
5 Click “Customized Style Import,” and then click “Style Mapping....”
In the “Style Mapping” dialog box that appears (shown below), click on the InDesign style on the right that matches up with the Word style; this pops up a menu.
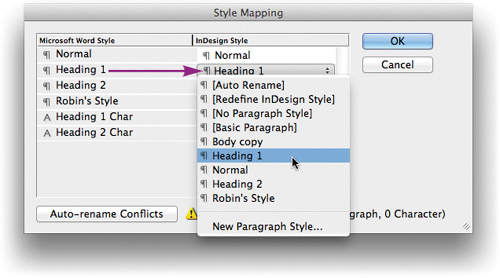
To maintain the imported Word style, choose “Redefine InDesign Style.” This forces the InDesign’s style sheet to reformat itself according to the Word style.
To format the imported style sheet with the InDesign style, choose an existing InDesign style.
To rename the Word style, choose “Auto Rename.”
6 To close the “Style Mapping” dialog box, click OK, and then click OK in the main dialog box (far above) to finish importing the file.
Try This!
Where style sheets really shine is in longer documents (although I end up using style sheets on everything). Recreate the project you see below, using style sheets for each different formatting.
A handy resource for lots of copyright-free text to work with is:
http://www.gutenberg.org/browse/scores/top
Just choose a story on the Gutenberg site (with grateful appreciation), copy a bunch of text, and add your own headlines and subheads to divide it into sections. Take advantage of everything you have learned about tabs and indents, leading, paragraph spacing, kerning, etc.
The text in the project below is from How to Analyze People on Sight Through the Science of Human Analysis: The Five Human Types, 1921, by Elsie Lincoln Benedict, available on the Gutenberg site (I did a little editing on the text below).