
11. Going to Press
If you really are a new designer, chances are you’re not creating really complex jobs that need to be babied through a million-dollar printing press. On the other hand, with the combination of InDesign in your hands and online print shops that can print your uploaded files in gorgeous full-color, there’s no reason for you to limit yourself.
If you follow the guidelines in this chapter, your work should print just fine.
I know I’ve said it before, but I’ll say it again—it is so exciting to be living in a world where we can print in full color for such affordable prices! Go to your room and design something!
Printing to your desktop printer
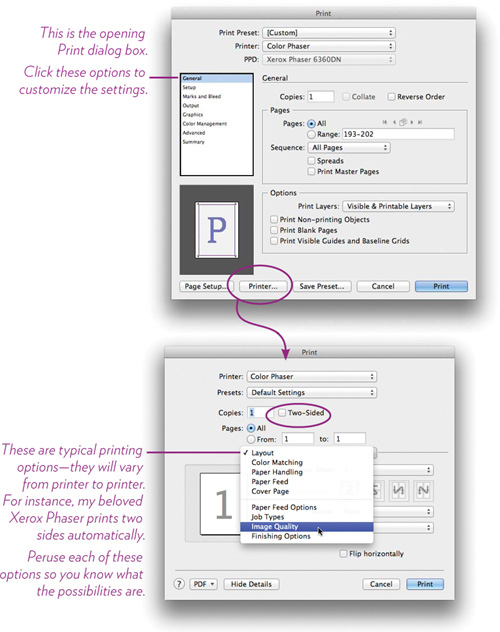
If you plan to print to your inexpensive little inkjet, you really don’t need to do anything but set up your printing specs in the Print dialog box, then click the Print button. The paper and quality that you choose in the Print dialog boxes for your specific printer make a huge difference in the output, so be sure to check them (see below).
If you have a more expensive desktop laser printer, you have even more control over the quality. Surely you have downloaded the latest print driver so you have options for quality control. In the Print dialog box, click the button at the bottom, “Printer...,” to get access to your specific printer options. InDesign will yell at you (a little message pops up), but that’s okay.
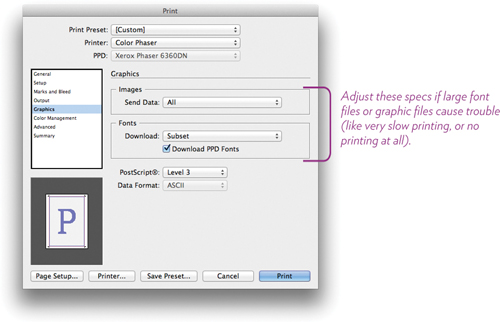
• If you’ve used an OpenType font with a huge character set, be sure to set the Fonts/Download option as “Subset,” as shown below.
If you find that really large graphic files choke your printer, change the Images/Send Data option to “Optimized Subsampling.”
• Page Setup: It’s always a good idea to check the Page Setup options before you print a new job for the first time. Click the “Page Setup...” button and make the simple adjustments, if necessary.
• Print Presets: If you print a certain type of job regularly, such as horizontal postcards or lengthy reports, set up your specs exactly how you want them, then click the “Save Preset” button at the bottom of the dialog box; name that preset collection of options.
From then on, those preset options will appear in the “Print Preset” menu at the top of the main Print dialog box, or you can choose it from the File menu to send the job straight to the printer.
Preparing your files for a commercial press
If you plan to print anywhere besides your desktop printer, clean up your files before sending them off. Here is a list of the things I check:
• Check the Links panel to ensure that all graphics are linked properly. Also check that you don’t have any .jpg or .gif files in the document.
• Get rid of all unnecessary swatches, character styles, and paragraph styles: Go to each of the panel menus and choose, “Select All Unused.” InDesign will highlight all the unused swatches and styles. While they are selected, Option-click (PC: Alt-click) the Trash icon. In the Paragraph Styles panel, if “Basic Paragraph” is selected, you can’t throw anything away, so with the Command key held down, single-click on “Basic Paragraph” to deselect it from the collection, and then throw the rest of them away.
• Make sure all Swatches are CMYK. If you have an RGB or LAB color, double-click it and change it to CMYK. You can select more than one color to apply this change to them all at once.
• Make sure all Swatches are process colors, not spot colors. If you have a spot color, double-click it (or select and double-click several at once) and change it to “Process” (assuming you are printing CMYK).
• Check the fonts in the document: Use “Find Font...” from the Type menu to make sure there are no missing fonts and to make sure you haven’t used any TrueType fonts unnecessarily.
• If the press you use doesn’t like TrueType and you have to use it, outline it (select the text, go to the Type menu, and choose “Create Outlines”).
• Check every page to ensure there are no empty frames hanging around (only because it’s like having dirty socks all over the floor when company comes over): From the View menu, go down to Extras and choose, “Show Frame Edges.” If you see any empty frames, delete them.
Also check the Preflight panel, as shown on page 214, then package your files (page 215) or make a PDF for print (page 216).
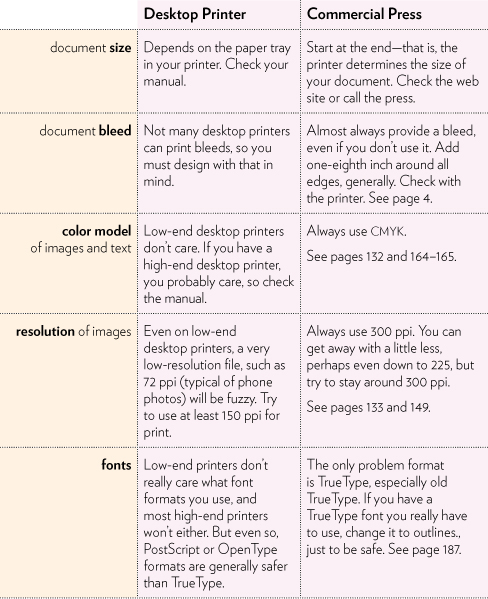
Check the press specs
The printing specifications for various projects have been mentioned here and there throughout this book, but I’ve made a table for easy reference, below.
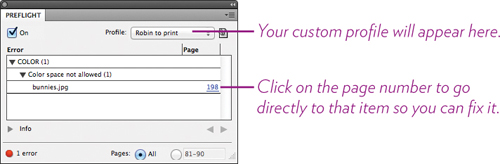
Check the Preflight panel
The Preflight panel is great. You might have seen a tiny message in the bottom-left corner telling you there are “No errors” or “17 errors.” That’s the Preflight panel constantly checking your document to make sure it’s printable. It has its own defaults that it checks, but you can create customized profiles so it checks what you want it to check. For instance, for my jobs that go to a high-end press, such as this book, I tell the Preflight panel to make sure all my graphics are CMYK, of a certain resolution, the links are good, no fonts are missing, etc.
Task 1 Check out the Preflight panel
1 There are two easy ways to open the Preflight panel:
• Click on the very tiny triangle in the bottom-left corner of the window, as shown below, to pop up the menu. Choose “Preflight Panel.”
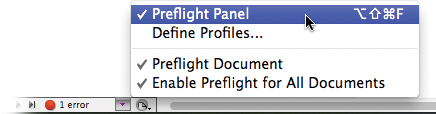
• Or from the Window menu, slide down to “Output,” and then choose “Preflight.”
2 This opens the Preflight panel that tells you what is wrong with your document, according to its defaults.
3 To customize the panel, go to the Preflight panel menu and choose “Define Profiles...,” or choose “Define Profiles...” from the pop-up menu as shown in Step 1.
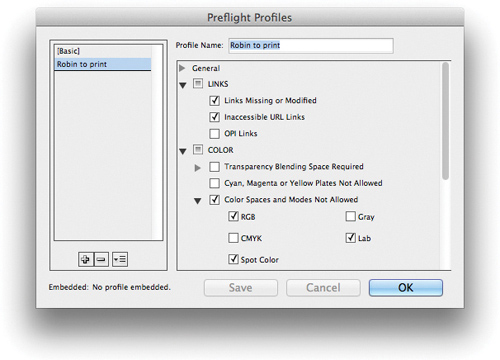
Click the + button to add a new profile. Name it, and disclose each of the headings and make your selections. If you don’t know what something is, leave it alone.
Package your files
When sending your files off to be printed, you need to include the InDesign file itself, of course, plus every graphic that is linked to the file, plus the fonts. To make this process so easy, InDesign has a Package feature. It gathers up everything it needs and puts copies of everything into a new folder, with the word “folder” at the end of the name.
In the process of packaging, InDesign does a preflight check, similar to the one you can do yourself on the opposite page. If you did a good job cleaning up your file and doing a preflight, there should be no errors in the packaging.
Task 2 Package your file
1 From the File menu, choose “Package....” You’ll see this dialog box:
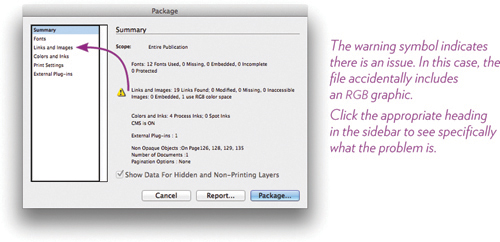
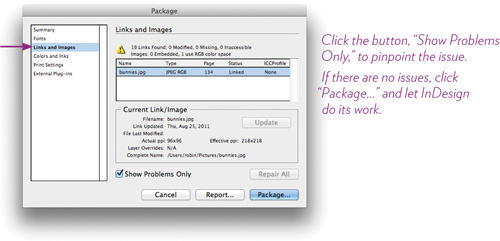
2 If there are errors, as shown above, click the heading in the sidebar to see what the problems are. If they can’t be fixed by selecting the file and clicking the “Update” button, you have to cancel this and go back to the InDesign file and fix it.
Note
As mentioned above, InDesign puts a copy of everything in the packaged folder, so now you have duplicates of every little thing in that file. You might want to delete the original folder in which you were storing most of these files, but first check to make sure you don’t throw out some great graphics that you thought you were going to use, but didn’t.
Export to PDF
If you have created a lovely piece and you either want to send it via email, post it online, or upload it to an online print shop for printing, you can create a PDF very quickly in InDesign.
1 From the File menu, slide down to “Adobe PDF Presets.”
2 Of the options in the submenu, choose the one appropriate for the destination of the PDF:
• If the PDF is to be viewed on a screen of any sort, choose “Smallest File Size....”
• If you’re sending the PDF to someone to print on her desktop printer, choose “High Quality Print....”
• If you are sending this job to a high-end press and they have told you to send a press-quality file, choose “Press Quality....”
• If you’re uploading the file to a print shop and their specs say to create a PDF/X-4, then, of course, choose “PDF/X-4....”
3 Name the file and save into a folder where you can find it again.
Now, that is the quick and easy way to make a PDF and will probably be sufficient for most of your needs. However, PDFs are hugely complex and mysterious and magical files. If you plan to produce a PDF for the press, get in touch with a representative of that press and make sure you are preparing the file appropriately. She may give you certain specifications to add to the dialog boxes before you save the file.
Save a file for earlier versions
InDesign doesn’t have an option to save in an earlier version, but you can export any file as an “InDesign Markup” file. A file saved this way can be opened with a CS4 version of the program, although if it includes features that are specific to CS5 or CS5.5, those features (and perhaps the content) will be lost. The person running CS4 must make sure his app is completely up to date (go to the Help menu, choose “Updates...,” and follow the directions).
1 From the File menu, choose “Export....”
2 At the bottom of the Export window, click the “Format” menu (PC: “File type” menu) and choose “InDesign Markup (IDML).”
3 Choose the folder in which to save the file, then click Save. The new file will have a .idml extension on the file name, instead of .indd.
If you need to take a file all the way back to CS3, you’ll need to export it as an IDML file, open it in CS4, then from CS4, export it in the Interchange INX format.
Save a corrupted file
Sometimes a file starts crashing InDesign and you don’t know why. The first thing to try is the technique mentioned above—export the file as an IDML file, then reopen it in InDesign. This has saved my boompah a number of times, including this very chapter file. Also try making a snippet of a page that you think is causing trouble, delete the original page, and replace with the snippet (see page 219).
Occasionally I have had files that crashed when creating an index or making a table of contents. I have been able to save the files by cleaning them up with the proverbial fine-tooth comb—getting rid of missing fonts that the file was still calling on, deleting unused style sheets, updating graphics, etc.
To prevent a file from crashing, this is the most important tip: Regularly do a “Save As” and replace the file. InDesign has almost unlimited Undos (the number of times you can undo something you just did). But it has to keep track of these in memory; when memory gets full, InDesign crashes and you risk corruption. So every time you do something big, such as delete pages, add pages, add or delete large graphics, or make global changes such as search-and-replace, save the file with the same name and replace it. Also “Save As” every hour or so. I can’t stress enough how important this is to keep things running smoothly!
Where to go from here
As I’ve mentioned, this small book only touches the tip of the InDesign iceberg. I hope it makes you want to find out more! Here are a couple of great places to learn more about this great tool.
• Help files: Adobe’s help files are pretty good. They include not only the entire manual (searchable), but links to people in the community who offer support, video tutorials from Adobe and others, and much more.
• Real World Adobe InDesign CS5 (with free CS5.5 bonus content), an 800-page book by Olav Kvern, David Blatner, and Bob Bringhurst. If you can’t find the info you need in that book, it doesn’t exist. It’s available from Peachpit Press.
• Adobe InDesign CS5: Learn by Video series from Peachpit Press.
• Before & After: How to Design Cool Stuff
You really must subscribe to Before & After, from John McWade. It’s the best thing I’ve ever seen on design, and now you know enough about InDesign to understand and benefit from the concepts John talks about. He provides short bits on specific aspects of design, with brilliant examples and explanations. www.BAmagazine.com
• The Non-Designer series, from Peachpit Press. These books comprise a pretty good education in the basics of design, plus the basics of using the Adobe Creative Suite software:
The Non-Designer’s Design Book
The Non-Designer’s Type Book
The Non-Designer’s Presentation Book
The Non-Designer’s InDesign Book
The Non-Designer’s Photoshop Book (by John Tollett; I helped)
The Non-Designer’s Illustrator Book (by John Tollett; I helped)
Plus these more advanced books:
Robin Williams Design Workshop (with John Tollett)
Robin Williams Handmade Design Workshop:
Create Handmade Elements for Digital Design
(my most favorite book ever, by Carmen Sheldon, and I helped)