1. Introduction to InDesign
The general way to use InDesign is to place some graphics on the page, get some text on the page, and design them into a piece. Putting the graphics and text on the page is the easy part—the fine-tuning is what takes time to master. This book merely gets you started in the right direction.
This primary chapter introduces you to a few of the background basics that you’ll use in every project. It’s not very exciting, but it’s useful, and if it is useful, it is beautiful.
Document setup
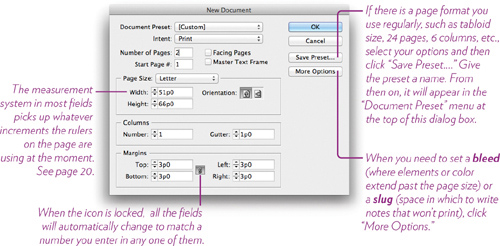
As in any other program, to create a new document you go to the File menu and choose “New.” In InDesign, you have a choice of creating a new Document (shown below), a Book (a file for managing individual chapter files in a book), or a Library (for easy access to items you use often; see page 196). If you don’t have a new, blank document open yet, follow the steps below.
Task 1 Make a new document
Any settings you make while creating a new document can always be changed, so don’t worry too much about choosing the wrong thing.
1 From the File menu, choose “New,” then “Document.”
2 In the “Intent” option, make sure “Print” is chosen.
3 Let’s make several pages to play on—enter 2 or 3 in the “Number of Pages” field.
4 If there’s a check in the box for “Facing Pages,” uncheck it.
5 Choose the “Page Size” option of “Letter,” with a portrait (tall) “Orientation.”
6 If the margins are 3p0 or .5 in. all the way around, leave them like that (or enter those numbers, if not).
7 Click OK. You should now have a single, untitled, blank page on the screen, as shown opposite.
8 Save this document into the folder of your choice, just as you do with all your other documents.
Get to know the workspace
InDesign opens your document in a workspace, as shown below. A workspace determines which panels are open for you and where they are placed, your ruler settings, what is visible in the Control panel, etc. You can customize the workspace endlessly and save various workspaces for different sorts of projects.
For now, we’re going to use the workspace that InDesign has already created, called “Essentials.” If that’s not what you see at the moment, go to the Window menu at the top of the screen, choose “Workspace,” and then choose “Essentials.” It will look like the screen below.
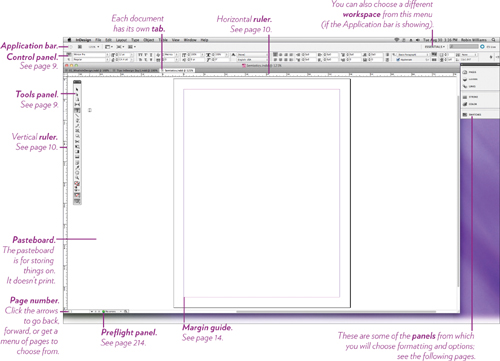
Delete the Application bar: The Application bar takes up a lot of room on the screen. Everything in the bar can be accessed from a menu or the Tools panel. If you want to get rid of it, go to the Window menu and uncheck “Application bar.”
When you’re familiar with InDesign and have figured out how you like to arrange the tools and panels on your screen, you can save your own arrangement: Go to the Window menu, the “Workspace” command, choose “New Workspace,” and give it a name. Whenever your panels get all messy, choose your workspace again and all will be returned to how you like it.
The panels
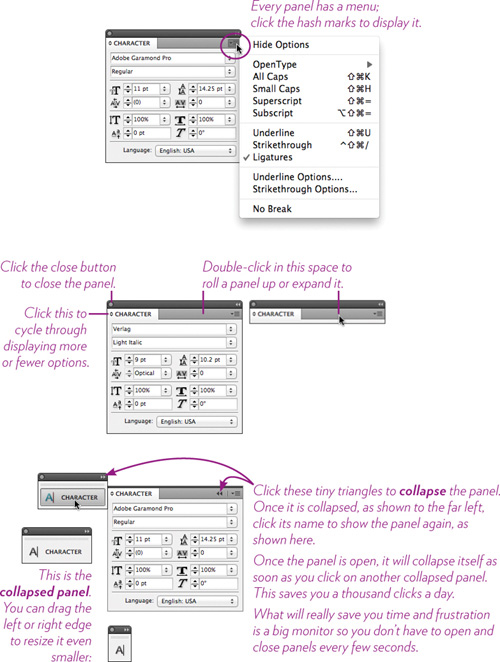
It can make you crazy if you don’t understand how the panels work. If you’re proficient in Photoshop or Illustrator, you are probably comfortable working with panels, so skip this section. If you’ve never worked with them before, take a few minutes to familiarize yourself because you’re going to be working with panels every minute in InDesign.
To open panels if they’re not already on the screen, get them from the Window menu or the Type menu. Learn their keyboard shortcuts so you can open them quickly.
Task 2 Open the docked panels on the side of the screen
If you just opened a document and are using the Essentials workspace, you have several panels docked at the side of your screen (Mac) or application frame (PC). Docking the panels is a good option if you’re working on a very small screen or just want to keep everything obsessively tidy.
To open a docked panel, just single-click on its name.
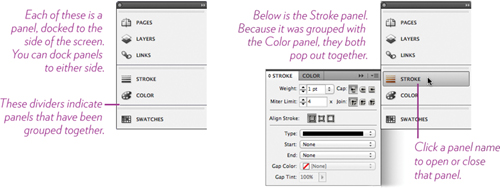
Tear off a panel so you can experiment with it in the tasks on the next few pages. Just grab its title tab, drag it off to the side, and drop it on the window. It looks like this:
To dock a panel to the side, grab it by its title tab and drag it toward the edge. When it gets within a few pixels, the panel snaps to the edge. You can dock an open panel, like the Stroke panel above, or collapse it as shown on the opposite page and then dock it.
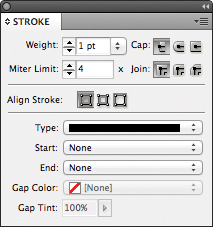
Task 3 Play with a typical panel
Use the Stroke panel shown on the opposite page, or open another, such as the Character panel, which you can open from the Type menu. Read each of the captions below and follow their directions until you can click on something and know what to expect.
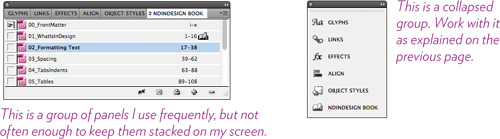
Task 4 Group and ungroup panels
Panels can be grouped together to save space on your screen. You can move the group around, collapse it, dock it, etc. When a panel is grouped, you have to click on its tab bar (or double-click in the empty space to the right of the tab) to see the panel.
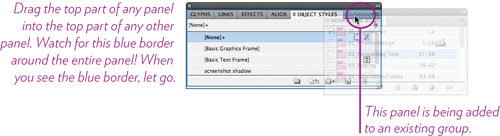
The trick to grouping a panel is to make sure when you drag it into the collection, the blue bar appears around the entire group, as shown below, and not just a blue bar at the top or the bottom. To ungroup, drag a title tab away and drop it on the window.
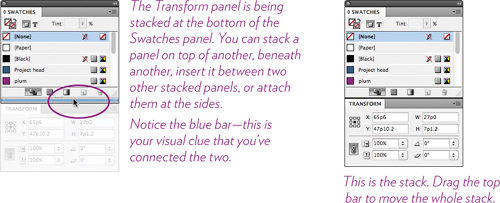
Task 5 Stack and unstack panels
If you have room on your screen to keep your most-used panels open and available, stack them. To stack panels, drag one on top of another. When you see a blue bar across the top, bottom, or either side (whichever end you want the panel to stack onto), let go, as shown on the top of the opposite page. To unstack a panel, drag its title tab away and drop it on the window.
The Control panel
The Control panel is that area across the top of your window, just below the menu commands. Options in the Control panel change depending on what is selected in the document. For instance, if your insertion point is flashing in text, you’ll see text options in the Control panel; if you use the black Selection Tool to select a graphic object, you’ll see different options for manipulating the graphic.
This means that you should not try looking for an option or specification in the Control panel until after you have selected the item you want to affect!
There is an overwhelming collection of tiny little icons in the Control panel. Keep checking the tool tips, as shown below (hover over an icon and the tool tip appears). As you learn InDesign, more and more of the icon buttons will become useful to you in your daily creativity.

The Tools panel
The Tools panel might be familiar to you from other applications. In InDesign, you can change its shape and move it, but you can’t add or delete tools from it. The Tools panel, like the Control panel, cannot be grouped, stacked, nor docked on the side.
If the Tools panel is not showing, choose it from the Window menu.
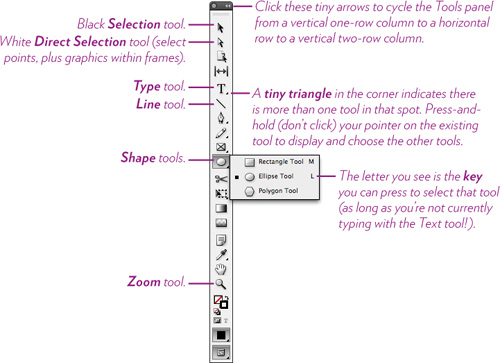
Tip
For information on every tool, go to the Window menu and choose Utilities > Tool Hints. Click on a tool in the Tools bar for an explanation of that item.
Hide or show the rulers
You will be using the rulers constantly for pulling out guides and for setting measurements in formatting fields. Whichever measurement system the ruler displays becomes the measurement system in the panels and dialog boxes. Mostly, you will be changing the rulers back and forth between inches and picas (see page 20 about picas)—maybe you don’t think so yet, but trust me, you will. So learn this nifty shortcut for changing the measurement now.
Task 6 Change the ruler settings
1 If the rulers aren’t showing: From the View menu, choose “Show Rulers.”
2 Right-click on the horizontal ruler across the top of the window or the vertical ruler down the side.
3 In the contextual menu that appears, choose a measurement increment. (For the future, also note the other options in this contextual menu!)
Task 7 Using ruler guides on the page
1 Make sure the rulers are showing, as in Step 1, above.
2 Simply press the cursor in the ruler and drag onto the page.
3 To move a ruler guide, get the black Selection tool, press on it and drag it.
4 To remove guides, get the black Selection tool, click on a guide, then hit Delete or Backspace. Also, see the options in “Grids & Guides” from the View menu—you can hide the guides, lock them, and delete all at once.
5 When “Snap to Guides” is turned on (from the “Grids & Guides” options mentioned in Step 6), objects will jump to the nearest guide when you drag close to it. It’s kind of freaky because you can actually feel the guide pull the graphic to it and then bump into it.
6 To create a horizontal guide while dragging a vertical one, or to create a vertical guide while dragging a horizontal one, hold down the Option key (PC: Alt key) while dragging.
7 To create a guide across a double-page spread, hold down the Command key (PC: Control key) and drag the ruler.
8 To set the same guides on all the pages of a document, put them on the Master Pages; see pages 14–15.
Create and hide or show the guides
If you didn’t change the default settings when you created your page at the beginning of this chapter, you should see margin guidelines a half inch from the edges of the page. These guides do not print, nor do they prevent you from doing anything—they are there only to show you the margins you set up when you created the document. They are for you to design around.
The menu command to hide, show, and lock the guides is in the View menu, under “Grids & Guides.” Learn the keyboard shortcut to hide and show the guides because you will be constantly turning them off and on.
Smart Guides
Smart Guides appear automatically to help you line things up. If they’re turned on, you’ll see green guides showing up all the time. They can show you when an element is placed the same distance between another element, when frame edges are aligned, when centers of items are aligned, and more.
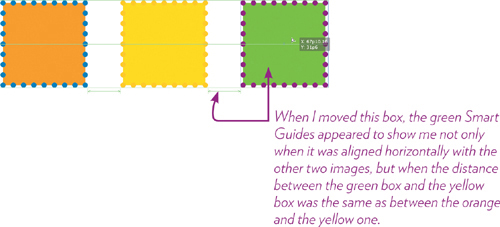
Smart Guides are very handy, but they sometimes make it difficult to place a guideline or an element in an exact position because the Smart Guides want to take over. So if you have trouble with a guide or item jerking away from the place where you want to put it, turn off Smart Guides (View > Grids & Guides). Learn the keyboard shortcut so you can do it instantly whenever you want.
Tip
If you hit the Tab key (not while you’re typing), all the panels and the rulers disappear so all that’s left is the window. This is a great way to remove all the clutter so you can see your page. This also might happen accidentally, so don’t freak out—just tap the Tab key again to bring everything back.
Know your defaults
As you type in InDesign or create shapes, the text appears with a font and size and color, and shapes appear with a stroke (a border) and a fill inside the shape. They automatically appear with whatever has been set as the defaults, and then you change the text or the shape to what you want.
But that wastes a lot of time, changing things every time you create them. So it’s really important to set your own defaults. It’s this easy: Choose what you want to see before you create it.
That is, if you plan to create a lot of type in 11-point purple Garamond text, then first make sure nothing is selected. Either get the black Selection tool and click on an empty space, or go to the Edit menu and choose “Deselect All” (learn the keyboard shortcut so you can do it quickly whenever you want).
Now, while nothing is selected, choose 11-point Garamond text and the color purple from the menus or the panels.
Now when you type (as explained in Chapter 2), it will always be in 11-point Garamond purple until you change the defaults again.
Keep this in mind as you work in InDesign.
If you want to draw seven circles, all with a blue fill (the inside color) and a dotted line stroke (the border) that is 5 points wide, first make sure nothing is selected, then choose those specifications, and then get the Ellipse tool and draw your seven circles.
This will create defaults for the document that you are working in.
But you can also create application defaults for all documents that you open from here on out. Just open InDesign, but do not open a document. Now choose what you want from the menus and the Preferences (Preferences are in the InDesign menu). Anything you can choose from a menu or the Preferences pane becomes the default for every new document you open.
This might not seem so important right now, but keep it in mind. The day will come when you’ll say, “Aha! I want to set this as an application default!” And you will know exactly what to do.
All sorts of visual clues
Over the years you have become accustomed to noticing the tiny changes in a cursor or items on the page (like red dots under text) that give you clues about what is going on. Heighten that awareness while working in InDesign.
The cursors change constantly while you’re using them—the black Selection tool cursor changes when it’s near the corner of a frame or on a handle or inside a selected object, etc. The Eyedropper tool flips back and forth, the white Selection tool adds tiny symbols to itself, and more. Every cursor change indicates something that tool can do specifically because it is in that position (hovering over a handle, for instance). Throughout the book I will call your attention to them, but there’s not room to mention them all! Keep a lookout. Be conscious.
Tool tips abound. Hover any tool over fields and icons in the panel, and a tool tip appears to tell you what that item is for. This is hugely useful.

Every graphic and every piece of text is contained within a frame. Every frame has eight handles (one on each corner and each side), plus several other gadgets, as shown below. When a cursor is positioned on one of these handles or gadgets, it changes to give you a visual clue that tells you something will happen if you were to press-and-drag. Watch for these!
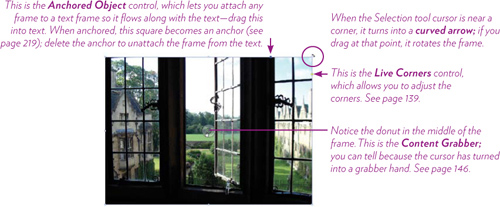
I suggest you turn off some of these gadgets (hide them) until you need to use them; if you don’t, weird things happen that you won’t know how to fix. To turn them off, from the View menu, choose “Extras” and hide the items.
Master pages
When you create a document with more than one page, typically there are items you want to put on all the pages, such as page numbers, or perhaps a header or a logo. Every document has “Master Pages” built into it, which is where you put items that you want to appear on every page. At any point, you can override any item to remove it from a particular page, so don’t think you are stuck with whatever you put there.
There is lots you can do with master pages, so I hope this introduction will lead you to discovering more. Check out the panel options and the Help files.
Task 8 Set up a document and use master pages
1 Create a new document, and in the “New Document” dialog (as shown on page 4), make it 8 pages, letter sized, portrait, and make sure to check the box for “Facing Pages.”
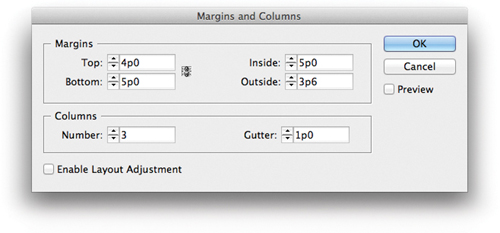
2 When “Facing Pages” is checked, the “Margins” change so you can set a different inside margin from the outside, as shown below. Typically the margin on the inside is larger to allow for the binding on that edge, whether it be a book or a stapled booklet or a bound report.
To set different measurements for the various margins, click the lock icon so it turns into a broken lock icon, as shown.
If the measurement system is something you don’t know what to do with, such as points and picas, you can enter a number in inches—just type the letter i after the number of inches. For instance, enter .75i if you want a three-quarter–inch margin. InDesign will automatically translate it into the current measurement system (see page 10).

3 You can change the settings at any time; for now, click OK.
4 Your document opens and you only see one page, even though you chose facing pages! That’s because odd-numbered pages, such as page 1, are always on the right-hand side. Think of a book—the first page is a single page, then you turn the page and you see the double-page spread, the facing pages (they face each other).
So turn the page of your document: Choose a page from the page field in the bottom-left corner of the window, or open the Pages panel from the Window menu and double-click the page numbers.
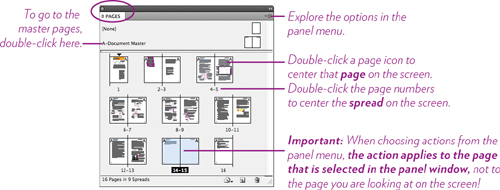
5 Go to the master page spread: Choose “A-Document Master” from the page menu in the bottom-left corner of the window, or double-click on the master page icon in the Pages panel, as shown above.
6 On this master page spread, you can draw or place any graphic on these pages that you want to appear on all pages in the document.
You can drag in guidelines for placement, as explained on page 10.
You can change the margins and add columns: From the Layout menu, choose “Margins and Columns....”
You can create text frames for headers and footers (see Chapter 2 about text frames). To create automatic page numbers:
Get the Type tool. Press-and-drag diagonally downward to the right to create a small text frame. From the Type menu, choose “Insert Special Character,” then “Markers,” then “Current Page Number.”
Now get the black Selection tool. Hold down the Option key (PC: Alt key), and with the Selection tool, press-and-drag that text frame to the opposite page.
7 Go to your document page, as described in the callout above (double-click a page icon in the Pages panel). Flip through the pages on the screen and you’ll see that they are automatically numbered, and any margins or columns you added are shown on every page. Notice that on document pages, you cannot select anything that was placed on a master page. You can, however, “Hide Master Items” from the panel menu. If you choose to “Override All Master Page Items,” you can select individual master items, then move, change, or delete them.
If everything goes goofy
If you or someone else has been playing with defaults and now every time you try to do something, goofy things happen, you might want to reset all the defaults back to the factory settings and start over.
Task 9 Reset all defaults
1 Quit InDesign, if it’s open.
2 Hold down all these keys:
Mac: Shift Option Command Control
PC: Shift Ctrl Alt
3 With those keys held down, open InDesign.
4 When you see the message asking if you want to delete the preference files, click “Yes.”
Try this!
Discover how to zoom in and out of your page (check the View menu). Practice doing it and using the keyboard shortcuts until you can resize the page easily. InDesign zooms in on whatever is selected on the page.
Also experiment with the Zoom tool from the Tools panel—press-and-drag with the tool to zoom into exactly the spot you want. Then use the keyboard shortcut to fit the page back into the window.
Set up the panels you think you will want to use—stack them and dock them and group them as you like. Make a workspace, as explained on page 5, and give it your name so you can choose it whenever you want. Experiment with changing the workspaces: Choose various setups from the Window > Workspace menu. Then carry on to the next chapter!
Tip: Best keyboard shortcut
While working in InDesign, use the W key to see a preview of your page without all the ruler guides, frame guides, etc. Hit W again to show everything. (The only trick is that you can’t use this shortcut if you’re typing!) You can also click the Preview icon at the bottom of the Tools panel to hide and show the preview.