7. All About Graphics
Well, certainly not all about graphics, but enough to get you started and keep you busy for a while.
InDesign has added more and more graphic capabilities to its page layout features. If you are an Illustrator user, you’ll find the drawing tools are very similar, though more limited. If you are a Photoshop user, you’ll be pleased to see how quickly you can pop into Photoshop from InDesign to adjust your images. And if you’ve never used any of Adobe’s Creative Suite before, you will be astounded at what you can do with your unleashed creativity.
Graphic formats
The short story: Use PDF, .ai, .psd, or .tif for graphics to be printed (although you can get away with .jpg files on your small desktop printer). Scan images as TIFFs. You can actually place another InDesign file onto an InDesign page.
Avoid PICT, WMF, BMP, PNG, and only use EPS and DCS if you know what you’re doing and have no choice.
Vector files from Illustrator
When saving an .ai file in Illustrator, make sure the box is checked to “Create PDF Compatible File” in the options when you save the file or InDesign won’t be able to read it. Avoid EPS files, if you can, only because they are an old technology and not as dependable as .ai files.
Graphic color
When you view graphics on your computer screen, they are displayed in RGB (red, green, blue) mode. Graphics that have been commercially printed—like those in this book, in any magazine, or on your cereal box—were created in CMYK (cyan, magenta, yellow, black) mode.
These two modes are not interchangeable. Most commercial printers cannot accurately print an RGB image, and what you see on screen is not what you’ll get in your printed project.
So, when you are creating a graphic that is to be viewed on a screen, like a new logo for your web site, you’ll want that image to be in RGB mode. Anything you’re going to have printed by a commercial printer should be in CMYK.
Many home and office printers print in RGB. However, if your printer takes four (or more) separate color cartridges, you will usually get better results if you work in CMYK. See Chapter 8 on Color for more details.
Graphic resolution
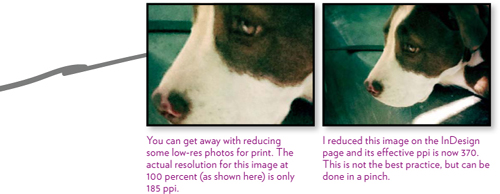
Photographs and Photoshop graphics are raster images; they are comprised of a fixed number of pixels and are measured in pixels per inch (ppi). A high-resolution image, say 300 ppi, is one that contains enough pixels to resolve the image clearly. The image resolution is determined by the original source file; that is, if the photo is from your old cell phone, it’s pretty low-res and there’s not much you can do about it (well, John has some great tips in our book, The Non-Designer’s Photoshop Book; see the image of Scarlett on page 159 of this book for an example of a low-res image made beautiful).
Generally, for commercial printing use 300 ppi images; desktop printing on an inexpensive inkjet printer is of pretty low quality anyway, so low-res photos don’t look much worse than anything else.
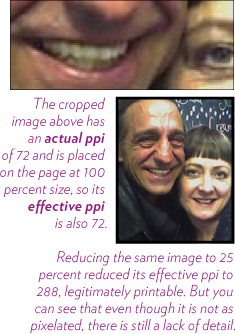
However, when you reduce the size of a bitmap image on the page in InDesign, you effectively increase its ppi—the pixels in the image become smaller and so they appear to be better resolved. This lets you cheat on some images, although they still won’t have as much detail. InDesign’s Links panel keeps track of an image’s actual ppi and its effective ppi; see page 160.
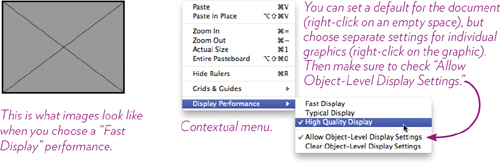
The display performance
Even if your graphics are high resolution, they might appear to be low resolution on the InDesign page, depending on the “Display Performance” settings in the preferences. Go to the Preferences dialog box (from the InDesign menu on a Mac; from the File menu on a PC), where you can set a document default so all your graphics display either “Fast,” “Typical,” or “High Quality.” To set an application default for all new documents that you create, choose a display option before you open any document.
The advantage of a “Fast” display is that if you have an old and slow machine, the images are all gray boxes and so your pages load very fast and you can move the graphics around quickly—but you can’t see the images. A “Typical” display shows a lower resolution image, again for faster working time, and “High Quality,” of course, shows your best high-quality image.
You can override the default for individual graphics: Select one or more images, then right-click to get the contextual menu shown below.
Drawn Graphics
There is a lot you can do with graphics that you draw right on the page in InDesign. You can make quick and easy shapes to use as lively frames and backgrounds for text or to enhance other images you draw or import. If you actually know how to draw, take advantage of the Pen and Pencil tools.
More importantly, all the things you can do to the frames and fills and strokes in drawn graphics, you can do to text and graphic frames. So don’t skip this section just because you don’t think you’ll be using drawing tools for illustration!
All graphics drawn on the page in InDesign are in the vector format so you can enlarge them as much as you want and they will always print nice and crisp.

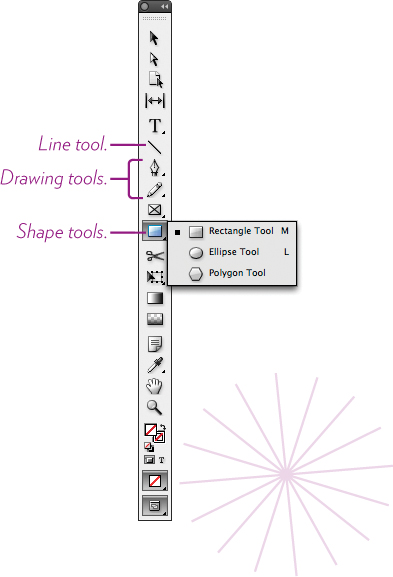
The line and shape tools
You have probably used shape tools before, and InDesign’s work the same as any other: Get the tool, press-and-drag on the page. Every shape has a frame, whether you can see it or not. You can change the stroke and the fill, as explained on page 136. To reshape a drawn shape, see pages 138–139. Do these easy tasks:
To constrain proportions to a perfect square or circle, hold the Shift key while dragging.
To start a shape from its center instead of its corner, hold the Option (PC: Alt key) while dragging.
To move a shape before letting go, hold down the Spacebar and drag to another position.
Rectangle and Ellipse tools: Click on the page (instead of press-and-drag) to get a dialog box where you can enter a specific size.
Polygon tool: Click on the page (instead of press-and-drag) to get a dialog box where you can enter a height and width, and also the number of sides and how deeply they are inset (which makes points). An inset of zero prevents a star shape; an inset of 100 percent gives you straight lines connected in the middle. Try it!
Double-click on the Polygon tool icon in the Tools panel to set just the sides and inset.
The Polygon tool is crazy wild
I’m not quite sure how useful this is, but the Polygon tool can do things no other tool can do. First experiment with it by using the techniques explained at the bottom of the opposite page. InDesign retains the settings for the next polygon you draw. When you’re comfortable creating them, try these tasks.
Task 1 Go insane with the Polygon tool
• Reshape a drawn polygon: With the black Selection tool, select the shape. Double-click on the Polygon tool icon in the Tools panel and enter new specs.
• Reshape the polygon as you create it: Drag out a polygon, but don’t let go of the mouse or trackpad button. Tap the Spacebar once (nothing appears to happen), then use the arrow keys. The UpArrow and DownArrow increase and decrease the number of sides; the LeftArrow and RightArrow increase and decrease the inset.
If you’re feeling confident, use this technique combined with the next two, below.
• Multiply the polygons: Draw a polygon, but don’t let go of the mouse or trackpad button; tap the UpArrow key. Each time you tap, another polygon appears, above the first one; tap the DownArrow key to delete a polygon. Since your button is still down, drag to resize all of those polygons at once.
• Make a grid of polygons: Follow the steps above to multiply the polygons. When you’ve got a nice tall column of them, tap the RightArrow key to make a new column. Drag to the right and simultaneously tap the RightArrow key to create a whole darn grid. To delete a column, tap the LeftArrow key.
• Use the technique mentioned on the opposite page to move the polygon before you’re finished: Hold down the Spacebar and drag the entire collection.
• When you let go of the collection of polygons, they are automatically all selected. This would be a great time to group them together (see page 140) or change their fills and strokes, as explained on the following page.
• Also see page 139 to alter individual points, sides, or insets on any polygon.
• Also see page 138 to add corner options to polygons!
Strokes and fills
Every frame has a stroke around it (a border), whether or not you can see it. And the inside has a fill color. A frame can have a fill and at the same time have content, such as an image (in which case it is a graphic frame) or text (in which case it is a text frame). The three frames (shape, image, and text) are each a little different from each other, but all can have strokes and fills.
Task 2 Change the fill and stroke of a shape
The trick to changing a stroke or a fill is to first select these three things:
• Select the object with the black Selection tool.
• Select the Container Formatting box in the Swatches panel, as shown below (if you selected a shape frame, this box is already chosen; get in the habit of checking anyway).
• Select the Fill or Stroke box in the Swatches panel, as shown below.
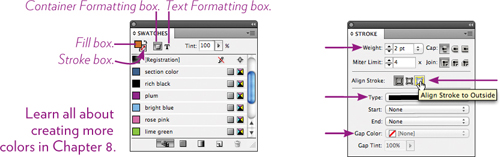
1 Select and change the fill: Make sure you have selected the three items listed above (including the Fill box), then choose your color.
2 Select and change the stroke: Make sure you have selected the three items listed above (including the Stroke box), then:
• Choose your stroke color from the Swatches panel.
• From the Stroke panel, choose a “Weight” and a “Type.”
• If you choose any stroke besides the solid one, you can also choose a color for the gap between the lines. Try it! Don’t be a wimp—play with the possibilities of giant wavy strokes or dots!
• Be aware that the “Align Stroke” options change the size of your shape. Below, all the boxes are the same size, with a 3-point stroke.

Manipulating the shapes
Knowing how to manipulate the shapes and frames and fills is important because, as I mentioned before, these techniques apply to all frames in InDesign—drawn shapes, placed graphics, and text.
Task 3 Resize an object
Resizing a shape (not a frame with an image in it; see pages 148–149 for that) is the same as in many other programs you may have used. Essentially, you are resizing the frame itself in this operation, but since a shape frame has no content (just a fill), it works to resize the shape.
1 With the black Selection tool, drag any handle.
2 To maintain the same proportion, hold down the Shift key and drag.
To resize from the center outwards, press on the handle, and then hold down the Option key (PC: Alt key) and drag.
Task 4 Copy an object
1 Get the black Selection tool.
2 Hold down the Option key (PC: Alt key), then press-and-drag the object.
To drag the object perfectly horizontally or vertically, hold down the Shift key as well as the Option key.
Task 5 Rotate an object
1 With the black Selection tool, single-click the image.
2 Position the pointer just outside any corner handle—you’ll see the curved double-arrow appear. At that point, press-and-drag to rotate the object.
Or select the object, then choose the Rotate tool from the Tools panel. Position the rotate cursor (which looks like crosshairs) anywhere on the page and drag.
Or enter a rotation amount in the Rotation Angle field in the Transform panel (see page 155).
To put the image back into its normal rotation, select the graphic with the black Selection tool. Right-click on the P icon in the Control panel; this pops up a contextual menu with one option, to “Clear Transformations.” Or select the object, go to the Transform panel (page 155), and from its panel menu choose “Clear Transformations.”
Or enter zero in the Rotation Angle field in the Transform panel.
Task 6 Use the Corner Options
You have a choice of several corner options for any frame. They’re not terribly useful, but it’s good to know they’re there. Sometimes you might want to take the harsh edge off the corners, or add a bit of a fancy one on a text frame for a special invitation. If you combine a shaped corner with a fancy stroke with a gap color, you can create some interesting effects.
1 With the black Selection tool, select the frame (try this on a shape or graphic frame for now).
2 From the Object menu, choose “Corner Options....”
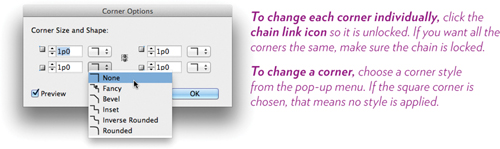
3 You can see the changes on your frame as you enter values in these corner fields. Click OK when finished.
To remove all corner styles, make sure the chain icon is locked, then choose the square corner from any pop-up menu, as shown above.

Try this for fun!
The crazy shapes below are actually polygons that have had their corners reshaped with the “Corner Options” dialog box (above) and various strokes applied with colored gaps. The first three are groups of two polygons each; I used the Smart Guides to center the small shapes within the larger shapes.

Task 7 Use the Live Corners controls
If you haven’t turned off the Live Corners control, you see a little yellow box on the upper-right edge of most frames. This control lets you adjust corners directly on the frame, and you can adjust them individually.
To hide or show this control, go to the View menu, choose “Extras,” and then choose to “Hide [or Show] Live Corners.” (Since you’ll use it so rarely, I recommend turning the control off until you need it.)
1 Click the yellow Live Corner control; all four corners now have a yellow diamond-shaped control.
2 To reshape all the corners the same, drag any yellow diamond.
3 To reshape just one corner, hold down the Shift key and drag.
4 To change the corner shapes to any of those listed in the dialog box on the opposite page, hold down the Option key (PC: Alt key) and click on any yellow diamond. Continue to hold down the key and click to cycle through the options.

Task 8 Reshape an object
There are many opportunities in design for altering the shape of a frame, and there are several ways to do it in InDesign. Try these:
1 With the black Selection tool, select a frame of any sort.
2 Double-click on the Polygon tool in the Tools panel.
3 Set the number of sides and the inset, then click OK. Voilà.

Also try this more useful technique
1 With the white Direct Selection tool, single-click on any object.
2 Then with the same tool, single-click directly on the frame so you see the individual white points. They are really tiny, so it’s hard to see them. Watch the cursor—you’ll see a tiny square when you are positioned over a point.
3 Press-and-drag on that point. Do the same to any other point that you wish to reshape.
Task 9 Group elements together
You can group as many objects together as you like, and then apply settings to all of them at once, or move them all, delete them, resize them, etc.
1 Draw a number of shapes on the page.
2 With the black Selection tool, do one of the following:
• To select more than one object, hold down the Command key (PC: Control key) and single-click on various items. Each one you click becomes part of the group.
To deselect an object from the group, Command-click (PC: Control-click) on that individual item.
• Or with the black Selection tool, press on an empty spot outside of any shape, then drag the selection area to include at least one corner of any object you want to include.
3 You can keep the objects grouped together so they move as a unit: From the Object menu, choose “Group.”
To ungroup the collection, from the Object menu, choose “Ungroup.”
Task 10 Select an object in a group
When objects are grouped, individual items can be difficult to select.
• With the black Selection tool, double-click on the object you want.
• To edit text, click in it with the Type tool, even though it’s grouped.
Task 11 Send back and forward
Throughout InDesign, any object in any sort of frame can be in front of or behind any other object. Simply select the item, from the Object menu, choose “Arrange,” and then choose the action you want.
Now, keep in mind that every single thing you have placed on the page is on its own private layer (completely different from the Layers panel); it’s as if each object is on a separate piece of plastic wrap. In general, it’s most efficient to choose “Bring to Front” or “Send to Back.” Learn the keyboard shortcuts!
Task 12 Select an object beneath another object
When objects are layered in front or back of others, they can be difficult to select; sometimes you can’t even see them.
• Hold down the Command key (PC: Control key) and single-click on the item you want to grab. Each click takes you down through the layers of plastic wrap.
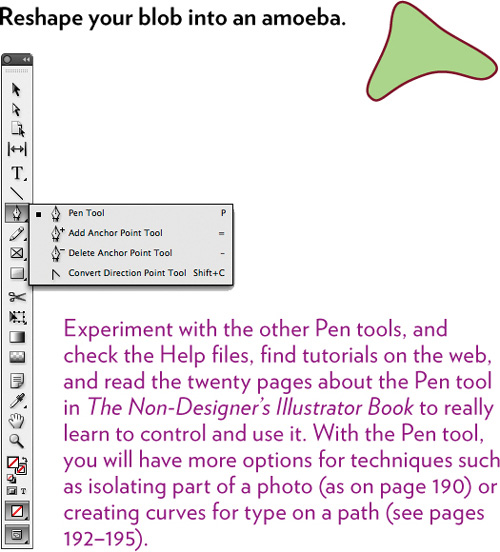
The Pencil Tool
The Pencil tool lets you draw as if you were drawing or writing with a pencil on paper. It creates a path full of points that you can alter, apply effects to, set curved type along (see pages 192–195), or insert graphics inside of. This tool is great for when you need a simple shape and don’t want to—or know how to—use the Pen tools.

Task 13 Draw a cloud
1 Select the Pencil tool.
2 Press-and-drag to draw squiggly lines all over the page. Try writing your name. You can change the stroke type, weight, and end caps of the line, just as if it were a shape (see page 136).
3 Once you’ve got the feel of it, draw a cloud shape. Be sure to make the ends meet so you have a closed shape.

4 To add color to your cloud, select the cloud with the black Selection tool.
Open the Swatches panel; select the Stroke box (as explained on page 136). Choose a color for the stroke of your cloud.
Click the Fill box to select it, and select a color for the inside of your cloud. Or select the cloud and place a graphic inside of it, as explained on pages 154.

Task 14 Smooth out a bumpy line
1 Press (don’t click) on the Pencil tool in the Tools panel to get the little fly-out menu; choose the Smooth tool.
2 Press-and-drag over any bumpy parts in your penciled path.
Or if you know how to use direction handles and points, get the white Direct Selection tool. Drag points and handles to alter the shape.
Double-click the Pencil tool icon in the Tools panel to get a pane of preferences to experiment with.

Pen tools
The Pen tools in InDesign are very similar to the Pen tools in Illustrator and Photoshop, so if you are familiar with those, you can skip this section. If you’ve never used a Pen tool before, this might be confusing because it operates like nothing you’ve ever seen. On these two pages I’m going to explain just the very bare necessities; please see The Non-Designer’s Illustrator Book for a much more thorough explanation of the Pen tool as well as exercises for using it.
Task 15 Experiment with the Pen tools
Create a star shape.
1 Clear your page of other objects. Make sure nothing is selected. Get the Pen tool.
2 In the Swatches panel, choose a black stroke of .5, and a fill of None.
3 Click with the Pen; you get a little dot.
Click somewhere else, and you see a line between the two clicks. Continue to click until you’ve created a star shape.
Make the last click on top of the first one—you’ll know you’re in the correct position because the Pen tool displays a tiny round circle.
4 To release the Pen from the path, click on any other tool, or hold down the Command key and click on an empty space.

5 Alter the shape: Get the white Direct Selection tool, then select the star. If you don’t see tiny white squares at each point, click again.
Press-and-drag to move the points of the star to reshape it.
6 Once you have a shape you want, get the black Selection tool again. You can resize the star, change its stroke and fill, place a graphic inside, and do everything else to it. You can edit its shape forever.

1 Follow Steps 1 and 2 on the opposite page.
2 Do not click with the Pen tool—press-and-drag a short ways. This puts down a point and drags direction handles out (see below).
3 Continue to press-and-drag points and handles to make a blob.
4 Make the last click/drag directly on top of the first one, but drag slightly in the opposite direction you’ve been going (this is to prevent the line from getting twisted).
5 To release the Pen from the path, click on any other tool, or hold down the Command key and click on an empty space.

6 Alter the shape: Get the white Direct Selection tool, then select the blob. If you don’t see tiny white squares at each point, click again.
7 This time, use the white Direct Selection tool to click on a point to display its direction handles. Then drag the end of a direction handle to alter the shape. Drag the handle outward, inward, or any way. It takes a while to figure out which way to drag to affect the shape the way you want. Practice until you kinda know what to expect.
You can also drag the point itself to another position.
Graphic Manipulation
Once you place a graphic on a page, you usually need to customize it in some way. You might want to crop it, resize it, rotate it, put it inside a round frame, add a shadow to it, or many other things. For working through the tasks in this section, put several photographs in a folder where you can get to them easily.
Placing images in InDesign
You might think of this action as importing or inserting graphics, as it is often called in other applications. But in InDesign, you place a graphic. It’s exactly the same process as in other apps, except you get to choose where the image lands on the page. You can even choose to resize it as you place it.
Task 16 Place a graphic on the page
There are several ways to place a graphic on the page, but the steps below explain the primary and safest method (also see page 160).
1 First make sure nothing is selected on the page—single-click on a blank area. You especially don’t want an insertion point flashing in the text right now! Or to deselect everything, press Command Shift A (PC: Control Shift A).
2 From the File menu, choose “Place....”
3 Navigate to the folder in which you stored your photos. Double-click on the image you want to place.
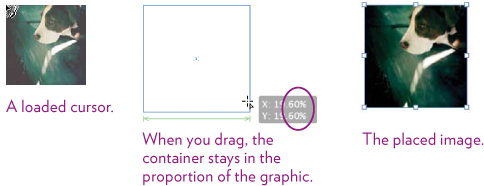
4 On the screen, you will see a “loaded” cursor—your pointer is now loaded with the graphic image, as shown below.

To put the graphic on the page, single-click anywhere.
The upper-left corner of the graphic will appear wherever you click the tip of the pointer to place it.
5 Also try this: Do the steps again to place a graphic. This time, instead of clicking to drop the graphic on the page, press-and-drag with the loaded cursor to place the graphic inside a contained area. You might want to do this, for instance, if you have columns on a page and want to place the graphic in the exact size you need it. Notice, below, that the info box tells you the percentage of the file size as you drag it.
6 Also try this: You can select and place more than one file at a time. The cursor loads up with them all, provides a tiny thumbnail of the image about to be placed, and tells you how many files are left.
If Smart Guides are on (see page 11), you can drag to place the first item, then as you drag other items, the Smart Guides tell you when they are a matching size. Try it!

7 Also try this: Place into a shape. Create or select a shape on the page and select it. Go to the File menu to place a graphic, and make sure to check the box to “Replace Selected Item.” The graphic will be placed inside the shape (see page 141). Use the white Direct Selection tool to resize (page 149) the brown bounding box of the graphic to fit.
Tip
If the insertion point happens to be inside a text frame, the graphic will drop into that frame automatically! Just Undo the action and the cursor will reload with the graphic, ready to re-place.
Task 17 Now that the image is on the page
1 To move the photo somewhere, choose the black Selection tool.
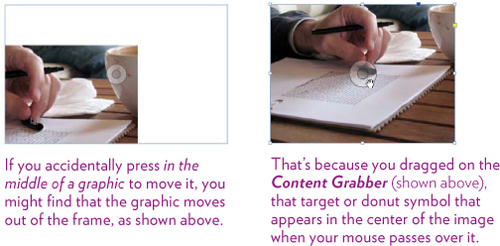
2 Press on the image anywhere except in the middle; then drag the graphic around on the page. Drop it in the middle of the page for now.
3 The photo is contained inside a frame, just like all the drawn graphics you worked with earlier in this chapter. This means you can change the frame—put a stroke on it, color the stroke, reshape the frame, etc. Try it!

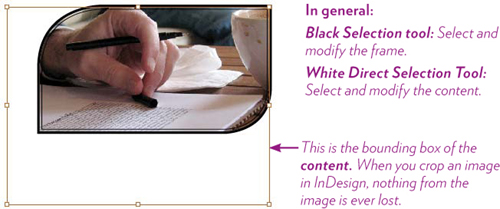
Very important: A placed graphic consists of the content and the frame. Whenever you see a brown bounding box (not the frame, but the line that indicates the graphic), that means you have selected the content, not the frame. You can select the content separate from the frame by clicking on the Content Grabber (if it’s showing) or by using the white Direct Selection tool. Experiment with this! You can resize the content, move it, rotate it (with the black Selection tool), etc., independently from its frame. Also see page 152.
Tip
You can turn off the Content Grabber feature if you want. Go to the View menu, choose “Extras,” and then choose “Hide Content Grabber.”
If you accidentally move the graphic out of the frame
Undo and see if that works. If moving the graphic was the very last thing you did, it will work. If not:
If you can see a bit of the image or the empty frame: With the black Selection tool, click on the bit of image or the frame to select it. You will see the thin, blue bounding box and the handles.
Or if the image has completely disappeared and you can’t see the frame: With the black Selection tool, click around on the page where the graphic used to be. When the eight handles of the frame appear, that means it’s selected. (Or select everything, then pick out that one frame.)
Then go to the Object menu, down to “Fitting,” and choose “Fit Content to Frame.” The image will snap back where it belongs. It’s a good idea to memorize the keyboard shortcut for that command.
If your graphic won’t move sideways
If you place a graphic and find that you can’t move it sideways, only up or down, that means you accidentally placed the image inside a block of text (which can be a handy thing—check the Help files for anchored images—but for now, you need to correct the situation).
If you notice it right away, simply Undo. The image will load itself back into your cursor and you can now click anywhere to drop the graphic on the page.
If you did it a few minutes (or days) ago, get the black Selection tool, single-click on the graphic, cut it, and paste it somewhere else. Make sure you click in any empty spot on the page before you paste so the graphic doesn’t end up in a text frame again. InDesign maintains the link to the original source file.
Vector graphics resized
![]()
A vector image created in an application such as Illustrator is built with mathematical formulas instead of with pixels. It has no ppi count (as explained on pages 132–133). You can make a vector graphic as large or as small as you like, and it will always print beautifully.
If you have a vector image in your collection, do this task so you can compare it with a raster image resized, as on the opposite page.
Task 18 Place and resize a vector graphic
1 Place a vector graphic on the page. You can use an Illustrator file (.ai), a PDF, an EPS file, or any shape or collection of shapes drawn in InDesign.
2 With the black Selection Tool, single-click on the image to select it so its handles show up.
3 Hold down both the Command and Shift keys (PC: Ctrl and Shift keys); press-and-drag a handle. Drag inward to resize smaller; drag outward to resize larger. You can make it as big or as small as you want!

Raster graphics resized
You cannot make a raster image (.psd, .tif, .jpg) much larger than its 100-percent size without it looking pixelated. If you plan to place a lot of photos in your projects, you need to buck up and prepare them appropriately—resize them in Photoshop so they are the correct resolution and close to the size you will use them on the page. I know, it’s annoying.
Task 19 Place and resize a raster graphic
1 Place a photograph on the page.
2 With the black Selection tool, single-click on the image to select it.
3 Hold down both the Command and Shift keys (PC: Ctrl and Shift keys); press-and-drag a handle. Drag inward to resize smaller; drag outward to resize larger.
(The Command/Ctrl key resizes the image, and the Shift key keeps it in the proper proportion.)
4 Check the Links panel (shown on page 160) to see how the actual ppi of the image (its resolution at 100 percent) changes to the effective ppi (the resolution at which it will print, based on its enlarged or reduced size). For a commercial press, the ppi should ideally be between 250–300 for raster images; your desktop printer is a little less fussy, but a higher ppi will still look better.
Higher resolution in a raster image is not always better, though! If you have a giant photo that you reduced on the page to an itty bitty thing and the effective ppi is something like 1296, stop it! Make a copy of the photo and reduce it appropriately in Photoshop before placing it.
Crop a graphic
Sometimes you want to crop a graphic slightly (or a lot), either for composition or to fit it into a particular space. It’s very easy to do.
Task 20 Crop a graphic
1 Place a graphic on your page.
2 Get the black Selection tool.
3 Single-click on the photo so its eight handles show up.
4 Press on any handle and drag inward to crop the photo in that direction (dragging a corner handle will crop two sides at once). This does not destroy anything—drag the handle back out and the image is still there.
To crop all sides of the image proportionally, hold down the Shift key and drag any handle.
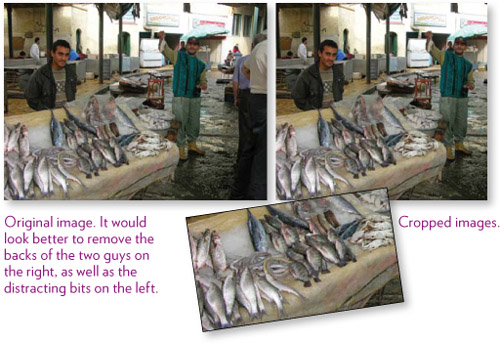
To do major cropping, such as to crop a group photo so only one face is showing, you really should do that in Photoshop. If you place the entire large graphic in InDesign and then crop down to the one face, you still have to send the entire large graphic to the printer. This slows down the printing and also makes your InDesign file unnecessarily large.
To show the entire image again, select it. From the Object menu, slide down to “Fitting” and choose “Fit Frame to Content.”
Expand or compress a graphic
It’s rare that you want to expand or compress an image, but it does happen. Sometimes (because the camera adds weight to everyone) you might want to squeeze an image horizontally just a wee bit so a person looks the same size in the photo as they do in person. Or perhaps you want to widen a photograph to fit into the column in your newsletter, but you don’t want to crop or resize it.
Task 21 Adjust a photo’s width or height without cropping
1 Place any graphic of your choice.
2 With the black Selection tool, single-click on the photo to select it so its eight handles show up.
3 Hold down the Command key (PC: Control key) and drag any handle. Drag inward, of course, to compress, and drag outward to expand.
To get the correct proportions back, select the image with the black Selection tool. From the Object menu, slide down to “Fitting,” then choose “Fit Content Proportionally.” This will make the frame a different size from the image, so you need to go back to the Fitting menu and choose “Fit Frame to Content” (check that menu to learn the keyboard shortcut).

Reposition a graphic within its cropped frame
You might want to crop a graphic so the frame fits within your layout, but then you decide you want to see a different portion of that image within the frame. Because InDesign crops images in a non-destructive way, none of your picture is ever really gone. Once you have the size frame you want, you can adjust the image inside that frame.
Task 22 Reposition the graphic in the frame
1 Place a graphic on the page.
2 Get the black Selection tool; single-click on the photo to select it.
3 Drag a corner handle inward so the shape of the photo is smaller. It doesn’t matter right now what it looks like.
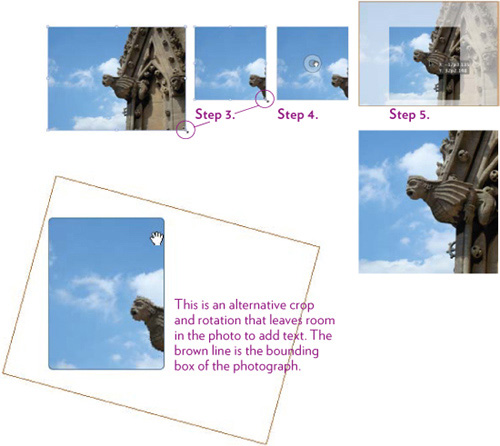
4 Hover the black Selection tool over the image and you’ll see the Content Grabber; it looks like a donut in the middle of the image. If you have previously hidden the Content Grabber, no problem—use the white Direct Selection tool.
5 Press on the image and hold for a second until you see the shadow of the full image, then drag the pointer and the image will move inside the frame. At any time, you can reposition it again.
Working with a graphic in a frame
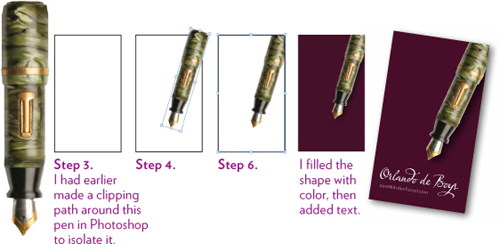
Here is an example that uses a variety of techniques to edit and crop an image within InDesign, including the technique on the opposite page.
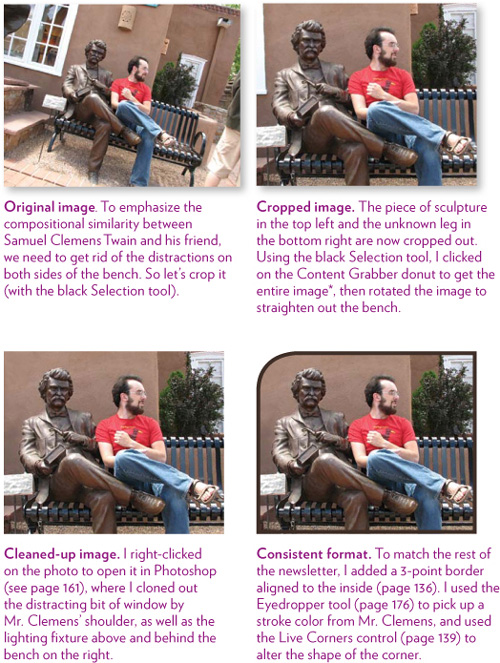
* If the Content Grabber is not showing, use the white Direct Selection tool to select the entire photo, then switch to the black Selection tool to rotate.
Paste Into and adjust
The “Paste Into” command in the Edit menu is very useful. It allows you to paste an element inside a frame, even though the content is a completely different shape from the frame. With the white Direct Selection tool, you can move or resize the inside image easily, within the frame.
Task 23 Paste a graphic into a frame and adjust the graphic
1 With either a frame tool or a shape tool, create a shape.
Fill it with None, and a 1-point black stroke. (You can use any fill or stroke you want, actually, but it’s easier if you can see the stroke at first; you can always change the stroke and fill later.)
2 Make sure the frame is not selected.
3 Place a graphic on the page: Don’t click to place it—drag a shape so it’s about twice the size of the frame (because many graphics drop onto the page in their full, huge size).
4 Resize the graphic to about the size you want it to be in the final piece.
Choose a section of the image that you want to appear in the frame you created, and position that section over the top of the frame.
5 Select and cut the graphic.
6 Select the frame. From the Edit menu, choose “Paste Into.”
It pastes into exactly the spot from where you had cut it. Use the white Direction Selection tool to reposition the graphic, resize it, rotate it, etc. Fill the frame with color, if you like.
If your graphic is not isolated, as this pen is, you won’t see any fill in the frame. See page 157 for an example of pasting an opaque image.
Transform panel
Everything in the Transform panel is also in the Control panel when an object is selected. The options you’ll find yourself using most often are the width and height fields for checking and for specifying sizes of objects, and the scaling fields for resizing. The most important thing to recognize in the Transform panel (as well as in the Control panel) is that the measurements must have a reference point. InDesign chooses one for you, but you can change it: In the little Reference Point icon (also called the Proxy), shown below, click on the dot that represents the handle on the object that you wish to stay stationary.
Task 24 Resize and rotate a drawn line (or any frame)
1 Using the Line tool, choose a colored 2-point stroke, and draw a 6-inch line. Watch the width field in the Transform panel to see when your line is 6-inches long (or 36 picas). If you get close, let go, and enter 6i or 36p in the width field; the line (which is still selected) snaps to that exact measurement.
2 Now rotate the line: With the black Selection tool, select the line.
In the Proxy, you see three dots selected; click on one of them. That is the reference point that will stay stationary when the line rotates.
From the panel menu (or the Control panel), choose “Rotate 90° CW.” Did it do what you expect? Undo that rotation, choose another proxy point, and rotate the line again. Practice with this until you can predict what will happen.
3 Place a graphic on the page and use Scaling fields in the Transform panel to resize it. Don’t forget to pick a proxy, and make sure the chain icon is locked so the scaling is proportional.
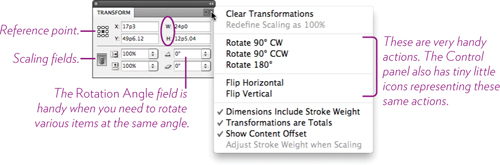
Tip
When you resize using a measurement in the Transform panel, the content and frame resize, but the blue bounding box around the original graphic doesn’t change. To match the bounding box to the content, go to the Object menu, down to “Fitting,” and choose “Fit Frame to Content.” Memorize the keyboard shortcut for this because you’ll use it constantly.
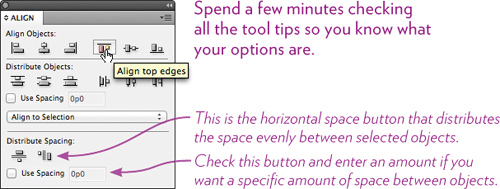
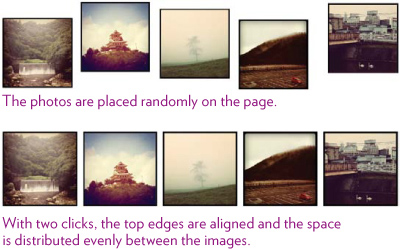
Align panel
The Align panel is enormously useful. Use it to align objects along their edges or centers, or to distribute the space between objects evenly.
Task 25 Align a variety of graphic images (or text frames)
1 Draw or place five or six objects on the page.
Get the Align panel from the Window menu.
2 Select all the objects and click the “Align top edges” button (or align the bottom edges, whichever you prefer), as shown below.
3 Now position the first and last photos at the outer boundaries of where you want them to fit, as shown below. Arrange them horizontally for this exercise.
4 Click the “Distribute Spacing” horizontal space button (see below). The spaces between the elements will adjust themselves, and the first and last photos will stay in their positions.
Effects panel
You can experiment endlessly with the effects. The combinations of effects from the dialog box (shown on the following pages) and the ones in the Effects panel (below) are mind-boggling. You can do lots of crazy things, but you can also do very practical things. Below are two tasks using the Effects panel.
Task 26 Make an object semi-transparent
1 Select an object or objects of any sort.
2 From the Window menu, open the Effects panel.
3 Drag the Opacity slider, or enter a number in the field.

Task 27 Blend an item into the background
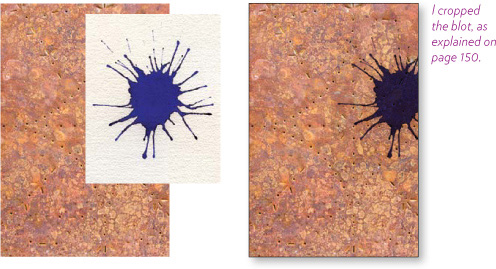
This effect doesn’t work for all combinations of objects and colors, but can be a lifesaver when it is appropriate. Here’s an example:
Let’s say you want to use this photo of a cabinet door, below, as the background for a poster, and this scan of a watercolor blot on top of it. But the blot makes a big opaque shape.
Select the blot, go to the Effects panel (above), and choose “Multiply” from the Blending Mode menu. Now you can create the poster.
Effects dialog box
You can open the Effects dialog box by choosing one of the effects from the panel menu in the Effects panel (see the previous page), from the Object menu, from the contextual menu when you right-click on an object, and from the small fx icon in the Control panel. To experiment, let’s apply a drop shadow.
Task 28 Create a drop shadow on an object

The quickest way to add a drop shadow is to select the object, then click the drop shadow button in the Control bar. It applies the current settings that are in the Effects dialog box, as shown below. But to have more control:
1 With the black Selection tool, select an object.
2 From the Object menu, choose “Effects,” then “Drop Shadow....”
3 Make sure the blue bar is highlighting “Drop Shadow.” Choose your settings. “Multiply” is the best mode, and an opacity of something like 40% is not too obnoxious. The x and y offsets determine how far the shadow is from the object. Experiment!

Try some other effects on selected objects, such as the various feathering effects and embossing. Also see page 186 for drop shadow effects on type.


Linked images and the Links panel
One very important thing to remember: Even though, yes, it is possible to do it, do not ever copy and paste a graphic from another application into an InDesign document. Why? Because InDesign doesn’t embed images into its files—it merely displays an image as a placeholder with a link that tells InDesign where to go to find the actual image. The display on the page and in print comes from the linked image; if there is no link, the image will display crummy, and print even crummier. So never, ever.* Got that?
* OK, the one exception to this rule is a vector image created in Illustrator. Turn on the AICB setting in Illustrator’s Preferences (under “File Handling & Clipboard”), then when you copy and paste a file from Illustrator into InDesign, the paths are editable in InDesign! If this makes no sense to you, ignore it.
You can, however, drag files from another InDesign file, from Bridge, and even from your Desktop, and InDesign will link to them appropriately. Or you can place a graphic in InDesign, then cut it and paste it (as on page 154) and it will come back in with its link intact.
The Links panel keeps track of every image you place in InDesign. If an image gets updated outside of InDesign (that is, you didn’t use the technique on the opposite page), you’ll see a yellow warning symbol, shown below. If you change a file’s name or move its location, you’ll see a red question mark. InDesign prints from the original file, not from the placeholder you see on the page, so the symbols warn you of a discrepancy or a broken link.

Adjust images in the original application
This is really great. It’s for those times when you are looking over the photos in your project and say to yourself, “Omigoodness, my teeth need whitening!” This technique lets you pop into Photoshop, whiten your teeth, go right back to the InDesign page, and la, there you are, teeth whitened. InDesign makes it easy to edit almost any file on the page and updates the link immediately.
Task 29 Edit an image
1 Right-click on an image that needs an adjustment.
2 In the contextual menu that appears, choose “Edit Original” if the file is internally linked to the original application.
Or go down to “Edit With” and choose an application in which to open and edit the file.
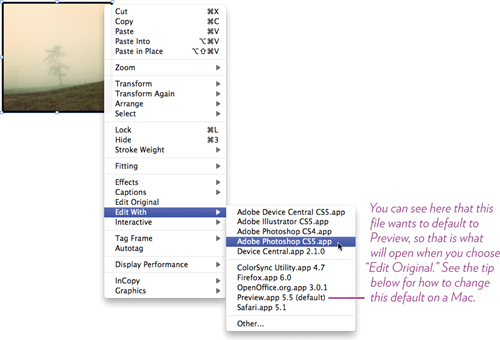
3 Edit your file and save it. If you look at the InDesign page, you’ll see that as soon as you save it, the changes are reflected on the InDesign page. When you’re happy with the image, save it and close it and go back to InDesign.
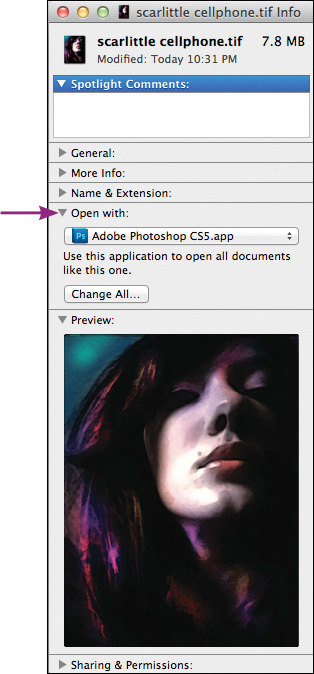
Tip for Macs
If your files constantly want to open in Preview, go to your Desktop and click on any .tif file; press Command I to get the Get Info window. Click the “Open with” button. Choose “Adobe Photoshop,” and then click the “Change All...” button. All .tif files will now default to your version of Photoshop.
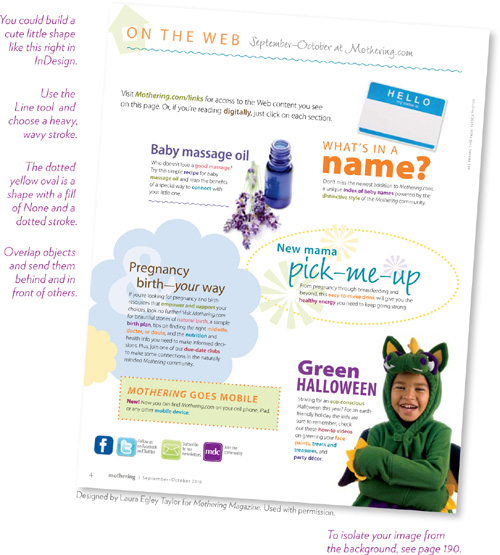
Try this!
Below is a page from Mothering Magazine, designed by Laura Egley Taylor, that uses many of the techniques explained in this chapter. There is nothing on the page that you don’t know how to do! Recreate something like this, using your own images (or ones from CreativeCommons.org) and shapes and text (also see pages 198–199 for a similar example with objects selected).