9. Creative Tidbits
Really, everything in InDesign is a creative tidbit. But here are a few extra tips for your artistic pleasure. Each page in this chapter is merely an introduction to a particular technique, and I encourage you to spend discovery time exploring the further possibilities.
Also keep an eye out for design projects that use any of these techniques—put them in your Idea File. And keep your wheels turning for ways in which you can push the boundaries of your creativity in InDesign!
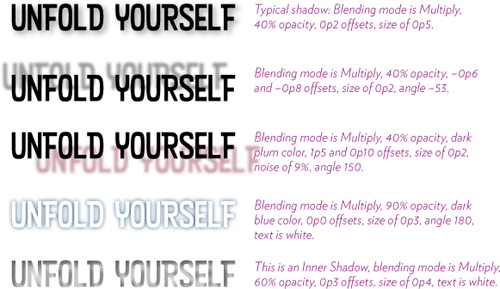
Drop shadows and other effects
You learned to apply a drop shadow on graphics in Chapter 7; you can also apply effects to text. Remember, to apply effects to text as an object, you must select the text frame with the black Selection tool. This means the effect will apply to everything in the frame. If you want individual characters within the frame to have a shadow, see the opposite page.
Task 1 Create a shadow on text in a frame
1 Make a text frame with a headline in it.
2 With the black Selection tool, click on the text frame.
3 From the Object menu, choose “Effects,” and then “Drop Shadow....”
4 Make sure the “Preview” button is checked, and start exploring!

Outline the text for graphic possibilities
As you have surely noticed, there are some effects that you cannot apply to text unless you apply them to the entire frame. But you can turn any character into an object and then apply effects just to that object. Follow these steps to apply a drop shadow to one or more characters in a text frame.

Task 2 Create a shadow on individual characters
1 Make a text frame with some fairly large text in it, including one or more characters that you want to drop a shadow on.
2 With the Type tool, select the character/s you want to affect.
3 From the Type menu, choose “Create Outlines.” That character is now an object.
4 Get the black Selection tool and click on the character. Even if you did this to more than one character, you can only select one at a time.
5 Now you can apply just about any effect: From the Object menu, choose “Effects,” and then “Drop Shadow...” (or other effect of your choice). Choose your options and click OK.
Task 3 Reshape a character outline
When a character is an outline, you can use the white Direct Selection tool to alter its shape. This uses Bezier curves and control points, which I don’t have room in this book to explain fully (see pages 142–143), but if you know how to use them from Illustrator or Photoshop, then have at it!
1 Create a large character in a text frame. Create outlines, as above.
2 With the black Selection tool, select the outline, cut it from the text frame, and paste it on the page somewhere (you can alter the points while it’s in a frame, but it’s tricky).
3 With the white Direct Selection tool, press and drag the anchor points and direction handles.

Tip
To preserve the original characters as editable text, you can create the outlines as a copy. Just hold down the Option key (PC: Alt key) when you choose “Create Outlines” from the Type menu. The outlines will appear directly on top of the original.
Task 4 Type into an outlined text character
The outlines that you created in Tasks 2 and 3 on the previous page can actually be used as text frames.
1 Create a giant character, big enough to put text inside of. Use a bold sans serif or decorative face.
2 With the Type tool, select the character/s you want to affect.
3 From the Type menu, choose “Create Outlines.” Now that character is an outline.
4 With the Type tool, click in the outline and type!
If nothing happens when you click and type, you need to change this preference: Go to the InDesign menu, choose “Preferences...,” then choose “Type....”
Check in the box, “Type Tool Converts Frames to Text Frames.”
Click OK.
Now you can click in the outline and type or paste text.
5 Format the text inside the frame as usual.
To change the color of the outlined character, select it with either of the Selection tools (black or white) and choose another color.

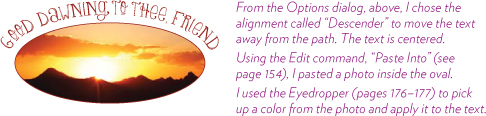
Task 5 Put a photo inside text characters
Not only can text outlines be used as text frames, they can be used as containers for images. Find a photo on your computer and put it somewhere where you can find it, for use in this task. You’re going to create something like one of the examples shown at the bottom of this page.
1 Create a large word in a text frame. Choose a heavy face, very bold. Kern the letters close together.
2 With the black Selection tool, click on the text frame to select it.
3 From the Type menu, choose “Create Outlines.” Now every character in the frame is an outline.
4 You can, at this point, place the photo (from the File menu) into the selected outlines. But I find it easier to do this:
Do not select the text outlines yet. First, get the photo: Go to the File menu and choose “Place...,” and double-click your photo.
Click to put the photo on the page, anywhere.
5 Resize the photo to about the size you want it to be when it will be inside the outlines.
6 Position the photo directly on top of the outlines. This is because when you choose the “Paste Into” command, it gets pasted into the exact position it came from, as long as you don’t move the outlines.
Once the photo is in position, go to the Edit menu and choose “Cut.”
7 With the black Selection tool, select the outlined characters.
8 Go to the Edit menu and choose “Paste Into.” Voilà!
9 Get the white Direction Selection tool. Click on the photo to get its brown outline. Drag the image into the position you want, or resize it from one of the brown corners.
10 To resize the entire graphic, outlines and all, use the black Selection tool. Don’t enlarge it past the appropriate resolution of the graphic, as explained on page 133.

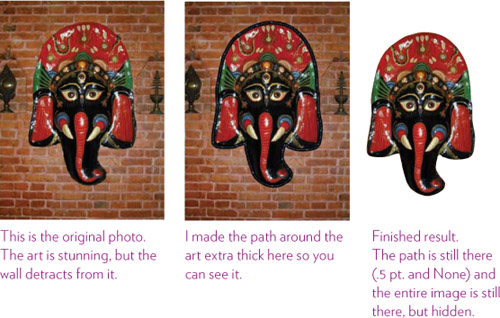
Isolate a photographic image
It enhances your design options if you know how to isolate an element in a photograph. This technique uses the Pen tools, to which there is a much-too-brief introduction on pages 142–143. If you do feel comfortable using the Pen, this is a very useful procedure.
Task 6 Isolate an area of a photo
1 Place a graphic on the page (File > Place).
2 Get the Pen tool.
3 Choose a 1-point or half-point black stroke and a fill of None.
4 Draw a path around the object you want to isolate, on top of the photo.
5 Select the photo, then cut it (from the Edit menu), leaving the path behind. Don’t move the path.
6 With the black Selection tool, select the path.
7 From the Edit menu, choose “Paste Into.” Ta da!
When you move the entire object, make sure to use the black Selection tool. To adjust the position of the photo inside the path, use the white Direct Selection tool.
You can use the white Direction Selection tool to adjust the paths at any point.
If you don’t want to see the path, select it with either the white or black Selection tools and give it a swatch color of None.
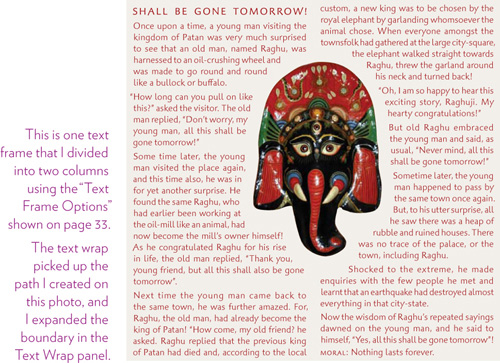
Wrap text around an object
You can wrap text around any sort of object, including drawn objects, imported graphics, and even text frames. The wrap is actually applied to the object, not to the text; the object holds a boundary around itself to repel the text. This means if you move the object onto another body of text, that new text will wrap around the object boundary. This is the simplest form of text wrap, just to get you started using it.
Task 7 Wrap text around an object
1 Create a text frame full of small type, and justify the text.
2 Then place a photo or draw any sort of shape on the page. Position the graphic so it overlaps the text at least halfway.
3 With the black Selection tool, select the object.
4 From the Window menu, choose “Text Wrap.”
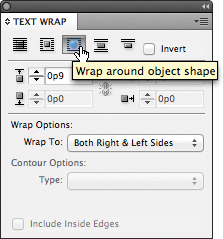
5 Click the button to Wrap around object shape.
6 Explore the options in the “Wrap To” and Contour “Type” pop-up menus.
7 If you know how to use the Pen tools and the white Direction Selection tool, you can create new points and customize the shape.
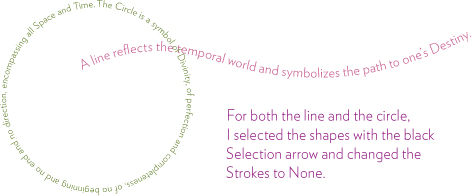
Type on a curve
Type on a curve is not only fun to create, it’s useful. You might want to curve type around a logo, a seal, or a patch, add energy to an ad or poster, or simply draw attention in an appropriate way. InDesign makes this easy to do—as long as you follow the directions and are aware of the visual clues in the cursor.

Task 8 Create a path and set the type
Text gets set along a path, which is a vector line of any sort. A path is made whenever you create any frame, shape, or draw a line with the Pen tool or the Pencil tool. (You cannot, however, create type on a compound path, which is when several paths are combined into a single object. For instance, when you convert type to outlines, as shown on pages 187–189, the type becomes compound paths.)
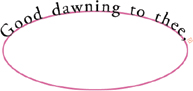
So your first step is to create a path. Let’s start with an oval.
1 Get the Ellipse tool. Make sure nothing is selected, and then choose a Fill of None, and a Stroke of 1 point in any color. Choose 12-point type.
2 Draw an oval several inches wide, with a gentle arch.
3 Get the Type-on-a-Path tool (it’s under the regular Type tool).

4 Position the tool on the line, toward the left, upper edge of the oval; you will see a teeny tiny little + sign when you are positioned properly on the line, as shown below-left.
Press-and-drag the tool to the opposite side of the oval. You will see the in and out ports on the text brackets, as you do on a regular text frame, as shown below-right. Let go when the right bracket is positioned where you want the text to end.

5 As soon as you let go, the text insertion point flashes at the beginning of the line. Start typing. Ta da! For this task, continue typing until the text doesn’t fit anymore and you see the red plus sign in the Out Port, as shown below. Uh oh, overset text.
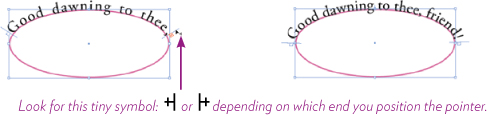
6 Get the black arrow Selection tool, and single-click on the text.
Position the tip of the Selection tool on either of the brackets at the ends of the text frame—do not position the tip over the in or out port. A really tiny symbol appears in the cursor when you are in the correct position, as shown below. Drag the bracket until all the text appears.
7 Now that the text is set on the path, format it as usual: Select the text and change its color, the font, center it, kern it, etc. You will probably have to adjust the end brackets as you change the formatting.
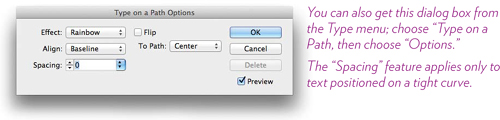
8 To get the Options dialog box, select the text with the black Selection tool, then double-click on the Type-on-a-Path tool in the Tools panel. Experiment with these options! Make several copies of your text (Option- or Alt-drag) and see how the various effects compare.
9 Select the oval with the black Selection tool and change its color to None. The oval is still there, but now all you see is the text.
Task 9 Set text all along a circle
In the first Task, you defined the space in which to type. In this short Task, you’re going to simply click and start typing.
1 Get the Ellipse tool and draw a circle (hold down the Shift key to make a perfect circle).
2 Fill the circle with None, and give it a 1-point Stroke of any color.
3 Get the Type tool. Choose 10- or 12-point type, depending on the size of your circle (bigger circle, bigger type).
From the Type menu, choose “Tabs” and make sure all the indent markers are all the way to the left.
From the Paragraph specs in the Control panel or the Paragraph panel, choose a left alignment.
You can, of course, do all of the above after you set the type instead of doing it before.
4 Get the Type-on-a-Path tool (it’s under the regular Type tool).
5 Position the tool at the top of the circle; you will see a tiny + sign when you are positioned properly on the line.
Click. Type. The text goes all the way around the circle. Follow Steps 6–9 on the previous page to format your text and shape.
Task 10 Set text along a line
1 Using the Pencil tool or the Pen tool (see pages 141–143 for how to use the Pencil and the Pen tools), draw a curved line.
2 With the Text-on-a-Path tool, click on the line, then type!
3 With the white Direct Selection tool, move or adjust the points on the line as explained on pages 139 or 143.
Task 11 Reposition the text on a curve
You can reposition the text on the line at any time. For this Task, use the circle of text you created in Task 9, or recreate another circle of text.
1 With the black Selection tool, single-click on the text so you see all the handles. Find the teeny weeny little tiny blue marker in the middle of the line of text, as shown below-right.

2 Position the cursor over that tiny blue center bracket (make sure you see the tiny symbol, shown above), then press-and-drag the bracket outside the text. This moves the end brackets around the shape or back and forth on a line, as shown below-left. When the end brackets are positioned where you want the text to begin and end, let go.
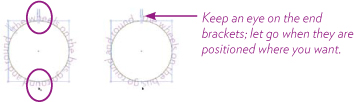
3 If, during the process above, you drag the cursor toward the center of the shape, you’ll notice that the text flips to the inside. If you want this, great—just let go of the pointer. If not, drag the cursor back to the outside of the text and it will flip back to its original position.

Tip
You can only set one line of type per path, but you can thread the lines just the same as you thread regular text frames (pages 24–28).
Libraries
When you find you use a certain element over and over, you can create a Library to keep it in and make it easy to access. You can store drawn shapes, grouped items, logos, text frames, even ruler guides. Each element preserves all attributes that you gave it, and when you drop it into another document, all those attributes go with it, including any file link information.
If you remove the element from the InDesign document, its thumbnail stays intact in the Library, still available for you to use.
Task 12 Create a new Library and put things in it
1 From the File menu, choose “New,” and then “Library....”
2 Name the library. This name will display in the Library panel tab, so give it a descriptive title that will tell you what is in it.
You can have as many Libraries as you want, perhaps categorized for different projects.
3 With the black Selection tool, select an item on the page to put into the Library. You can either drag-and-drop it into the Library pane, or click the New Library Item button.

Option-click (PC: Alt key) the New Library Item button to get an information pane where you can name the item and add keywords to make it easy to search and find later. (If you forget to do that, you can always double-click an item once it’s in the Library to get the information pane).
4 To place an item from the Library onto a page, just drag it out of the Library pane. Or select an item in the pane and use the panel menu.
Try this!
If you’re in a class, use the features explored in this chapter (and the others), and discover something new! Experiment with all the options, try something wild, combine effects, push things to the limit. For instance, find out more about the text wrap feature and all the things you can do with it; learn to use the Pen tool and create paths for isolating graphics and curving lines of text, discover what else can be done with the Paste Into command or outlined text characters. Share the results with your classmates.