
2. Core Data
To kick off our discussion on iOS Core Frameworks, I thought it only appropriate to start with your data. Figuring out how to structure and manage the data in your app is always the first programming step for a new application—whether it’s an iOS app or an app on any other platform. Core Data is a native iOS framework designed to offer a persistent data store of your application’s data. You’ll discover in the sections that follow, however, that Core Data operates as more than just a serialization or archiving service for your model; Core Data is optimized to work within the design paradigm of most iOS app architectures while offering out-of-the-box features like automated undo/redo management and cloud syncing between devices and platforms.
Getting Started with Core Data
Core Data has existed in Mac OS X for some time and was introduced to iOS with iOS version 3.0. Over time, Core Data continued to grow and now, with the introduction of iOS 5 and iCloud, for the first time developers can easily sync Core Data databases between iOS, Mac OS X, and even Windows platforms.
Before we get to cloud syncing, though, it’s important to lay some groundwork on Core Data framework. First and foremost, the topic of Core Data is extremely complex. There are entire books dedicated to the subtle nuances and configuration options of Core Data and Core Data optimization techniques, some of which are longer than this book, let alone this chapter. In the limited space of the next few chapters we simply can’t cover every little detail about Core Data.
What this chapter will do, however, is present you with a Core Data crash course, so to speak. By the end of this chapter you’ll have a firm grasp of how to set up Core Data driven apps, how to interact with Core Data efficiently, and how to take advantage of some of the added features that come for free with Core Data-based projects. Then in Chapter 3, iCloud, we’ll discuss how to use new Core Data APIs to automatically manage the synchronization of your app’s data between multiple devices and platforms.
What Is Core Data?
Core Data is a schema-based data management solution available as a collection of Objective-C classes in the Core Services layer of the iOS system architecture. Core Data is not a relational database. If you’re familiar with Oracle databases or MySQL, you know that relational databases store data in tables, rows, and columns and that these databases facilitate access through a query language.
Core Data is similar in that it manages your data but the difference is that Core Data operates beyond a simple set of values. Instead, it’s designed to work within the Model-View-Controller (MVC) design paradigm. To illustrate the difference, imagine you’re writing an app to track Person records of the individuals in a company. In a relational database like Oracle or MySQL, you would probably set up a Person table and insert a new row for each individual. If you need to obtain a record from that table, you would query the database using a SELECT statement. The database would then return an object that’s an array of values matching the conditions of your query; one row for each person, identified by columns like firstName, lastName, and so on.
With Core Data, however, you don’t query a central database looking for values. Core Data does not care about values; instead Core Data cares about objects. When information is fetched from Core Data, an array of managed objects is created and returned. These managed objects are full-fledged Objective-C entities created from Objective-C classes, just like you would use in your model. Core Data automatically wraps the values of your data into the model objects used in your app and then returns those objects as the result of fetch operations. So instead of an array of values, you’re returned a Person object with accessible properties like Person.lastName and Person.firstName. The structure of this data is defined by the schema, or managed object model.
Core Data Stack
The managed object model in Core Data is one of many objects that define what is known as the Core Data stack (Figure 2.1). The Core Data stack is a visualization of Core Data’s architecture that identifies the various players and their interactions. The Core Data stack consists of
• Managed Object Model
• Persistent Store Coordinator
• Persistent Store and Store File
• Managed Object Context
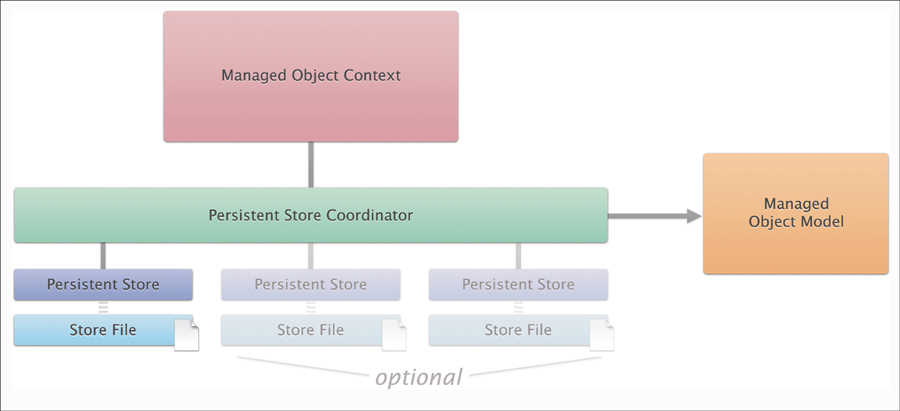
Figure 2.1. The Core Data stack.
Managed Object Model
The managed object model (sometimes simply referenced as the object model) is the schema that defines the data structure in your app. The managed object model is a file with the extension .xcdatamodeld. These files are edited using a Graphical User Interface tool (GUI) provided in Xcode called the Core Data Model Editor (Figure 2.2).
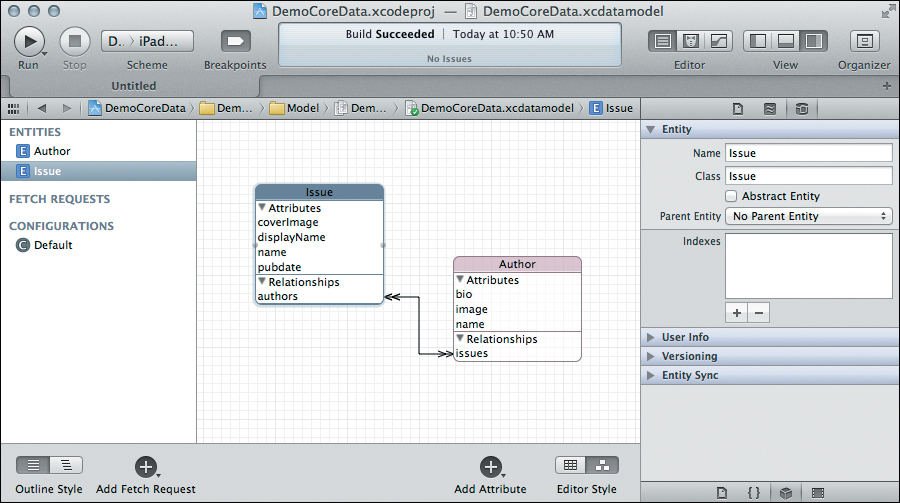
Figure 2.2. The managed object model in the Core Data Model Editor in Xcode 4.2.
The managed object model shown in Figure 2.2 outlines the schema for a simple magazine style app. In this example, the object model defines Issue and Author, and their relationships to one another.
In a managed object model, each object (Objective-C class) is known as an entity. Each entity is characterized by a list of attributes, relationships, and fetched properties. Think of attributes as the instance properties you would use to define your own custom objects (like displayName or pubdate). Relationships define how individual entities relate to one another. When a relationship is defined, Core Data creates an NSSet or NSOrderedSet property on that entity and generates the accessors needed to add objects to that relationship (such as add/remove author to issue).
 Tip
TipSimilar to relationships, fetched properties relate entities in the object model. The difference, however, is while relationships are two-way (meaning both objects know about the relationship), fetched properties are only one way. For example, an Issue might know who the senior writer is in its set of authors (based on the job titles of the associated authors), but each author does not know if they are the senior writer in a particular issue. Using fetched properties you can define a predicate (like a query or search) and return values based on the result of that predicate.
 Note
NoteIf values change within your entity, fetched properties will not immediately update. You must refresh your object from the managed object context after new properties are assigned to obtain new fetched properties.
After you’ve finished creating your object model, you can use Xcode to automatically generate the managed object classes. To generate the managed object classes, navigate to File > New > New File... in the Xcode menu. In the new file creation dialog, select the NSManagedObject subclass (filter for Core Data file types in the left sidebar) and click Next (Figure 2.3). Xcode will then ask you for which entities you would like to create a managed object subclass. To generate these classes, select all of the desired entities, and click Next.
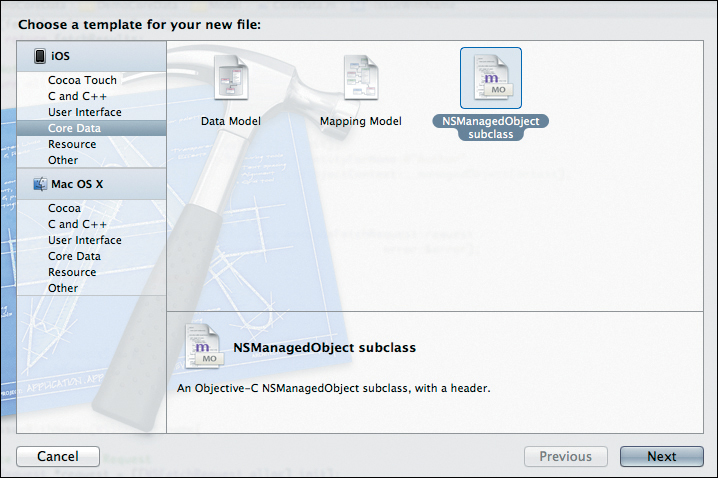
Figure 2.3. Generating new managed object subclasses from object model entities.
Persistent Store Coordinator
The next important element to the Core Data stack is the persistent store coordinator. A persistent store coordinator is created using a managed object model. This object model defines the entities and relationships that the coordinator manages.
While the persistent store coordinator plays a very important role in Core Data, it’s largely an automated process. When implementing Core Data in your own apps, besides the initial creation process you really won’t need to worry about interacting with the coordinator throughout the app lifecycle. In most iOS Core Data implementations, apps are designed around a single database (or store file, as shown in Figure 2.1). But if an app has more than one store file, the coordinator’s usefulness becomes clearer as it manages the underlying stores while giving you, as the developer, the advantage of working in a single managed object context.
Additionally, as shown in Chapter 3, iCloud, the persistent store coordinator plays an important role of notifying the object context when a persistent store has changed due to iCloud syncing.
Persistent Store and Store File
When implementing Core Data, the URL of a database file on the file system is used in the creation of a new persistent store. The persistent store is simply an Objective-C representation of the actual database file. In a real world scenario, you don’t actually have to worry about allocating a new persistent store yourself. Instead, new stores are added to an existing coordinator by identifying the store type, configuration, URL, and options. The following code block demonstrates how to set up a new persistent store on an existing store coordinator:
1 // Create a URL for our Database file
2 NSURL *storeURL = [[ applicationDocumentsDirectory]
URLByAppendingPathComponent:@"DemoCoreData.sqlite"];
3
4 // Create the persistent store
5 NSError *error = ;
6 NSPersistentStore *store;
7 store = [coordinator addPersistentStoreWithType:NSSQLiteStoreType
configuration:
URL:storeURL
options:
error:&error];
8
9 // If creating the store failed, handle the error
10 (!store){
11 // Handle the error
12 }
In line 2 of this code block, we create an NSURL for our database file by using a self-implemented convenience method, applicationDocumentsDirectory. This method simply returns the URL for this app’s documents directory using the NSFileManager. Once we have the store URL, we create the new persistent store in line 7. Because our database is a .sqlite file, we add the store with the type NSSQLiteStoreType passing in our store URL.
In this example, we left the configuration and options as nil. We’ll use these values to configure our store’s automatic syncing behaviors in the following chapter on iCloud.
If for some reason the coordinator is unable to add a new store, it will return a nil value. In lines 10 through 12 we simply check to make sure the store was created without errors. If the store is nil, the if-statement in line 10 will evaluate as true and we can handle the error appropriately.
Notice we added our store using an SQLite database. In iOS 5, Core Data supports three store types:
• NSSQLiteStoreType
• NSBinaryStorageType
• NSInMemoryStoreType
The store type used will depend on your application’s specific needs. While all three types offer similar performance when it comes to speed, the information retained from the object model differs between store type. SQLite stores only maintain a partial graph but are more efficient when dealing with large data sets. For more information and a discussion on the pros and cons of each store type, visit iOSCoreFrameworks.com/reference#store-types.
Managed Object Context
So you have a persistent store coordinator initialized with a managed object model. Additionally, a persistent store that reads in our database file has been added to that coordinator. How, then, do you interact with the data? The answer is the managed object context. Remember Core Data returns objects rather than values. When objects are created they exist within a managed object context. As its name implies, the managed object context’s job is to manage objects created and returned through Core Data.
When we generated classes from our entities, those classes were subclasses of the object, NSManagedObject. It’s the responsibility of the managed object context to manage the lifecycle of NSManagedObjects.
It sounds confusing—but let’s step back for a second and consider this. After the managed object context is created, we set the coordinator of that context, which gives the coordinator access to our entities. So to expand on the previous magazine example, let’s use the manage object context to fetch all of the issues from our database as Issue objects.
1 // Set the entity of the fetch request to be our Issue object
2 NSEntityDescription *issueEntity = [NSEntityDescription
entityForName:@"Issue"
inManagedObjectContext:objectContext];
3
4 // Create a new fetch request
5 NSFetchRequest *request = [[NSFetchRequest alloc] init];
6 [request setEntity:issueEnity];
7
8 // Fetch the results
9 // Since there is no predicate defined for this request,
10 // The results will be all issues in the managed object context
11 NSError *error = ;
12 NSArray *fetchResults = [objectContext executeFetchRequest:request
error:&error];
13
14 //Iterate through results
15 (Issue *issue fetchResults){
16 NSLog(@"%@",issue.name);
17 }
We’ll talk about the specifics of this code block a bit later, in the section Interacting with Core Data that follows, but I thought it was important to use this example as an illustration of the managed object context’s role in the Core Data stack. The goal of this code block is to print the names of all the issues in our persistent store. To perform this task we simply follow these steps:
1. Create an entity description object for an entity named “Issue” in our managed object context. Because the managed object context has a persistent store coordinator, which was allocated with our object model, the entities we’re looking for come from the entities defined in the object model (line 2).
2. Create a new request for our desired entity. We could also define additional parameters on the request such as a search predicate used to return only specific issues, and sort descriptors used to sort the returned objects (lines 5 and 6).
3. Execute the fetch request on our managed object context. This method will create new Issue objects based on our request and return them in an NSArray (line 12).
4. Iterate through returned objects. Notice that the fetch results array simply contains Issue objects. We can iterate through each of those objects, access its name, and print it to the console (lines 15 through 17).
With the managed object context, it’s important to remember that it manages the objects it creates. So in this example, the object context is watching any changes made to the Issue objects it returns. If you modify properties of those objects, the object context will automatically keep a record of those changes. When you’re finished making changes, you simply call a save operation on the context and the context will push all of the changes back down through the coordinator and save the objects back to the persistent store. Additionally, as you’ll discover in the sections that follow, you can easily insert or delete objects to your persistent store by inserting and deleting objects in your managed object context. When you’re ready, these changes can be committed by calling a save operation on the context.
The managed object context uses the information it gathers on these observed changes to handle the automatic undo/redo management as discussed in the sections that follow.
Setting Up Core Data in Xcode
There are a few different ways to get started using Core Data in Xcode. If you want, you can actually use Xcode to generate all of the relevant object models, persistent stores, store coordinators, and managed object contexts. By clicking the Use Core Data check box in the new project creation dialog, Xcode automatically imports the Core Data framework to your project and adds creation and management methods of the Core Data stack to your app delegate (Figure 2.4).
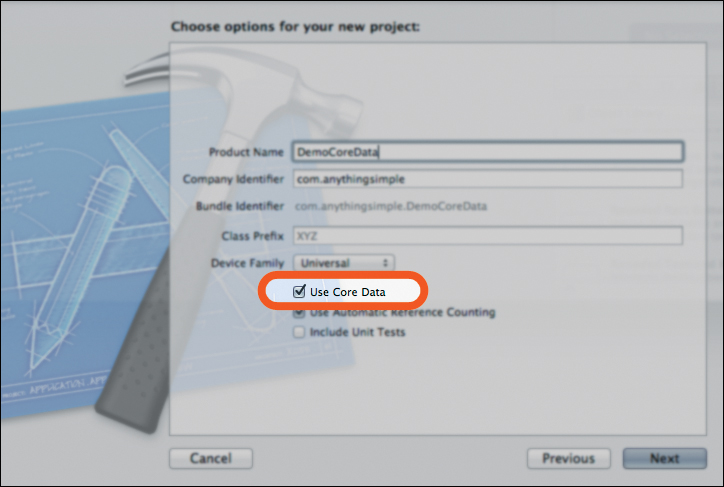
Figure 2.4. Automatically include Core Data frameworks in Xcode.
If you don’t want to use the autogenerated methods created by Xcode, however, you can of course do it yourself. But before you can use Core Data, you have to create your own Core Data stack, which involves the following steps:
1. Create a managed object model in the Xcode Core Data Model Editor.
2. Create a persistent store coordinator, initialized with the managed object model.
3. Add a persistent object store to the coordinator, created with the NSURL of a store file in the app’s file system.
4. Create a new managed object context and set store coordinator.
To download an example project demonstrating a custom Core Data stack set up as a singleton object, visit iOSCoreFrameworks.com/download#chapter-2.
Creating a Managed Object Model
To create a new managed object model, you need to add a new .xcdatamodeld file to your project. Navigate to File > New > New File... and select the Data Model file type in the new file creation dialog (Figure 2.5) and click Next.

Figure 2.5. Create a new managed object model.
Data model files are edited using the Core Data Model Editor, as seen previously in Figure 2.2. The model editor allows you to graphically organize the object model of your app’s data. New entities are added by clicking the Add Entity button in the bottom left corner. You can add attributes and relationships to an entity by clicking their respective options in the lower right corner.
The Add Entity button in the Xcode Core Data Model Editor contains a flyout menu for Add Fetch Request and Add Configuration. You can access the additional options in this menu by clicking and holding the button. Additionally, the Add Attributes button contains a flyout menu for Add Relationship and Add Fetched Property—again accessed by clicking and holding the button.
The right sidebar in the Core Data Model Editor is an object inspector that will change based on the selected item in the editor’s main view. When you select an attribute or relationship in the main view you can use the right sidebar to set the specific properties. Of note, each attribute has a type (such as string, date, and number) and each relationship defines an inverse. Remember that relationships are strong—so our authors know what issues they are in and our issues know what authors are used—while fetched properties are weak, meaning the author doesn’t know he or she is the senior writer in an issue.
Because a full overview on the Core Data Model Editor is largely visual, I put together a dedicated tutorial on this book’s website. Visit iOSCoreFrameworks.com/tutorial#core-data-editor and, in addition, download the example project at iOSCoreFrameworks.com/download#chapter-2.
Additionally, Apple has some fantastic reference material on the Core Data Model Editor, available at developer.apple.com. For a direct link to these reference materials, visit iOSCoreFrameworks.com/reference#core-data.
Don’t forget to generate your NSManagedObject subclasses after you’ve finished defining your entities and relationships in the Core Data Model Editor!
Creating a New Persistent Store Coordinator
After creating your object model in the model editor, the next step is to use that model to create your persistent store coordinator. Recall that the persistent store coordinator is largely an automated object. Besides creating and setting the coordinator to a managed object context, you really don’t need to interact with the coordinator of a Core Data stack. The following code block demonstrates how to set up a new persistent store coordinator:
1 NSURL *modelURL = [[NSBundle mainBundle]
URLForResource:@"DemoCoreData"
withExtension:@"momd"];
2 objectModel = [[NSManagedObjectModel alloc]
initWithContentsOfURL:modelURL];
3 coordinator = [[NSPersistentStoreCoordinator alloc]
initWithManagedObjectModel:objectModel];
In these three simple lines we create a new persistent store coordinator. In line 1 we first obtain a reference to our data model file (the one created in the previous section). Next, we use that file URL to create a new NSManagedObjectModel object (line 2), which is used to allocate a new NSPersistentStoreCoordinator in line 3. It’s that easy! Now that we have a coordinator, we just have to add our persistent stores and set the coordinator to a managed object context.
Adding New Persistent Stores
We’ve already seen this code in our earlier discussion on the various store types. Once you have a store coordinator, new stores are added based on their type, configuration, file URL, and options. In Chapter 3, iCloud, we’ll discuss how to use the options dictionary to configure a store for iCloud syncing. For now, though, recall the necessary code for setting up a new store and adding it to our coordinator:
1 // Create a URL for our Database file
2 NSURL *storeURL = [[ applicationDocumentsDirectory]
URLByAppendingPathComponent:@"DemoCoreData.sqlite"];
3
4 // Create the persistent store
5 NSError *error = ;
6 NSPersistentStore *store;
7 store = [coordinator addPersistentStoreWithType:NSSQLiteStoreType
configuration:
URL:storeURL
options:
error:&error];
For a discussion on the pros and cons of each store type, visit iOSCoreFrameworks.com/reference#store-types.
Creating a New Managed Object Context
When you create a new managed object context, remember that you need to create and access the objects in that context based on the relevant dispatch queue. Because of the advantages of GCD and block processing, it’s recommended that you use a queue based concurrency-type, either main queue or private. The legacy confinement type is available, however, if needed for legacy support in your applications.
1 NSManagedObjectContext *moc = [[NSManagedObjectContext alloc]
initWithConcurrencyType:NSMainQueueConcurrencyType];
2
3 // Set context in perform block
4 [moc performBlockAndWait:^(){
5 // Set persistent store
6 [moc setPersistentStoreCoordinator:coordinator];
7 }];
8
9 .managedObjectContext = moc;
This example sets up a new managed object context using the main queue concurrency type. In line 1 we allocate a new NSManagedObjectContext using the concurrency type NSMainQueueConcurrencyType. Next, in line 4 we use the performBlockAndWait method to perform synchronous actions on the managed object context in the appropriate queue.
Because this context was set up using the main queue concurrency type, there’s a chance we wouldn’t need to use the perform block methods (in other words, this setup is already being performed on the main queue). However, this example demonstrates how to configure the context in the event this operation was called outside of the main queue (for example, through the observation of a notification or in completion block). Incidentally, this code block would look exactly the same if we had used the private queue type, which would require perform block methods, even if executed on the main queue.
In line 6 we set the persistent store coordinator of our managed object context as the coordinator object we created in the previous section. Finally, in line 9 we set the newly configured context as an instance variable on self.
And that’s it! Once you have a managed object context, you’re ready to start interacting with the entities in your persistent store. Remember, you should not interact with your context outside of the queue that created that context. If you’re using the private queue, you should always use the perform block methods to ensure entity validity.
The objectID property associated with each NSManagedObject subclass is unique and consistent across all queues. If you have a case in which you need to use objects outside of the appropriate queue, use the objectForID method on the managed object context to ensure you’re working with the right object.
Interacting with Core Data
Finally, it’s time to start interacting with your data. Now that you have a Core Data stack set up in your application, you can start interacting with that data. When interacting with Core Data persistent stores through a managed object context, your interaction is typically categorized into one of four categories:
• Adding new objects
• Fetching objects and modifying data
• Deleting objects
• Undo, Redo, Rollback, and Reset
Adding New Objects
Remember that all of your interaction with the persistent store is abstracted through the managed object context. With all of the interactions that follow, think of the managed object context as a working copy of your persistent store. Changes made to the managed object context do not affect your data until they’re committed using the appropriate save action.
Recalling our magazine example, the following code block demonstrates how to create ten new issues and save them to our persistent store:
1 ( i=0; i<10; i++){
2 // Insert and return a new issue from our context
3 Issue *newIssue = (Issue*)[NSEntityDescription
insertNewObjectForEntityForName:@"Issue"
inManagedObjectContext:.managedObjectContext];
4
5 // Set the name of the new issue
6 [newIssue setName:[NSString stringWithFormat:@"Issue #%d",i]];
7 }
8
9 // Commit the changes to persistent store by saving context
10 NSError *error = ;
11 (![.managedObjectContext save:&error])
12 NSLog(@"There was an error");
There is actually a very important lesson in this code block, but we’ll get to that after we outline the steps taken. First, in line 3 we create a new object in our context by inserting a new object with an entity name from that context. Because each entity will have its own class name, the return value of this method is simply a generic id object. To make the object usable, we typecast the return value to an Issue object. In line 6 we set the name of our newly created Issue object to a string based on our iteration loop.
Finally, in lines 10 through 12, we save our context. This is the important takeaway from this code block. Notice we didn’t save our context after each object was created. The managed object context will track all of the changes made in between saves. It’s not necessary to call a save function after every change. In fact, doing so could cause significant performance issues, especially when working with iCloud syncing. With this in mind, consider the save option as the last step when working with your managed object context; you should perform any and all changes to your data that are required by that task, and then save the context as a final step.
Fetching and Modifying Objects
In the previous section we performed a simple fetch operation to demonstrate the role of a managed object context. What we didn’t discuss at the time, however, is that just like adding objects to the context, any changes made on objects returned from a fetch operation are tracked by the managed object context. That means that any changes to those objects can be committed to the persistent store when the save operation is called on the context that created them.
In the following code block, we perform the same fetch operation on the managed object context. Only this time, we define a predicate to the fetch object that limits the search parameters to an object with a specific name. Once we obtain the result, we change properties of that object and save the context to commit the changes:
1 // Set the entity of the fetch request to be our Issue object
2 NSEntityDescription *issueEntity = [NSEntityDescription
entityForName:@"Issue"
inManagedObjectContext:objectContext];
3
4 // Create a new fetch request
5 NSFetchRequest *request = [[NSFetchRequest alloc] init];
6 [request setEntity:issueEnity];
7
8 // Set up a predicate limiting the results of the request
9 // We only want the issue with the name provided
10 NSPredicate *query = [NSPredicate predicateWithFormat:
@"name == %@",name];
11 [request setPredicate:query];
12
13 // Fetch the results
14 NSError *error = ;
15 NSArray *fetchResults = [objectContext executeFetchRequest:request
error:&error];
16
17 // If we have results, modify the properties
18 ([fetchResults count] > 0){
19 Issue *issue = (Issue*)[fetchResults objectAtIndex:0];
20 issue.pubdate = [NSDate date];
21 issue.displayName = @"iOS Core Frameworks #1";
22 }
23
24 NSError *error = ;
25 (![.managedObjectContext save:&error])
26 NSLog(@"There was an error");
The setup to this fetch request is similar as before. This time, however, we define an NSPredicate for the request to limit our search results (line 10). In this example, we have an NSString for the name of the issue we want. In line 11 we create our predicate accordingly and set it to the request. Next, in line 15 after executing the fetch request on our context, we check to see if we have any results in line 18.
If the fetch request returned results based on our predicate, the fetchResults array count will be greater than zero and the if-statement in line 18 will evaluate to true. If this is the case, in line 19 we obtain a reference to the Issue object in the fetchResults array and modify the desired properties (lines 20 and 21).
Finally, just like we did when adding objects, if we want to save the changes we made to the properties down to the persistent store, we need to call a save on the managed object context (lines 25 and 26). Remember to be mindful of how often you save your context. If you are changing several properties, hold off the save operation until you’re finished!
Apple has made available a set of documentation on the NSPredicate and predicate format operations. To learn how to construct more complex queries, visit iOSCoreFrameworks.com/reference#predicates.
Deleting Objects
Deleting an existing object is a lot like adding a new object. The delete operation is called on the context by passing in the object you wish to delete, and the change is committed to the persistent store by calling save on the object context. The following code block demonstrates how to delete an object from a persistent store by first deleting the object in a managed object context and then committing the changes:
In this example, the method issueWithName: uses the same fetch request operation as in the previous section. The only difference is, instead of modifying properties after an issue was pulled from the fetchResults array, the Issue object is simply returned.
1 Issue *issue = [ issueWithName:name];
2 (issue)
3 [.managedObjectContext deleteObject:issue];
4
5 ([.managedObjectContext hasChanges]){
6 // Save Changes
7 NSError *error = ;
8 (![.managedObjectContext save:&error])
9 NSLog(@"There was an error");
10 }
As you can see, the process of deleting an object is remarkably simple. In line 1 we obtain a reference to the desired object by calling issueWithName. This self-implemented function will return our Issue object using the predicate technique described in the previous section. Next, if the issue returned as a valid object (and not nil), we call deleteObject on the managed object context, passing in the object we want to delete. Finally, in order to save those changes to the persistent store, we call a save operation.
Notice that this code block does something different than previous blocks. In line 5, before we save our context, we first check to see if the managed object context has any changes that need saving. If our issueWithName returned a nil value, then the delete operation of our object was never performed. In this case the managed object context would not have any new information to save. To optimize the performance of your app, it’s always a good idea to only perform save operations if a save is needed. Using the hasChanges Boolean of the managed object context is a perfect way to perform this check.
Undo, Redo, Rollback, and Reset
As I’ve noted, one of the nice things about using Core Data is that the managed object context automatically records undo and redo states throughout the lifecycle of your app.
This is made possible through an NSUndoManager. The NSUndoManager is the iOS way of tracking changes in data for the purposes of undo management. Typically, if you want to support undo operations in your app, you would have to create your own undo manager and record events as they occur. With Core Data, however, the managed object context automatically adds undo/redo snapshots to its associated undo manager whenever a user event occurs.
Adding the Undo Manager
The one caveat to undo/redo support in Core Data is that by default, Core Data on iOS does not come with an undo manager, essentially for the purpose of optimizing performance on iOS. Therefore, because not every application that uses Core Data on iOS will use an undo manager, by default the manager is set to nil. (On Mac OS X, Core Data automatically allocates an undo manager for new managed object contexts.)
Fortunately, adding an undo manager only involves two lines of code. Recall in the previous section where we allocated a new NSManagedObjectContext. By adding two lines of code (lines 7 and 8), we can set up a new undo manager.
If you don’t plan on using undo operations in your app, you should not include an undo manager. Also, you can improve the undo manager’s performance in Core Data by limiting the number of undo steps it records with the NSInteger property, levelsOfUndo.
1 NSManagedObjectContext *moc = [[NSManagedObjectContext alloc]
initWithConcurrencyType:NSMainQueueConcurrencyType];
2
3 // Set context in perform block
4 [moc performBlockAndWait:^(){
5
6 // Add undo manager
7 NSUndoManager *undoManager = [[NSUndoManager alloc] init];
8 [moc setUndoManager:undoManager];
9
10 // Set persistent store
11 [moc setPersistentStoreCoordinator:coordinator];
12 }];
13
14 .managedObjectContext = moc;
Be default, the undo manager of a managed object context is set to record undo snapshots on user events. A user event, as it relates to the undo manager in Core Data, is characterized by a control event, touch event, or shake event performed by the user. Control events are generated through UIControls like buttons, sliders, and steppers. A touch event can be generated through touchesBegan methods or a UIGestureRecognizer. A shake event is often generated by motionBegan methods, or the shake gesture.
Implementing Undo, Redo, Rollback, and Reset Logic
When a user event occurs, the undo manager of a managed object context records a snapshot of your data. Table 2.1 outlines the effects of calling undo, redo, rollback, and reset on the managed object context.
Table 2.1. Undo, Redo, Rollback, and Reset Methods
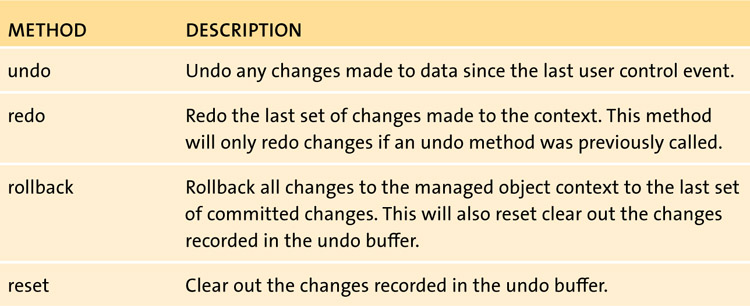
It’s important to note that the undo manager only records a snapshot when a user event occurs. If you’re adding multiple objects programmatically and outside of a user action, then the undo manager will not record these events. The undo manager is configured to undo a user’s actions—not all of your (the developer’s) interactions with the managed object context.
For a tutorial on recording your own undo manager snapshots in a managed object context’s undo manager, visit iOSCoreFrameworks.com/tutorial#undo-manager.
Remember that the undo/redo actions only change the state of the managed object context. In many cases, users are performing an undo to return their data back to a previous state. Consider these cases and remember to save your context when appropriate.
Wrapping Up
By now you should have a solid understanding of how to set up a Core Data project in your own applications. Core Data is the cornerstone of most native iOS apps, used throughout both Mac OS X and iOS as the primary data provider. By taking advantage of Core Data in your applications you can integrate a fast, reliable, and easy to manage persistent data model.
Before you can start using Core Data you must set up a Core Data stack consisting of a managed object model, persistent store coordinator, persistent store (created from a file in your app’s file system), and at least one managed object context. Choose the persistent store type relevant to your application’s needs—SQLite for large data sets, Atomic for smaller sets that require full representation of the object graph in memory (that is, ordered set arrangements).
All of your interaction with Core Data is abstracted through the managed object context, which means iOS will automatically handle all of the reading and writing operations of your database file. This context automatically creates and populates NSManagedObject based on insert, fetch, and deletion methods. But the managed object context is only a working copy of your data store. Until you commit the changes by calling save on the context, your persistent file is not modified.
Finally, to optimize performance, Core Data on iOS does not include an undo manager by default. Before you can use the automated undo and redo support of the managed object context, you must allocate and set an NSUndoManager object to that context.
In the next chapter, we’ll discuss how to move Core Data to the cloud by using new APIs available in iOS to automatically sync persistent stores across multiple devices and platforms.
For more information on Core Data and projects available for download, see:
• Core Data Tutorial:
iOSCoreFrameworks.com/reference#CD-intro
• Core Data Programming Guide:
iOSCoreFrameworks.com/reference#CD-guide
• Example Core Data Project: