
7. Core Image
When I look at the new features offered in iOS 5, some of the more impressive additions come from the Core Image framework. Core Image has existed in Mac OS X for a few years now, so the technology is nothing new. The remarkable thing, however, is how effectively Apple moved such a powerful image-processing framework to a mobile platform. Using Core Image, developers now have access to state-of-the-art post processing photo filters and image analysis algorithms like auto-image enhancement and face detection. And if that wasn’t enough, because Core Image is so efficient, developers can apply these effects and filters in near real time to camera and video streams.
Getting Started with Core Image
Special thanks to Bryan Elliott and family for letting me use this wonderful picture in examples throughout this chapter; visit their website at www.elliottsjourney.com.
At its most basic definition, Core Image is an Objective-C framework that offers an extremely efficient image-processing library for pixel-based image manipulation and analysis. While Core Image was originally designed for the system resources available in a desktop environment, Apple engineers have very effectively moved this framework to iOS without a significant loss in performance or functionality.
That’s not to say that Core Image is the same on both platforms. While Mac OS X includes over 130 filters and the APIs developers need to create their own filters, Core Image on iOS (as of iOS version 5.0) includes primarily system filters designed for image editing. At the release of iOS version 5.0, there are currently 48 built-in filter types available that control either direct pixel manipulation or image compositing techniques such as blend-modes, straightening, and cropping.
Sixteen of these 48 filters are specifically designed to offer professional quality image editing capability to control exposure, highlights and shadows, hue/saturation curves, and color vibrancy—just to name a few. In fact, because the team responsible for Core Image on iOS worked so closely with the advanced imaging team responsible for Apple’s professional photo editing software Aperture, many of these filters are directly carried over from both Aperture and Core Image on Mac OS X. The following list highlights some of the most common filters you will use for photo editing operations in iOS:
• CIAffineTransform
• CIColorControls
• CIColorMatrix
• CIConstantColorGenerator
• CICrop
• CIExposureAdjust
• CIGammaAdjust
• CIHighlightShadowAdjust
• CIHueAdjust
• CISepiaTone
• CISourceOverCompositing
• CIStraightenFilter
• CITemperatureAndTint
• CIToneCurve
• CIVibrance
• CIWhitePointAdjust
Why Use Core Image?
So why do you need Core Image? Obviously, photo editing apps existed before iOS 5—how were these apps built if Core Image was only just introduced? Before iOS 5, to create a photo editing app image data needed to be processed manually using either open source or custom built libraries. Companies like Adobe, who have entire engineering teams dedicated to the science behind image manipulation, used their own image processing libraries to achieve apps like Adobe Photoshop Express for iPhone and iPad. These libraries, while used in their apps, are not generally available to the public. And for open source libraries, an understanding of the science behind image editing or matrix-based math operations was needed when implementing complex solutions. In other words, the scope and expertise involved with creating an app that supports image-editing operations was not often in the realm of possibility for the average app developer.
 Note
NoteIt’s clear based on the initial release of Core Image in iOS version 5.0 that Apple will continue to improve the functionality and performance of this platform. This chapter is based on the original specifications released in iOS 5.0. Presumably, over time new filters and functions will be added. To stay up to date on the changes of Core Image framework, visit this book’s website at iOSCoreFrameworks.com/updates or you can follow me on Twitter @shawnwelch.
Core Image on iOS levels the playing field. Using Core Image, iOS developers can implement the same quality photo editing operations found in popular photo apps without understanding the science underlying image processing. Additionally, because Core Image was built by Apple and incorporated directly into the iOS system architecture, Core Image has the advantage of leveraging either the CPU or the GPU when rendering images. This natural extension of native frameworks into iOS hardware allows for even further performance enhancements.
Simply put, Core Image is easy to implement, easy to manage, and—because it’s a native iOS framework, built and optimized by Apple—demonstrates excellent performance on iOS devices. When combined, all of these advantages equate to a better development experience for you and a better overall user experience for your users.
Let’s say, for example, you have an image and want to apply an exposure adjustment, or you want to record video from the camera in black-and-white or Sepia tone. Using Core Image, you can efficiently apply filters and other compositing techniques to these still images or individual video frames and generate their corresponding output images. When working with video frames, you can either apply filters as the final step performed when saving a video to file (such as applying a watermark overlay to video captured using free versions of your app), or you can offer in-camera effects by applying filters directly to video frames before they’re presented to the user.
For analysis, the Core Image API offers state-of-the-art algorithms for both face detection and automatic filter enhancement. These analysis functions make available the same APIs used to perform the one-touch enhance feature in the native Photos app on iOS (Figure 7.1) and the face-detection algorithms used to automatically position animated overlays in the Mac OS X Photo Booth application.

Figure 7.1. The native Photos app in iOS 5 for iPhone and iPad.
Face detection is not the same thing as face recognition. As implemented in iOS version 5.0, Core Image can only detect where faces are located in an image; it cannot identify the people in an image.
By taking advantage of the filters and analysis functions available in Core Image, you can develop anything from a basic photo-editing app to a real-time photo-filter camera app like Instagram, Camera+, or 100 Cameras in 1.
Linking the Core Image Framework
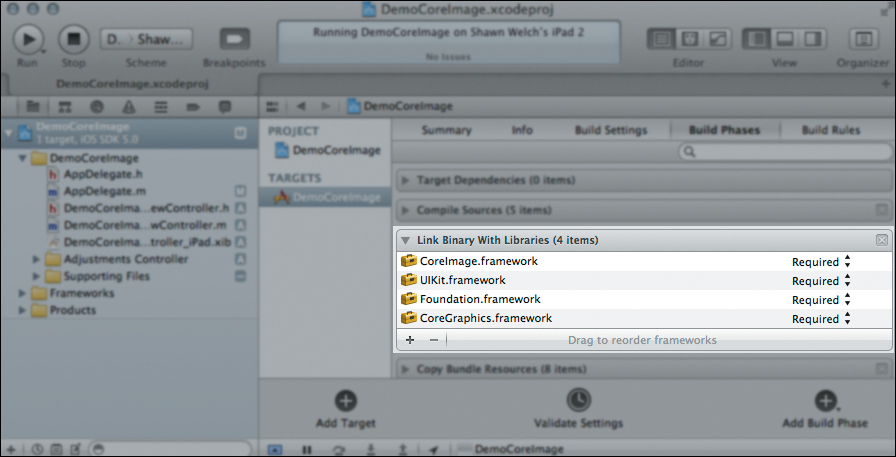
Figure 7.2. Core Image framework linked to your Xcode project.
1 #import <CoreImage/CoreImage.h>
Understanding the Core Image Framework
While an understanding of the science and math involved with image manipulation is not necessary, before we get to code examples it’s a good idea to understand how the Core Image framework is set up and the steps needed for processing an image.
Table 7.1 outlines the Core Image objects you’ll encounter when working with the Core Image framework.
Table 7.1. Core Image Framework Objects

Key-value coding is a programming technique used to indirectly access an object’s attributes and relationships using strings. For example, you know that if an object has the property backgroundColor, you can access this property using myObject.backgroundColor. Through key-value coding, the same property can by accessed using [myObject valueForKey:@"backgroundColor"]. Key-value coding supports both valueForKey: to return a property, and setValue:forKey: to set a property.
We’ll discuss these objects in greater detail in the sections that follow. To prime this conversation, however, let’s look at the workflow needed to process an image using Core Image.
1. Create a new CIImage.
2. Create a new CIFilter and supply that filter with various input values using key-value coding. Input values and keys vary depending on the filter, but every filter needs a value added for the key inputImage. This value will be the CIImage object to which you want to apply the filter.
3. Generate the output image from the CIFilter. Accessed through the property outputImage on your CIFilter, the output image is a new CIImage object that contains your original image data and a filter chain that needs to be applied to that image data when it’s rendered.
After obtaining a new output image, you can either use the output image to render your image with applied filters (as seen in Step 4) or you can use the output image as the input image of a new filter, thus creating a filter chain (jump back to Step 2 and repeat).
4. Render CIImage object using a CIContext. The CIContext can either be CPU based, in which case a new CGImageRef object is created, or GPU based and drawn to the screen using OpenGL ES 2.0.
 Tip
TipCore Image also defines a CIVector object used to describe the vector (direction) of gradients as they’re applied to images. While this chapter doesn’t cover CIVector directly, the example Core Image editor available at iOSCoreFrameworks.com/download#chapter-7 demonstrates gradients and CIVectors.
Core Image Still Images and Video Frames
When working in Core Image, your primary data type is CIImage (Core Image, image). At this point in the book, it’s probably safe to assume that you’ve worked in iOS long enough to be familiar with another image data type, UIImage. UIImage is a Foundation object used to represent image data in iOS. In the previous chapter, I emphasized that Core Graphics is responsible for most of the underlying drawing operations performed in the iOS framework. To that end, Core Graphics has its own image data type known as a CGImageRef.
These three image objects, CIImage, UIImage, and CGImageRef, all contain an object-oriented representation of the actual data that makes up an image (individual pixel values). In addition to the data associated with the image, however, these objects also include other properties used to display the image on screen such as size, orientation, colorspace, etc. And as you will learn later on, one of these display properties for the CIImage is actually filter chain that needs to be applied to that image when it is rendered..
The following code block demonstrates how to create a new CIImage. Notice in this example the CIImage is initialized using a CGImageRef.
1 UIImage *image = [imageView image];
2 CGImageRef cgImage = image.CGImage;
3 CIImage *coreImage = [CIImage imageWithCGImage:cgImage];
In line 1 we pull a reference to the UIImage stored in a UIImageView. How you get this UIImage object is up to you; you can either pull it from an existing image on screen, or you can load the image from the app bundle using [UIImage imageNamed:@"myImage.png"]. In line 2 we simply obtain a reference to the UIImage’s CGImageRef property and then use that CGImageRef as the source of a new CIImage in line 3.
In fact, while UIImages are primarily used in UIKit views, every UIImage manages a CGImageRef property to represent the underlying image data. This CGImageRef can be accessed and used in both Core Graphics and Core Image operations, acting like a bridge to go back and forth between Core Image and UIKit. The examples demonstrated in this chapter will pull the UIImage (and its underlying CGImageRef) from a UIImageView, process that image data using Core Image, and then render the image back into a CGImageRef. This CGImageRef is then used to create a new UIImage that is set to the UIImageView.
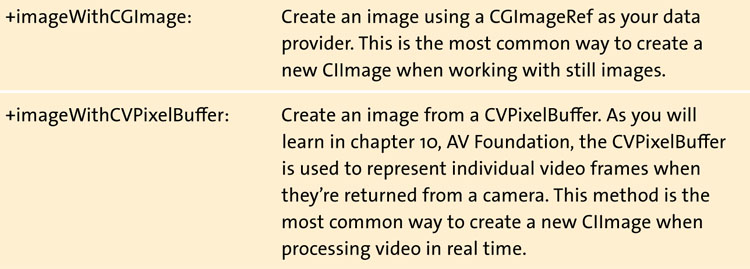
In this example we created a new CIImage using imageWithCGImage: while providing a CGImageRef as source image data. Table 7.2 outlines additional creation methods used for different sources available on iOS.
Table 7.2. CIImage Creation Class Methods
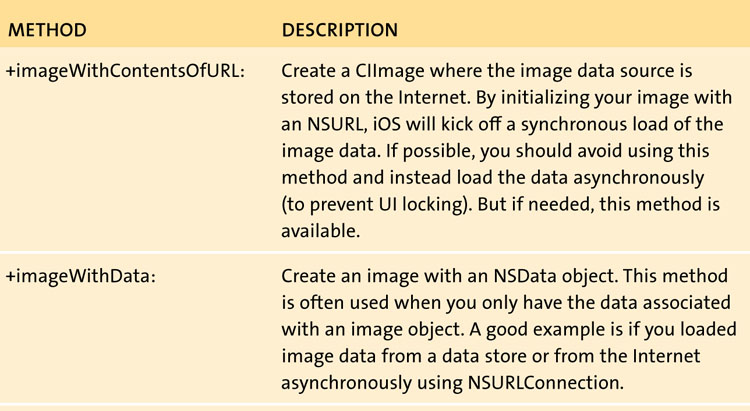
Each of these creation methods also has a counterpart that allows for an additional options dictionary. This options dictionary can be used to set various metadata properties of the CIImage once created.
The difference between CIImage and the other image objects is that a CIImage is not a final product. What do I mean by final product? Remember the steps for processing an image with Core Image. First we create the image, next we apply filters, and then we render the output of our filter through a CIContext. Filters do not modify the image data of a CIImage until the image is actually rendered. In this way, the CIImage object is actually closer to a blueprint of the final image because the associated pixel data is dependent on the filter chain until it’s rendered.
It helps to visualize an image in Core Image as characterized by two distinct pieces of information:
• The raw pixel data of an image (as in UIImage and CGImageRef)
• A representation of the filter chain that must be applied before the image is rendered onscreen (Figure 7.3).
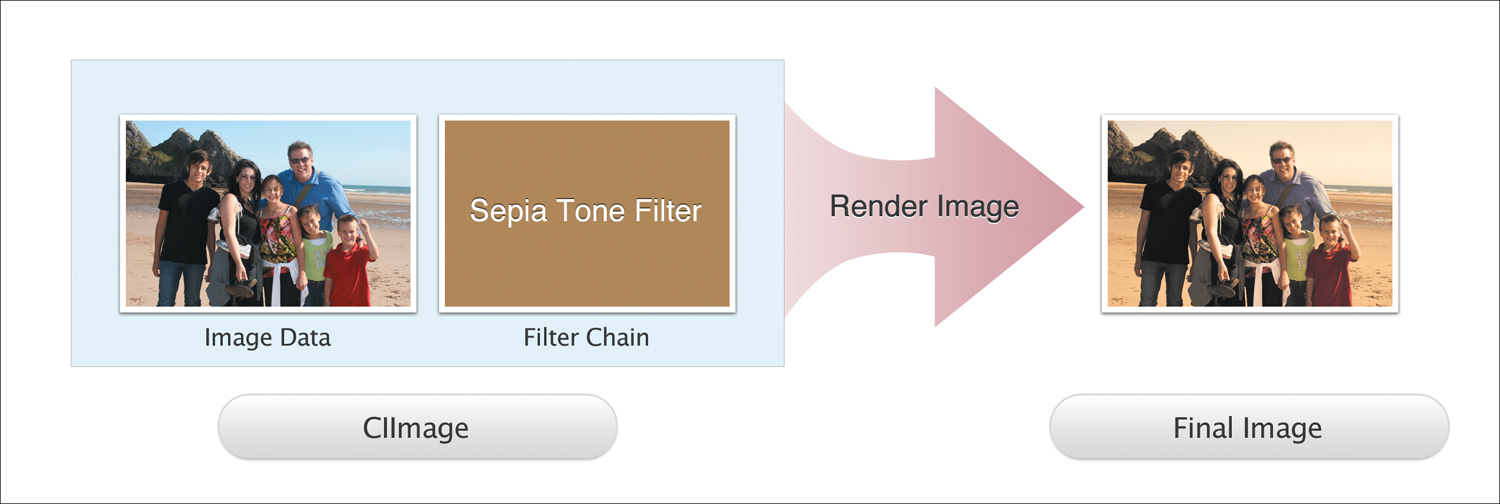
Figure 7.3. Image and filter data as represented in a CIImage object.
Just like UIImages and CGImageRefs, CIImages are immutable; you can’t change the image data or filter chain properties once they’re created. After a CIImage is created from a data source (such as a CGImageRef), you can either render that CIImage or you can use that CIImage as the image input value of a new CIFilter. The image data and filter chain cannot be accessed directly.
Core Image Filters
Core Image filters are used to modify individual pixels of an image source. A new CIFilter is created by calling [CIFilter filterWithName:@"my-filter-name"]. In the initial release of iOS version 5.0, there are 48 filter names available. Because new filter additions will likely occur between iOS version updates, Apple has created a simple method for determining what filters are available at run time. Additionally, because each CIFilter requires a different set of input values, you can obtain an NSDictionary of a filter’s attributes by calling [myFilter attributes].
The following code block queries Core Image for a list of all available filters and then outputs the filter name and its definable attributes to the console:
1 // Create an array containing all available filter names
2 *filters = [
:];
3
4 // Iterate through each filter name
5 // and output that filter's attributes to the console
6 (NSString *filter filters){
7
8 // Create a new filter with the filter name
9 CIFilter *myFilter = [CIFilter filterWithName:filter];
10
11 // Output the filter name and attributes to the console
12 NSLog(@"%@",filter);
13 NSLog(@"%@",[myFilter attributes]);
14 }
Every filter exists in one or many filter categories. As you can see in line 2, we asked Core Image to provide us with an array of all filters available in the built-in category, which returns a list of all Apple-created filters available on the system. In this example, we searched using the broadest filter category possible, essentially pulling every filter available. There are, however, additional subcategories available for specific filter types such as kCICategoryVideo and kCICategoryStillImage.
You can use the filtersNamesInCategory: to build your app in a way that new filters are automatically added to your UI as they’re added to Core Image in future releases. For a complete list of filter categories, visit iOSCoreFrameworks.com/reference#cifilter.
The array of filter names returned from the category search is an array of NSString objects; each string represents the name of an available filter found in the search. In lines 6 through 14 we iterate through each of those NSStrings and create a new CIFilter using the class method filterWithName: (line 9). After creating our CIFilter, the filter name and the filter’s corresponding attributes are output to the console (lines 12 and 13, respectively).
In the example demonstrated in Figure 7.3, we added a Sepia-tone filter to our image. Remember, the attributes dictionary contains all of the information needed to determine a filter’s input values. Using the output in the console (demonstrated in the previous code block) of a Sepia-tone filter’s attributes dictionary, we can inspect what inputs are needed to configure the Sepia-tone filter.
{
CIAttributeFilterCategories =(
CICategoryColorEffect,
CICategoryVideo,
CICategoryInterlaced,
CICategoryNonSquarePixels,
CICategoryStillImage,
CICategoryBuiltIn
);
CIAttributeFilterDisplayName = "Sepia Tone";
CIAttributeFilterName = CISepiaTone;
inputImage = {
CIAttributeClass = CIImage;
CIAttributeType = CIAttributeTypeImage;
};
inputIntensity = {
CIAttributeClass = NSNumber;
CIAttributeDefault = 1;
CIAttributeIdentity = 0;
CIAttributeMax = 1;
CIAttributeMin = 0;
CIAttributeSliderMax = 1;
CIAttributeSliderMin = 0;
CIAttributeType = CIAttributeTypeScalar;
};
}
Notice an attributes dictionary contains all of the information needed to configure a filter. First, the attributes dictionary contains various metadata like the categories, display name, and filter name. If you want, you can pull these values from the attributes dictionary using traditional dictionary operations like objectForKey: (for example, if you want to show the display name of a filter to a user in your UI). In addition to this metadata, however, the attributes dictionary also tells us what inputs are needed to use the filter.
Recall that I mentioned every CIFilter requires an input image. As you might expect, you can see in the previous attributes dictionary that the CIFilter lists the inputImage attribute of the filter as an object with the class CIImage. This means when we call setValue:forKey: on this filter for the key “inputImage, “ the filter is expecting the value to be a CIImage object.
But that really doesn’t tell us anything about the Sepia-tone effect, which is the whole purpose of the filter. The next bit of information in the attributes dictionary determines this filter’s effect on an image. Identified by the key “inputIntensity,” you can see the type of data expected by the filter.
The inputIntensity value of a Sepia-tone filter controls how much the filter is applied when rendered. You can see from the attributes dictionary that this input is an NSNumber object, has a default value of zero, has a minimum and maximum value of 0 and 1, respectively, and that the input is expected to be scalar—meaning the value should be a single number within a range of numbers (zero and one).
Now that we know what attributes make up a Sepia-tone filter, we can start setting values. The following code block demonstrates how to create a Sepia-tone filter and generate the corresponding output image.
1 // Create a new filter with the name CISepiaTone
2 CIFilter *sepia = [CIFilter filterWithName:@"CISepiaTone"];
3
4 // Set the input image of the sepia tone filter
5 [sepia setValue:myCoreImage forKey:@"inputImage"];
6
7 // Set the inputIntensity of the sepia tone filter
8 NSNumber *intensity = [NSNumber numberWithFloat:.5];
9 [sepia setValue:intensity forKey:@"inputIntensity"];
10
11 // Generate a new CIImage from the output image
12 // of the sepia tone filter
13 CIImage *outputImage = [sepia outputImage];
As you can see in this code block, once you know the attributes of a CIFilter, by using setValue:forKey: you can easily set those attributes. In this example, a new CIFilter is created in line 2 using the filter name “CISepiaTone.” Next, in line 5 we set our CIImage object as the value for the filter’s key “inputImage.” Remember the inputIntensity, as defined in the attributes dictionary, is declared as an NSNumber. So in lines 8 and 9 we create a new NSNumber object with the float value of 0.5 and then set that number for the inputIntensity key. This will tell the Sepia-tone filter that it should apply its effect with an intensity of 0.5. Finally, in line 13 we create a new CIImage based on the outputImage of our filter.
Remember, key-value coding lets us set properties on an object by referencing those properties through strings. The attributes dictionary told us this filter had a property for the key inputImage and inputIntensity. If you try to set an attribute with a key for a property that does not exist, your app will crash throwing an NSUnknownKeyException. Always check the attributes dictionary!
One of the reasons iOS is so efficient with Core Image is because it eliminates intermediate buffers when processing a filter chain. In the previous code block, we applied a single filter to our image. You know from the steps outlined at the beginning of this section, however, that we can easily use the output of a CIFilter as the input of a new CIFilter, thus creating a filter chain. When iOS renders this filter chain it does not render each intermediate step. Instead, iOS will concatenate all of the filters into a single filter chain. Fortunately, all of the complex matrix operations used to combine these filters are completely transparent to the developer. When you create a new filter based on the output of an existing filter, iOS automatically optimizes the filter chain for that CIImage (Figure 7.4).
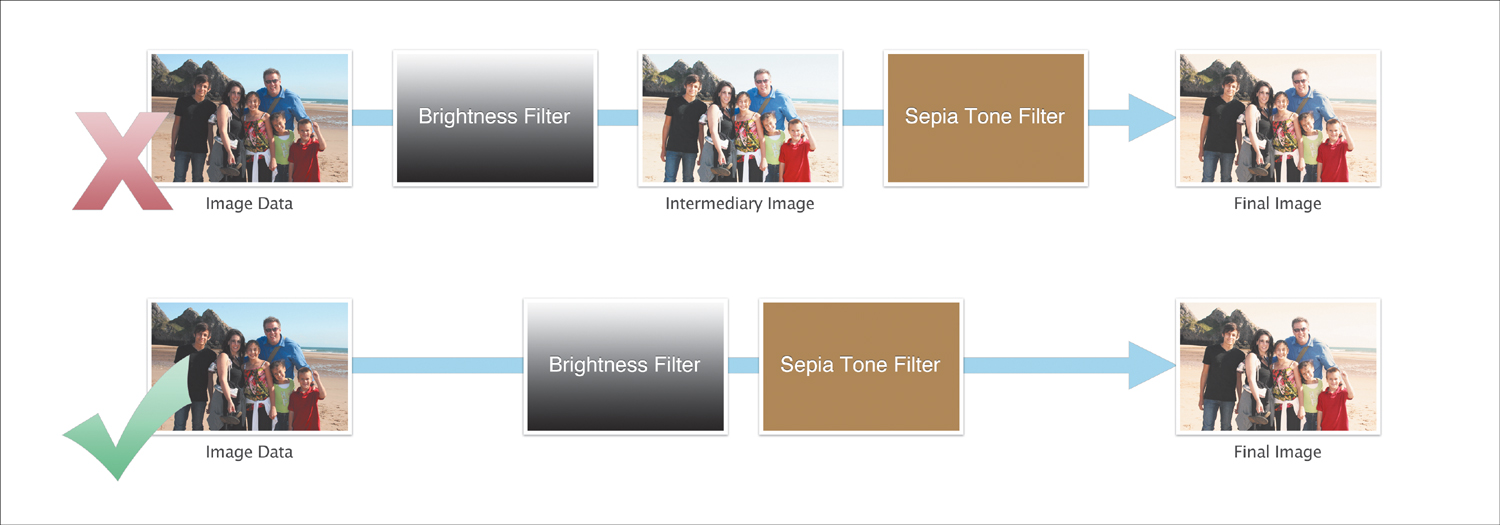
Figure 7.4. Core Image automatically optimizes filter chains by eliminating the need for intermediary steps and concatenating filter operations.
Core Image Context
The Core Image context is used to render a CIImage by applying all of the filters in an associated filter chain. When a new CIContext is created, it’s initialized using either a CPU rendering path or a GPU rendering path. When using the CPU rendering path, iOS will apply the filters to image data using LibDispatch (GCD). This means the processing resources used to render the image are the same processing resources shared by your application’s run loop. When using the GPU rendering path, the CIContext will render images using OpenGL ES 2.0. One of the benefits to using the GPU rendering path is that the CPU is completely offloaded (which means the resources of your application’s run loop are not affected).
This is important because the performance of your app is directly related to the processing resources available to your application’s run loop. If you use up all of these resources in a complex CPU render, your UI will become jerky and non-responsive (or even result in a crash). So you should choose a rendering path based on the needs of your specific task.
CPU vs. GPU Rendering
There are advantages and disadvantages to both CPU and GPU rendering. As with most things, each rendering option has its intended use and practical application. The CPU rendering is very reliable and, in most cases, easier to implement than GPU rendering. Using the CPU rendering path ensures that your app can complete a render process even if the user quits your app—by allowing the process to be handed off to a background task. Because of the nature of a GPU CIContext, rendering done on the GPU cannot be performed as a background process; GPU render operations will be quit when an app enters the background.
GPU rendering, however, offers better performance than CPU rendering. If you’re performing multiple complex image filters, such as in-camera filters and distortions on a video input source, then the GPU is much more qualified to handle the rendering. Not only does GPU perform better than the CPU in complex renders, but by using the GPU you are not using the CPU. It seems obvious, but one of the biggest advantages of using the GPU for rendering is that doing so will offload processes from the CPU freeing up resources for your application’s run loop. One exception is that you should consider using CPU rendering to process a video when saving a file so that the processing can continue if the application quits.
Creating a new CIContext
There are two primary ways to create a new CIContext. Since we know that a context can either be CPU or GPU based, each of these class methods defines the rendering path of the newly created context.
• contextWithOptions:
• contextWithEAGLContext:
In the first class method, we create a new CPU context with a set of options. These options can be nil, or they can be used to define the input color space and working color space. Additionally, while the first method creates a CPU rendering context by default, the options dictionary allows you to define a property that requires software rendering. It’s a good idea to use this option if you’re planning on running your context in the background.
The second creation method returns a CIContext created using an EAGLContext. When using GPU rendering, you must have an EAGLContext set up before you create your CIContext. For those unfamiliar, the EAGLContext is used in OpenGL ES 2.0 drawing. Xcode automatically generates an EAGLContext for you if you create an app based on the OpenGL Game template. Otherwise, it’s assumed that this EAGLContext is ready prior to setting up your CIContext.
The following code block demonstrates how to set up a new CPU rendering CIContext while setting it as an instance variable imageContext.
1 NSDictionary *options = [NSDictionary
dictionaryWithObject:[NSNumber numberWithBool:YES]
forKey:kCIContextUseSoftwareRenderer];
2 CIContext *newContext = [CIContext contextWithOptions:options];
3 [ setImageContext:newContext];
In this short code block we create a new CPU based CIContext. First, in line 1 we set up an options dictionary that requires software rendering. Remember, this options dictionary is optional. In line 2 we create a new CIContext using the options dictionary, but we could have simply passed nil if we didn’t need to specify software rendering required.
While not obvious in this example, there is one point made in this code block that is fairly important. When working with Core Image, you should not recreate a CIContext every time you apply a new filter. Instead, if all of your filters are working with the same rendering path, you should create your CIContext once and then reuse that context to render your images. If you try to recreate the CIContext with every render, you’ll see a significant drain on your application resources. In this code block, we create the CIContext and then set it as an instance variable (line 3).
Rendering CIImages
Once a CIContext is created, rendering images is fairly simple. When working in a CPU context, you can use the CIContext to render a CIImage into a new CGImageRef object. This will automatically apply the filter chain to the CIImage data and return a CGImageRef object that can be used to set up a new UIImage or drawn using Core Graphics. When working with a GPU-based CIContext, an image is rendered by drawing the CIImage and then presenting your OpenGL render buffer.
The example below demonstrates how to use a CPU-based CIContext to return a CGImageRef and then set that CGImageRef as the image of a UIImageView:
1 // Render CIImage through CIContext to CGImageRef
2 CGImageRef cgImg = [self.imageContext createCGImage:coreImage
fromRect:[coreImage extent]];
3 // Set the UIImage of a UIImageView as an image created with
4 // the newly created CGImageRef
5 [.imageView setImage:[UIImage imageWithCGImage:cgImg]];
In line 2 we render the CIImage coreImage through the CIContext self.imageContext producing a new CGImageRef cgImg. Notice that one of the parameters required in the createCGImage:fromRect: call is a CGRect. This rectangle parameter is Core Image’s way of asking us what bounds of the image should be rendered. The extent property of a CIImage defines what is equivalent to a UIView’s bounds. By providing the extent property as our fromRect: parameter, we’re telling Core Image to render the entire image. Finally, in line 5 we use the newly created CGImageRef (returned from the render operation) to create a new UIImage and set it to a UIImageView.
Because GPU rendering requires additional setup of the EAGLContext and additional operations to present the OpenGL render buffer, there wasn’t enough room in this chapter to demonstrate rendering a GPU based CIContext. For an example of GPU rendering, please visit iOSCoreFrameworks.com/download#chapter-7.
Analyzing Images
Core Image provides developers with the APIs needed for filter optimization (auto-enhance) and face detection. For the auto-enhancement algorithms, Core Image will actually return an NSArray of CIFilters that should be applied to your image. Each of these filters will be configured automatically with each input value optimized for the CIImage used in the analysis. Your job, as the developer, is to create the filter chain by applying each CIFilter to your image and then rendering the result.
Face detection, as mentioned, operates as a function of the CIDetector class. When a new CIDetector is created and initialized to detect faces, you can simply call featuresInImage:options: where the options dictionary defines the desired detection accuracy based on low or high—higher accuracy requires more time to process.
The following code block demonstrates how to obtain the return values of these analysis functions:
1 // Create an array of optimized filters
2 NSArray *filters = [coreImage autoAdjustmentFilters];
3
4 // Iterate through all the filters and apply them to our image
5 (CIFilter *filter filters){
6 [filter setValue:coreImage forKey:kCIInputImageKey];
7 coreImage = filter.outputImage;
8 }
9 // Set up desired accuracy options dictionary
10 NSDictionary *options = [NSDictionary
dictionaryWithObject:CIDetectorAccuracyHigh
forKey:CIDetectorAccuracy];
11
12 // Create new CIDetector
13 CIDetector *faceDetector = [CIDetector
detectorOfType:CIDetectorTypeFace
context:.imageContext
options:options];
14
15 NSArray *faces = [faceDetector featuresInImage:coreImage
options:options];
For examples on what you can do with an array of detected features, download the example Core Image editor at iOSCoreFrameworks.com/download#chapter-7.
Notice that creating auto adjustment filters is simply a matter of calling autoAdjustmentFilters on our CIImage object (line 2). If needed, you can also call autoAdjustmentFiltersWithOptions, which allows you to turn off specific enhancements such as color adjustments or red-eye reduction. With no options provided (as in the previous code block), Core Image will automatically enhance with every option enabled. In lines 5 through 8 we iterate through all of the returned filters and apply each filter’s input key as our coreImage object. Notice in line 7 after applying the filter input image we reset our coreImage object to be the output image of the filter. Each time this loop is called (once for each filter), the previous filters are stacked on top of the others creating our filter chain.
Next, lines 10 through 15 perform our face detection. The first thing we do is set up an options dictionary in line 10. Here we’re defining the keys needed for the highest accuracy possible. Remember, the higher your accuracy the more resources needed to perform the detection. So if you’re working with video frames instead of still images, you might want to go with lower detection quality as a trade off for performance.
Once we have the options dictionary created, we set up a new CIDetector object in line 13 providing the parameters for face detection type, an image context, and an options dictionary. In this example, we used an instance variable self.imageContext to create our CIDetector. However, if you don’t have a context set up, you can provide nil for this parameter and iOS will create its own CPU context to perform the face detection. Finally, in line 15 we return an array of detected features (faces) by calling featuresInImage:options: on the CIDetector object.
As a side note, the options dictionary can also define the orientation of an image. This is important because Core Image expects faces to be oriented with the eyes above the mouth. If a face is turned sideways, or your image is not oriented up in relations to the CIImage, then the CIDetector will not detect the feature.
In the example Core Image editor available at this book’s website, we use the detected face features and highlight them as blue in the source image (Figure 7.5).
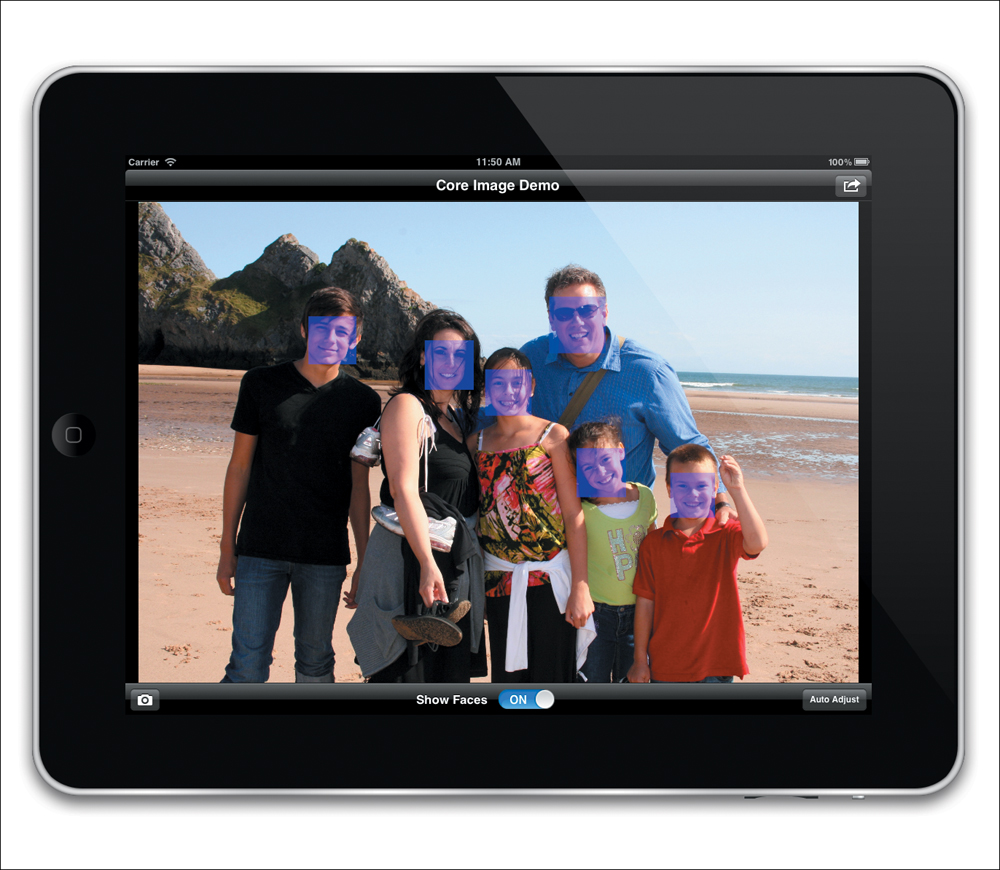
Figure 7.5. Detected CIFaceFeatures highlighted in source image.
Don’t Block the Main Thread!
Remember, even though Core Image is highly efficient on iOS you should still be aware of the impact filter and rendering operations have on your main thread. When working in Core Image, you should always try to push filter operations to a background thread, either using the NSThread class or GCD blocks. When your filter and render operation is complete, you can update your UI by performing a selector on the main thread, or dispatching a new block to the main queue.
The following code block demonstrates how to apply an array of filters to a CIImage, render the output to a CGImageRef, and then use that CGImageRef to create a new UIImage set to a UIImageView. Notice how GCD is used to ensure the resource intensive operations are performed in the background to prevent the app’s UI from locking up.
1 dispatch_async(
dispatch_get_global_queue(DISPATCH_QUEUE_PRIORITY_BACKGROUND, 0),
^(void){
2
3 // Create CIImage from CGImageRef of our UIImageView's image
4 CGImageRef cgImg = .imageView.image.CGImage;
5 CIImage *coreImage = [CIImage imageWithCGImage:cgImg];
6
7 // Iterate through all of our filters and apply
8 // them to the CIImage
9 (CIFilter *filter filters){
10 [filter setValue:coreImage forKey:kCIInputImageKey];
11 coreImage = filter.outputImage;
12 }
13
14 // Create a new CGImageRef by rendering through CIContext
15 // This won't slow down main thread since we're in a
16 // background dispatch queue
17 CGImageRef newImg = [.imageContext
createCGImage:coreImage
fromRect:[coreImage extent]];
18
19 // Dispatch a new process to the main queue
20 dispatch_async(dispatch_get_main_queue(), ^(){
21 // Update our image view on the main thread
22 // You can also perform any other UI updates needed
23 // here such as hiding activity spinners
24 self.imageView.image = [UIImage imageWithCGImage:newImg];
25 });
26 });
In this example we prevent blocking on our main thread by performing all of our CIImage operations asynchronously using GCD. In line 1 we dispatch a new GCD block asynchronously using a background priority queue. Remember, any changes to your UI should be done on the main thread. Since this block will be executed in the background, when it’s done we need to dispatch a new block back to the main queue to perform any UI updates.
In lines 4 and 5 we create a new CIImage from the CGImageRef provider. Next, in lines 9 through 12, we iterate through all of the CIFilters in an array of filters. This array could be provided through the auto-enhance analysis, or through a custom adjustments controller that returns multiple filters. In line 17 we render the CIImage through a CPU-based CIContext into a new CGImageRef.
Finally, once our CIImage is rendered into a new CGImageRef, we dispatch a new block to the main dispatch queue to update our UI (lines 20 through 25). In this example, we simply set the newly created CGImageRef to our UIImageView. However, in a more complex scenario you can also take this opportunity to turn off any activity spinners and re-enable any buttons that might have been disabled at the start of this process.
Because we’re running in a background dispatch queue, requests for resources are made in parallel with the main dispatch queue (which controls our UI). This example is a simple filter operation. In this case, there are enough resources available on the device to satisfy the needs of both the filter operation and the main application run loop. If we were doing a more complex filter operation, however, it’s likely that there would not be enough resources to go around and a background queue would start to affect the main queue’s performance. In this case, we should use a GPU-based CIContext.
You should not attempt to create a new CIContext every time you’re rendering a new CIImage. In this example, we’ve already set up the CIImage context and set it as an instance variable.
Example: Core Image Editor
The background process example we just covered is actually code taken directly from the example Core Image editor available at iOSCoreFrameworks.com/download#chapter-7. You can download this project to see working examples of all the topics covered in this chapter, as well as a few further explanations such as CIVectors, gradients, and GPU rendering.
Because this example project is available for download and marked up with comments, I won’t go into a detailed explanation of how it’s set up. There are a few gotchas though that you should be aware of when creating your own Core Image editor.
As you can see in Figure 7.6, the Core Image editor example offers an adjustments control panel to adjust various filter options in real time on the application’s main image view. This adjustments control panel is built dynamically using the filtersInCategory: call mentioned at the beginning of this chapter. If the adjustments control panel discovers a filter that has input values easily controlled by a slider, then that filter is added to the control panel and a new slider is created based on the attributes dictionary.

Figure 7.6. Example of the Core Image editor, available at iOSCoreFrameworks.com, showing the adjustments control panel.
When you move a slider in the example Core Image editor, the adjustments control panel passes new values back to its delegate (the parent view controller). To avoid the biggest gotcha when working with Core Image, be careful not to over apply filters. Remember that a CIImage includes a filter chain of previous filters, even if you’re applying the same filter twice. If you have a CIImage with a Sepia-tone filter configured at an intensity of 0.5, and your slider adjusts that Sepia-tone filter to 0.6, then that filter should be applied to a new CIImage object.
If you apply the new Sepia-tone filter of 0.6 to the existing CIImage with a Sepia-tone filter of 0.5, Core Image will create a filter chain with two filter objects: the first being a filter with the intensity of 0.5, and the second being a filter with an intensity of 0.6. Both filters are applied when the image is rendered, even though the desired result is a single filter with the value of 0.6.
The next gotcha has to do with trying to apply too many filters too often. When you dispatch your filter operation to the background process queue, iOS lines them up and performs them in the order they were received. If you’re adjusting a filter based on the change events of a slider, know that the slider will generate more events than Core Image can keep up with. So, even though your UI is free from locking up (because the heavy lifting is done in a background queue), the observed application of a filter to your image will be lagged and not appear to track the position of your slider.
Granted, it will only take a few microseconds to apply the filter, but in a real world scenario your slider will generate a new value before a new image is rendered from the previous filter value. These microsecond delays quickly compound into noticeable lag on the observed filter application. In a real-world scenario, you don’t need to apply every minor change in the filter (for example, a Sepia-tone intensity of 0.5 to 0.501) to achieve the look of real-time edits.
Instead of applying a new filter for every new value sent from the change event of a slider, you should set up a simple Boolean instance variable to prevent overworking Core Image. Before dispatching a new process to the background, simply check to see if you’re already processing a filter change. If you are, just ignore the update. It won’t take long for the filter to finish processing and you’ll be able to catch the next update in a continuous slider motion.
The following code example demonstrates how to prevent filter lag by using a Boolean instance variable.
1 // Check to see if we're already working on a filter before
2 // we start working on a new one
3 (!.applyingFilter){
4 dispatch_async(
dispatch_get_global_queue(DISPATCH_QUEUE_PRIORITY_BACKGROUND, 0),
^(void){
5 // Apply filters and render output
6
7 // Dispatch a new process to the main queue
8 dispatch_async(dispatch_get_main_queue(), ^(){
9 // Update our image view on the main thread
10 // You can also perform any other UI updates needed
11 // here such as hiding activity spinners
12 self.imageView.image = [UIImage imageWithCGImage:newImg];
13 // Reset our filter Boolean so the next update is performed
14 .applyingFilter = ;
15 });
16 });
17 }
18 {
19 NSLog(@"Already applying a filter, we'll catch the next one");
20 }
You’ll notice this is the same GCD example from before; we simply added an instance variable to prevent filter lag. Before dispatching our process to the background, we first check to see if we’re already working on a filter (line 3). If we are, then this update is ignored and we jump down to line 18. If we’re not working on a filter, we dispatch a new asynchronous block to the background and handle the filter application in the same way we did in the previous code block.
The important thing to remember when using an instance variable to prevent lag is to switch the instance variable back when it’s finished processing. In our block that’s dispatched back to the main queue, we simply reset our applyingFilter Boolean to NO in line 14. In this example, if a user is continuously moving a slider, our filter will be applied as often as possible throughout the movement of the slider.
Wrapping Up
Core Image offers iOS developers the opportunity to implement some of the most advanced image-processing algorithms available in image editing and image analysis without specialized knowledge. Using Core Image, developers can create apps ranging from a simple photo editor to complex real-time camera filters.
While working with Core Image, it’s important to remember that the CIImage object does not actually manipulate image data until it’s rendered through a CIContext. Depending on the needs of your app, this CIContext can render an image using either the CPU or GPU. Additionally, CIFilters are configured using key-value coding, and the available attributes for a filter are accessed through a filter’s attributes dictionary. Use the attributes dictionary to validate your new values before setting them to your filter, or for configuring your UIControls. Further, you can easily create a filter chain by using the output image of one filter as the input image to another.
Also, don’t block the main thread! Remember to perform your image processing operations in the background using GCD or NSThread operations. Be aware of how fast you’re attempting to apply filters to an image. If you’re receiving updates from a UIControl such as a UISlider, remember that these controls will generate updates faster than you can apply them. To avoid lag, simply set up a Boolean to prevent working on too many updates at once.
Finally, have fun! Image-processing apps like Instagram, Camera+, and 100 Cameras in 1 are some of the most popular apps in the App Store, and Core Image will make these apps of the next generation and beyond even better.