
6. Core Graphics
In the coming chapters, I’ll be discussing the Media layer of iOS, one of the four layers of the architecture we introduced in the first chapter. Remember that Core Data, iCloud, and Core Location, Accounts, and Twitter exist primarily in the Core Services layer. The Media layer is an intermediary layer that communicates information from the Core Services and Core OS layers up to the Cocoa Touch layer (which handles user interaction) and back down again. Core Graphics, the first core framework we’ll cover in the Media layer, is responsible for nearly all drawing operations on the iOS screen. When you create any UI element, iOS uses Core Graphics to draw these elements to the window. By implementing and overriding Core Graphics methods, you can create custom UI elements with text, images, gradients, and shadows.
Getting Started with Core Graphics
Core Graphics should really be looked upon as a third essential framework, alongside UIKit and Foundation.
Core Graphics is a C-based API used for all drawing operations. When you use UIKit to create a button, image, or any other UIView subclass, UIKit uses Core Graphics to draw those elements to the screen. Additionally, UIEvent (the event handling class of UIKit) uses Core Graphics to help determine the location of touches on the screen.
UIKit handles these processes automatically and behind the scenes. This allows developers to rapidly produce common UI elements while working in the higher-level Objective-C framework of UIKit without getting their hands dirty with the lower level C-based API of Core Graphics. However, you’ll discover that sometimes it is very useful to dig down and take advantage of the power of the Core Graphics API directly.
 Note
NoteTheoretically, it’s possible to compile and run an app that doesn’t use Core Graphics. However, doing so would require an app that never uses UIKit—essentially removing any and all user interface elements. Even a simple app that has only a blank UIWindow on the screen will import Core Graphics because of the dependency in UIKit. For this reason, every app in the App Store should include the UIKit, Foundation, and Core Graphics frameworks.
Linking Core Graphics to Your Project
1 #import <CoreGraphics/CoreGraphics.h>

Figure 6.1. Core Graphics framework linked to your Xcode project.
Core Graphics and Quartz 2D
If you’ve worked with iOS or Mac OS X in the past, you’ve probably heard reference to Quartz. Quartz is a general term used to describe multiple technologies implemented across the Media layer in iOS and Mac OS X including graphics, animation, audio, video, and so on. For the purposes of this book it’s important to know the difference between two specific Quartz technologies: Quartz 2D and Quartz Core.
• Quartz 2D is a collection of two-dimensional drawing and rendering APIs used by Core Graphics (covered in this chapter).
• Quartz Core specifically refers to the animation library, APIs, and classes used by Core Animation (covered in Chapter 8).
Often you’ll see the terms Quartz 2D (or simply Quartz) and Core Graphics used interchangeably because they’re so closely associated. The Quartz 2D API is the 2D drawing library behind Core Graphics and exists in both iOS and Mac OS X. This API exists as a part of the Core Graphics framework and is included when you import <CoreGraphics/CoreGraphics.h> to your projects.
Core Graphics, or Quartz 2D, is a two-dimensional drawing environment that allows developers to create custom graphics by drawing shapes, gradients, text, and images to a graphics context for later use.
For further reading on this and other Quartz libraries, check out the iOS reference guides at developer.apple.com or the reference material listed below at iOSCoreFrameworks.com:
• “Core Graphics Overview,”
iOSCoreFrameworks.com/reference#core-graphics-overview
• “Quartz 2D Programming Guide,”
iOSCoreFrameworks.com/reference#quartz-2d
• “Core Animation Programming Guide,”
iOSCoreFrameworks.com/reference#core-animation
Points vs. Pixels
Core Graphics uses a geometric coordinate system where the origin (0,0) is defined as the top left corner of the screen. In this system, the x-axis extends positively to the right, while the y-axis extends positively down.
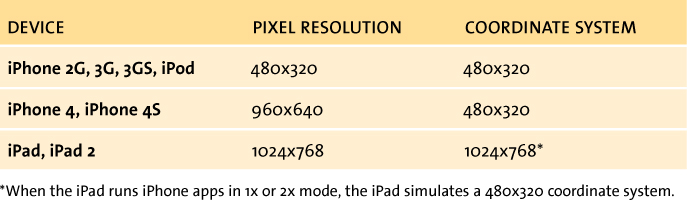
When working with Core Graphics, it’s important to think in points, not pixels. The pixel resolution of iOS devices varies depending on the device hardware. For example, the iPhone 4 introduced the first retina display with a pixel resolution of 960 by 640 (when the device is held in a landscape orientation). This is exactly twice the pixel resolution of previous generation iPods and iPhones (480 by 320).
Even though the pixel resolutions on these devices differ, the coordinate system (in points) remains exactly the same. On a retina display like the iPhone 4, one point is drawn using two pixels. Core Graphics and other iOS APIs draw to the OS point coordinate system, not the hardware pixel coordinate system. Table 6.1 outlines the various pixel and coordinate systems of iOS devices.
Table 6.1. iOS Device Displays and Resolutions (Landscape)
The top half of Figure 6.2 illustrates the observed difference between normal and retina displays.
Figure 6.2. Pixel depth differences between normal (left, top) and retina (right, top) display, along with zoomed-in individual pixels (bottom).
In a point coordinate system, the letter “a” is drawn in the exact same position and size on each device. However, the retina display will use twice as many pixels to draw the curves resulting in the smoother, sharper image. The lower half of this figure zooms in to the individual pixels. In this example we drew a line starting at point (1,2) and ending at point (5,2). This line also is defined with a stroke width of 1 point.
Notice the difference between how each display draws this line. Because a point in the point coordinate system exists where the lines intersect, the normal display is unable to correctly draw a line at 1 point width. Instead, the normal display shows the full pixel at half intensity (because it can’t turn on half a pixel). On the retina display, however, we get a crisper image because of the increased pixel depth.
 Tip
TipWhen drawing with Core Graphics, if you need to draw a straight line or geometric shape with an odd width or height like the example in Figure 6.2, you should offset your coordinate system calculations by .5 point. This will ensure the edge of your line falls in line with the edge of a pixel and reduces aliasing. Of course, if you’re drawing a curve or complex shape, let Core Graphics do the work.
The Graphics Context
Core Graphics works within a graphics context, which acts like a painter’s canvas and serves as a destination for any drawing actions. A graphics context can either be temporary and used to simply display content on the screen, or it can be used to render a more permanent file structure like JPEG images or PDF documents. In fact, Core Graphics has a specially defined graphics context for PDF documents called CGPDFGraphicsContext that gives the context additional functionality including actions like creating page breaks and adding PDF metadata.
You cannot draw outside of a graphics context. Although you can create a graphics context yourself, this process is highly inefficient in terms of performance and memory and should be avoided unless absolutely necessary. Instead, you can retrieve the current context when subclassing a UIView. When you override the drawRect: method in a UIView subclass, iOS automatically (and efficiently) prepares a graphics context for you that is retrieved by calling UIGraphicsGetCurrentContext().
All of this makes Core Graphics ideal for creating custom elements like graphs, charts, or even custom table view cells and views. And because you’re drawing these elements at runtime, they can be completely dynamic unlike static image assets. Later in this chapter we’ll highlight some of the most common uses of Core Graphics.
Why Use Core Graphics?
The obvious question then becomes, why would you ever want or need to draw your own graphics, especially when UIKit efficiently handles most common tasks?
Using Core Graphics appropriately will make your apps faster and more efficient (smaller app binary) while giving you the freedom to use dynamic, high-quality graphics and images not possible with UIKit. With Core Graphics, you can create and transform lines, paths, gradients, text, and images. Using Core Graphics, you draw a custom user interface instead of depending on image assets (PNG files) set as the background of UIKit-based views. This reduces the size of your app binary and adds additional flexibility for high-resolution devices by rendering high fidelity dynamic shapes, text, gradients, and shadows.
Apple demonstrates this point perfectly with iPad apps like Calendar and GarageBand, or iPhone apps like Stocks or Weather (Figure 6.3). In each of these apps, Apple uses Core Graphics to draw custom UI elements like the grid pattern in Calendar or the wave pattern in GarageBand. Additionally, apps like Stocks use Core Graphics to draw charts and graphs while Weather draws custom elements in a traditional UITableView.

Figure 6.3. Custom UI drawn with Core Graphics demonstrated on the iPad and iPhone. From left to right: Calendar, GarageBand, Stocks, and Weather.
Understanding Core Graphics
Because Core Graphics is built directly into the Media layer of iOS, it optimizes the use of graphics hardware where appropriate. This process is completely transparent to the developer and happens automatically making Core Graphics a highly efficient and lightweight tool—perfect for mobile devices. This efficiency allows developers the opportunity to quickly and easily draw new UI elements in a UIView.
Drawing Custom UIViews
The graphics context that Core Graphics works within acts as a destination for drawing actions much like a painter’s canvas. And like a painter’s canvas, drawing actions are performed sequentially with each new action performed on top of the last (Figure 6.4).
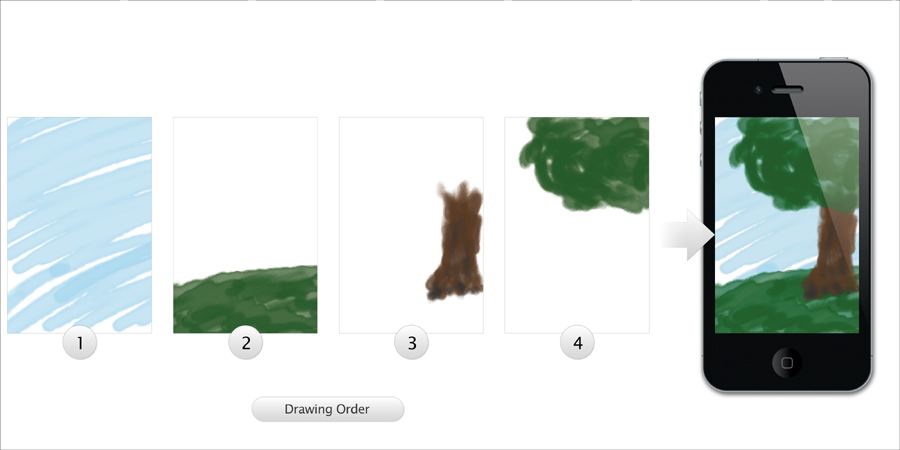
Figure 6.4. Core Graphics drawing order in a graphics context.
The most common implementation of Core Graphics involves overriding the drawRect: method in a UIView subclass. In iOS, a view is a simple UI object that has a defined height, width, location, and opacity. In UIKit, the base object for all views is called UIView. The drawRect: method is called whenever iOS feels the view needs to be refreshed or redrawn. This means drawRect: is called in high frequency, especially during animations and resizing/repositioning operations and should therefore be extremely lightweight. As a developer, you should never call drawRect: from your code directly and you should not allocate or deallocate memory within this method.
Instead of calling drawRect: directly, to refresh a view you should simply call setNeedsDisplay. This will set a flag that tells iOS to call drawRect: on your view at the next available time. In practice, the time difference between calling drawRect: and calling setNeedsDisplay is unnoticeable, on the order of milliseconds. But by allowing iOS to call drawRect: on its schedule, iOS is able to optimize multiple drawing operations simultaneously resulting in increased performance and decreased power consumption—something that is essential on mobile devices.
When you subclass UIView to create custom UI objects, you’re essentially working with a single, blank graphics context. A graphics context has its own set of properties, much like other objects in iOS. Unlike a UIView, however, the properties of a graphics context are state-oriented. This means the results of a drawing action are dependent on the current state of the graphics context at that moment in time. If you change a property between drawing actions, only future results will be affected by the change. Once something is drawn to the graphics context, it’s treated as a flattened image. When drawing with Core Graphics, you’ll encounter the following graphics context properties:
• Path
• Stroke
• Line Width
• Fill Color
• Line Dash
• Shadow
• Clip Path
• Blend Mode
• Current Transform Matrix
To demonstrate how state-oriented properties work in a graphics context, consider this simple example that draws two text strings on the screen.
1 CGContextSetShadow(context, CGSizeMake(5, 5), 2);
2 [@"Hello, Core Graphics" drawAtPoint:firstPoint
withFont:myFont];
3 CGContextSetShadow(context, CGSizeMake(-5, -5), 2);
4 [@"Hello, Core Graphics" drawAtPoint:secondPoint
withFont:myFont];
In this example we set the shadow location of our graphics context to (5,5) with an offset of 2 points (down and to the right). When we draw our text in line 2, it’s automatically drawn with the appropriate shadow. In line 3 we change the shadow from down and to the right to up and to the left. When we draw a new text string in line 4 it’s drawn with the new shadow offset. However, the shadow on the text drawn in line 2 does not change (Figure 6.5)
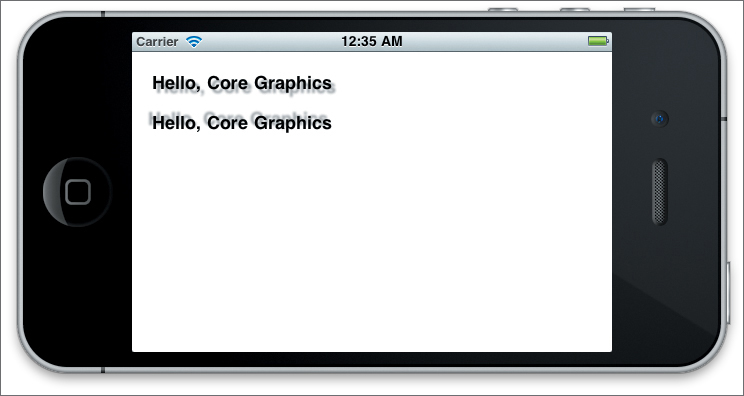
Figure 6.5. Graphics context state-oriented properties.
Graphics Context Stack
Another characteristic of Core Graphics is the graphics context stack. Again, using the painter’s canvas analogy, a graphics context is a flattened image like the painter’s canvas. When a drawing action is performed, it’s done so on a single layer. Unlike Photoshop and other image editing software, the graphics context does not allow you to separate out content into multiple layers.
If you want to have layer-like functionality, consider using the view hierarchy found in UIKit. Instead of trying to handle multiple layers in a single UIView, create separate UIViews for each layer and manage them as subviews of a parent view.
The graphics context stack allows you to save the current state of a graphics context and restore it after certain actions are performed. This is useful for complex drawing operations that require specific properties, or to temporarily clip your graphics context for select actions. You can nest multiple save and restore calls in a single drawRect: method but you should always restore a graphics context at some point after saving it. For performance reasons, you should never leave lingering graphics contexts in the graphics context stack at the end of your method.
This code example demonstrates a simple set of drawing actions. Figure 6.6 illustrates what the result of these actions would be with and without saving and restoring the context state where appropriate. Try not to get distracted with the code specifics. We’ll cover the code responsible for drawing in the next section.
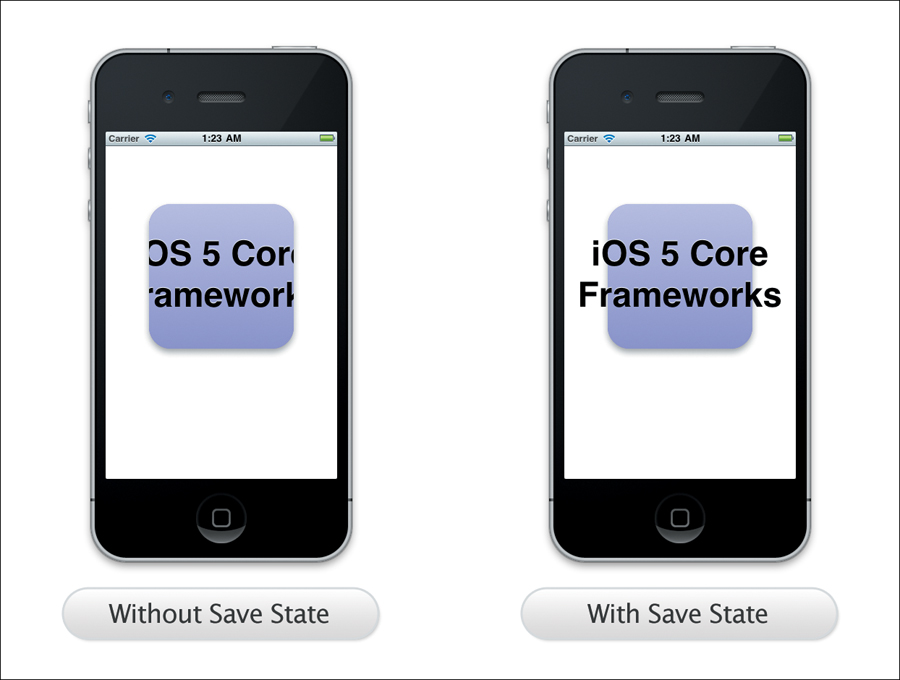
Figure 6.6. Drawing actions performed with and without using the graphics context stack.
1 //Draw rounded rect with shadow
2 CGRect myRect = CGRectMake(60, 80, 200, 200);
3 UIBezierPath *rr = [UIBezierPath bezierPathWithRoundedRect:myRect
cornerRadius:30];
4 CGContextSetShadow(context, CGSizeMake(0, 5), 10);
5 [rr fill];
6
7 //Save the current state
8 CGContextSaveGState(context);
9 //Clip the context to the rounded rect path
10 [rr addClip];
11 //Draw a gradient,
12 //this will be limited to the area of the clipping path
13 CGContextDrawLinearGradient(context, [ gradient], p1, p2, 0);
14 //Restore the context state
15 // This restores the context to before our clipping mask was added
16 CGContextRestoreGState(context);
17
18 //Draw Text
19 CGContextSetRGBFillColor(context, 0, 0, 0, 1);
20 [@"iOS 5 Core Frameworks" drawInRect:CGRectMake(0, 120, 320, 200)
withFont:myFont
lineBreakMode:UILineBreakModeClip
alignment:UITextAlignmentCenter];
In lines 2 and 3 we set up a new Bézier path using the bezierPathWithRoundedRect class method. After creating our path, we set the shadow property of our context in line 4 and we fill the path with a solid color in line 5. At this point, our canvas shows a rounded rect filled with a solid color and a drop shadow. But, we want to fill the rounded rect with a gradient.
The problem is, when we draw a gradient it fills the entire context; you can’t simply fill a path with a gradient like you can with a solid color. Instead, we have to clip our entire graphics context to the path so that when we perform the draw gradient action it only draws within the area of that path. Before we clip our graphics context, though, we save its current state in line 8 (which pushes the current state of our context and its original bounds prior to clipping onto the graphics context stack).
After saving our graphics state, we add a clipping mask (line 10) using the same rounded rect path from before. Next, we draw our gradient (line 13), which will be limited to the area defined by the rounded rect.
In line 16 we restore the graphics context from the graphics context stack to its previous state—in this case to the state in line 8 just before we added our clipping mask. When we draw our text in line 20, because the graphics context state has been restored and the clipping mask is no longer present, the text extends beyond the bounds of the rounded rect.
Looking again at Figure 6.6, notice that if we don’t save our graphics state in line 8 and restore it in line 16, the text gets clipped to the same bounds as the gradient. This is because we added the clipping mask in line 10. Without saving and restoring the graphics state, the text is cut off because our graphics context is still clipped and there is no way to unclip it.
Paths, Gradients, Text, and Images
When working with Core Graphics, you’ll find that everything comes down to paths, gradients, text, and images. When you draw to a graphics context, nine times out of ten you’ll be working with one of these operations. At this point you’ve probably noticed that the Core Graphics API is pretty straightforward. Once you’ve established a graphics context, drawing code can be as complex or as simple as needed.
For a complete set of code recipes demonstrating these drawing tasks, as well as examples on working with PDF documents in Core Graphics, visit iOSCoreFrameworks.com/download#chapter-6.
Paths
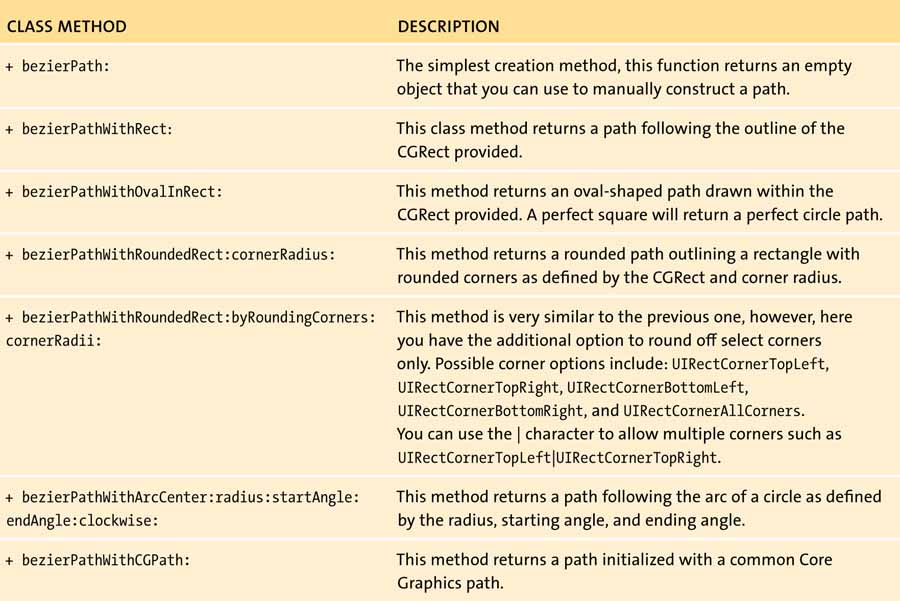
A path is one of the simplest forms of drawing. Remember when you were a kid and you played connect the dots? This is essentially how paths work when drawing in Core Graphics. A path is no more than a series of points that are connected using either straight lines or multiple points calculated over a Bézier curve. There are a couple of ways to work with paths in Core Graphics, but the most useful and straightforward is to use the UIBezierPath object.
The UIBezierPath object is used to define the geometry of a path. As you’ve seen, once your path is defined you can perform actions like fill or stroke (which outlines the path with a line at a fixed width). Additionally, you can perform hit tests within the path, or clip your graphics context to the bounds of the path.
UIBezierPath provides class methods for easy creation. Table 6.2 outlines these class methods and their operation.
Table 6.2. UIBezierPath Creation Class Methods
You can download all of the examples used in this chapter at this book’s website by visiting iOSCoreFrameworks.com/download#chapter-6.
To create a path manually, you simply walk around the desired path using moveToPoint and addLineToPoint, or for more complex operations using addArcWithCenter and addCurveToPoint. This code block demonstrates how to create a simple teardrop shape with a pointed top and a curved bottom as illustrated in Figure 6.7.
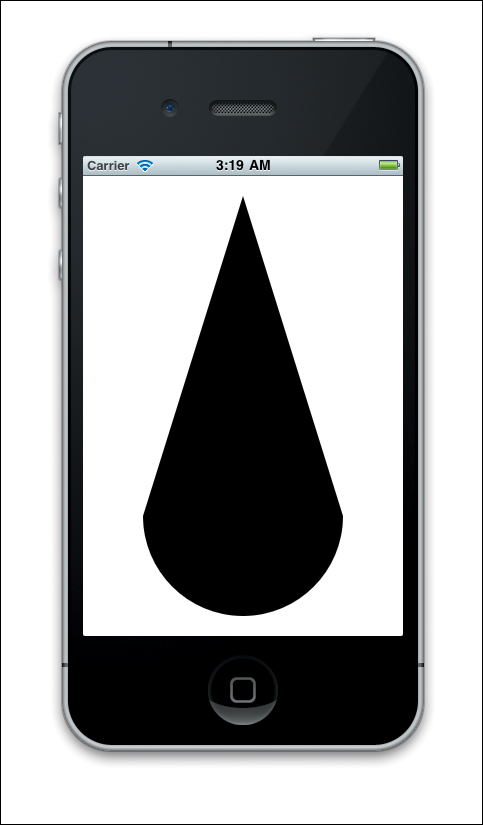
Figure 6.7. A manually created UIBezierPath.
1 UIBezierPath *path = [UIBezierPath bezierPath];
2 [path moveToPoint:CGPointMake(160, 20)];
3 [path addLineToPoint:CGPointMake(260, 340)];
4 [path addArcWithCenter:CGPointMake(160, 340)
radius:100
startAngle:0
endAngle:M_PI
clockwise:];
5 [path closePath];
6 [path fill];
In this example the path starts top center of Figure 6.7 with line 2, moveToPoint. Next, in line 3 we add a line from that point to the start of the curve (bottom right of figure). In line 4 we add a curve that moves clockwise 180 degrees around a circle centered at (260,340). Finally we close the path in line 5, which moves us back to the top center, and fill the path in line 6.
In this example, we moved around the circle in a clockwise fashion. Had we moved around in a counterclockwise fashion, our dip would have been a dent in the cone. When using the arcWithCenter method, pay close attention to the direction in which you move around the circle.
Gradients
At its simplest definition, a gradient is a transition from one color to another over a specified area. Gradients can transition through a series of colors with varying rates of change in a specified direction. When using Core Graphics, you can draw either a linear gradient or a radial gradient.
• Linear Gradient: Changes in color are calculated linearly between stops along a line defined as the start point and end point. If this line is drawn at an angle, the linear gradient will follow along the same path.
• Radial Gradient: Changes in color are calculated linearly between stops along two circles, a starting circle and an ending circle. A center point and a radius define each circle.
The radial gradient is a little more difficult to understand than the linear gradient. To help visualize what’s happening, take a look at Figure 6.8.
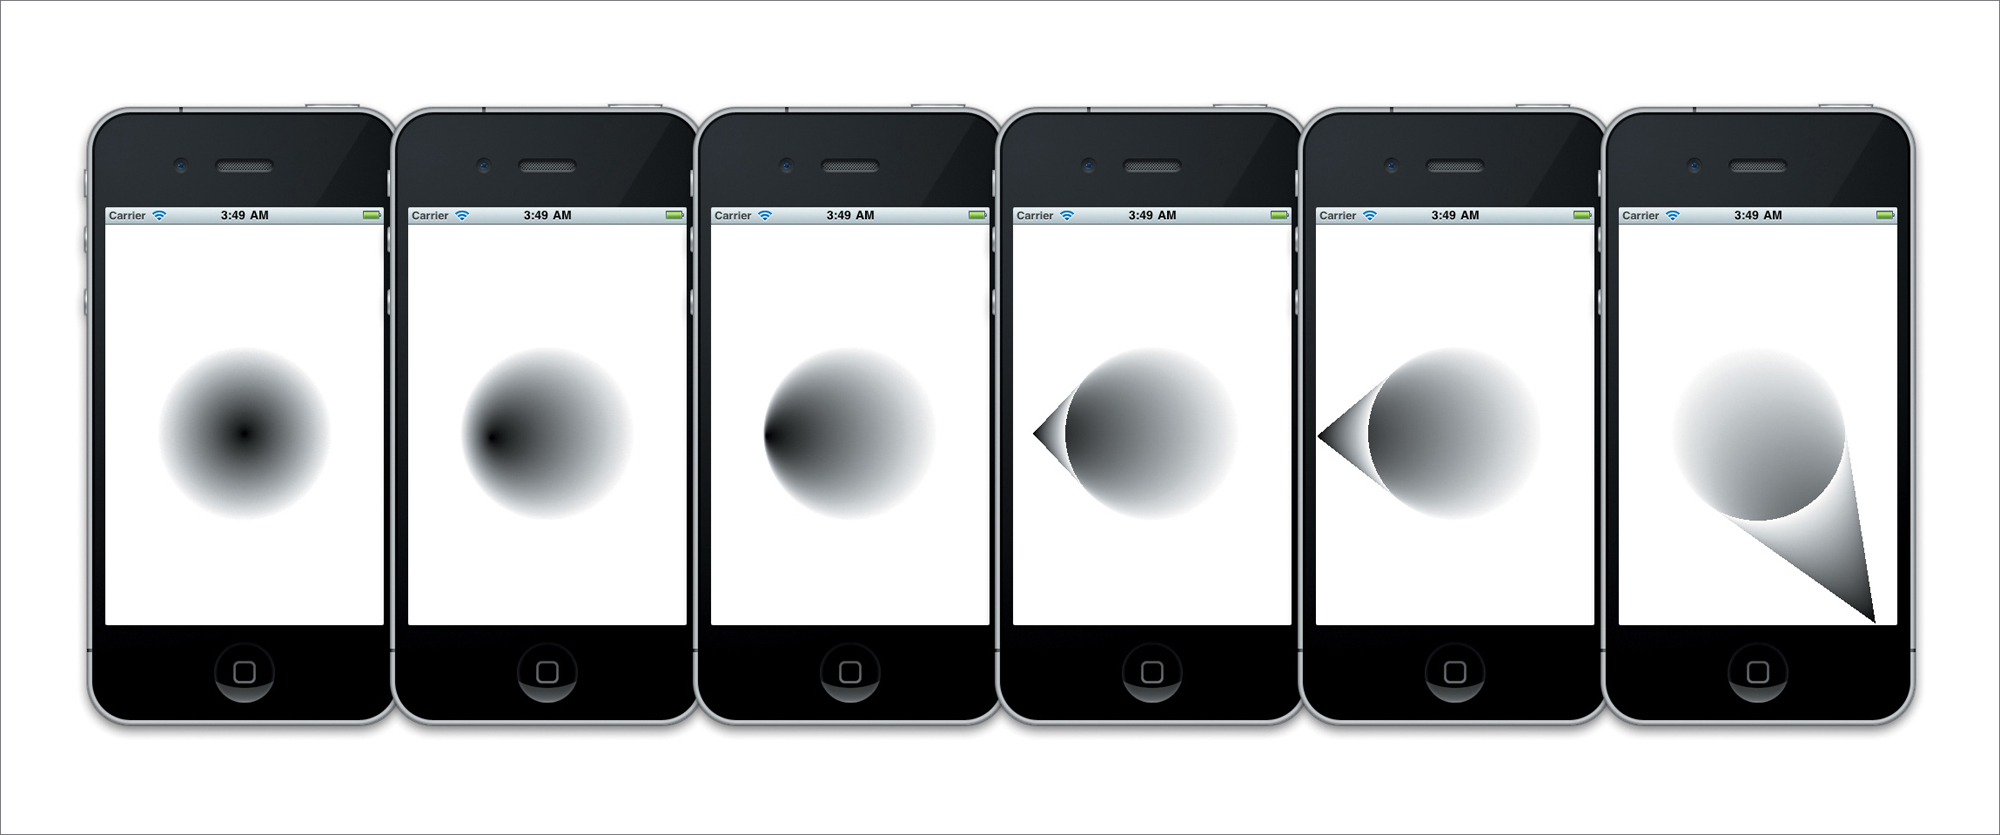
Figure 6.8. A starting circle slowly adjusted with a radial gradient.
In this figure a radial gradient was set up with two circles. The starting circle has a center point at the center of the screen and a radius of 0. The ending circle also has a center point at the center of the screen, but has a radius of 100. As the images move left to right, the center point of the starting circle is slowly moved to the left. You’ll notice when the center point goes beyond the edge of the ending circle, you start seeing what looks like the outside surface of a cylinder.
When working with the radial gradient, it’s best to visualize looking down the end of a cone. As you move the cone around, the shadows inside adjust and if you tip the cone far enough to one side, you start seeing the outside as well.
You can check out Apple’s Quartz documentation at developer.apple.com or iOSCoreFrameworks.com/reference#gradients for more information.
Text
Text is probably one of the simpler drawing techniques when it comes to Core Graphics. Unlike paths or gradients, with text you really only have a few options. You can either draw text at a specified point, or you can draw text to fit in a CGRect. Shadows and other options are dependent on the properties of the graphics context at that time (Table 6.3).
Table 6.3. Text Drawing Operations
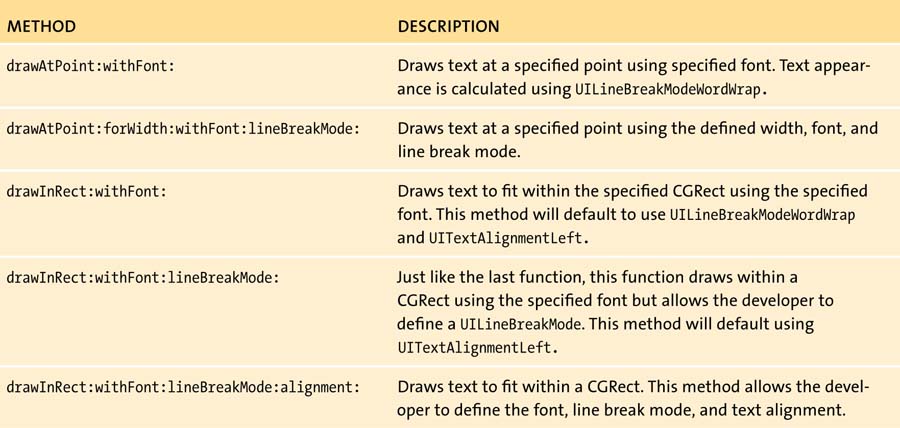
To help with your calculations, the Core Graphics API also provides sizing functions that can be used to determine the appropriate size for a given text string, font, and line break mode. The return values of sizeWithFont, sizeWithFont:forWidth:lineBreakMode:, sizeWithFont:constrainedToSize:, and sizeWithFont:constrainedToSize:lineBreakMode: reflect the appropriate CGSize for a given text string.
Images
Now that we know how to draw primitive shapes and text using paths and gradients, we can start talking about images. First, it’s important to note that if you simply need to display an image, the UIImageView class is much more efficient and should be used whenever possible. You should only use images in Core Graphics when you’re doing so as part of a larger custom UI element or creating an image mask.
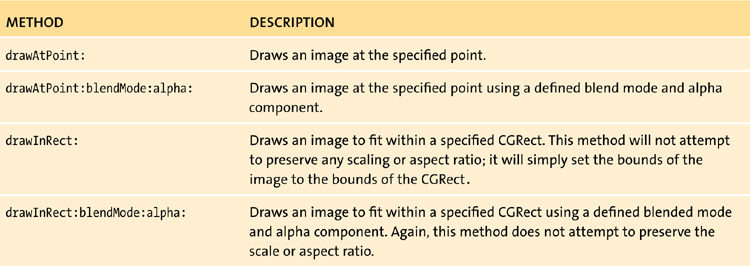
Just like with text, drawing images can be done simply using drawAtPoint or drawInRect methods. The key difference with drawing images in Core Graphics and setting an image to a UIImageView is that Core Graphics makes no attempts to preserve the scale or aspect ratio of an image. If you call drawInRect, Core Graphics will set the bounds of your image to the CGRect regardless of how it may distort things. Table 6.4 highlights the key drawing methods used for images.
Table 6.4. Image Drawing Methods
While Core Graphics lets you use various blend modes when working with images and gradients, you’ll find that it’s not the most efficient operation in iOS. Using complicated blend modes in the drawRect: method can really slow things down quickly. Instead, we’re going to take advantage of the new Core Image framework in the next chapter to learn how you can use blend modes to apply live filters to your images. The concepts, however, are the same and you can take the theory of blend modes from Core Image and apply them to these Core Graphics APIs.
Wrapping Up
Using Core Graphics you can create extremely efficient and high quality apps. When used properly, Core Graphics will speed up your app at runtime and decrease the size needed for the app binary. Core Graphics lets you draw in a graphics context powered by Quartz 2D and makes it easy to draw paths, gradients, text, and images. With Core Graphics you can generate dynamic graphics and charts at runtime, or save out files such as JPEG images and PDF documents. Because Core Graphics is used to draw all graphics to the screen of an iOS device, and because you as a developer have direct access to the same APIs used by Apple engineers to create native iOS apps, Core Graphics truly cements itself as one of the iOS core frameworks.
Visit iOSCoreFrameworks.com/reference#chapter-6 to find additional material referred to throughout this chapter. Also, you can download full working projects for all of the code samples used in this chapter and additional Core Graphics recipes at iOSCoreFrameworks.com/download#chapter-6.