
5. System Accounts and Native Twitter APIs
With iOS 5, Apple introduced two entirely new frameworks to the iOS SDK: Accounts and Twitter. These frameworks are designed to reduce the amount of code and complexity needed to create apps that interact with external authentication services and APIs. With the initial launch of iOS 5.0, Apple primed this infrastructure to support the management of system-type accounts, particularly accounts that interacted with the OAuth-based Twitter API. Starting in iOS 5, you no longer need to depend on external libraries or self-implemented solutions for interacting with Twitter’s API. Instead, using the native Twitter and Accounts frameworks you can seamlessly interact with the Twitter API while your users observe a single sign-on experience from app to app.
Getting Started with System Accounts and Twitter
The Accounts framework manages all of the accounts a user has added to their device. Each of these accounts is defined by an account-type property. Because the Accounts framework is new to iOS 5, at the launch of iOS version 5.0 there is only one type of system account available, Twitter. It’s expected, however, that because of how the Accounts framework is designed, Apple will eventually include additional account types in future iOS releases.
The goal of this chapter is two-fold. First, we’ll discuss how the Accounts framework is set up and how it can be used in combination with Twitter’s API. Next, we will interact with the Twitter API through the Twitter framework using credentials stored in the Accounts framework.
Linking Accounts and Twitter frameworks to your project
1 #import <Accounts/Accounts.h>
2 #import <Twitter/Twitter.h>
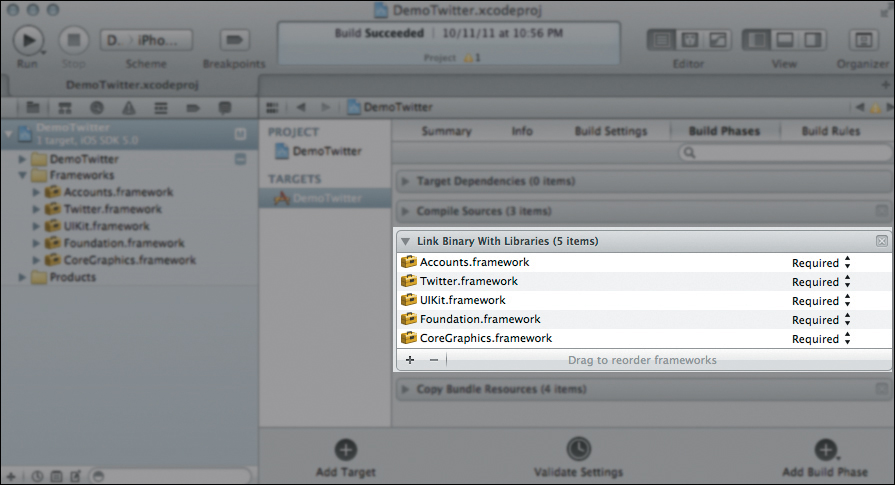
Figure 5.1. Accounts and Twitter frameworks linked to your Xcode project.
Understanding OAuth Services
OAuth, for those unfamiliar with it, is an authentication service for web APIs that does not require applications to store username and password pairs. Instead, users grant an application access to a particular service. The application can then act on behalf of the user with respect to that service. When a user grants this access, the application is provided an access token that developers can use to sign requests on behalf of the user. This token is only valid within the context of that particular application and developers never gain access to the user’s authentication credentials.
If you’ve used a Twitter app in the past, you’ve probably noticed this behavior. When an app wants to interact with an OAuth service, the user is typically redirected to a web page (or modal web page on a mobile device) managed by that service. That service—such as Twitter or Facebook—will then tell you that Application X wants access to your account with permissions to perform actions A, B, and C. When you say yes, these web services send a validated request token back to the app that can be exchanged for an access token. Once an app has obtained an access token, all future requests to protected services can be accessed by signing the request with that token (Figure 5.2).
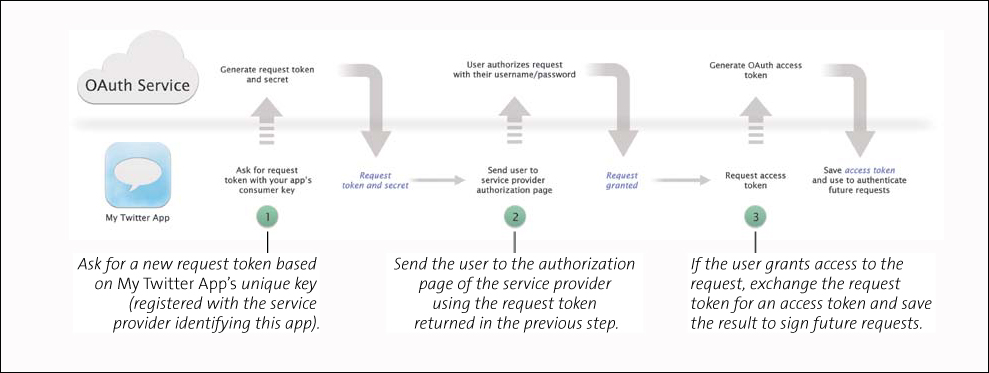
Figure 5.2. The OAuth workflow diagram.
The Accounts Workflow
The Accounts framework provides this seamless integration with web services by acting on behalf of your application when dealing with necessary authentication signing and callbacks. Using new APIs available in iOS 5, the Accounts framework will automatically handle the OAuth handshake, which significantly reduces the complexity of your app. With a single method, developers can generate an OAuth access token for their app based on system accounts stored on the device (Figure 5.3).
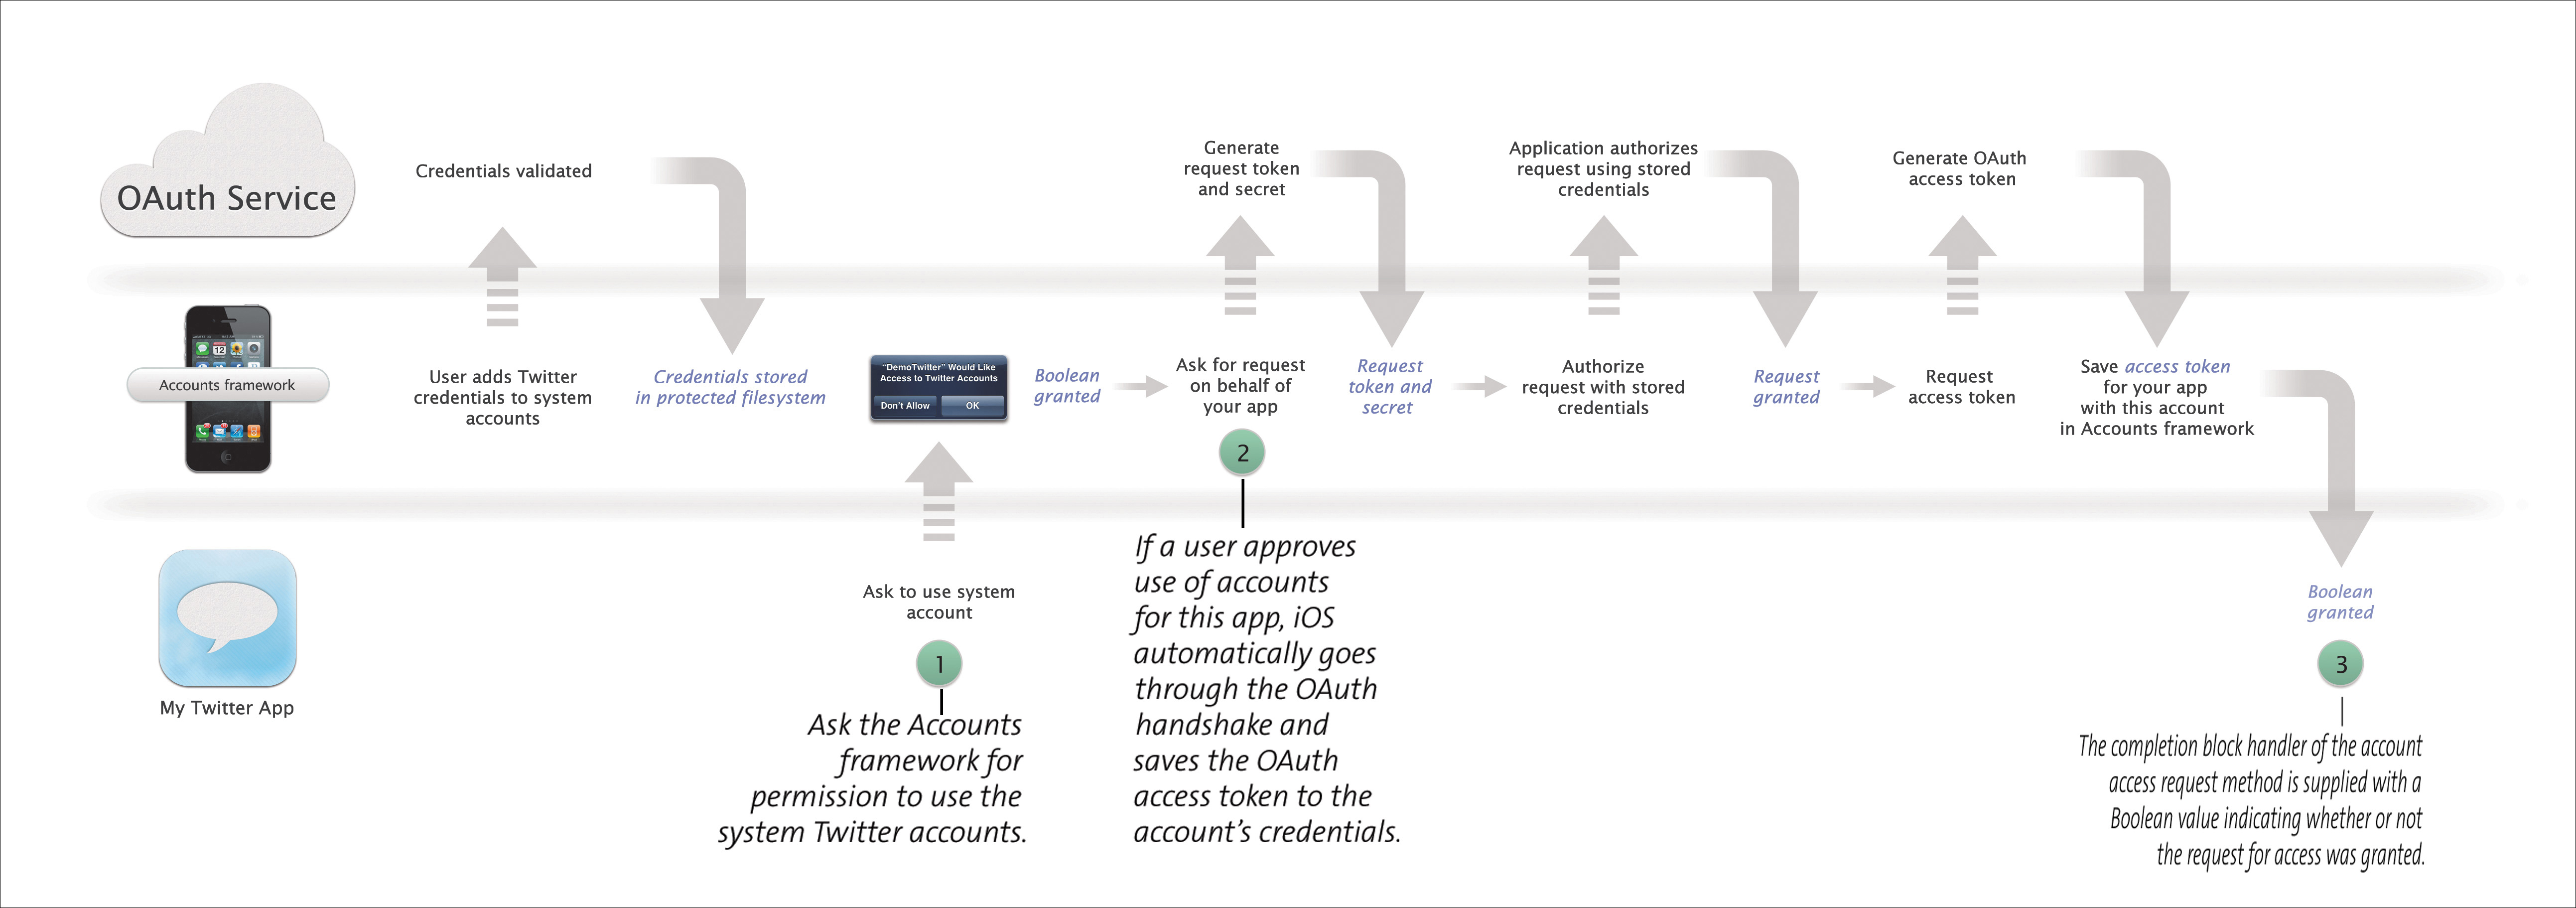
Figure 5.3. Obtaining an OAuth access token for your app using the Accounts framework.
Notice in this diagram that users can add their credentials to the system before your app is launched. This is done through the Settings app in iOS 5 and allows multiple applications to use the same stored username and password. When a user enters their username and password to the Settings app, the credentials are validated with the service provider and stored in the protected file system. Again, as a developer you do not have access to the username and password pair.
As you can see in Figure 5.3, once permission is granted to your app to use a system account, iOS acts on your behalf and obtains the OAuth access token from the service provider. This OAuth access token will be saved to the ACAccount object in the accounts database. Once this token is saved, you cannot access it as a developer. Instead, you will use a reference to this ACAccount object (which contains the access token) to sign API requests, but more on that later.
 Note
NoteIf your app asks the Accounts framework for permission to use an account of a type that is unavailable (for example, the user has not added an account for that type to the Settings app), then iOS automatically directs the user to the Settings app where they can enter new account information.
Using the Accounts Framework
As mentioned, the Accounts framework is used to store and manage system accounts. This framework is made up of four simple classes:
• ACAccountStore
• ACAccount
• ACAccountType
• ACAccountCredential
The beauty of the Accounts framework is that while new apps can easily access system accounts stored on a device, existing apps (apps that already implemented a Twitter OAuth solution on their own) can easily migrate their user’s accounts into the Accounts framework.
 Tip
TipRemember, as of iOS version 5.0 there is only one ACAccountType: a Twitter account type with the identifier ACAccountTypeIdentifierTwitter.
You can download complete projects of the following samples and all of the samples used in this chapter by visiting iOSCoreFrameworks.com/download#chapter-5.
New Apps and the Accounts Framework
The steps for interacting with the Accounts framework are remarkably straightforward. Remember, when your app asks permission to use system accounts, it presents an obtrusive dialog informing users of the request. For this reason, it’s best to wait until your app actually attempts to use Twitter instead of handling at launch in a method like applicationDidFinishLaunching.
Once you’re ready to access the Accounts framework, follow these two steps:
1. Allocate a new ACAccountStore.
2. Request permission from the ACAccountStore to use accounts for a specific type.
In Step 2, a request is made to the account store with a configured completion handler block. When the request is finished, the account store passes a Boolean value to this completion block that indicates whether or not the request was granted as well as an NSError object to indicate if there were any errors. The following code block demonstrates how to request access to Twitter accounts stored in the Accounts framework.
1 // Create a new account store
2 store = [[ACAccountStore alloc] init];
3 ACAccountType *twitterType =
[store accountTypeWithAccountTypeIdentifier:
ACAccountTypeIdentifierTwitter];
4
5 // Request Access for Twitter Accounts
6 [store requestAccessToAccountsWithType:twitterType
withCompletionHandler:^( granted, NSError *error){
7 (granted){
8 // Handle Granted condition
9 }
10 {
11 // We didn't get access, output why not
12 NSLog(@"%@",[error localizedDescription]);
13 }
14 }];
In line 2 of this code block, we create a new ACAccountStore by simply calling its init method. In line 3 we obtain the ACAccountType from that store using the identifier ACAccountTypeIdentifierTwitter and store it as the variable twitterType. At the release of iOS version 5.0, this is the only ACAccountTypeIdentifier available. Next, because permissions to use an account are managed by the account type, in line 6 we request access for all of the accounts with the type matching our twitterType variable.
Immediately after this call, iOS will prompt the user and ask for their permission to access system accounts. If granted, iOS will then asynchronously obtain the OAuth access tokens from each account on behalf of your application. Finally, when the tokens are obtained iOS calls the completion block identified in lines 7 through 14. In this completion block, we simply handle different conditions based on the result of granted.
It’s important to notice that lines 7 through 14 are executed in the completion block handler. Because of the nature of Grand Central Dispatch (GCD), this block is not guaranteed to execute on the main thread. If you want to enable or disable UI elements from this block or interact with your main application, you should dispatch this process to the appropriate thread using GCD. A complete example of how to handle this condition is demonstrated in the following section.
Accessing Accounts in the Accounts Framework
When you allocate a new ACAccountStore, iOS does some behind-the-scenes work to populate that store with all of the accounts available on the device. Even though the store is populated with accounts, however, your app does not have direct access to the accounts in the protected file system. Instead, iOS passes the data through a secure process called accountsd. This process helps ensure that each app has access to its own account store with mediated access to the secure Accounts framework database. As the arbiter between apps and the Accounts framework database, the accountsd process also maintains strict separation between apps (Figure 5.4).
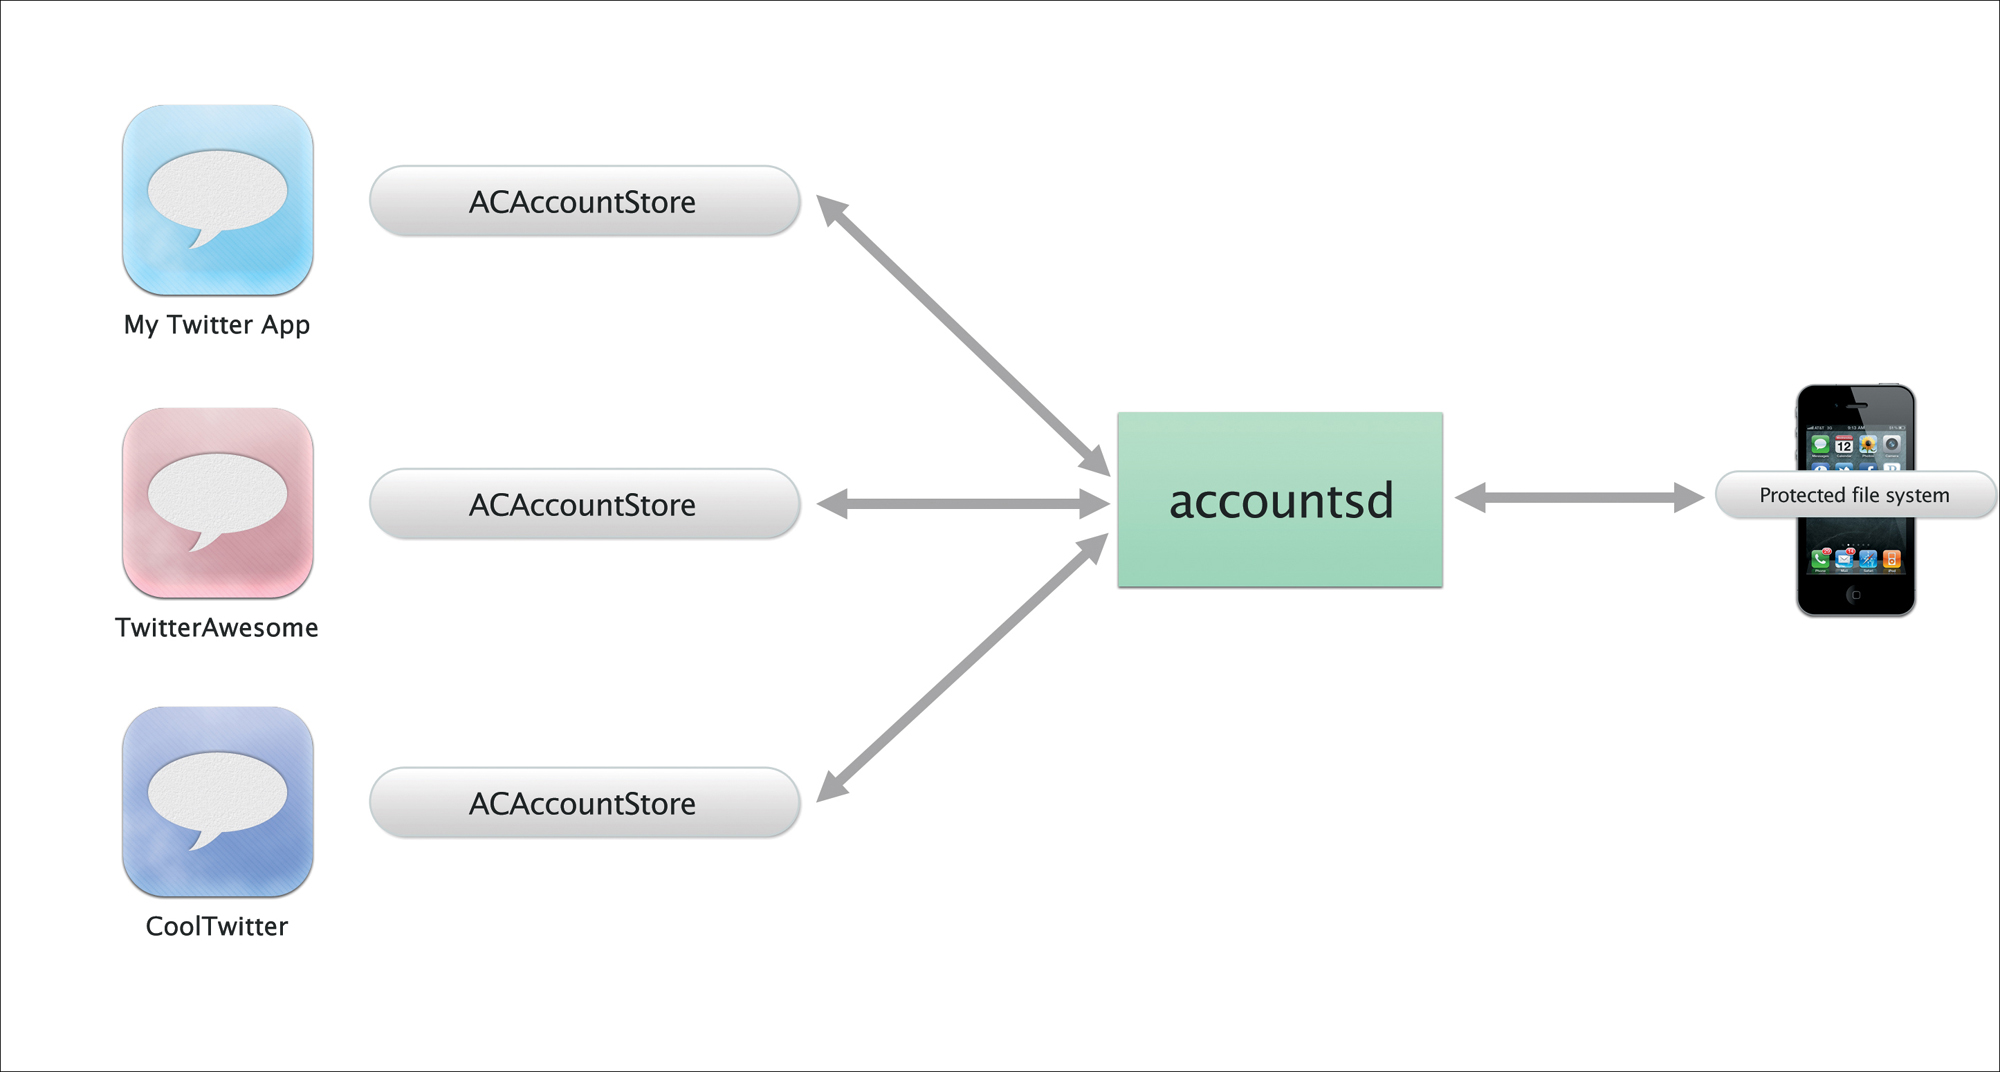
Figure 5.4. Visual representations of multiple ACAccount-Stores used in various apps.
It is also the accountsd process that retrieves available accounts and populates the store when a new ACAccountStore is created. Every ACAccountStore manages an array of ACAccounts (in that store) and each ACAccount in this array manages properties for the account type, account identifier, account description, and account username.
Remember that access to an account is controlled by the account type. Each ACAccount has an ACAccountType, and each ACAccountType manages a Boolean property accessGranted. When our store is freshly created, before we ask for permission to use it, every ACAccount in that store has an ACAccountType where accessGranted is set to NO.
Using what we know about the accessGranted property of ACAccountType, you can easily determine if you have access to a particular account by using someAccount.accountType.accessGranted.
After obtaining permission to access account types in an ACAccountStore, the Accounts framework updates all accounts for that type to accessGranted equals YES.
To retrieve an account from the store, you can either query the store for a specific account identifier, or simply pull a reference to the NSArray containing all accounts for a specific type (presumably, the type you requested permissions for). Remember, the Accounts framework supports multiple accounts for multiple account types. This means someone could add any number of Twitter accounts to their device; therefore, when retrieving accounts it’s important to know which account you’re using and which account to sign requests with.
The account identifier is automatically assigned by iOS when the account is added to the accounts database. This identifier is a GUID (Globally Unique Identifier) and is represented by a 32-character alphanumeric string.
The following code block demonstrates how to retrieve accounts from the account store. In this example, the variable twitterType is an ACAccountType initialized with the identifier ACAccountTypeIdentifierTwitter. This code block also assumes you have already requested and received permission to use the Twitter ACAccountType.
1 NSArray *accounts = [store accountsWithAccountType:twitterType];
2 (ACAccount *account accounts){
3 NSLog(@"%@",[account username]);
4 NSLog(@"%@",[account accountDescription]);
5 }
In line 1 we use ACAccountType for Twitter to pull out of all of the accounts from our account store. Then in lines 2 through 5 we iterate through these accounts and print out the account username and account description. You could use this accounts array as the data source of a UITableView (to provide a list of available accounts) or in a UIPickerView presented as an action from a UIButton. Later, we’ll use individual accounts in this array to sign requests made to the Twitter API through the Twitter framework.
For Twitter accounts, the account description will default to @some-username. You should not, however, depend on this functionality because users can easily change their account description in the Settings app.
Migrating Users from Existing Apps into the Accounts Framework
Let’s say you have a production app with users, built using a separate OAuth library. In this case, you’ve already built or implemented a mechanism for handling the OAuth access token handshake and are storing your token and secret somewhere on the device. You then use this token to sign your own requests and interact with the Twitter API. Wouldn’t it be great if there were an easy way to migrate those access tokens into the Accounts framework? Fortunately, there is!
Using the Accounts framework, you can migrate your existing user authentication data into an account store and save the data to the protected file system; however, the bridge to the Accounts database is one-way. Once an account is saved to the Accounts database, it becomes read-only and the accountsd process manages all access.
The following code sample demonstrates how to migrate an existing account into the Accounts database. In this example, let’s assume your app stored the token and secret needed for the OAuth access handshake—which you should have somewhere if you’re working from an existing OAuth app. Remember, the only reason you ever need to programmatically create an account is if you have existing user authentication data.
If you do not have access to a saved access token for existing users, then you should just treat your app as a new app and use the example in the previous section.
1 // Create a new account store
2 store = [[ACAccountStore alloc] init];
3
4 // Create our Twitter account type
5 ACAccountType *twitterType =
[store accountTypeWithAccountTypeIdentifier:
ACAccountTypeIdentifierTwitter];
6
7 // Create new credentials using our saved token and secret
8 ACAccountCredential *newCreds = [[ACAccountCredential alloc]
initWithOAuthToken:myToken tokenSecret:mySecret];
9
10 // Create a new AC Account and set the type and credentials
11 ACAccount *newAccount = [[ACAccount alloc] init];
12 [newAccount setAccountType:twitterType];
13 [newAccount setCredential:newCreds];
14
15 // Save the new account to the account store
16 [store saveAccount:newAccount
withCompletionHandler:^( success, NSError *error){
17 (success){
18 // Handle Success
19 }
20 {
21 // Handle Failure
22 NSLog(@"%@",[error localizedDescription]);
23 }
24 }];
In line 2 we simply create our new ACAccountStore followed by line 5 where we obtain a reference to our Twitter account type. Next, in line 8 we create a new ACAccountCredential object using our saved token and secret. In lines 11 through 13 we create a new ACAccount object and set the type and credentials. Finally, in line 16 we save the account to the account store.
Once we save the account, iOS asynchronously attempts to authenticate to the account type service provider using the credentials provided. If the authentication is successful, the account is saved to the accounts database and the completion handler block (lines 17 through 24) is called with the success Boolean set to YES. If the authentication fails, or for some reason iOS is unable to save the account, the completion handler block is called with the success Boolean set to NO and the account is discarded.
Just as before, the completion block in this method executes on an arbitrary thread; if you plan on updating your UI based on the success or failure of this method, you need to make sure to dispatch that process using GCD in the main thread queue.
Special Considerations
There are a few things to take into account when working with the Accounts framework. First, as you’ve seen in the code samples the Accounts framework is highly dependent on completion block handlers executed using GCD. Next, you must observe special notifications when an account changes. And finally, it’s important that you do not attempt to access accounts from one account store using the account information in another account store.
Executing Code on the Main Thread from Completion Block Handlers
As you know, completion blocks are not guaranteed to execute on the main thread. If you need to update your UI because of the conditions of these blocks, it’s a good idea to either dispatch a new GCD process to the main thread, or to use performSelectorOnMainThread. The following code sample demonstrates both of these techniques in the completion block of our request access method.
1 [store requestAccessToAccountsWithType:twitterType
withCompletionHandler:^( granted, NSError *error){
2 (granted){
3 //Update UI using perform selector
4 // This method calls an update method on this view
5 // controller on the main thread
6 [ performSelectorOnMainThread:
(updateUserInterface)
withObject:
waitUntilDone:];
7 // Update UI using GCD dispatch on main queue
8 dispatch_async(dispatch_get_main_queue(), ^(){
9 [ updateUserInterface];
10 });
11 }
12 }
13 ];
You’ve seen this code block before; only this time we update our UI on the main thread. Just like last time, we’re requesting access to accounts in the account store with the ACAccountType twitterType. When the request is completed, iOS calls the completion block handler. This completion block handler is represented in lines 2 through 12. There are actually two calls in this handler; both do the exact same thing but use different techniques. The first call, line 6, uses the performSelectorOnMainThread method to update the user interface. The second call, lines 8 through 10, uses GCD to dispatch a new process on the main queue. Because the completion block handler will be executed on an arbitrary thread, when we update our UI we must use one of these two techniques.
You can download this example and all of the samples used in this chapter by visiting iOSCoreFrameworks.com/download#chapter-5.
Observing Account Database Change Notifications
Another condition you need to consider when working with system accounts is what to do when account credentials are changed (or your access is disabled). This situation could occur either because someone removes his or her account from the device entirely, or because someone removes your app’s access—either of which will generate a notification.
When the accounts database issues a change, it generates the notification ACAccountStoreDidChangeNotification. You should always observe this notification in your app and monitor any changes to the accounts database. If you catch this notification, you should consider any accounts you have retained invalid and refresh them through a new account store. The following code block demonstrates how to add an observer to the notification “account store did change” notification. In this example, when the notification is generated, it will call the method accountsDidChange: on the object self where we can handle refreshing our accounts and account stores.
1 [[NSNotificationCenter defaultCenter]
addObserver:
selector:(accountsDidChange:)
name:ACAccountStoreDidChangeNotification
object:];
Maintaining Account Store Separation
You know that each account has a unique identifier. You might think that you could create an account store, retrieve and save off some account information, and then discard your reference to that store. Later down the road, (you think) you might create another account store and attempt to access a specific account using the information you obtained earlier.
Wrong. You should never use the accounts from one store to access or interact with the accounts from another. If you want to save off an account for later use, you should maintain a reference to the account store that provided you with that account because the values of the account store can change from store to store (identifiers, accessGranted, and so on).
For more information on the Accounts framework, visit developer.apple.com or iOSCoreFrameworks.com/reference#accounts.
Easy Twitter: Tweet Compose View Controller
In the next two sections you’ll use what you’ve learned from the Accounts framework and apply it to interacting with the Twitter REST API through the native Twitter framework. There are two ways you can do this. You can either use the native UITweetComposeViewController, which is a subclass of UIViewController that operates as a drop-in status update view controller, or you can build your own requests using the TWRequest class. The first technique we’ll cover is the tweet compose view controller (Figure 5.5).

Figure 5.5. The tweet compose view controller.
The following examples require the framework Twitter.framework be linked to your Xcode project and imported to the appropriate header files.
Using the Tweet Compose View Controller
The tweet compose view controller is designed to be as painless as possible. You can use it without importing the Accounts framework or interacting with an ACAccountStore. When you’re working with the tweet compose view controller, it’s a completely self-contained status update view controller.
Using the TWTweetComposeViewController typically involves four steps—five if you count a step zero, checking to see if Twitter is available.
0. Check to see if the TWTweetComposeViewController can send tweets.
1. Create a new TWTweetComposeViewController.
2. Attach any images, links, or initial text.
3. Set up a completion handler block.
4. Present the TWTweetComposeViewController.
The following code block demonstrates how to create and present a new TWTweetComposeViewController.
1 // Create a new tweet compose view controller
2 TWTweetComposeViewController *tweet =
[[TWTweetComposeViewController alloc] init];
3
4 // Attach various objects to our tweet
5 // Each add method returns a BOOL indicating
6 // the success (e.g., tweet is already too long)
7 // If the add method returns NO, output a message
8 (![tweet setInitialText:@"iOS 5 Core Frameworks"])
9 NSLog(@"Unable to add text");
10 (![tweet addURL:myURL])
11 NSLog(@"Unable to add URL");
12 (![tweet addImage:myImage])
13 NSLog(@"Unable to add Image");
14
15 // Set up a completion handler to output a log
16 // message for each condition of the result
17 TWTweetComposeViewControllerCompletionHandler handler =
^(TWTweetComposeViewControllerResult result){
18 (result){
19 TWTweetComposeViewControllerResultCancelled:
20 NSLog(@"Tweet Cancelled");
21 ;
22 TWTweetComposeViewControllerResultDone:
23 NSLog(@"Tweet Completed");
24 }
25 [ dismissViewControllerAnimated: completion:];
26 };
27
28 // Add our custom handler to the tweet compose view controller
29 [tweet setCompletionHandler:handler];
30
31 // Present the tweet compose view controller
32 [ presentViewController:tweet animated: completion:];
In line 2 of this code block we create a new TWTweetComposeViewController, followed by lines 8 through 13 where we attach various media objects. Notice how these add actions are wrapped inside an if() statement. Since Twitter messages are limited to 140 characters, when you programmatically set the message of a TWTweetComposeViewController, if the message body becomes longer than 140 characters, these add methods will fail and return a Boolean NO. In lines 8 through 13, we’re catching that NO condition and printing a message to the logs.
Note that you can only programmatically change a tweet message using setInitialText, addImage, and addURL before a tweet compose view controller is presented. Once the view controller is presented as a child view controller, these methods will always return a failed condition. You cannot programmatically change the TWTweetComposeViewController message after the view controller is presented.
The tweet compose view controller will automatically handle uploading images to the Twitter image hosting system and shortening of URLs. Simply attach these objects to the tweet compose view controller and you’re set.
Next, in lines 17 through 26 we set up the tweet compose view controller completion block handler and in line 29 add it to the tweet compose view controller. This block is configured with a TWTweetComposeViewControllerResult parameter that tells our block under what conditions the tweet compose view controller dismissed. By default, this block will simply call a dismiss action on the view controller. If you override this block, be sure to dismiss the view controller as we did in line 25.
Finally, in line 32 we present our tweet view controller as a child view controller. Remember the TWTweetComposeViewController is designed to present modally. You should not attempt to push this controller onto a navigation stack or contain it within a UIPopoverController. If you need Twitter functionality within either of these contexts, you should create your own update status controller using the TWRequest method described in the next section.
Notice this code block does not contain references to any ACAccounts or ACAccountStores. In fact, this entire code block will execute without the Accounts framework linked to your project. That’s because the TWTweetComposeViewController handles all of the interactions with the accounts database on your behalf.
Step 0, not show in this code block, can be used in a method like viewDidLoad to determine whether or not your UI should display relevant Twitter buttons (like a Compose button). Using the class method canSendTweet, implemented by TWTweetComposeViewController, we can easily check if Twitter is available.
1 ([TWTweetComposeViewController canSendTweet]){
2 // Set up UI to handle Twitter functions
3 }
You can download complete projects of these samples and all of the samples used in this chapter by visiting iOSCoreFrameworks.com/download#chapter-5.
Interacting with the Twitter API
Note: This section deals heavily with the Twitter API. For more information and complete documentation on the Twitter API, its functions, and required parameters, visit iOSCoreFrameworks.com/reference#twitter-api or dev.twitter.com.
As we learned in the first section, the Twitter REST API is OAuth-based. While the TWTweetComposeViewController is great for working with simple “compose tweet” operations, the TWRequest class is designed to handle any Twitter API call and is flexible enough to handle new API calls added by Twitter (for example, new features added) without an Apple re-release of the framework.
Creating a TWRequest Object
The TWRequest object manages a request URL, a dictionary of parameters, and an HTTP method (GET, POST, or DELETE). Additionally, for Twitter API calls that require authentication, an ACAccount can also be associated and will be used to automatically sign an OAuth compatible request.
The Twitter API operates under a REST API, meaning each API call has a specific URL. For example, to gain access to the public timeline through the request API, you can simply access the URL
http://api.twitter.com/1/statuses/public_timeline.json
The URL identifies the API call. If you want to create a new TWRequest that pulls the public timeline data, you would simply use this URL as the request URL in your TWRequest object.
1 NSURL *requestURL = [NSURL URLWithString:
@"http://api.twitter.com/1/statuses/public_timeline.json"];
2 TWRequest *twitterRequest = [[TWRequest alloc]
initWithURL:requestURL
parameters:
requestMethod:TWRequestMethodGET];
In this example, we create a new request URL in line 1 with the Twitter API call for the public timeline. This is an unauthenticated request (so we don’t need to attach an ACAccount) and uses the GET method as defined in the Twitter documentation. So in line 2 we initialize our TWRequest with our request URL, no parameters, and the request method GET.
The public timeline does support parameters, but they’re optional. You can see full documentation on this API call at https://dev.twitter.com/docs/api/1/get/statuses/public_timeline.
The format of the response string for calls made to the Twitter API is controlled by the extension call. In the previous example, we wanted our response string to be in JSON format, so we appended .json to the API call. Additional formats options include XML, RSS, and ATOM.
Next, let’s say you want to make an API request for a specific timeline. The API request URL for this call is
http://api.twitter.com/1/statuses/home_timeline.json
Unlike the public timeline call, this API request must be authenticated, meaning you must attach an ACAccount to your TWRequest before you try to perform it. To set an ACAccount, simply call setAccount on the TWRequest. In this example we create a TWRequest for a user’s home timeline. This time we add an account from our ACAccountStore to sign the request (line 12) and create a parameter dictionary to limit the number of tweets returned (line 5).
1 //Create a request URL
2 NSURL *requestURL = [NSURL URLWithString:
@"http://api.twitter.com/1/statuses/home_timeline.json"];
3
4 // Set up a parameters dictionary
5 NSDictionary *param = [NSDictionary dictionaryWithObject:@"5"
forKey:@"count"];
6
7 // Create our request using the request URL
8 // and parameters dictionary
9 TWRequest *twitterRequest = [[TWRequest alloc]
initWithURL:requestURL
parameters:
requestMethod:TWRequestMethodGET];
10
11 // Set our account to the request for signing
12 [twitterRequest setAccount:myAccount];
Performing a TWRequest
Once you have a TWRequest object, you have two choices for performing that request and retrieving the data. You can either use the new performRequestWithHandler method available in TWRequest, or you can obtain a signed URL request (signed automatically from the Accounts framework) and create an NSURLConnection. Figure 5.6 demonstrates the process of working with the performRequestWithHandler method, while Figure 5.7 demonstrates how to use a traditional NSURLConnection in combination with the TWRequest. Remember, if your API call requires authentication according to the Twitter API documentation, you must assign an account to the request before performing it.
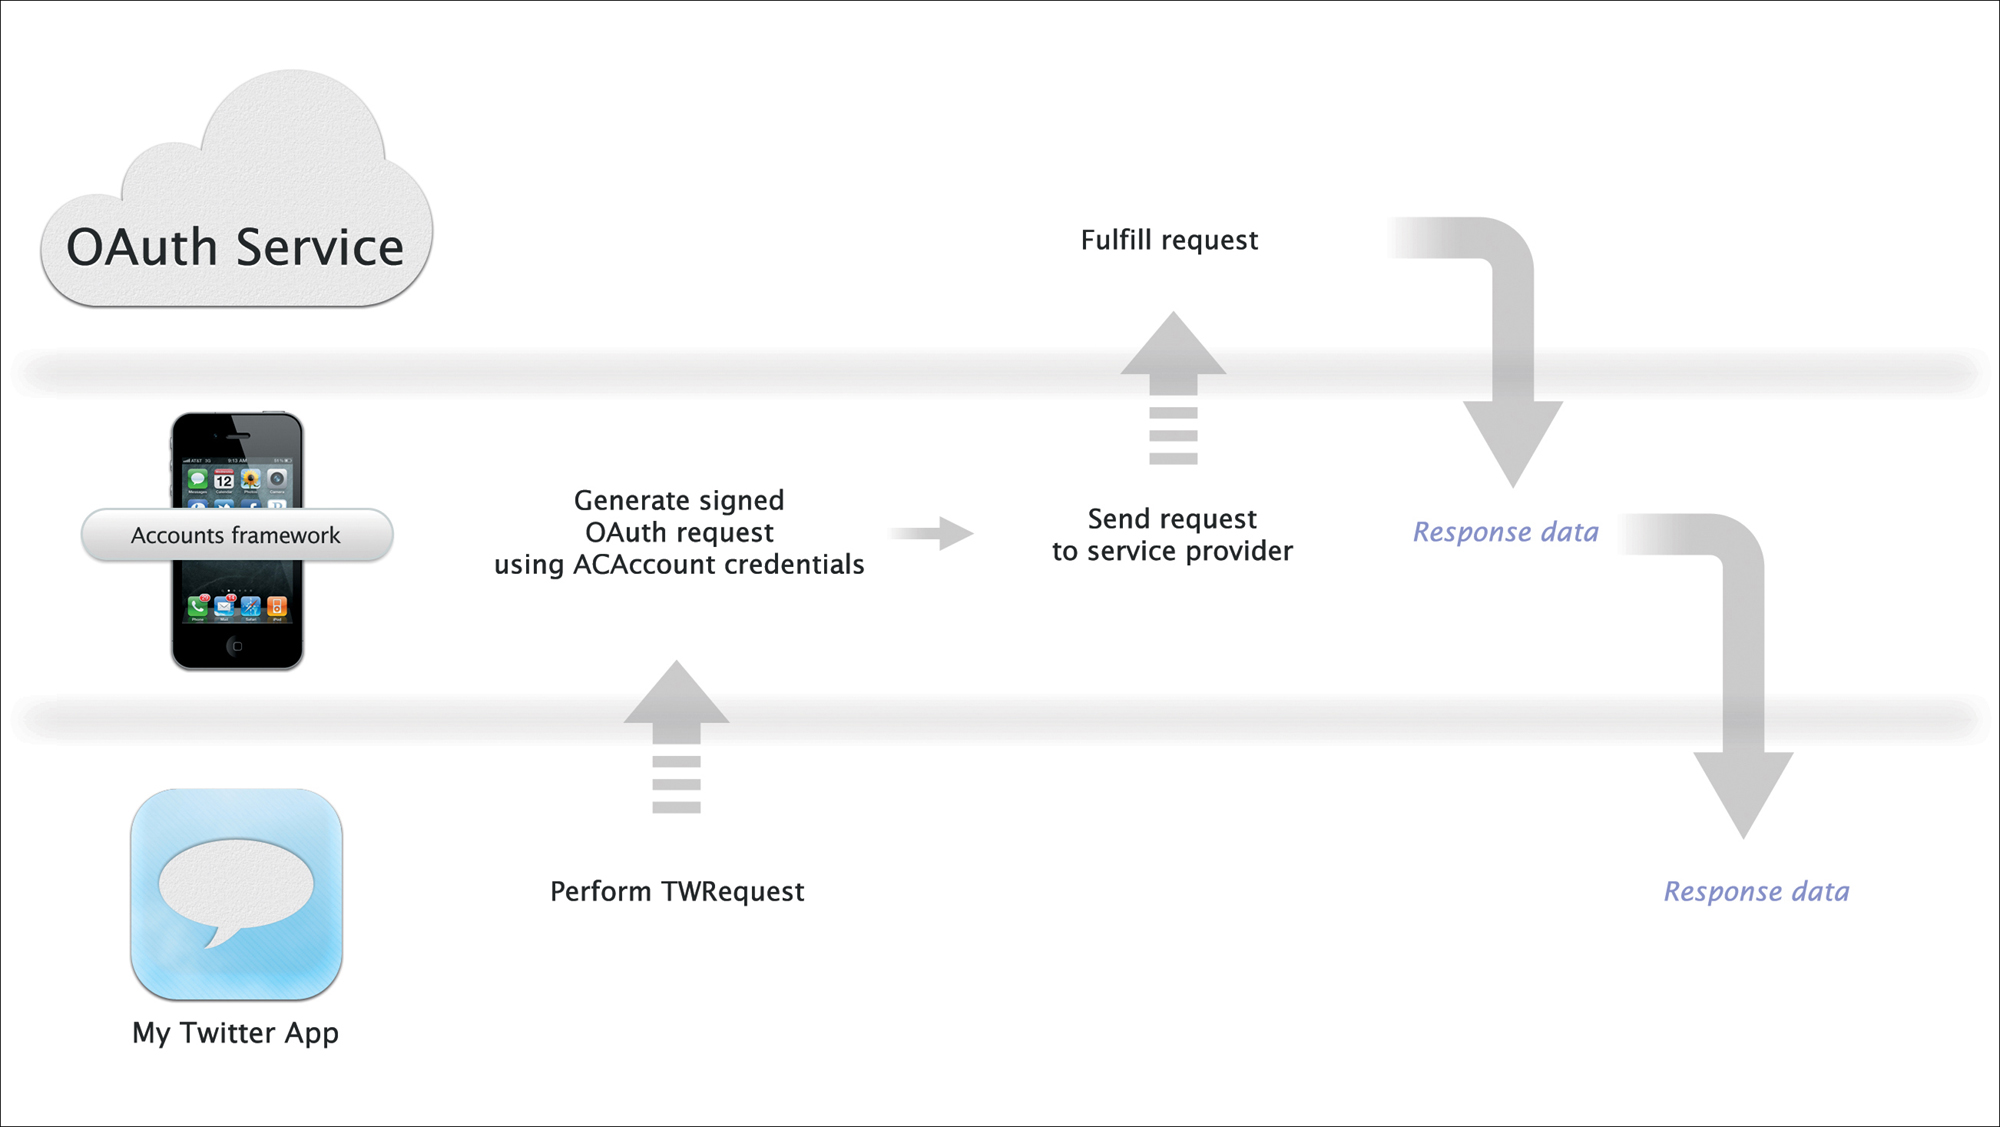
Figure 5.6. Performing a TWRequest workflow using performRequestWithHandler.
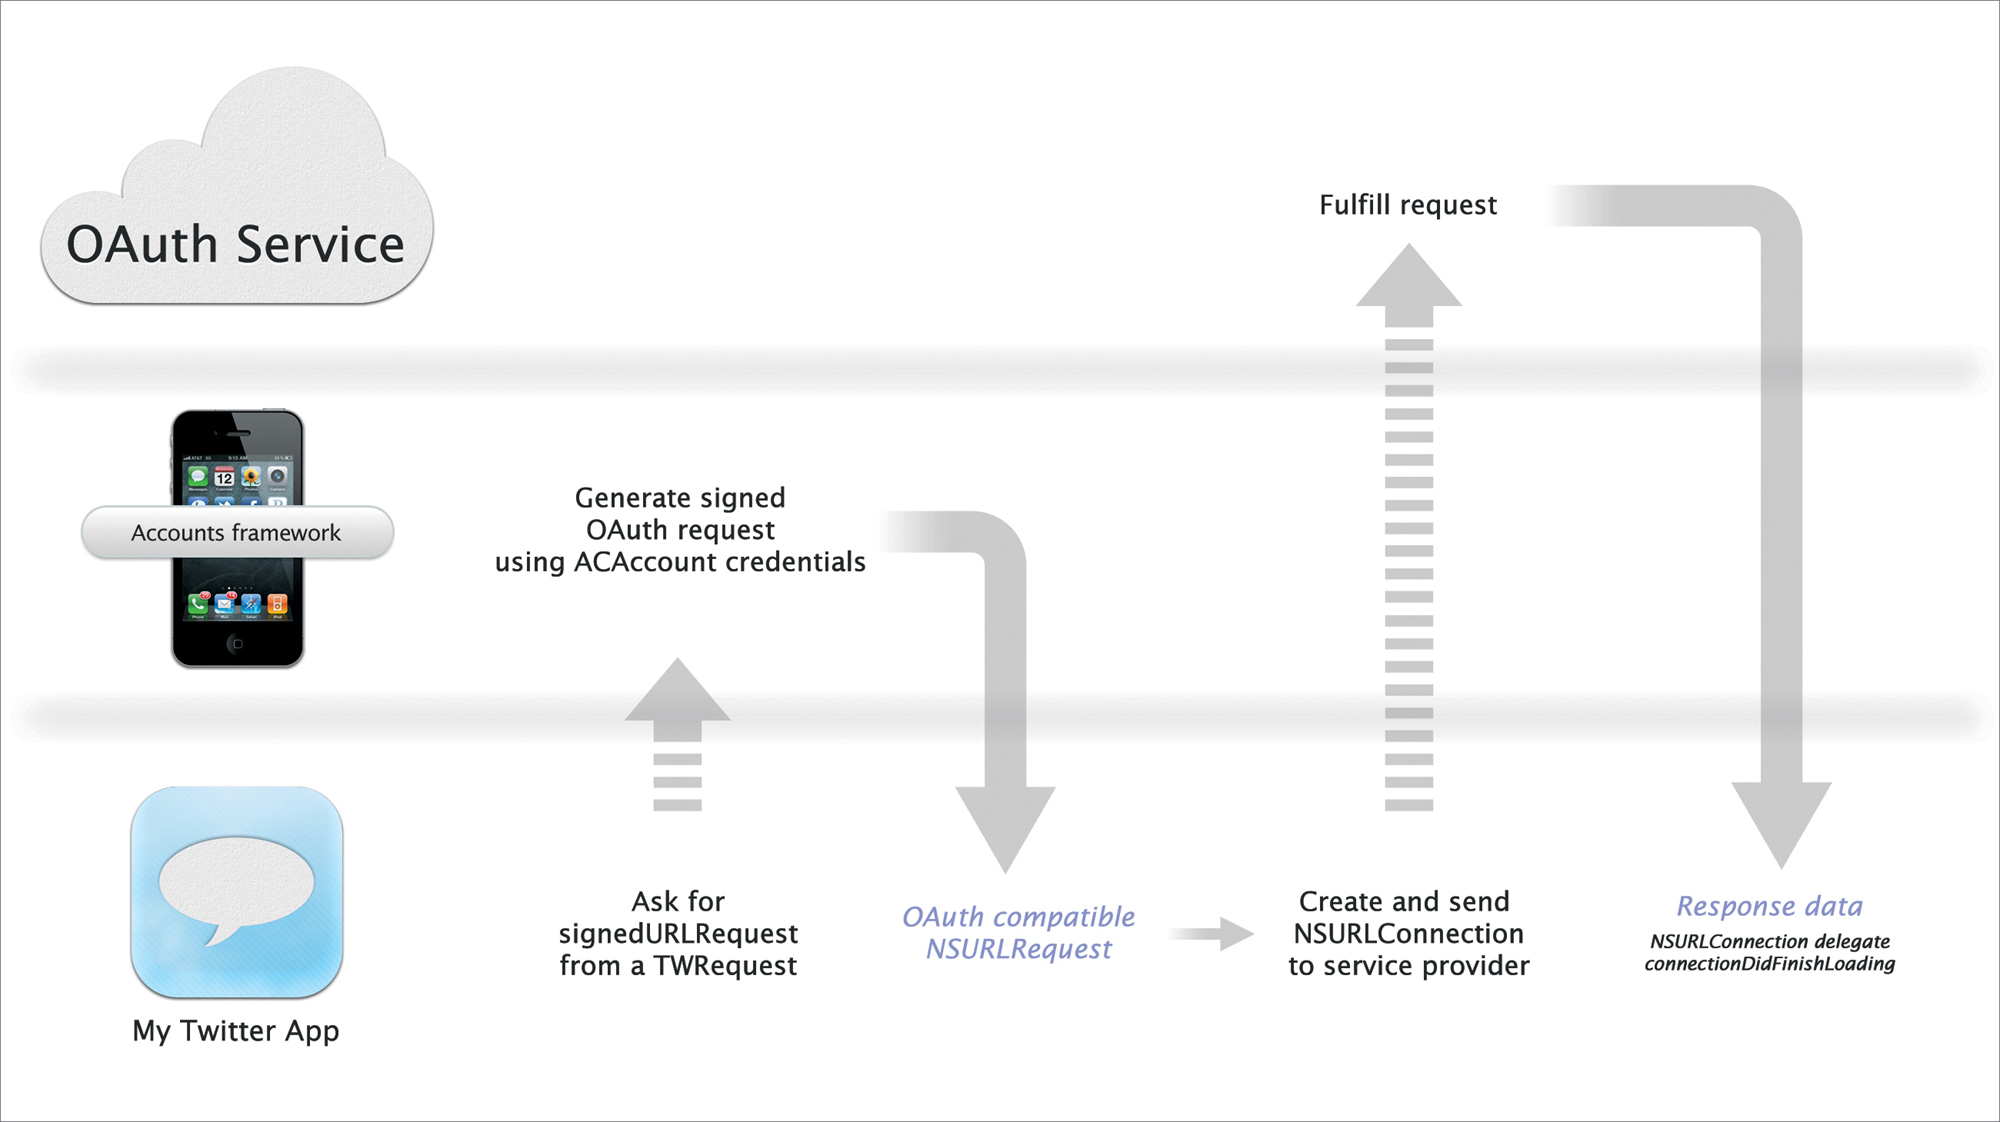
Figure 5.7. Performing a TWRequest workflow using an NSURLConnection object.
If you’ve ever worked with a web API before, you’re probably familiar with the NSURLConnection class and its delegate methods. Using NSURLConnection you can load a web page (or API call like the previous timeline calls) and collect its data using the NSURLConnectionDelegate method connectionDidFinishLoading.
If you have an existing application that uses Twitter, you’re probably already working with the NSURLConnectionDelegate method to retrieve your data. For this reason, the TWRequest object provides you with an easy way to obtain the OAuth-compatible signed NSURLRequest. Simply call [myRequest signedURLRequest] and handle the NSURLConnection as you’ve always done.
Remember that iOS automatically handles the signing of your request. But one of the added bonuses to the Twitter framework is that iOS will not only handle authentication but will also automatically attribute your application in the Twitter timeline as the source of the tweet. When sent from the iOS simulator or development devices, the Twitter timeline will always attribute the source as iOS. However, once your application is released and code-signed, iOS will automatically attribute your application as My Application for iOS with a link back to your application. If you migrated authentication data into the Accounts framework, iOS retains your existing attribution settings.
Handling a TWRequest Response
To handle your TWRequest response, you simply need to convert the response data into a Foundation object (such as NSArray and NSDictionary). If you’re working within an existing application, you probably already have the response to your NSURLConnectionDelegates set up. Because iOS provided you an NSURLRequest to create an NSURLConnection, your NSURLConnectionDelegate response methods do not need to change. Simply treat the request and response the same way you have always done by responding to connectionDidFinishLoading:
A full example of how to implement TWRequest using NSURLConnectionDelegate methods is available online at iOSCoreFrameworks.com/download#chapter-5.
The following code demonstrates how to use the new performRequestWithHandler method. In this code block we submit our TWRequest with a handler completion block that updates our timeline with the response data from the Twitter API.
1 // Perform a TWRequest with a handler
2 [twitterRequest performRequestWithHandler:
^(NSData *responseData,
NSHTTPURLResponse *urlResponse,
NSError *error){
3 // Start of handler block
4
5 // Convert our response data to a foundation object
6 // using the new NSJSONSerialization class in iOS 5
7 NSError *jsonError = ;
8 response = [NSJSONSerialization
JSONObjectWithData:responseData
options:0
error:&jsonError];
9
10 // If the response data converted without errors
11 // dispatch a process TO THE MAIN QUEUE and update
12 // our timeline
13 (jsonError=){
14 dispatch_async(dispatch_get_main_queue(), ^(){
15 [ updateMyTimeline:response];
16 });
17 }
18 {
19 // If there are errors, print a message to the log
20 NSLog(@"There was an error converting the JSON");
21 }
22 }
23 ];
In line 2 we call performRequestWithHandler on our TWRequest object. Lines 3 through 22 implement our handler completion block by converting the response data into a Foundation object. Notice that the parameters passed into the completion block for a TWRequest object are an NSData object, an NSHTTPResponse object, and an NSError object. These objects represent our request and response data from the Twitter API. In lines 7 and 8 we convert the response data object into a Foundation object using a new API available in iOS 5, NSJSONSerialization. This class method will simply convert our JSON string into an NSArray or NSDictionary, accordingly.
The first thing we do after converting our JSON string is check if there were any errors passed out of the method. If our jsonError object is still nil (meaning there were no errors in the conversion), we dispatch a new process to our main thread and update the timeline using the newly converted response object.
You can download this code sample and all of the samples in this chapter by visiting iOSCoreFrameworks.com/download#chapter-5.
Wrapping Up
In summary, in using the new Accounts framework you can provide your users with a single sign-on experience for system accounts, specifically the OAuth-based Twitter API. When used in combination, the Twitter and Accounts frameworks can significantly reduce the complexity of your applications by relying on native processes to handle various OAuth operations.
Remember that when working with the Accounts framework it’s very important to always monitor changes in your accounts database by observing the ACAccountStoreDidChangeNotification notification. If you receive this notification, assume that all of your ACAccounts and ACAccountStores need to be refreshed. Also, be prepared for conditions that the account you’re working with is the account that’s removed. Similarly, you should never attempt to use an ACAccount from one ACAccountStore to interact with another. Finally, remember that completion blocks will execute on an arbitrary thread, so any changes to the UI should be dispatched to the main queue.
Using the TWTweetComposeViewController you can quickly add Twitter functionality to your apps. For more complex operations, use the TWRequest object and sign requests using ACAccounts in your ACAccountStore. When working with the Twitter API your applications will automatically register as coming from MyApplication for iOS in the Twitter timeline.
For complete documentation on the Twitter REST API including option parameters, HTTP methods, and authorization requirements, visit iOSCoreFrameworks.com/reference#twitter-api or visit dev.twitter.com.