
4. Core Location and Map Kit
One of the obvious benefits of iOS is that it’s a mobile platform. iOS devices move throughout the world; calling upon a device’s location while utilizing Core Location and Map Kit helps you provide a better context for the data in your app. For example, if a user is in San Francisco and does a search for “Bart,” they’re probably looking for information on the Bay Area Rapid Transit system (aka the BART), whereas in other parts of the world that same search may be looking for a pop culture reference. By pulling a user’s location, you make the data in your app more relevant to your users. New to iOS 5 are enhancements to location services including forward and reverse geocoding, placemarks, and regions.
Getting Started with Core Location and Map Kit
Core Location is a set of Objective-C classes built into the Core Services layer of iOS. Core Location was designed to simplify the process of working with location by providing a set of APIs that facilitate location monitoring and various location-data conversions (such as latitude/longitude coordinates to human readable addresses and vice versa). The Core Location framework is data oriented and can be used to obtain relevant location information as needed for check-in services, user tracking, nearby searches, and more.
The Core Location Manager (CLLocationManager) manages this flow of data, and controls your app’s interaction with the physical hardware used to determine location. The location manager passes new location data that is retrieved from hardware to its delegate and then encapsulates it in a CLLocation object. This object contains a determination of the latitude and longitude coordinates of the device as well as information about the accuracy of the determination. The location manager also calculates speed and heading (based on the observed change in location), and likewise encapsulates it in the CLLocation object.
Unlike the Core Location framework, the Map Kit framework is visually oriented—it communicates location data back to a user through maps. Using Map Kit, you can seamlessly embed various map views into your app using Google Maps data as a service provider. Map Kit also has some very handy (and entirely automated) APIs designed for visually based real-time user tracking on a map.
When used in combination, Core Location and Map Kit allow you to create feature-rich, location-aware apps for all iOS devices.
 Note
NoteAs mentioned by the Apple Terms of Service agreement and the Apple iOS Developer agreement, because the Map Kit framework uses Google Services, the use of this framework and data holds you liable to the Google Maps/Google Earth API terms of service. For more information about these terms of service, visit http://code.google.com/apis/maps/iphone/terms.html. While this will not be an issue for most apps, it’s something you should be aware of when making your apps.
Linking Core Location and Map Kit Frameworks
1 #import <CoreLocation/CoreLocation.h>
2 #import <MapKit/MapKit.h>
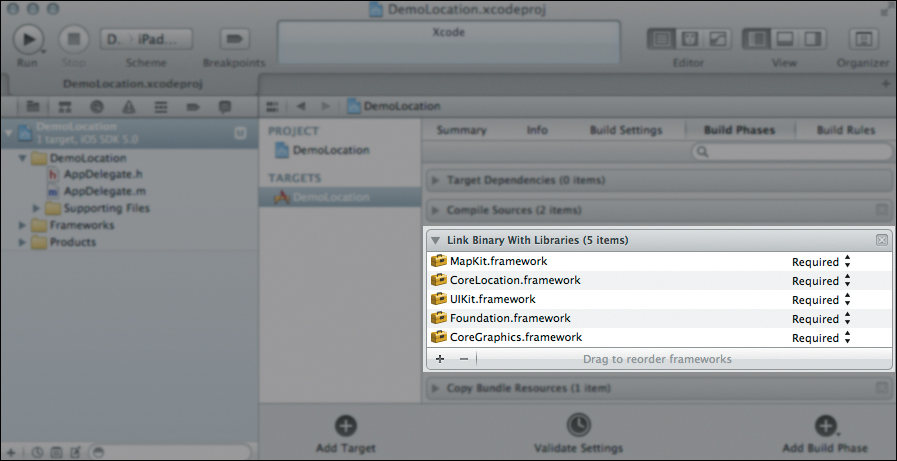
Figure 4.1. Core Location and Map Kit frameworks linked to your Xcode project.
How Location Is Determined
When an iOS device attempts to pinpoint its location, it relies on three data sources to make the determination. Each of these data sources provides a different level of speed (the time it takes to make the determination), performance (the amount of power used to make the determination), and accuracy (the +/− distance in meters). Table 4.1 (on the next page) highlights the three technologies used and ranks them based on their relative properties.
Table 4.1. Location Determination Sources on iOS Devices
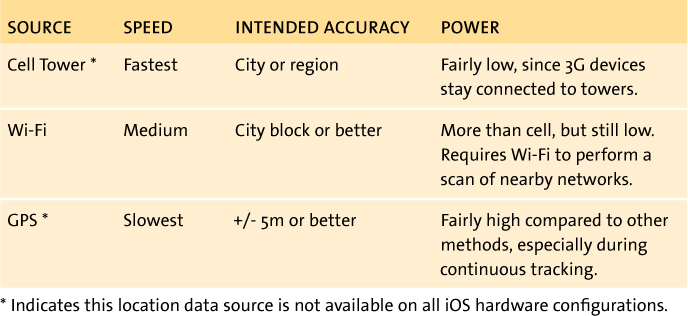
As you can see, there are varying levels of performance, speed, and accuracy between each location source. Determining location through cell phone towers is very fast and very efficient but it’s not the most accurate determination. This is not always an issue. For example, if you’re making a taxi app and you want to list the phone numbers for all of the taxi services in the area, you probably only need to know what city someone is in. Since taxi services will drive a ways to pick you up, it’s not necessarily relevant that a person is standing on the corner of Arlington and Boylston.
At the other end of the spectrum, a fitness app that tracks your running progress or a turn-by-turn GPS app would require more accurate location data. Your users would be annoyed if their turn-by-turn app missed a turn by about 100 meters. In between these extremes, where accuracy is important but not as much as turn-by-turn, would be a location check-in service. In this case it’s not critical to your app’s function that a person be in the exact location their device claims to be, so you can trade off the accuracy for better battery performance.
Another important take-away from Table 4.1 is that not every location data source is available on every iOS device. Only devices configured with a cellular radio (iPhones and 3G-enabled iPads) are able to determine location through cell towers. Additionally, GPS is only available on the iPhone models 3G and later and all 3G-enabled iPads. If accurate location data is critical to the operation of your app (such as for turn-by-turn navigation or Find My Friends), then you should configure your app’s info property list to require the appropriate hardware.
You can add two levels of restrictions for location-based hardware capabilities. When added to the UIRequiredDeviceCapabilities array in your info property list, these keys provide the following restrictions (Figure 4.2):
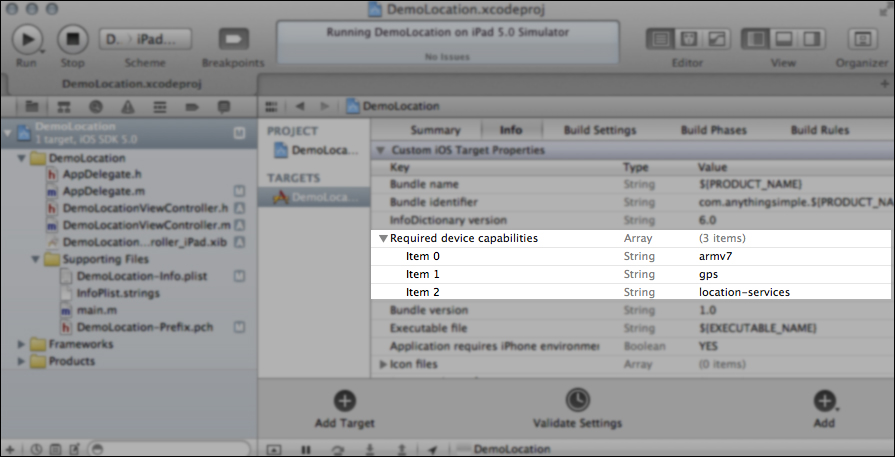
Figure 4.2. Location-based hardware requirements added to an app’s info property list.
• location-services: Requires that device has some form of location service available. Used as a general restriction.
• gps: Requires device with GPS hardware.
Remember, add these keys to your app only if your app is unable to operate without them. If location is simply a nice feature that improves user experience, then your app should not require specific hardware. For example, a movie theatre app might work best when the app can automatically determine your location using hardware. But this app would also work if a user simply types in their ZIP code for nearby theaters. In this case, the app should not include location-services as required hardware.
The required hardware capability “armv7” in Figure 4.2 simply indicates that the app must run on an iOS device and will be in your required capabilities list by default when a new iOS app is created in Xcode.
Fortunately, while it is important for you to be aware of the various source hardware capabilities, it is not necessary for you to specify which piece of hardware your application should use—iOS chooses the hardware automatically. When working with the Core Location Manager to manage updates from hardware, you simply specify your desired accuracy. The desired accuracy of the location manager is measured in meters and can be set using a CLLocationAccuracy constant. These constants are defined by the iOS SDK and indicate by name their intended use (Table 4.2).
Table 4.2. Core Location Accuracy Constants
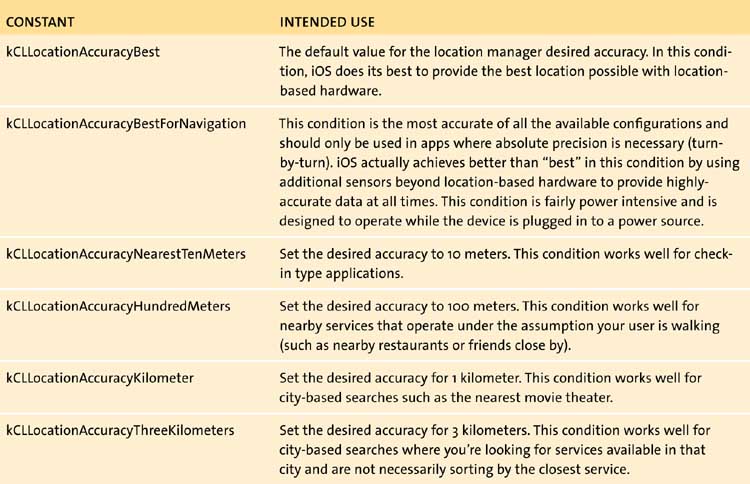
While the accuracy can be defined, it is not a guarantee. iOS will do its best to optimize accuracy based on the conditions in the table and will automatically switch between available sources to reach the desired accuracy level.
Location Permissions
I don’t know about you, but I can’t count how many times I’ve launched an app and was surprised to be asked for access to my location. Nine times out of ten, if I wasn’t expecting to provide an app with my location, I won’t allow it.
The moral of this story is when you use location in apps, you have to ask for permission first—there’s no way around it. The harsh truth about location-aware apps is that many users don’t like providing apps with their location data. Not everyone will enable location for your app, even if it makes your app super awesome. So you need to be prepared to handle conditions where your app does not have permission to use the services you planned on using.
Controlling Location Permissions
The first time your app attempts to determine a device’s location, iOS will prompt a permission dialog to the user that indicates your action. This action occurs whether you’re using a CLLocationManager (Core Location) or an MKMapView (Map Kit) configured to show the device’s location. By default, this dialog will simply say, “Your App Would Like to Use Your Current Location,” with the choices of Don’t Allow and OK. When you’re determining location using the CLLocationManager, you have the option of setting a purpose string, which is your opportunity to explain in the permission dialog why your app needs access to a user’s location. (Figure 4.3).
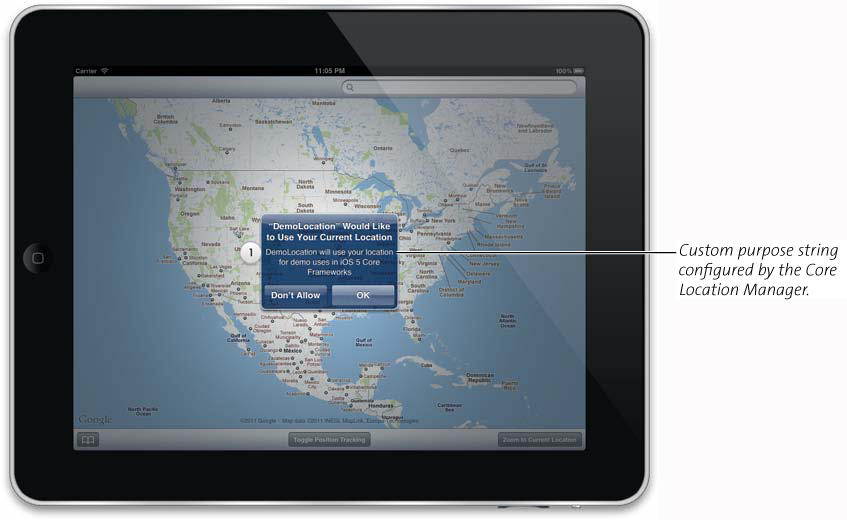
Figure 4.3. A location services permission dialog.
We’ll get into the specifics of the CLLocationManager in the next section; however, while we’re on the subject of permissions you can configure the custom purpose message of a CLLocationManager by setting its managed property purpose (Figure 4.3).
1 [locationManager setPurpose:@"My Custom Purpose Message..."];
Determining Location Service Availability
Before you attempt to use location services in your app, you should first check to see if they’re available. There are many reasons why location services might be unavailable. First and foremost, the necessary hardware might be disabled because a device is in airplane mode or because the user has turned off location services globally for all apps. Second, a user might have disallowed access to your app specifically either in the location services permission dialog mentioned in the previous section or in the Settings app. Finally, the Parental Controls section of the Settings app on every iOS device allows parents the choice to prevent apps from using location data. This condition should be handled separately from the permission dialog because in this case your users will never be presented with a dialog asking for permission.
With these conditions in mind, the CLLocationManager offers two class methods that allow you to determine first, whether or not location services are enabled, and second, the authorization status of your specific app. These class methods are [CLLocationManager locationServicesEnabled] and [CLLocationManager authorizationStatus], with the conditions and possible values demonstrated in the following code block:
1 // Check to see if location services are enabled
2 ([CLLocationManager locationServicesEnabled]){
3
4 NSLog(@"Location Services Enabled");
5
6 // Switch through the possible location
7 // authorization states
8 ([CLLocationManager authorizationStatus]){
9 kCLAuthorizationStatusAuthorized:
10 NSLog(@"We have access to location services");
11 ;
12 kCLAuthorizationStatusDenied:
13 NSLog(@"Location services denied by user");
14 ;
15 kCLAuthorizationStatusRestricted:
16 NSLog(@"Parental controls restrict location services");
17 ;
18 kCLAuthorizationStatusNotDetermined:
19 NSLog(@"Unable to determine, possibly not available");
20 }
21 }
22 {
23 // locationServicesEnabled was set to NO
24 NSLog(@"Location Services Are Disabled");
25 }
This code block is fairly straightforward. Functionally, we’re not doing much more than printing log messages based on the possible location services enabled and location authorization states. In line 2 we first check to see if location services are enabled. If this condition results to NO, we jump down to line 22 and handle our disabled condition. This condition would result as NO if the device were in airplane mode or if location services were disabled globally in the Settings app. In lines 8 through 20 we handle the condition that location services are enabled by evaluating a switch statement based on the possible authorization status values. The possible values for the location authorization status are
• kCLAuthorizationStatusAuthorized: Your app is able to use location services.
• kCLAuthorizationStatusDenied: The user has chosen to deny your app access to location services.
• kCLAuthorizationStatusRestricted: You do not have access to location services because availability is restricted by parental controls. This means the user will never be presented a permission dialog.
• kCLAuthorizationStatusNotDetermined: Your app was unable to determine if location services are authorized. This authorization state is most likely caused by location services being disabled or some other fringe case caused by errors. In our code block, we would probably never reach this condition because we first check to see if location services are enabled. But, if you were to check this value outside of our code block while services are disabled, the status would be unknown.
Even though the unknown authorization status is most likely the cause of services being disabled, you should not use this status value as a condition in your app indicating services are disabled. This status could also be the cause of some unknown error iOS experienced when attempting to check on your app’s status (possibly caused hardware or software issues, uncorrectable by you or the user). To indicate services are disabled, use the locationServicesEnabled Boolean.
The Core Location Manager
As the first step in working with location data, we’ll focus on Core Location. Remember, Core Location is primarily a data-oriented framework. This means we’ll be dealing with coordinates, text strings, and number values instead of visual location information like maps. Later in the Map Kit section, we’ll discuss how to use some of the data sources we learn about with Core Location in combination with Map Kit, and how to visually represent location information on a map.
I’ve mentioned the Core Location Manager (CLLocationManager) a few times. The CLLocationManager is responsible for controlling the flow and frequency of location updates provided by location hardware. Simply put, the location manager generates location objects (CLLocation objects) and passes them to its delegate whenever a certain set of criteria is met. These criteria are determined by how you configure and start your location manager.
The CLLocationManager is typically used to generate location data while working with one of the following services.
• Standard Location Service
• Significant Location Change Monitoring
• Heading Monitoring
• Region Monitoring
You can have as many CLLocationManager objects as needed by your application, but each location manager should be used to monitor one service. In the case of regions, any region being monitored during the runtime lifecycle of your app will be added as a member of the NSSet property monitoredRegions in all CLLocationManager objects.
Standard Location Service
The standard location service is one of the most common uses of the location manager. Used to determine a user’s current location as needed for nearby searches or check-in locations, the standard location service can be configured with a desired accuracy and distance filter (which is the threshold used to determine when a new location should be generated). When a device moves beyond the configured distance filter, the standard location service triggers a new location and calls the necessary delegate methods. After creating the location manager and configuring the desired properties, call startUpdatingLocation to begin location services. The following code block demonstrates how to set up a new location manager using the standard location service:
1 //Create a new location manager
2 locationManager = [[CLLocationManager alloc] init];
3
4 // Set Location Manager delegate
5 [locationManager setDelegate:];
6
7 // Set location accuracy levels
8 [locationManager setDesiredAccuracy:kCLLocationAccuracyKilometer];
9
10 // Update again when a user moves distance in meters
11 [locationManager setDistanceFilter:500];
12
13 // Configure permission dialog
14 [locationManager setPurpose:@"My Custom Purpose Message..."];
15
16 // Start updating location
17 [locationManager startUpdatingLocation];
In this code block, line 2 allocates a new CLLocationManager and saves it as an instance variable named locationManager. In line 5 we set the location manager delegate as self, which means this class must observe the CLLocationManager-Delegate protocol (covered in the section below, Responding to New Information from the Core Location Manager). Next, in line 8 we set the desired accuracy of our location manager to 1 kilometer, and in line 11 we set the distance filter of our location manager to 500 meters.
While the distance filter can be almost any value, I personally have found that setting your distance filter to half the distance of your desired accuracy typically generates a fairly accurate sample of locations as needed by the location accuracy.
In line 14 we set the custom purpose message. Remember, this message will be shown in the location permission dialog as seen in Figure 4.3 and should be used to describe why your app needs access to a user’s location—especially when it’s not readily apparent. Finally, in line 17 we start updates on the location manager by calling startUpdatingLocation.
 Tip
TipThe permission dialog is presented once and only once to the user the first time your app calls startUpdatingLocation. Plan accordingly and be prepared for the user to disallow location services!
You can download a sample app that demonstrates the standard location service (with background support) at this book’s website, iOSCoreFrameworks.com/download#chapter-4.
Significant Location Change Monitoring
The location manager of a significant location change service sends new locations to the delegate whenever it detects the device has significantly changed position. The location manager provides a starting location as soon as this service is started and future locations are only calculated and sent to the delegate when the device detects new Wi-Fi hotspots or cellular towers. While slightly similar to the standard location service in functionality, this method is much more aggressive in power management and is highly efficient. While the standard service continuously monitors a user’s location to determine when the distance filter threshold is crossed, the significant location change disables location services between new location events (because location events are determined when new connections are located by the cellular and Wi-Fi antennae). As an added bonus, unlike the standard location service, the significant change monitoring service will wake up an app that’s suspended or terminated and allow the app to execute any necessary background processes.
Your app only stays active in the background for a few seconds, long enough to perform simple calculations and updates. If you need to perform more complicated tasks, consider setting up a long background process with an expiration handler. For more information on long background processes, visit iOSCoreFrameworks.com/reference#long-background-process.
The code needed to set up a significant location change monitoring is much simpler, essentially because the significant location change service is largely handled by the core operating system. Remember, the significant location change monitoring service automatically generates new locations when the radio antennae detect new connection sources (cellular or Wi-Fi). That means the significant location change service will ignore the accuracy and distance filter properties of the location manager (the accuracy will always be the best available by the sources used). The following code block demonstrates how to set up a location manager that monitors significant location changes:
1 //Create a new location manager
2 locationManager = [[CLLocationManager alloc] init];
3
4 // Set Location Manager delegate
5 [locationManager setDelegate:];
6
7 // Configure permission dialog
8 [locationManager setPurpose:@"My Custom Purpose Message..."];
9
10 // Start updating location
11 [locationManager startMonitoringSignificantLocationChanges];
Very similar to the previous code block, starting the significant location change service simply involves creating a new location manager (line 2), setting the delegate (line 5), configuring an optional custom purpose message (line 8), and then calling the method, startMonitoringSignificantLocationChanges in line 11 (instead of startUpdatingLocation). Just like the standard location service, the significant location change service interacts with its delegate using the same methods, which is covered in the section that follows, Responding to New Information from the Core Location Manager.
Download a complete project demonstrating the significant location change service and relevant background processing methods at iOSCoreFrameworks.com/download#chapter-4.
Heading Monitoring
Heading information is a little different than the other location-based data types generated by the location manager. Unlike the previous services, the heading monitoring service only generates new heading information (direction information relative to magnetic north or true north). The heading object (CLHeading) is created using the device’s magnetometer (compass) and does not contain a reference to the latitude and longitude coordinates of the device.
Just like with other location services, not all devices are equipped with a magnetometer, especially older generation models. You should first check to see if heading services are available by calling [CLLocationManager headingAvailable], and if heading services are required for your app’s function (such as a compass app) you should add the value magnetometer to your app’s info property list.
One of the reasons heading monitoring exists as a separate service—besides separate hardware—is because doing so allows additional performance optimization. In most location-aware apps, you don’t need to know the device heading with incredible accuracy. The majority of apps are able to get by on the generic speed and heading information generated in the standard and significant location change services. In these cases, the course and speed values managed by the CLLocation object are simply extrapolated based on the previous location coordinate (distance moved, direction moved). This means if your user is standing still, the CLLocation object is likely to hold invalid heading information.
Because heading monitoring is a separate service, however, you can give your users the option of turning on additional heading information as needed. This practice is observed in the native Google Maps app on the iPhone and iPad. When a user taps the location button once, the map zeros in on their current location. If they tap the location button again, the Google Maps app enables heading monitoring to indicate the direction the device is facing.
Starting a heading monitoring service is just like starting updates on a standard location service. The process involves creating a new location manager, assigning the delegate, setting your desired accuracy and threshold filter (in degrees changed), and calling startUpdatingHeading. Because the heading is dependent on the orientation of your device (landscape versus portrait), the location manager also allows you to set the desired heading orientation. The following code block demonstrates how to set up a new heading monitoring service:
1 ([CLLocationManager headingAvailable]){
2
3 // Create a new Location Manager and assign delegate
4 headingManager = [[CLLocationManager alloc] init];
5 [headingManager setDelegate:];
6
7 //Send all updates, even minor ones
8 [headingManager setHeadingFilter:kCLHeadingFilterNone];
9
10 // Set heading accuracy
11 [headingManager setDesiredAccuracy:kCLLocationAccuracyBest];
12
13 // Set expected device orientation
14 [headingManager setHeadingOrientation:
CLDeviceOrientationLandscapeLeft];
15
16 // Start updating headings
17 [headingManager startUpdatingHeading];
18 }
19
20 NSLog(@"Heading not available");
You’ll notice this code block is similar to the standard location service. The first thing we do is check to see if heading services are available by calling the CLLocationManager class method headingAvailable in line 1. Next, in lines 4 and 5 we create a new CLLocationManager object and assign the delegate to self. In line 8 we set up our desired heading filter. This value specifies the minimum heading change in degrees needed to trigger a new heading event. In line 8 we set this option to the constant, kCLHeadingFilterNone. This simply sets the filter to nothing allowing us to obtain every change detected (no matter how minor) from the magnetometer. By default, this filter value is set to 1 degree.
In line 14 we set the expected orientation of our device to landscape left. The orientation will default to portrait, and if your device allows for rotation you should detect device rotations and reassign the heading orientation when appropriate. Finally, in line 17 we start updating our heading information. This begins calling the delegate method, locationManager:didUpdateHeading: when the filter threshold condition is met.
Region Monitoring
One of the newest features available in iOS 5 is the ability to add region-based monitoring services to a location manager. Region monitoring allows you to monitor a device’s interaction with the bounds of defined areas or regions; specifically, the location manager will call didEnterRegion and didExitRegion on its assigned delegate when the bounds of monitored regions are crossed.
This new functionality allows for all sorts of app opportunities from auto-check-in services to real-time recommendations (for example, you’re walking past a good coffee shop and an app on your phone knows that you like coffee). In fact, the new Reminders app for iOS 5 uses this functionality in combination with Siri (the iPhone 4S digital assistant) to carry out requests such as “Remind me when I get home that I need to take out the trash,” or “Remind me when I leave the office that I need to call my wife and tell her I’m on my way.” In these examples, Siri simply defines a region in a core location manager for the locations home and the office and sets up a reminder to trigger when those regions detect the appropriate didExitRegion or didEnterRegion events.
When Siri sets up the regions, “she” will actually read your personal address card and look for an address labeled as “home” and “work.” If detected, Siri will convert your home address to a latitude and longitude coordinate using the forward geocoding APIs and then set up a region based on that coordinate. More about this in the section below on geocoding.
The process for monitoring regions is very similar to the other services we monitored. Instead of setting up distance filters or depending on cell towers to trigger new location events, however, we define a specific circular region (or regions) based on a set of latitude and longitude coordinates and a radius in meters.
The following code block demonstrates how to monitor for a region. This example assumes that you already know the latitude and longitude coordinates of your target region. Later, we’ll cover how to generate these values using human-readable address strings, but for now, let’s just assume you’ve memorized that Apple’s main campus is located at the latitude and longitude coordinates of (37.331691, −122.030751).
1 // Create a new location manager
2 locationManager = [[CLLocationManager alloc] init];
3
4 // Set the location manager delegate
5 [locationManager setDelegate:];
6
7 // Create a new CLRegion based on the lat/long
8 // position of Apple's main campus
9 CLLocationCoordinate2D appleLatLong =
CLLocationCoordinate2DMake(37.331691, -122.030751);
10 CLRegion *appleCampus = [[CLRegion alloc]
initCircularRegionWithCenter:appleLatLong
radius:100
identifier:@"Apple"];
11
12 // Start monitoring for our CLRegion using best accuracy
13 [locationManager startMonitoringForRegion:appleCampus
desiredAccuracy:kCLLocationAccuracyBest];
In this example, we set up the location manager and delegate in lines 2 through 5. In line 9 we create a new CLLocationCoordinate2D using the latitude and longitude coordinates for Apple’s main campus. Next, in line 10 we allocate a new CLRegion. Notice we initialize this region as a circular region with the radius of 100 meters. This method also allows us to assign an identifier we can use to refer to the region at a later time (in the event you’re monitoring more than one region in your location manager). Finally, in line 13 we simply start the monitoring service for our CLRegion by calling startMonitoringForRegion:desiredAccuracy.
In this example we used the kCLLocationAccuracyBest setting because our region radius is only 100 meters. The accuracy of the region monitoring will help eliminate false positives and prevent duplicate notifications by adding a small buffer zone. Make sure your accuracy radius is not too high compared to the radius of your region. For example, if you had a 50m radius defined, you wouldn’t want your accuracy to be calculated using the 3 kilometer accuracy setting.
Responding to New Information from the Core Location Manager
As you’ve learned, the location manager is delegate based. This means the location manager calls methods on its assigned delegate whenever new location, heading, or region information is available. These delegates are defined in the protocol CLLocationManagerDelegate.
Table 4.3 outlines the delegate methods used in the standard location service, significant location change monitoring service, heading monitoring service, and the region monitoring service described in this chapter. By implementing these methods in the class used as the assigned delegate, you can update your UI or save relevant course information as needed by your app.
Table 4.3. Core Location Manager Delegate Protocol Methods
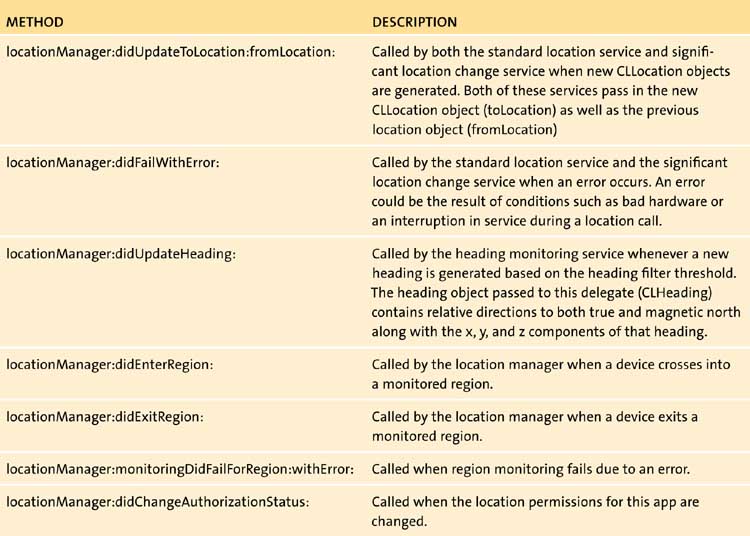
Notice the last delegate method in Table 4.3 is not actually related to the return of CLLocation objects from hardware but rather to changes in the authorization status of location services in your app. You should be continually aware of any changes in your app due to permissions with core location services. While the method is optional, it’s best to implement it in case something changes while you’re using location.
You can download a complete project that demonstrates all of the core location manager services demonstrated in this chapter by visiting iOSCoreFrameworks.com/download#chapter-4. For more information on the hardware requirements and various capabilities of different iOS models, visit developer.apple.com or iOSCoreFrameworks.com/reference#core-location.
Forward and Reverse Geocoding
Geocoding is the process of going from a set of latitude and longitude coordinates to a human readable address and vice versa. Forward geocoding means you start with an address or location (such as Boston, MA) and end up with latitude and longitude coordinates. Reverse geocoding is the process of going from latitude and longitude coordinates back to a human-readable address.
Before iOS 5, developers only had access to reverse geocoding APIs available in Map Kit. With the introduction of iOS 5, however, the Map Kit APIs have been deprecated and Apple engineers added both forward and reverse geocoding to the Core Location framework. Not only does iOS 5 provide unique access to forward geocoding APIs, but there is no longer a dependency on Map Kit for these processes.
Geocoding Benefits
One of the major advantages of using the iOS 5 geocoding APIs is the fact that they are inherently locale based. For example, if my phone is set to Japanese as my native language and I’m visiting a friend in the United States, when I perform a geocoding operation to convert coordinates to a physical address, the result is returned in the native language of my phone (Japanese). This involves not only translating the language but also reformatting the order in which addresses are communicated.
Additionally, the forward geocoding APIs are form agnostic, meaning they really don’t care what language or format an address is entered in. The geocoding APIs will automatically handle any known format based on the language settings of the device and handle the conversion as necessary.
As a developer working with the geocoding APIs, you don’t have to do anything special to make your app work with different geocoding languages.
Geocoding Drawbacks
One of the biggest drawbacks to the geocoding API stems from one of its great advantages. All of the geocoding operations are handled in the cloud, meaning the conversions do not happen on the device. Now, this is undeniably an advantage because your device is not wasting precious power and resources to handle the conversion. Additionally, as new conversion information and techniques become more accurate, Apple can simply update their APIs in the cloud giving your app even better performance down the road. The drawback is your app must have an Internet connection to use the geocoding APIs. That means if your app is running in airplane mode or on a Wi-Fi-only device that’s not connected to a Wi-Fi hotspot, you won’t have access to geocoding services and should plan accordingly.
Because geocoding operations are asynchronous, the callbacks of these services are handled using completion handler blocks. When the geocoding operation is complete, the geocoder will execute this block and pass in an NSArray of possible placemarks and an NSError object indicating the success of the conversion.
Forward Geocoding
Forward geocoding means you’re starting with an address and are seeking coordinates. This can be used to create the coordinates of a region, as needed by the previous example on region monitoring, or to derive the coordinates of nearby locations based on address information (such as a check service or nearby restaurants). There are three ways to forward geocode. Two of these methods involve simple string conversion while the third supports an address dictionary.
Working with Strings
The first, and most simple, geocoding operation converts a single string to an array of possible CLPlacemark objects.
1 // Geocode a simple string using a completion handler
2 [fgeo geocodeAddressString:@"Boston, MA"
completionHandler:^(NSArray *placemarks, NSError *error){
3
4 // Make sure the geocoder did not produce an error
5 // before continuing
6 (!error){
7
8 // Iterate through all of the placemarks returned
9 // and output them to the console
10 (CLPlacemark *placemark placemarks){
11 NSLog(@"%@",[placemark description]);
12 }
13 }
14 {
15 // Our geocoder had an error, output a message
16 // to the console
17 NSLog(@"There was a forward geocoding error
%@",
[error localizedDescription]);
18 }
19 }
20 ];
In this code block we convert the simple string, “Boston, MA”, to a CLPlacemark using forward geocoding. The returned array of CLPlacemarks contains all of the possible placemarks for the given address. Obviously, the more information you provide in the address string, the more reliable the returned placemarks will be. As mentioned before, one of the advantages of the geocoding APIs is they’re form independent. It’s not necessary that you add delimiters like commas or tabs between your address values.
The CLPlacemark object simply contains a CLLocation, CLRegion, and NSDictionary of available address component strings. For example, if you have an incomplete address (say you’re missing a ZIP code), you can convert the address using forward geocoding and pull the completed address from the CLPlacemark object.
While an Internet location is required for geocoding operations, the forward geocoder is able to determine high level address information (for example, country origin) without an Internet connection based on local device information.
The second geocoding operation is similar, but allows for further optimization by limiting the conversion to a specified CLRegion. If you want to help iOS with the conversion process, you can define a CLRegion (if known) to limit the scope of search and improve result speed and accuracy. This method is handled just as before, except we define a CLRegion as an additional parameter, as seen in the following code block:
1 [fgeo geocodeAddressString:@"Boston, MA"
inRegion:myRegion
completionHandler:^(NSArray *placemarks, NSError *error){
2 //handle results
3 }
4 ];
Working with Address Dictionaries
The third method used to forward geocode address information operates within the context of an address dictionary. Using the Address Book framework, you have full access to the contact cards and their relevant address information. When pulled from the address book, this information is returned as an NSDictionary object with various keys and values based on the information available.
Using the geocodeAddressDictionary method on a geocoder object, you can easily convert this address book dictionary into a CLPlacemark. This is exactly the process Siri uses to convert address book information for labels like home or the office into region monitoring services using the location manager. The following code block demonstrates how to convert an address book dictionary using the GLGeocoder class. For a complete example on how to pull these address dictionaries from the Address Book using the ABPeoplePicker, visit iOSCoreFrameworks.com/download#chapter-4.
1 [fgeo geocodeAddressDictionary:myAddressDictionary
completionHandler:^(NSArray *placemarks, NSError *error){
2 //handle results
3 }
4 ];
Reverse Geocoding
Reverse geocoding is the process of converting a CLLocation into a CLPlacemark. Remember that the CLPlacemark contains the CLLocation, CLRegion, and an NSDictionary for the address. So while both geocoding techniques create a CLPlacemark, the geocoding process CLGeocoder simply fills in the blanks.
The following example demonstrates how to convert a CLLocation into a CLPlacemark using reverse geocoding. Remember, because the monitoring services return CLLocation objects when a new update is performed, you can easily obtain an address for a user’s location by starting the standard location service, obtaining their current location, and then reverse geocoding that location with the CLGeocoder.
1 // Reverse Geocode a CLLocation to a CLPlacemark
2 [fgeo reverseGeocodeLocation:myLocationObject
completionHandler:^(NSArray *placemarks, NSError *error){
3
4 // Make sure the geocoder did not produce an error
5 // before continuing
6 (!error){
7
8 // Iterate through all of the placemarks returned
9 // and output them to the console
10 (CLPlacemark *placemark placemarks){
11 NSLog(@"%@",[placemark description]);
12 }
13 }
14 {
15 // Our geocoder had an error, output a message
16 // to the console
17 NSLog(@"There was a reverse geocoding error
%@",
[error localizedDescription]);
18 }
19 }
20 ];
Working with Map Kit
Now let’s turn from working with data oriented location objects to maps. The Map Kit framework is rather extensive and provides the necessary views and controls for displaying map data. The primary view in the Map Kit framework is MKMapView, which is a subclass of UIView, and automatically renders Google Maps data based on the relative location of a visible map view rect.
Map Kit allows you to add a variety of overlays and annotations (such as push pins and location indicators), all of which are incredibly useful for creating rich map data, but not directly relevant to our conversation about location. Because we don’t have enough space in this book to go into the finer details of Map Kit, I’ve put together an online tutorial explaining the ins-and-outs of Map Kit overlays and annotations, available at iOSCoreFrameworks.com/tutorial#map-kit.
Tracking Location with Map Kit
So you know that the MKMapView render’s map data and provides the same gesture-based interaction seen in the native Maps application. You also know that you can use the standard location service to track a user’s location. Fortunately, tracking a user’s position is a common enough use case that both Map Kit and Core Location offer this capability. The benefit of Map Kit’s tracking services is they will automatically track a user’s location and indicate that location on the map using the famous Google Maps blue tracking ball seen in the native Maps app. As accuracy changes, the region circle around this ball will automatically adjust just as it does in the native app.
To enable tracking on an MKMapView, simply set the Boolean property showsUsersLocation. When set to YES, the MKMapView will first prompt the user with the same Core Location permission dialog. If authorization is approved, the MKMapView will automatically animate the changes in a user’s location and the accuracy of the determination.
The MKMapView also manages a delegate property that it uses to communicate location update information through various methods. These methods are defined in the protocol MKMapViewDelegate and can be used to update necessary map information (such as reload overlays and annotations). The delegate method relevant to location updates is mapView:didUpdateUserLocation: which passes in an MKUserLocation object.
The MKUserLocation object is very handy. Unlike monitoring location with Core Location, the MKMapView can be configured to provide both heading and motion in a single delegate method based on the tracking mode defined by its userTrackingMode property. The possible values of this property are
• MKUserTrackingModeNone
• MKUserTrackingModeFollow
• MKUserTrackingModeFollowWithHeading
When the tracking mode is set to follow with heading, the MKUserLocation object will contain both a CLLocation object and a CLHeading object. If the tracking mode is set to just follow, the MKUserLocation object passed to the delegate will only contain the location.
For a complete project example demonstrating the power of MKMapView and the Map Kit framework—along with other downloads available in this chapter—visit, iOSCoreFrameworks.com/download#chapter-4.
Wrapping Up
Core Location and Map Kit are an incredibly powerful set of tools and APIs that give you full access to available location metadata. Using Core Location directly, through the location manager, you can monitor a user’s location using standard services, significant change services, or region monitoring. Additionally, the core location manager allows direct access to heading information relative to either true north or magnetic north. Using Core Location you can determine where a person is and where they’re going.
Beyond specific device location information, Core Location offers powerful (locale aware) address conversion APIs. These APIs let you forward and reverse geocode location information into a CLPlacemark. Placemarks contain a completed form of the address including a CLLocation, CLRegion, and NSDictionary of address values.
Finally, using Map Kit you can easily track a user’s location by toggling a single Boolean property, showsUserLocation. Once enabled, the MKMapView will automatically animate and track the location while communicating that information back to the user on the map.
Don’t forget, when working with location it’s always important to check and monitor relevant permissions! It doesn’t matter if you have the coolest location app in the world, there are users who will download your app and not enable location services. Be prepared for error conditions and blocked access.