
8. Core Animation
One of the best ways to polish a five-star user experience is to harness Core Animation. Animations can be simple and subtle, like hiding navigation bars—or they can take center stage as seen in the Mail app when a message is moved from one folder to another. Animations add to the user experience and help the user feel immersed in your app by hiding unnecessary UI elements or providing important feedback when data changes. What makes this possible is Core Animation, another Quartz technology built into the Media layer of iOS. As a developer you can either leverage the common animations built into UIKit, or import the Quartz Core framework and implement your own custom animations.
Getting Started with Core Animation
Core Animation (or Quartz Core) is a library of Objective-C classes built directly into the Media layer of iOS and serves as the backbone for all animations. These animations range from the shaking app icons (indicating a user can rearrange the apps on their home screen) to the sliding animation seen when a user navigates their music library. Unlike Core Graphics, which is confined to a two-dimensional plane, Core Animation also allows for three-dimensional transformations. This makes it easy to implement effects such as the 3D card-flip animation seen in the iPhone’s native Weather app, or the unique page-turn effect seen in the popular Flipboard app for iPad.
Many aspects of Core Animation are accessible through APIs available in UIKit. In some cases, Apple has built specific animations into the base operations of UIKit objects that can be invoked with a single method call. For example, Core Animation powers the modal presentation and the modal transition styles found in UIViewController as well as the pushViewController:animated: method found in UINavigationController. UIKit also facilitates the creation of simple custom animations using methods implemented in UIView. This means basic UIView properties like opacity, bounds, and background color can easily be animated using a series of animation blocks and animation delegate methods.
The properties of a UIView outlined in Table 8.1 can be animated using simple UIKit animations. We’ll discuss UIKit animations in the following section.
Table 8.1. UIView Properties Animatable With UIKit Animations
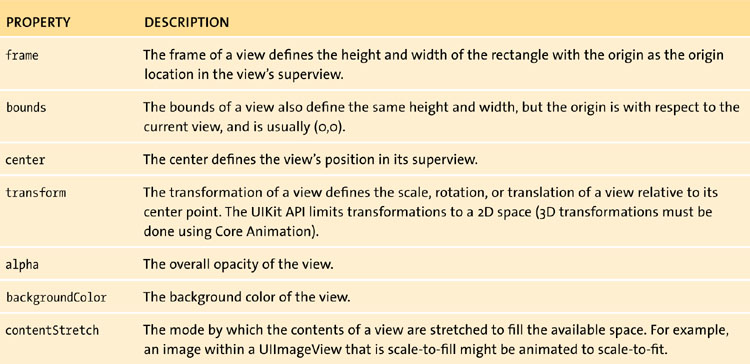
Animations implemented with or invoked through UIKit still use Core Animation, which means at the end of the day they’re executed using the same rendering and compositing engine found in lower-level Core Animation techniques. You’ll find that while these simplified APIs make animating properties in UIView easier, they can also quickly become much more complicated than implementing Core Animation directly—especially when multiple animations are linked together in a series. Implementing Core Animation not only gives you access to additional animatable properties, but also allows you to easily stack and link multiple animations together.
 Tip
TipRemember that UIView operates as the base object for all UI elements in iOS. This means anything that can be animated through the UIView parent class can also be animated in any of the corresponding subclasses.
Linking Quartz Core to Your Project
1 #import <QuartzCore/QuartzCore.h>
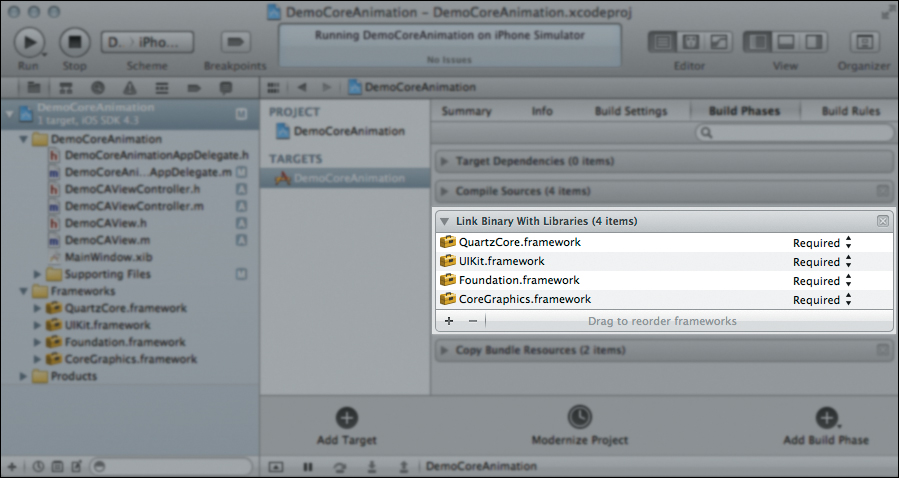
Figure 8.1. Quartz Core framework linked to your Xcode project.
Core Animation Using UIKit
Using the UIKit animation API you can quickly animate UIViews without importing the Quartz Core framework. There are two methods used when implementing Core Animation from UIKit: UIView Animation Contexts and UIView Animation Blocks.
UIKit Animations with Animation Contexts
One of the ways to animate views using the UIKit API is to create a series of UIView animation contexts. These contexts are self-contained animations that can be nested or strung together into a series. You can assign each animation context an animation delegate that responds when the animation triggers key events such as animationDidStop. Let’s start with an example, and then we’ll dissect the animation and have a look at all of the players involved.
1 - ()viewDidLoad {
2 [ viewDidLoad];
3 UIView *box = [[UIView alloc]
initWithFrame:CGRectMake(10, 10, 50, 50)];
4 box.backgroundColor = [UIColor blueColor];
5
6 [.view addSubview:box];
7
8 [UIView beginAnimations:@"box-animate" context:];
9 [UIView setAnimationDuration:1];
10
11 box.backgroundColor = [UIColor redColor];
12 box.frame = CGRectMake(50, 50, 100, 100);
13 box.alpha = .5;
14
15 [UIView commitAnimations];
16
17 [box release];
18 }
This code block is a simple implementation of a viewDidLoad method inside a custom UIViewController. Our animation context starts at line 8 and ends at line 15. But let’s stop and take a look at the setup.
First, in line 3 we create a UIView called box and initialize it with the frame (10, 10, 50, 50). Remember the CGRectMake function defines (x,y,width,height). So our UIView box is initialized with the top left corner at location (10,10) and has a height and width of 50. Next, in line 4 we set the background color of our box to blue, and then add our box as a subview to the view associated with our UIViewController. At this point, our app shows a blue box on the screen.
In line 8 we begin our animation context. Each animation can have a string identifier; in our case we called our animation “box-animate.” In line 9 we set the animation duration of this context to one second.
You’ll notice in lines 11 through 13 we start to change some of the properties of our original blue box: making it red, changing the frame, and decreasing the opacity. Because these changes are made within a UIView animation context, they won’t happen until the animation is committed. Finally, in line 15 we commit the animation.
As soon as we commit the animation, any changes to the animatable properties of the UIView that occurred between the beginAnimation method and the commitAnimation method automatically transition over the duration of the animation context. In our case, the blue box takes exactly one second to animate its color, position, and opacity to the new values set between lines 11 and 13. By the end of our animation, the blue box is no longer blue.
It’s as easy as that! Creating animations using the APIs of UIKit are simple; you just have to remember these simple steps:
1. Create or define a UIView with some set of initial conditions.
2. Begin an animation context.
3. Configure the settings of your animation context including duration, repeat count, animation curve, and so on.
4. Make changes to your UIView properties.
5. Commit the animation to begin animating the transition between changes.
UIKit Animations with Animation Blocks
As discussed in the opening chapter, many frameworks take advantage of multiple processors and multithreading by using blocks and GCD (Grand Central Dispatch). Quartz Core is no exception. As you can imagine, animations are inherently multithreaded as they often run in the background while other, more critical functions are processed in the foreground.
It’s important to note that the block syntax is not required for multithreaded operations. Using the animation context syntax mentioned in the previous section works great for animating UIViews and is extremely efficient when executed in iOS. Using the block syntax, however, can reduce the number of lines needed and allows the developer to define completion blocks that will be executed at the end of an animation. This avoids the chore of setting up a delegate relationship to handle animationDidStop and animationDidStart events, as is needed with the animation context.
 Note
NoteThe following code block implements the same example as before, but this time we’re using a UIView animation block.
1 - ()viewDidLoad {
2 [ viewDidLoad];
3 UIView *box = [[UIView alloc]
initWithFrame:CGRectMake(10, 10, 50, 50)];
4 box.backgroundColor = [UIColor blueColor];
5
6 [.view addSubview:box];
7
8 [UIView animateWithDuration:1
9 delay:0
10 options:UIViewAnimationOptionCurveLinear
11 animations:^(){
12 box.backgroundColor = [UIColor redColor];
13 box.frame = CGRectMake(50, 50, 100, 100);
14 box.alpha = .5;
15 }
16 completion:^( finished){
17 //Add additional code
18 NSLog(@"Animation Finished");
19 }];
20 [box release];
When executed, this code block will output the exact same result as before. Notice the additional options available when using the animation block. In lines 8 through 19 our animation block is defined in a single statement where we declare the duration, delay, timing function, animated properties, and completion block. Additionally, the options parameter in line 10 allows you to define repeat behavior (auto-repeat, repeat indefinitely, and so on) and view transition behavior if animating between views.
Understanding Custom Core Animation Effects
UIKit animations are designed to be hands-off. Without really understanding how Core Animation works, a new developer can quickly and easily implement various animation techniques while iOS does all the heavy lifting of low-level implementation. We’ve already hinted that implementing Core Animation from UIKit limits your capabilities. Let’s start by first understanding some of the technologies and classes involved with implementing Core Animation directly, and in the next section we’ll dive into some concrete examples.
Core Animation Layer (CALayer)
The Core Animation layer, or CALayer, is much like a view—both define a set of properties that make up what is eventually displayed on the screen. In fact, every UIView has a layer property that’s used as a low-level representation of that view. Up to this point, we’ve animated properties like the frame and opacity on the UIView. When we do this, iOS uses Core Animation to animate those properties on the view’s underlying CALayer, which is eventually rendered to the user.
Because we’re working with layers instead of views, we can animate the properties of the layer using Core Animation. As of iOS 5.0, there are over 26 separate properties in the CALayer class that can be animated with Core Animation. Some key properties that are not available in UIKit animations are anchor point for rotation, corner radius, mask layers, and shadows.
For a complete list of animatable properties found in Core Animation, visit iOSCoreFrameworks.com/reference#ca-layer.
CALayers also contain a sublayer hierarchy, much like UIViews contain a view hierarchy. Using this hierarchy you can add multiple layers as a sublayer of another. Remember that Core Animation allows us to transform views in a three-dimensional space. Because of this 3D environment, a layer’s transform matrix not only has an X and Y value, but a Z value as well. The Z value of a layer’s transform matrix represents the depth from the user’s eye. Layers in the layer hierarchy are rendered based on their position in this 3D transform matrix.
While the Z value of the transform matrix will change the size and position of an object, the perspective (visual representation of how the z-axis is rendered on screen) is dependent on the parent layer’s 3D transform matrix. Later, we’ll discuss how to modify perspective in a 3D transform matrix to make realistic 3D effects.
Implicit vs. Explicit Animations
There are two types of animations within the Core Animation framework: implicit and explicit. Unlike UIViews, the CALayer actually contains a presentation layer and a model layer. The model layer is used to store the necessary layer information in memory. The presentation layer is used when displaying the layer on the screen and is optimized accordingly.
If an animation is implicit, it means that the values being animated are changed in the model layer, propagated through the presentation layer, and finally rendered on the screen. If an animation is explicit, the values being animated are stored only in the presentation layer while the original model layer (prior to the animation) remains untouched. This means that unless action is otherwise taken, after an explicit animation has completed the CALayer reverts to its pre-animated state because the underlying model layer is not modified (Figure 8.2).
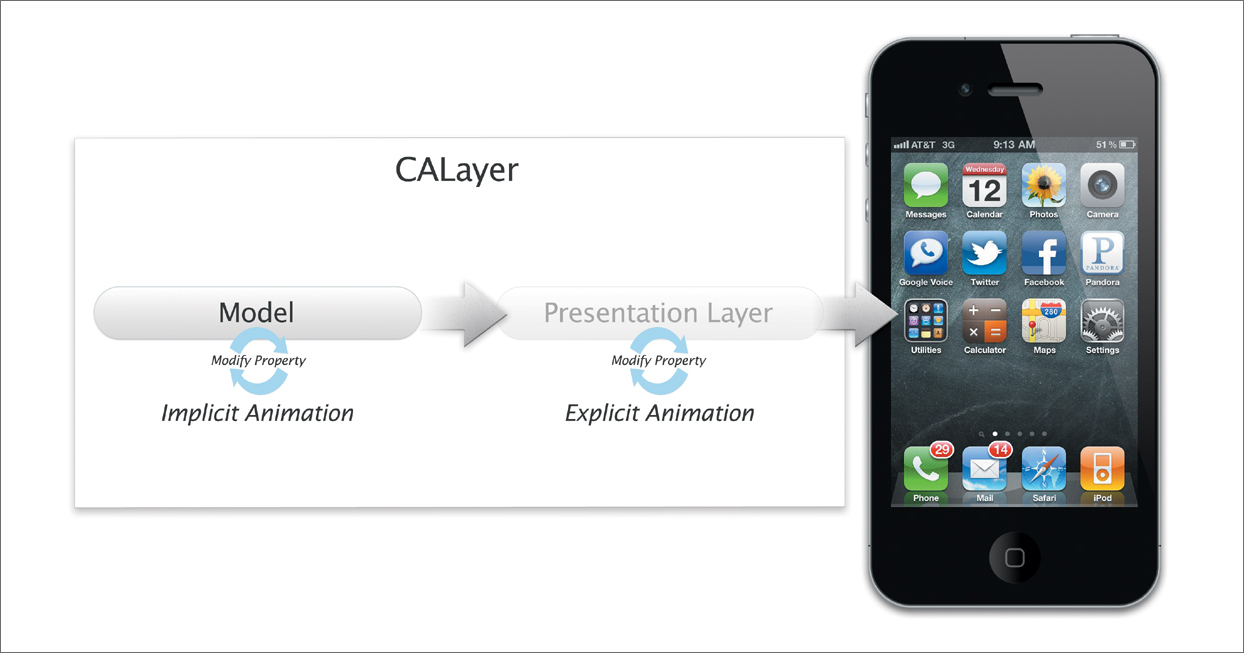
Figure 8.2. Implicit vs. explicit animations in a Core Animation layer (CALayer).
This distinction allows for further performance enhancements in iOS. For example, if you have an animation that’s continuous (such as a spinning icon or image), it’s more efficient to use explicit animations so that iOS doesn’t waste resources by changing the underlying model layer. When you rearrange the app icons on an iPhone or iPad’s home screen and the icons shake, their interpolated positions are never stored in the model layer; rather, these values are only stored in the temporary presentation layer because of explicit animations. Additionally, for complicated animation groups or paths, you can use explicit animations to interpolate values over the duration of the animation, and then set the implicit values in the model when the animation is complete.
Core Animation Object (CAAnimation)
One of the key differences between Core Animation and UIKit animations is the Core Animation class, or CAAnimation. Core Animation defines a subset of animation classes that are used when implementing animations. An animation class is an object that defines the distinct properties of that particular animation. Using these classes, you can animate or transition an entire layer or specific properties of a layer using basic or keyframe animations.
When working with Core Animation, there are three different types of Core Animation classes that you’ll often deal with:
• CABasicAnimation
• CAKeyframeAnimation
• CATransitionAnimation
Both CABasicAnimation and CAKeyframeAnimation are used to animate distinct properties in a layer. To transition an entire layer, you should use the CATransitionAnimation class. Multiple animations can be grouped together in a single animation class called CAAnimationGroup. For example, to change the size and opacity of a layer, you would first create a CABasicAnimation for each property and then combine each of them into a single CAAnimationGroup. This group is then added to the CALayer you wish to animate.
The CAAnimation class and the CAAnimation subclasses are all explicit animations, which means at the end of the animation sequence the original model of the CALayer will be restored.
My First Custom Animation
Now that you understand some of the basics behind Core Animation, it’s time to do some actual coding. There are three simple steps to creating a simple animation using the Core Animation framework.
1. Create a new reference to a CAAnimation subclass.
2. Define the properties of your animation.
3. Assign your animation to a layer.
Once you assign the CAAnimation to your layer, iOS automatically handles the execution of the animation on a separate thread. Let’s take a look at an example. In the following code block, we animate the background color of a UIView to blue and then back again. In this example, self refers to a UIView subclass.
1 CABasicAnimation *animation = [CABasicAnimation animation];
2 animation.toValue = ()[UIColor blueColor].CGColor;
3 animation.duration = 1;
4 animation.autoreverses = ;
5 [.layer addAnimation:animation forKey:@"backgroundColor"];
In line 1 we create a new CABasicAnimation object. In line 2 we set the toValue property, which defines where we want to end up; in our case, we want to end up with a value of the color blue. In lines 3 and 4 we set the duration of the animation in seconds and set the autoreverses property to YES. This means our view will animate over one second to change blue and then automatically reverse the animation back to the original color for an additional one second. Finally, in line 5 we add the animation to the layer using the key "backgroundColor".
The forKey parameter in line 5 is actually very important. The key defined in this parameter should be the same name as the variable you’re trying to animate. If you’re trying to set a specific variable like the width of your view, you can use dot syntax to reference sub-variables in a structure. For example, if we want to set the width of our view by adjusting the bounds, we use:
5 [.layer addAnimation:animation forKey:@"bounds.size.width"];
In this code block, we animate the width property of the bounds by referencing “bounds.size.width” in the key parameter.
This style of referencing properties through a string-based key is known as Key-Value Coding. For more information, visit iOSCoreFrameworks.com/reference#kvc.
As a last thought, remember that CAAnimation (and the CAAnimation subclasses) are all explicit animations, which means at the end of an animation sequence the presentation layer will be restored to the original model. Because we set autoreverse to YES, at the end of the animation sequence the model will equal the presentation layer. However, if you did not want to autoreverse your animation, after adding the animation to the layer (line 5) you would need to add an implicit change to the model layer by saying:
6 .layer.backgroundColor = [UIColor blueColor].CGColor;
Core Animation Examples
Now that you know how to use Core Animation to animate the properties of a UIView from UIKit, it’s time to discuss some of the powerful effects that can only be achieved by implementing Core Animation directly. When you implement Core Animation to create custom animations, not only can you animate properties that are not available in UIView, you can also create highly efficient and completely unique effects. Some of the examples we’ll cover in this chapter include
• Keyframe and path animations (such as moving a message in Mail)
• 3D transforms (such as the Flipboard page turn)
• Particle emitters (new to iOS 5)
Keyframe Animations
A keyframe animation is a basic animation in which you define multiple “key” steps along the way—your keyframes. To do this in UIKit, you have to implement a series of setAnimationDidStopSelector methods to daisy chain a series of animation contexts together, or nest a series of animation completion blocks using the block syntax. With keyframe animations in Core Animation, we can accomplish the same goal with only a few lines of code.
Let’s take the same color change example from the previous section, but this time let’s animate to yellow and green before we animate to blue.
1 CAKeyframeAnimation *animation = [CAKeyframeAnimation animation];
2 animation.values = [NSArray arrayWithObjects:
().layer.backgroundColor,
()[UIColor yellowColor].CGColor,
()[UIColor greenColor].CGColor,
()[UIColor blueColor].CGColor,];
3 animation.duration = 3;
4 animation.autoreverses = ;
5 [.layer addAnimation:animation forKey:@"backgroundColor"];
You’ll notice in this code block that we really only changed a few lines of code. In line 1, instead of creating a CABasicAnimation, we created a CAKeyframeAnimation. Similarly, instead of assigning a toValue in line 2, we assigned an array of values to the property values. Each value in this array will be used as a keyframe, or step value, in the animation. Lines 3 through 5 are much the same. We set the animation duration, define autoreverses, and then add the animation to our layer using the key "backgroundColor".
Notice how the first value in the values array refers to the current color of the layer self.layer.backgroundColor. When a keyframe animation is started, the first value in the values array is used as the initial condition for the animation. To prevent the animation from abruptly changing the initial color, we pull the current value from the model layer of our view’s associated CALayer. That way, when the animation starts, the current layer transitions seamlessly into the first keyframe.
Animating Along Paths
In addition to animating a CAKeyframeAnimation through a series of values, you can animate a keyframe animation along a specified path. The following code sample simulates the drop animation found in the native Mail app on the iPhone.
1 CAKeyframeAnimation *ani = [CAKeyframeAnimation animation];
2 CGMutablePathRef aPath = CGPathCreateMutable();
3 CGPathMoveToPoint(aPath, , 20, 20); //Origin Point
4 CGPathAddCurveToPoint(aPath, , 160, 30, //Control Point 1
220, 220, //Control Point 2
240, 380); //End Point
5 ani.path = aPath;
6 ani.duration = 1;
7 ani.timingFunction = [CAMediaTimingFunction
functionWithName:kCAMediaTimingFunctionEaseIn];
8 ani.rotationMode = @"auto";
9 [ball.layer addAnimation: ani forKey:@"position"];
10 CFRelease(aPath);
Once again, in line 1 we create the CAKeyframeAnimation. In line 2 we start creating the custom path that will eventually be our animation path. In lines 3 and 4 we construct the path using an origin point of (20,20), a curve with control points of (160,30) and (220,220), and an endpoint of (240,380). The origin, control points, and endpoints work together to make a smooth curve in our CALayer. To help you visualize the curve, let’s look at where these points fall in our canvas (Figure 8.3).

Figure 8.3. iOS automatically connects the control points to form a smooth curve.
As you can see from Figure 8.3, iOS connects the control points smoothly, which results in our desired path.
Next, in line 5 we apply the path to our animation, and in line 6 we set the animation duration. In line 7, we set the timing function, which controls how an animation moves throughout the animation. This example uses the EaseIn timing function, which means that the animation will move slowly at the beginning and then accelerate toward the end—exactly the kind of behavior we want in our box-dropping effect. Other timing functions include Linear, EaseOut, and EaseInEaseOut.
Line 8 is unique to the keyframe animation. The rotationMode of a keyframe animation controls how the layer reacts to changes in direction along the path. By setting this value to auto, the layer automatically rotates tangentially to the path. Again, it’s a small detail but one that really sells the dropping effect we’re creating. In lines 9 and 10, we add the animation and clean up some memory.
You can download this and other examples used in this chapter at iOSCoreFrameworks.com/download#chapter-8.
3D Transforms
Core Animation lets you apply a 3D transform matrix to your layers, making it possible to transform a flat layer in three-dimensional space. This does not mean that iOS will add a third dimension to your layer, rather, you can easily manipulate the layer as if it existed in a 3D environment. Both rotation and position can be manipulated on all three axes: x, y, and z. With this capability, you can easily produce the custom 3D flip animation used in the Weather app and, by adding perspective, the page-turn animation used in the popular Flipboard for iPad app.
UIKit animations allow you to rotate an object along the plane parallel with the surface of the screen. By using 3D transforms, however, you can flip your views along the x-, y-, or z-axis, or any combination thereof. The following code sample shows the steps necessary to implement the same 3D card flip seen in the default Weather app on the iPhone and iPod touch:
1. Create a CABasicAnimation to rotate or spin the layer along the y-axis (vertical).
2. Create a CABasicAnimation to scale down the card to enhance the 3D effect.
3. Combine the flip and scale animations into a single CAGroupAnimation.
4. Apply the group animation to the layer.
In this method, we create animations with the animationWithKeyPath method. This allows us to assign the animation key when we first create the animation class, rather than at the end when we add the animation to the layer.
1 //Step 1: Create basic y-axis rotation animation
2 CABasicAnimation *flip = [CABasicAnimation
animationWithKeyPath:@"transform.rotation.y"];
3 flip.toValue = [NSNumber numberWithDouble:-M_PI];
4
5 //Step 2: Create basic scale animation
6 CABasicAnimation *scale = [CABasicAnimation
animationWithKeyPath:@"transform.scale"];
7 scale.toValue = [NSNumber numberWithDouble:.9];
8 scale.duration = .5;
9 scale.autoreverses = ;
10
11 //Step 3: Combine scale and flip into one animation group
12 CAAnimationGroup *group = [CAAnimationGroup animation];
13 group.animations = [NSArray arrayWithObjects:flip, scale, ];
14 group.timingFunction = [CAMediaTimingFunction
functionWithName:kCAMediaTimingFunctionEaseInEaseOut];
15 group.duration = 1;
16 group.fillMode = kCAFillModeForwards;
17 group.removedOnCompletion = ;
18
19 //Step 4: Add animation group to our layer
20 [.layer addAnimation:group forKey:@"flip"];
And just like that, we have our own custom 3D card flip animation! Remember the steps we implemented in this code block were as follows:
1. In lines 2 and 3, create a CABasicAnimation to flip the layer along the y-axis.
2. In lines 6 through 9, create a CABasicAnimation to scale down the card to enhance the 3D effect.
3. In lines 12 through 17, combine the flip and scale animations into a single CAGroupAnimation.
4. In line 20, apply the group animation to the layer.
Adding Perspective
This last example had no true perspective. We faked it by scaling down our layer as the transition progressed. This works great when our pivot point is the center, but what if the pivot point was the edge of the square, as if it were the center binding of a book or page?
One of the reasons the Flipboard page-turn effect stands out is because of the perspective drawn on the page as it’s turned. This is accomplished by applying a 3D transform to our parent layer before the animation is executed.
In the interest of time, we won’t go into the matrix theory and matrix operations involved in explaining or performing a homogeneous transform. There’s a lot of math and a lot of theory behind calculating these transforms, but nine times out of ten you’ll only need to affect one value of this transform matrix to add depth to the visual perspective of the user looking at the screen.
The Core Animation CATransform3D is defined as:
CATransform3D
{
CGFloat m11, m12, m13, m14;
CGFloat m21, m22, m23, m24;
CGFloat m31, m32, m33, m34;
CGFloat m41, m42, m43, m44;
};
To simulate depth as seen by a user looking at the screen, we need to modify variable m34 in this structure’s identity matrix.
1 CATransform3D perspective = CATransform3DIdentity;
2 perspective.m34 = -1.0f/1000.0f;
3 box.layer.transform = perspective;
In line 1 of this code block, we create a new CATransform3D structure based on the 3D transform identity matrix. Next, we adjust the m34 value to a very small number, between zero and negative one. And finally in line 3 we apply our perspective transform to our box layer.
Now, the most important line in this code block is line 2, where we define the intensity of our perspective. In this case, a value of zero assigned to m34 would result in zero perspective; a value of one assigned to m34 would result in infinite perspective. Negative numbers will make the page flip towards the screen, positive numbers will flip into the screen. So, if you wanted to increase the intensity of the perspective on our flip animation, you would make the number closer to negative one, (i.e., –1.0f/500.0f) and if you wanted to decrease the intensity, you would make the number closer to zero (i.e., –1.0f/1500.0f). For my apps, I’ve always found –1/1000 to be an appropriate scale.
1 //Step 1: Set the anchorpoint for our rotation
2 box.layer.anchorPoint = CGPointMake(1, .5);
3
4 //Step 2: Create basic y-axis rotation animation
5 CABasicAnimation *flip = [CABasicAnimation
animationWithKeyPath:@"transform.rotation.y"];
6 flip.toValue = [NSNumber numberWithDouble:M_PI];
7 flip.duration = 1.5;
8
9 //Step 3: Create 3D Perspective
10 CATransform3D perspective = CATransform3DIdentity;
11 perspective.m34 = -1.0f/1000.0f;
12 perspective = CATransform3DRotate(perspective, 0, 0, 1, 0);
13 box.layer.transform = perspective;
14
15 //Step 4: Add animation flip to our layer
16 [box.layer addAnimation:flip forKey:@"flip"];
Particle Emitters
Particles emitters are new to iOS 5. If you’ve never programmed with particle emitters before, they’re conceptually simple to grasp. To help visualize a particle emitter, consider an aerial fireworks display.
In this analogy, each firework is a particle. If you imagine the fireworks display on your iPad or iPhone, each glowing dot that makes up a firework is a separate particle (almost like a separate view or layer, but very, very lightweight). When watching a fireworks display, all of the fireworks launch from the same general location. This launch site is the particle emitter. A particle emitter has a set of properties defining the position, shape, size, and so on.
The particle emitter also manages a list of the fireworks that will launch. From each launch site you have additional properties like the size, frequency of launch, or speed.
All of these analogies and properties carry over directly when dealing with particle emitters.
In iOS, the launch site for our particles is called a CAEmitterLayer. This CAEmitterLayer has four distinct properties:
• emitterPosition: defines where the emitter is located
• emitterShape: defines the shape of the emitter (e.g., line, sphere, rectangle)
• emitterMode: defines where emitter cells are generated on the emitter shape (outline, inside, and so on)
• emitterCells: An array of CAEmitterCells for this particle emitter
You can think of each individual firework as starting off as a CAEmitterCell. Each CAEmitterCell defines its own set of properties such as velocity, birthrate, spin, scale, or contents. But most importantly, each CAEmitterCell also contains a property, emitterCells, which means each CAEmitterCell can operate as its own particle emitter.
So, to simulate a fireworks display we must set up the following conditions:
1. Create CAEmitterLayer as the base of our particle emitter.
2. Define a CAEmitterCell from the CAEmitterLayer that propels a single particle at a specified interval.
3. In the particle that is launched from the CAEmitterCell, define a second CAEmitterCell that generates thousands of small particles in every direction.
The following code block does its best to demonstrate CAEmitterCells. However, the code can be quite involved and a little long. In the example printed in the text, we simply create the “rocket” of our firework; in the code available online, the example continues and creates additional particles for the fireworks effect. Visit iOSCoreFrameworks.com/download#chapter-8 for the complete example.
1 //Create the EmitterLayer for out rocket
2 CAEmitterLayer *mortor = [CAEmitterLayer layer];
3 mortor.emitterPosition = CGPointMake(180,480);
4 mortor.renderMode = kCAEmitterLayerAdditive;
5
6 //Create an invisible particle for the rocket
7 CAEmitterCell *rocket = [CAEmitterCell emitterCell];
8 rocket.emissionLongitude = -M_PI / 2;
9 rocket.emissionLatitude = 0;
10 rocket.emissionRange = M_PI / 4;
11 rocket.lifetime = 1.6;
12 rocket.birthRate = 1;
13 rocket.velocity = 400;
14 rocket.velocityRange = 100;
15 rocket.yAcceleration = 250;
16 rocket.color = CGColorCreateCopy([UIColor colorWithRed:.5
green:.5
blue:.5
alpha:.5].CGColor);
17 rocket.redRange = 0.5;
18 rocket.greenRange = 0.5;
19 rocket.blueRange = 0.5;
20
21 //Name the cell so that it can be animated later using keypath
22 [rocket setName:@"rocket"];
23 mortor.emitterCells = [NSArray arrayWithObjects:rocket, ];
24 [.layer addSublayer:mortor];
The first step in creating a particle animation is to create a CAEmitterLayer, as seen in lines 2 through 4. This emitter layer will generate new CAEmitterCell objects based on the properties set. Here, we called our emitter layer mortar, because in our analogy this mortar will launch our fireworks (just like the CAEmitterLayer launches the emitter cells). Next, in line 7 we create our CAEmitterCell. Lines 8 through 19 we define the behaviors of this specific cell. In lines 8 and 9, we define the longitude and latitude angles (in radians). The longitude angle represents the angle from zero on the x-y axis (parallel to the screen). The latitude angle represents the angle from zero on the x-z axis (into the screen). Line 10 provides a range from the angle defined in line 9—essentially creating a “cone” where particles are shot from.
In this example, we want our fireworks to shoot up from the bottom of the screen. In line 3, we positioned our emitter layer on the bottom of the screen, so we need to adjust the longitude angle to point up. Now, for those of you familiar with the polar coordinate system, you probably noticed that we defined our angle as negative Pi/2. Normally, polar coordinates move from zero to 2Pi in a counterclockwise motion. However, recall that in iOS the (0,0) origin is defined as the top left corner, and the x-axis extends positive to the right while the y-axis extends positive down. For this reason, the polar coordinate system of the latitude and longitude emitter angles are reversed from convention (that is, they move from zero to –2Pi in the counterclockwise direction).
In lines 11 and 12 we define the lifetime of the cell and its birthrate. These values simply represent how long the cell will stick around once it’s been emitted from the emitter layer and how many cells are emitted per second, respectively. While not used in this example, you can also define a lifetimeRange, which adds or subtracts a random value within that range to the specified lifetime. For example, not all fireworks shoot the same height; if we wanted to make this effect more random, we could add a lifetimeRange so each firework was slightly different from the last.
Next, in lines 13 through 15 we define the velocity of our emitter cell and the effect gravity has on that cell. Line 13 sets our initial velocity while line 14 adds a random range so that each rocket is shot with a different intensity. Finally, we set the yAcceleration variable in line 15. Just like the polar coordinates, notice here our yAcceleration is a positive number. Because the y-axis increases in value in the down direction on the screen, and because we want gravity to pull the cell down, we add a positive yAcceleration. If we wanted to push the cell up, we would add a negative value.
If you want to add some realism to your app, you could calculate the specific orientation of the device using Core Motion and apply realistic gravity effects on your particles using a combination of xAcceleration and yAcceleration values.
In lines 16 through 19 we set up the colors of our emitter cell. Actually, because we want our fireworks to vary between all colors (monochromatic fireworks are pretty boring...) we define a color and a color range. Line 16 defines the starting value of each emitter cell to have RGB components: .5, .5, and .5. In lines 17 through 19, we allow those color components to vary by .5 in each direction. This means that the color components of the emitter cell will vary between RGB(0,0,0) and RGB(1,1,1).
Finally and most importantly, after setting up both the CAEmitterLayer and CAEmitterCell, we have to add the cell to the layer. Upon doing so, the layer will start animating it based on the properties and birthrate defined. In line 22 we set the name of our emitter cell (so we can reference it again later, if needed), and in line 23 we add the rocket to the mortar (emitter cell to the emitter layer). Once our emitter layer is set up, we add it to the layer hierarchy of our UIView’s main layer.
Notice that line 23 lets us define an array of emitter cells to a layer. This means you could create different kinds of rockets and add them all to the same mortar. Additionally, remember that each emitter cell can operate as an emitter layer. In the example that continues online, we set up an explosion of particles (fireworks explosion) by simply creating a new CAEmitterCell that has a birthrate of 10,000 particles and then attach it to the rocket. To download this and other examples, visit iOSCoreFrameworks.com/download#chapter-8.
Wrapping Up
At this point, you should have a firm grasp of various Quartz technologies across the Media layer in iOS: Core Graphics, Core Image, and Core Animation. These make up some of the most essential, and exciting, frameworks in iOS 5. They’re vital to core functions, and when mastered, will bring your apps to the next level.
For more reading on this and other frameworks in the Media layer of iOS, check out the following reference materials:
• Core Graphics: iOSCoreFrameworks.com/reference#core-graphics
• Core Image: iOSCoreFrameworks.com/reference#core-image
• Core Animation: iOSCoreFrameworks.com/reference#core-animation