8. Trimming Your Edit
Trimming is the process of adjusting where two clips touch. (The point where they touch is called the edit point.) To me, trimming makes the difference between a home movie and a professional film. Trimming is the process of finding that one spot where two clips transition so smoothly that the viewer barely notices that an edit has occurred.
That’s the good news. The bad news is that you can spend 30 minutes trimming to create the perfect edit; then, when you play it for your friends, it goes by so smoothly that they don’t even notice it.
But the audience notices, because a well-trimmed video captures their attention and holds it in the story, while bad trims keep jarring them back to reality.
Getting Ready to Trim
There are four basic trims, and Final Cut Pro X does all four:
• Ripple. A ripple trims one side of the edit point (one edge of a clip) by moving it to occur at a different time. A Ripple trim always changes the length of a clip and the Timeline.
• Roll. A roll trims both sides of the edit point (the End of one clip and the Start of the next) but moves each edge in opposite directions. A roll trim changes the location of the edit point but doesn’t change the duration of the Timeline.
• Slip. A slip edit changes the content of a shot, without changing its duration or its location in the Timeline.
• Slide. A slide edit changes the location of a clip in the Timeline, without changing its duration or its content.
Additionally, FCP X provides a new trimming interface, called the Precision Editor, and a new trimming tool, called the Position tool, that make the process of trimming both faster and more intuitive. I’ll start with the Precision Editor, because it makes trimming easier to understand.
The last time I counted, Final Cut provides a dozen different ways to trim clips, with multiple ways to accomplish the same thing. Choose the technique that works best for you, because regardless of which technique you select, the end result is the same.
Three Types of Transitions
A transition is a change from one shot to another. There are three basic transitions: cuts, dissolves, and wipes.
• A cut is an instantaneous change from one shot to another. Aesthetically, a cut creates a change in perspective.
• A dissolve is where two clips are superimposed, or blended, on top of each other so that you see both images at once, though in varying degrees, throughout the transition from one shot to the next. Aesthetically, a dissolve implies a change in time or place.
• A wipe, these days, can be darn near anything. Wipes have clips and pieces of clips flipping, flopping, and skedaddling all over the screen. Aesthetically, wipes break the story and take you someplace different. Wipes work best when you don’t use them too much.
Note: When Does FCP Use the Skimmer and When the Playhead?
The skimmer always takes precedence over the playhead unless one of these two conditions is true: The skimmer is turned off or the skimmer is not in the same window as the selected clip.
This chapter on trimming assumes you are working with cuts. Chapter 10 explains how to work with dissolves and wipes.
Why Trim?
Imagine you have two shots. The first shows a wide shot of a person walking up to a door and putting his hand on the door handle, opening the door, and walking through the door. The second shot is a close-up of the door handle, where you see a hand reach in, turn the handle, open the door, and a person walks through the door as the door slowly closes after it.
Now, edit those two shots to the Timeline. In shot 1, you see the person walk up to the door and touch the door handle. In shot 2, you see the door handle but need to wait for several seconds before the hand reaches in to touch it. In this case, the order of the shots is correct, but the timing of the shots is not correct. You need to trim, or adjust, the Start of the second shot so that it starts just as the hand reaches in to turn the handle. In other words, you need to match the action between the first shot and the second shot.
This concept of matching the action is one that underlies much of trimming. You need the action in the first shot to easily flow into the action of the second shot. Sometimes, finding that match is easy. Other times, though, it is devilishly difficult.
Once you’ve matched the action—generally done with a ripple trim—now you have an aesthetic decision to make: When do you want the edit to occur? To go back to the example, do you want the edit to occur before the person reaches the door, which creates a sense of anticipation? Comedy uses this kind of a cut all the time—where you see what’s going to happen before the people on-screen see what’s going to happen.
Or, do you want the edit to occur on the action of turning the door handle? This is emotionally neutral and is used by documentaries to keep a story moving forward without making an editorial comment about it.
Or, do you want the edit to occur late, after you watch the person walk through the door, and then cut to the close-up of the door slowly swinging shut, which creates a feeling of dread or suspense, which the horror genre uses all the time.
In all three cases the two shots are identical. The action is identical. Yet the emotional impact is different. What creates this difference is the timing of the transition, the cut, between the two shots. Changing the timing of a cut is generally done with a roll trim.
Another example of when trimming is necessary is in sports. Let’s say you are doing a sport highlights reel and you are cutting clips to the beat of the music. Each shot runs exactly four seconds and ten frames. So, you edit a shot that runs exactly 4:10—but which 4:10 do you need? The start of the play? The end of the play? The middle of the play?
The answer depends upon what you are trying to highlight—the story of your highlights reel, as it were. So, what you need to do is adjust what that B-roll looks like once you have it edited to the Timeline. That trim is generally done using a slip edit.
For me, the slide edit has been totally replaced by a connected clip. So, in the interest of fairness, I’ll show you both—and after you compare them, you’ll never use a slide edit again.
Explaining Handles
Handles are extra video before the Start (In) point and after the End (Out) point. Handles are needed for adjusting the location of the edit point between two clips.
For example, in Figure 8.1, the gray section after the End in the top clip is the handle—extra video that is part of the clip but not displayed in the Timeline. In the bottom clip, the gray area before the Start is also the handle—part of the clip but also not displayed in the Timeline.
Figure 8.1 Handles, the gray areas, are extra video after the End point and before the Start point.
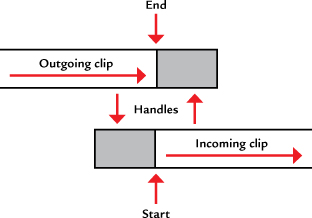
When you trim the End, for example, you are adjusting its location in the clip—moving it later, into the handle, or earlier, into the clip. If there were no handle, you couldn’t move the End any farther to the right to extend the clip; you could move it only to the left, shortening the clip.
Setting Preferences for Trimming
One preference setting makes trimming a whole lot easier—so much so that it should be on by default. (The only reason you might want to turn it off is to improve trimming performance if you are editing HD video in a nonoptimized camera format like H.264 or AVCHD.)
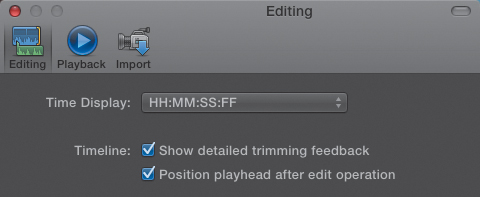
Open Final Cut Pro’s Preferences window (press Command+[comma]) and click the Editing tab (Figure 8.2). Then, select “Show detailed trimming feedback.” This preference switches the Viewer to a special trimming view—called two-up display—when trimming clips. I find this option really helpful.
Figure 8.2 Trimming preferences are set in this screen.
Tip: Switching Your Preference
In case you forget to change this preference, you can quickly switch to two-up display by pressing and holding the Option key. If two-up view is off, this turns it on. If two-up view is on, this turns it off. As soon as you let go of the Option key, the Viewer resets to its default display setting.
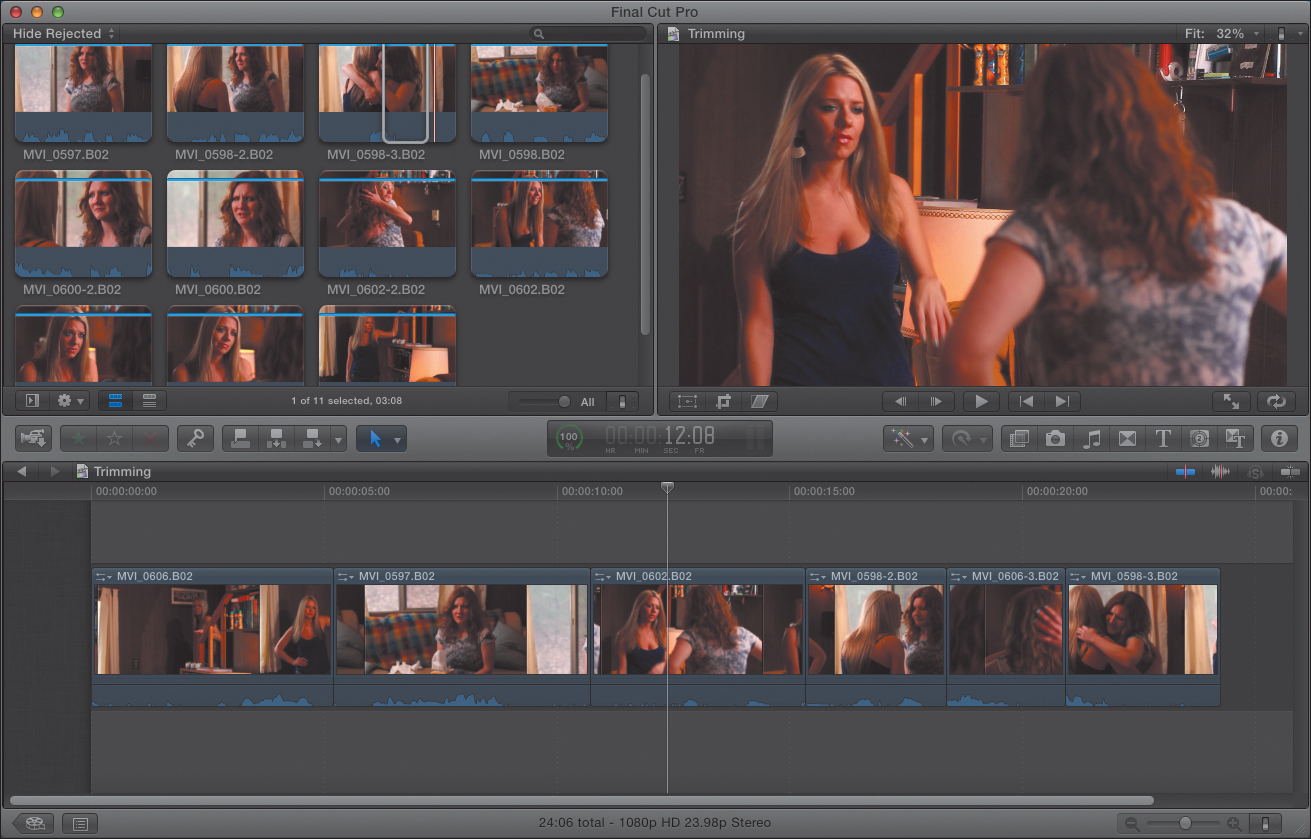
Setting the Scene
Figure 8.3 shows the scene you will be using for most of this chapter. (Thanks, John Putch, for sharing this with us!) This is a six-shot dialogue scene, where one actor comes downstairs to comfort an upset actor. Two physical moves occur between shots—one where the blonde actor crosses from the bookcase to stand next to the couch. The second is where they hug. The order of the shots is correct, but the timing between them is messed up.
Figure 8.3 This is the six-shot scene, from the movie Route 30, too! that you will use in this chapter.
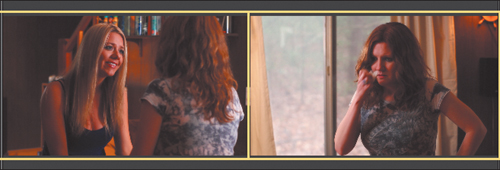
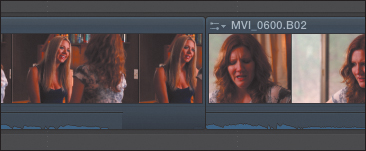
Here’s the first problem: At the end of shot 3 (Figure 8.4), the two women are standing next to each other. Yet, at the beginning of shot 4, the blonde has not yet entered the frame. (I’ve added a yellow border to make it easier to see the two frames.) The outgoing shot is on the left (the End of shot 3), and the incoming shot is on the right (the Start of shot 4).
Figure 8.4 In the shot on the left, the two women are together. In the shot on the right, they are still apart. The shot order is correct, but the trimming is not.
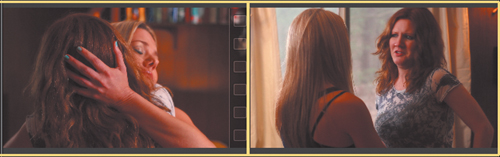
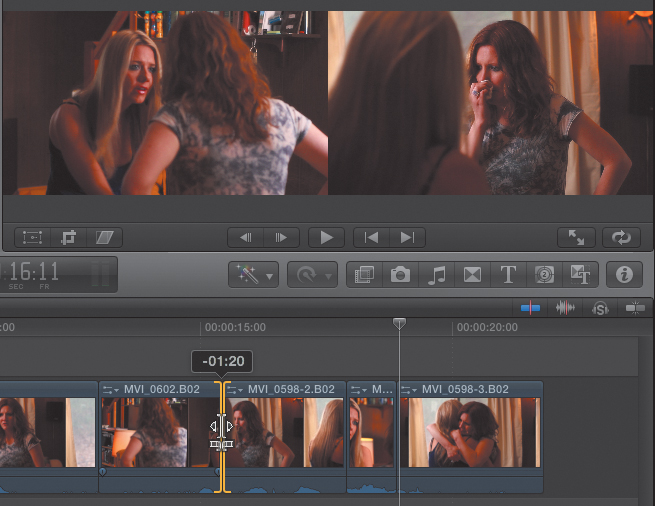
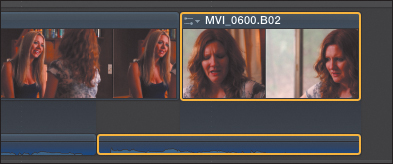
Here’s the second problem: At the end of shot 5 (Figure 8.5), they are in the middle of a hug. At the start of shot 6, the hug has not yet started. (Again, the outgoing shot is on the left, and the incoming shot is on the right.)
Figure 8.5 Another example of a trimming error. In the first shot, they are hugging. In the second shot, they are not yet touching.
As long as I am pointing out problems, the first shot has a problem, because I edited the shot to the Timeline before the director called “Action.” I need to remove the excess video before the start of the first shot.
The Precision Editor
Apple added a new trimming tool to FCP X called the Precision Editor. To open the Precision Editor, double-click the place where two clips touch (the edit point) on the primary storyline. The Precision Editor only works with clips on the primary storyline; I’ll talk about trimming connected storylines later in this chapter.
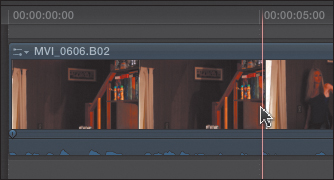
The Precision Editor presents an expanded view of the two clips (Figure 8.6); the outgoing clip is on the top, and the incoming clip is on the bottom. The brighter portions of each clip are what you see in the Timeline. The dimmer portions are the handles, the unused portion of each clip that you use for trimming.
Figure 8.6 The Precision Editor provides a highly accurate and intuitive way to trim your clips.
The yellow highlight allows you to move the edge of a single clip, which is a ripple trim. The gray “thumb” between them in the middle allows you to change the position of the edit point itself, which is a roll trim.
Perform a Ripple Trim
To fix the problem of the actors not being in the same physical position (see the earlier Figure 8.4), you need to adjust the Start of the incoming clip so that the position of the blonde actor matches the end of the outgoing clip. When you are adjusting one clip but not the other, you are doing a ripple trim.
Let’s take a closer look at the edit point (Figure 8.7). Notice that there is a yellow bar highlighting the end of the outgoing clip. This highlights the End (or the Out) of the clip—the last frame of that clip that appears in the Timeline when you play your project.
1. To select the Start (or In) of the incoming clip, click the leading frame of the bottom clip. The selection is indicated by a yellow bar.
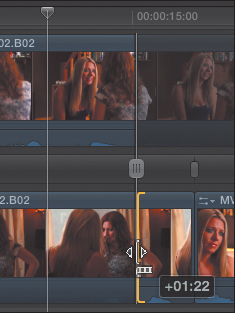
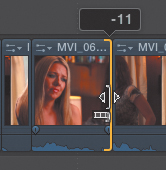
2. Using either the Select tool or the Trim tool (which I haven’t really talked about yet), grab the yellow bar and drag the edge left to move the Start of the clip earlier or drag it right to move it later (Figure 8.8). The small number box shows how much you are moving the edge of the clip in seconds and frames. Positive numbers mean you are moving to the right; negative numbers mean you are moving to the left. (In Figure 8.8, I moved the edit point 1:22 to the right.)
Figure 8.7 The yellow highlight indicates which edges of an edit point are selected. In this case, the last frame of the End (or Out) is selected.
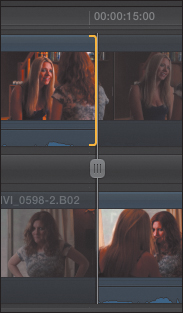
Figure 8.8 Drag the yellow bar in the bottom clip to change the Start of a clip to more precisely match the action from the top shot (outgoing) to the bottom shot (incoming).
When you trim, you are changing where a clip starts or ends.
In this case, you are moving the Start of the bottom clip to occur later so that the ending action in the top shot matches the starting action in the bottom shot. Drag the yellow bar until the action of the two shots essentially matches. (I say “essentially” because it will rarely ever be perfect. Your goal is not perfection but believability.)
Tip: Cool Skimmer Tip!
Here’s a very cool trick you can use in the Precision Editor. Once you have the edit point selected (Start, End, or both), position the skimmer on the frame you want the edit point to move and click. The selected edit point jumps to the frame you click.
As you move the edge, the display in the Viewer changes (Figure 8.10). The left clip remains the same, because you did not change the End of the outgoing clip. Instead, the right image changes as you move the Start of the incoming clip.
Figure 8.10 The two-image display in the Viewer continually shows you the results of dragging the edge. Notice that now the two women are standing together.

3. When you are done trimming these two clips, press the Return key to close the Precision Editor.
4. To preview the edit, press Shift+/. This backs up the playhead a few seconds, plays for several seconds through the original location of the playhead, and then resets the playhead to its original position. (This is one of my favorite keyboard shortcuts.)
That’s it. You’ve done your first ripple trim! As you’ll discover, there are lots of different ways to do a ripple trim, but they all do the same thing—move one side of the edit point, the Start or the End, to the left or the right to get the shots to match.
Perform a Roll Edit
Now that you have the two clips in sync—sync means that the action matches between the two shots—you get to decide when you want the edit to occur. Do you want to change shots before the blonde woman starts walking? During her walk? After she stops walking? Any of those options could be correct.
As you’ll discover, there’s no one aesthetic way to trim an edit. The technique is the same, but the aesthetics continually change. For example, maybe you decide that you need to cut while the blonde actor is walking toward the actor near the couch. (There is a major school of thought that says, when in doubt, cut in the middle of action, rather than when the action is complete.) If so, you should change the End of the outgoing clip, not the Start of the incoming clip. There’s no right answer; it all depends upon your story.
A roll trim allows you to change the location of the edit point by moving both the Start and the End the same amount but in opposite directions (Figure 8.11).
1. Double-click the edit point to open the Precision Editor.
2. This time, grab the handle in the middle and drag it. Now, both images in the Viewer change because you are moving both—but in opposite directions. This keeps the action in sync while you figure out the best place to put the edit point.
In this case, I decided the best place to put the edit was after the two women came together (Figure 8.12).
Figure 8.11 Moving the “thumb” between the two clips in the Precision Editor changes the position of the edit point earlier or later in the Timeline; this is a roll trim.
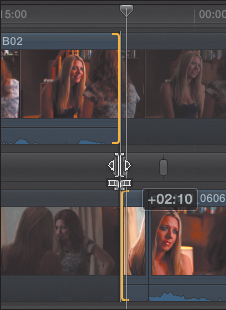
Figure 8.12 The edit point is now positioned so the two women are holding hands. Both the outgoing and incoming edges were moved using a roll trim.

To summarize, a ripple trim adjusts one side of the edit. A roll trim adjusts both sides of the edit.
Note: How Can You Move to Different Edit Points in the Precision Editor?
When you are done trimming an edit point in the Precision Editor, before you close it, press the Up or Down arrow key to jump to the next or previous edit point. This is a fast way to trim a number of edits by quickly loading each into the Precision Editor.
• To trim from the beginning of a clip, put the skimmer where you want to trim and press Option+[.
• To trim from the end of a clip, put the skimmer where you want to trim and press Option+].
• To trim away footage outside a selected range, use the Range tool (press R) to select a range inside a clip and press Option+.
Figure 8.13 FCP X also has the ability to quickly trim the start or end of a clip.
Twelve Trimming Techniques
In addition to the Precision Editor, there are a number of different ways to accomplish both these trims. For example, here is a list of all the different ways you can do a ripple trim. (The following techniques all assume you have sufficient handles on the selected edge of the clip.)
1. Using the Select tool, select the edge of the clip you want to move, that is, the Start or the End. In Figure 8.14, I have selected the End of the outgoing clip.
Figure 8.14 Here I’m using the Selection tool to drag an edge in the Timeline, without first opening the Precision Editor.
2. Then, do one of the following:
• Drag the selected edge with the Select tool.
• Position the skimmer or playhead where you want the selected edit point to be placed, and press Shift+X. This jumps the selected edit point to the position of the skimmer. (This shortcut can also be used in real time to trim an edit point.)
• Press [comma] to move the selected edit point one frame left.
• Press Shift+[comma] to move the selected edit point ten frames left.
• Press [period] to move the selected edit point one frame right.
• Press Shift+[period] to move the selected edit point ten frames right.
• On the keypad, press [minus] followed by a number; then press Enter. This moves the selected edit point the number of frames you typed to the left.
• On the keypad, press [plus] followed by a number; then press Enter. This moves the selected edit point the number of frames you typed to the right. (Negative numbers move left; positive numbers move right.)
• Pressing Option+[ trims from the beginning of a clip to the skimmer.
• Pressing Option+] trims from the end of a clip to the skimmer.
• Pressing Option+ trims everything outside the selected range.
Tip: Keyboard Shortcuts in the Precision Editor
All the keyboard shortcuts in this bulleted list work exactly the same way in the Precision Editor, too.
Figure 8.15 Oops! Instead of dragging the edge of a clip, I am dragging an audio fade button. To avoid this, drag nearer the top or bottom of the edge, not the middle.
Note: On Editing and Trimming
In spite of what you may think, there is no one perfect place to edit and trim anything. It all comes down to your story. Every edit carries both emotion and information with it as it transitions from one shot to the next. Your job is to figure out how to trim your edit to enhance your story—partly this is experience, partly it is learning from others—and keep the story you are trying to tell firmly in mind as you trim your project.
Introducing the Trim Tool
The Select tool allows you to do ripple trims without needing to resort to the Precision Editor. But it won’t allow you to do a roll trim. That’s where the Trim tool comes in. The Trim tool allows you to do roll, slip, and slide trims.
As you’ve seen in the Precision Editor, a roll trim adjusts the edges of two touching clips at the same time, and it’s used to adjust the position of the edit point in the Timeline.
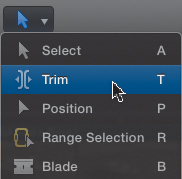
1. To do a roll trim, without using the Precision Editor, select the Trim tool (press T) or select it from the Tool menu (Figure 8.16).
Figure 8.16 A portion of the Tool pop-up menu, showing the trimming tools.
With the Trim tool, do the following:
2. Click the edit point you want to adjust. The two edges will glow yellow (Figure 8.17). (If one edge glows red, it means that clip has no handles. You can make the red-edged clip shorter but not longer. If both edges glow red, you have no handles on either clip, which means you won’t be able to alter the timing of this edit point.)
Figure 8.17 In this specially constructed image, I am rolling the edit point in the Timeline at the bottom, while watching the effect of the roll in the two-up display in the Viewer, above.
3. Drag the Trim tool in the direction you want to move the edit point.
In this example, I’m dragging the roll tool to the left to move the edit point to where the blonde woman is reaching forward to take the hand of the red-haired woman. I am cutting during the action, rather than afterward.
Every keyboard shortcut that we discussed earlier with the Ripple tool works exactly the same in moving the Roll tool, with the keyboard, skimmer, mouse, and timecode. Specifically:
• Drag the selected edit point with the Trim tool; the Select tool does ripple trims, and the Trim tool does roll trims.
• Position the skimmer or playhead where you want the selected edit point to be placed, and press Shift+X. This jumps the selected edit point to the position of the skimmer.
• Press [comma] to move the selected edit point one frame left.
• Press Shift+[comma] to move the selected edit point ten frames left.
• Press [period] to move the selected edit point one frame right.
• Press Shift+[period] to move the selected edit point ten frames right.
• On the keypad, press [minus] followed by a number; then press Enter. This moves the selected edit point the number of frames you typed to the left.
• On the keypad, type [plus] followed by a number; then press Enter. This moves the selected edit point the number of frames you typed to the right. (Negative numbers move left; positive numbers move right.)
To be truthful, I use roll trims far more than ripple trims in my own editing.
Perform a Slip Edit
A slip edit changes the content of a shot without changing its duration or location in the Timeline. The most common way of using this is for cleaning up the content of B-roll; however, you can use this trimming technique everywhere: primary storyline, connected storyline, and connected clips.
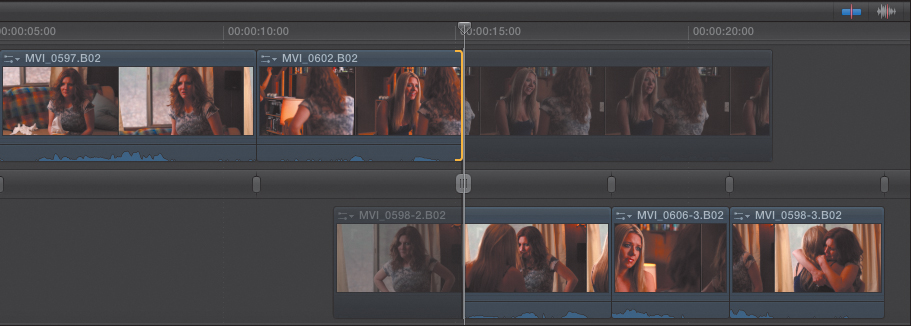
In Figure 8.18, I have a single connected clip as a B-roll over Dr. Cerf’s interview. For the purposes of this example, I used a clip with a clear color difference from the start to the end of the clip. This is still a single clip, as you can see from the yellow outline. Notice, also that the clip starts exactly at 5:00 in and ends at 15:00 in the Timeline.
1. Select the Trim tool (press T) and click in the middle of the selected clip.
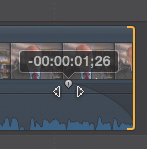
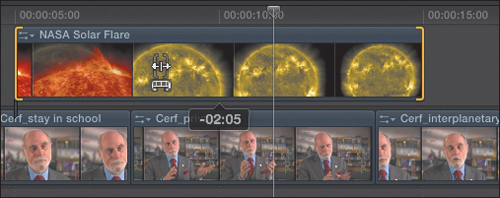
2. Drag the clip with the Trim tool. As I drag the contents of the clip, notice that the duration is not changing. Nor is its location in the Timeline (Figure 8.19). However, the contents of the clip shift, depending upon which way I drag the Trim tool.
Figure 8.18 To illustrate a slip edit, I selected a connected clip with a clear color difference from the beginning to the end of the clip.
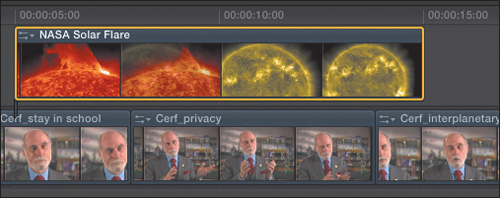
Figure 8.19 Dragging the middle of the clip with the Trim tool moves the content of the clip earlier, or later, without changing its position in the Timeline or its duration.
This is a very powerful edit that allows you to change the content of a clip without changing anything else. I use this tool constantly when editing B-roll, sports, and music—just about everywhere when I want to get the best possible content to fit within the clip.
Perform a Slide Edit
A slide edit is a holdover from the days of Neanderthals; though, perhaps, I’m being a bit biased. In 35 years of editing, I’ve never used this technique. However, as soon as I leave it out of the book, I’ll be inundated with e-mails, so here goes....
A slide edit moves a clip in the primary or connected storyline earlier or later in that storyline relative to the clips before it and after it, provided the clips on both sides of this clip have sufficient handles. If either clip is missing handles, you won’t be able to slide the clip.
For instance, here I have a clip sandwiched between two other clips (Figure 8.20). The slide edit allows me to move the clip earlier but not earlier than the previous clip. Or, it allows me to move this later but not later than the following clip.
Figure 8.20 Here are three different clips in the Timeline. I will slide the middle one.
To slide a clip, hold the Option key while dragging the middle of the clip with the Trim tool. As you see here, the clip has moved significantly to the left, while the duration of the three clips remains the same (Figure 8.21). The content remains the same, the duration remains the same, but the location changes.
Figure 8.21 Holding the Option key while dragging the Trim tool performs a slide edit. I cannot tell you how thrilled I am.
Note: When Is a Slide Edit Useful?
I’ve been reminded that a slide edit is still relevant if a series of B-roll clips are connected as a storyline and you want to slide a B-roll clip in the middle of the connected storyline to position it better with the underlying narration or sound bites.
The problem with this edit is that the middle clip cannot move earlier than the start of the clip before it or later than the end of the clip after it. The slide edit was invented when editing software supported only two tracks of video. With the unlimited layers that Final Cut Pro X offers, it is much easier to simply edit your B-roll clip as a connected clip, at which point you can move it wherever you want, without being limited to the boundaries of the clip before it or the clip after it.
Special Case: Split Edits Between Audio and Video
I haven’t talked much about audio yet. The reason for this is that it is easier to understand the techniques of editing if you take things in small steps. Once you add audio, your projects get much more interesting—and complex. However, since this is a chapter on trimming, I should explain how trimming works with audio.
Note: Trimming Keyboard Shortcut
When in slip or slide mode, you can nudge a selected clip one frame left or right using [comma] or [period]. Nudge it ten frames left or right using Shift+[comma] or Shift+[period], always provided you have sufficient handles at the end of the clip.
A split edit is an edit where the video and the audio between two clips change at different times in the Timeline. It is used when you want to hear one thing and see something different. Split edits have a variety of names, including L-edit, L-cut, or video-precede-audio (forming the shape of an L) where the video edits before the audio; and J-edit, J-cut, or audio-precede-video (forming the shape of a J) where the audio edits before the video.
For example, John is yelling at Martha. Most of the time, you want to see the person doing the yelling. However, in this case, his anger is undeserved, so you want to see Martha react while you hear John yell. This requires a split edit, where the video (Martha) precedes her audio when she responds to John.
One of the new features in FCP X is that the audio is attached to the video so that when you edit a clip to the Timeline, the audio and video travel together. You can see the waveforms—that is, a visual representation of the volume of a sound associated with a clip—by turning them on using the Switch in the lower-right corner of the Event Browser or by selecting one of the four left icons in the Switch in the Timeline.
Note: When to Use Split Edits
This technique is used constantly in dramas, documentaries, reality TV, and just about everywhere two people are shown talking.
For instance, Figure 8.22 shows what the waveforms look like attached to three clips in the Event Browser. And, “attached” is the right word. Until you disconnect them, the audio and video clips are permanently attached and show as a single clip.
Figure 8.22 Waveforms are the visual representation of the volume of sound, displayed at the bottom of a video clip. Human speech is “bursty.” This means that when we talk, every syllable is a single “puff” of waveform.

The small puffs of lighter blue represent the volume of the sound. Where the puffs are missing, the sound is silent. Where the puffs are tall, the sound is loud. The puffs vary in size as the sound varies in volume. When we speak, each syllable is a separate burst of sound. Generally, you edit audio where the waveforms are shortest.
Note: Can You Tell What People Are Saying?
By reading waveforms? No. All you can tell from looking at waveforms is how loud a sound is. (Well, that’s not totally true. After ten years of editing the sound of my own voice, I was finally able to recognize the waveform for “Um.” Clearly, a breakthrough in my editing.)
Let’s go back to the scene where the two women are talking. Say you want to see the blonde woman listening while the red-headed woman is talking. Currently, you are changing shots to see each actor as they speak.
You create this effect using a split edit. Here’s how:
1. As usual, select the two clips where you want to create a split edit.
2. Choose Clip > Expand Audio/Video, or press Control+S.
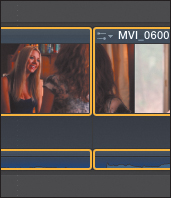
The audio separates from, but does not detach from, the video. In this example, both clips are still selected (Figure 8.23).
Figure 8.23 When you expand the audio and video, the clips remain attached, but you can see the two different components of each clip.
Note: On Overlapping
Overlapping is good for sound effects but generally bad for dialogue. (As always, there are exceptions.)
3. Using the Select tool, drag an edge of the audio. In this example, I am dragging the audio of the second clip to the left so that I hear the incoming clip’s audio start sooner (Figure 8.24).
Figure 8.24 To create a split edit, drag the edge of one of the audio clips.
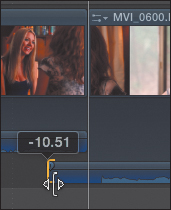
In this example, I am hearing both the incoming and outgoing audio at the same time. To fix that problem, I would also drag the outgoing audio clip to the left so that the two don’t overlap.
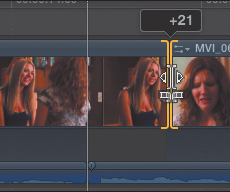
Or, select the Trim tool, click the edit point between two video clips, and drag (Figure 8.25). In this example, I’m dragging the outgoing video portion of the clip to the right so that you see the video of the outgoing clip while listening to the audio of the incoming clip.
Figure 8.25 You can use the Trim tool to roll the video edit point to create the split edit. This is generally a better choice to avoid audio overlap, as you saw in the prior example.
While you can’t use the Trim tool to roll the audio edit point, you can use the keyboard. Place the playhead at the expanded edit point, and press Shift+ to select the audio edit point. Then, press [comma] or Shift+[comma] to roll the audio in one, or ten, frame increments to the left. Use [period] or Shift+[period], to roll the audio in one, or ten, frame increments to the right.
The result, when all the dragging is complete, is that you have created a J-edit where the audio of the incoming clip starts before the video of the incoming clip (Figure 8.26). This allows you to watch the face of the blonde woman reacting to what the red-haired woman is saying.
Figure 8.26 Notice, with this selected clip, that the audio starts earlier than the video. This is called a split-edit or a J-edit.
4. When you are done, you can collapse the clips back to a single level condition by choosing Clip > Collapse Audio/Video.
However, the problem I have with collapsing clips with split edits is that the darker blue area of the Timeline where the audio overlap occurs is so very hard to see that you may forget it is there (Figure 8.27). My recommendation is that once you expand your audio, leave it expanded so you know it’s there.
Figure 8.27 After creating a split edit, collapsing clips makes seeing the split edit very, very difficult, as this screenshot illustrates.
Tip: Reactions Are Everything
Drama, in many cases, is not in the person speaking but in the face of the person reacting to the person speaking. Keep this in mind as you are trying to figure out what to show in a scene.
Special Case: Trimming Connected Clips
Trimming connected clips is simpler than trimming inside a storyline, because some trim tools no longer apply. For example, the Precision Editor cannot be used for connected clips. A roll trim can be done only inside a storyline where two clips touch. And a slide edit can be done only inside a storyline where three clips touch.
However, that doesn’t mean you can’t trim a connected clip. For example, you can change the length of the clip by dragging the Start or End of a clip. Since this isn’t really a trimming tool, changing the duration of the connected clip has no effect on any clips before or after it—unless they bump into each other.
Also, the slip edit works the same way it does in the primary storyline: Select the Trim tool and drag inside the connected clip.
Special Case: Trimming Connected Storylines
Connected storylines have two significant benefits compared to connected clips: They support trimming and transitions.
For this reason, it often makes sense to convert even single connected clips to connected storylines. To do this, select the clip or clips you want to convert and choose Clip > Create Storyline or press Command+G. Once connected clips are converted into a connected storyline, all the trimming techniques you learned earlier in this chapter will work—with the exception of the Precision Editor.
Special Case: Trimming Stills
Working with stills is also a special case, for the same two reasons: trimming and transitions.
Although you can edit stills directly to the Timeline, more often than not, you are using the stills to illustrate what someone is talking about in the primary storyline. It is far smarter to convert and edit your stills into a connected storyline. (By the way, Chapter 12 shows you how to create moves on your stills.)
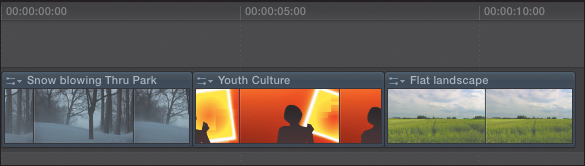
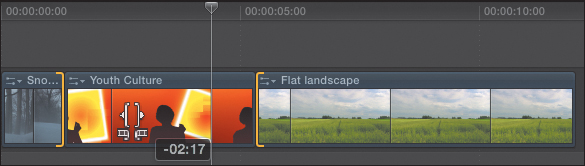
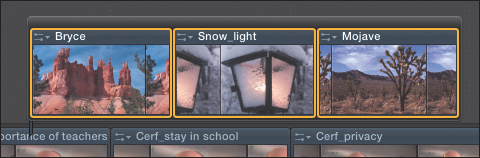
For instance, I started with three full-screen still images that are edited as three connected clips and selected. To convert them into a connected storyline, press Command+G or choose Clip > Create Storyline. This converts the selected clips into a connected storyline indicated by the dark gray bar at the top of the clips (Figure 8.28).
Figure 8.28 Three still images converted into a connected storyline (notice the dark gray bar over the top of the images).
At this point, a connected storyline acts just like the primary storyline for trimming—except that you still can’t use the Precision Editor.
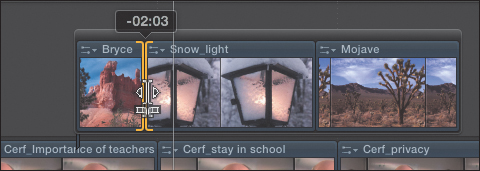
To do a ripple trim, drag the edge of a clip. Notice that as you do, the duration of the connected storyline changes. To do a roll trim, select the Trim tool (press T), click an edit point, and drag—just like you learned earlier (Figure 8.29). And, as you learned, a roll edit does not change the duration of the connected storyline.
Figure 8.29 Use the Trim tool to drag an edit point left or right to do a roll trim. In this example, the edit is rolling to the left 2:03.
How Do You Set the Default Duration for a Still?
There is no limit to the duration of a still image clip. You can adjust durations using any of the trimming techniques I discussed in this chapter. The default duration of a still image is four seconds and you can change this in the Editing preference pane (Figure 8.30).
Figure 8.30 By default, all stills have a duration of 4:00. You can change this in Editing preferences.

To change the duration of multiple still images in the Timeline, select the images you want to change, press Control+D, and then enter the new duration into the Dashboard.
This last technique, changing duration using the Dashboard, is my favorite technique for changing the duration of anything—clip, still, transition, everything. I use it in both the Event Browser, to set the duration of a clip, and in the Timeline.
Summary
Editing and trimming are central to creating video that other people want to watch. Just as there are a wide variety of editing techniques you can use to edit your clips to the Timeline, there is an equally wide variety of trimming tools you can use to get it to flow smoothly.
This chapter on trimming wraps up the first half of the workflow I introduced in the first chapter—picking the content and telling the story. After you make a side trip into the world of audio in the next chapter, you’ll pick up the workflow again and follow it into the second half—making your video look perfect using transitions and effects.
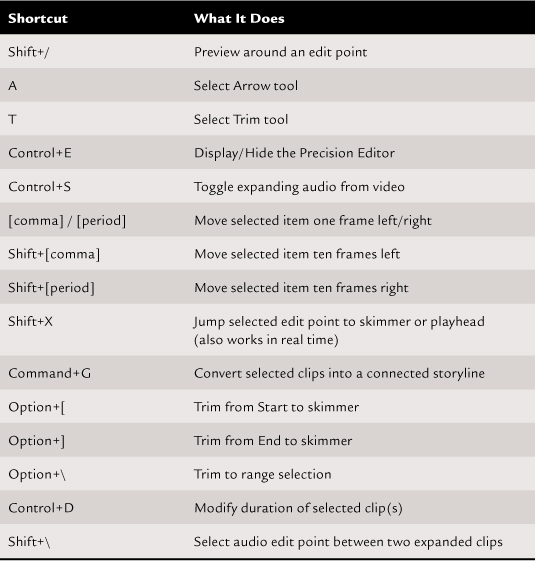
Keyboard Shortcuts