9. Audio
I’ve covered editing in significant detail. But I concentrated on the video. Special features and controls apply when you add audio to the mix. This chapter builds on what you’ve learned already and extends it to the world of sound.
There are two elements of audio that will be covered later in the book: Chapter 10 offers a unified discussion of transitions for both audio and video, and audio effects are discussed in a bonus chapter you can download according to the instructions in this book’s Introduction.
However, before I cover audio in Final Cut Pro X, let’s review some audio basics.
Audio Basics
Human hearing is defined as a range from 20 cycles per second at the low end to 20,000 cycles per second at the high end. (This also assumes you are 18 years old; as you get older, you slowly lose the ability to hear higher frequencies.)
Whenever we graph human hearing, we always draw a line, with bass on the left and treble on the right (Figure 9.1). Twenty cycles per second (most often, just called cycles) is such a low pitch that it feels more like a vibration than a specific tone; 20,000 cycles per second is such a high frequency that it sounds more like wind through the pine trees than an actual pitch.
Figure 9.1 Normal human hearing goes from 20 cycles to 20,000 cycles, with bass on the left and treble on the right.
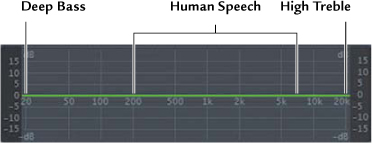
All noise, music, speech—everything we hear—is carried within that range of frequencies. There isn’t a separate musical frequency range that’s just for music; instead, the frequency of everything we hear is located somewhere on that range from 20 to 20,000 cycles.
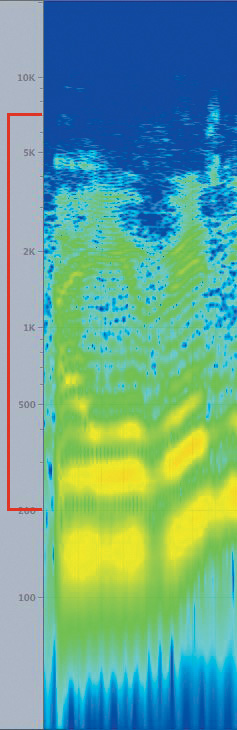
While human hearing goes from 20 to 20,000 cycles, human speech does not. Human speech ranges, roughly, from 200 cycles to 7,000 cycles; men are slightly lower, and women are slightly higher. Kids are definitely higher. (The frequency range of human speech is indicated by the bracket in Figure 9.1.)
Another interesting thing about audio is that it isn’t linear; it’s logarithmic. It isn’t a straight line; it’s a hockey stick. In Figure 9.2, the numbers on the left indicate the frequency of the sound. The colors on the right indicate the amount of sound at that frequency—ranging from yellow (a lot) to blue (very little).
Figure 9.2 This is a graph of human speech based on frequency.
Every time the frequency doubles (or cuts in half), the pitch of a sound moves up (or down) an octave. This means that human hearing covers a 10-octave range from 20 to 20,000 cycles.
Sound is displayed using peak levels in decibels (dB), as shown in Figure 9.3. (In fact, FCP X uses a system called dBFS—Decibels Full Scale.) The loudest a sound can be is 0 dB. All softer sounds are measured as negative numbers. It is also interesting to note that, like frequencies, audio volume is also logarithmic.
Figure 9.3 Audio volume is measured using meters. Louder sounds create taller green bars. Sound is displayed as peaks measured in dB (decibels) indicated by the numbers on the left.
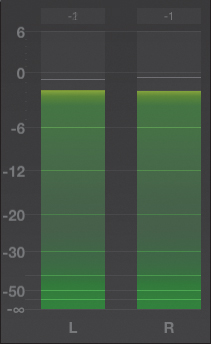
Each time the audio level drops by 6 dB, the perceived audio volume is cut in half. That means an audio level of -6 dB is 50 percent of the gain at 0 dB. I’ll have more to say on this before this chapter ends, but this is so important that I want to start by mentioning it now.
Note: Vowels Are Not Consonants
Vowels—a, e, i, o, and u—are generally low-frequency sounds. Consonants—um, all the other letters—are high-frequency sounds. The warmth, character, and sexiness of a voice are carried by the low frequencies. Diction and clarity are carried by high frequencies. You’ll see how this applies when I talk about audio effects later in the book.
Note: The Funny Letters F and S
The letters F and S are called fricatives. A fricative is caused by forcing air across a small space, like the lower lip and upper teeth. The frequency needed to distinguish the letter F from the letter S is 6,100 cycles for a man’s voice and 8,000 cycles for a woman’s voice.
Note: A Joke
It always amuses me that the absolute maximum, in other words, the loudest, a sound can be equals 0. And all audio levels are measured in negative numbers where the bigger the number, the softer the sound. Well, it seems funny to me.
Audio in Final Cut Pro X
Working with audio in Final Cut Pro X provides a new set of controls and a new dimension of the interface for you to learn. In Chapter 8, you learned about waveforms. A waveform is a visual representation of the volume of the sound in a clip. When the waveforms are tall, the sound is loud. When the waveforms are small, or nonexistent, the audio is soft. Human speech tends to go in bursts, while music tends to move more like waves.
The Audio Meters
You measure audio levels—which are also called volume and gain—using the audio meters. There are two sets of audio meters in Final Cut Pro. The small version is located to the right of the dashboard (Figure 9.4).
Figure 9.4 The meters on the right side of the Dashboard display audio volume. Clicking them toggles the display of the large audio meters.
Or, if you click the small audio meters in the dashboard, it opens the large audio meters on the right of the Timeline (Figure 9.5). Drag the left edge to resize them. (You can also press Shift+Command+8 to display the audio meters, but it is much cooler to click the icon!)
Figure 9.5 These larger audio meters are much more useful for accurately measuring the volume of a sound.
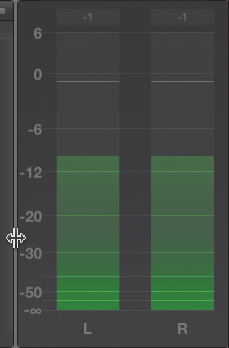
As you look just above the bouncing green bars, you’ll see a thin white line. Because Final Cut’s audio meters measure peak levels, the green bars are continually bouncing during playback. They’re bouncing so much, in fact, that they become difficult to read.
So, Apple added that thin line just above them—called a Peak Hold indicator—that indicates the loudest the audio has been during the last second. That way, you always know how loud your audio is during playback.
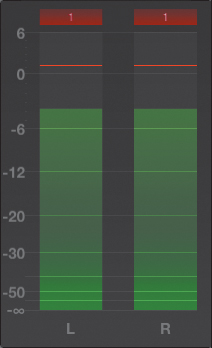
Figure 9.6 Red lights at the top of the meters indicate your audio is too loud. This must be fixed before you export your final program.
Audio Skimming
Another nice feature in FCP X is audio skimming. Just as you can skim the video in a clip, you can also skim the audio. This gives you a high-speed way to review what a clip sounds like.
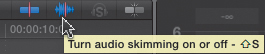
To turn audio skimming on, video skimming must be turned on first (Figure 9.7). (Keyboard shortcut S.) Then, turn on audio skimming by either clicking the button indicated in the screenshot or pressing Shift+S.
Figure 9.7 Clicking this icon, or pressing Shift+S, toggles audio skimming on or off.
What’s cool about skimming is that it is pitch-corrected. Normally, if you dragged quickly across an audio clip, the pitch would rise sharply. Or, if you dragged slowly, the pitch would sound truly lugubrious (it’s a word; you can look it up). However, Apple added pitch shifting so that no matter how fast or slow you drag the audio skimmer, the tempo will change but not the pitch. Neat.
Viewing Audio in a Clip
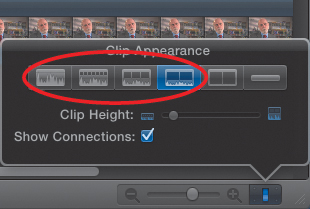
You can view the audio associated with a clip in several ways. Click the Switch in the lower-right corner of the Timeline, and then click any of the four icons to the left to display waveforms in the Timeline (Figure 9.8).
Figure 9.8 Click the Switch and then click one of the four left icons to display waveforms in the Timeline.
As you saw in Chapter 8, another way to see the audio attached to a video clip is to select the clips you want to expand and then choose Clip > Expand Audio/Video, or press Control+S.
This separates the audio from the video but keeps the clips attached. You use this technique to create a split edit. Also, as you’ll discover in the next chapter, you expand clips to create an audio transition. The benefit of expanding the audio is that because the clips are still attached, there’s no risk that the audio and video will go out of sync. To collapse the audio back into the video, choose Clip > Collapse Audio/Video or press Control+S.
Tip: Display Faster!
A fast way to expand the audio from the video is to double-click the audio waveforms.
You can also detach clips, which creates separate audio and video files. The danger with this method is that it becomes very easy for the audio and video to get bumped out of sync. When that happens, unlike Final Cut Pro 7, there is no indicator to show that clips are out of sync. By the way, to reconnect audio that is detached from the video, select both clips and create a compound clip. Aside from a simple Undo, there is no way to reattach audio once it has become detached.
Audio Analysis on Import
When you import a clip that contains audio, or later when it is in the Event Browser, you have the option of analyzing the audio of a clip (Figure 9.9). This analysis provides three options:
• Analyze and fix audio problems. This looks at three common problem areas: loudness, background noise, and hum removal. Loudness tries to fix clips that were recorded too loud or too soft to make the levels more uniform. Background noise removal reduces, but does not remove, noises like air conditioners. Hum removal reduces common electrical hum at either 50 Hz or 60 Hz. Final Cut will automatically fix problems it thinks are severe and flag problems it thinks are moderate. You can decide later whether to accept these changes.
• Separate mono and group stereo audio. Interviews are almost always recorded as mono, either by putting the same signal on both audio channels or by putting one mono signal, such as the interviewer, on one channel and a second mono signal, such as the guest, on a second channel to create dual-mono audio. Stereo is where similar, but not the same, audio is placed on both channels. When this option is checked, Final Cut Pro converts channels improperly captured as stereo to dual-channel mono, and vice versa. When it comes to mixing, dual channel mono is much more flexible than stereo.
Figure 9.9 These are the three analysis options for audio.
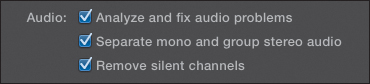
• Remove silent channels. If, by accident, you fed audio to only two channels but your camera recorded six, when you import from the camera, you are bringing in four unnecessary audio channels that are just taking up hard drive space. This option mutes the channels you don’t need so they don’t get in your way.
By the way, when discussing audio, I use channels and tracks essentially interchangeably. Since FCP X uses a trackless timeline, don’t confuse my use of the word tracks with the horizontal audio and video tracks in an FCP 7 Timeline. There’s probably a deep, dark, difference between these two words...but in this book, I’m using both words to mean the same thing.
You can analyze clips in the Event Browser, after they were imported, by selecting the clips and choosing Modify > Analyze and Fix. Once a clip is edited into the Timeline, the options change. To analyze Timeline clips, select the clip, or clips, and then do one of the following:
• Select Auto Enhance from the Enhancements menu—the Magic Wand icon (Figure 9.10).
Figure 9.10 Once clips are edited into the Timeline, you can analyze them using the Enhancement menu.
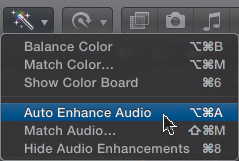
• Choose Modify > Auto Enhance Audio.
• Press Option+Command+A.
• Click the Auto Enhance button in the Audio tab of the Inspector.
In addition to the three tests performed on a clip during analysis, auto-enhancing a clip adds one more: equalization. This lets you adjust ranges of frequencies in a clip to boost the bass, reduce the treble, or match the sounds between clips. This allows you to perform a variety of simple EQ modifications.
Introducing the Inspector
The Inspector is new to Final Cut Pro. The Inspector is “where you make changes.” You’ve seen it in other applications, but this is the first time for FCP. You use the Inspector to make changes to clips, transitions, and effects. You won’t use the Inspector much for editing, but you will use it constantly for effects.
To display the Inspector, click the Inspector icon (the small letter i) or press Command+4. When the Inspector is closed, the icon is gray. When the Inspector is open, the icon is blue (Figure 9.11).
Figures 9.11 Click the Inspector icon (indicated in blue) to toggle the Inspector open or closed. The keyboard shortcut is Command+4.

There is a great deal of depth and power in the Inspector. For now, I just want to point out the Audio Enhancements feature.
Choose Window > Show Audio Enhancements or press Command+8. This opens the audio enhancements pane in the Inspector. Three settings are displayed: Loudness, Background Noise Removal, and Hum Removal (Figure 9.12).
Figure 9.12 The Inspector is where you are able see, modify, or disable audio enhancements. Click a blue square to enable or disable a feature.
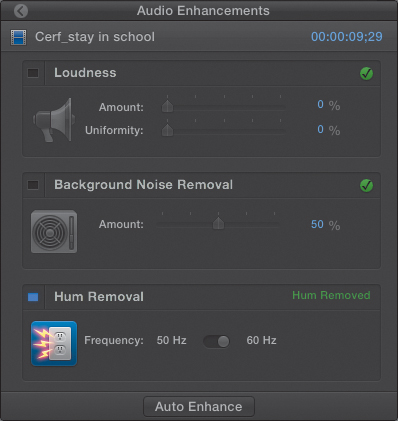
A green check mark (on the right) indicates that the clip was checked for that potential audio problem and it wasn’t found. A blue box (on the left) indicates a problem was found (in this case too much hum) and that the hum was removed. (Click the slider to set the hum removal to either 50 or 60 cycles. North America uses 60 cycles for power; just about everywhere else uses 50 cycles.) If you don’t want to apply a particular enhancement, click the blue box to turn it off. When no blue box is displayed, that enhancement is disabled.
How do you decide whether to use a setting? Listen to it. Whichever sounds better—on or off—is the one you should use. If you are not quite happy, drag one of the sliders a little bit in each direction and listen to hear whether things improve or get worse. If they get worse, drag in the opposite direction. If they get better, keep dragging until the audio sounds as good as it can.
Audio Techniques
Because audio deals with sound, rather than picture, there are specific techniques you can use to make editing audio easier. This section presents several of them.
Editing Audio
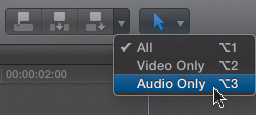
The process of editing audio is the same as editing video—everything I’ve already covered still applies. For instance, to edit a clip audio-only from the Event Browser to the Timeline, you still need to set a Start and an End. However, before you edit the clip, either select Audio Only from the small pop-up menu next to the Edit buttons or press Option+3 (Figure 9.13). When you edit the clip, only the audio moves down to the Timeline.
Figure 9.13 To edit just the audio of a clip in the Event Browser into the Timeline, check Audio Only in this pop-up menu.
Audio can be edited in one of two ways in FCP X—attached to a video clip or as a separate clip. Audio can also be edited into three locations: into the primary storyline, as a connected clip, and into a connected storyline.
What’s a little disconcerting about editing audio in FCP X is that the audio clip can appear below or above the primary storyline. (Yes, I know, the idea of audio above a video clip does smack of heresy!) But imagine you have multiple audio clips playing simultaneously and a few sound effect clips that are intended to play in sync with connected B-roll. Rather than always keeping video above and audio below and constantly scrolling vertically to see where the B-roll and sound effects are, you can move the sound effects above the primary storyline so they are closer to the B-roll clip and, thus, easier to locate, sync, and work with together.
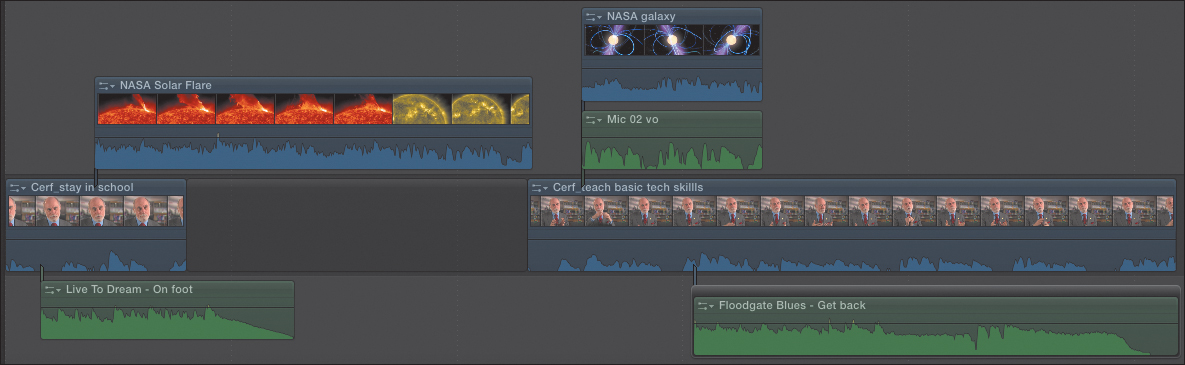
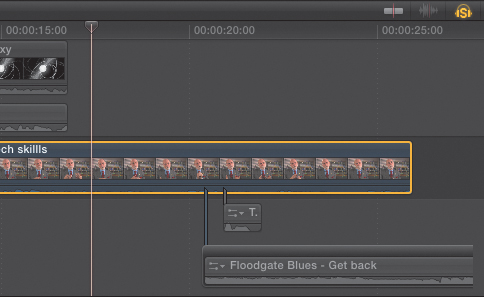
Here, for instance, are four different audio examples (Figure 9.14):
• Audio as part of a video clip in the primary storyline
• Audio as a connected clip below the primary storyline
• Audio as a connected clip with video above the primary storyline
• Audio as part of a connected storyline
Figure 9.14 Four different audio configurations are illustrated here: audio in the Primary Storyline and as connected clips. Notice that connected audio clips can go above video!
In general, only audio synced to video edits into the primary storyline; all other audio is some form of a connected clip.
Note: How About Placing Video Below the Primary Storyline?
You can do that. However, unlike audio, vertical position makes a difference for video. Assuming you haven’t made any changes to the video (such as applying an effect), video on higher layers always blocks video on lower layers. So, in general, place your audio wherever you want. But place B-roll video clips above the primary storyline.
The keyboard shortcuts to edit audio into the Timeline are the same as for video, which I illustrated in Chapter 6:
• E for an append edit
• D for an overwrite edit
• W for an insert edit
• Q for a connected edit
The Music Browser
In addition to Events, there is one special place where you can find music and sound effects and, like the Inspector, it’s a part of the interface I haven’t talked much about: the Music and Sound Browser.
In fact, I haven’t talked about the browsers at all. Allow me to introduce the browsers, located on the right side of the toolbar from left to right (Figure 9.15):
• Effects
• Photos
• Music and Sound Effects (the blue icon)
• Transitions
• Text and Titles
• Generators
• Themes
• Inspector (This isn’t really a browser, which is why there is a space between its icon and the browser icons.)
Figure 9.15 Each of the seven browser icons opens to display a wealth of resources.
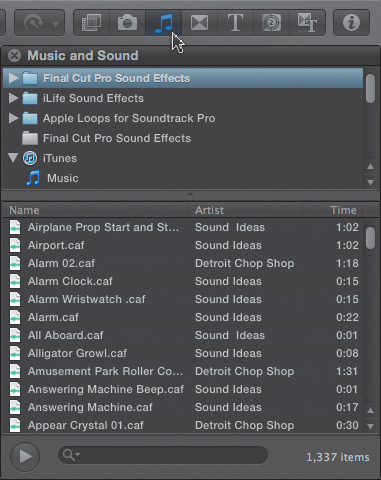
1. Click the Music Browser icon to display the browser. The only browser that has a default keyboard shortcut is the Effects Browser. All other browsers need to be clicked to be opened. However, as you learned in Chapter 3, you can easily create custom keyboard shortcuts to open any browser.
This browser contains audio that’s part of the additional content you can download after you purchased Final Cut Pro X. (Since this content includes hundreds of royalty-free sound effects and other materials, it’s worth the time to download. Use Software Update to get your copy.)
2. Each browser window has three sections: categories, individual files, and a search window. In this browser, the categories are at the top. Most of the time, the categories are on the left side.
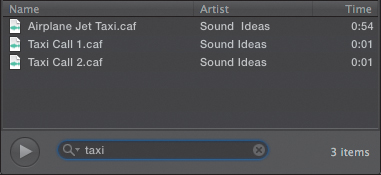
There are way too many elements to scroll through, so at the bottom of every browser is the search window. As an example, I entered the word taxi, and from those hundreds of clips, FCP found three taxi sound effects (Figure 9.16).
Figure 9.16 Use the Search text box at the bottom to locate elements by filename.
3. To preview an effect, click the Play arrow to the left of the Search box, or simply double-click the clip.
4. To reset the Search box to empty, which means you’ll see all your clips again, click the cancel button—the X in a circle on the right side of the search text box.
As an aside, if all your clips are suddenly missing, either your entire hard disk has gone missing, there’s been a disruption in the Force, or, more likely, you have something entered in the Search text box. That’s because when you close a browser, the Search text box doesn’t empty. Click the Cancel button (the X in a circle) to clear it.
5. When you are done working with a browser, either click the Close button in the top-left corner (another X in a circle) or click the Browser icon in the toolbar.
Unlike editing from the Event Browser, there are no default keyboard shortcuts that quickly edit a selected element from an effects browser. In the case of audio, you need to drag the clip from the Music and Sound Browser to either the Event Browser or the Timeline. (Double-clicking is also an option when you get to placing effects, but this won’t work for audio.)
As you saw in Figure 9.14, an audio clip can be placed above or below the primary storyline. This has zero impact on playing the audio. Audio clips play fine regardless of where they are placed.
The Timeline gives you a lot of flexibility in placing audio to help you keep your project organized, without worrying about whether it will play. (It will always play!)
Working with Clips
There are several things you can do specifically with audio clips, such as adding a fade-in or fade-out, adjusting pan, or selecting specific audio channels to play in the Timeline. (Because audio transitions are a special case, I will cover transitions between audio clips in Chapter 10.)
Fade-in and Fade-out
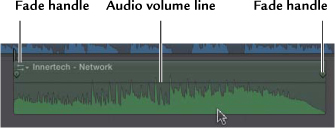
Whether skimming is turned on or off, when you move the cursor into an audio clip, two fade handles show up on either end of the clip, just above the black volume line (Figure 9.17).
Figure 9.17 Each audio clip has fade handles at each end, allowing fades at the beginning and end of each clip, plus the horizontal volume line.
To add a fade-in or fade-out to a clip, drag a fade handle left or right. This is just like adding a video fade using the opacity slider. (The small black box measures the duration of the fade using timecode.) To remove a fade, drag the fade handle back to the edge of the clip.
Something that FCP X borrowed from Soundtrack Pro is the ability to change the shape of the fade—this is a feature I like a lot! To display the four fade shapes, right-click a fade handle (Figure 9.18).
Figure 9.18 There are four different curves you can apply to an audio fade. Control-click a fade handle to select one.
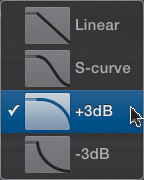
• Linear. This performs a straight-line fade, also called equal power. This is best used when fading to and from black. If you use a linear transition when cross-fading between two audio clips, there will be a slight (-3 dB) drop in volume in the middle of the cross-fade.
• S-curve. This does an ease-in and ease-out of a fade, with the midpoint gain equaling 0 dB.
• +3dB. This adds a +3 dB boost in gain in the middle of the cross-fade; this shape is also called equal gain. This is best used when cross-fading between two audio clips. This fade is the default setting and is, generally, the best choice for most situations.
• -3dB. This adds a -3 dB drop in gain in the middle of the fade. This is best used when you need to avoid a noise at the very beginning (for a fade up) or end (for a fade out) of a fade.
To change the fade curve applied to a fade handle, simply select the curve you want. The shape of the current curve is displayed in the clip. Final Cut makes it easy to see at a glance what curves are applied to a clip.
Fade handles and fade curves also apply to audio which is attached to video. For example, as soon as the cursor enters the boundary of the audio waveforms attached to a video clip, the fade handles appear. As you add fades, the duration of the fade is indicated by the small black number box.

I will talk about mixing later in this chapter, for now I want to mention that adjusting the volume of an audio clip is easy—you just drag the “black rubber band” up (to make the clip louder) or down (to make the clip softer). Apple calls this line the volume control (Figure 9.20).
Figure 9.20 To adjust the audio volume of the clip, drag the volume line up to increase the volume or down to decrease it.
Dragging the black line this way changes the volume of the entire clip by the same amount.
Adjust the Pan
Just as you can adjust the volume of a clip, you can also adjust the pan. Pan determines where, in the left-right space between two speakers, a sound appears. Although you can adjust volume in the Timeline, you need to use the Inspector to adjust pan. And, seeing as you’ll be working with the Inspector for the rest of this book, this is as good a place as any to learn about it.
1. Select the clip who’s pan you want to adjust. Press Command+4 to open the Inspector.
Note: A Note on Panning
Generally, you want dialogue and narrator audio panned close to 0. This assures that principal dialogue can be heard, even if one of the speakers on the TV doesn’t work. Sound effects can pan as far toward the edges of the sonic field as you want. Keep dialogue very close to the center.
2. Click Audio at the top of the Inspector. This displays the audio controls associated with a clip (Figure 9.21). For example, in the Inspector you can adjust the volume of a clip using the slider or type a value for the audio into the number to the right of the slider. (It turns blue when you can enter values into it.)
Figure 9.21 The Audio section of the Inspector. This allows adjusting volume, pan, channel configurations, and audio enhancements.
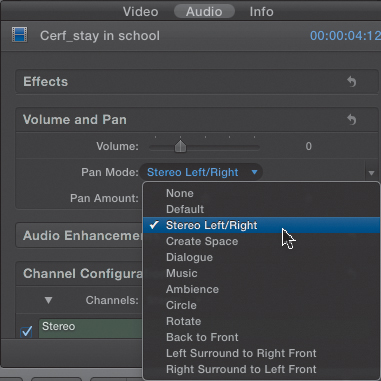
Next to the words Pan Mode is the word None. This means that no special settings have been applied to the pan.
3. Click None, and the pan menu appears. Most of the time, the best choice is Stereo Left/Right. This allows you to change the pan settings for the selected clip. (Default means the default settings for the clip.) All the other settings in this pop-up menu relate to surround mixing.
A pan setting of zero means a mono clip is panned to the center—evenly distributed between the two speakers. As you drag the pan slider left or right, the sound moves left or right between the two speakers. (A pan setting of 0 for a stereo clip means the left channel is coming out the left speaker and the right channel is coming out the right speaker. Generally, changing pan on a stereo clip is not a good idea.)
4. You can either drag the slider or type a value between -100 and +100. (Negative numbers move the sound left; positive numbers move the sound right.) In this example, I panned the dialog just slightly to the left, to -17 (Figure 9.22).
Figure 9.22 Drag the pan slider left to move the audio toward the left speaker or right to move the sound to the right.

Channel Configuration
Most audio clips are either mono or stereo. However, some camera formats record multiple channels of audio, and some audio-editing applications export six, or more, channels of audio. That’s the good news. The bad news is that you may not want all those channels. Or, you may have an interviewer on one channel that you don’t want to hear. In other words, you want to select which channels play in the Timeline. The Inspector solves this problem, too, by using the Channel Configuration option.
In this example, I imported a six-channel clip that was exported, by mistake, as a surround clip from Soundtrack Pro. The problem is that I want to use only two channels from this clip, as opposed to all six. Final Cut Pro correctly interprets this clip as a surround 5.1 clip—it has no way of knowing that I made a mistake.
Here’s how to turn off the channels you don’t need (and this trick also works if you bring in two channels and want to use only one).
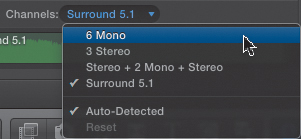
1. Click the words Surround 5.1 next to Channel Configuration (Figure 9.23), and change the setting to match how you want your clip to sound. In my case, I have six discrete channels, so I set this to 6 Mono. If you have a stereo pair that you want to convert to dual-channel mono, set this to Dual Mono.
Figure 9.23 To change the number of channels audible in a clip or change a clip from stereo to mono, adjust the Channel Configuration setting.
2. The Inspector shows all channels associated with that clip. Uncheck the blue checkbox next to the channels you don’t want to play, and you’ll hear only the channels that are checked (Figure 9.24).
Figures 9.24 Set the Channel Configuration to mono, and then uncheck all the channels you don’t want to hear. In this case, I turned off four channels.
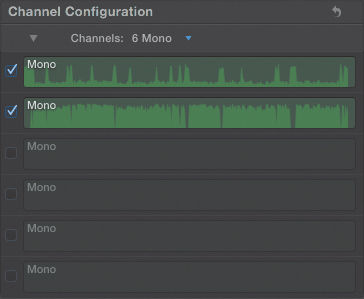
3. These excess channels are not deleted; they’re merely muted so that you don’t hear them. To hear them again, click the blue checkbox to turn it back on. Also, this has no effect on the source media stored on your hard disk.
Special Situations for Audio
Working with audio in FCP X is typically pretty straightforward, even when you encounter special situations. This section covers a few of those and gives you some techniques to use.
Working with Dual-Channel Mono
Many interviews are recorded using dual-channel mono audio, where the interviewer is on one channel and the guest is on another. When you edit the clip to the Timeline, you will automatically hear both channels. However, you have audio level control only on the stereo pair, not each individual channel.
If you want to hear only the guest, mute the interviewer’s audio channel in the Inspector as just discussed. However, in the current release, if you want to hear both channels, with separate audio level control for each, the best way is to use the Razor Blade (B) to cut the clip when you want to switch between channels. Then, using the Inspector, mute the channel you don’t want to hear for each portion of the clip.
Soloing and Muting Clips
It is often helpful to hear one clip, or a small set of clips, and have everything else silent. In Final Cut 7 you could do this using the green track visibility buttons on the left side of the Timeline, but tracks don’t exist in FCP X. There’s a very easy way to solve this—solo a clip.
1. First, as always, select the clip or clips you want to solo. (Soloing does not work on clip ranges.)
2. Click the Solo button—the letter S wearing headsets—in the top-right corner of the Timeline, or press Option+S. The button glows gold.
All nonselected clips go gray and become inaudible. Soloing affects only the audio of a clip, not the video (Figure 9.25).
Figure 9.25 When the Solo button glows gold, all nonselected clips are grayed out—visible but inaudible.
3. To make everything audible again, click the Solo button, or press Option+S.
4. You can take this one step further and make a clip or selected group of clips inaudible and invisible.
5. Select the clips you want to hide and press V. This dims all the selected clips so they are visible as objects in the Timeline but not visible or audible during playback or export.
6. To bring them back, press V again.
Recording a Voice-Over
Voice-overs are a staple of video production. A voice-over is an audio-only recording of a narrator who is describing, in some way, what is happening on-screen. Most of the time, the narrator will be recorded outside the edit suite—either on-camera or in a recording studio. However, sometimes, you need to record a quick scratch track (scratch meaning temporary or for initial editing only) because you just don’t have time to go to a studio. You need to record this audio right now and get the project done and gone.
Final Cut Pro makes it easy to record a voice-over, and here’s how:
1. First, position your playhead where you want the voice-over to start. (Unlike FCP 7, recording a voice-over does not record in a range.)
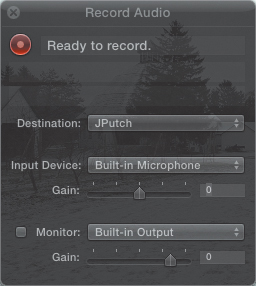
2. Choose Window > Record Audio to display the controls to record your audio (Figure 9.26).
• Destination: This is the Event that will store your voice-over recordings.
• Input Device: This is the source you want to use for the audio recording. Generally, this will be a microphone attached to your computer.
• Gain: Use this to adjust the level of your recording. In general, you want the audio meters (also called VU meters) to bounce around 75 percent of the distance from left to right. In other words, more green is good—up to a point.
• Monitor: Check Monitor to allow you to listen to your audio as you are recording it. Generally, you would only monitor audio using headsets.
• Gain: Use the lower gain slider to adjust the output volume.
Figure 9.26 This is the main interface to record voice-overs.
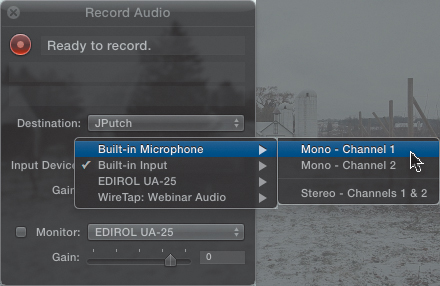
Configure the setup for your microphone and set the level (Figure 9.27).
Figure 9.27 Use the input device to select the audio source. Generally, audio sounds better the closer the microphone is to your mouth.
3. Click the red button to start recording. Recording starts at the current position of the playhead in the Timeline and runs until you click the red button (or press the spacebar) to stop.
4. The voice-over appears as a stand-alone clip in both the Event Browser and the Timeline. Once it appears in the Timeline, you can move, edit, or trim this clip the same as any other clip.
The original recording file is stored in the Event folder that you set as a destination.
Syncing Double-System Audio
Final Cut Pro X has the ability to sync double-system clips. A double-system clip is one where the audio was recorded on one device and the video was recorded on another. A typical example of this is shooting with an (H)DSLR camera, which has very poor sound recording. So, the audio would be recorded on a digital audio recorder while the video is recorded on the camera.
Essential to getting the audio and video synced up is providing some common point—a clapper slate, a still camera flash, a production assistant clapping their hands—that provides a clear indication of where to sync the two files. This is called the sync point.
Final Cut Pro can sync multiple video and audio clips and, in doing so, creates a compound clip. The original clips in the Event Browser and the source media on the hard disk are not affected by this process.
Sync points can be markers (my personal favorite), matching timecode, file creation date, and audio content. If there are no matching elements, FCP syncs them based on the starting point of each clip.
For example, say two clips were shot double-system using a clapper slate. Put a marker where that slate “claps” by positioning the skimmer or playhead at the frame where you want the marker and pressing M. (As a note, if the clips are stored in two different Events, it is best to move one of the clips so they are both stored in the same Event.)
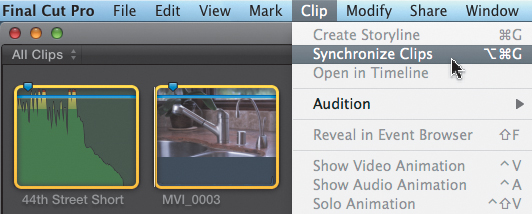
After you’ve created a sync point marker for each clip, select the clips you want to sync and press Option+Command+G, or choose Clip > Synchronize Clips (Figure 9.28).
Figure 9.28 Use markers to create a sync point for both the audio and video clips, and then synchronize the two clips to create a single clip you can use for editing.
A new compound clip is created and stored in the Event Browser. The name of the clip starts with Synchronized Clip: followed by the name of the video clip. When you open it, you’ll discover the clips are aligned using their markers.
You can rename a compound clip in the Event Browser by double-clicking the name. To rename a compound clip in the Timeline, select it, and then go to the Info panel in the Inspector.
Double-click the compound clip to open it in the Timeline and notice that both clips are aligned based upon the position of the markers. You can add, modify, or delete clips in this compound clip the same as any other compound clip.
Precise Audio Editing
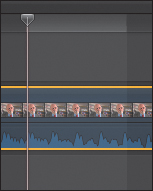
When you edit audio clips in the primary storyline, you are restricted by the frame boundaries between video frames to editing in single-frame increments. However, you can edit the audio in connected clips much more precisely. For instance, zoom into the Timeline using Command+[plus]. The light gray area extending to the right of the playhead represents a single video frame (Figure 9.29).
Figure 9.29 The light gray area represents the duration of a single video frame.
However, you can zoom in much further when you are editing a connected clip. Remember at the beginning of this chapter when I mentioned that sampling is how you convert analog audio into something the computer can store? Well, most audio recording for video uses 48,000 samples per second—which we call “48k” for short. All those thousands of samples provide lots of room for precise editing.
Go to the Final Cut Pro > System Preferences > Editing tab (or press Command+[comma]) and change the display from timecode to timecode plus subframes (Figure 9.30).
Figure 9.30 Changing this Editing preference to timecode plus subframes allows editing audio in connected clips to 1/80th of a frame.
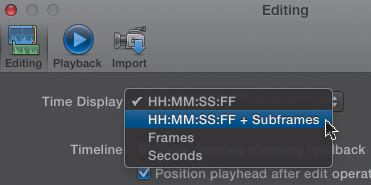
A subframe divides the audio portion of a frame into 80 parts. Notice that now the Dashboard displays a timecode of hours:minutes:seconds:frames.subframes. Subframes mean you can make adjustments 80 times more precise than a video edit. (The smallest increment you can use for video editing is a single frame. So, if you are shooting at 60 frames per second, the shortest duration you can edit video is 1/60th of a second. For the same frame rate, you could edit audio down to 1/4800th of a second!)
To see how this works, choose View > Zoom to Samples, or press Control+Z. Zoom all the way in. Notice, now, that as you move the skimmer around, the frames are not changing in the Dashboard (Figure 9.31). Instead, the subframe number changes. You are zoomed so far in that an entire frame more than fills the Timeline.
Figure 9.31 Notice that now the Dashboard displays timecode plus subframes.
In the next section, on mixing, I’ll show you how to add keyframes to adjust audio levels. By combining subframes with keyframes, you can cut out pops, clicks, and other audio weirdness without doing any damage to your video edit.
Mixing
Mixing is the process of adjusting the levels, pan, and “sound” of each clip so that the audience hears what you want them to hear and doesn’t hear what you don’t want them to hear. Mixing primarily concerns itself with audio levels. However, Final Cut Pro X also contains world-class audio filters, borrowed from Logic, which can truly give your audio a unique sound. With more than 100 filters included in Final Cut Pro X, there are far more settings available than I can cover in this book.
Note: Caution
I was recently taken to task for suggesting specific levels for mixing. All audio and mixes are different, just like edits. If you are an experienced audio engineer, you already have your own system. If you are new to audio, use these numbers to get yourself in the ballpark. Ultimately, as long as levels don’t exceed 0 dB, the only way to determine what’s “right” is how it sounds.
In this chapter, I discuss mixing using pan and volume. The Audio Effects Cookbook (see this book’s Introduction) is where I’ll show you how to apply some of the more common—and powerful—filters in Final Cut Pro X.
Set Audio Levels
I’ve mentioned several times already that audio levels should not exceed 0 dB. But, what levels should we use for audio mixing? One thing I’ve learned over the years is that if you get five audio engineers in the same room at the same time, you’ll have seven different opinions on what “proper” audio levels should be. (I guess this is analogous to asking five camera operators their opinions about what’s the “best” camera.)
Nonetheless, given its current state of development, FCP X is optimized for mixing smaller projects with less demanding specs. It is not yet ready for mixing complex projects, or projects with exceedingly tight audio delivery specs, without relying on third-party plug-ins.
Still, FCP X can be ideal for anything going to the Web, DVD, or local cable, provided you set the right audio levels. So, let’s answer that question.
There are three key rules for audio:
• Audio levels must not exceed 0 dB.
• Audio levels are additive; the more clips you have playing at the same time, the louder the total audio level.
• Total audio levels of the full mix should be as close to 0 dB as possible, without going over.
The only rule that will get you fired for breaking it is the first rule. So, be really sure your audio levels are safe.
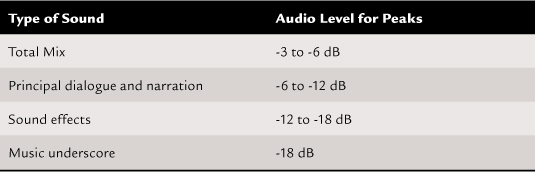
That being said, Table 9.1 shows my recommendations for audio levels. The only critical number is the level of the total mix. The other numbers are there to help you rough in your audio levels. How the whole mix sounds is the critical issue—the specific numbers for each clip are not important, as long as your total mix does not exceed 0 dB.
Note: FCP X Displays Peaks
When looking at these levels, remember that FCP X measures peak audio levels, not average levels. There is no way to measure average audio levels, such as RMS, in FCP X.
The purpose of adjusting audio levels is twofold:
• So you can hear what you want the audience to hear
• So your levels stay below 0 dB
Note: Adjust Audio Levels in Real Time
All the techniques presented here also work in real time. To adjust and listen at the same time, start playback of your clip before adjusting the volume.
To that end, let’s take a look at different ways you can adjust levels, starting with the mouse.
Adjust Audio with the Mouse
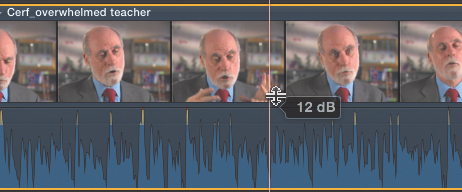
To adjust audio levels for the entire clip by the same amount, grab the black line, called the volume line or black rubber band, and drag up to make the sound louder or down to make it softer.
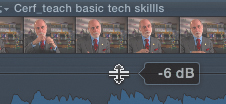
As you drag the line, notice that the waveforms displayed for that clip get taller or shorter (Figure 9.32). In fact, as the loudest portions of the waveforms approach 0 dB, the tips first glow yellow; then, when the volume of the clip exceeds 0 dB, they glow red. This is a very cool alert system!
Figure 9.32 As you drag the black volume level line, the height of the waveforms correspondingly changes.
While you can’t adjust multiple selected clips at once with the mouse, though you can with the Inspector, you can copy effects settings from one clip to another. To do this, select the clip with the volume settings you like, and choose Edit > Copy, or press Command+C.
Then, select the clip or clips that you want to paste these settings into and select Edit > Paste Effects, or press Option+Command+V. The only disadvantage to this shortcut is that you must paste all effects from the first clip into the second. You can’t choose—as you could in FCP 7—which effects would transfer and which would not.
Note: Displaying Audio Meters
Remember, you can’t set audio levels by ear—your ears get tired quickly and are not accurate. You need to use, and trust, the audio meters. Press Shift+Command+8 to toggle the display of the audio meters.
Use Keyboard Shortcuts to Change Audio
There are keyboard shortcuts that also allow you to change audio for a single selected clip or multiple selected clips:
• To increase audio gain in 1 dB increments, press Control+= [equals].
• To decrease audio gain in 1 dB increments, press Control+- [minus].
Remember, you need to select the clips before adjusting levels.
Change Levels and Pan with the Inspector
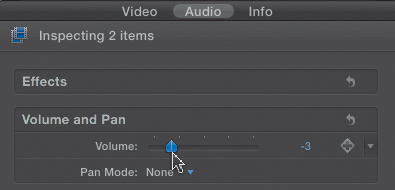
You can also use the Inspector to change both audio levels and audio pan for a clip or a group of selected clips (Figure 9.33). Changing levels for a group of clips is a new option that you didn’t have in Final Cut 7:
1. Select the clips.
2. Press Command+4 to open the Inspector (or click the Inspector icon in the toolbar).
3. Click the word Audio at the top.
4. Adjust the volume by either moving the volume slider left and right or entering a number in the text box to the right of the volume slider.
Figure 9.33 You can also use the Inspector to set both volume and pan settings.
Note: Using the Inspector for Pan
As a side note, you can also do the same for pan—adjusting settings for multiple selected clips in the Inspector.
Adjust Volumes With a Menu
You can also adjust audio volumes using a menu:
• Modify > Volume > Up
• Modify > Volume > Down
Generally, I tend to use the mouse to set levels, just so you know. But, all these different techniques work, except...remember at the beginning of this section I said that this would “adjust audio levels for the entire clip by the same amount”? What if you want to adjust different portions of the same clip by different amounts? Can you do that? Yes, but it requires learning one more new thing before this chapter ends: keyframes.
Explaining Keyframes
Keyframes have a bad reputation. However, that’s the wrong attitude, because keyframes can really make your life easier.
First, a definition. A keyframe is “a point of change during playback.” If nothing changes during playback, then you never use keyframes. If you want something to change during playback, such as an audio level, keyframes make that possible.
This second rule is also useful when working with keyframes: You always use keyframes in pairs. There is always a “starting position” and an “ending position.” It’s like taking a trip; you can’t complete the trip unless you know where you are starting and where your destination is. That’s the same philosophy to use with keyframes. I like talking about keyframes when mixing audio, because mixing makes keyframes easier to understand.
However, keyframes are not just for audio. Actually, every clip effect, transition, and most built-in settings use keyframes. They may be hidden, but they are used everywhere inside FCP X.
There are two ways to set keyframes for audio levels:
• In the Timeline using the volume lines
• In the Inspector
Set and Adjust Keyframes in the Timeline
To set a keyframe, Option+click directly on the black volume line in a clip. (If you can’t see the black line, go to the Switch and click one of the icons that displays waveforms.) Notice as you press the Option key that a small diamond attaches itself to the cursor. This indicates that you are in “keyframe setting mode.”
Wherever you Option+click the line, you’ll set a keyframe (Figure 9.34):
• To change the timing of a keyframe, drag it sideways along the volume line.
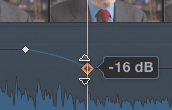
• To change the volume associated with a keyframe, drag it up or down. In this example, I am lowering the volume of the second keyframe so that the sound goes from -3 dB during playback to -16 dB.
• To delete a keyframe, click the keyframe once to select it, and then press the Delete key. Be careful that the keyframe is selected (has a golden border around it); otherwise, when you press the Delete key, you’ll delete the clip, not the keyframe. You cannot select a range of keyframes and delete them as a group; keyframes need to be deleted one at a time.
Figure 9.34 To set a keyframe, Option-click the black volume line. To adjust a keyframe, drag it.
You can adjust keyframes at any time by clicking and dragging. (If you can’t select a keyframe, be sure you are using the Arrow [Select] tool.) To set keyframes for a range within a clip, select the Range tool (R) and select a range within the clip containing the volume you want to adjust (Figure 9.35).
Figure 9.35 You can use the Range selection tool to adjust the audio level within a portion of a clip.
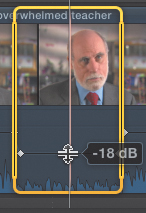
Using either the Arrow or Range tool, drag the volume line inside the range up or down. FCP automatically sets keyframes for the start and end of the range and adjusts the level in the middle.
Keyframes are essential in removing clicks and pops in subframe editing (Figure 9.36).
Figure 9.36 You can use keyframes to remove short noises like pops. This technique is especially useful in subframe audio editing.
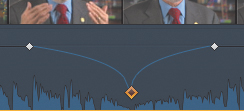
For example, you could use three keyframes to fade the audio to minimize a loud pop:
1. Create a keyframe on either side of the pop.
2. Create a third keyframe directly on top of the pop.
3. Depending upon how long the pop lasts, move the two keyframes on the edges closer together or farther apart.
4. Lower the middle keyframe until the pop is no longer distracting; generally, though, this sounds better if you don’t drag the middle keyframe all the way down so the audio becomes silent. This tends to leave an audible “hole” in the mix.
While using ranges within a clip to set keyframes is very helpful, you can’t use ranges to set or adjust keyframes across the edit point between clips.
Set and Modify Keyframes in the Inspector
You can also set, modify, and delete keyframes in the Inspector. While not as convenient as setting keyframes directly in the Timeline, the benefit is that all other keyframes in Final Cut X are set using the Inspector. So, once you learn this technique, you will know how to set keyframes for everything else.
Remember, you always set keyframes in pairs, so you never set just one keyframe; you always set a starting and ending keyframe at two different times in the clip. (You can use more than two, but it really helps to think of them in pairs.)
To set a keyframe using the Inspector, follow these steps:
1. Put the playhead on the frame in the Timeline you want to set the keyframe and select the clip.
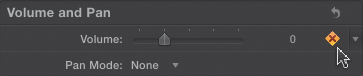
2. Click the gray plus icon on the right side of the volume slider.
As soon as a keyframe is added, the plus sign color changes from gray to gold (Figure 9.37). This indicates a keyframe exists at that playhead position for that parameter. (Look over to the Timeline, and you’ll see a keyframe is also set on the volume line for the clip.)
Figure 9.37 You can set, modify, delete, and navigate between keyframes in the Inspector.
3. Adjust the volume slider to set the audio level you want before moving the playhead off the keyframe. You can adjust a keyframe only when the playhead is parked on it.
4. Move the playhead to where you want to set the next keyframe and click the plus icon again. Notice that as you set keyframes, small left- and right-pointing arrows appear on either side of the Set Keyframe button. These allow you to jump from one keyframe to the next.
Using these arrows is a really good idea—try to use these, instead of dragging the playhead or skimmer between keyframes. The reason is that these arrows take you precisely to a keyframe. If you drag the playhead or skimmer, you could be off by a frame or two and suddenly all your settings get screwed up.
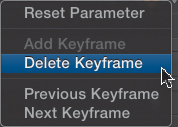
5. Click the small downward-pointing arrow to the right of the keyframe button to display the keyframe pop-up menu (Figure 9.38). This allows you to jump between keyframes, add a keyframe (as long as you are not currently parked on a keyframe), or delete a keyframe (assuming you are parked on a keyframe).
Figure 9.38 Click the small downward-pointing arrow to the right of the glowing keyframe icon in the Inspector to reveal a pop-up menu.
Summary
This chapter has primarily looked at audio editing and mixing. But audio is more than that—it’s also about transitions and effects. Just as you have a wealth of visual effects—each creating exciting new looks for our projects—you also have a wide variety of audio filters that can make your audio sparkle.
However, simply to keep this chapter from turning into its own book, I’m going to cover audio transitions in Chapter 10 and audio effects in a chapter available for download (see the Introduction). There are two key filters that you really need to learn: EQ to shape your sound and the Limiter to work magic with audio levels. I use both of these constantly.
Up until now, I’ve talked about editing and building your story. Now you get to concentrate on making it look great. That is the realm of transitions and effects, which is where we are heading next.
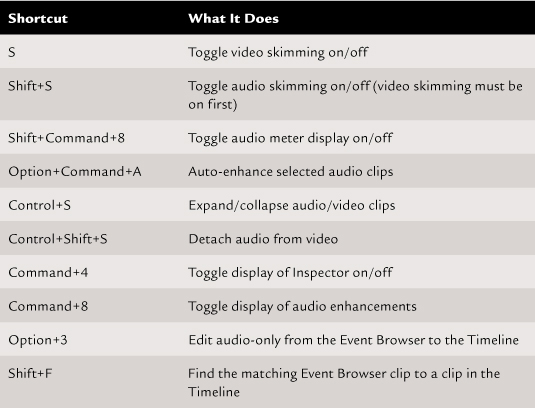
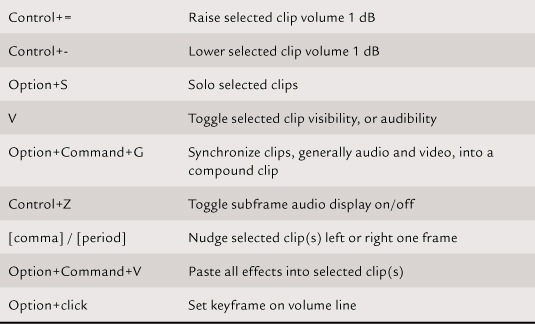
Keyboard Shortcuts