
Lesson 4. Navigating Your Timeline
In this lesson, you learn how to utilize all the different elements of your timeline page, formerly known as a profile. You’ll learn how to navigate your way around the new timeline, change your profile picture and cover picture, post status updates, and more.
Timeline Basics
New to Facebook, the timeline is an evolution of the old profile page of just a profile photo and a list of interests into a visual account of your ongoing story. Whether you still call it a profile or a timeline, it’s basically still a page containing information about you.
In past renditions of Facebook, the profile page included an area called the Wall in which you and your friends could post comments, stories, photos, links, and other shared information. The Wall was a fairly obvious area in the middle of the page where the newest items were listed on top and older items eventually dropped off the page as new items were added. With the new timeline format, everything is plugged into a vertical line of time, hence the word timeline, running down the center of the page. You can visually see when each story item was added and the progression of activities across the span of time. This new format makes it easy to jump back and view past events. You can even add key events into the timeline, even though the actual date has passed. Stories are organized by year, and on the far-right side of the page is a year-based timeline where you can click a year and view your stories for that particular year.
Your timeline actually consists of several key elements. You’ve already learned about several of those elements in the process of creating an account, such as your profile picture. Now it’s time to go into a little more detail. After you start adding friends, liking pages, adding apps, and other Facebook activities, your page starts looking more like the one shown in Figure 4.1.
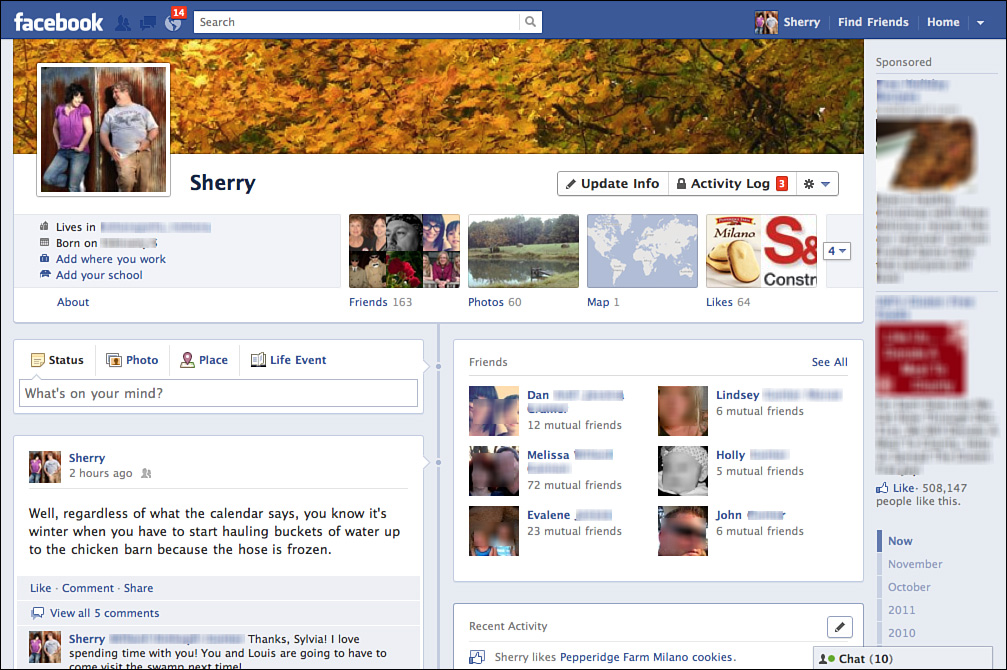
Figure 4.1 Here’s a typical timeline page.
To help you make sense of the new timeline, let’s take a look at the main areas of the page. The top of the page, right below the blue navigation bar, displays a large customizable photo called the cover, with an inset profile picture. The cover photo offers you a way to uniquely customize your page with a large visual element.
Below the cover and profile picture is your name and a bit of the information you added when you set up your account, such as birthday, education, or employer. If you didn’t add any info yet, the areas here appear as links that you can click and then fill in the necessary info.
Next to your name is a bar area featuring buttons that take you to your About page for filling in or changing info, to your Activity Log detailing your activities, and a drop-down menu of other settings.
Also in the top area of the page, below the cover, are boxes featuring several unique apps that work within the Facebook framework, each with a particular focus. Included in this area:
• Friends—Click here to see a list of all the friends you’ve added on Facebook.
• Photos—Open the Photos apps to add photos and videos, create albums, and view photos in which others have tagged you.
• Map—This application tracks all the places you’ve been, lived, visited, and more.
• Likes—This app lists your favorite things and interests, along with Pages you like.
• Notes—This app keeps all your notes and blog entries.
• Subscriptions—This feature lets you subscribe to other news streams without actually adding them as friends, such as celebrities, journalists, and other interesting people.
As you add more apps, this area of the page grows.
The next section of the page is where the actual timeline begins, as shown in Figure 4.2. A fresh status update box awaits your input at the top of the timeline. Over on the right, a Friends box features a random sampling of your Facebook friends. Below that is an area listing your recent activities, such as Pages you liked, people you’ve subscribed to, and friends you just made.
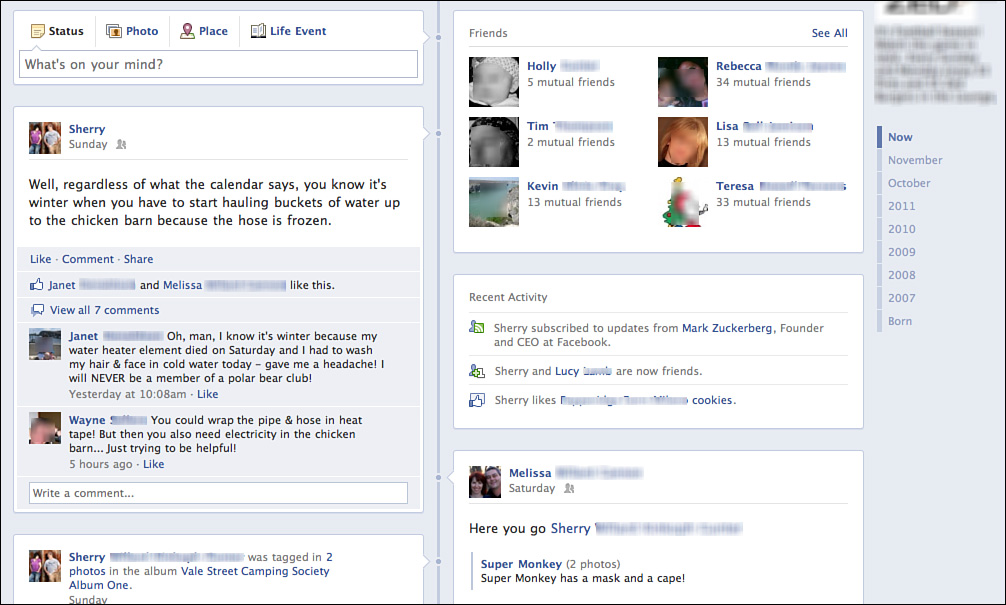
Figure 4.2 The middle of the page starts the actual timeline area.
The rest of the screen unfolds in stories listed in month-based sections. Newer stories appear at the top of the screen.
Off on the right side of the screen are sponsored ads along with a yearly graph of your longevity on Facebook. You can click a year to view the stories recorded during that time.
Adding a Cover Photo
As mentioned previously, the cover photo is an opportunity to give your page visual impact. You can use a cover image to personalize the page, such as showcasing a favorite day, hobby, or interest, or just decorate your page with something visually appealing. You may want to feature a different photo for different seasons or months, or just keep the same picture forever. It’s totally up to you. Facebook stores all the cover photos in a folder named Cover Photos, which you can find among the other albums kept by the Photos app.
To add or change the cover, click anywhere on the cover to display a Change Cover menu, shown in Figure 4.3. Click the drop-down arrow button and select whether you want to use a previously uploaded photo or upload a new photo. Select the photo you want to use. When Facebook has the photo placed, you can drag it to reposition it however it best suits the wide cover area, as shown in Figure 4.4. When everything is to your liking, click the Save Changes button.

Figure 4.3 You can change your cover photo as often as you want.
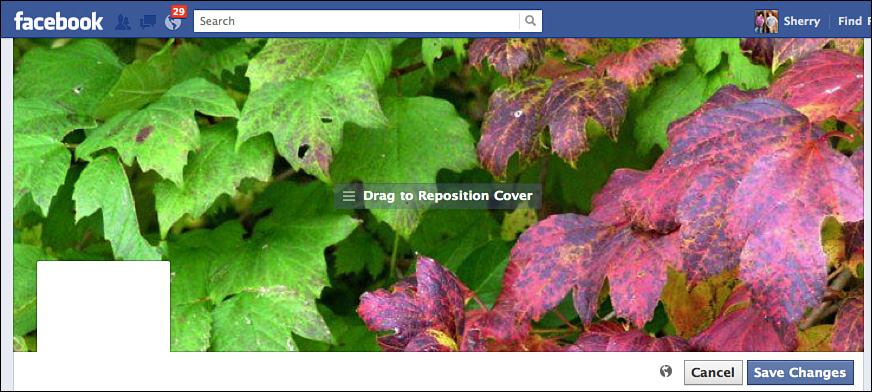
Figure 4.4 You can drag your photo to reposition it in the cover area.
If the cover photo needs adjusting, you can click the Change Cover drop-down menu again and select Reposition.
To remove the photo entirely, open the menu and select Remove. When you remove the cover image, a blank placeholder appears in its place.
Changing Your Profile Picture
To change your profile photo, move the mouse pointer over the inset picture and click the Edit Profile Picture drop-down arrow. Facebook displays a menu of options, as shown in Figure 4.5. You can choose another photo from previously uploaded pictures, take a new photo with your computer’s camera, or upload a new photo. For example, to swap your profile picture with another, click the Choose from Photos option to open the Choose from Your Photos box, shown in Figure 4.6, and select a different profile picture to post. Profile pictures are stored in an album called, appropriately, Profile Pictures.
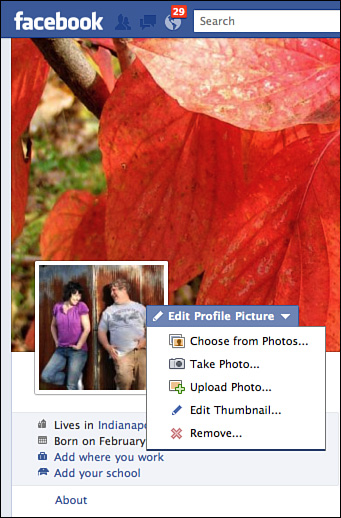
Figure 4.5 Swapping out your profile picture with another photo is easy.
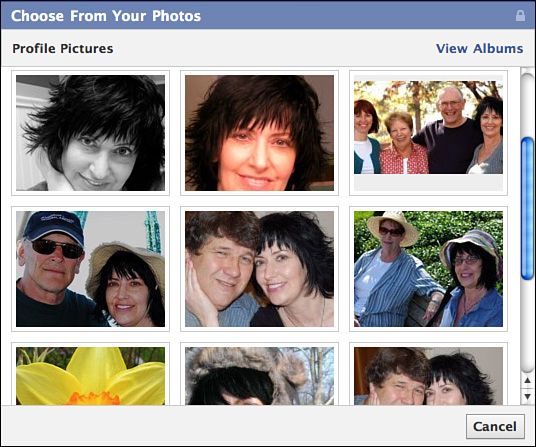
Figure 4.6 Look through your albums for a picture to use, or open the Profile Pictures album.
If the profile picture photo needs adjusting, you can click the Edit Profile Picture drop-down menu again and select Edit Thumbnail. This opens the Edit Thumbnail dialog box, shown in Figure 4.7, and you can adjust the photo to get just the right fit. Click Save to save your changes.
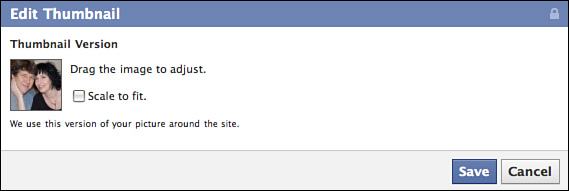
Figure 4.7 Use this dialog box to reposition your profile picture.
To remove the photo entirely, open the Edit Profile Picture menu and select Remove. This option removes the picture and leaves a generic placeholder image in its place.
Viewing Your Activity Log
The Activity Log keeps chronological track of your daily activities all the way back to when you first joined Facebook. No one else can see or access your log. You can use the log to review and manage your stories and other bits of information shared on Facebook. The log keeps track of activities such as when you change a profile picture to when you commented on someone else’s photo. To access the log, click the Activity Log button under the cover photo on your timeline page. Figure 4.8 shows a typical Activity Log page.
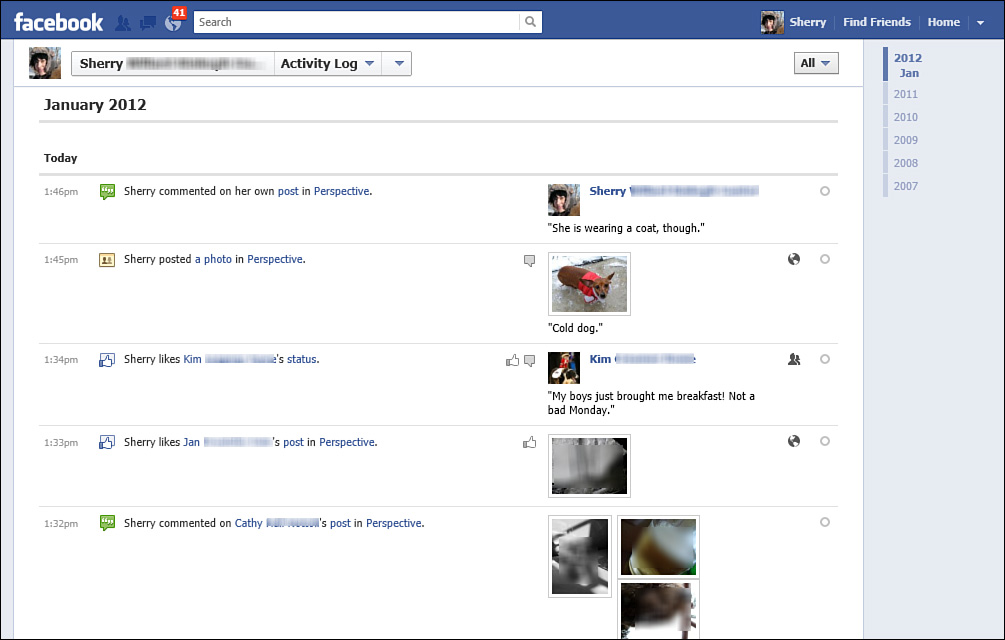
Figure 4.8 The Activity Log page lists all your activities.
You can use the All drop-down arrow at the top of the page to filter the types of information displayed in the log. Click the arrow, shown in Figure 4.9, to view the filters and click the one you want to employ. You can use the far-right column next to the item descriptions to control what appears on the timeline or manage posts elsewhere. Click a circle to display a menu of options. For example, you can decide to feature an item so it appears prominently on your timeline, or hide an item altogether. Depending on the item, you can also change the audience selector and allow a customized friends list to view the posting. The activity log even keeps track of who liked or commented on your posts. When you scroll to the bottom of the log page, you can click the More Activity link to view more activity.
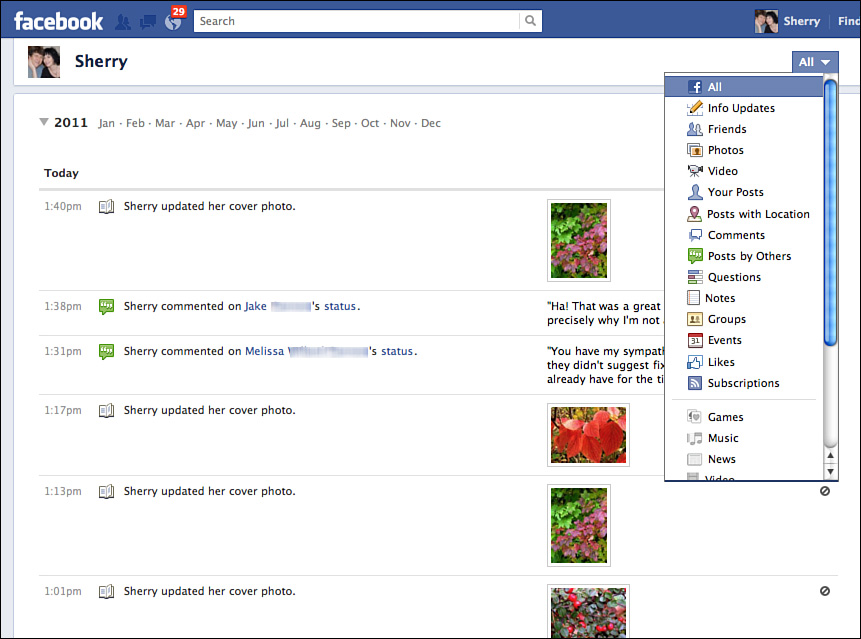
Figure 4.9 You can filter the Activity Log using the items on this menu.
Note
The top of your Activity Log may show some pending posts in the Profile Review area. This is a privacy option you can use to grant approval to others who tag you. You can manage each request or approve all at once. Click the check mark button to approve a tag post, or click the Approve All button to approve everything listed.
Working with Stories
Items you add to your timeline are called stories. Stories can be status updates, photos, links you share, and even postings left by your friends. You can add stories at any point in your timeline. You can feature a story with a star icon, allowing you to highlight its importance by making it expand across the timeline. Highlighted stories always appear visible in the timeline. You can also hide stories, control who sees a story, or remove ones you no longer want associated with your timeline.
Updating Your Status
To post something on your own timeline, fill out a status update and share it. Essentially, this creates a story on your page. Click in the text box at the top of your page, as shown in Figure 4.10, where it says something like, “What’s on your mind?” In previous versions of the Facebook interface, the box had different titles. The name or text may change at any time, but the intent remains the same: to share something that you’re thinking or doing, some random remark, observation, or witty thought. Status updates also include important events and activities in your life, and you can share more than just a blurb or comment.
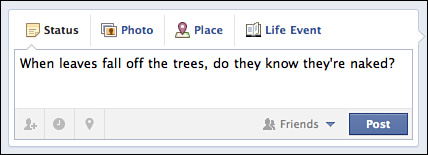
Figure 4.10 Use the status update box to post an update about what you’re doing or thinking.
To add a story to your timeline, type out your status update and then press Enter (Return) or click the Post button to post it on your page. Facebook adds the information to your timeline, as well as to the news feed that appears on the Home page.
You can also fill out the update box on your Home page to update your Facebook status. When you click in the box, additional buttons appear for adding photos, a video, or a polling question.
The update box is technically known as the Publisher. When you activate the What’s on your mind? box, which you can do just by clicking inside the field, you can use the additional buttons above the field for sharing:
• Status—The default selection, this simply adds a regular post about what you’re thinking or doing.
• Photo—Choose this option to add or include a photo in your posting.
• Place—You can use this feature to map a location for the story, such as a coffee shop or city.
• Life Event—Use this feature to mark a specific type of event in your life, such as a new job, hobby, or engagement.
You can also tag people in your story. Click the tag icon (the first gray icon beneath the update box) to type in a specific person’s name. You can click the date icon (the second gray icon) to tag a year with the posting. You might do this when sharing an old photo, for example. To add a location to the post, you can click the location icon (the third gray icon) and type in a location.
To set a specific audience for the post, such as only viewed by a customized group of friends, click the Audience Selector drop-down arrow next to the Post button and choose a different privacy setting.
How often you update your status is entirely up to you. It really depends on how often you log in to Facebook and how much you want to share about what you’re doing or thinking. Some users prefer to post updates several times a day; others prefer to post more sporadically based on things that happen throughout their day. Other users choose to update their status once a day or, if feeling not so social, once a week. Facebook stories are really all about connecting and sharing with your friends, so deciding how much to participate and share is up to you.
You can highlight a posted story so it’s featured across the entire page, making it more prominent. To do so, move the mouse pointer over the posting’s top-right corner and click the Star icon that appears. You can click the icon again to remove the feature status.
Posting on a Friend’s Timeline
You can visit a friend’s timeline and add a story. When you view her page, you’ll see the same Update Status box found on your own page. Click in it and type up your post. You can also use the box to add a photo, a video, tag another person, or tag a particular location, just as you can with your own status updates. When you finish typing, click the Share button or press Enter (Return).
Removing a Post
Sometimes you might need to edit your timeline postings. For example, you may need to correct a spelling or remove a questionable post someone left on your page. To delete a post from the timeline, move your mouse pointer over the post and click the Edit or Remove icon that appears in the upper-right corner of the post. Select Delete Post from the menu that appears. Facebook displays a prompt box, shown in Figure 4.11. Click Delete Post to remove the post entirely.
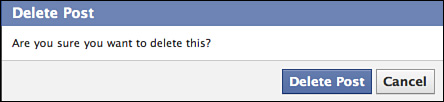
Figure 4.11 Facebook displays this prompt box when you try to delete a post.
You can also remove a post you left on a friend’s timeline. Open your Activity Log page as described earlier in this lesson; then click the circle icon at the far-right side of the post and select Delete Post. You can also visit the person’s timeline page and use the same deletion technique for removing your own posts. In other words, your ability to remove posts is limited to your own posts (wherever they are) and anything on your timeline; you can’t delete other people’s posts from their timelines.
Summary
In this lesson, you learned how to navigate and manage your timeline page, and work with Facebook stories. In the next lesson, you learn how to use the Home page.