
Lesson 2. Setting Up a Facebook Account
In this lesson, you learn how to sign up for a Facebook account, create a timeline, and specify a current status. This information covers everything you need to get started as a Facebook member.
Signing Up for an Account
If you’re new to Facebook, the first thing you need to do is sign up for an account. Joining Facebook is free, and the only requirements are that you have a working email address—in other words, a real email address—and you must be 13 years of age or older. At the end of the registration process, Facebook sends you a confirmation email you must follow to finish setting up your account. The process is relatively painless and fast.
Note
If you want to create a professional account, such as a profile page for a band or business, you can click the Create a Page for a celebrity, band or business link located on the Facebook Sign Up page (see Figure 2.1). Learn more about the professional and promotional sides of Facebook in Lesson 14, “Understanding Pages.”
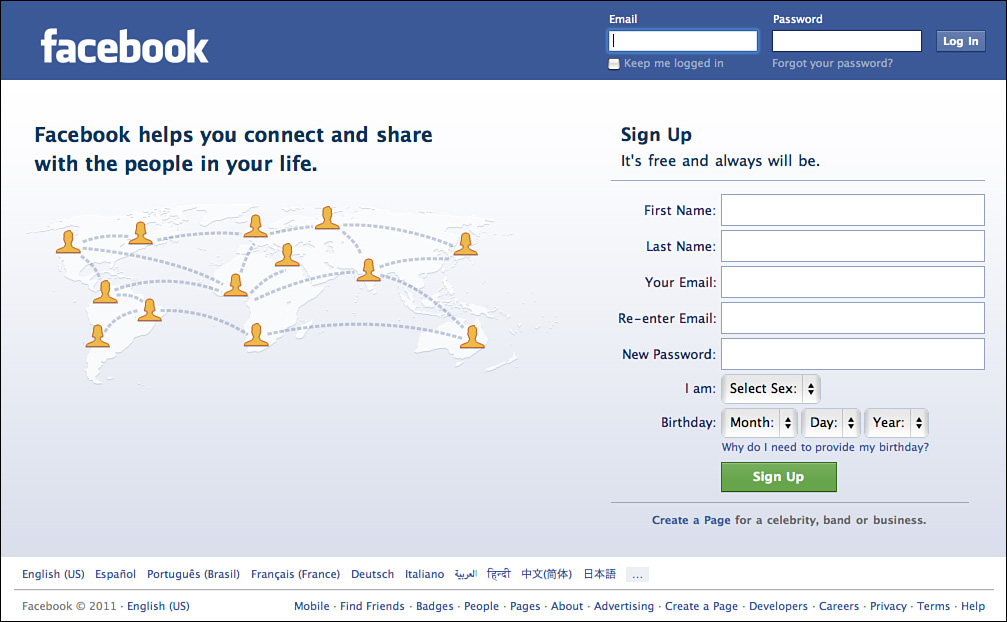
Figure 2.1 Facebook’s Sign Up page is the place to start when you want to create a new account, as well as where you log in to use your account.
When creating a Facebook account, you need to use your real name. The whole social networking architecture of the site is built on the authenticity of its users. Odd nicknames, pseudonyms, or aliases are simply not allowed. In fact, if you try to use an odd-looking name, it will probably be flagged by Facebook as a possible bogus account. For example, if you attempt to create an account for Lone Ranger, chances are it will not make it. If the name happens to be your real, honest-to-goodness name, you can appeal to Facebook by clicking the Help link on the Sign Up page.
To sign up for an account, follow these steps:
1. Use your web browser to display the Facebook Sign Up page, www.facebook.com.
2. You can start the registration process by filling out the initial sign-up form, shown in Figure 2.1. Click inside the first form box and type your first name.
3. Type in your last name.
4. Type in your email address, and then type it again to confirm that it’s correct as originally entered.
5. Establish a password. As with most passwords you use on the Internet, choose one that contains both numbers and letters for maximum security.
6. Click the I am field and select your gender.
7. Click the Birthday fields to specify your date of birth. Don’t worry—you don’t have to show this on your profile page if you don’t want to. This information is a security measure to make sure you’re old enough to use the site.
If you already have a Facebook account, you can use the login fields at the top of the page to enter your email and password to log in.
8. Click the Sign Up button when you’re ready to continue.
9. The next phase of the registration process is the security check, shown in Figure 2.2. Type in the words shown on the screen.
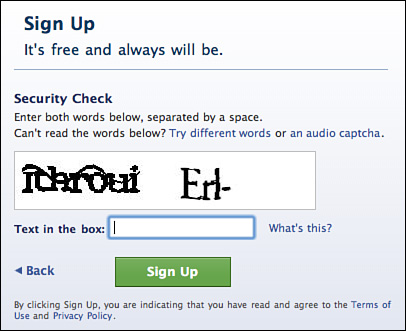
Figure 2.2 The Security Check screen verifies you’re legit and not automated software trying to create an account.
Tip
If you have difficulty reading the wavy words on the Security Check page, you can click the option for changing the words to a new set or listening to an audio file instead.
10. Click the Sign Up button to continue.
Note
As you can imagine, people rarely read the terms of service and privacy policy when signing up for things. In case you were wondering, Facebook’s policies basically say you’re not allowed to send spam or post pirated material, and you’re expected to be honest and nice to everyone online. They also say you cannot hold Facebook accountable if you get into trouble. See Lesson 3, “Finding Help with Facebook Services and Etiquette,” to learn more about these terms.
The next phase is to add details to your Facebook account. You’ll actually go through three main sections, and each page asks you to do something, such as look up friends using your email contacts, specify profile info about your education or job, and add a profile picture. You can choose to pursue each page’s options right then and there and add all the necessary details, or you can skip the steps and fill in the information at a later time (or not at all, if you prefer). We’ll opt for supplying this information later. Keep in mind that Facebook may change its sign-up steps from time to time, so your own steps might vary slightly.
In Figure 2.3, the first thing Facebook wants to know is whether you want to look up friends by searching through your contacts list and seeing whether any matches already have Facebook accounts. You can learn all about how to find friends in Lesson 6, “Connecting with Friends.” For now, just click the Skip this Step link at the bottom of the page to continue onward. If you do opt to find friends now, click Find Friends and follow the instructions. You can click the Save & Continue button to proceed to the next step.
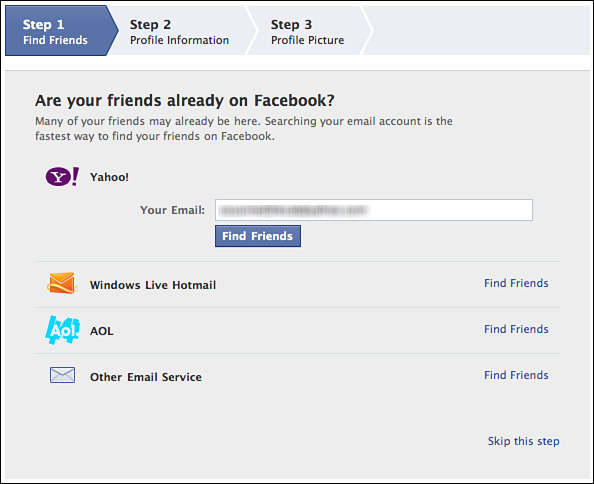
Figure 2.3 Step 1 allows you to search for existing friends on Facebook using your email contacts list.
Figure 2.4 shows the second step. This time, Facebook wants to get you started on your profile by adding educational or job information. You can take the time to fill this out now, or you can do so later. Skip this section by clicking the Skip link and move on. If you did fill out the info, click Save & Continue instead.
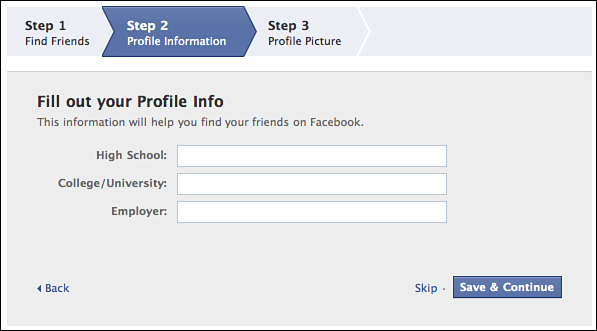
Figure 2.4 The second step lets you specify your education and/or work associations.
The third step, shown in Figure 2.5, prompts you to add a profile picture. You can click the Upload a Photo option, or if your computer has a web camera, you can click Take a Photo and create a new picture. You can also save this task for later and just click the Skip link. If you added a picture, click Save & Continue.

Figure 2.5 The third step lets you add a profile picture.
After you jump through all the registration and setup hoops, Facebook finally shows you a customized Welcome page featuring your name (see Figure 2.6). The first thing you need to do is confirm your email address as prompted at the top of the page; go check your email. Facebook sends you an email confirmation. When you open the email message, click the link or cut and paste it into your browser to finish the registration process.
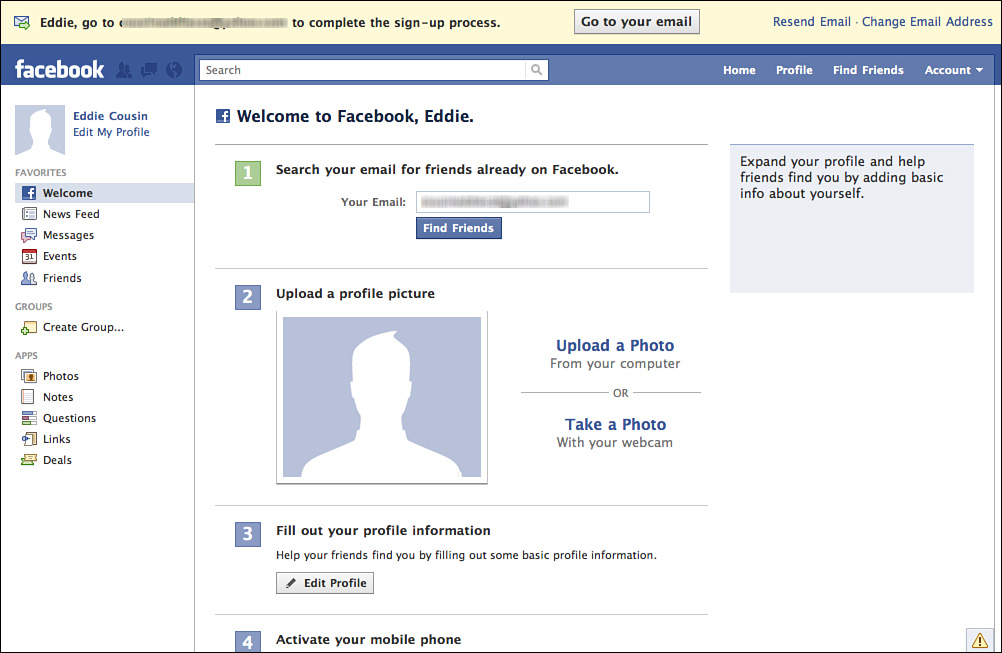
Figure 2.6 The Welcome page prompts you to confirm your email address.
Caution
Depending on your browser setup, the confirmation process may cause several of the same Facebook pages to open. Use the newest window and close the others as needed.
Now that you have an account, you can begin customizing your profile, adding to your timeline, searching for people you know, adding your mobile device, and so on. The next section shows you how to add nitty-gritty data to your page.
By the way, now that you’re officially a member, you can log out and in again using your email address and password at the main Facebook page. You’ll see boxes (form fields) at the top of the page to enter both these pertinent pieces of information. You can even tell the site to remember you so you don’t have to keep typing in the info each time. As for logging out, you can click the Account menu and click Log Out to exit the site at any time.
Note
New to Facebook, the timeline format on your profile page lists your postings chronologically on an actual timeline that runs down the center of the page. You can add important events to the timeline, such as the birth of a child, graduation, or a new job, to document your life experiences. You can also post regular items to the timeline, such as status updates about what you’re currently doing or thinking. The timeline replaces what was formerly known as the wall.
Building Your Profile Page
After you’ve registered on Facebook and navigated the Getting Started pages, you can start customizing your personal profile right away. A profile is just a collection of information about you, such as your hobbies and interests, where you go to school or work, favorite music or television shows, favorite quote, and so on. Your Facebook profile is visible to your friends and anyone on your network. After you complete the registration process, Facebook starts you out with a bare-bones page featuring the new timeline format. It’s up to you to add the meat.
In the land of Facebook, profiles are for individuals but pages are for bands, celebrities, politicians, businesses, and other groups. We focus on your individual profile in this lesson. To see your profile, just click your name link located in the navigation bar at the top of any Facebook page. You’ll open a page similar to Figure 2.7.
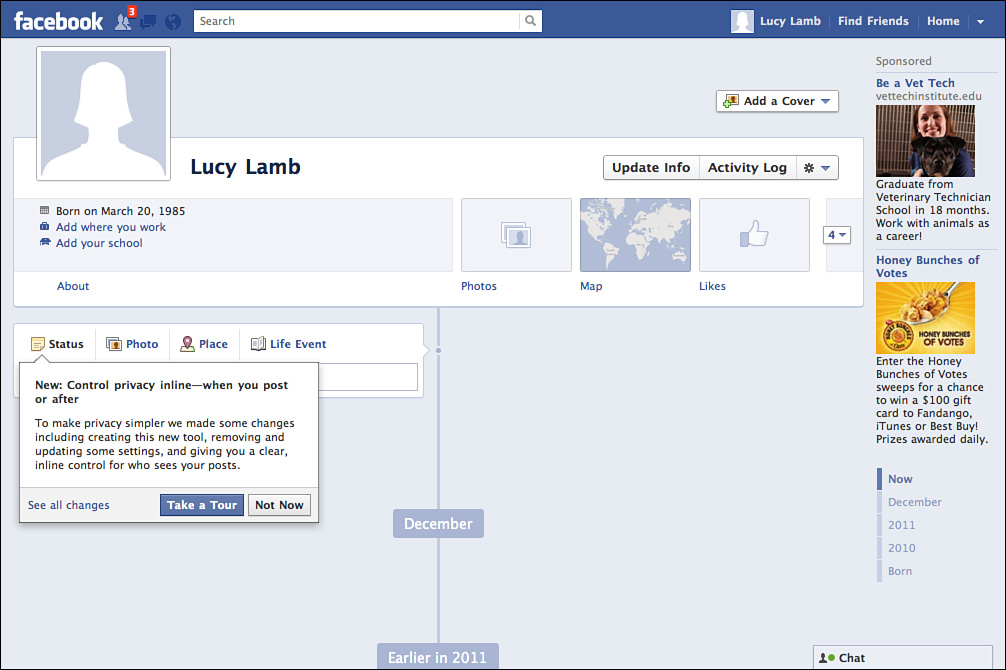
Figure 2.7 The bare-bones profile page.
To learn how to add to your profile, see the next section.
A help area, which offers you tips on what to do, might appear on your screen from time to time as you work with your new profile; click Close to hide the feature, or follow the directions to learn more about a feature.
Adding to Your Profile Info
Ready to start filling out your profile information? You can click the About link located under your profile name area on your page, or you can click the Update Info button under the Cover photo area. With either method, Facebook takes you to a page where you can edit your profile’s different categories, shown in Figure 2.8. You decide what you want to input. You can choose to make a comprehensive profile, or just dole out little bits of information about yourself. As you can see in Figure 2.8, profile info is grouped into several categories, as follows:
• Work and Education—This category includes fields for listing your education and employment information, such as which school you attend, where you work, degrees earned, and so on.
• Living—You can add your hometown here.
• Relationships and Family—Use this category to set a personal status, such as single or married, and list family members in your profile text.
• About You—You can add a brief paragraph about yourself using this field.
• Basic Info—You can change your birthday and gender, relationship status, religious and political views, and other basic info under this category.
• Favorite Quotations—Open this category to include a favorite quotation on your page.
• Contact Info—Use this category to input information about how to contact you, such as address, cell phone number, website, and so on.
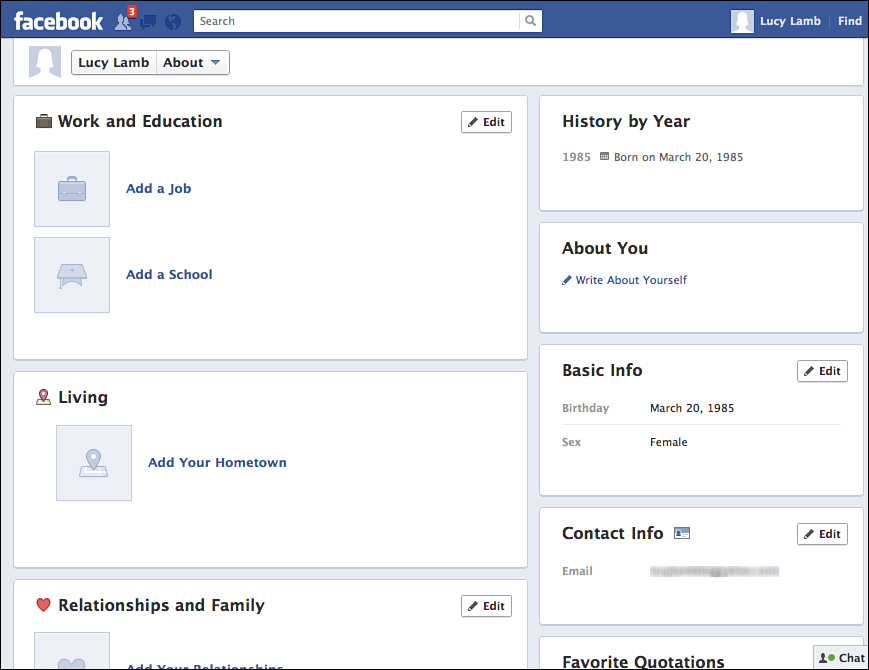
Figure 2.8 Profile info is grouped into categories.
You can click the Edit button for any category to display additional fields for entering data or selecting options. Some fields are text boxes; others are drop-down menus with selections you make. You may notice as you type that Facebook tries to help you with common words and phrases in a pop-up box that appears. You can make selections from the pop-up box and insert them immediately, or you can just ignore the suggestions and keep on typing.
As you make changes to the data in each category, you must click the Save button at the bottom of the form to keep your changes.
When you have finished filling out the profile information, you can click your name button at the top of the page to return to the normal profile page view.
Tip
If you have an account with an instant messaging service, you can add your screen name or alias to your Facebook page using the Contact Info category options.
Adding a Profile Picture
You can add a picture to your profile to help people recognize you. Facebook uses your picture as an avatar, an image that represents you as you interact with other profiles, groups, and so forth. You can also add a cover photo to your page to add visual interest, but you’ll learn more about this in Lesson 4, “Navigating Your Timeline.” If you already added a profile picture when setting up your account, you can skip this section. If you haven’t added a picture yet, stick around.
If you have a digital image of yourself stored on your computer, you can quickly add it for all to see. If you don’t have a portrait photo readily available, you can also insert another type of picture that represents you, such as a picture of your favorite hobby, sport, or pet. A profile picture can be up to 4MB in file size.
You can choose to upload a picture already stored on your computer or, if your computer has a built-in camera, you can take a new picture to use. If you’ve previously added photos to your Facebook account, a third option appears for choosing from your existing photos.
Let’s focus on using a picture already stored on your computer. To get started, you can click on any of the Upload a Photo links you see on your pages wherever you encounter them (such as the Welcome page for new users). Any time you want to update or change your picture from the profile page, simply move the mouse pointer over the picture area until an Edit Profile Picture menu appears, as shown in Figure 2.9. Click it and choose how you want to add a photo.
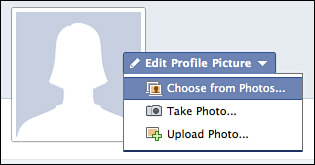
Figure 2.9 You can add a photo directly from your profile page.
Inevitably, all uploading tasks lead to an Open dialog box. You’ve seen this dialog box hundreds of times in other programs on your computer; use it to navigate to the file you want and double-click to open the file and start the uploading process. Depending on your Internet connection speed and the size of the file, the process may take a second or several minutes. When it’s done, however, your picture appears. Figure 2.10 shows an uploaded photo added. Notice the new addition is also duly noted on your timeline.

Figure 2.10 The newly uploaded picture appears.
Tip
You can add more than one profile picture to your account and switch between them as the mood strikes you. Facebook stores your profile pictures in the Profile Picture album. Click the Photos near the top of your profile page, and click the Profile Pictures album to view, edit, and add new pics.
Note
You can now create your own personal URL to your Facebook profile page using a unique username. This feature is handy if you want to direct people directly to your page. To create a Facebook URL, follow this link to set it up: www.facebook.com/username.
Changing Your Status
There’s one more task you can do to help you start your Facebook experience—add a status update. You can use your status posting to share a thought, tell people what you’re doing at the current moment, or mention other points of interest. Anything you post in the “What’s on your mind?” box appears in the news feeds of your friends, as well as on your own timeline. The first time you use this feature, Facebook offers a help tutorial, as shown in Figure 2.11. You can use the self-guided tutorial to learn about the feature. Just follow the on-screen prompts.
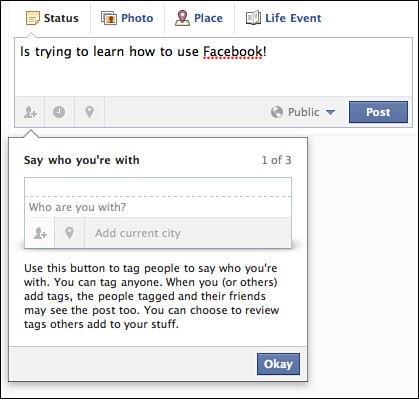
Figure 2.11 You can update your status to let people know what you’re thinking or what you’re doing.
To change your status, follow these steps:
1. Click in the What’s on your mind? box and type an entry.
2. Click the Post button.
Facebook adds the posting to your timeline (see Figure 2.12). Others can now respond with a comment.
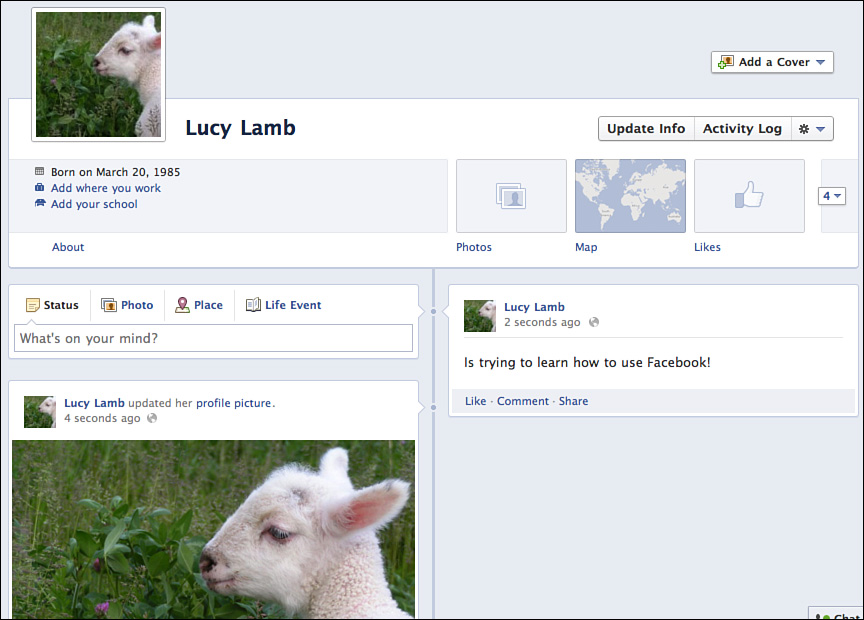
Figure 2.12 Facebook adds the new status to your timeline.
When you start typing in the status box, additional options appear above the box and more option icons appear directly below the box. You can use the top options to include a photo, designate a place, or a life event. You can use the bottom options to specify a friend, date, or location. Over next to the Post button is an option that lets you control who sees the status update. By default, the status is viewable by everyone on Facebook unless you change the privacy setting. To change it, click the button and choose a setting, such as Friends. You can learn more about these settings in Lesson 7, “Guarding Your Privacy.”
Tip
Need to remove your status? Move your mouse pointer over the status listing and click the button that appears in the upper-right corner of the post. A menu appears; click the Remove Post option.
Accessing Your Account Info
You can always access your Facebook account info to make changes to your email address, name (if you get married, for example), password, and other settings. To do so, move your mouse pointer over the Account menu at the top of the Facebook page (looks like a drop-down arrow), and then click Account Settings from the drop-down menu.
The Account Settings page appears, as shown in Figure 2.13. To change any account information, click the Edit link for the data you want to edit, and then make the appropriate changes. Be sure to click the Save Changes button to keep your edits.
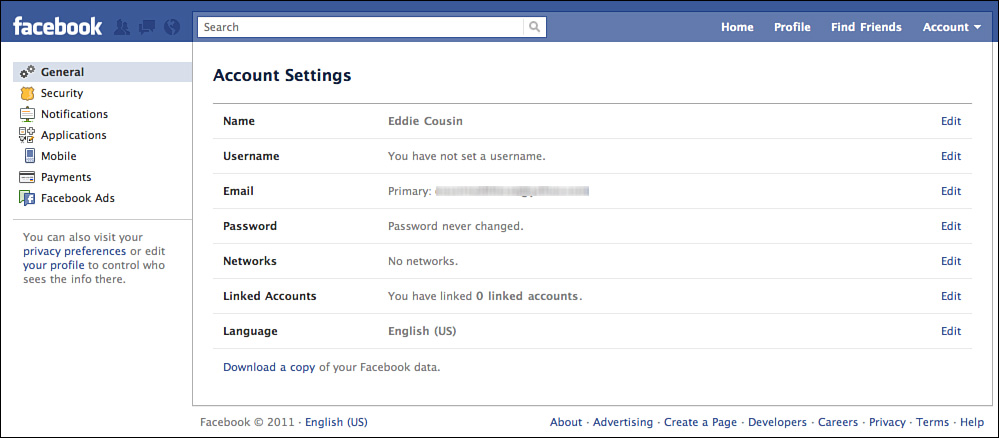
Figure 2.13 The Account Settings page lets you change basic account details.
To return to your profile page again, click your name button on the navigation bar at the top of the Facebook page.
Tip
Learn more about changing account settings, such as privacy settings, in Lesson 7. Learn how to control notification settings in Lesson 5.
Summary
In this lesson, you learned how to sign up for a Facebook account and how to begin building your profile page, including adding information and a photo. You also learned how to update your status and access your account information. In the next lesson, you learn how to use Facebook’s Help Center and find some tips about how to conduct yourself on the website.