
Lesson 11. Joining Groups
In this lesson, you learn how to find and join Facebook groups. You’ll learn how to search for groups of interest, join a group, view group pages, and even create and manage your own group.
Socializing with Facebook Groups
Yet another way to socialize and network on Facebook is through groups. You can use Facebook groups to mix and mingle with people outside your Friends list and make new friends along the way. You can also use groups to share information with a specific set of people, such as family members, coworkers, and teammates. Groups are gathering places generally organized around a common interest, such as a hobby, a favorite topic, or a cause. Groups on Facebook run the gamut from silly to serious, and finding all kinds of humorous groups to join just for the fun of it is not uncommon, especially those attempting to break a record or participate in some type of social experiment. Need to agonize with someone over your ongoing shoe-shopping problem? There’s a group for that. Do you want to commiserate with fellow foodies over the quest for a good steak? There’s a group for that. Do you want to link up with fellow aircraft enthusiasts or civil war buffs? There are groups for both. The possibilities are endless and waiting for you to explore, and you’ll quickly see that a huge number of groups are out there.
Groups are the perfect venue for sharing ideas, passions, social and political issues, or just creating a place to connect. You can learn a lot from specialty subject groups, or find an avenue to post questions to others about a topic you want to know more about. Chances are, you’ll find somebody willing to offer information in no time at all.
You can search for different kinds of groups, as well as create your own group. You’re bound to find a group to suit your needs. For example, if you’re into politics, you can find a group based around your political leanings, or if you’re a reality TV show addict, you can find a group of fellow fans to share news. Many companies, politicians, celebrities, musicians, and even products have avid groups going on Facebook as well as on their Pages. (Learn the difference between groups and Pages in Lesson 14, “Understanding Pages.”) You can even find groups about Facebook itself. If you can’t find a group for your topic of interest, you can create your own group and invite others to join.
Groups can attract hundreds or thousands of people, or just a few. Groups form to air grievances, express ideologies, or just gush about a favorite actor or band. Groups can also be a powerful tool to spread a message, organizing people into grassroots movements, social causes, and more. Election years create a lot of groups on Facebook, as you can imagine. Figure 11.1 shows an example of a group my friend started because we all dabble in photography. Each week the group members share photos surrounding a specified theme.
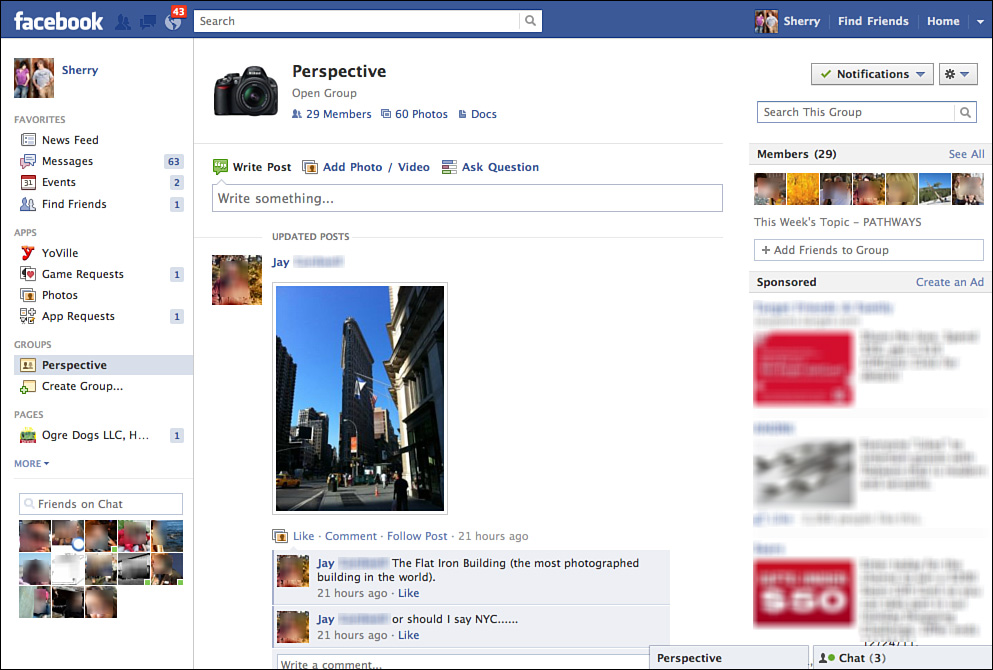
Figure 11.1 An example of a typical group page on Facebook.
Groups are run by an administrator, usually the person who created the group. Larger groups may also include additional administrators to help manage the postings. Depending on the group and what’s allowed, group members can share comments, participate in group chat, and post photos, videos, links, share docs (dynamic wiki-like documents everyone can add to and edit), and so on.
Facebook groups are divided into three main types, as follows:
• Open—Open groups are public, which means anyone can see the group and its members’ postings. Open groups allow anyone on Facebook to join. You can request to join, and after you’re accepted, you can invite your friends.
• Closed—Closed groups are visible in a search, but you cannot view any member postings. Closed groups are more exclusive and require an invitation to join. You can also ask to join a closed group, and it’s up to the administrator to let you in or not.
• Secret—Secret groups are not advertised anywhere on Facebook, and can only be joined by invitation.
In October 2011, Facebook redesigned groups to facilitate better sharing, such as group docs, group chat, and improved notifications. Prior to the change, groups utilized their own profile pages and appeared as regular profiles. The new group format displays the group and its postings more like a news feed, similar to the main Home page.
Now that you know a little about groups, it’s time to find groups and join up.
Caution
Watch out for spammers! Finding spamming going on among the larger open Facebook groups, such as people selling products and services or get-rich schemes, is not uncommon. Although spamming isn’t allowed on Facebook, it still occurs. You can report a spam posting by clicking the Report/Mark as Spam link found when you click the drop-down arrow next to the posting.
Note
Older groups created before October 2011 do not feature the new group design and elements. If the group was not very active, Facebook automatically archived the group. If the group experiences an influx of new activity, it can upgrade to the new format. To learn more about how to convert an old group to a new group, visit Facebook’s Help Center.
Finding a Group
One way to find a group is to pay attention to the news feed on the Home page to see what groups your friends are joining. If you see something interesting, check it out. You might also spot an interesting group to join while perusing your friends’ profiles. For serious group exploration, however, you can conduct a search.
You can use the Search field at the top of any Facebook page to search for a specific topic. For example, if you want to find a group related to snow skiing in Colorado or a moms group in your area, you can conduct a quick search and see what’s available. There are groups centered on just about every subject you can think of, and many more you hadn’t thought of at all. Simply click in the Search field and type the keyword or words you want to search for. By default, Facebook lists the top few results in a drop-down list as soon as you type a word. Scroll down the results list that appears and click the See more results link at the bottom. This opens a page displaying all the results, as shown in Figure 11.2, including filters on the left for choosing which type of results you want to view. In this case, click the Groups filter to view only groups.
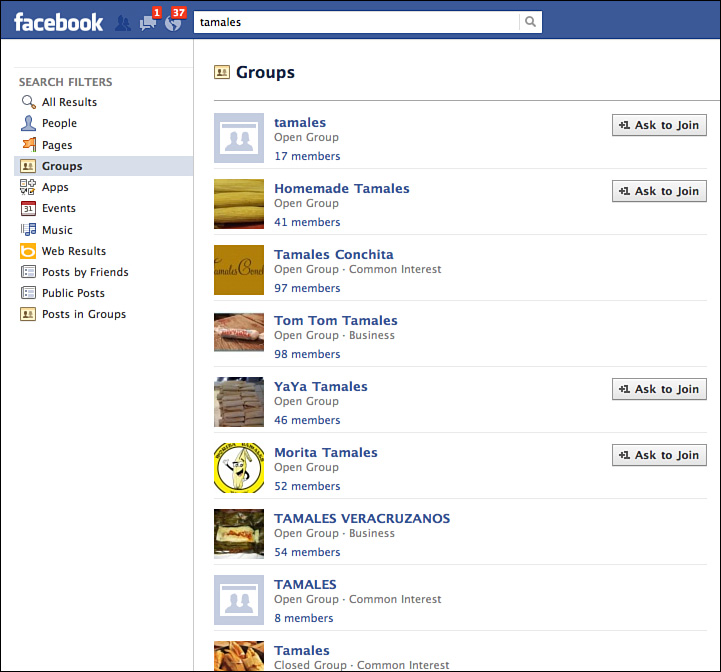
Figure 11.2 You can use the search feature to help you look for groups on Facebook.
The results page for groups lists the groups with a block of information detailing the group name, number of members, and type of group. To view a group, click the group name to open its page. The group page tells you more about the group, and you can see what sort of activities they pursue. If it’s an open group, you can view postings other group members have added. If it’s a closed group, you can only view the basic info about the group. See the next section to learn more about joining groups.
Joining a Group
You can join up to 300 groups on Facebook, so don’t feel limited to just a few. After you find a group that interests you, ask to join it and become a member. Checking out the group page first is a good idea just to see whether it’s something you really want to participate in, as shown in Figure 11.3. Group pages can include features found on regular profile pages, including a profile picture, a news feed wall, posted links, photos and videos, and a listing of members.
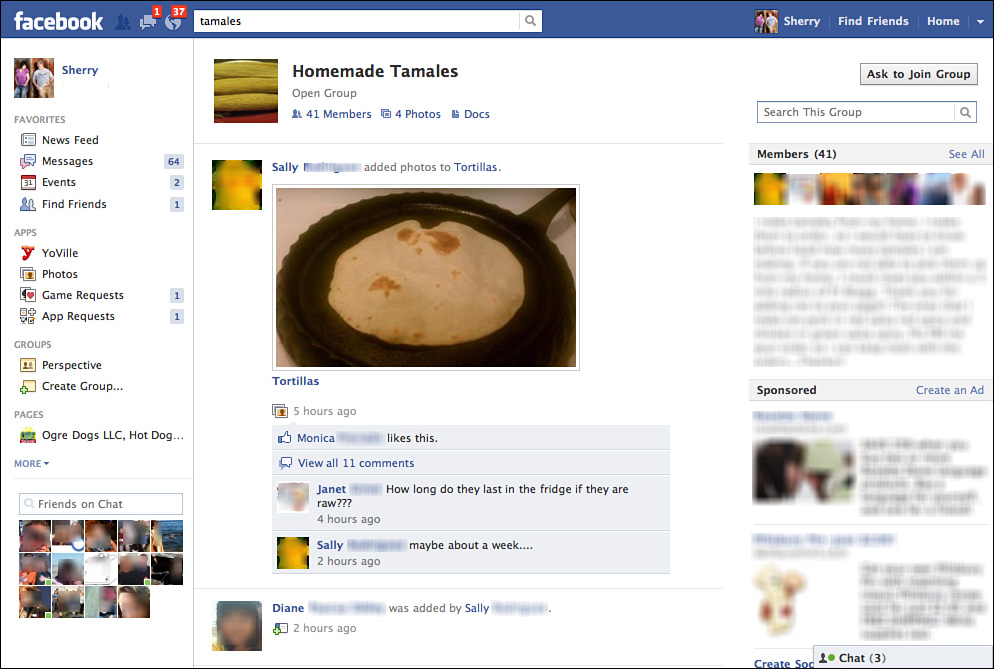
Figure 11.3 A typical group page.
You can view the various postings to get an idea of how the group operates. You should also check to see whether the group has active postings based on dates. If the last posting was six months ago, the group probably isn’t, uh, thriving.
If you’re ready to join, and it’s an open group, look for the Ask to Join button on the group’s page and click it. The group administrator then has to approve the request, if applicable. If this is the case, you’ll need to check back and see whether you’re accepted. Depending on how the group is administrated, you might not necessarily need approval before joining.
If the group is closed, you can join only if the administrator of the group allows you to; you’ll still have to request to join, just as with an open group.
A new feature to groups is automatic joining. Your friends can automatically add you to the membership ranks if the group is an open group type. For example, when a friend joins an open group without administrator restrictions or creates a new group, he or she has the option to specify other Facebook friends in the process. If you find yourself a member of a group you do not want to belong to, you can always leave the group. From the group page, look for the cog-like icon in the upper-right corner (next to the Notifications button); click it and select Leave Group from the drop-down menu.
After you’ve joined a group, you can start participating. Communication in groups takes place mainly in the news feed area of the Wall. Look for the Write Something box to add your own input, including posts, photos or videos, or polling questions. Groups can also communicate through group chats and group emails.
Groups you join appear in an abbreviated list under the Groups heading on the far-left side of your Home page. To visit a group, just click its name. You can also open the Groups page, a page listing all the groups you’ve joined on Facebook. To access this special page, click the Groups heading label on the Home page.
Starting Your Own Group
Creating a group on Facebook is easier than ever. You might want to build a group around a particular hobby, or make a group for an interest in your area or region of the country. You might also create a new group to serve a specific purpose, such as a work group centered around a project, or a family group focused just on your family members. Before you jump in and make a new group, take a few minutes to figure out these details first:
• Decide what you want to name the group. Watch out for misspellings and typos!
• Decide what photo you want to use as the group profile picture. Try to choose an image that goes along with what the group is about.
• Write out a brief description of the group, stating the group’s purpose, mission, or intent.
• Formulate an idea about what type of group you’re creating, such as common interest, business related, or just for fun.
• Decide on availability: open, closed, or secret.
• If you’re creating an open group, decide whether you want to administrate membership approval. Some people prefer not having to deal with requests to join the group.
You’ll save yourself some time and effort by organizing your group information before actually creating the group.
To start your own group, follow these steps from the Groups page:
1. From the Home page, click the Group heading label over in the left pane. Facebook displays the Groups page, similar to the one shown in Figure 11.4.
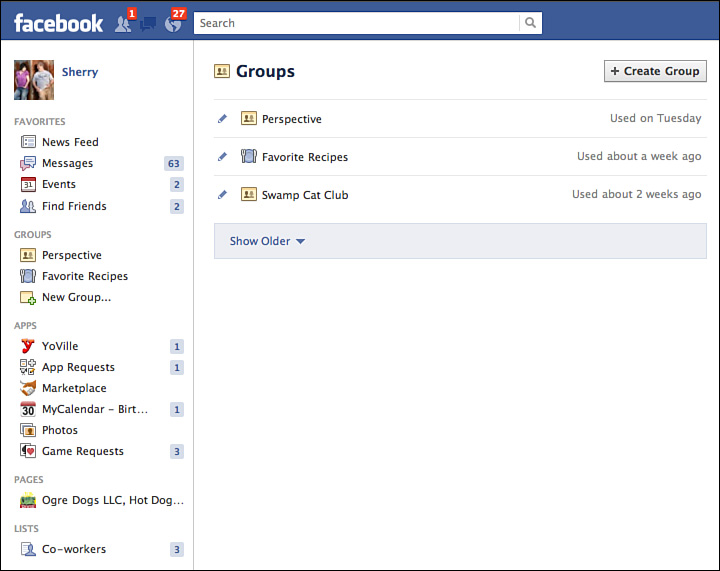
Figure 11.4 The Groups page lists all the groups you’ve joined on Facebook.
2. Click the Create Group button. The Create Group form opens, shown in Figure 11.5.
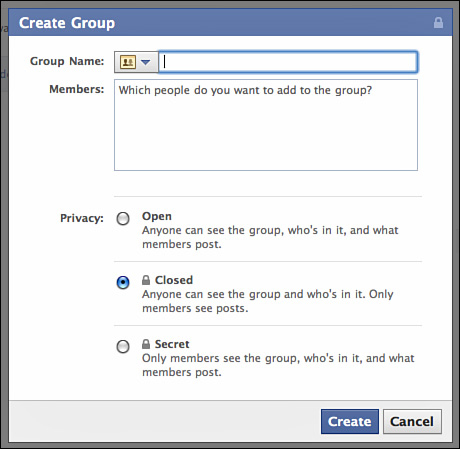
Figure 11.5 Fill out the form with a group name, privacy group type, and list anyone you want to include automatically in the group.
3. Click in the Group Name box and type in a name.
Optionally, you can click the icon drop-down list in the Group Name field and choose an icon that represents the type of group you’re making.
4. To add specific Facebook friends to your group, click in the Members box and start typing names. Facebook displays a pop-up list and you can choose friends. You can add as many as you want.
5. Click a Privacy option for the group: Open, Closed, or Secret.
6. Click the Create button. Facebook displays the new group page, as shown in Figure 11.6.
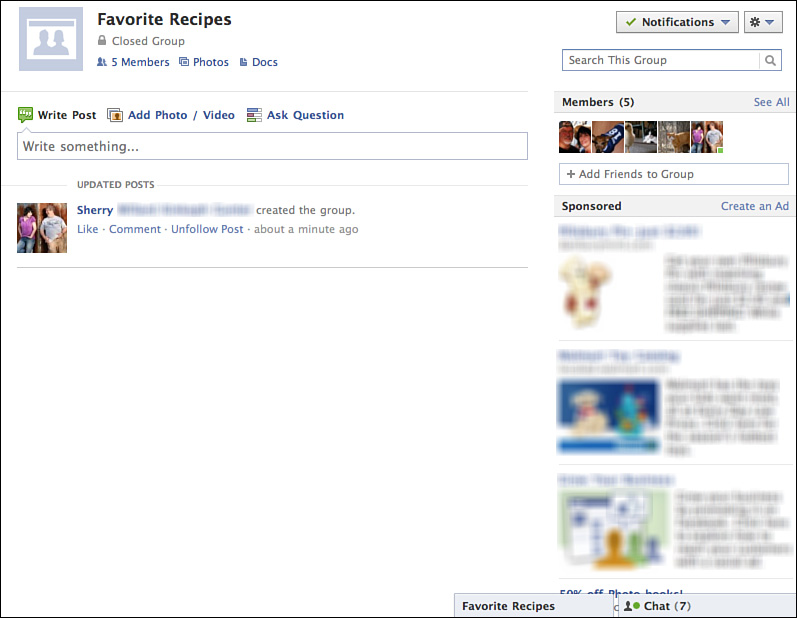
Figure 11.6 Behold, a new group page.
The next phase to creating a group is to edit the group settings. This includes assigning a profile picture, deciding whether you want to approve requests to join, setting up a group email, and filling out a description. You can tackle all these options from the Edit page. To view the page, click the cog-like icon next to the Notifications button (see Figure 11.7), and select Edit Group from the menu that appears. Figure 11.8 shows the group settings for the new group I just created.
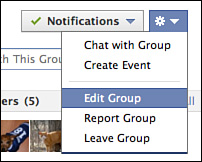
Figure 11.7 Use the drop-down menu to find editing options for your group page.

Figure 11.8 Use this page to add more details and settings to your group.
Take a few moments to scroll up and down the page to view the various settings and controls. As the group administrator, you can choose from the following options:
• To assign a profile picture, click the Choose File or Browse button under the Profile Picture area or use your computer’s camera to take a new picture. You might want to use this opportunity to add a picture that illustrates your group’s purpose or identity.
• If you ever need to change the group name, you can do so in the Group Name box on this page. In the past, you were stuck with whatever name you assigned when you first made the group. Now, you can tweak it, if needed, based on member input.
• You can also change the group’s privacy setting to something else. For example, you might have started with an open group but decide later to close it to just the current members. You can do this only with groups that have fewer than 250 people.
• As the administrator, you can choose to approve all requests to join or not. Click the Membership Approval check box if you want to control who joins the group. If the group is open and you do not select this check box, anyone can join without needing approval.
• You can use the Email Address option to set up a group email address for communicating with everyone in the group through a specific email address in Facebook.
• Use the Description box to type up a description of your group, such as its purpose, expectations, and so on.
• As administrator, you can also control who can post items on the group Wall.
After you complete the edits, be sure to click the Save button at the bottom of the page to keep your changes and apply them to the group. Click the Back to Wall link at the top of the Edit page to return to the group page.
Managing Your Group
As the creator of a group, you’re in charge of administering the group. You’re automatically given the title of administrator, also called admin for short on Facebook. Keeping an eye on the group and the content posted there by others and keeping the group alive and active are your jobs. You can post news about the group, send out group messages to your members, create events, docs, and so forth. Basically, this is your club, and you’re in charge of making everyone feel welcome and encouraging participation.
You can change the profile picture just as you do on a regular profile page. You can find links to tasks you can do to manage the group located directly below the group’s profile picture, as shown in Figure 11.9. You can also return to the form fields you originally filled out to create the group and make changes to the information.

Figure 11.9 Use the links on the group page to manage the group.
Here are a few management tasks you can do on your group’s page:
• To share photos or videos, click the Add Photo/Video link in the Write Something box on the group page and upload the file(s).
• To ask a polling question, click the Ask Question link in the Write Something box and ask your question. You can then use the polling options link to include specific answer choices.
• To view all the photos posted by the group, click the Photos link beneath the group name to open a page listing photos.
• To view your members list, similar to the list shown in Figure 11.10, click the members link beneath the group name. You can also click the See All link over on the right side of the page next to the Members heading.
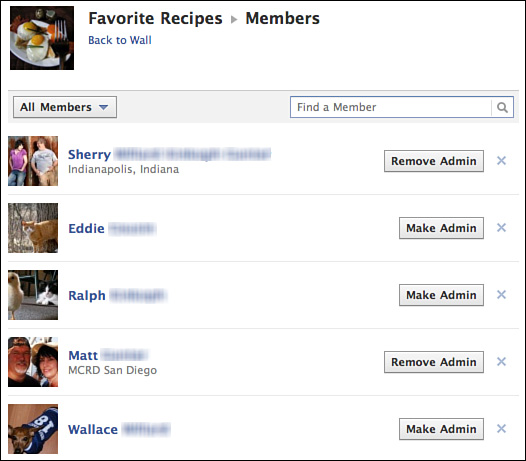
Figure 11.10 The Members page lists all the group’s members, and includes options for removing members and assigning administrator status.
• To chat with everyone at the same time, click the cog-like icon (refer to Figure 11.7) in the upper-right corner of the group page and select Chat with Group. To learn more about the chat feature, see Lesson 6, “Connecting with Friends.”
• To add more people to your group, display the members list again and click the Add Friends button in the upper-right corner. This opens a box where you can type the names of other Facebook friends you want to add to the group.
• To create a group doc, click the Docs link beneath the group name and type up your document contents.
• To make someone an administrator, open the Members list and click the Make Admin button next to the person’s name. You can use the same process to remove admin status.
• You can also create events for your group. See Lesson 12, “Tracking Events,” to learn more about this Facebook feature.
When you create a group-related event, it shows up on the group’s page and all the group members are invited to attend.
Along with the management activities described previously, you can also administer the postings on the Wall:
• To remove a post from the Wall, click the drop-down arrow next to the posting, and then click Delete Post, as shown in Figure 11.11. Confirm the deletion to make it permanent.
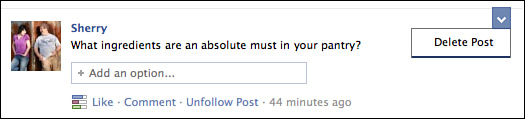
Figure 11.11 You can easily remove a post from the group using the Delete Post feature.
• To remove a member from the group, open the Members list and click the X button next to the person’s name. Facebook prompts you to confirm the removal; click Confirm. If he wants back in the group again, he must request to join.
• To permanently remove someone from your group and not allow him back, you can activate the Ban Permanently feature. When you delete the person and confirm his removal, click the Ban Permanently check box before clicking Confirm. The person can no longer find the group in a Facebook search, see group content, or request to rejoin.
Tip
To delete your group from Facebook, remove all the members, including yourself. If you prefer to exit the group yourself but leave it active and give it to someone else to manage, you can assign admin status to another member.
Summary
In this lesson, you learned how to utilize groups on Facebook. You learned how to look for groups to join, how to manage the groups you join, and how to create brand-new groups and act as administrator. In the next lesson, you learn how to use Facebook events.