
Lesson 6. Connecting with Friends
In this lesson, you learn how to use the Facebook Friends features to connect with friends online. You learn how to find friends, respond to friend requests, and view and organize your lists of friends.
Finding Friends
Because you can’t really have a social network without friends in some form or fashion, let’s get started with learning how to connect with people on Facebook. Many people find themselves invited to join Facebook by their friends who are already online. If this is the case for you, you already have some friend connections to get you started. If you’re brand-spanking new to Facebook, you’ll have to start finding friends from scratch.
After you start accumulating friends, you’ll see their stories posted out on the Home page. This is officially called an automatic subscription.
Looking Up Friends
Looking up people on Facebook and establishing online connections is easy. For example, if you want to find an old high school chum or look to see whether a family member has a profile on the site, you can use the Facebook tools to perform a search. You can employ several methods to look up friends. For starters, you can use the Search box at the top of any Facebook page. Start typing in a name and Facebook immediately tries to display a list of possible matches, as shown in Figure 6.1. For a complete listing to peruse, click See More Results at the bottom of the menu. This opens a search results page similar to Figure 6.2; click the People filter link in the left column to view people rather than all the other types of pages.
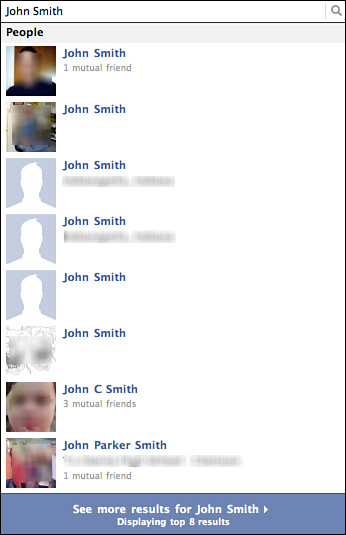
Figure 6.1 You can use the Search box to look for a specific person on Facebook.
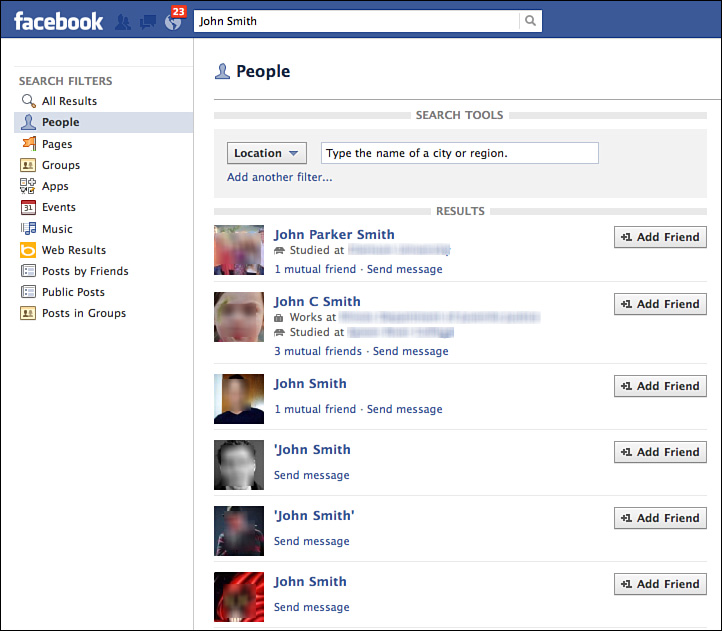
Figure 6.2 Scroll through the results page to find the person you’re looking for.
As you can see on the results page, you can use the tools to send a friend request or a message. For example, you might need to message someone to verify it’s who you think it is. To view a person’s profile page, click his name link. Depending on his privacy setting, you might not be able to view much of his profile. To befriend him, click the Add Friend button. He will have to confirm your request before he is added to your Facebook friend list.
Another way to search for friends is to look through the recommendations and common friendships through existing friends. You can do this in several ways. If you click the Find Friends link on the Home page (over on the left side of the page under the Favorites category) or the Find Friends button on the navigation bar, Facebook displays the Friends app, as shown in Figure 6.3. The top of the page lists recommendations from others and pending friend requests. Another part of the page offers to help you find friends through your email contacts lists from services such as Yahoo! or Windows Live. In other words, Facebook checks your email address book against users’ email addresses on the site and tells you about any matches. You’ll have to okay access to your email client to perform this task.
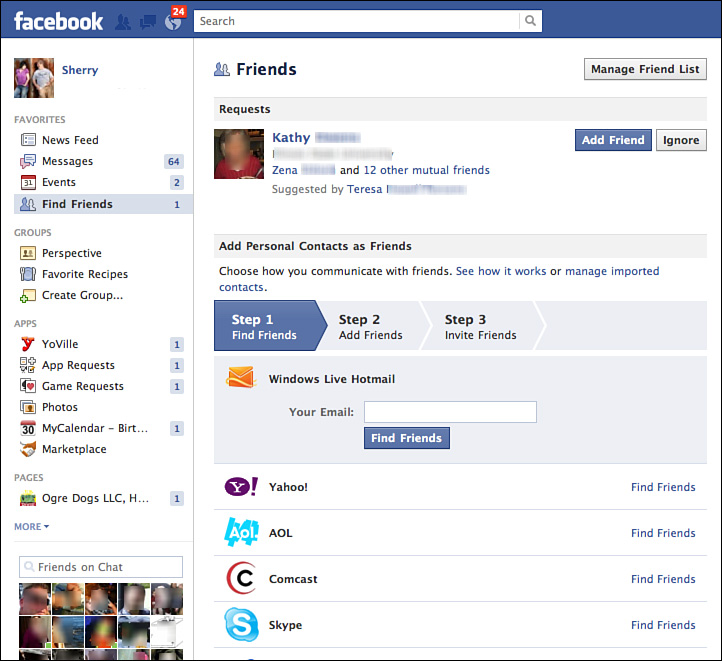
Figure 6.3 Use the Friends page to locate friends on Facebook or through your email account.
The lower portion of the page, shown in Figure 6.4, lists people you might know. If you’ve already added some friends, this section lists suggestions based on people you’ve already added to your list. These are typically friends of friends. As a new user, you won’t see friend suggestions until you start adding friends. If you do see some listed, you can click the Add Friend button to invite them to be your friend.
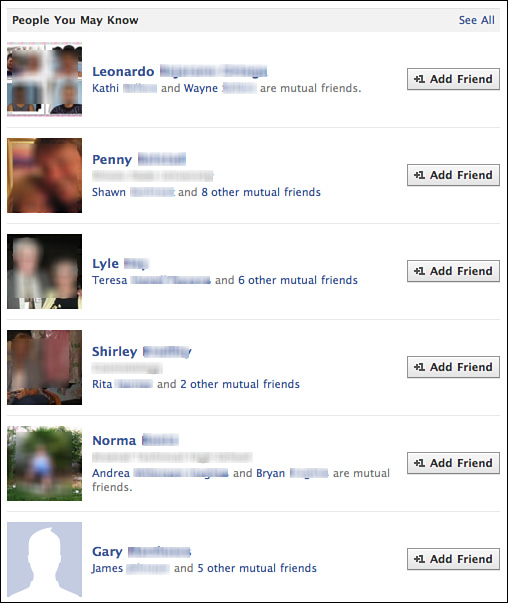
Figure 6.4 You can also find friends by looking through Facebook suggestions based on the friends of friends.
Note
To search through your contacts or address book, you must give Facebook the password for the email account. If you’re not comfortable doing this, you might want to forgo this search method entirely. To learn more about Facebook’s privacy and security settings, see Lesson 7, “Guarding Your Privacy.”
When you add a new friend, you can use Facebook’s friend suggestion feature to connect the person to other friends you both know. This feature is especially helpful if your friend is new to Facebook. Open the person’s profile page, click his or her Friends link, and look for an option for selecting friends to suggest and send along to the people you think might be interested in knowing the new friend.
Responding to Friends Who Find You
While you’re busy inviting people to be your friends, don’t forget to look for friend requests from other people. When you’re the lucky recipient of an invitation from another Facebook user, it appears on your Home page as a friend request next to the Find Friends link on the left side, or as a red number up among the three notifications icons on the blue navigation bar. Depending on your notifications settings, Facebook might also alert you with an email if you’ve turned on the requests feature. When you do find yourself with a friend request, such as the one shown in Figure 6.5, simply click the Confirm button to add the person to your friends list.
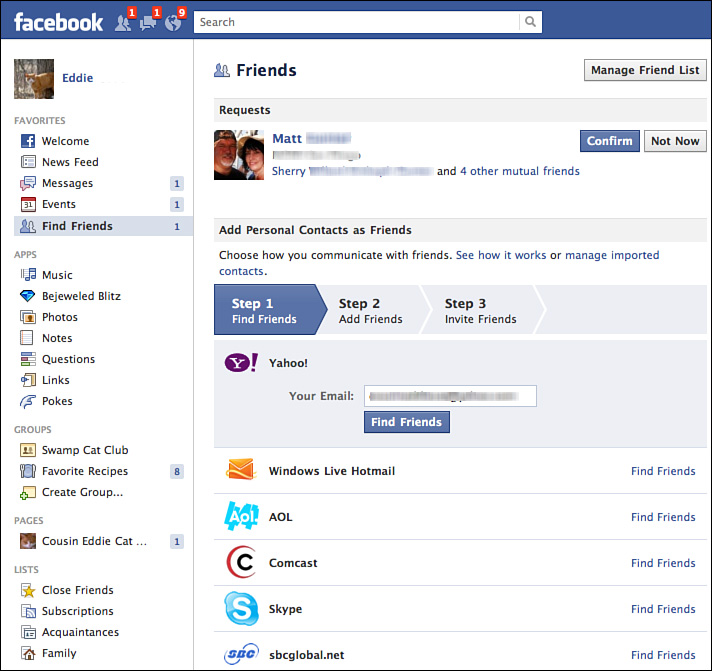
Figure 6.5 Remember to check your notifications for requests and invitations.
If you’re having trouble remembering who the person is or how you’re acquainted, you can click the person’s picture to view his or her profile first, and then decide to add that person as a friend or not. You can also click the Mutual Friends link to learn which mutual friends you have in common. If you’re still having trouble figuring out who the person is, you can click the Not Now button to hide the request and deal with it another time. To revisit hidden requests, select See Hidden Requests.
If you delete a friend request, the person who sent it never knows. However, they may send you another request in the future.
Viewing and Editing Friends
After you start accumulating friends on Facebook, you’ll want to view their profiles from time to time and see what they’re up to online, or check out their latest photo or video postings. For starters, when you open your profile page, Facebook displays a random list of friends in a Friends box, as shown in Figure 6.6.
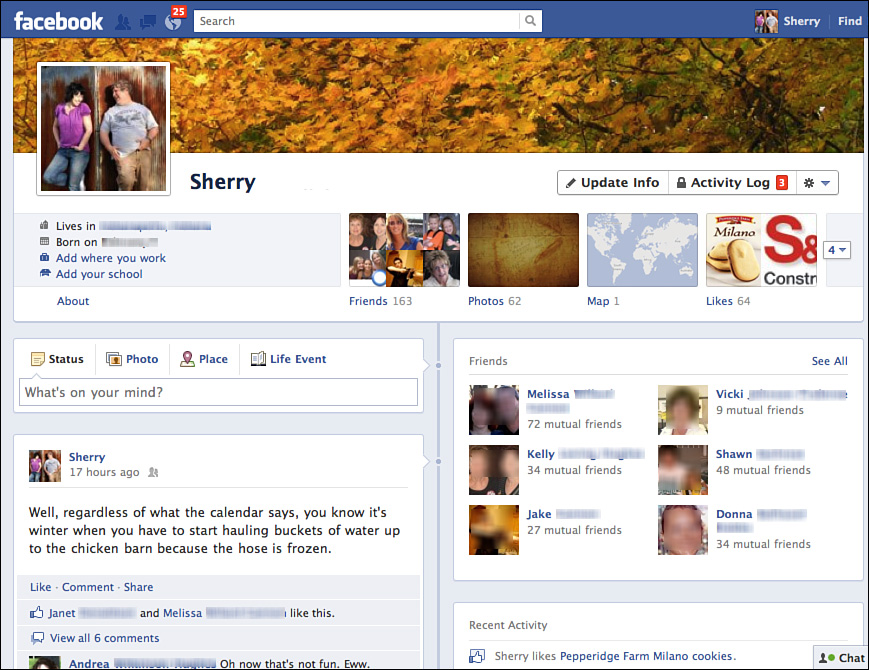
Figure 6.6 You can view your friends in the timeline’s Friends box.
You can click a friend to view his or her profile. You can also click on a friend listed on the Home page in the news feed, or you can click on a friend listed on your timeline postings. You can also open your entire Friends list and access profiles from there, too.
Viewing Friends
To see everyone on your Friends list, click the See All link found in the Friends box area on your profile page. This opens a page similar to the one shown in Figure 6.7. If you’re using a Mac or another web browser, a dialog box might open instead.
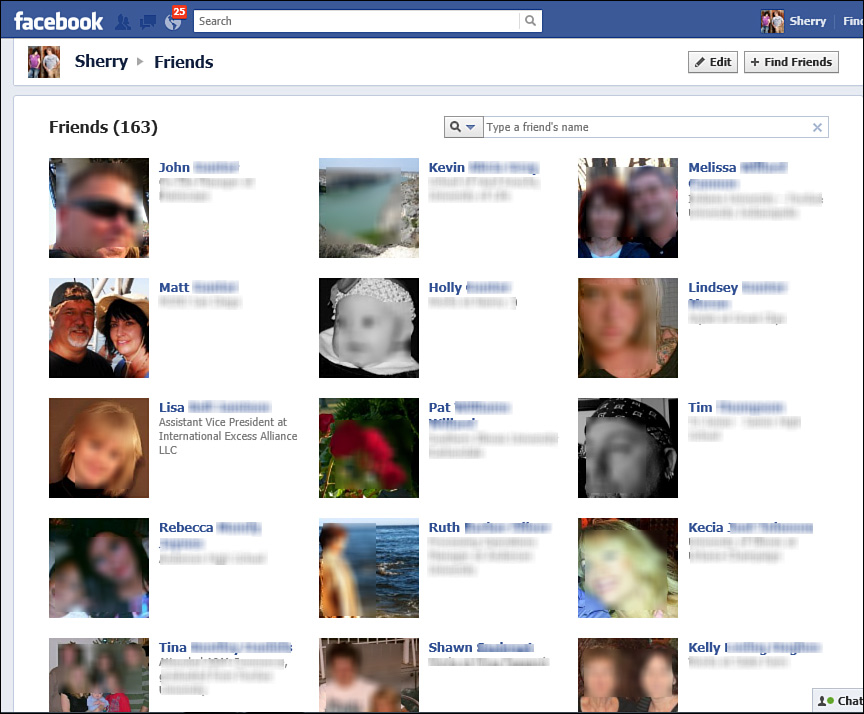
Figure 6.7 The Friends list is simply a listing of all your Facebook friends.
To view any friend’s profile in the list, just click the person’s name or photo.
Organizing Friends into Lists
If you like organization, you’ll love Facebook’s various Friends lists. You can group your friends into lists, which is particularly useful if you have hundreds of them on Facebook. For example, you may have a list for family and another for close friends, and still another list filled with casual acquaintances. Lists can help you keep track of different groups at different times, or send out messages to everyone in a group all at once.
If you’re like most people, you probably talk about some subjects with everybody and other subjects with only those who are close to you. For example, you may freely express your political or religious views, but not everyone on your Friends list or network may want to share in those views. So, you end up having private conversations with some, and more public conversations with others. You can make sure your separate worlds don’t collide on Facebook using Friends lists as a tool for communicating and organizing.
Facebook starts you out with three default lists: Close Friends, Acquaintances, and Restricted. These lists are empty until you add people to them. Facebook also creates smart lists that automatically update themselves based on profile info, such as relatives you befriend on Facebook. You can also create your own unique lists. When you create a customized list, you can use it to view only news stories from people on that list. You can also selectively post a status update viewable only by the people on that list. You can summon a customized list at any time by clicking the audience selector and selecting the list name.
To create a customized Friends list, follow these steps:
1. Display your Home page and look for the Lists category (see Figure 6.8) in the left pane area; click Lists. (Note: If the category is not displayed, click More to unhide it.) Facebook opens the Lists page, as shown in Figure 6.9.
Figure 6.8 Locate the Lists category.
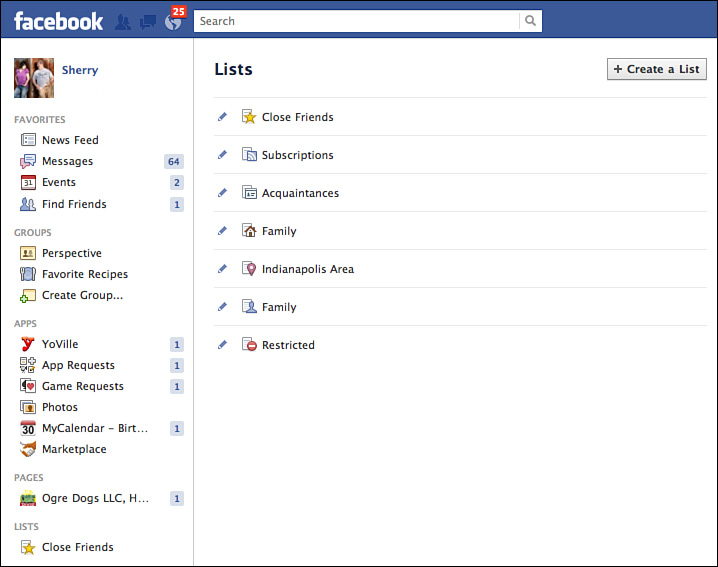
Figure 6.9 The Lists page.
2. Click the Create a List button at the top of the page.
3. In the Create a List dialog box that appears (see Figure 6.10), type a name for the new list in the List Name field and click Create List.
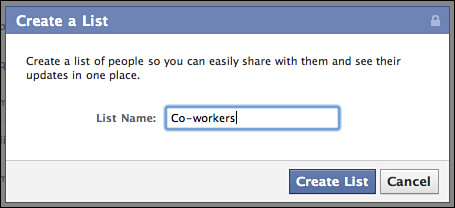
Figure 6.10 Give your new list a name.
Facebook opens the new list’s page, as shown in Figure 6.11.
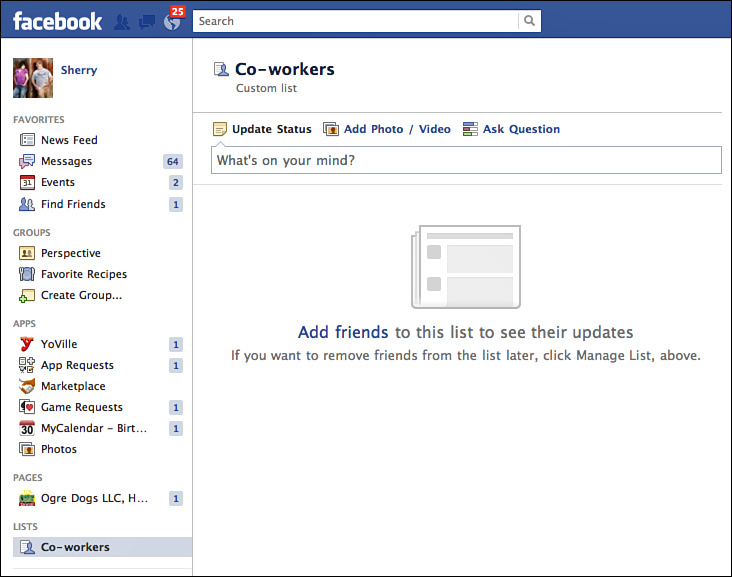
Figure 6.11 The new list’s page appears; click the Add Friends link to start filling it with people.
4. Click the Add Friends link. Facebook opens the list, as shown in Figure 6.12.
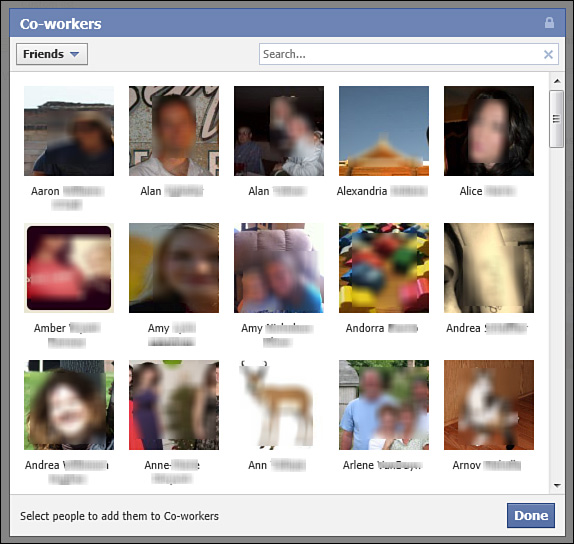
Figure 6.12 Facebook lets you add or remove people in a list.
5. You can scroll through and click on people you want to add to the new list, or you can type their names in the Search field.
6. When you finish adding friends to the list, click Done.
After you create a new list, Facebook saves it and displays it under the Lists category on the Home page. If you click the list name, the news feed view switches to show only stories from the people on the list. To view the list itself, just click the Manage List button in the top-right corner, and then click Add/Remove Friends. This opens the same box you used to add friends. You can add more, or deselect the ones you want to remove from the list as needed.
Your customized list is just for you; no one else can see your lists.
To remove a list entirely, display the list’s news feed view, click Manage List, and click the Delete List button; then click Delete List.
Unfriending Friends
As your Friends list grows, you may encounter an occasion in which you want to “unfriend” someone. For example, if the person turns out to be a notorious spammer or you have a falling out of some kind, you can remove the person from your list, or perhaps you want to pare down your list to just people you actually know in some way. There’s no official declaration of this action; however, if your friend goes looking for you in her Friends list, your name won’t appear anymore.
To remove a friend from your list, display his or her profile page and click the Report/Block link, or click the cog-like icon in the top-right corner and choose Report/Block. A dialog box of options appears, as shown in Figure 6.13. Click the Unfriend option and click Continue. A confirmation box appears announcing you are no longer friends; click Okay.
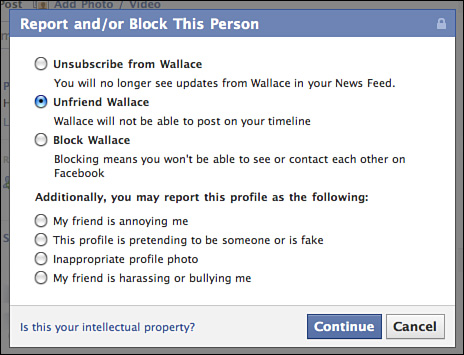
Figure 6.13 A friend removal action is permanent.
There’s no undo button for a friend removal. If you do want to “re-friend” them again at a later time, you’ll have to beg them to be your friend again through a friend request.
When you remove a friend, they can no longer post on your timeline. If you’re looking for a more serious solution, you might want to block them instead. This prevents you both from contacting each other again.
Another option is just to unsubscribe. As you can see in Figure 6.13, you can unsubscribe from their posts, which means you’re still Facebook friends, but you won’t see their stories anymore out on the Home page news feed.
Tip
What about when someone unfriends you for no good reason? When you discover you’ve been unfriended, try not to take it personally. Sooner or later you’re bound to encounter someone in your group who gets angry and goes on a tirade unfriending people, like a relative on the warpath or a vengeful coworker. It might even happen by accident. Just shake it off and keep enjoying the more “stable” friends you have left.
Caution
In addition to removing a friend, you can also use the reporting tools in the Report and/or Block This Person box to report harassment, bullying, or inappropriate content. Facebook takes this very seriously, so pursue these options only as a last resort.
Subscribing to People
When you add friends on Facebook, you’re automatically subscribing to their posts. New to Facebook, you can also subscribe to people you’re not necessarily friends with but want to keep track of, such as celebrities or political figures. Called subscriptions in Facebook, you can view their public updates as part of your news feed stories on the Home page. To turn on the subscription feature, visit the person’s page and click the Subscribe button.
When you subscribe, you can control what types of updates you view as well as types of content, such as life events or photos. Simply move the mouse pointer over the person’s Subscribed button to display a menu of viewing options. You’ll also find an Unsubscribe option in case you ever want to stop viewing the person’s postings.
Note
If you don’t see a Subscribe button, that particular person doesn’t allow subscribing.
To view a list of people you’re subscribing to, display your timeline page and look for the Subscriptions box. If the box is not in view below the cover photo, click the More arrow next to the boxes for Friends, Photos, Map, and Likes. When you click the arrow, other boxes come into view, including the Subscriptions box. Click the Subscriptions link to open the Subscriptions page, shown in Figure 6.14, listing people you’ve subscribed to and the number of friend subscriptions you currently have. You can use this page to control what types of information individual subscriptions post on your news feed.
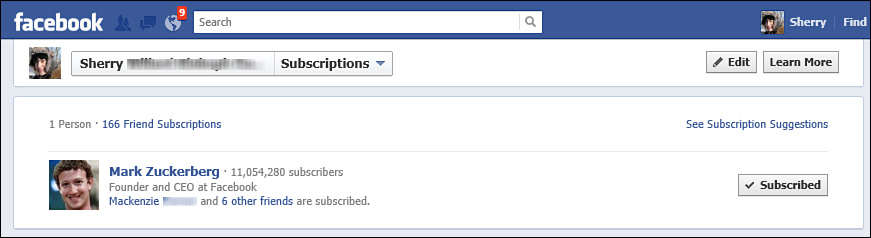
Figure 6.14 Use the Subscriptions page to manage the people you subscribe to.
If you allow it, others who are not your friends can subscribe to you as well. This feature is not turned on by default. To activate your own subscription feature, follow this link: www.facebook.com/about/subscribe. Open the description page about the feature and click the Allow Subscribers button.
Summary
In this lesson, you learned how to look for friends on Facebook and respond to friend requests. You also learned how to view your Friends list and organize your friends into customized lists. Finally, you learned how to “unfriend” a friend and subscribe to others. In the next lesson, you learn how to use Facebook’s privacy controls.