Hour 4. Using Xcode Templates to Create Projects
What You’ll Learn in This Hour:
• Xcode project templates
• How to create a new project
• The anatomy of an Xcode project
• Managing project properties
In the past few hours, you have learned how to install Xcode, what Objective-C looks like, and how the model-view-controller (MVC) development methodology can lead to well-structured projects. Starting with this hour, it is time to work directly with Xcode.
In this hour, you learn about the Xcode project templates and how to create and test an application using the templates. One of the best things about the Xcode templates is that they provide a starting point for a variety of different applications. Before deciding to reinvent the wheel, take a look at the available Xcode templates and consider using one of them as your starting point; it might save you hours of coding.
Available Project Types
In Hour 1, “Xcode 4,” you learned that project templates in Xcode are divided between iOS and OS X applications. This division is more than superficial. Creating an iOS project sets up the compiler, target platforms, interface, and controllers for an iDevice deployment. Similarly, a OS X project contains project resources that are just as specific to the Mac. In other words, don’t plan on creating a new project with the idea it will be “truly” cross-platform.
Watch Out!: iOS and OS X: Where the Paths Cross
You can create common classes to be shared between OS X and iOS, but your implementation is constrained to the intersection of Cocoa and Cocoa Touch. Opportunities for code reuse are improving, but don’t plan on a large overlap between iOS and Mac projects.
Let’s begin by exploring many of the different types of projects templates in Xcode. Apple changes these somewhat frequently, so do not be surprised if the names don’t quite match up. The basic functionality, however, seems to be consistent between Xcode releases.
iOS Project Templates
We start with the iOS project rather than Mac project templates because, frankly, they are more interesting. They provide starting points across a wide variety of different application interface styles. The Mac templates, in contrast, are more basic and require you, the developer, to determine what the final product will look like.
The iOS templates are divided into three categories: Application, Framework & Library, and Other. Within each category are a number of templates, as follows:
• Application
Master-Detail Application
OpenGL Game
Page-Based Application
Tabbed Application
Single View Application
Utility Application
Empty Application
• Framework & Library
Cocoa Touch Static Library
• Other
Empty
In this hour, we walk through each category and each template type within. As you’ll see, chances are your time will be spent with Application projects more than anything else.
Selecting iOS or OS X in the project creation screen shows all available templates for that platform. Choosing the individual categories under the platform filters the choices appropriately.
Master-Detail Application
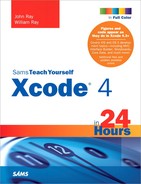
The first template, called the Master-Detail template (and previously known as the Split View template), creates an iPad or iPhone application that displays hierarchical information and enables users to drill down to more detailed items, ultimately displaying a screen containing a detailed description of what they have selected.
An app that catalogs flowers, for example, might let the user pick a geographic region, and then display a screen listing species in that area, and then finally show details on the chosen species. Figure 4.1 shows an example of the Master-Detail application template in use.
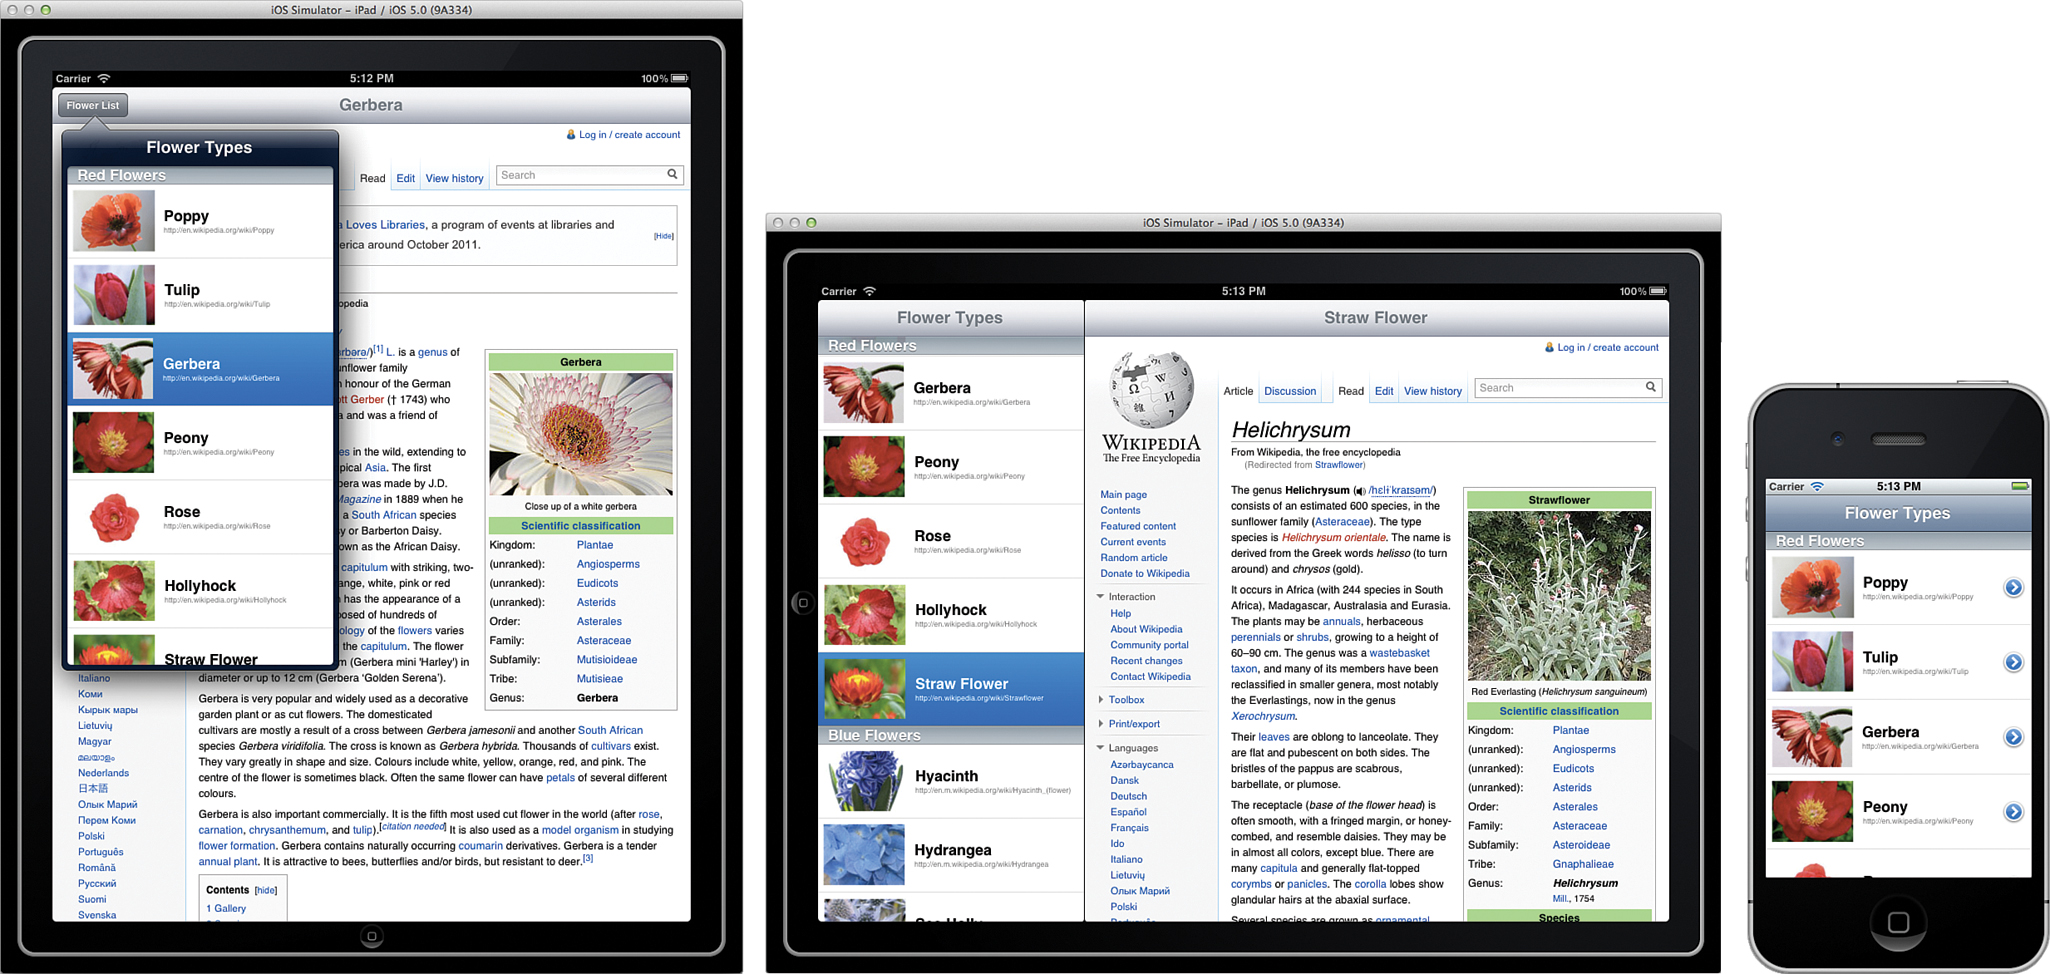
Figure 4.1. Use the Master-Detail template to show structured information.
A unique feature of this template is that you can use it to build universal applications for iPhones and iPads, even though the interface differs strikingly between these devices.
OpenGL Game
iOS (like OS X and many other operating systems) uses OpenGL for creating interactive 3D scenes. To get a quick start on creating your own OpenGL masterpiece, you can use the OpenGL Game template. The default template implements an OpenGL ES drawing context with a few 3D objects, and a timer that can be used to check for updates and apply them to the scene. Figure 4.2 shows the OpenGL template and its default scene of floating blocks.
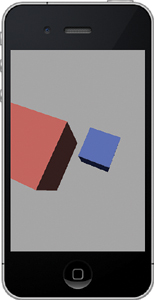
Figure 4.2. The OpenGL template is a starting point for your own 3D iOS creations.
By the Way
Although the template is referred to as a Game template, nothing stops you from using for any 3D application you want to implement. The basic pieces are all in place; that is, you can use the drawing context and a timer in any type of application. You just need to provide code to process user input and control the OpenGL scene accordingly.
Page-Based Application
The Page-Based Application template emulates a book (similar to iBooks), with a familiar 3D page-turning effect, as shown in Figure 4.3. Although available for both iPhone and iPad (and universal) deployment, the effect and user experience is far superior on the iPad.
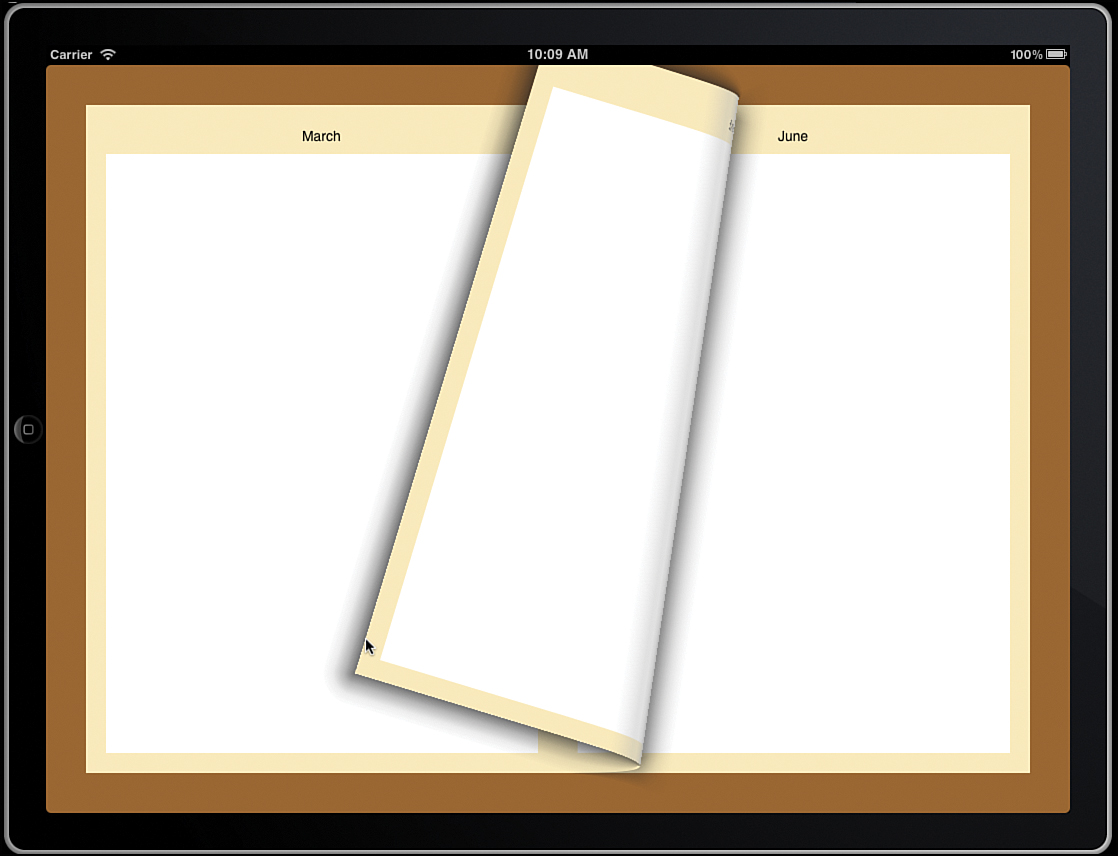
Figure 4.3. Use the page-based template to create interactive linear content.
Although this template might seem like a no-brainer for creating interactive iOS books, you should choose it only if you need to build a digital book that offers more interactivity than possible with iBooks Author. Yes, the Page-Based Application template looks like a book, but it has all the features of a typical iOS app at its disposal. If you need that, great. If not, you might find it harder to maintain your content and that your development takes longer than if you just use the Apple digital iBooks content-creation tool.
Single View Application
The Single View Application template is the most “generic” of the iOS templates and your likely starting point for applications for which you want to develop your own interface. As its name suggests, this template provides a single empty view when the application starts.
Tabbed Application
Applications that provide different functions (for example, a conversion app that has conversions for measurements distance, volume, and temperature) can provide different “areas” within a single piece of software by adopting the tabbed application template. In this template, a tab bar (a bar with icons on it) displays at the bottom of the iOS device screen, as shown in Figure 4.4.
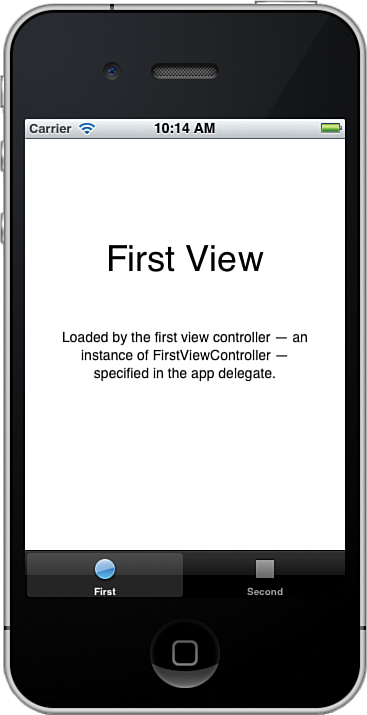
Figure 4.4. Tabbed applications separate functional areas of the app.
Using the tabs, a user can navigate between different views within the application, giving you (and them) plenty of space to work in.
Did You Know?
Tabbed applications are more common on the iPhone than on the iPad because of the smaller amount of screen real estate available. If you’re creating a universal application that uses a tabbed interface on the iPhone, you might want to consider a different UI for iPad users.
Utility Application
Utility applications are simple applications with a primary content view and a secondary view (often reserved for configuration). The iPhone version of the Utility Application template provides a single blank view with an information button (i) that triggers a flipping effect on the screen to transition to the secondary view. When finished with the secondary view, the user can touch a Done button to return to the primary, as shown in Figure 4.5. iPad users do not get the flipping effect and instead access the secondary view via a button and a popover displayed on the primary view.
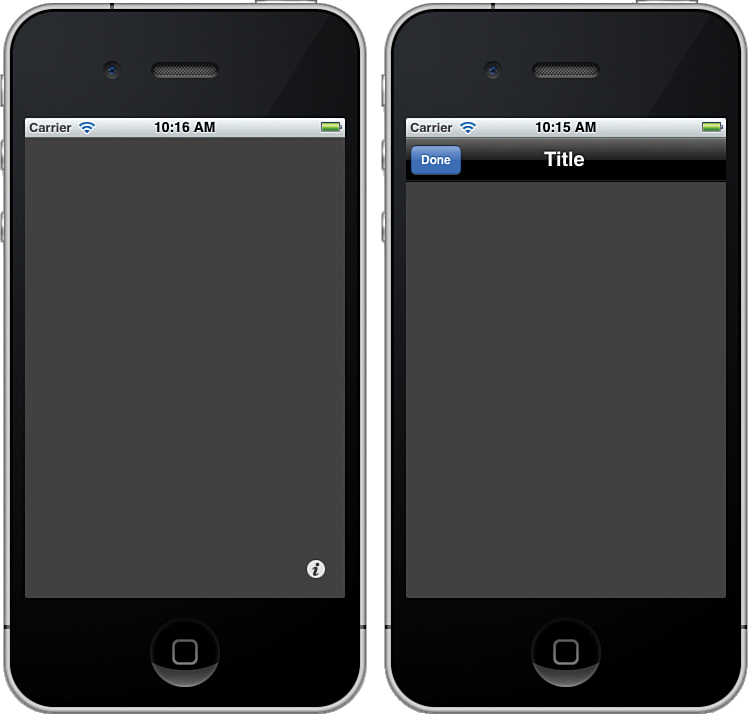
Figure 4.5. Quickly transition to and from a primary and secondary view with a utility application.
You should use this template for applications that provide their functionality within a single view but that might also require some setup. Timers, clocks, weather widgets—simple content-consumption apps—are prime examples of applications that fit this template structure.
Empty Application
The Empty Application template is a properly configured iOS template with absolutely no UI in place, nor any code to support a UI. If you want to build an app from the ground up, this is the proper starting place.
Cocoa Touch Static Library
In the Framework & Library category of templates, you find the Cocoa Touch Static Library. Using this template, you can build your own code library for use in other projects or distribution to other developers.
Creating a library is different from creating and sharing a class. A class is the raw code that implements functionality. A library is compiled code that implements functionality. If you develop a new handwriting-recognition engine that you want to share with other developers (without giving them access to your code), you do this by using the Cocoa Touch Static Library template.
Empty
The final iOS template (located in the Other category) is named Empty and does nothing except create an empty project structure that you can fill with code. The empty template does not include any code or files beyond the project folder. You’ll not likely ever want to use this, but it is there if you do.
OS X Project Templates
OS X projects are divided into five different categories: Application, Framework & Library, Application Plug-In, System Plug-In, and Other. Unlike for iOS, you can develop software that integrates much deeper into OS X, so you’ll find a greater breadth of project templates here, but they are less fully developed than the iOS application templates.
• Application
Cocoa Application
Cocoa-AppleScript Application
Command Line Tool
• Framework & Library
Cocoa Framework
Cocoa Library
Bundle
XPC Service
C/C++ Library
STL C++ Library
• Application Plug-In
Automator Action
Address Book Action Plug-In
Installer Plug-In
Quartz Composer Plug-In
• System Plug-In
Generic Kernel Extension
Image Unit Plug-In
IOKit Driver
Preference Pane
Quick Look Plug-In
Screen Saver
Spotlight Importer
Sync Schema
• Other
Empty
External Build System
If you are learning to program and want to write some simple C/C++/Objective-C code without dealing with complexities of Cocoa, pay close attention to the Command Line Tool template. This gives you what you need to start programming with minimal overhead.
Cocoa Application
The Cocoa Application template delivers a bare-bones window-based application that can cover two scenarios: applications that present their functionality in a window (a calendar, for example), and applications where the user works within a document window, as shown in Figure 4.6.
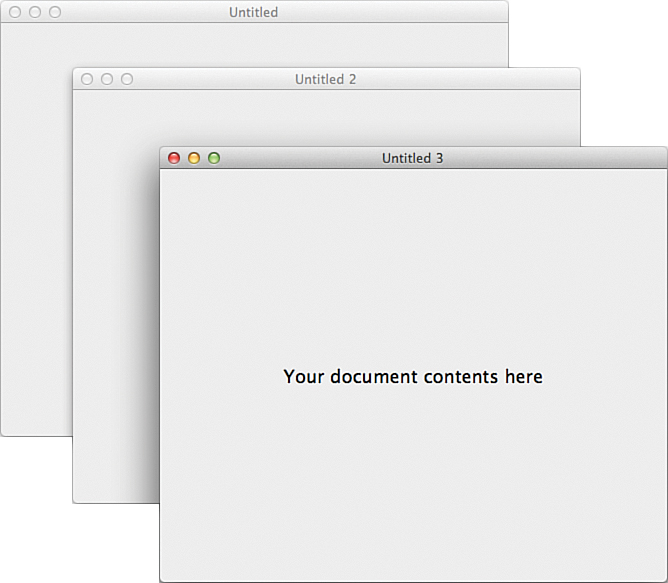
Figure 4.6. Quickly set up a skeleton app that functions from a single window or many document windows.
The template does not handle the process of creating files or providing any features beyond displaying one or more windows; it just sets up the basic methods and UI for your app. Consider this the equivalent of the Single View iOS application template.
Cocoa-AppleScript Application
If you’re an experienced AppleScript application developer, you can develop full Mac applications using AppleScript rather than Objective-C. You still use the Cocoa classes, but you do not need to learn a whole new language. Aside from the language, this template is identical to the Cocoa Application template.
To get started with AppleScript Xcode development, visit http://www.macosxautomation.com/applescript/develop/index.html for more information. Hour 13, “Xcode-Supported Languages,” includes more information about using other languages in Xcode.
Command Line Tool
Developers coming from a UNIX background may be used to creating a main() function and coding from there. In addition, if you’re in the progress of learning basic development skills, chances are you are not worried about building user interfaces or using the MVC design. In these cases, the Command Line Tool template may be exactly what is needed.
This template enables you to choose a base language, and then sets up a main() function and lets you code from there. Your application runs via the command line and produces output in text. Sometimes simple is all you need or want.
Cocoa Framework
The Cocoa Framework project type is the first of the OS X Framework & Library project templates. This template is used to create a framework, a collection of independent but shared resources. Frameworks usually consist of one or more libraries and can include multimedia, interface objects, and more.
By the Way
To learn more about frameworks and the role they serve in OS X, be sure to read the document “Framework Programming Guide” in the Apple Xcode documentation. Hour 7, “Working with the Xcode Documentation,” discusses the documentation system.
Cocoa Library
Use the Cocoa Library framework to create a distributable binary library that provides a common set of functions to other applications. Libraries can be used as standalone tools or combined with other related libraries and resources to form a framework.
Bundle
Bundles are similar to frameworks (and libraries) in that they encapsulate functionality and resources. Rather than provide those features to arbitrary applications, however, they are written to extend existing applications. You can build OS X software to accept bundles to extend and enhance features. To create a bundle, you can start with this template, but you also need information about the bundle architecture required by the software you want to extend. In other words, you need developer documentation for the software you’re enhancing before you start building a bundle.
XPC Services
XPC services are used by OS X applications to implement interprocess communications. They act as small, standalone helpers that enable two or more independent (but related) processes to communicate safely. With this go-between established, applications can be safely extended or broken into smaller components that only expose system resources to the parts of the app that need it. A browser, for example, might communicate with its plug-ins via an XPC service, removing the ability for a plug-in to directly affect the browser in a negative way.
Use the XPC Service template to set up a project for building a new service for your application.
C/C++ Library
The C/C++ Library is the same as a Cocoa Library, but it is developed for use with C/C++.
STL C++ Library
The STL C++ Library uses the C++ Standard Template Library (a variation of the C++ Standard Library). Learn more about STL C++ at http://en.wikipedia.org/wiki/Standard_Template_Library.
Automator Action
The Automator Action template starts off the Application Plug-In template category. This template is used to create a new action for use with the Automator OS X automation/scripting system. The template includes the required Automator input/output method and an empty UI that displays within the Automator workflow.
Address Book Action Plug-In
Address Book Actions extend the OS X Address Book application by providing custom functions that you can apply to entries. The plug-in template creates a sample action that uses the OS X speech synthesizer to speak information about a selected contact.
Installer Plug-In
Applications that use the OS X installer can customize the GUI of the system installer by writing installer plug-ins. This template does not provide any functionality, but it does include method stubs and an empty interface for designing your own installer plug-in.
Quartz Composer Plug-In
Quartz is a graphical rendering environment that enables developers to layer processing modules (creating what is called a composition) to visualize data, without having to write code. Quartz plug-ins are custom processing modules that you can add to a composition. This template provides no example, but it implements all the method stubs that you’ll need to complete.
Generic Kernel Extension
Need to extend the core system-level functionality of OS X? Use this template to create a dynamically loadable extension for the Darwin kernel. Few development efforts require creating kernel extensions, so it is unlikely that you’ll use this often.
Image Unit Plug-In
Core Image is a framework for OS X (and also iOS 5+) that enables advanced image manipulation through the application of nondestructive filters called an image unit. This template enables you to create your own Core Image filters that can be loaded and applied in other applications. (It contains a sample filter implementation by default.)
IOKit Driver
Use the IOKit Driver template to get a start on developing drivers for communicating with external hardware. Like kernel extensions, this is highly specialized and rarely needed by most developers.
Preference Pane
To create a program that presents itself through the OS X System Preferences application, use the Preference Pane template. Preference panes are typically just used for configuration and control of another service. Unlike iOS preferences, however, they are complete applications themselves. The default template provides an empty slate and UI for development.
Quick Look Plug-In
Quick Look makes it possible for a user to quickly preview the contents of a file from within the Finder, Mail, and other enabled applications. You can extend Quick Look capabilities beyond the built-in file types by creating a Quick Look plug-in. This template includes empty method stubs for building your own plug-in to preview files of your choosing.
Screen Saver
Don’t like the built-in OS X screen savers? Build your own with the Screen Saver template. Unfortunately, the template does not provide sample code beyond method stubs, so you’ll be starting from scratch in your implementation.
Spotlight Importer
You can extend Spotlight, much as you can Quick Look, to handle new types of content. By creating a Spotlight Importer, you can enable the OS X system to intelligently index files that normally would be ignored or not provide useful information. The Spotlight Importer template sets up the methods you need to do so.
Empty
Like the iOS Empty template, the OS X template contains absolutely nothing. This is your starting point for a project where you want to determine all the details (not Xcode).
External Build System
This template, like the Empty template, is a starting point for just about anything. The only difference is that the External Build System template is configured for a command-line build system (such as make). Many of us started development by creating C applications that built with Makefiles. This is where we go to relive the old days.
The Project-Creation Process
Creating a project in Xcode follows a wizard/assistant-like process that walks you through a set of screens to configure how the template is applied. With all the different template types and options that can be used with each template, your projects can inherit hundreds of possible starting points.
Obviously, we cannot cover all of these in a meaningful way, but we walk through the creation of an iOS project and discuss the most common template options you’ll encounter. Why an iOS project? Because the iOS templates include almost all the same configuration options of Mac templates, plus a few that are unique to iOS.
By the Way
When you create a new project in Xcode, all the source files contain a copyright message at the top with your name, date, and company. Xcode grabs this information from the My Card identified in Address Book. If you haven’t properly set this card, the text in your files will be wrong.
Be sure to start Address Book and choose Card, Go to My Card to see your current contact data. Choose Card, Make This My Card while browsing a contact to choose a new card as your personal card.
Choosing the Template
To begin creating a new project, use either the Create New Xcode Project button in the Xcode welcome window, or choose File, New, New Project after starting Xcode. Figure 4.7 shows the template selection screen.
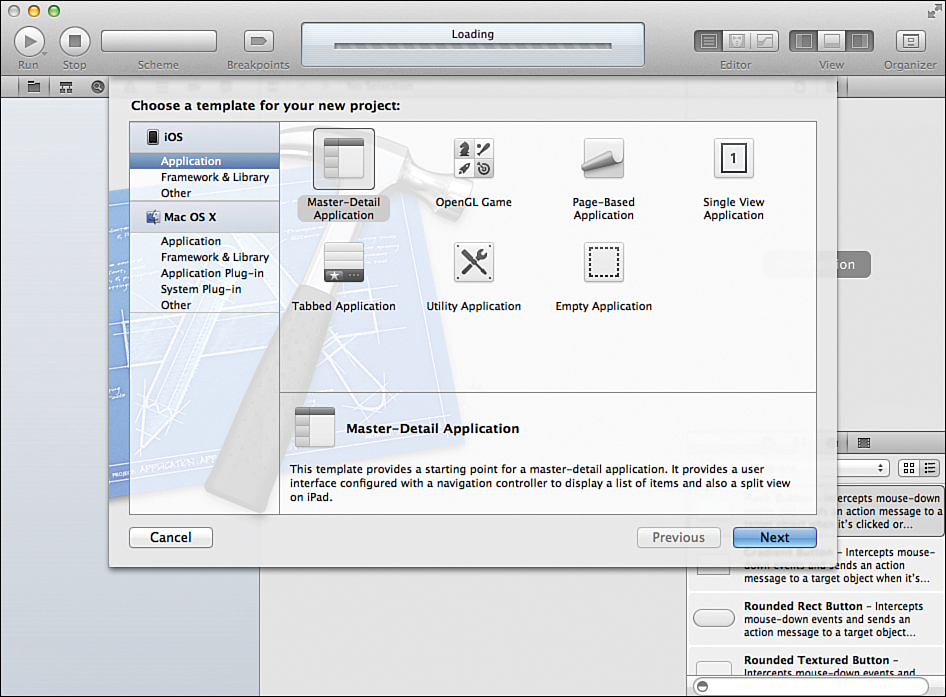
Figure 4.7. Choose your platform, category, and then a project template.
Use the column on the left to choose your deployment OS, the category, and finally the individual template that you want to use. Click the Next button in the lower-right corner of the template screen when happy with your selection.
Configuring the Template
After choosing the template, you are prompted for a product name, identifier, and a variety of other values, as shown in Figure 4.8. Let’s start by working through the basic naming conventions, and then look at the other possible options you might encounter.
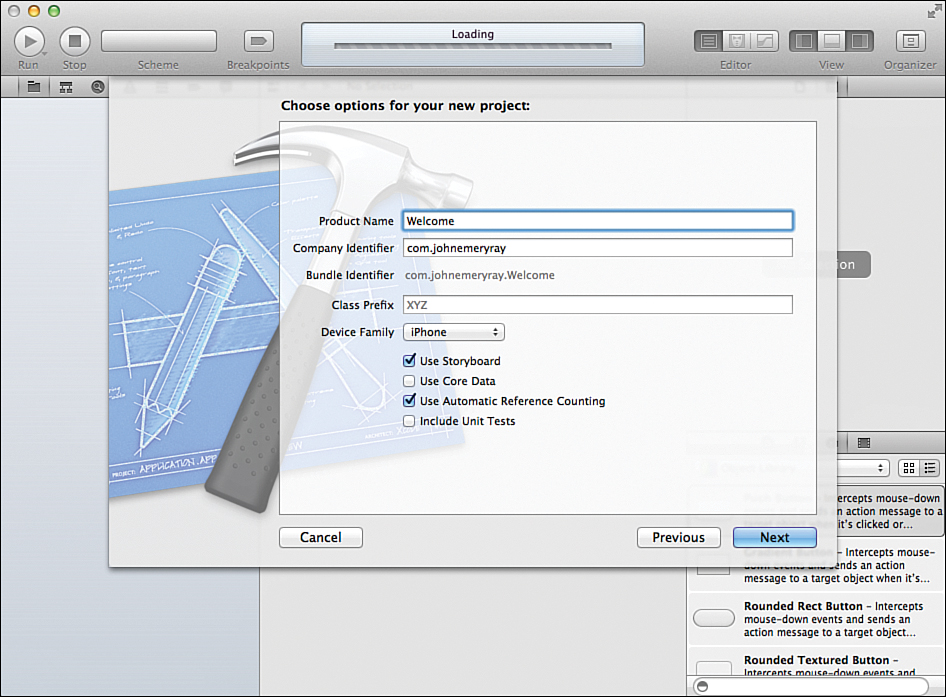
Figure 4.8. Choose the options to customize your template.
Product Naming
The product name is the name of your application, and the company identifier is the domain name, in reverse order, of the organization or individual producing the app (Apple’s convention, not mine). Together, these two values make up something called the bundle identifier, which uniquely identifies your application among all other apps.
For example, assume I am creating an app called Welcome. This becomes the product name. I own the domain teachyourselfxcode.com, so I enter com.teachyourselfxcode as the company identifier. The final bundle identifier for the application becomes com.teachyourselfxcode.Welcome. If you do not own a domain name, you can just use the default identifier for your initial development.
The class prefix is an arbitrary string that is appended onto the start of the filenames in an Xcode application template. Apple has traditionally automatically assigned the product name as the prefix, but changed this in recent versions of Xcode. Leave this blank or provide any value you want.
Additional Attributes
After setting the naming conventions to be used by your application and classes, you still have several possible settings to choose from. Many of these cannot be reset after the fact, so make sure you pick what you need:
• App Store Category: This sets the primary category that your application will be offered under in the Mac App Store if you choose to publish it there. (OS X only)
• Create Document-Based Application: Includes code in the template for basic handling of document windows and document creation. You must still write the load/save code yourself, but the method stubs are all in place if you check this check box. (OS X only)
• Document Extension: In document-based applications, you use this to define the file extension that your application’s documents will be saved with. (OS X only)
• Device Family: Unlike when creating a OS X application, iOS apps must target a specific device. Use the device family attribute to create projects for iPhone or iPad. You can also create universal projects that include resources for both devices. (iOS only)
• Include Unit Tests: Unit tests are short coded tests that, when run, verify that your code is working the way it should be. You learn more about unit tests in Hour 18, “Test Early, Test Often.” Until you’re ready to use them, leave this box unchecked. (OS X and iOS)
• Include Spotlight Importer: When this check box is checked, your project includes the method stubs for a Spotlight Importer for your application’s documents. Remember, there is also an Importer project template, so you can always build one later. (OS X only)
• Use Automatic Reference Counting: Switches the project to use ARC (automatic reference counting). Apple prefers that new projects include automatic reference counting, instead of relying on garbage collection (OS X) or manual reference counting (OS X/iOS). (OS X and iOS)
• Use Core Data: When this box is checked, this option includes a Core Data data model and the framework for accessing it. Core Data is a built-in relational database engine that applications can use if they have complex data requirements.
• Use Storyboard: Like ARC, it is probably best to check this option in your iOS apps. Storyboard is a new method for designing and storing interfaces and interface transitions and is considered the future of iOS interface development. You learn to use the storyboarding tools in Hour 8, “Creating User Interfaces.” (iOS only)
When satisfied with your settings, click Next.
Saving the Template
Xcode prompts for a save location for the project, as shown in Figure 4.9. Navigate to an appropriate location on your drive and then click Create. Xcode makes a folder with the name of the project and places all the associated template files within that folder.
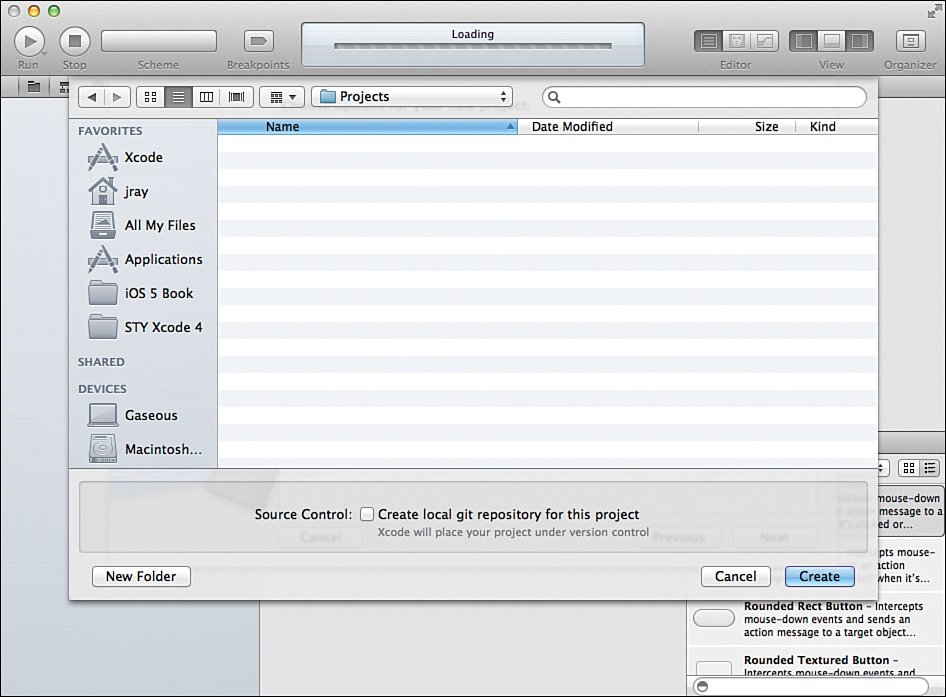
Figure 4.9. Choose your save location.
Notice the availability of a Source Control check box when choosing where to save your project. This helps you track versions of files in your project, see changes between versions, and restore earlier files if needed. You learn more about source control in Hour 12, “Using Source Control.”
You’ve Got a Project
Okay, so you’ve got a project... now what? The answer to that question is provided over the next few hours. For now, though, let’s take a look at what you should see after creating a project.
Project Files
First, after walking through the template configuration and choosing a save location, you arrive in the main Xcode workspace. On the left side of the Xcode interface, you see the project Navigator and all the files associated with your project, as shown in Figure 4.10.
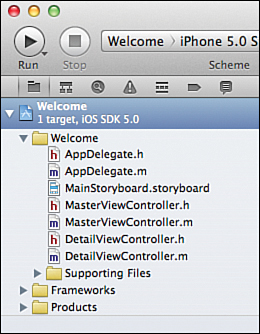
Figure 4.10. Xcode displays your project files and resources in the Navigator.
One thing you want to be aware of is that the representation of the project in Xcode is not a mirror of what was been created in your file system. The folders (called groups) are logical divisions of content. They are used for organization within the project and do not influence the project’s actual folder structure.
If you browse to the location on your disk where the project is stored, you see a top-level project folder that contains a file with the extension .xcodeproj, as shown in Figure 4.11. This is the file you need to open to return to your project workspace after exiting Xcode.
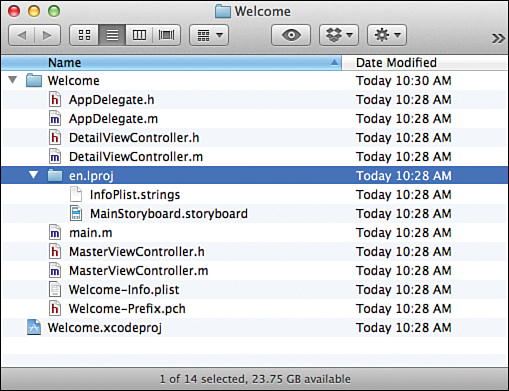
Figure 4.11. Don’t expect to see the same folder structure shown in Xcode in your actual project directory.
You’ll also notice another folder (also named after the project) within your main project folder. This contains all the class and supporting files for the project. Additional folders might also be visible for supporting localization (en.lproj for English projects, for example) and for resources you manually add to the project.
Project Configuration
To review your project configuration, click the top-level icon in the project Navigator in Xcode. To the right of the Navigator, make sure the application icon under Targets is selected, and then click the Summary tab. Doing so displays a summary of how the project is configured, as shown in Figure 4.12.
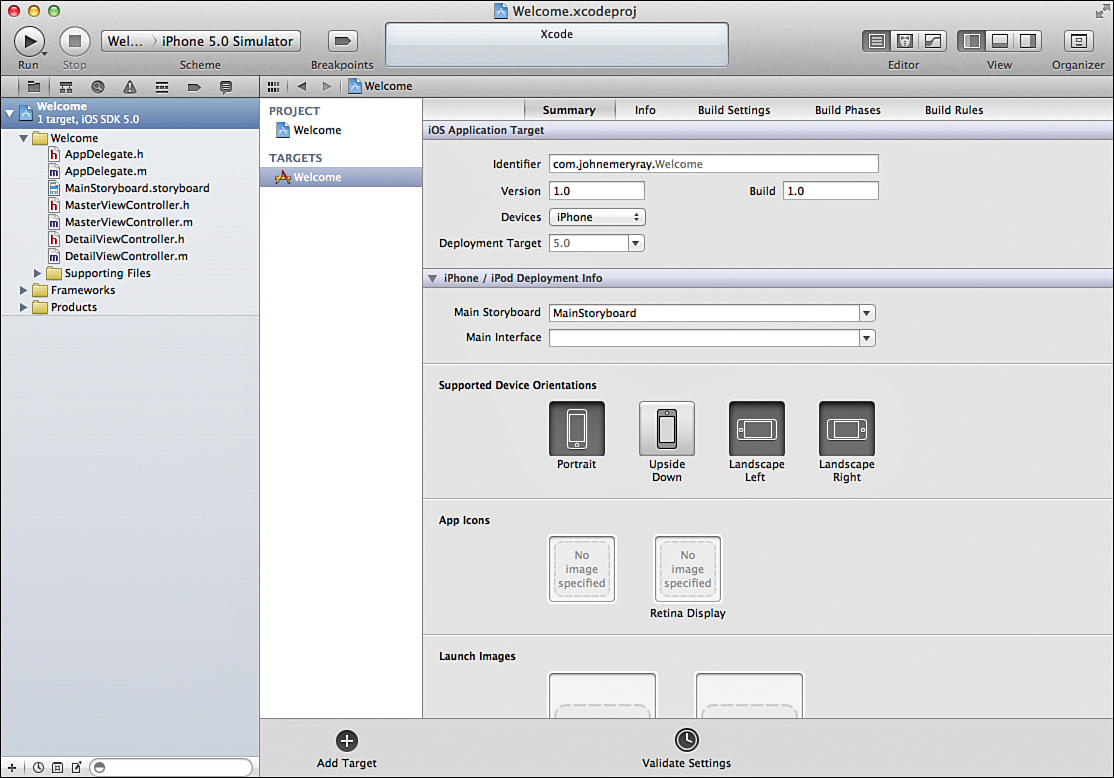
Figure 4.12. Review your project summary.
The project configuration contains information that describes how your project will work and look. Settings such as deployment target (operating system version), icons, and even (on OS X) which capabilities the application is going to have.
Building the Template
Even if you haven’t written any code, the templates Apple provides will compile and (unless completely empty) run. To run and view the output of an application, click the Run button in the upper-right corner. OS X applications will run, just as you expect. iOS applications will run in a simulator, as shown in Figure 4.13.
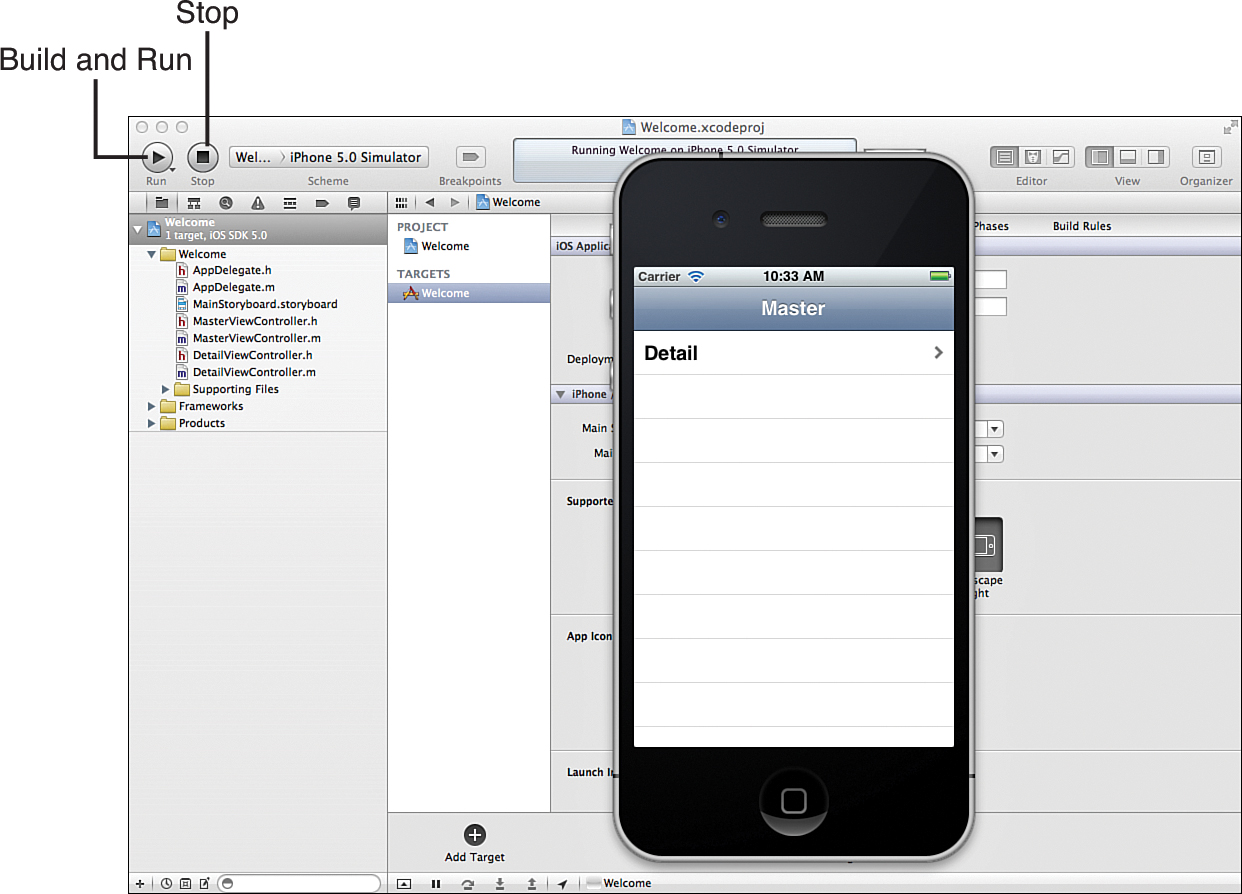
Figure 4.13. Click Run to build and run an application.
To stop an application that is executing, click the Xcode Stop button. You learn more about building applications and the simulator in Hour 11, “Building an Application,” but this should give you enough information to get started exploring live examples of the Xcode templates.
Customizing the Xcode Templates
The Xcode templates are actually project files that you can open and edit to customize with your own code and resources. To do this, you must first make a copy of the project template you want to change. OS X projects are located in /Applications/Xcode.app/Contents/Developer/Library/Xcode/Templates/Project Templates/Mac. You can find iOS templates at /Applications/Xcode.app/Contents/Developer/Platforms/iPhoneOS.platform/Developer/Library/Xcode/Templates/Project Templates.
After changing the template, do not copy the updated template back overtop the factory-installed templates. Instead, create the folder structure Developer/Xcode/Templates/Category within the Library folder in your home directory. The Category can be anything you want to help categorize your templates (Applications, Games, or so on). Place the updated project templates inside these folders, and Xcode will immediately recognize them.
Summary
Developers often approach a problem with the mindset of “I’m going to build this from scratch.” This, however, is rarely needed when working with Xcode. In this hour, you learned about the project-creation process, which templates are available, and how you can configure them for both iOS and OS X platforms. Although you are most likely interested in creating applications, Xcode provides starting points for libraries and frameworks, command-line utilities, image filters, and even screen savers.
After a project is created, we reviewed “what happens next”: A project workspace opens, and the project files are stored on your hard drive. You can now review your project configuration and even build and run the project to get a sense for what the template has provided. Obviously, you want to expand the project beyond just creating a template, so keep on reading.
Q&A
Q. The templates I’m seeing don’t exactly match what you’ve listed here. Why not?
A. Apple continually tweaks and updates the templates included with Xcode. The functionality usually remains very similar, but don’t be surprised to see template names change over time.
Q. Are templates my only starting point?
A. Absolutely not. Dozens of sample projects are provided in the Xcode documentation (see Hour 7) that you can use for experimentation or adapt to your own use. I encourage you to use these samples as a means of exploring Xcode and Objective-C.
Q. What options do you recommend selecting when creating new projects?
A. For beginning developers, I recommend making sure that ARC is enabled, Storyboarding (for iOS) is selected, a single (iPad/iPhone) device is chosen, and that Document-Based Application, Unit Tests, and Source Control are disabled. This results in a project that uses the latest technologies and does not include any extra cruft that will just get in the way.
Workshop
Quiz
1. What type of template provides a means of browsing hierarchically arranged information on iOS?
2. The OS X and iOS projects have a great deal in common. True or false?
3. You cannot build and run a project immediately after creating it from a template. True or false?
Answers
1. The Master-Detail template creates unique interfaces on both iPhone and iPad devices that enable a user to drill down through information to ever-increasing details.
2. True and false. Although the skills and many libraries needed to develop for OS X and iOS are very similar (true), the user interaction in an application dictates very different starting points and application resources (false).
3. False. The templates, in most cases, will create a perfectly valid project that will build and execute. It may not do much, but it does give you a quick way to start experimenting with functionality without performing any additional setup.
Activities
1. Walk through the creation of one or two projects (for OS X and iOS) using the application templates. Review the Xcode workspace that is created and compare it to the project folders saved on your disk.
2. Create and run an iOS application using one of the available templates. Notice that the application runs within the iOS simulator. Although this is covered in a later hour, test the simulator and get a feel for how it compares to a real iOS device.