Hour 11. Building and Executing Applications
What You’ll Learn in This Hour:
• The terminology of the Xcode build tools
• How to create new project targets
• The types of per-target build settings you can modify
• The purpose and management of schemes
• How to use the iOS simulator to test iOS apps
Nothing is quite as grand as creating an application and running it for the first time. To run an application, however, Xcode must take into account how to compile the application, what dependencies (if any) it has, how to run it, whether to include debugging information, and many, many more possible variables. It is no exaggeration to say that an entire 24-hours book could be dedicated to tweaking and configuring the dozens of possible build settings Xcode presents us with.
In this hour, we take a step back and review the different components of the build system, what they are used for, ways they can be modified, and how it all ties together. This is not the most exciting hour in the book, but you’ll thank yourself for learning the “language of the build” sooner rather than later.
The Language of the Build
Building a project usually produces an executable or a library. This seems simple enough, and is the ultimate outcome of most development projects. What lies beneath the surface, however, is anything but simple.
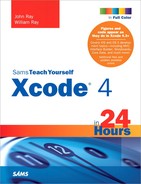
If you’ve been building sample code as you have read through the first several hours, you have likely been clicking the Run button and viewing the results, as shown in Figure 11.1. There is certainly nothing wrong with this; in fact, we encourage it. As you start to customize projects, however, you need to understand the terminology of the Xcode build system. What’s a build configuration? An action? A scheme? Let’s start this lesson by reviewing the many terms you’ll encounter when you start delving deeper into the build process.
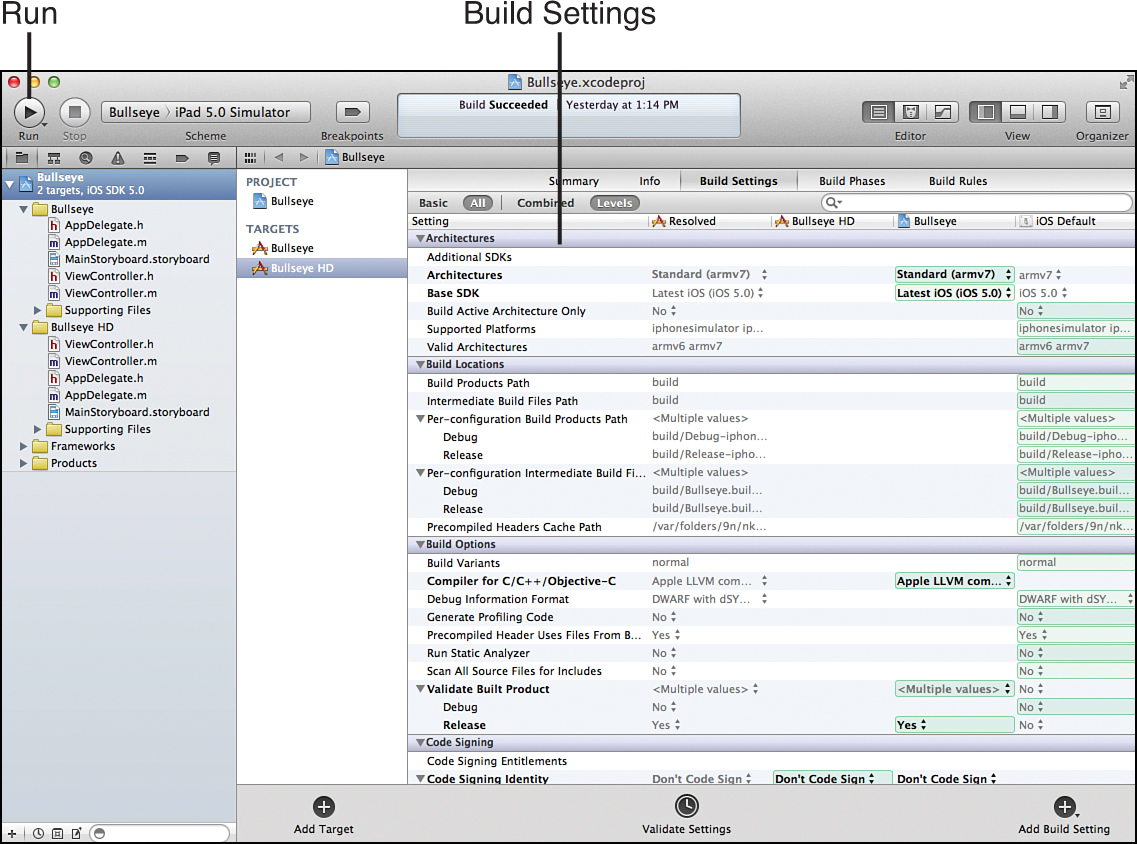
Figure 11.1. Clicking Run is simple. The Xcode build system is not.
By the Way
This hour introduces many of the build-related options in Xcode, but it should not be considered comprehensive. Read Apple’s Xcode Build System Guide for a complete reference to everything build related.
Targets
Targets are a collection of instructions that define how to build a project. Typically, a target is a framework or an application, but it can also be tests or other actions that are carried out against your project’s code. Projects usually start with a single target (an application), but you can add others easily. You might, for example, start an iOS application with a single iPhone target, but later add an iPad target for a larger, more complex version of the app. You might also use a target to create a version of an application for a particular version of the OS.
To view the targets configured for your project, click the topmost project icon in the Project Navigator. The targets are listed in the column to the right of the navigation area, as shown in Figure 11.2.
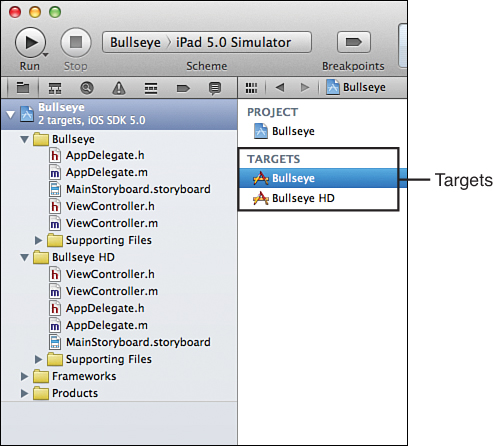
Figure 11.2. View the targets associated with your project.
Products
The files that are generated by following the build instructions in a target are called products. As you would expect, products are usually applications, libraries, or frameworks. In its initial state, a project has no completed products but, because of the target rules, knows the products that it will be producing.
You can look at the products that have been created (or are waiting to be built) by looking in the Products logical group within the Project Navigator, as shown in Figure 11.3.
Figure 11.3. Xcode lists the products that will be created by your targets within the Products group.
Products that have not yet been created are highlighted with a red label. Those that are already built show in black. To find the actual files represented by a target (such as an executable), you can right-click the target and choose Show In Finder from the contextual menu.
Build Actions
A build action is what you are executing when you click the Run button on the Xcode toolbar. It builds the target (or targets), and then performs one or more predefined actions on them. The Run build action, for example, builds your target and launches it in OS X or installs it on an iOS device (or in the iOS simulator) and attaches a debugger to the process.
Five predefined build actions are configured for each project you create. The first step of each of these actions is to build one or more targets (You learn how it knows which targets shortly.)
Did You Know?
The first step of any build action is to build the target. This makes “build” itself an informal and implied (but very important) build action.
• Run: The Run build action launches the application in OS X or installs the iOS application on a device or in the iOS simulator. A debugger process is attached to the running application for tracing/tracking its behavior. You learn more about debugging in Hour 19, “Getting the Bugs Out: Debugging with LLDB and GDB.”
Watch Out!: Debugging with Run
Pay close attention to what I’m saying here about the Run build action. In its default configuration, it is intended for debugging an application, not simulating the application in a final release scenario. Applications that are built for debugging include symbol information that makes it possible to track/change variable contents on-the-fly and view the application’s flow in relation to the source code in real time.
• Test: The Test build action is used to build and run any unit tests that you’ve created along with your project. Unit tests are pieces of code that execute the core functions of your application to verify that the proper results are being returned. This ensures that as you build your application out you do not introduce changes that break working code (a condition known as a regression). You learn about creating unit tests in Hour 18, “Test Early, Test Often.”
• Profile: The Profile action is used in conjunction with an Xcode tool called Instruments. Instruments can analyze your running application for performance issues, memory leaks, and other problems that may not be detectable through simple debugging efforts. We walk through some of the basics of Instruments in Hour 21, “Advanced: Analyzing Code with Instruments.”
• Analyze: The Analyze action performs a static analysis of your code, detecting logic issues that would not stop an application from building but might prevent it from running correctly.
• Archive: The Archive action creates a distribution-ready version of the application for uploading to the App Store or distributing to product testers. By default, it does not include any debugging information or unit tests that were initially added to the project. You can fine-tune the archive settings to deliver exactly the target or targets you intend to submit.
You can execute any of the build actions from the Product menu, or most of the actions (Archive being the exception) by clicking and holding on the Run button, as shown in Figure 11.4.
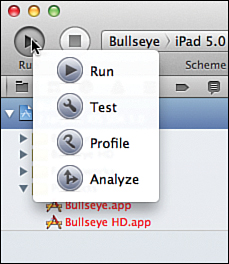
Figure 11.4. Choose the build action to execute by clicking and holding the Run button.
Build Configuration
As mentioned, you can build applications with debugging information using the Run build action or prepare an application that is devoid of any debugging symbols using the Archive build action. This brings up a question: How do these different actions build differently? The answer is that they use a different build configuration. Two build configurations are created with each project you create: a debug configuration and a release configuration. As their names suggest, one builds your project with debugging information included; the other doesn’t. The build actions use one or the other build configuration, depending on what it is trying to accomplish.
You can verify these build configurations as follows:
1. Click the project-level icon in the Project Navigator.
2. Select the project icon in the column that appears to the right of the Navigator.
3. Click the Info tab in the top of the Editor area, as shown in Figure 11.5.
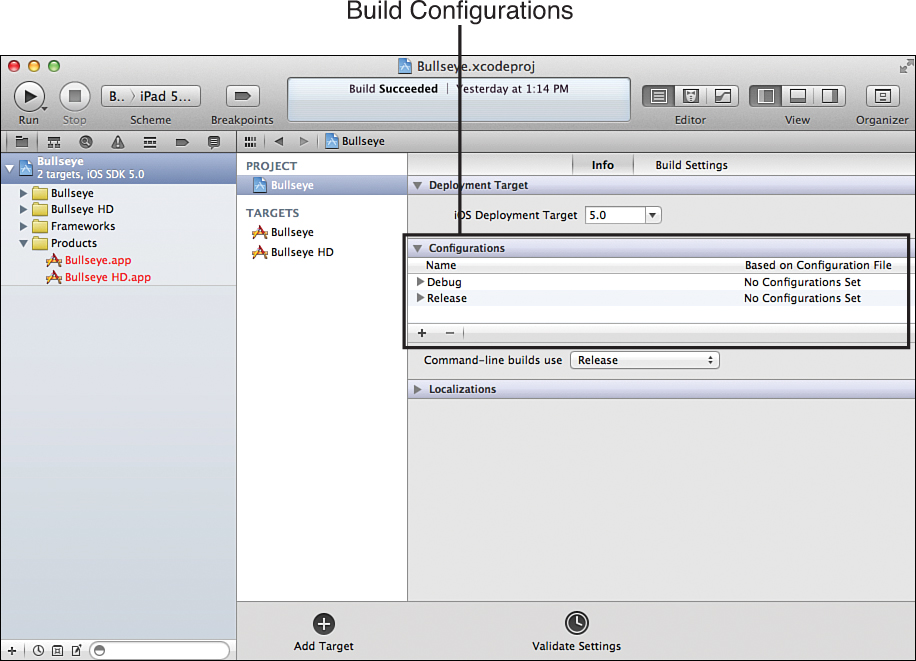
Figure 11.5. Each project includes a debug and release build configuration.
For most development projects, debug and release are all you need.
Schemes
If you are feeling an abundance of information overload by now, I don’t blame you. Understanding how all the different pieces of the build system fit together can be like trying to solve a 5,000-piece puzzle of the sky on a clear day. That said, I introduce just one more component this hour: schemes.
If you have been building and running applications over the past few hours, you’ve seen your project name along with a destination for running the code (My Mac, iOS Device, iPhone Simulator, iPad Simulator) show up in a Scheme pop-up menu directly to the right of the Stop button, as shown in Figure 11.6.
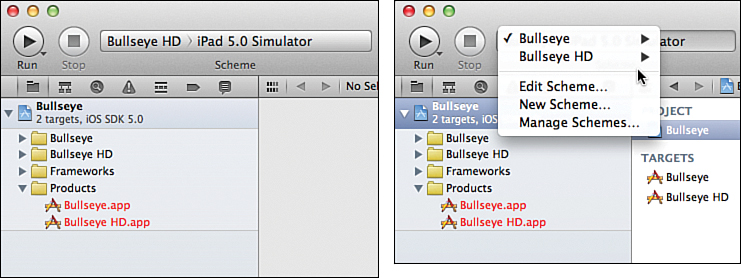
Figure 11.6. The Scheme menu is directly to the right of the Stop button (shown here in unclicked/clicked states).
In reality, what you’re seeing in the Scheme pop-up is not the name of your project but the name of a scheme that has been defined for your project. A scheme ties all the concepts that you have just learned about together. A scheme determines what targets will be built, what the various build actions will do when they are executed, and what build configuration are used for a given build action.
When you create a project, a scheme is automatically created and named for the project’s target. It provides the default functionality that ties each of the build actions to the targe so that clicking Run will do what you expect.
Managing Targets
Although targets and schemes are not something you will change frequently (you see some examples in the later hours of this book), I wanted to give you an opportunity to start exploring these features on your own. In the earlier hours, you saw how to configure icons, launch images, and set entitlements for applications. What you were doing, in fact, was configuring your target. At that point in time, there was only a single target to look at, so it appeared that your settings were for a project. In actuality, however, they were for the target.
Creating a New Target
Creating a new target is nearly identical to creating a new project, but it occurs with an existing project. Click the topmost project icon in the Project Navigator, and then click the Add Target button that appears at the bottom of the Editor area, as shown in Figure 11.7.
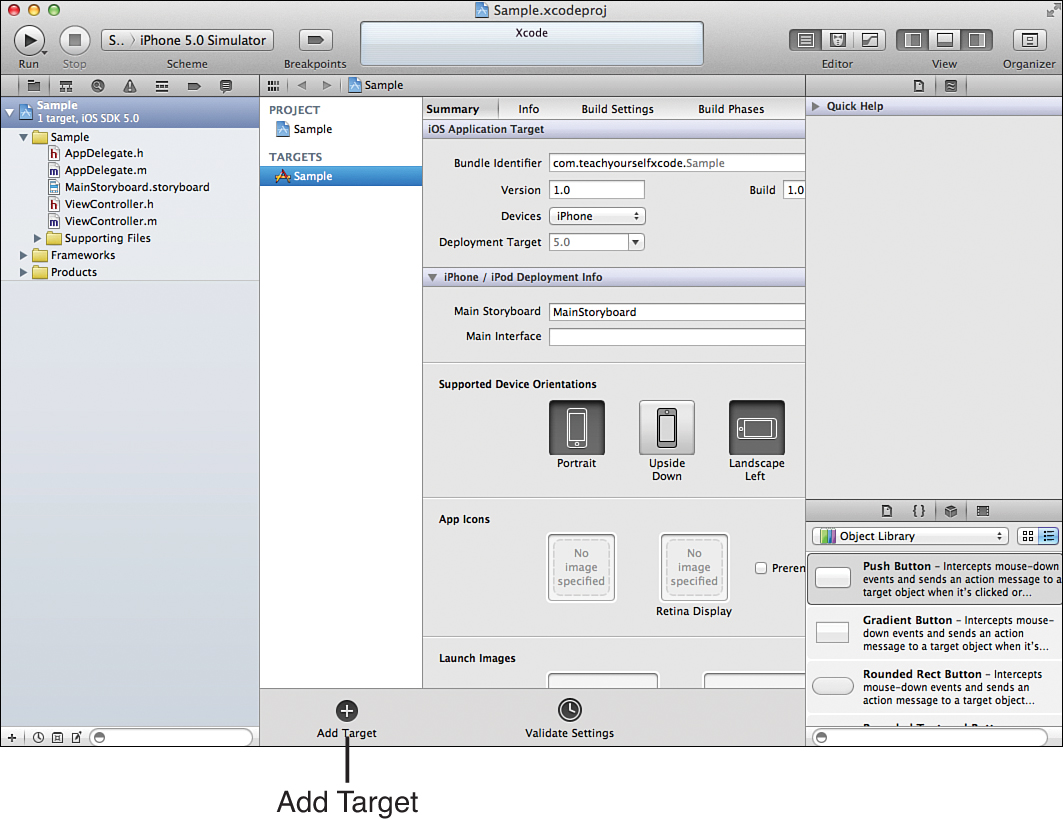
Figure 11.7. Clicking to add a new target.
You are then guided through the exact same project-creation assistant that you learned about in Hour 4, “Creating Projects with Xcode Templates.” The result? A single project that contains two targets, and two sets of files for each of the targets, as shown in Figure 11.8.
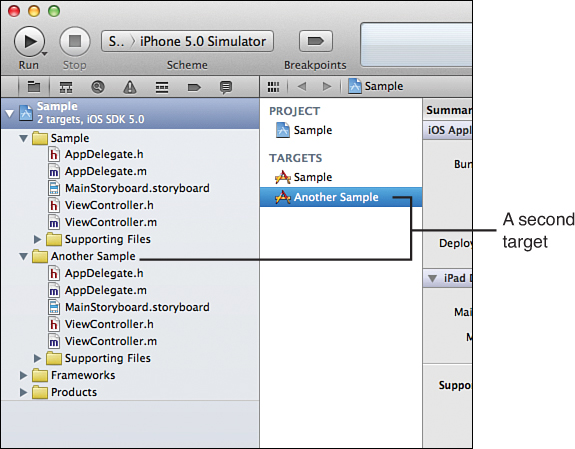
Figure 11.8. A single project with multiple targets.
Did You Know?
To delete a target, just select it and press the Delete key. This removes the target, but it does not remove the target’s files or any schemes that were defined for the target.
Managing Files Between Targets
A point of confusion with multiple targets is “which file belongs to which target.” For targets to be useful, they should be able to share some files but not others. We look at one way to do this in the next section, but before we get there, I want to introduce the Target Membership tool, found within the File Inspector (Option+Command+1).
With a file selected in the Project Navigator, you can open the File Inspector and expand the Target Membership section to show all your possible targets for the project, as shown in Figure 11.9.
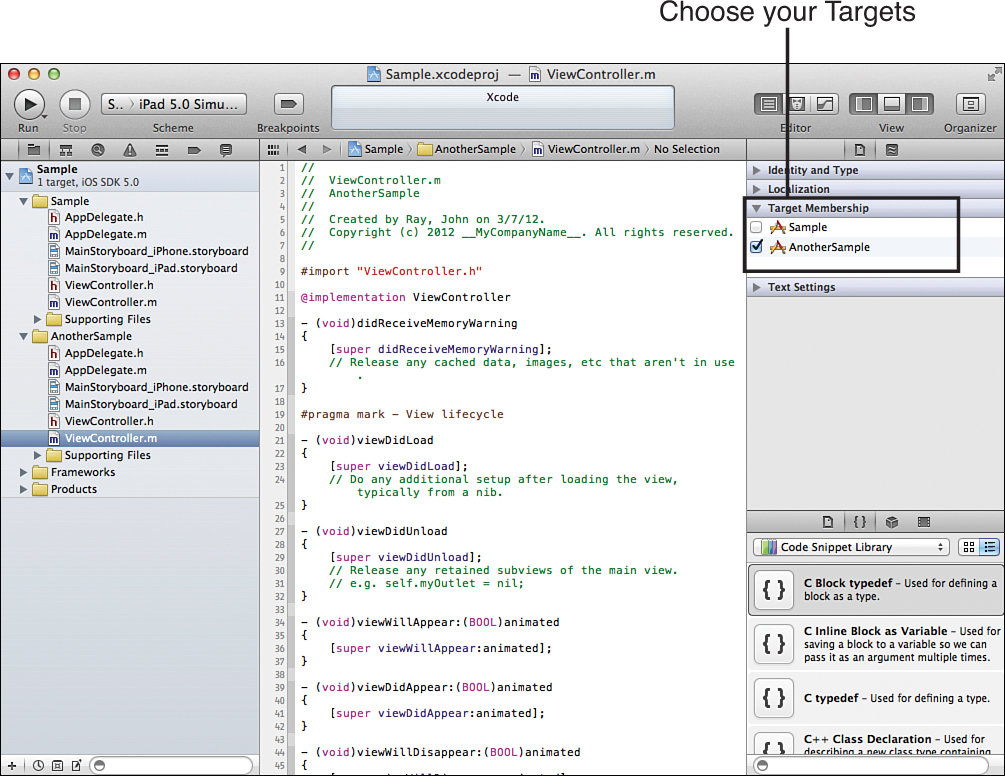
Figure 11.9. Associate a file with one or more targets.
Use the check boxes beside each target to determine whether the file is to be used when creating that target (or not).
A Targeted Case Study
When you add a new target to a project, it essentially creates another new project, with all the supporting files, inside your existing project. This is not necessarily what you want, so do not assume this default behavior is the way it “has to be.” To see a simple example of a multitarget project that makes a bit more sense, open the Bullseye project included in the Hour 11 Projects folder. This is a very simple iOS project that, when a button is clicked, displays I’m SD (on an iPhone) and I’m HD (on an iPad), as shown in Figure 11.10.

Figure 11.10. A simple application that will make millions.
What makes this application unique is that it, like many iOS applications on the App Store, is not universal. There are both Bullseye HD and Bullseye targets within the project, shown in Figure 11.11. These create two distinct executables, one for the iPad and one for the iPhone.
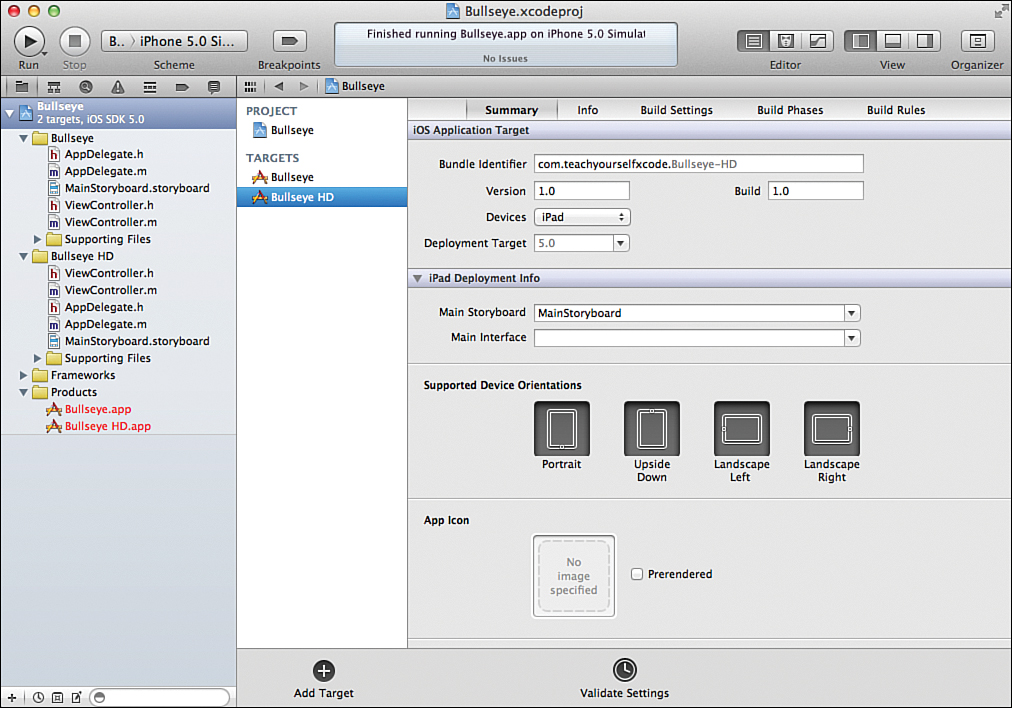
Figure 11.11. Multiple targets for multiple devices.
To set up this project, I just created a basic iPhone app that worked the way I wanted it to, and then I added a new target. Using the project-creation assistant, I configured the new target to be iPad-specific. Xcode automatically added the new target in a group called Bullseye HD in my project. Even though the projects create separate executables, I wanted them to share the ViewController class that I developed for the original iPhone application (dramatically cutting down on my development time).
Unfortunately, because Xcode automatically adds all the files into the target that would be required for a brand new project, I needed to make two minor modifications. First, I deleted the ViewController class files that were added to the Bullseye HD group. Next, I dragged (from a Finder window) the existing iPhone Bullseye ViewController class files into the Bullseye HD group and told Xcode to add the files to the Bullseye HD target, and that it shouldn’t create a new copy of the files, as shown in Figure 11.12.
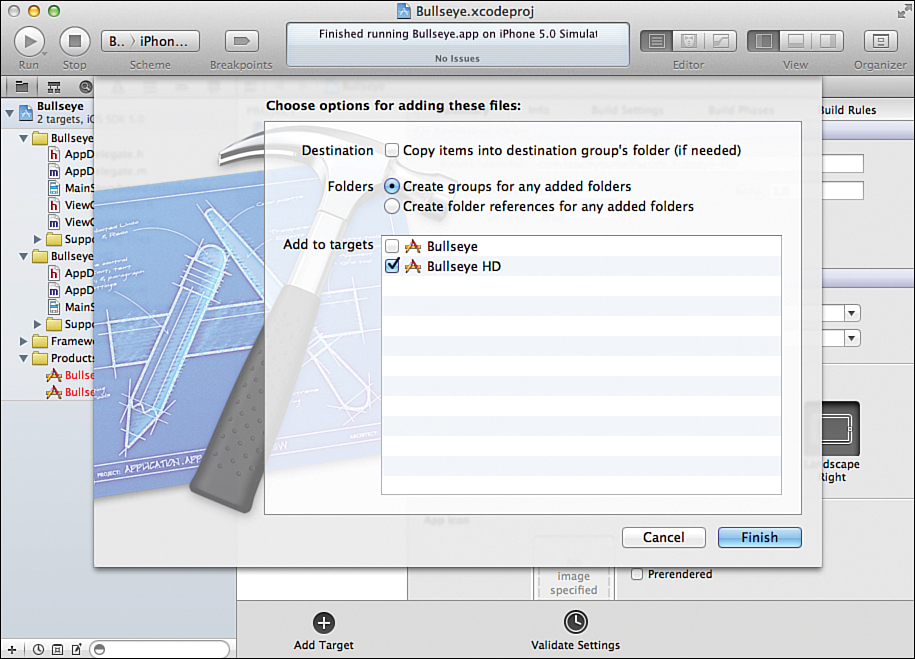
Figure 11.12. Choose the target to associate with your files.
Did You Know?
Remember, you can set which files are associated with which target by selecting the file in the Project Navigator and using the File Inspector (Control+Command+1). Just expand the Target Membership section, click the check box by each target the file should be considered a part of, and you are done.
I could also add the ViewController.m implementation file to the Compile Sources section of the Build Phase settings to accomplish the same thing.
For groups of files I can easily find in the Finder, however, I find this approach easier.
As a final step, I edited the iPad version of the Mainstoryboard.storyboard file and created connections to the outlets and actions I had already defined in the iPhone version of the ViewController class. The end result? Two targets that have unique storyboards, share a ViewController class, and create two distinct executables.
I can now execute my build actions on whichever target I want because the appropriate schemes were automatically added for each of the targets, as shown in Figure 11.13.
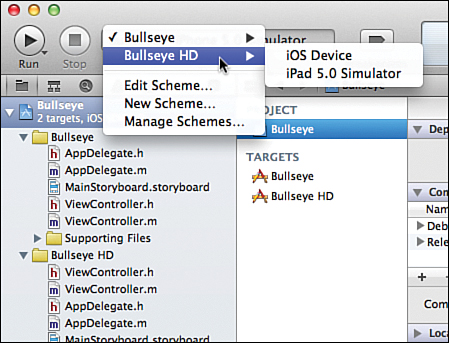
Figure 11.13. Choose the scheme that corresponds to the target you want to build.
Target Build Settings, Phases, and Rules
Recall that a target defines the rules for a build. Therefore, for each target you create, you can modify how the build process is carried out. To do this, make sure the project icon is selected in the Navigator, and then choose the target you want to configure. The tabs at the top of the Editor area give you control over the build process for that specific target. The summary, as you have seen before, gives you easy access to basic settings, such as icons, supported device orientations, and resource requirements. The Info tab presents the information in a less friendly, but more inclusive manner—providing the opportunity to configure any of the dozens of possible project plist options that might apply to your application.
Build Settings
The more interesting settings are found under the Build Settings, Build Phases, and Build Rules tabs. The Build Settings tab, shown in Figure 11.14, makes it possible to choose things such as the base SDK for your project, the compiler being used, the permissions used for deployment, and much, much more. This is not a playground, so I highly recommend reviewing Apple’s build documentation before touching anything here.
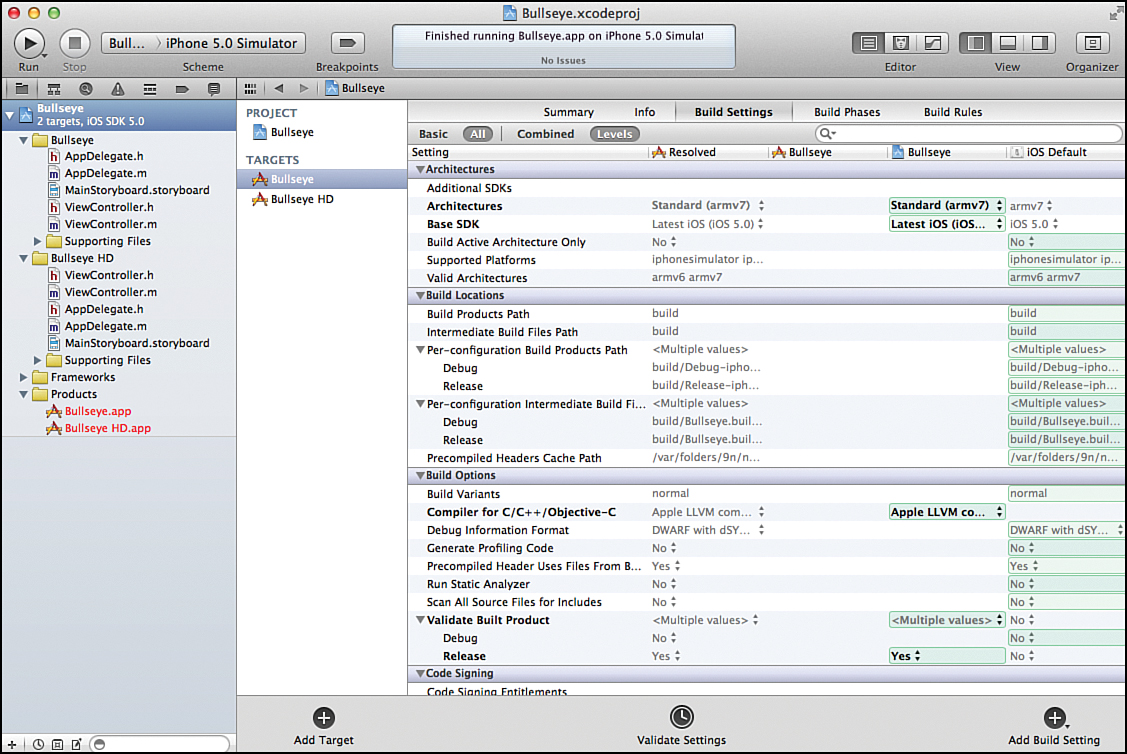
Figure 11.14. The Build Settings tab contains dozens of options and tweaks for your target’s build process.
Build Phases
The Build Phases tab is essentially a list of steps, from top to bottom, of what happens during a build. For example, looking at the Bullseye Build Phases in Figure 11.15, you can see that the source code files will be compiled (Compile Sources), the resulting binaries will be linked with the necessary iOS frameworks included in the project (Link Binary with Libraries), and then the necessary resources will be copied into the executable (Copy Bundle Resources). The first step, Target Dependencies, is empty because this project is not dependent on anything else. If you need for another target to be built first (a library, for example), you can add it to this list by clicking the + icon at the bottom of the Target Dependencies section.
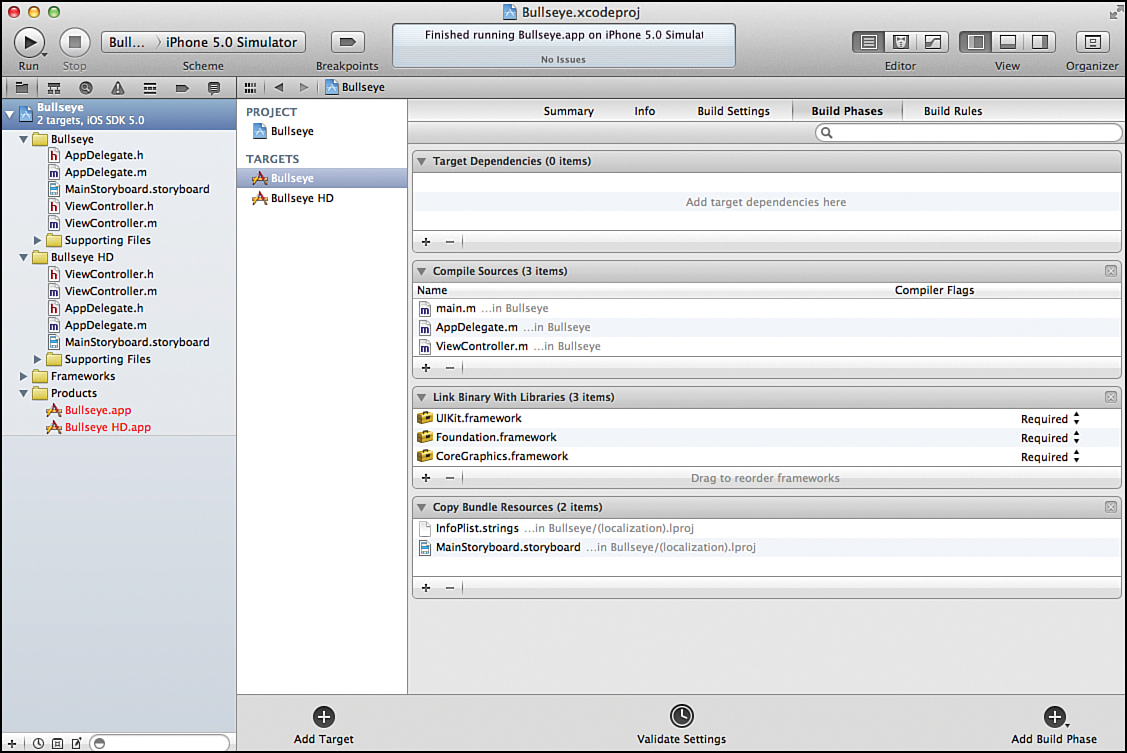
Figure 11.15. Customize each step of the build process.
If the default phases are not enough, you can even add additional build phases using the Add Build Phase button in the bottom-right of the Editor area.
Build Rules
The final tab, Build Rules, is shown in Figure 11.16. This tab describes how certain types of files are handled when encountered during the build process. Rarely will you need to add any rules to this section, unless you are doing very specialized development.
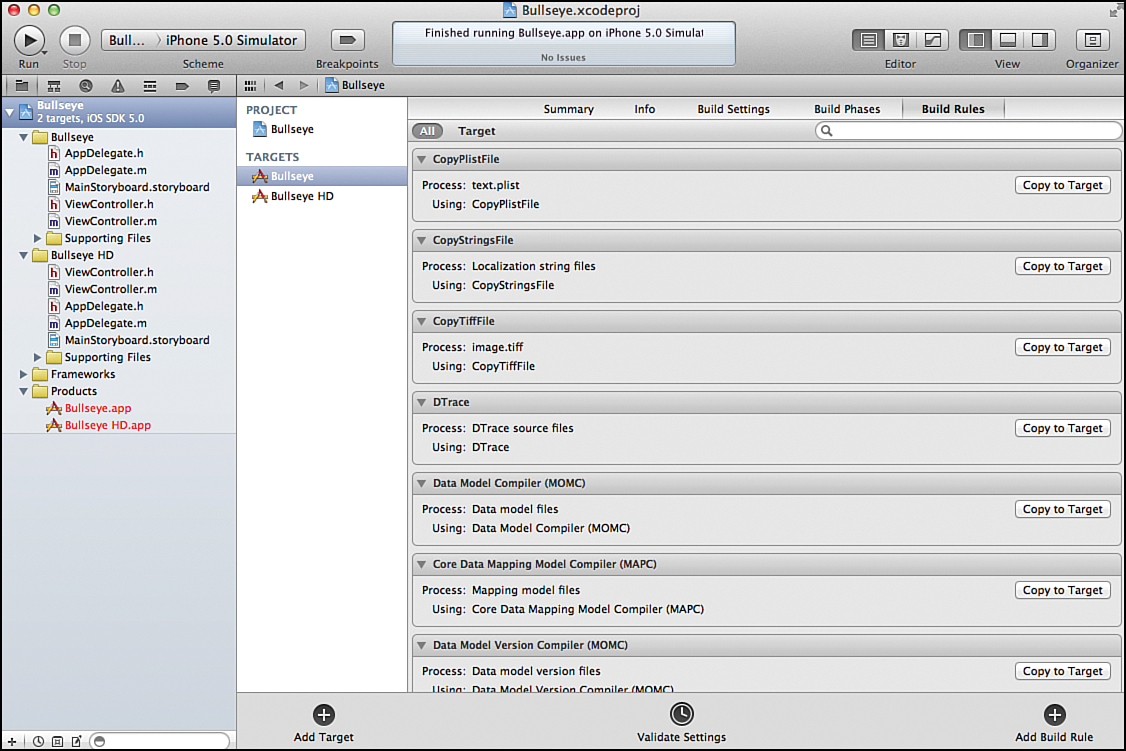
Figure 11.16. Fine-tune how the build process deals with different files it encounters.
Managing Schemes
Now that you understand how a project can have multiple targets, and how each target defines its own build rules, it is time to explore the glue that ties everything together: schemes. To view the schemes that are installed for a given project, click the left side of the Scheme pop-menu on the Xcode toolbar and choose Manage Schemes, as shown in Figure 11.17. You can also find this option under the Product menu. Use the Bullseye project to see these settings for yourself.
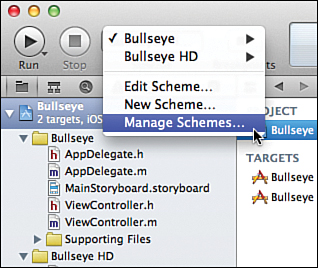
Figure 11.17. Manage the schemes that are attached to your project.
Because there are two targets in Bullseye (and the Autocreate Schemes check box is checked), you’ll see two schemes: Bullseye and Bullseye HD. These define what happens when a build action is performed on the respective targets. Highlight the Bullseye scheme and click the Edit button to open the Scheme Editor.
Editing Schemes
The Scheme Editor provides a list of the build actions, including the action that is included (by default) with all other actions: Build. To edit a build action’s settings, click the action in the left column. The right side of the window updates to display the options for that particular action. We start with the Build action and briefly cover what you can expect within each of the sections.
If you expand the actions in the left column by clicking the disclosure arrow, you can also edit pre-actions and post-actions. These are scripts (or email) that are executed before (pre) and/or (post) after the Build action. This isn’t something you’ll do often, but the capability is present should you need it.
Build
The Build action itself is used to define the targets that are built when each of the build actions are run. In Figure 11.18 you can see that only the Bullseye target is built when the Bullseye scheme’s build actions are executed. If I wanted, I could click the + button at the bottom of the list of targets and add the Bullseye HD target, as well. This would enable me to build both applications simultaneously.
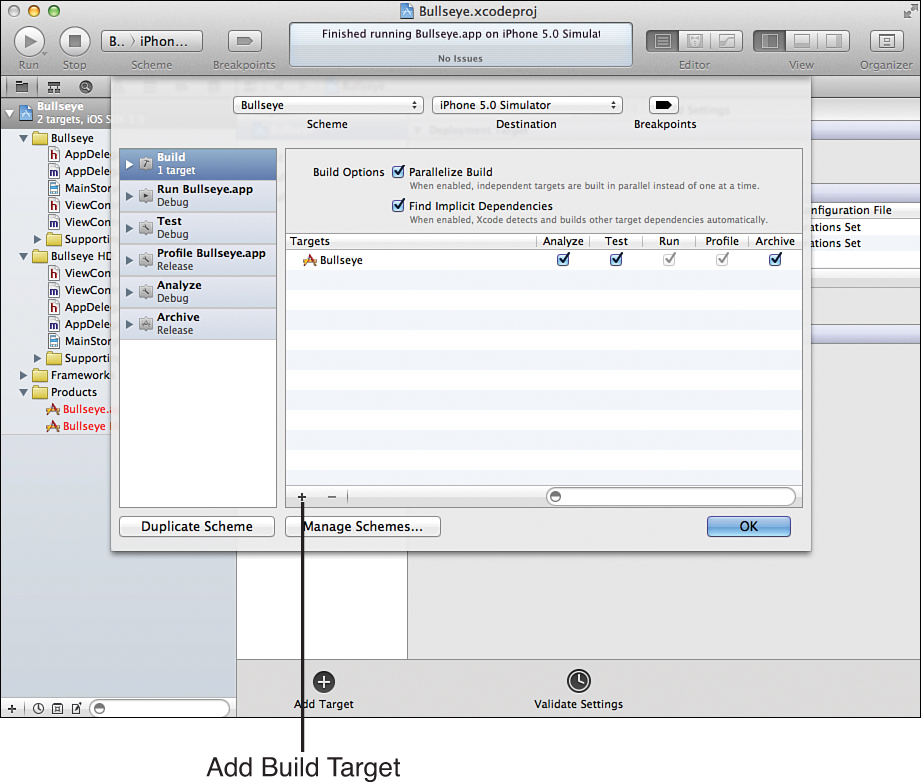
Figure 11.18. The build action settings.
Did You Know?
You can only run (debug) one application at a time, regardless of how many targets you build during the Run build action.
Run
Within the Run build action settings, shown in Figure 11.19, you can choose whether Run launches a debug or release version of your application, what executable (if there are multiples) should actually be executed, and whether the application is launched automatically.
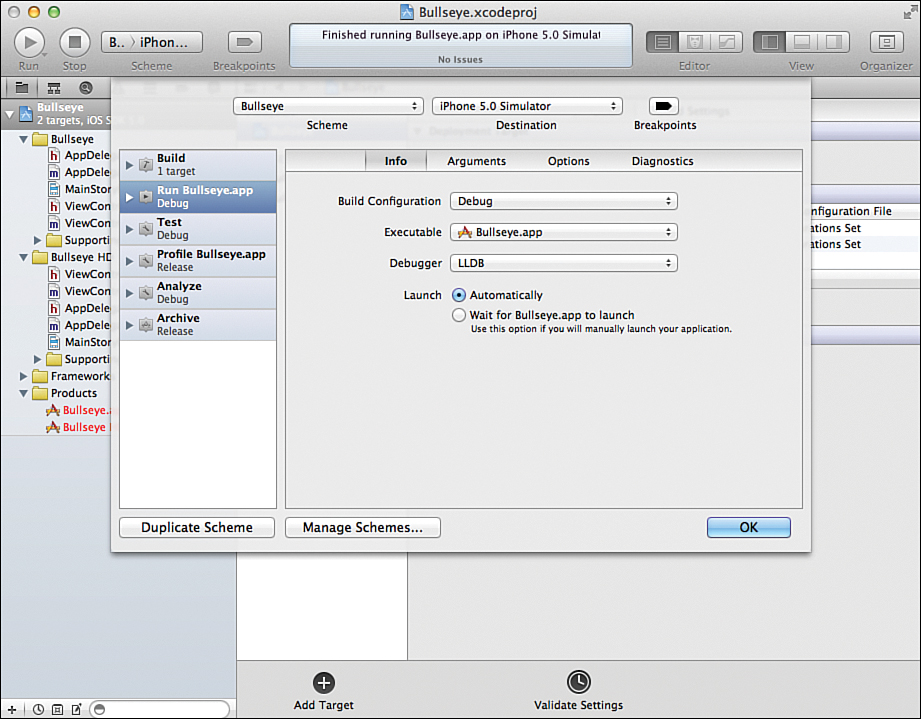
Figure 11.19. The Run build action settings.
You can also use the other tabs within this section (Arguments, Options, and Diagnostics) to choose arguments and environment variables that will be passed to the application when it launches, set simulated location services, and activate additional debugging and logging settings.
Test
The Test build action settings, shown in Figure 11.20, set the build configuration to use (debug or release) when the Test action is executed, the debugger to use, and any unit tests that should be executed. There are no unit tests associated with the Bullseye project, so this configuration is mostly empty. You learn all about unit tests later in Hour 18.
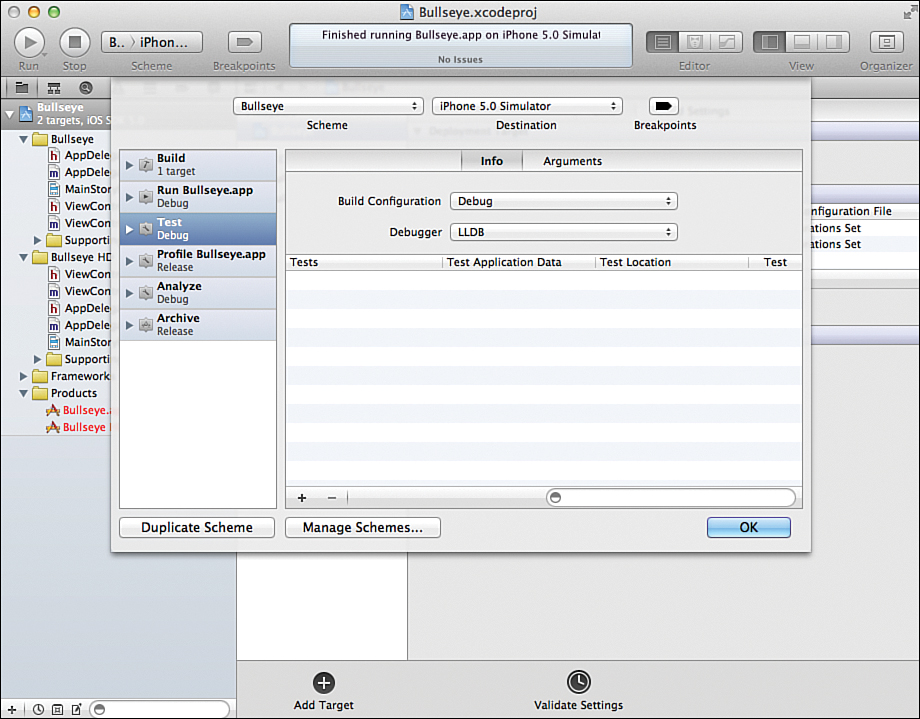
Figure 11.20. The Test build action settings.
By default, the Test action uses the Run action’s arguments and environment variables, but you can also set them independently in the Arguments tab of the configuration.
Profile
Recall that the Profile build action uses the Xcode Instruments tool to run tests against your running application. Use these settings, shown in Figure 11.21, to choose between a release or debug build configuration, which executable to launch, and which instrument (if you want to set a default) should be started when profiling begins. Again, the Arguments tab can override arguments and environment variables used during execution.

Figure 11.21. The Profile build action settings.
Analyze
The easiest of the build actions to configure, the Analyze action, shown in Figure 11.22, offers a choice between the release and debug build configurations. No other settings are required.
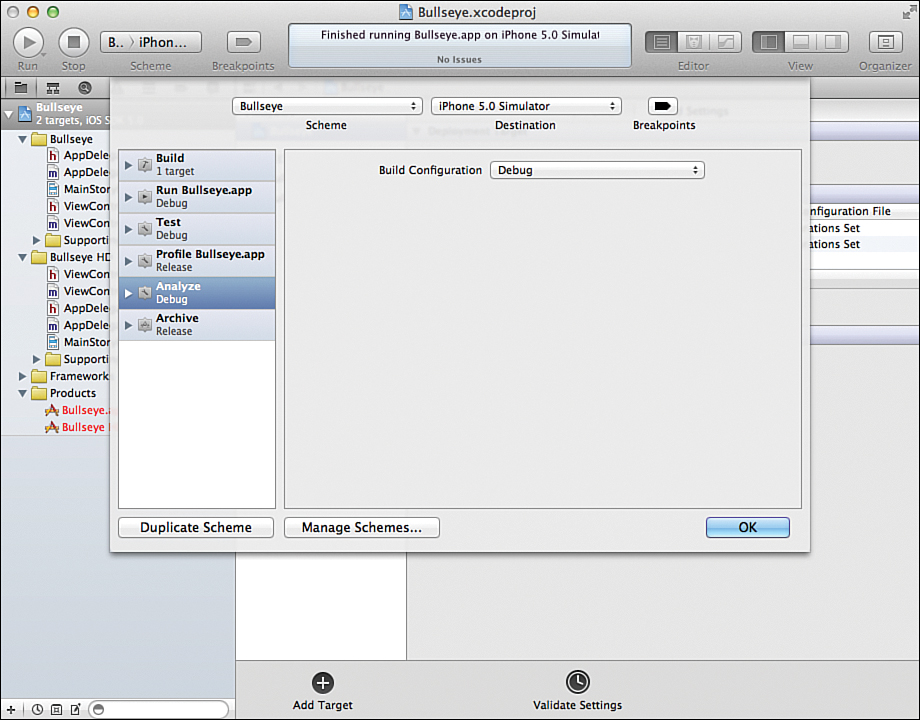
Figure 11.22. The Analyze build action settings.
Archive
Last but not least, the Archive build action creates a “production-ready” version of your app that is ready to be submitted to the App Store. You can use this action’s settings (see Figure 11.23) to set Archive to use a debug build configuration (but this really wouldn’t make much sense), set a name for the archive it produces, and, finally, whether the Xcode Organizer launches when the action finishes, showing the archive.
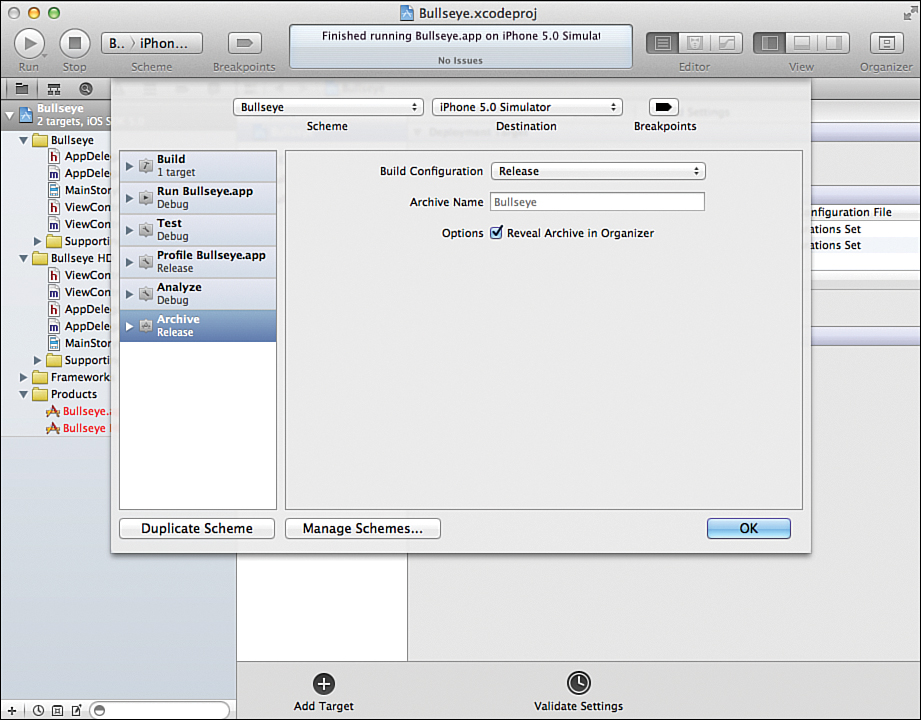
Figure 11.23. The Archive build action settings.
Adding New Schemes
In many cases, the default build setup (schemes, targets, and so on) that Xcode establishes for you when you create a project are all that you’ll need. If you do decide you want to create a custom scheme, however, you can do that easily, as follows:
1. From the left side of the Scheme pop-up menu on the Xcode toolbar, choose Manage Schemes (or choose the menu item with that same name from the Product menu).
2. On the Manage Scheme screen, click + to add a new scheme.
3. You are prompted to name the scheme and choose a default target, as shown in Figure 11.24. Provide the requested values, and then click OK.
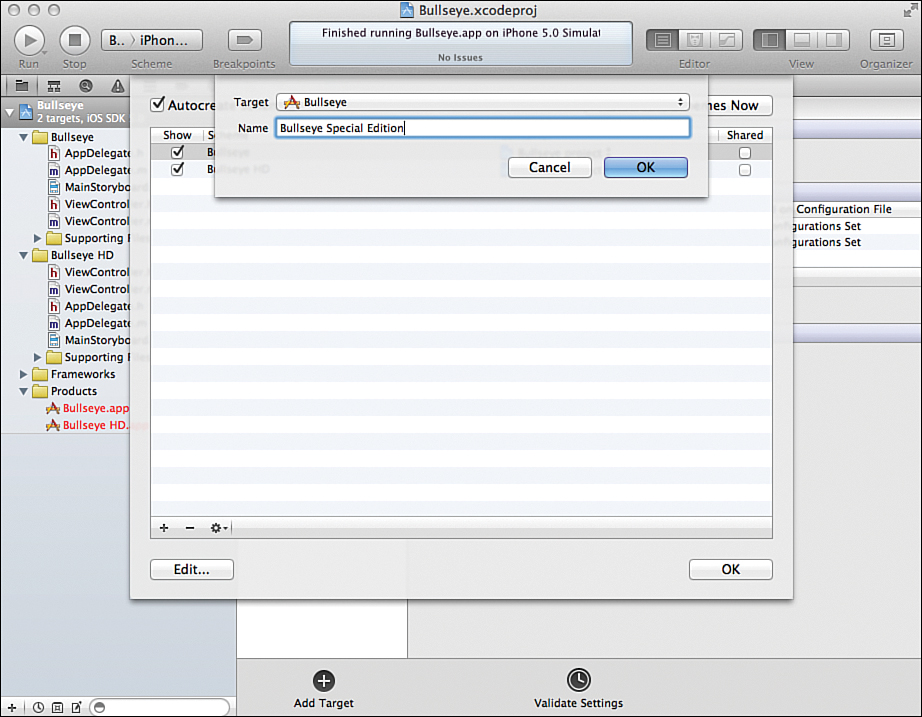
Figure 11.24. Add a new scheme to your project.
A new scheme appears in the Manage Scheme list, ready to be modified as described earlier.
To remove a Scheme you’ve added, select it in the management list and click the – button.
If you accidentally remove one of the autocreated schemes in the Manage Scheme window, just click the Autocreate Schemes Now button to automatically re-create it.
Using the iOS Simulator
The final topic we cover in this hour relates to what happens after you’ve chosen to build and run your application. If you are building for the Mac, you use the application exactly as you would any other. But what about for iOS apps? The answer is the iOS simulator. This tool, shown in Figure 11.25, is where you’ll spend a great deal of your time after clicking Run in an iOS Xcode project.

Figure 11.25. The iOS simulator includes a stripped-down version of Apple’s standard iOS apps.
Despite its fancy appearance, the iOS simulator is not a perfect iDevice. It cannot simulate complex multitouch events or provide readings from some sensors (gyroscope, accelerometer, and so on). The closest it comes on these counts is the ability to rotate to test landscape interfaces and a simple “shake” motion simulation. That said, for most apps, it has enough features to be a valuable part of your development process.
Watch Out!: Simulation Versus Real-World Performance
One thing that you absolutely cannot count on in the simulator is that your simulated app performance will resemble your real app performance. The simulator tends to run silky smooth, whereas real apps might have more limited resources and not behave as nicely. Be sure to occasionally test on a physical device so that you know your expectations are in line with reality.
Launching Applications in the Simulator
To launch an application in the simulator, open the project in Xcode, make sure that the right side of the Scheme pop-up menu is set to the iPhone Simulator or iPad Simulator, and then click Run. After a few seconds, the simulator launches and the application displays. You can test this using the HelloSimulator project (available in both iPhone- and iPad-specific versions) included in this hour’s Projects folder.
Once up and running, the HelloSimulator app should display a simple line of text and an image (see Figure 11.26).
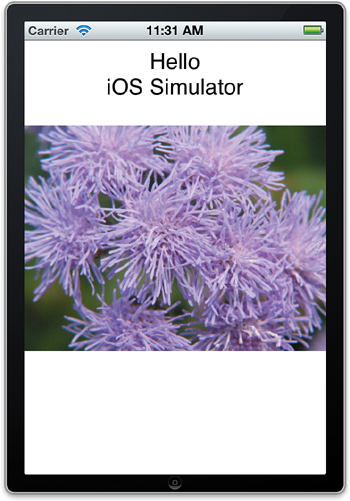
Figure 11.26. Click Run in Xcode to launch and run your application in the simulator.
When an application is running, you can interact with it using your mouse as if it were your fingertip. Click buttons, drag sliders, and so on. If you click into a field where input is expected, the onscreen keyboard displays. You can “type” using your Mac keyboard or by clicking the onscreen keyboard buttons. The iOS copy and paste services are also simulated by clicking and holding on text until the familiar loupe magnifier appears.
Clicking the virtual Home button (or choosing Hardware, Home from the menu) exits the application but does not quit the debugger in Xcode. To completely stop execution, click the Stop button on the Xcode toolbar.
Did You Know?
Launching an application in the simulator installs it in the simulator, just like installing an app on a real device. When you exit the app, it is still present on the simulator until you manually delete it.
To remove an installed application from the simulator, click and hold its icon until it starts “wiggling,” and then click the X that appears in the upper-left corner. In other words, remove apps from the simulator in the exact same way as you remove them from a physical device.
To quickly reset the simulator back to a clean slate, choose Reset Content and Settings from the iOS Simulator menu.
By the Way
By default, your application will display on a simulated non-Retina screen. To switch to a different simulated device, choose from the options in the Hardware, Device menu.
Generating Multitouch Events
Even though you have only a single pointer, you can simulate simple multitouch events, such as two-finger pulls and pinches, by holding down Option when your cursor is over the simulator screen. Two circles, representing fingertips, are drawn and can be controlled with your mouse or trackpad. To simulate a touch event, click and drag while continuing to hold down Option. Figure 11.27 shows the pinch gesture.

Figure 11.27. Simulate simple multitouch with the Option key.
Try this using the HelloSimulator app. You should be able to use the simulator’s multitouch capabilities to shrink or expand the onscreen text and image.
Rotating the Simulated Device
To simulate a rotation on your virtual device, choose Rotate Right or Rotate Left from the Hardware menu (see Figure 11.28). You can use this to rotate the simulator window through all four possible orientations and view the results onscreen.
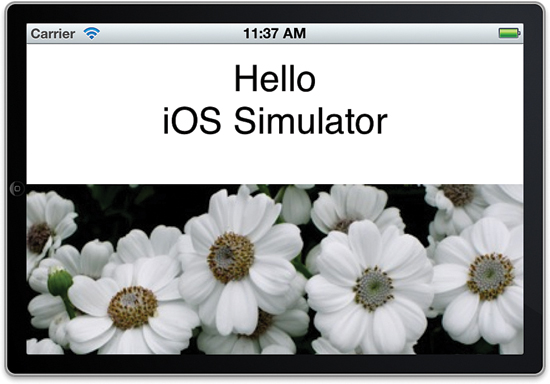
Figure 11.28. Rotate the interface through the possible orientations.
Again, test this with HelloSimulator. The app reacts to the rotation events and orients the text properly.
Simulating Other Conditions
You want to test against a few other esoteric conditions in the simulator. Using the Hardware menu, you can access these additional features:
• Device: Choose from the iPhone, iPhone Retina display, and iPad devices to simulate your application on each.
• Version: Check to see how your app behaves on earlier versions of the iOS. This option enables you to choose from many of the recent versions of the iOS. Note that you need to use the Xcode Component options (located in the Downloads section of the Xcode Preferences) to install simulator files for earlier iOS releases.
• Shake Gesture: Simulate a quick shake of the device.
• Lock: Simulates the condition of a locked device. Because a user can lock an iPhone or iPad while an application is running, some developers choose to have their programs react uniquely to this situation.
• Simulate Memory Warning: Triggers an application’s low-memory event. Useful for testing to make sure your application exits gracefully if resources run low.
• Toggle In-Call Status Bar: When a call is active and an application is started, an additional line appears at the top of the screen (Touch to Return to Call). This option simulates that line.
• Simulate Hardware Keyboard: Simulates a connected keyboard (just use your Mac keyboard).
• TV Out: Displays a window that will show the contents of the device’s TV out signal. We do not use this feature in this book.
Test a few of these out on the HelloSimulator application. Figure 11.29 shows the application’s reaction to a simulated memory warning.
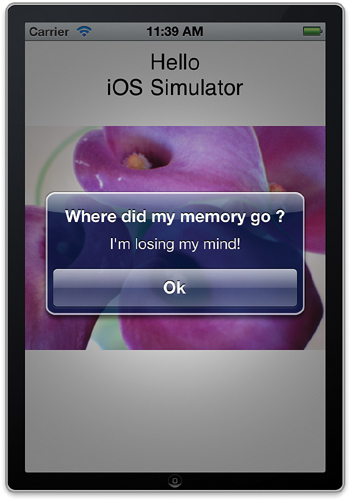
Figure 11.29. The simulator can react to a variety of different simulated conditions.
Summary
It’s always difficult for me to try to define the vocabulary for a system when a large number of the terms start the same way: build, build actions, build phases, build configurations, build rules, and so on. The Xcode build system is not something that can be mastered in a single sitting. This hour’s lesson provided an introduction to the terms you’ll encounter when reading about the build system, the role of targets and target build settings, the purpose of build actions, and the use of schemes to tie everything together. You should have a sense of how all of these things work together to produce your Xcode products, but don’t worry if it’s all a bit overwhelming. Many of these options will never need changed, and we revisit them with some examples later in the book.
As a final step, you also learned about the iOS simulator as a tool for testing and debugging iOS applications—a critical piece of the iOS build/run workflow that is not necessary for native OS X apps.
Q&A
Q. I built a release copy of my OS X application. Where can I find it?
A. To find any of your projects products, just right-click the target and choose Show in Finder.
Q. My sample projects have always included multiple targets. Why do yours only have one?
A. You have likely been including the unit tests during your project-creation step. There’s absolutely nothing wrong with this. I tend to leave the unit tests out in early tutorials to avoid any unnecessary clutter.
Q. Can I develop a full application for iOS without ever testing it on a device?
A. You certainly can, but I do not recommend it. The iOS simulator is good, but it is not a replacement for a real device. You’ll be missing most hardware events, a sense of the true execution speed/performance, and a full real-world test of your UI. In Hour 1, “Xcode 4,” you learned about basic iOS device provisioning for development, and you will learn even more in Hour 22, “Managing and Provisioning iOS Devices.”
Workshop
Quiz
1. What does a target do?
2. A project only has one scheme. True or false?
3. The iOS simulator cannot respond to rotation events. True or false?
Answers
1. A target defines a product that your project will build. It does this by tying files to build settings, phases, and rules.
2. False. By default, a project has one scheme for every defined target. You can, however, define as many schemes as you need for your particular project.
3. False and true. The simulator can handle simple rotation, such as entering landscape mode, but it cannot simulate complex rotations or acceleration that would be useful for testing accelerometer or gyroscope-driven applications.
Activities
1. Following the steps described in the “A Targeted Case Study” section earlier, and what you’ve learned in the previous hours, create a simple “Hello World” OS X or iOS application that includes two related but distinct targets. One might generate Hello World, whereas the other states Hello Earth, for example.
2. Use the Xcode iOS project templates, or a sample project found in the Xcode documentation, to test the iOS simulator. Be sure to test both iPhone and iPad modes of the simulator, and see what happens when you run an iPhone app in the iPad mode.