
Hour 5. Managing Projects and Resources
What You’ll Learn in This Hour:
• How to find your way around a project
• The file templates available in Xcode
• Ways to add new files and resources
• Where to add frameworks and libraries
• How to manage target properties
In the preceding hour, you learned how to create projects in Xcode using the built-in project templates. That’s a good start, but without the ability to add new classes and resources to your creation, you limit what you could potentially create.
This hour explores how you can add new files, resources, and frameworks to your project. You also learn how to manage the files that make up your project, how to create groups, and even how to configure some of the basic target properties that define how the applications your project creates appear and function. When you have finished, you can create projects with 1 or 100 classes; it’s up to you.
Getting Your Bearings
After you have created or opened a project in Xcode, the interface displays an iTunes-like window that you use for everything from writing code to designing your application interfaces. We briefly discussed the important parts of the interface (shown in Figure 5.1) in the first hour, but let’s review them now as a refresher.
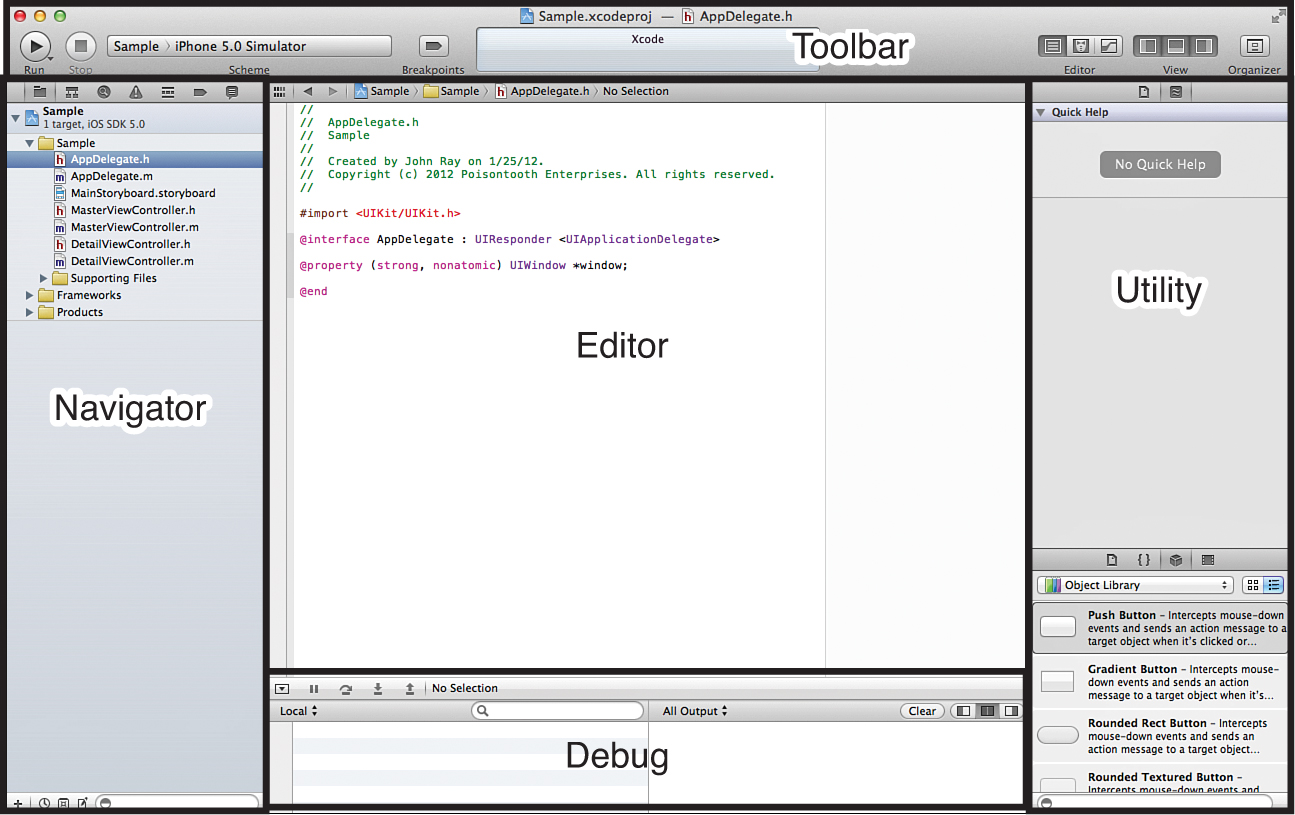
Figure 5.1. Xcode’s single window is divided into five functional areas.
• Toolbar: Displays project status and provides easy access to common functions
• Navigator: Manages files, groups, and other information related to your project or collection of projects
• Editor: Edits or displays the currently selected project resource, such as a code file, interface file, or property list (plist)
• Utility: Provides quick access to object inspectors, help, and object/code palettes
• Debug: Visible during application debugging, the debug area provides console feedback and debugger output
By default, the Utility area is hidden. You can toggle its visibility using the third button in the View area of the toolbar. Likewise, you can hide and show the Navigator using the first view button. The middle button reveals a fifth area, the Debug area. The debugger is displayed below the editor automatically when needed. In this hour, we focus on the Navigator (and a bit on the Editor). The next hour is devoted to using the Editor in depth.
By the Way
If you ever find that your display seems completely different from what you expect, use the View menu on the Xcode menu bar to show the toolbar, Navigator, or any other pieces that have gone missing. Of course, you can use this in reverse as well—hiding pieces of the interface that are getting in your way.
Navigating a Project
The Navigator can operate in many different modes, from navigating your project files to reviewing search results and error messages. You change modes by using the icons immediately above the Navigator area. The folder icon shows the project Navigator and is the where you will spend most of your time.
The project Navigator displays a top-level icon representing (and named after) your project; this is the project group. You can use the disclosure arrow in front of the project group to open and show the files and groups that make up your application. Let’s take a look at the project Navigator for a project named Sample created using the Mac OS X Cocoa Application template (others will be very similar.) Figure 5.2 shows the project Navigator for Sample.
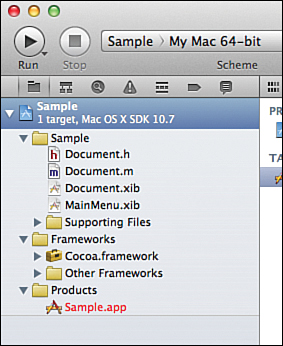
Figure 5.2. Your project is defined by the contents of the project Navigator.
Within the project group are three subgroups that you will find useful:
• Project Code: Named after the project, this folder contains the code for the class files and resources that you add to your project. As you learn in the next hour, classes group together application features that complement one another. Most of your development will be within a file located here. If you dig a bit further, you’ll find a Supporting Files group within the project code folder. This contains files that, although necessary for your application to work correctly, are rarely edited by hand.
• Frameworks: Frameworks are the core code and resource libraries that give your application a certain level of functionality. By default, Xcode includes the basic frameworks for you, but if you want to add special features, you might need an additional framework. We walk through the process of adding frameworks in a few minutes.
• Products: Anything produced by Xcode is included here (typically, the executable application).
As mentioned in the preceding hour, the folder divisions shown in the project Navigator are logical groupings; they do not directly correspond to a folder structure on your hard drive. In a few minutes, you learn how to create new groups to help organize your projects in a way that makes sense to you.
By the Way
If Xcode cannot find a file that it expects to be part of a project, that file is highlighted in red in the Xcode interface. This might happen if you accidentally use the Finder to delete a file from the project folder. It also occurs when Xcode knows that an application file will be created by a project but the application has not been generated yet. In this case, you can safely ignore the red .app file within the Products group.
Finding Your Way with Filtering
A project with two or three files is easy to work with visually, but large projects can have dozens of classes and resources and become unwieldy. To help manage the cruft, you can use the Navigator filter.
At the bottom of the Navigator area is a small toolbar, shown in Figure 5.3, that you can use to filter or adjust what is currently being displayed. In the project Navigator, for example, you can enter text in the Search field to only display project resources (groups or files) that match. You can also use the icons to the right of the field to limit the results to recent files or files that have not been saved (the clock and pen/paper icons, respectively). The box-shaped icon is used with source control, discussed in Hour 12, “Using Source Control.”

Figure 5.3. Filter files in the Xcode project Navigator.
The filtering options are contextual; they change based on what is currently being displayed in the Navigator. Be sure to take advantage of Xcode’s extensive tooltips to explore the interface as you encounter new areas and features.
Managing Project Files
Even though the Apple Xcode templates give you a great starting point for your development, eventually you will need to add additional code files to supplement the base project. This portion of the lesson describes how to add and remove files from your project.
Adding Template-Based Files
Much as Xcode can create projects with a base amount of functionality, it an also add new class files (or other useful files) to your project that already have method stubs or other features built in.
Using the File Template Wizard
To add a new template-based file to a project, follow these steps:
1. Highlight the group you want to add the file to (usually the project code group).
2. Choose File, New or click the + button located at the bottom-left corner of the Navigator.
In an interface similar to the project templates, Xcode prompts you, as shown in Figure 5.4, for the category and type of file that you want to add to the project.
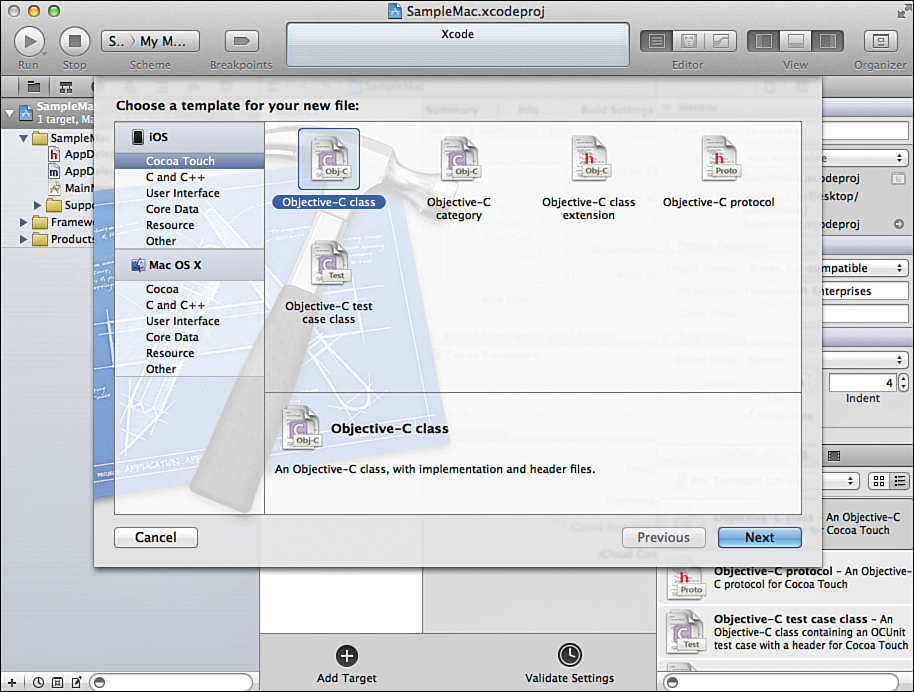
Figure 5.4. Choose the type of file to add.
To learn how to add arbitrary resources to a project (such as images), skip ahead to the “Adding External Resources” section.
Unlike project templates, file templates are more focused and contain a few method stubs to help you get started with your implementation. Let’s review a few of the templates that are available under the Cocoa Touch/Cocoa categories for iOS and Mac OS X, respectively. Like projects, these are subject to change at Apple’s whim:
• Objective-C class: Adds a new generic class implementation and interface file to the project. You can choose the name for the class and what it should be a subclass of—NSObject being the topmost level object that you can subclass.
• Objective-C category: Creates a new category in your project. Categories, as you learned in Hour 2, “Just Enough Objective-C and Cocoa,” extend the functionality of a class and all its subclasses. Using this template, you can name the category and choose which class it extends.
• Objective-C protocol: A protocol file defines a set of methods that a class must implement to “conform” to a protocol. In other words, this is a means of providing forced consistency between classes. Again, refer to Hour 2 for more details. This template adds a single empty protocol file to your project.
• Objective-C test case class: Adds a class to your project that is used to implement unit tests. The class template contains a sample method, but you need to add the SenTestingKit framework to your project before you can compile it. Learn more about how to add a framework in the “Managing Frameworks and Libraries” section, later this hour.
• Objective-C extension: Similar to a category, extensions anonymously extend the features of a class. Use this template to create a new extension by providing a name and the class to be extended.
I See More Templates. What Are They?
These templates listed here are the ones you will likely use for the vast majority of your development, but others are available under the other categories:
C and C++ Within the C and C++ category, for example, are simple C/C++ and header file templates. If you choose one of these, you end up with a largely empty file added to your project.
User Interface In the User Interface category, choose from a variety of UI documents that can use used to add new interface features to your application. The iOS templates, while similar to the Mac OS X options, are superseded by the storyboard file and shouldn’t be used in new applications. It is also useful to note that any of the interface templates can be built from scratch in seconds within the Interface Builder editor (Hour 8, “Creating User Interfaces”).
Core Data The Core Data templates are added to projects that want to use Mac OS X/iOS’s internal relational database system.
Resources In the Resources category, choose from a variety of generic file types that can be added as file resources in your project. Plists, rich text files, and so on are contained here.
Other Finally, the Other category contains templates for empty (yes, completely empty) files, shell scripts, and assembly language files. It is unlikely that you will need these templates often.
3. After picking your template, click Next.
You are then prompted for the name of the class, category, or protocol that you are creating. If you choose to make a subclass of a UIViewController (iOS only), you also have the option to add a corresponding NIB interface file and target it for the iPad, as shown in Figure 5.5.
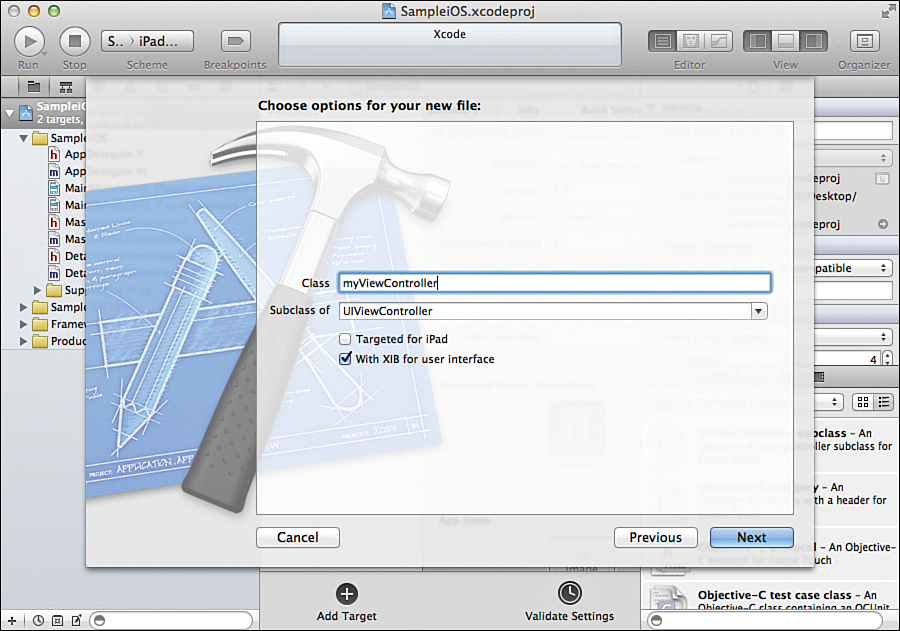
Figure 5.5. Set the options for the code template that you are creating.
4. Assuming you are using storyboarding, you do not want (or need) either of these options. Click Next to continue.
5. Choose where the new files will be stored.
Typically, this is inside the main project code directory (as shown in Figure 5.6). In some instances, however, you might want to add the files to one of the localization directories within the project or into an arbitrary directory. Remember that this is an actual directory, not an Xcode group.
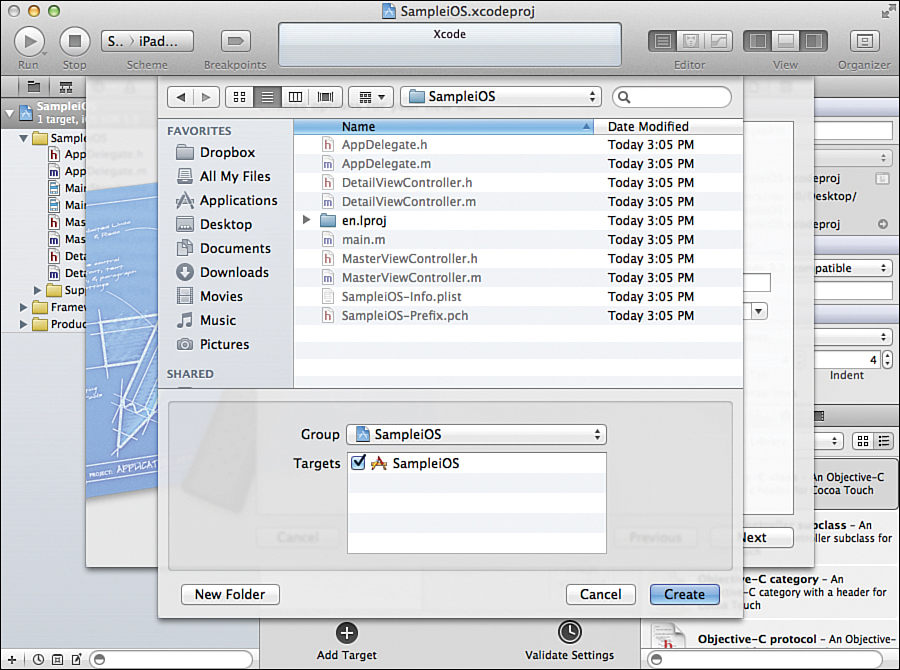
Figure 5.6. Choose where to create the file.
6. To set the Xcode group, use the Group pop-up menu near the bottom of the dialog box. You should also make sure that the appropriate targets are checked.
The targets are the products that are produced by building the application. For example, you might have an iOS project with individual targets for the iPad and iPhone. You do not necessarily want a new interface file for the iPhone to be included with the iPad target, or vice versa.
7. When satisfied with your choices, click Create.
Notice that the new files are immediately visible within the project Navigator, as shown in Figure 5.7.
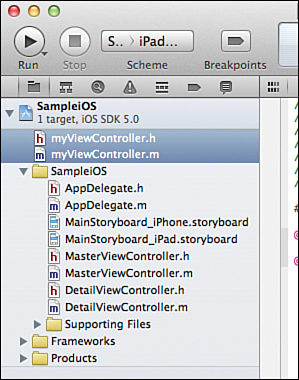
Figure 5.7. The files are added to the project Navigator.
By the Way
If your new files do not show up in the groups that you expect, you can move them after the fact. Just click and drag the file icons within the project Navigator to move them to and from any group.
Using the File Template Library
Not satisfied with one perfectly acceptable way of adding files to your project? Neither was Apple. If you prefer to have an always-visible collection of file templates at your disposal, you can use the File Template Library to add your files. To make this tool visible within the Utility area of Xcode, choose View, Utilities, Show File Template Library (Control+Option+Command+1). The File Template Library appears in the lower right of the Utility area, as shown in Figure 5.8.
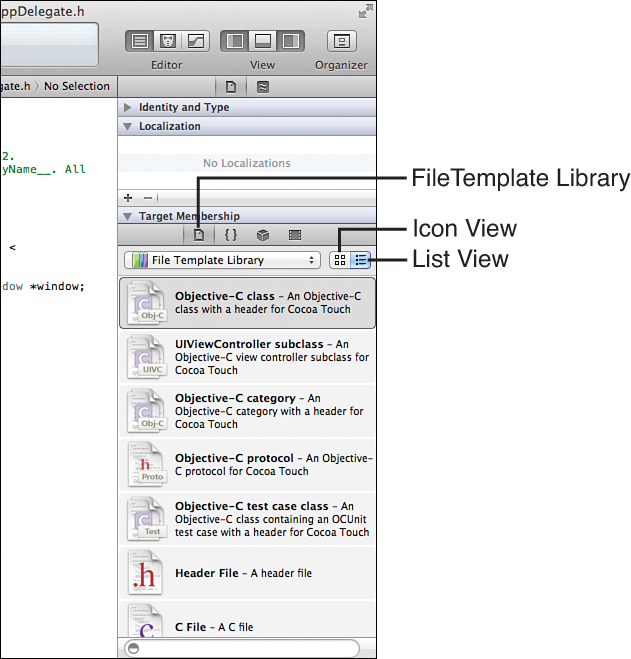
Figure 5.8. The File Template Library is visible in the Utility area.
By the Way
To increase (or decrease) the size of the File Template Library (or any other panel), just click and drag up and down on the top border of the panel.
You can also switch the File Template Library between icon and list (the default) view using the buttons in the upper-right corner. The icon view fits more onto the screen but does not provide a description of the template.
To add a file from the library to your project, scroll through the library to find the file you want (you can filter the list with the field at the bottom of the pane), and then click and drag the icon in the library to the project Navigator. When you release your mouse button, you are prompted to name the file (or class), choose a save location, and pick the targets that will use the file, as shown in Figure 5.9.
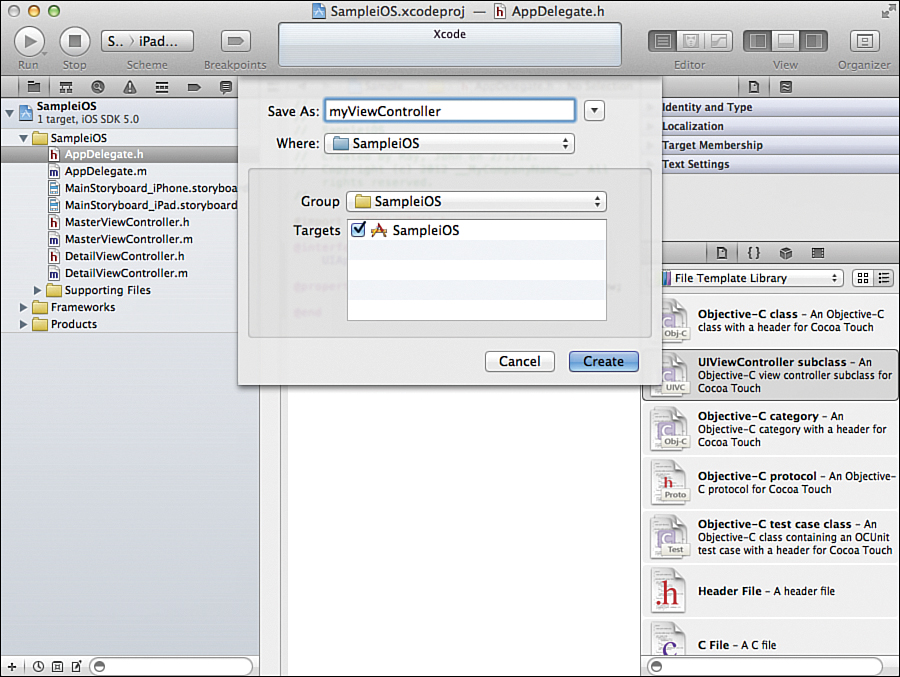
Figure 5.9. Complete the details to add file to your project.
Notice that the file library does not (currently) present the full multistep wizard for configuring the template. Unfortunately, this means that you might end up with files you do not want. For example, the UIViewController template for iOS automatically adds a NIB file for an iOS interface—even if your project is using a storyboard.
If you target a project group when dragging your template, the files are automatically added to the group. As always, you can drag and rearrange the files later.
Adding General Files
Many applications require sound or image files that you integrate into your development. Obviously, Xcode cannot help you “create” these files with a template, so you must add them by hand. To do this, just click and drag the file from its location in the Finder into the project code group in Xcode. You are prompted to copy the files. If you are not sharing files between multiple projects, make sure the Copy check box is selected so that Xcode can put the files where they need to go within your project directory and that the appropriate targets that will use the files are selected, as shown in Figure 5.10.
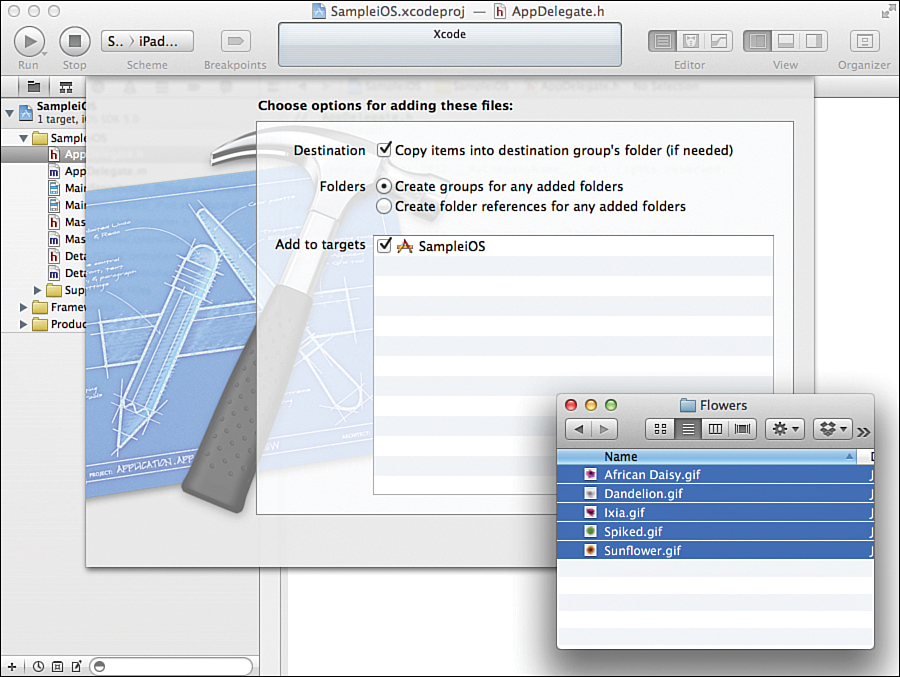
Figure 5.10. Copy the files to the project.
When you add new files in this method, notice that you have the option of creating folder references or groups for the files. If you choose to create a folder reference, the project creates a link to the folder on your drive (the folder itself is not copied). If you create a group, Xcode automatically creates a new logical group that contains the files.
You can add any type of file using this method, including your own code files. Just keep in mind that adding the template-based files buys you a head start in coding with method stubs and properly formatted class files.
Renaming Files
To rename a file within the project Navigator, click to select the file in the Navigator and then press Return or move your mouse back and forth over the name. The name changes to an editable field, as shown in Figure 5.11. Enter your changes, and then click off of the file to save them.
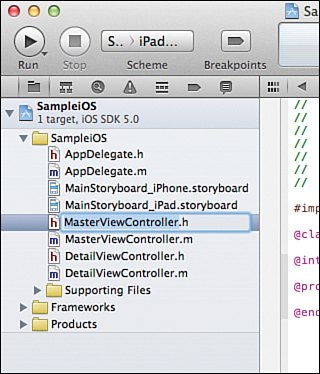
Figure 5.11. Change the name of any project file.
Be aware that changing a filename in the navigator will change the filename on your hard disk. If the file is referenced from any other files or lines of code, you also need to update them. To change the name of a class or other object and have it automatically propagated throughout your project, look at the refactoring features discussed in the next hour’s lesson.
Removing Files
If you have added something to Xcode that you decide you do not want, you can delete it easily. To remove a file or resource from your project, just select it within the project Navigator and then press the Delete key. Xcode gives you the option to delete any references to the file from the project and move the file to the trash or just to delete the references (see Figure 5.12).

Figure 5.12. Delete the files (or just their references).
If you choose to delete references, the file itself remains but is no longer visible in the project.
Locating Your Files in the Finder
When working in Xcode, it is sometimes helpful to be able to quickly jump to a file in the finder—perhaps to open it in another application, get some information about it, or in the case of an Xcode “product,” find where your compiled application has been saved.
To jump to any file that you can see in the project Navigator, right-click it, and then choose Show in Finder, as shown in Figure 5.13.
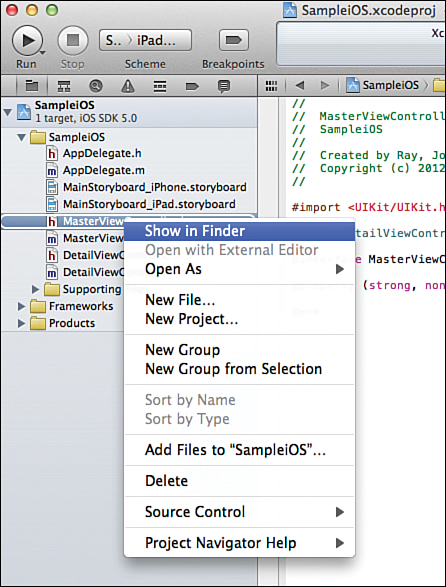
Figure 5.13. Show your files in the Finder.
Remember that if you want to delete or rename a file, you should do so directly in Xcode; otherwise, the Xcode project Navigator gets out of sync with the files that are actually stored on your disk.
Managing Frameworks and Libraries
Frameworks are bundles of files (libraries, headers, and other resources) that you can use to add functionality to your projects. Projects that you create from templates already include the base frameworks that you need, but you’ll likely want to add more as you use new Cocoa or Cocoa Touch features.
Adding Frameworks and Libraries to a Project
To add a framework (or library), follow these steps:
1. Select the top-level project group in the project Navigator, and then the application icon in the Targets section that appears in the column to the right of the Navigator.
2. Make sure the Summary tab is highlighted at the top of the Editor area.
3. Scroll down the summary until you find the section called Linked Frameworks and Libraries. Click the + button below the list.
A list of all available frameworks and libraries appropriate to your project appears, as shown in Figure 5.14.
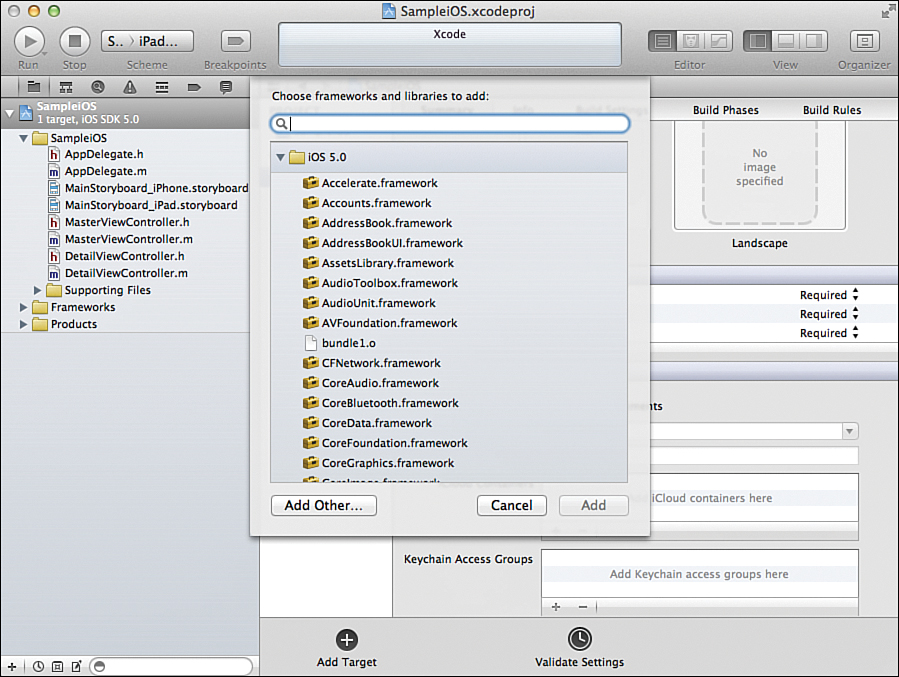
Figure 5.14. Choose a framework or library to add.
Select the item you want, and then click Add.
The framework now appears in both the Summary area and within the project Navigator. You must drag it to the Frameworks group in your project. This is not necessary for the project to work, but it keeps things neat and orderly (and that’s a good thing).
Did You Know?
If you know the location of your framework/library and/or it isn’t in the list, you can click Add Other to browse your drive and choose from another location.
Finding the Framework Headers
To successfully use a framework (or library), you need to include its header (interface file) within the class code that needs to access the framework’s methods. For a library, you must know exactly where the headers are located—but for a framework, the headers are included directly in the framework itself. You can expand any framework to examine its header files, as shown in Figure 5.15.

Figure 5.15. Explore the headers included in a framework.
A top-level header file—named after the framework itself—includes all the other header files in the framework, and it is what you want to include in your code using this naming convention:
#import <Framework/Framework.h>
For example, if you need to include the UIKit framework for iOS manually (it is included automatically, by the way), you use the following:
#import <UIKit/UIKit.h>
Removing Frameworks and Libraries
Removing a framework is just like removing any other file from your project. Just select the icon in the project manager and press the Delete key on your keyboard. Be sure to only delete the reference, not the actual files. Even if you do not need a framework today, that doesn’t mean you won’t want to include it somewhere tomorrow.
Managing Groups
You have already learned one way to add groups to the project navigator by dragging an existing Finder folder into the Navigator, but you can also add them directly without leaving Xcode.
Adding Groups
There are two different ways to create a group: either by grouping a set of existing files or by creating a new empty group. To add a new empty group, right-click in the project Navigator and choose New Group. A group, labeled New Group is then added to the project. You can rename it as described in the “Renaming Files” section, earlier in this hour.
If you are adding a group to collect a set of existing files, you can do it all at one time by selecting the files in the Navigator and right-clicking and choosing New Group from Selection, as shown in Figure 5.16.
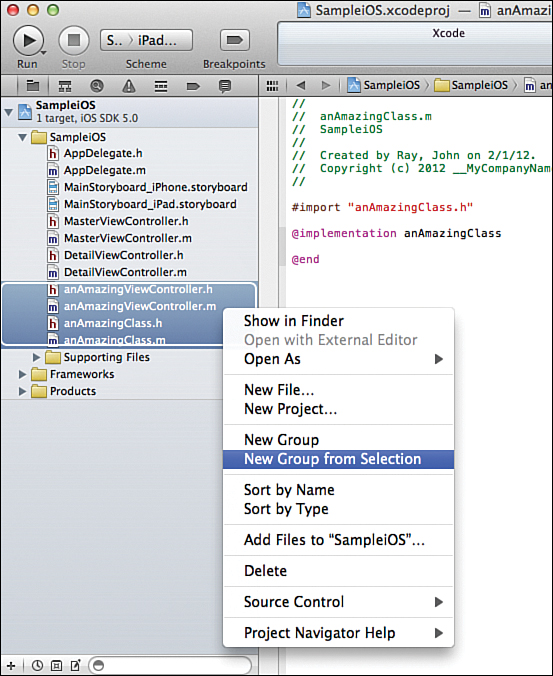
Figure 5.16. Collect existing files into a new group.
On Mac OS X, you can select noncontiguous ranges of files by holding Command and clicking the filename. You cannot, however, make a new group out of files that are already contained within different groups—you need to drag the files to a common level first.
By the Way
If you’re a more menu-centric user, you can access these functions by choosing File, New.
After creating your groups, add your files to them by clicking and dragging. Because this is just a logical view of the files, you can even arrange the individual files in the order you want—they are not forced into any particular sequence.
Removing Groups
If you create too many groups and decide you do not want them, just select a group and press the Delete button. If you choose a group with files, you are prompted with the standard Xcode file-deletion confirmation. If you choose to delete an empty group, it disappears silently.
Managing Target Properties
To finish this hour’s lesson, let’s focus on something a bit different: the properties that describe a target. A target is the application that your project produces. I sometimes refer to these as project properties, but because technically a project can have multiple targets, that is not quite the reality. I bring this up now because you access these through the project Navigator.
Did You Know?
In this book and most simple development, a project almost always has a single target, so equating a project and a target is not unusual.
Basic Properties
By default, your target is going to contain lots of settings for building an application—and you’re not going to need to change them. We talk about build settings more throughout the book, but there are several settings that affect how your project is built that you will need to access early on.
For iOS applications, this includes icons, launch images, supported device orientations, and so on. Mac OS X applications have similar settings, including a list of the attributes your software needs to run. So, where is this stored and edited? The answer is the target plist file.
This file, found in a project’s Supporting Files folder, is created automatically when you start a new project or add a new target, and is prefixed with the project/target name and ends in Info.plist. Although you can edit the values directly in the plist file, Xcode provides an easier approach, as follows:
Within the project Navigator, click the top-level project icon (a blue document icon). After selecting this, you can pick the target to focus on (usually just one) from the column beside the Navigator. Once you have chosen this, the Editor area refreshes to display several tabs across the top, as shown in Figure 5.17.
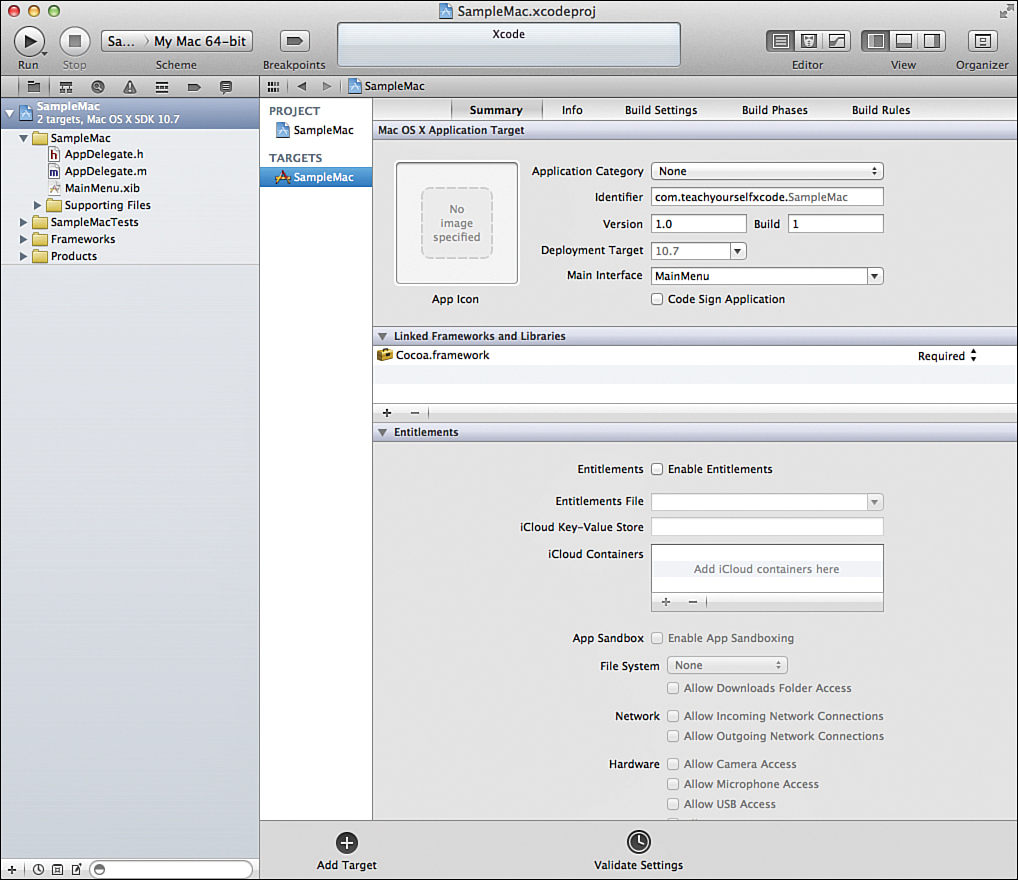
Figure 5.17. Set your target properties.
In the first, Summary, you can set many of the target plist options visually. The second, Info, provides direct access to the plist file contents without any digging around to file the plist file itself. We get to the others later; they contain settings that you probably will not need to modify for most day-to-day development.
Some of the properties you’ll encounter are as follows:
• Version/Build: The version number of your application
• Deployment Target: The OS version you are building for
• Devices: Which devices will run the software (iOS only)
• Identifier: The unique identifier for your application (added when the project is created)
• Main interface: The file that contains your primary application interface
• Supported Device Orientations: Which iDevice orientations your app will support running in (iOS only)
• App Icon(s): The icons to associate with your application
• Launch images: The images to show while launching your app (iOS only)
• Entitlements: Access rights that your application can ask for during execution (access to iCloud, network services, and so on)
Setting an Application Icon
Although we cannot go through every target property that exists (the Apple documentation system you learn about in Hour 7, “Working with the Xcode Documentation,” more than suffices for giving you every esoteric detail), we cover the one example that every application needs: an icon.
For iOS devices, there are currently four different sizes of icons that you might need:
iPhone – Non-Retina display – 57x57 pixels
iPhone – Retina display – 114x114 pixels
iPad – Non-Retina display – 72x72 pixels
iPad – Retina display – 144x144 pixels
For Mac OS X, you should start with an icon sized at 1024x1024 pixels, although you can also include smaller sizes in your project.
To set an icon, create a PNG file of the appropriate dimensions. iOS icons should not have rounded corners or any visual effects. (iOS automatically adds the glossy look for you.) Just drag the icon file from the Finder into the appropriate image well, as shown in Figure 5.18. “Regular” display icons are named as Icon.png, and Retina display icons are named [email protected].
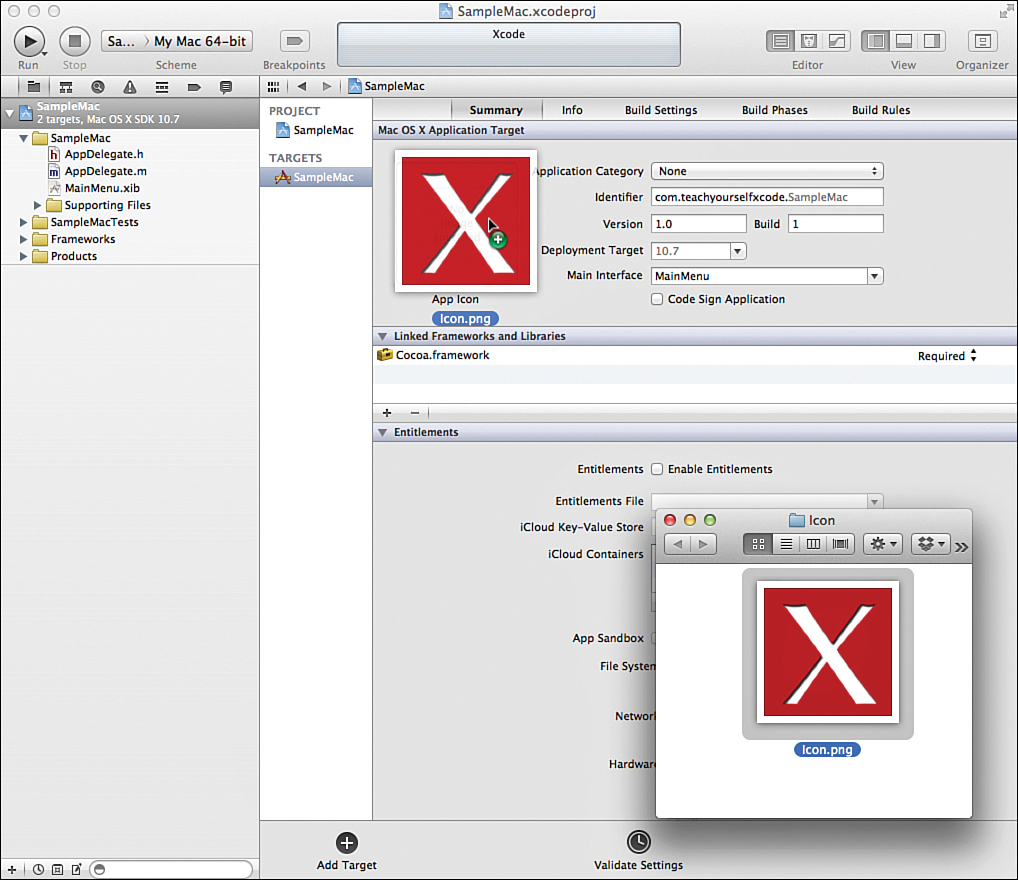
Figure 5.18. Add an icon to your application.
Did You Know?
The @2x naming convention is used in iOS to support the Retina display. In fact, if an application is running on a device with a Retina display and is asked to display an image, it automatically substitutes (if available) an image resource with the same name and the suffix @2x. This enables developers to support Retina displays without changing any code in their applications. I suspect that when Retina displays are added to the Mac line, the same conventions will apply.
Again, this is just meant to provide you with a starting point for configuring some of the attributes that define how your project targets will look and function. Dozens of additional options do not even display in the simple summary interface, so explore when you have a chance.
Summary
In this hour, you learned how to add new files to your project and how the file templates can give you a better starting point in your coding than simply adding a new file. You also learned how to manage files and resources in your projects, and how to create new groups to logically arrange your code in a way that makes sense.
Although these things might seem like simple steps, they are critical to working effectively on a project. Getting files in and out of Xcode is not as simple as working in the project folder in the Finder, so knowing how to manage your project and get to the resources you need is a useful skill as we move forward.
Q&A
Q. The file templates I’m seeing don’t exactly match what you’ve listed here. Why not?
A. Like project templates, the file templates may change over time. I suspect Apple will change the iOS interface templates given the advent of Storyboard, for example.
Q. What happens to the source files if I delete a reference to them?
A. Not a thing. The reference is just a link to the files. If you delete a reference accidentally, you can find the original file within the project directory and drag it back into the project Navigator.
Q. What other options, besides icon settings, are available for targets?
A. This depends on the OS you are deploying on, and is a moving target (no pun intended). If you are interested in which attributes of a target can be controlled by their plist, you want to search the Apple documentation for a full reference.
Workshop
Quiz
1. What file template is used to define a set of methods that other classes (should they choose to adopt it) must implement?
2. Deleting a file reference deletes the file. True or false?
3. The maximum size for a Mac OS X icon is 512x512 pixels. True or false?
Answers
1. The protocol template. Protocols define a standard collection of methods. To conform to a protocol, a class must implement those methods.
2. False. Deleting a file reference does not change the file on the disk.
3. False. The maximum Mac OS X icon size is 1024x1024. I suspect that this will increase to 2048x2048 when Retina displays become common across the Mac lineup.
Activities
1. Walk through the creation of a project and use it to test the activities described in this hour. Add and remove a class, add a new external resource, add and remove a group, and add a new framework.
2. Create an application using one of the available templates. Use the target properties to set an icon, and then view the icon in the iOS simulator (iOS apps) or the Finder (Mac OS X).