Hour 3. Understanding the MVC Design Pattern
What You’ll Learn in This Hour:
• What a design pattern is
• The goal of the model-view-controller design pattern
• How Xcode implements MVC
• What an MVC application project looks like
If you have programmed within other environments before, chances are you have gotten used to doing things in a certain way. Xcode and Mac OS X/iOS development is flexible, but you will find that using a development approach known as model-view-controller (MVC) will make your projects flow smoothly and make them easier to update in the future.
This hour explores the MVC approach and discusses why it can be a benefit to your development as well as how you can implement it within the Xcode toolset. You learn the forms a data model may take and how views are created and connected to controllers. This is a relatively short hour and an easy read, but the concepts introduced will be used in almost everything you do.
Development, Design Patterns, and MVC
When you start programming, you’ll quickly come to the conclusion that more than one “correct” way exists to do just about everything. Part of the joy of programming is that it is a creative process in which you can be as clever as your imagination allows. This does not mean, however, that adding structure to the development process is a bad idea. Having a defined and documented structure means that other developers can work with your code, projects large and small are easy to navigate, and you can reuse your best work in multiple applications.
The approach that you will use for many applications in Xcode is a design pattern known as model-view-controller; it will help you create clean, efficient applications.
What Is a Design Pattern?
A design pattern, in software engineering, is a reusable approach to that can be used to solve a common problem. That sounds innocuous enough, right? But what does it mean? It means developers frequently encounter problems while coding, and over the years, effective approaches have been identified to mitigate these problems.
Dozens of design patterns are in use, many of which you will end up using in your applications, even if you are unaware of it. For example, object-oriented development usually includes a chain-of-responsibility pattern. In this design pattern, lower-level objects that are asked to perform processing of an item (data, an event, and so on) can identify which portions they can process, then pass the rest to a higher-level object, and so on. You see this exact same behavior in Xcode when dealing with responses to events, and you will likely include similar functionality in your own classes and subclasses.
By the Way
If you have been through software engineering classes, chances are you have been taught many design patterns as “this is how you should be programming.” That’s fine, but do not assume that no other approaches also work. Programming is about problem solving, and design patterns develop and evolve as languages and computer capabilities evolve.
So, what is the problem that the MVC design pattern is going to solve? To understand that, we need to have dinner.
Making Spaghetti
When creating an application that interacts with a user, you must take into account several things. First, the user interface. You must present something that the user interacts with: buttons, fields, and so on. Second, handling and reacting to the user input. Finally, the application must store the information necessary to correctly react to the user (often in the form of a database).
One approach to incorporating all these pieces is to combine them into a single class. The code that displays the interface is mixed with the code that implements the logic and the code that handles data. This can be a straightforward development methodology, but it limits the developer in several ways:
• When code is mixed together, it is difficult for multiple developers to work together because no clear division exists between any of the functional units.
• The interface, application logic, and data are unlikely to be reusable in other applications because the combination of the three is too specific to the current project to be useful elsewhere.
• The application is difficult to extend. Adding features requires working around existing code. The developer must modify the existing code to include new features, even if they are unrelated.
• As user interfaces or data storage changes, all the code must be updated, making it difficult to scale the application to new technologies.
In short, mixing code, logic, and data leads to a mess. This is known as spaghetti code and is the exact opposite of what you want for your applications. MVC presents a solution to this problem.
Structured Application Design with MVC
MVC defines a clean separation between the critical components of our apps. As implied by the name, MVC defines three parts of an application:
• Model: A model provides the underlying data and methods that provide information to the rest of the application. The model does not define how the application will look or how it will act.
• View: One or more views make up the user interface. A view consists of the different onscreen widgets (buttons, fields, switches, and so forth) that a user can interact with.
• Controller: A controller is typically paired with a view. The controller is responsible for receiving the user’s input and acting accordingly. Controllers may access and update a view using information from the model and update the model using the results of user interactions in the view. In short, it bridges the MVC components.
The logical isolation created between the functional parts of an application, illustrated in Figure 3.1, means the code becomes more easily maintainable, reusable, and extendable—the exact opposite of spaghetti code.

Figure 3.1. The MVC design pattern isolates the functional components of an app.
Unfortunately, MVC comes as an afterthought in many application development environments. A question that I am often asked when suggesting MVC design is, “How do I do that?” This question does not indicate a misunderstanding of what MVC is or how it works, but a lack of a clear means of implementing it.
In Xcode, MVC design is natural. (You could even say forced in most iOS applications.) As you create new projects and start coding, you are guided into using MVC design patterns automatically. It actually becomes more difficult to program poorly than it does to build a well-structured app.
How Xcode Implements MVC
Before you start creating projects and designing your user interfaces, it is important to get a sense for how Xcode implements MVC. This will help ensure that you are working with the tools, rather than against them.
Because the MVC design pattern consists of three parts, let’s look at each one, and then see how they are (or can be) implemented in an Xcode project.
Models
Xcode provides a number of different ways to implement a data model. The simplest approach is to create a class that accesses and stores information through a series of setters and getters. You might also use a plist file (property list) to store a series of key/value pairs.
For applications that have more complex data needs, Core Data can be used. Core Data provides a persistent data store that can be used to store information in a way similar to a relational database. You learn more about Core Data in Hour 17, “Attaching Big Data: Using Core Data in Your Applications.”
By the Way
Incidentally, Core Data provides a very clean abstraction of the SQLite database engine. By using Core Data in your application, you gain the speed and power of SQLite, without needing to worry about writing SQL.
What’s more, Core Data models are created in a way that makes swapping out their implementation relatively straightforward, thus giving you the flexibility to change your application’s data model without requiring drastic changes to your controller.
Views
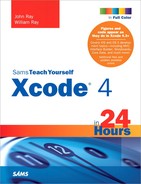
Views, although possible to create programmatically, are often designed visually with the Interface Builder Editor. Views can consist of many different interface elements: buttons, switches, check boxes, and so on (as shown in Figure 3.2). When loaded at runtime, views create any number of objects that can implement a basic level of interactivity on their own (such as a text field opening a keyboard when touched). Even so, a view is entirely independent of any application logic. This clear separation is one of the core principles of the MVC approach.
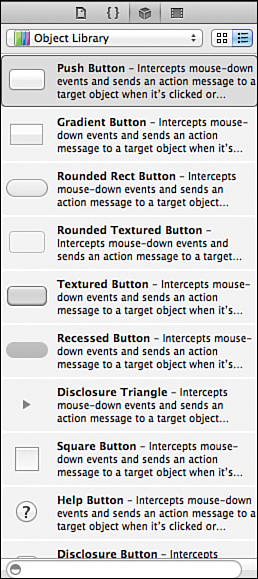
Figure 3.2. The Interface Builder Editor gives you access to a wealth of UI components.
For the objects in a view to interact with application logic, they require a connection point to be defined. These connections come in two varieties: outlets and actions. An outlet defines a path between the code and the view that can be used to read and write values. An action defines a method in your application that can be triggered via an event within a view, such as a touch or swipe.
So, how do outlets and actions actually get created? Xcode certainly cannot “guess” where in your code you want to create a connection; instead, you must define the outlets and actions that in the corresponding controller. Don’t worry, you learn how to do this starting Hour 9, “Connecting a GUI to Code.”
Controllers
As you learned, a controller is the “glue” that coordinates the action between a model and a view. You’ll usually be working with a subclass of UIViewController on iOS projects, and possibly NSViewControllers in Mac OS X. I say “possibly” because using a subclass of the NSViewController class provides only a few benefits to you over a generic subclass of NSObject. In iOS, however, subclassing UIViewController is necessary because of the support for handling device orientation.
Whatever your class type, it will handle the interactions with your interface and establish the connection points for outlets and actions. To accomplish this, two special directives, IBAction and IBOutlet, are added to your project’s code. IBAction and IBOutlet are markers that the Interface Builder Editor recognizes; they serve no other purpose within Objective-C. You add these directives to the interface files of your view controller either manually or by using the Interface Builder Editor’s connections to generate the code automatically, as shown in Figure 3.3 (Hour 9).

Figure 3.3. The Interface Builder Editor helps define connections to your code.
Let’s review what this code will ultimately look like through a brief introduction to IBOutlet and IBAction.
Did You Know?
Controllers hold the logic that glues your app together, but they do not have to be the only place where you implement your functionality. You can develop as many supporting classes as you need to create your application. In some cases, you will not need any; in others, you might have dozens. The controller just ties it all together.
IBOutlet
An IBOutlet is added to your controller’s interface (.h) file to enable your code to talk to objects within views. For example, consider an iOS text label (UILabel) that you have added to a view. If you want to create an instance variable and property for the label under the name myLabel within your view controller, you could explicitly declare both, or you might use the @property directive alone to implicitly declare the instance variable and add a corresponding property:
@property (strong, nonatomic) UILabel *myLabel;
This gives your application a place to store the reference to the text label and a property to access it with, but it still does not provide a way to connect it to the label in the interface. To do this, you include the IBOutlet keyword as part of the property declaration:
@property (strong, nonatomic) IBOutlet UILabel *myLabel;
Once IBOutlet is added, the Interface Builder Editor enables you to visually connect the view’s label object to the myLabel variable and property. Your code can then use the property to fully interact with the onscreen label object—changing the label’s text, calling its methods, and so on.
Did You Know?
In some cases, an object may connect to your code by setting your class as its delegate instead of using an outlet. In doing so, it is requiring your class to implement certain features that it will use to generate its display. In these cases, your class must, to work with the object, include a very specific set of methods (called conforming to a protocol).
If an Interface Builder Editor object requires a delegate, you can still make the connection visually in the Interface Builder Editor. It’s not harder than using an outlet, just different.
IBAction
An IBAction is used to “advertise” a method in your code that should be called when a certain event takes place. For instance, if a button is pushed, or a field updated, you will probably want your application to take action and react appropriately. When you have written a method that implements your event-driven logic, you can declare it with IBAction in the controller class interface file (.h), which subsequently exposes it to the Interface Builder Editor.
For instance, a method doCalculation might be declared like this:
-(IBAction)doCalculation:(id)sender;
The declaration includes a sender parameter with the type of id. This is a generic type that you can use when you do not know (or need to know) the type of object you will be working with. By using id, you can write code that does not tie itself to a specific class, making it easier to adapt to different situations.
When creating a method that will be used as an action (like the doCalculation example), you can identify and interact with the object that invoked the action through the sender variable.
There’s Room for All Styles!
You will sometimes write apps that have no separate data model. You will write apps that create and present their interface through code in the controller. That’s okay.
Xcode and Apple embrace the MVC design pattern, but that does not mean it fits in all cases, or that every program requires the overhead of setting up a separate data model from the controller, and so on. The examples in this book take a few different approaches. Why were things done this way? To provide a demonstration of the techniques in the allotted space. Is it the only way to do it? Not at all.
If you are just starting out, do what works, and refine your style over time. If you are a seasoned developer with a proven process, keep using it. The Xcode tools and structure are here to help you, not to limit you.
An MVC Walkthrough
To finish this hour, open the Library sample iOS application that is included in the code downloads for the book (within the Hour 3 folder). This is a simple piece of software that reads a database of books and displays them in a list, including the publication year and author, as shown in Figure 3.4.

Figure 3.4. The Library application accesses a database of books and presents them through several different views.
The Data Model
Open the Library project file and click the Library.xcdatamodeld file in the Project Navigator (the column on the left side of the Xcode window).
The Core Data Editor appears, as shown in Figure 3.5. Two entities (think database tables) are represented in the project. The first, Books, describes a book by its title and a publication year. The second, Authors, describes an author with their first name, last name, and an email address. The two entities are related to one another in that a book can have one author, while an author can have written many books. Xcode (and the operating system) hide the actual implementation of this model behind the scenes.
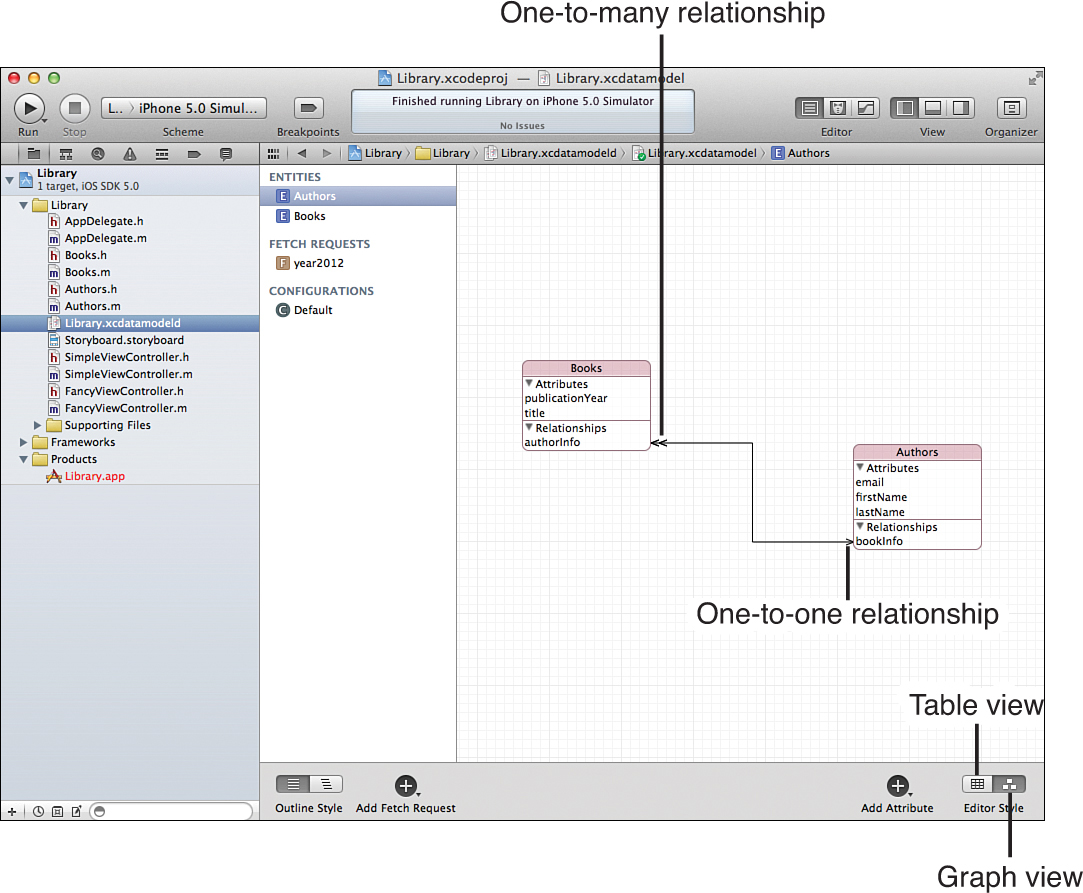
Figure 3.5. The Core Data Editor provides a visual means of viewing and designing your data model.
In code, these entities are accessed via Core Data framework methods and two NSManagedObject subclasses—essentially, the data is made available through the classes Books and Authors, which are automatically created for us (and visible in the Project Navigator).
The Views
To display information, the Library application includes two views: one a simple text field that lists information, another that displays the information in a table. A third view (the initial view seen by the user) presents an option of showing the simple text list, or the pretty table.
Click the Storyboard.storyboard file in the Project Navigator to open the Interface Builder Editor and display the design, as shown in Figure 3.6.
Figure 3.6. In the Interface Builder Editor, you design the Library interfaces and add the basic navigation logic.
The interface design becomes obvious in the Interface Builder Editor. The initial screen connects to the two information displays—one named Simple and another named Fancy—using connections created entirely in the Interface Builder Editor.
The Simple view contains a scrolling text field that the controller will insert data into, and the Fancy view uses a table that also ties to a controller to be populated with information. Buttons on both the Fancy and Simple views are created to return the user to the initial screen.
Did You Know?
The transitions between the initial view and the Simple and Fancy views are created using a feature in Xcode called storyboards. The functionality is defined in the storyboard rather than coded in a method. As a result, the initial view requires no code at all, and no corresponding view controller.
Unfortunately, storyboards are currently iOS-only.
The Controllers
The simple and fancy views in the storyboard UI design have corresponding view controllers that tie their interface to the information contained in the data model. Look to the Project Navigator again. Notice that the project contains two classes, SimpleViewController and FancyViewController, as shown in Figure 3.7.
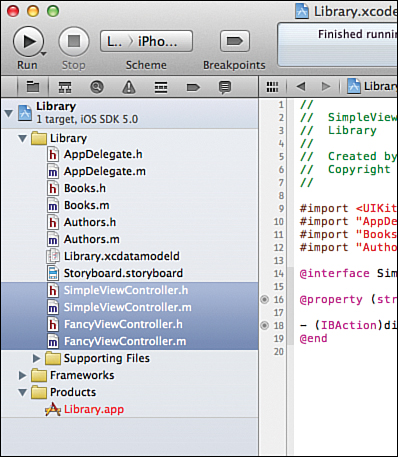
Figure 3.7. Each view is supported by an underlying controller.
The SimpleViewController includes an outlet for connecting the scrolling text field and an action for handling the user’s touch of the Dismiss button. It also provides the logic to read data from data model and populate the text field.
Similarly, the FancyViewController include the logic for reading the data and populating a table view—but it does so by being a delegate of the table view rather than through an outlet. It does, however, include the same action to handle the Dismiss button.
By the Way
Feel free to open up the SimpleViewController.h and FancyViewController.h files to view the outlets, actions, and delegate protocol declarations. The project is for poking around, so have at it.
If you run the application on your system, it, by default, will not have any information stored in it. Each time it is run, however, a single book title (STY Xcode 4 Development in 24 Hours) is stored. This happens at application launch in the AppDelegate.m implementation file.
Summary
In this hour, you learned how to the model-view-controller design pattern prevents spaghetti code before it starts. The MVC approach separates an application into three primary components: the model (which provides access to any underlying data needed for processing), the view (the user’s interface to the application), and the controller (the glue that ties the model and view together).
Xcode implements MVC through the use of classes representing the data model—often provided by the iOS/Mac OS X Core Data frameworks. Views are created visually through the Interface Builder Editor. Controllers are created as subclasses of UIViewController (iOS) and NSViewController (Mac OS X) and tied to views via outlets and actions.
Q&A
Q. I have code that I wrote that draws its own UI from scratch. Do I have to use MVC to port it to the Mac or iOS?
A. No. As mentioned earlier, Xcode is flexible. You can create a window/view from scratch and draw directly within it. Keep in mind, however, that Mac and iDevice users expect native interfaces.
Q. Is designing Mac/iOS interfaces the same?
A. No. You use very similar tools, but, for one thing, Mac applications use windows and menus, whereas iOS applications have a single “window” that presents one or more views. In addition, iOS applications have a different set of UI elements that work well with touch rather than with mouse/trackpad events.
Q. I’m thinking of writing an application, but I do not
seem to need a data model. What am I doing wrong?
A. Nothing. Use MVC where it makes sense. If your application does not require a data source, that’s fine.
Workshop
Quiz
1. Spaghetti code is an example of a design pattern. True or false?
2. The Interface Builder Editor connects to a controller how?
3. Core Data requires knowledge of SQL to use. True or false?
Answers
1. False. A design pattern provides a solution to a commonly occurring problem. Spaghetti code is one of the problems that MVC seeks to solve.
2. The Interface Builder Editor connects to outlets (IBOutlet) and actions (IBAction) that are added to the interface file (.h) of the controller class.
3. False. The underlying storage mechanism is abstracted in Core Data. It might use SQLite behind the scenes, but it is not something you need to worry about.
Activities
1. Read the “Cocoa Design Patterns” section within the Cocoa Fundamentals Guide (https://developer.apple.com/library/mac/documentation/Cocoa/Conceptual/CocoaFundamentals/CocoaFundamentals.pdf). This presents a full background of the design patterns used in Cocoa, with a focus on MVC.
2. Open the sample application and view the data design. Use the sample code in the AppDelegate.m implementation file to add additional books and authors, or additional books for a single author. Consider how you might go about presenting this data in an iOS application versus an Mac OS X application.