Hour 7. Working with the Xcode 4 Documentation
What You’ll Learn in This Hour:
• The different parts of the Xcode documentation system
• How to configure automatic documentation updates
• Ways to search and browse the developer documentation
• How the Research Assistant can help you as you code
• How to access sample projects referenced in the Apple documentation
A discussion that I frequently have with prospective developers is what they need to know to be successful. Is the sign of a good developer someone who can recite all the classes available in a language? Is it someone who can tell you the order of parameters in all the methods in a given application programming interface (API)? No. A good developer might be able to do those things, but in practice, memorization is much less valuable than applied logic skills.
Good developers can easily move between different programming languages because they understand the logic of development. All they need is a proper reference and an understanding of a language’s syntax, and the platform becomes meaningless. Xcode provides nearly all the documentation and examples you need to learn Objective-C and Cocoa—all accessible within its interface. This hour introduces you to the documentation tools and how you can use them to master Mac OS X and iOS development.
Overview of Documentation Resources
Apple makes their developer documentation available in a variety of different formats and through several different mechanisms. Which you use depends on what you are trying to do and what resources you have at your disposal.
Web-Based Documentation
If you want to learn about Xcode on the go, the web-based version of the documentation might be the most useful. You can access either the Mac or iOS documentation from the developer resources URL at http://developer.apple.com/resources/.
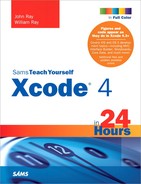
If you view the online documentation on your iPad, it is even formatted for the device like a native app (see Figure 7.1). This makes using the iPad as your documentation consumption device particularly appealing if you can set one up near your development station.
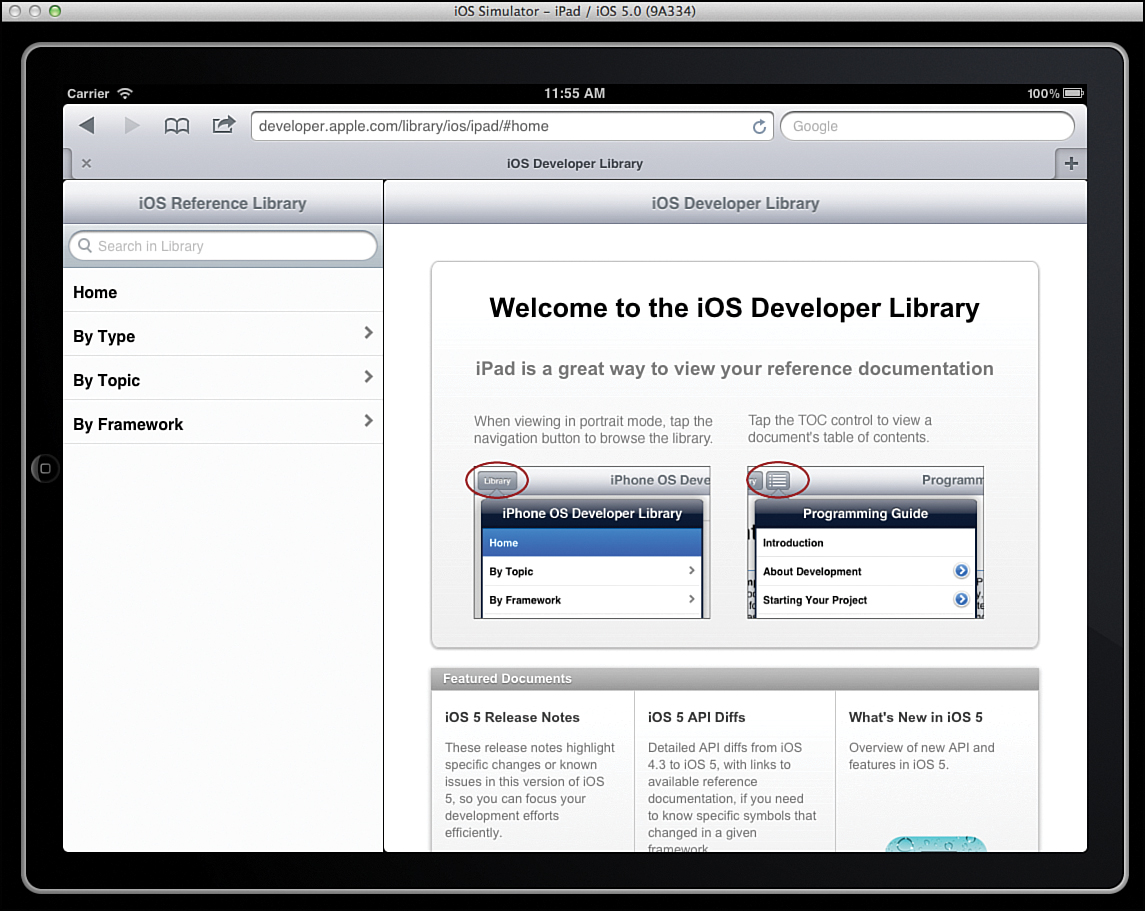
Figure 7.1. Browsing the Apple documentation on the iPad enables special tablet formatting.
By the Way
If you want to read without an Internet connection, most of the developer documents include a PDF link in the upper-right corner (or upper-left corner on mobile devices). Use this link in mobile Safari to download the document, and then open it in iBooks for an always-available copy of whatever you’re interested in.
Xcode Help Viewer
The Xcode Help viewer, shown in Figure 7.2, provides a convenient browser-like interface to the documentation, but with features that go above and beyond Safari. (We take an in-depth look at its use in a few minutes.)

Figure 7.2. The Xcode Help viewer provides all available documentation within a convenient interface.
To access the Xcode Help, you can either open the Xcode Organizer (the last tab on the right within the Organizer window), or choose Help, Xcode Help from the menu bar.
Did You Know?
Notice the several help resources under the Xcode Help menu. These are just shortcuts to different documents within the Xcode Help system. If you want to access help, it doesn’t really matter which you choose; you can navigate all of the Help system after the viewer opens.
Quick Help
The final form of developer documentation comes in the form of Xcode’s Quick Help system. Quick Help is not meant to replace the primary Help system but acts as a quick reference while coding. Shown in Figure 7.3, you can invoke Quick Help at any time in the coding process; it provides links to the full documentation if needed.
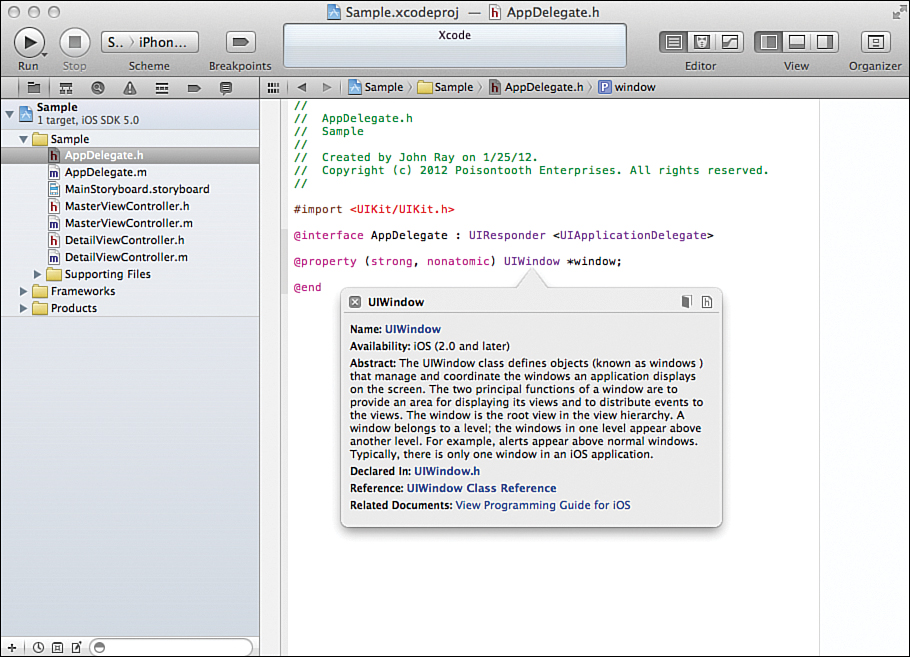
Figure 7.3. Quick Help brings help directly to the coding process—no need to lift a finger.
Configuring the Xcode Documentation Downloads
As you might have noticed, operating systems do not remain static. Roughly once a year, Apple issues major releases to iOS and Mac OS X, with more than a few interim releases in-between. As the operating system changes, so does the documentation you need to effectively develop for it. To keep things up-to-date, Xcode provides a documentation system that updates as needed by downloading docset files that include all the documentation for a given operating system release.
To configure your Xcode documentation downloads, choose Xcode, Preferences from the menu, and then click the Downloads icon on the Preferences toolbar. In the Documentation pane, shown in Figure 7.4, click the Check For and Install Updates Automatically check box. As long as this is selected, Xcode periodically connects to Apple servers and automatically updates your local documentation. Also notice that additional documentation sets may be listed for different versions of the operating system. If you intend to target earlier OS releases, keeping a copy of the appropriate documentation on hand can prove helpful.
Figure 7.4. Choose the documentation sets to download and keep updated.
Click the Install button beside any of the listed items to download and automatically include it in any future updates.
Each documentation set can take up several hundred megabytes of space. If this is an issue, you might want to keep only the most recent sets installed on your computer.
In the lower-right corner of the documentation list are + and – buttons. By clicking the + button, you can enter a URL for a third-party docset file that you want to add to Xcode. For example, the third-party iOS PDF library FastPdfKit (http://www.fastpdfkit.com/), provides their developer documentation in the form of a docset. If you use a third-party tool in your projects, check to see whether a docset is provided and add it to Xcode for integrated help.
Understanding the Documentation Resources
It would be easy to point you to the developer documentation resources and say “have at it.” But, as a beginning Xcode developer, your first impression might not be a positive one. The Apple developer documentation is full of information in many different forms. If your first experience with the library is stumbling across a document that is so terse and outdated that it dissuades you from ever using documentation again, we’ve done you a great disservice.
Before diving into the documentation viewer, let’s quickly review the types of documents found in a docset and what to expect from them. Note that these are listed here in alphabetic order (as Apple does), which most certainly will bear little semblance to their usefulness to a developer.
Did You Know?
Not all docsets have all the following document types. This does not necessarily mean that similar sorts of information are not available in other places. For example, the iOS How-To documents, which are not included for Mac OS X, are very similar to the Guide document type.
Articles
Articles are short, focused content on a very specific topic. For example, the article “Using Phusion Passenger as a Ruby on Rails Server” describes how to install a Ruby on Rails server—hardly a topic for a Mac OS X reference guide, but still useful enough that Apple chose to include it. Articles may be stories about technology, applications of technology, or individual developers who have used Mac OS X or iOS in interesting ways.
These are more useful for casual reading than fir learning how to program, so do not expect to spend much time browsing articles and finding answers to your questions.
Watch Out!: This Just In: Outdated Information!
Articles are one of the areas of the developer documentation that Apple does not update as frequently as they should. The article on Phusion Passenger, in fact, was written to target the Leopard operating system, but is included in the core Lion docset. Although the information contained in the article might still be accurate, you may want to look for online resources to supplement what is described in an article.
Coding How-Tos
Currently unique to the iOS docsets, the coding how-tos, shown in Figure 7.5, provide access to answers to common coding questions, such as “How do I display data from a website?” Each question is linked to a short code sample of how to solve a particular problem.
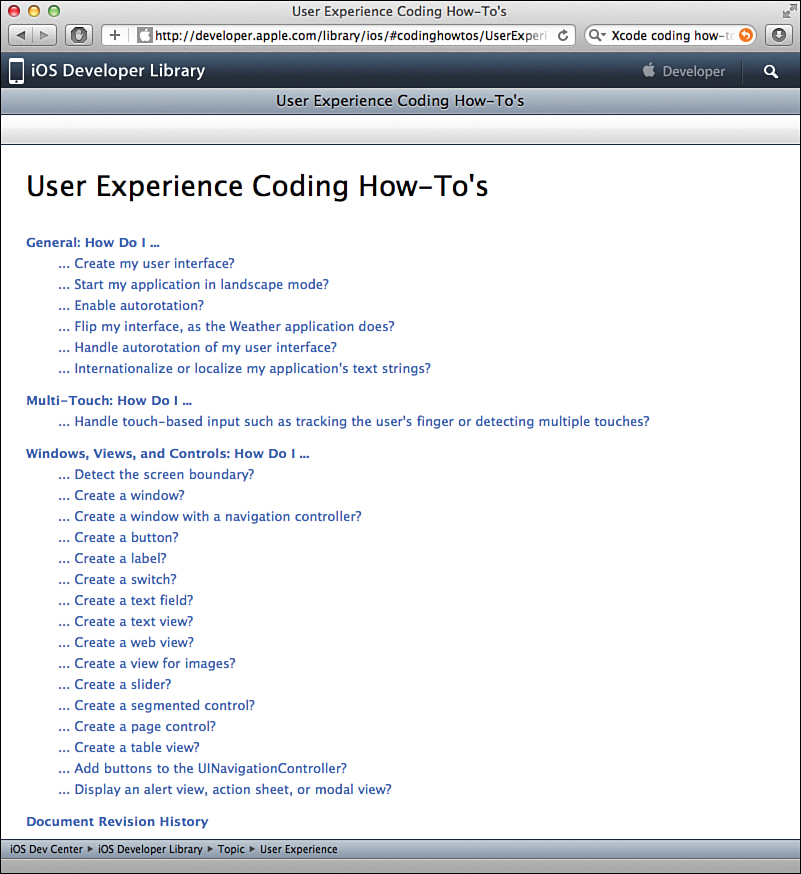
Figure 7.5. Coding how-tos present information as a series of questions and answers.
In general, the coding how-tos are most useful for tracking down a topic and finding more information than they are for answering practical questions. Although it is unlikely that the exact question you want answered will be covered in a how-to, chances are you can find references to class documentation that points you in the right direction.
Getting Started
Getting Started documents are short descriptions of a broad topic area, such as “Audio and View,” that contain links to prerequisite information and links to coding guides for implementing a particular technology. These are good documents to find all the resources and gain the background you need to implement features such as cryptography, iCloud, and so on with your projects.
If you are looking for a class reference or coding examples, Getting Started documents are a bit too high level. You’ll want to look through the Guides or Reference documents to get to the nitty-gritty.
Guides
Guides are similar to Getting Started documents, but they contain more targeted links to technical information and less introductory content. A view controller guide, for example, provides technical information on how view controllers work and links to sample code and class references. Browse the docset guides when you know exactly what topic you need information on but are not sure of the class names associated with it.
Reference
Reference documents are the lifeblood of the developer. These are the class and framework references that provide method names, input and output parameters, code samples, and a full technical description of how, when, where, and why a particularly piece of code is needed, as shown in Figure 7.6. References also document when particular pieces of code have been deprecated or when they should not be used in conjunction with other features.
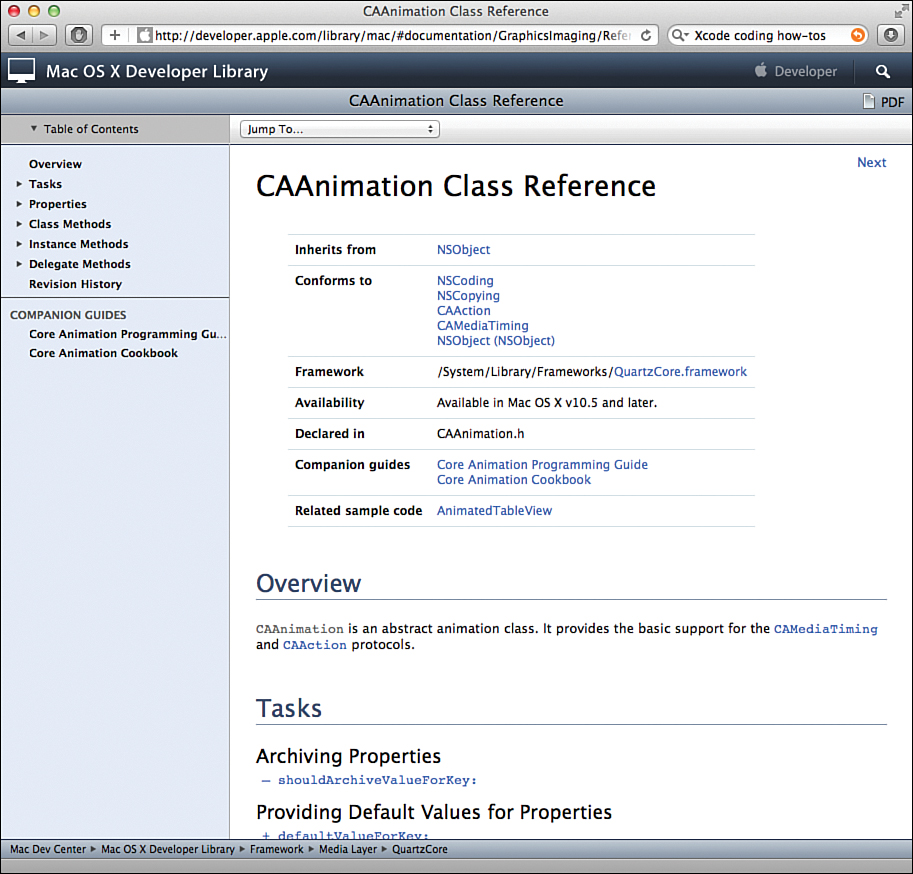
Figure 7.6. References provide the details needed to code successfully.
Reference documents contain many cross-reference links to other documents that you’ll find helpful. When method parameters call for constants that are defined elsewhere, for example, you see a link to the list of constants. As you browse reference documents, it is not uncommon to find that you have jumped between several difference references while looking up the information you need.
By the Way
If you view the developer documentation in a browser, returning to an earlier document is just a matter of clicking the Back button. As you learn shortly, the Xcode Help view works in much the same way, making it easy to cope with all the interlinked documents you traverse in your research.
Release Notes
Release notes describe the changes and new features added to the OS release described by a docset. These documents are a must-read if you’ve implemented a technology in an earlier version of your software and are intending to update the application for a new version of the Apple OS. With iOS especially, it is not unusual for applications that access advanced features to require updates to work correctly when the operating system updates. The release note documentation presents these changes clearly and provides links to the reference documents where detailed information can be found.
Sample Code
When browsing any one of the types of documents available in the developer documentation, you might encounter links to sample code. These aren’t just links to text documents full of Objective-C; they’re links to actual project files that you can open and explore in Xcode. The sample code included with Xcode covers a vast array of topics and presents examples of some of the most useful coding scenarios that you are likely to encounter.
When you happen upon a sample code link, clicking it opens a description of the sample project, as shown in Figure 7.7.
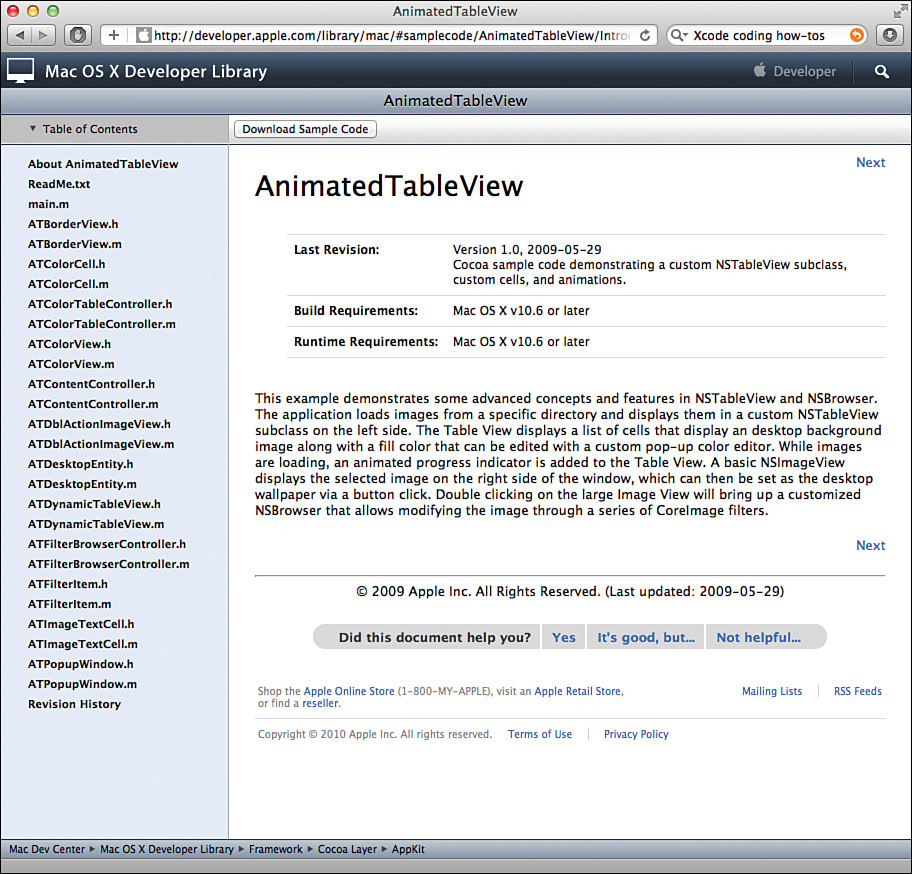
Figure 7.7. Sample code is available for a wide range of topics and is presented as a ready-to-go Xcode project.
To use the sample when accessing docs directly from Xcode, click the Open Project button and, when prompted, provide a save location for the project files. Xcode opens the project within the IDE, and you can run or edit it immediately.
Did You Know?
If you are using a web browser to access sample code (shown in Figure 7.7), you will see a Download Sample Code button, and the project will be downloaded to your Downloads folder. You must locate and open the project file manually.
Technical Notes
Technical notes are short help documents that describe how to troubleshoot or implement a given technology in a very specific situation. “Troubleshooting Push Notifications,” for example, is an available technical note for iOS and Mac OS X developers that helps identify why notifications may not be working as expected.
Although technical notes are helpful, their day-to-day benefit is limited. They are useful only in very specific circumstances—and have little information that applies to general development.
Technical Q&As
A technical Q&A is similar to a technical note but is presented as a single question and answer. Again, the question (and corresponding answer) is applicable in only a very specific circumstance, and (I say this cynically) never one that applies to me.
It’s likely that the only time you’ll end up reading a technical note or Q&A is when it is returned as the result of a document search. Browsing these two document categories can lead to some interesting discoveries, but is not very useful for learning development.
Xcode Tasks
I’m not sure why this resource type exists on its own, but it does. Xcode tasks are essentially Getting Started guides for tasks related to Xcode but that do not necessarily take place within the application. The current Xcode tasks available in the iOS and Mac OS X docsets are related to provisioning your iDevices and managing/preparing applications for submission to the App Store. Not much to see here, folks.
Video
Rarely included in Apple’s documentation are how-to videos. When you encounter a video, take an opportunity to watch it. I find Apple’s video tutorials useful, easy to watch, and quick to deliver information. Unfortunately, they are few and far between. If you are seeking more video content, I recommend that you visit the online developer portals and watch the Worldwide Developers Conference (WWDC) session videos. These are highly technical and provide a solid introduction to many important development topics.
Using the Xcode Help Viewer
The Xcode Help viewer, as mentioned earlier, works much like Safari for browsing documentation, but includes several additional features to make navigating the available information much easier.
To open the Xcode documentation, choose Help, Xcode Help from the menu bar. The Help system launches, as shown in Figure 7.8.
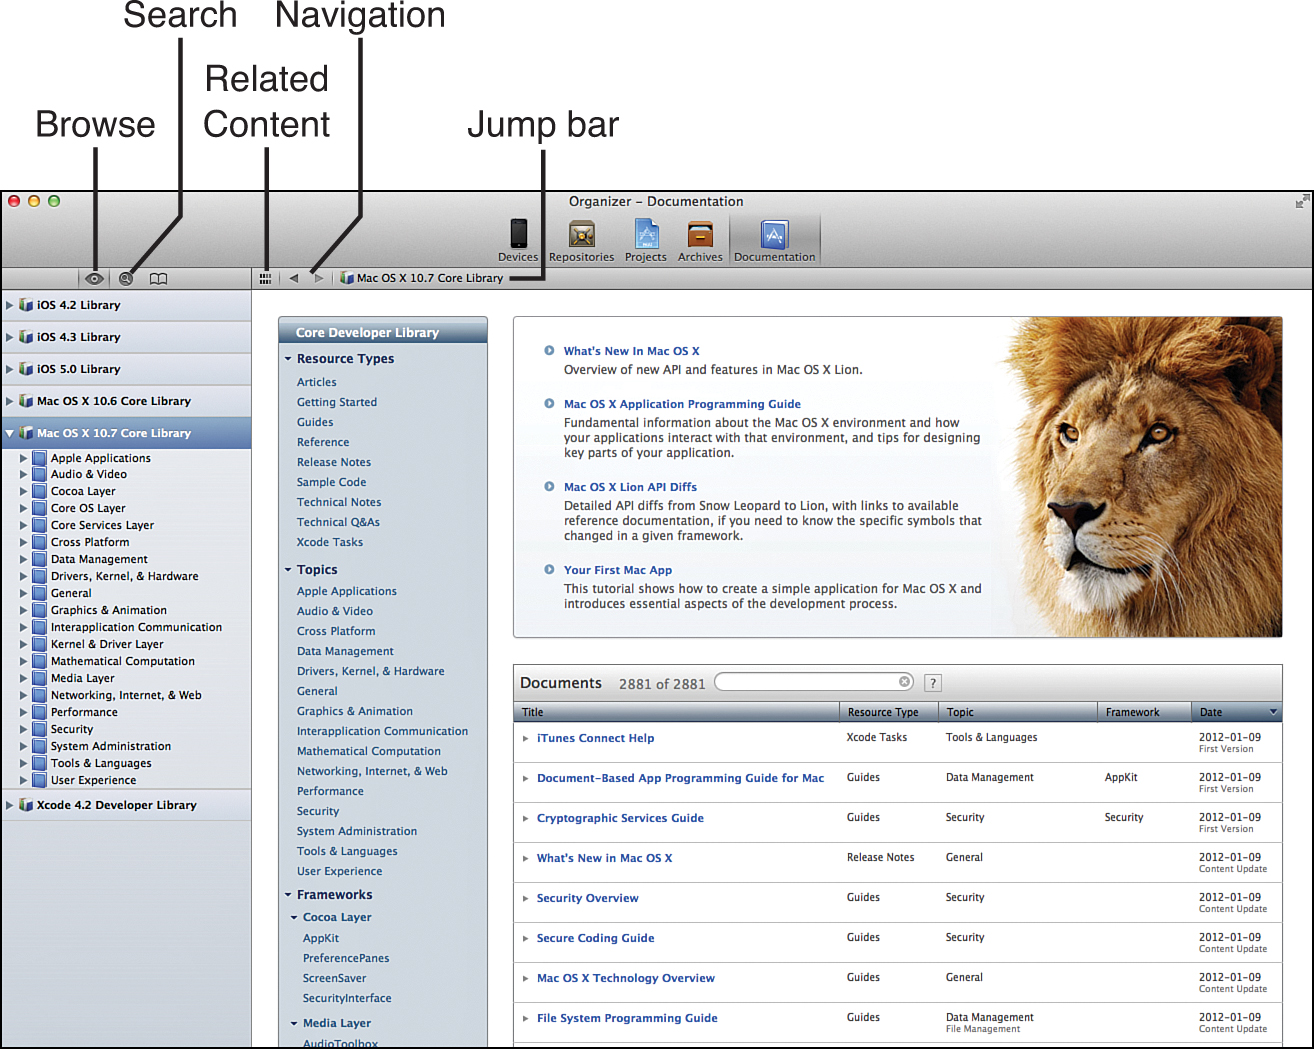
Figure 7.8. Browse or search the available help documents.
Browsing the Library
If you do not know exactly what you’re looking for, sometimes the best option is to just browse. Click the eye icon to browse all the available documentation. Browsing starts at the top of each docset, with the docsets listed in the left column—called the Navigator. Expanding a docset lists the topics and individual documents within, enabling you to select and view a file or to drill down further to lower-level topics. When a document or topic area is clicked, the corresponding content is shown on the right side of the window—just like when you choose a file and open its editor in Xcode.
By the Way
If you aren’t sure what document you want, you can click a topic area, or even the top-level docset to view a different organization of information. The top-level view of a topic or docset includes a description of what you will find in that area, along with an organization of the docset documents by resource type, topic, and framework.
When you have arrived at a document that interests you, you can read and navigate within the document using the blue links. You can also move forward and backward between documents using the arrow buttons located above the content—just as with a web browser.
Just to the left of the arrows is a button showing two short dashed lines. This is a drop-down menu that provides easy access to related content. Unfortunately, that is not quite what it sounds like. The related content (which you might validly assume a cross-reference to other classes) is actually just “attachments” referenced in the document. If sample code or a PDF of the document is available, you can access it by clicking it in the related content menu.
By the Way
To quickly move between documents in a topic area, or even sections within an individual document, use the jump bar, which shows the path to the document you are actively viewing and is located directly above the content area.
Adding Bookmarks
The Help view is much like a browser in that you can add bookmarks for later reading. To create a bookmark, right-click either an item in the Navigator or click the content itself, and then choose Add Bookmark for Current Page from the contextual menu. You can access all your documentation bookmarks by clicking the book icon at the top of the Navigator, as shown in Figure 7.9.
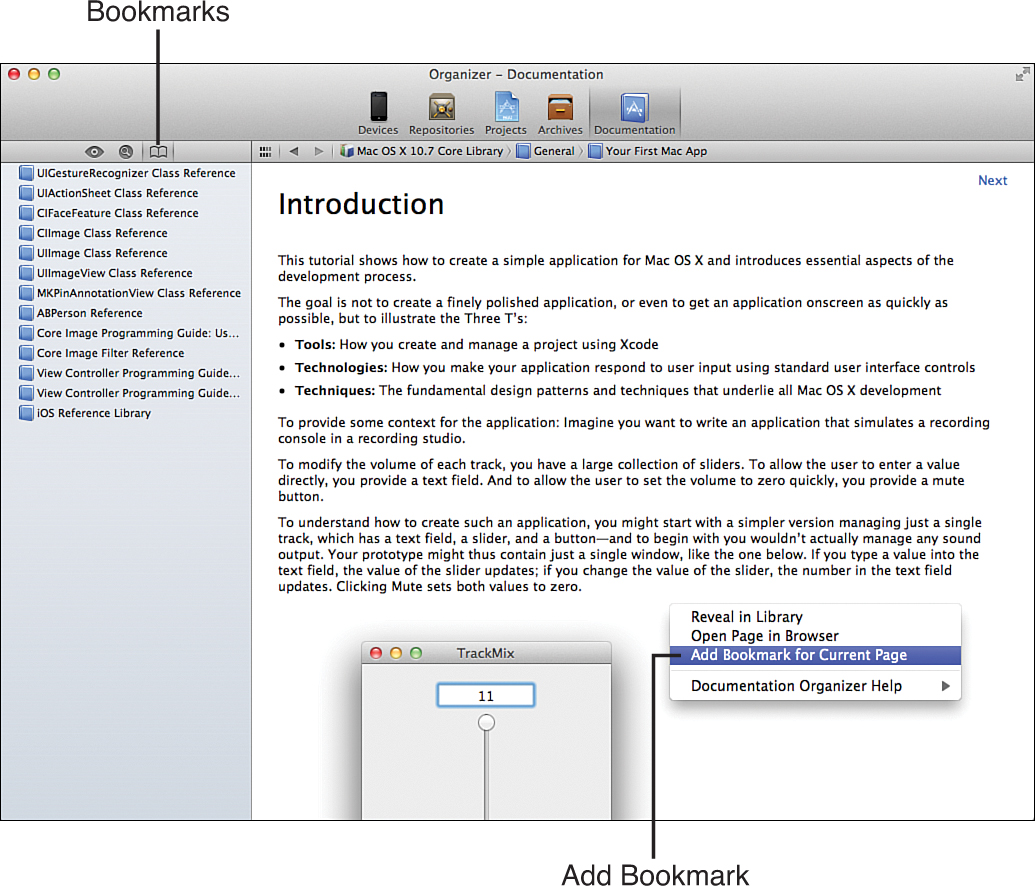
Figure 7.9. Bookmark commonly used help documents.
To delete a bookmark, make sure it is selected in the Navigator, and then press the Delete button on your keyboard. You receive no confirmation that it’s going to be removed, so make sure you are deleting the reference you want, not a bookmark to some esoteric class that took two hours to find.
Searching the Library
Browsing is great for exploring, but not that useful for finding references on exact topics—like class method names or individual properties. To search the Xcode documentation, click the magnifying glass, and then type into the Search field. You can enter class, method, or property names, or just type in a concept that you’re interested in. As you type, Xcode begins returning results below the Search field, as shown in Figure 7.10.
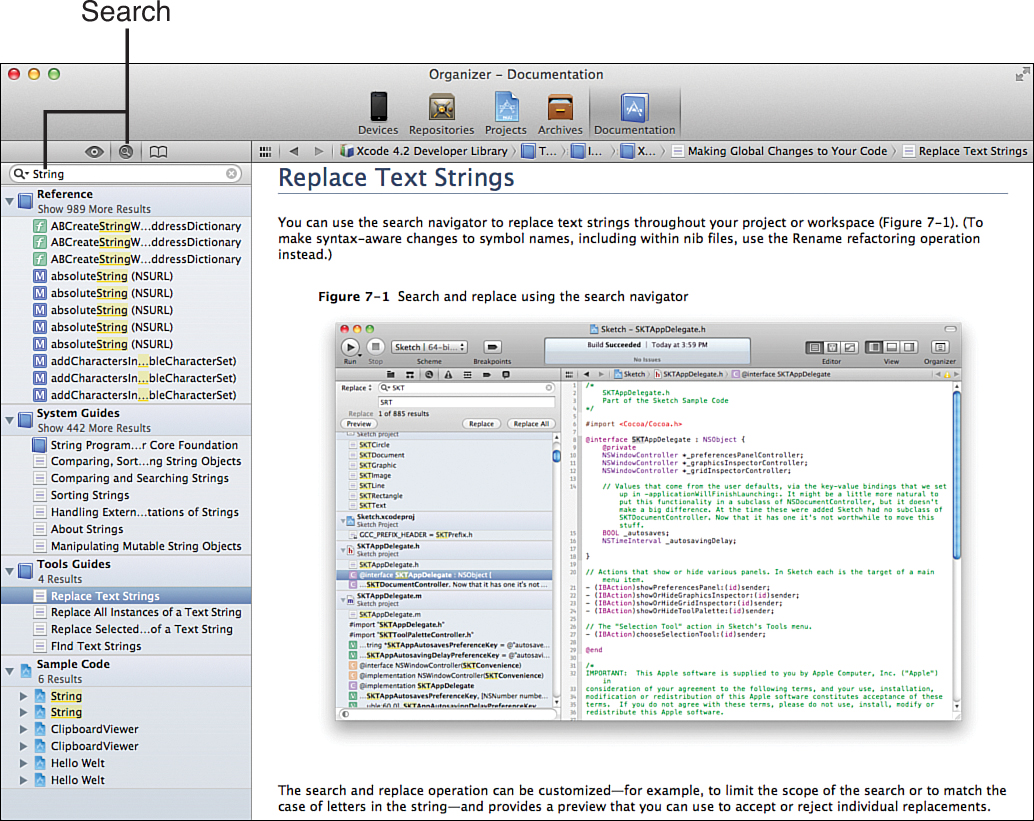
Figure 7.10. Search to find specific topics quickly.
Search results resources are divided into groups, including Reference (API documentation), System Guides/Tool Guides (explanatory/tutorial text), and Sample Code (example Xcode projects).
You can fine-tune your search criteria by clicking the magnifying glass located within the Search field. This displays a pop-up menu with selections for limiting your search to specific document sets and reviewing recently completed searches.
Using the Quick Help Assistant
One of the fastest and easiest ways to get help while coding is through the Xcode Quick Help assistant. Instead of searching help for a particular topic, Quick Help integrates directly with the code editor and can be used to directly reference a topic as you program.
Accessing Quick Help
Open the assistant by holding down Option and clicking a symbol in Xcode (for example, a class name or method name) or choose Help, Quick Help. A small window opens with basic information about the symbol and links to other documentation resources.
For example, consider the following line that allocates and initializes a string with the contents of an integer variable:
myString=[[NSString alloc] initWithFormat:@"%d",myValue];
In this sample, there is a class (NSString) and two methods (alloc and initWithFormat). To get information about the initWithFormat: method, hold down Option, and then click initWithFormat:. The Quick Help popover appears, as shown in Figure 7.11.
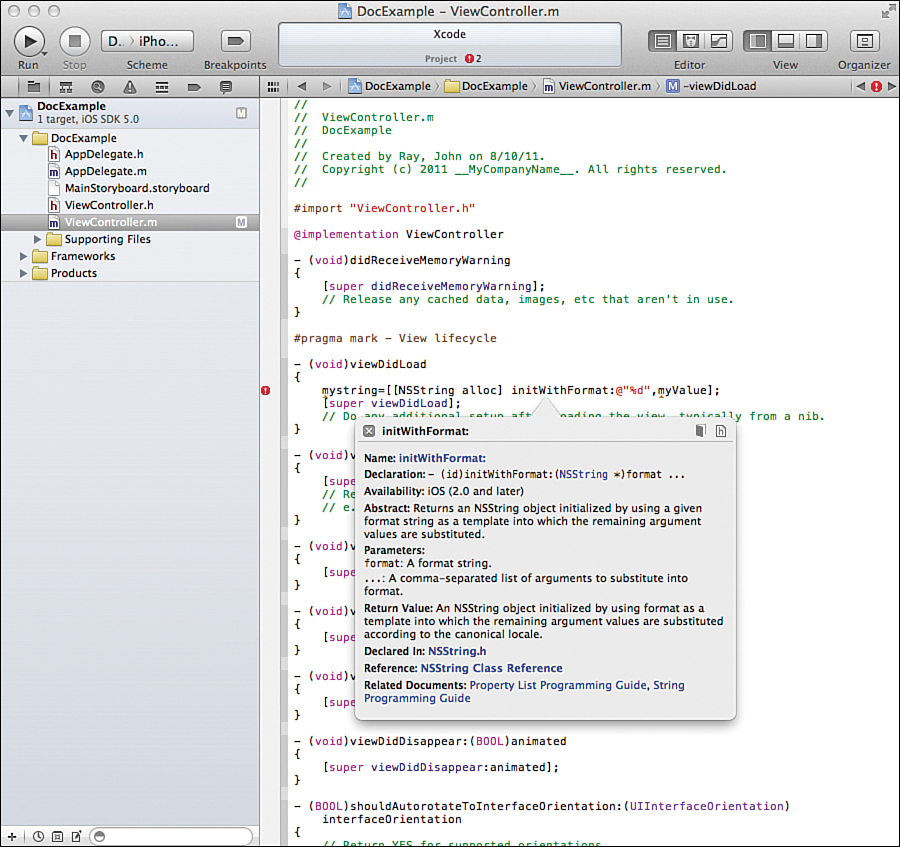
Figure 7.11. Open the Quick Help assistant directly within your code stream.
Interpreting Quick Help Results
Quick Help displays context-sensitive information related to your code in up to eight different sections. What you see depends on the type of symbol you have selected. A class property, for example, does not have a return type, but a class method does:
• Abstract: A description of the feature that the class, method, or other symbol provides
• Availability: The versions of the operating system where the feature is available
• Declaration: The structure of a method or definition of a data type
• Parameters: The required or option information that can be provided to a method
• Return Value: What information will be returned by a method when it completes
• Declared In: The file that defines the selected symbol
• Reference: The official reference documentation for the system
• Related API: Other methods within the same class as your selected method
• Related Documents: Additional documentation that references the selected symbol
• Sample Code: Sample code files that include examples of class/method/property use
To open the full Xcode documentation for the symbol, click the book icon in the upper-right corner. You can also click any of the hyperlinks in Quick Help results to jump to a specific piece of documentation or code.
Activating the Quick Help Inspector
Quick Help is fast, but it can be even faster, and possibly answer your questions before you even have them. By turning on the Quick Help Inspector, you can display help information all the time. Xcode actually displays context-aware help for whatever you’re typing, as you type it.
To display the Quick Help Inspector, activate the Utility area of the Xcode window using the third (rightmost) View button. Next, click the show Quick Help Inspector icon (wavy lines in a dark square), located in the Utility area, as shown in Figure 7.12. Quick Help automatically displays a reference for whatever code your textentry cursor is located in.
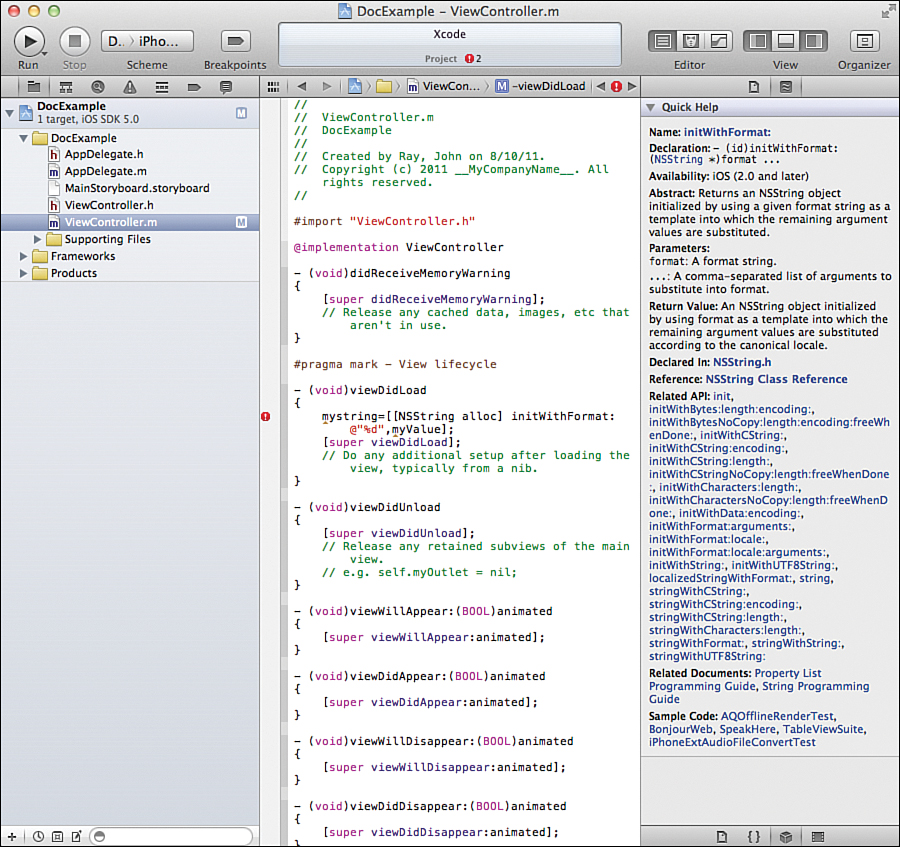
Figure 7.12. View Quick Help wherever you are, for whatever you’re coding.
Although Quick Help and the Quick Help Inspector do not offer the depth of information contained in the main Xcode documentation, they do give you the primary details needed to correctly implement the code you’re working on. As you can see, memorizing documentation is not a requirement in Xcode. (Save your brain cells for something more important—like your anniversary date.)
Summary
Documentation can make or break a developer. You can visualize a breakthrough algorithm in your mind, but without the means of turning the idea into code, it might never see the light of day. Thankfully, Apple provides a wide range of developer documentation resources that you can access from your browser, iPad, or directly within the Xcode development suite.
In this hour’s lesson, you explored the documentation resources available, what they are used for, and which offer the greatest benefit for typical development. You learned how to configure Xcode’s docset download facility, and how to browse, search, and bookmark resources—even access sample projects—all within the Xcode help viewer.
For on-the-fly help, we discussed how to invoke the Xcode Quick Help feature and display always-on information with the Quick Help Inspector. In short, if you need help coding in Xcode, you should now know where to find it.
Q&A
Q. Can I access the developer documentation through any browser, or only in Safari?
A. You can access the documentation in any browser you want. Only browsers that identify themselves as Mobile Safari on the iPad see the iPad-specific view, however.
Q. Can I access earlier iOS/Mac OS documentation releases through my browser?
A. No. Only the latest release is available through your web browser. You can access earlier versions by downloading the appropriate docsets in Xcode.
Q. I’m searching for a document, but I keep returning results for versions of iOS/Mac OS X that I do not want. What do I do?
A. Click the magnifying glass within the help viewer Search field and choose Show Find Options. A small configuration area that appears below the field enables you to choose which docsets are searched.
Workshop
Quiz
1. iOS and Mac OS X documentation is combined in a single docset. True or false?
2. Do the Guide documents contain detailed information about implementing a particular technology?
3. The Quick Help system is only available when coding for iOS. True or false?
Answers
1. False. Each iOS release and Mac OS X release has its own docset.
2. No. Guides provide links to technical documents, but rarely contain technical/implementation details themselves.
3. False. The Quick Help and Quick Help Inspector work across all project types to bring you instant information with no searching.
Activities
1. Configure your Xcode docset downloads so that the latest version of the iOS and Mac OS X documentation is downloaded as well as the previous release.
2. Open an Xcode project and activate the Quick Help Inspector. Try writing a line or two of code (feel free to use the example from this hour’s lesson) and watch what happens. Use the links within the Quick Help to open and access detailed documentation in the Xcode help viewer.