Hour 6. Using the Xcode Source Editor
What You’ll Learn in This Hour:
• Xcode Source Editor basics
• How to use autoformatting features
• The use of pragma marks to identify different pieces of code
• Ways to find and correct errors before your app even runs
• How to refactor existing code
Over the past few hours, you have learned how to create projects, add files, add frameworks, and do much of the work necessary to successfully build you own application projects. What we have not touched on, however, is the Xcode Source Editor itself, which you use to edit, unsurprisingly, source code. You’ve got your project and files; now how about editing them?
This hour walks through the different Source Editor features—from automatic code completion to code refactoring. You learn how the Source Editor can help you write clean, well-formatted code and even identify problems before you even try to run your application. Even if you have played around with editing files already, you’re still likely to find a few undiscovered tricks in this hour.
Understanding Editor Basics
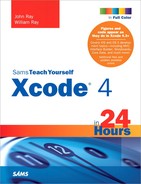
Let’s be serious: If you’re learning how to program in Xcode, you know how to edit a text file. I am not going to bore you with details on how to move your cursor or copy and paste. The Xcode Source Editor works just like any text editor, with several additions that may make your life easier. To follow along with this hour’s lesson, create a new project called HelloXcode using the Mac OS X Cocoa Application template and the configuration shown in Figure 6.1. We’ll edit this so that it displays a simple message (Hello Xcode) in the application’s window. Nothing earth shattering, but you’ll find it handy to keep this open so that you can test the tools as you read.
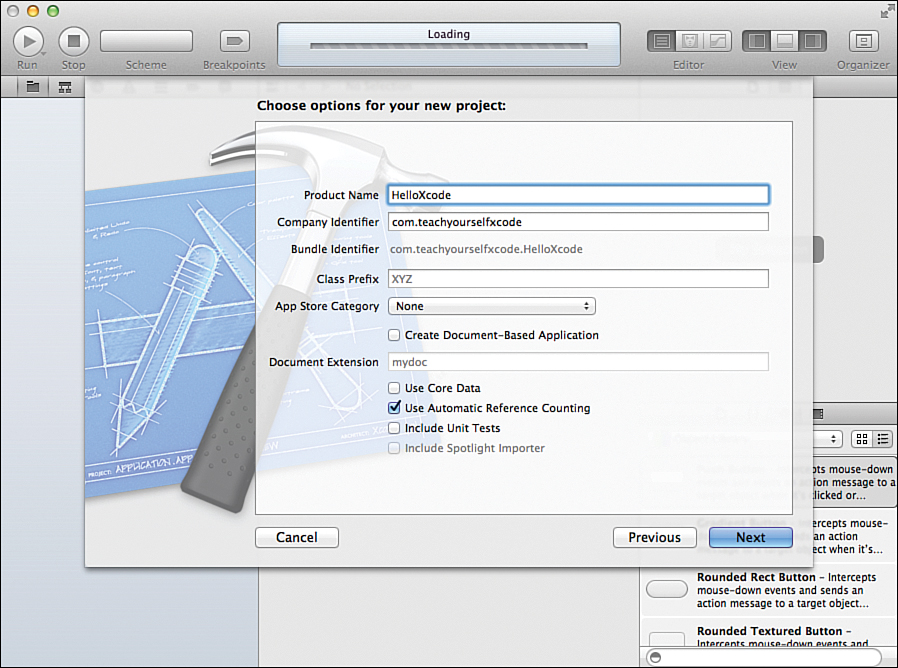
Figure 6.1. Create a new Mac OS X Cocoa application.
To edit code in Xcode, use the Project Navigator to find the file you want to work on, and then click the filename. The editable contents of the file are shown in the Editor area of the Xcode interface. For our sample application, click the AppDelegate.m file, as shown in Figure 6.2.
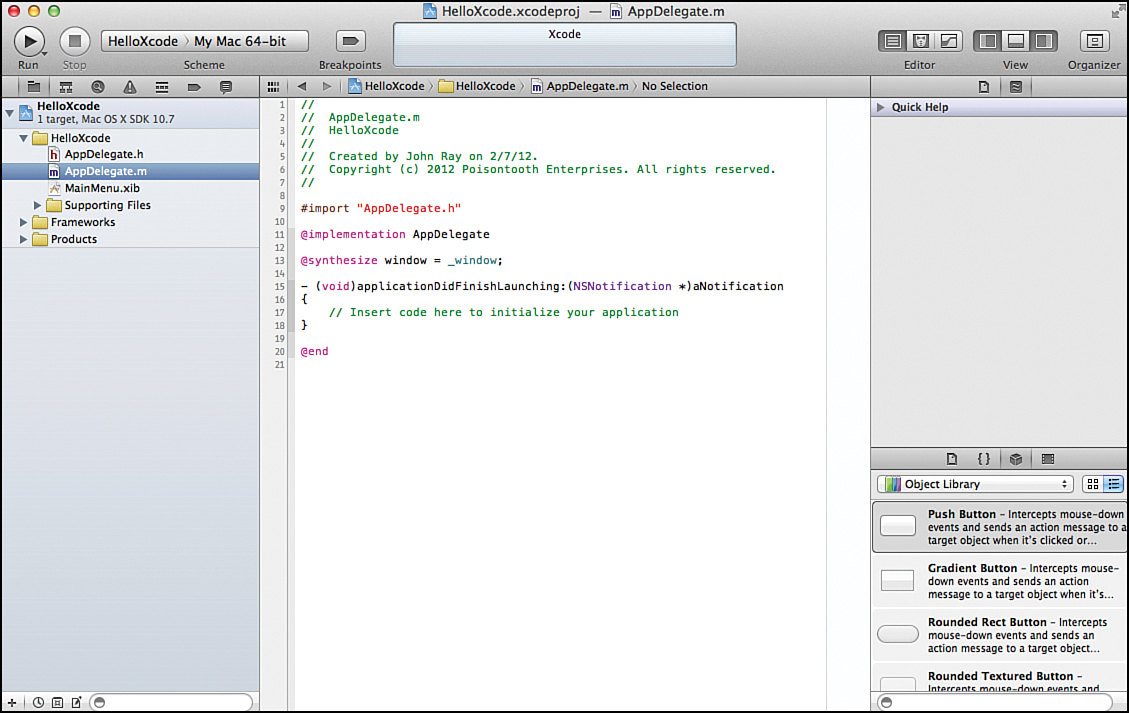
Figure 6.2. Choose a file to edit.
Code Completion
Using the Source Editor, start entering the following text to implement the applicationDidFinishLaunching method. Start a new line immediately following the existing comment “Insert code here to initialize your application.” Update the method as shown in Listing 6.1.
Listing 6.1. A Short Sample Mac OS X Application
1: - (void)applicationDidFinishLaunching:(NSNotification *)aNotification
2: {
3: // Insert code here to initialize your application
4: NSTextField *myMessage;
5: NSTextField *myUnusedMessage;
6: myMessage=[[NSTextField alloc] init];
7: myMessage.font=[NSFont systemFontOfSize:72.0];
8: myMessage.stringValue=@"Hello Xcode";
9: myMessage.textColor=[NSColor blueColor];
10: myMessage.editable=NO;
11: [self.window setContentView:myMessage];
12: }
As you enter the code, notice that when you are typing a method or class name that Xcode recognizes, a pop-up dialog appears near your cursor, as shown in Figure 6.3. Here, the systemFontOfSize method is being typed, and Xcode is presenting potential options for autocompletion as I type.
Figure 6.3. Xcode autocompletes recognized methods, classes, and symbols.
To choose an autocompletion value, use the arrow keys to highlight the value you want to use, and then press Return to insert it into your code. You can also press Escape to make the pop-up disappear.
If you are completing a method name, chances are that you need to provide parameters as well. (In the case of systemFontOfSize, it is a floating-point value that describes the size of the text.) You can again use the arrow keys to move between the parameter fields and enter the values you want, or you can just press Tab to skip from parameter to parameter.
If you have already finished typing (or autocompleted) a line in your code and discover that it is not what you want, you can click anywhere within the line and then choose Editor, Show Completions (Control+Spacebar) or press Escape. Doing so displays the autocomplete pop-up dialog with all the potential matches wherever your cursor is located—as if the rest of the line does not exist.
You can adjust the code completion options in the Xcode preferences within the Text Editing section.
Auto-Indentation
Clean code is easier to read and easier to maintain, and Xcode works behind the scenes to keep your code nicely formatted through auto-indention. As you program, Xcode automatically indents lines so that they fall either directly under the previous line or as appropriate to the structure of the statements you are writing.
Code within conditional blocks and loops, for example, are indented farther than surrounding code to visually show that they are a cohesive block. This has no effect on execution, but it can make reading through a source code file much easier than if each line’s code starts at the first character.
You can control the logic for the Xcode auto-indentation system using the Text Editing panel of the application preferences (Xcode, Preferences) and the Indentation button within that, as shown in Figure 6.4.
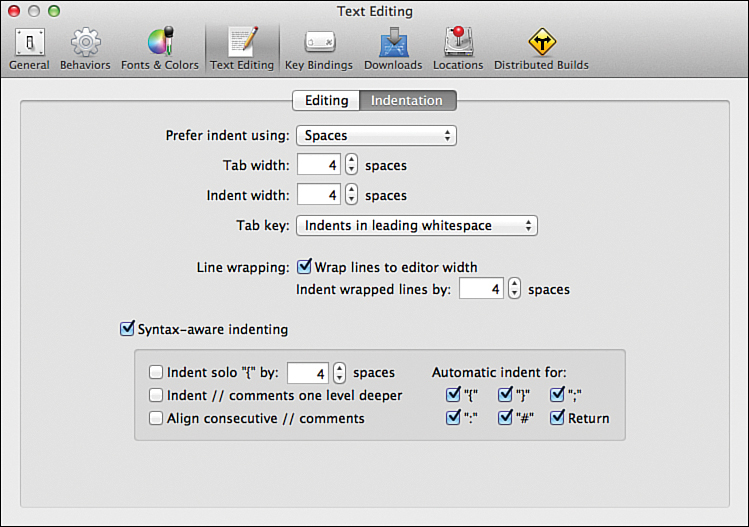
Figure 6.4. Configure the Xcode indentation logic.
A nice feature of Xcode is that indentation isn’t just applied while you’re typing and then lost. Although you can certainly move your code around and make it into a mess, you can always apply the indentation rules again, as follows:
1. Within the sample project, add tabs and spaces in front of some of the lines in applicationDidFinishLaunching.
2. Delete the indentation from some of the lines, as well.
3. After you have made the method sufficiently ugly in appearance, select the lines of code.
4. Choose Editor, Structure, Re-Indent (Control+I).
Xcode reformats the code, and all is well again, as shown in Figure 6.5.
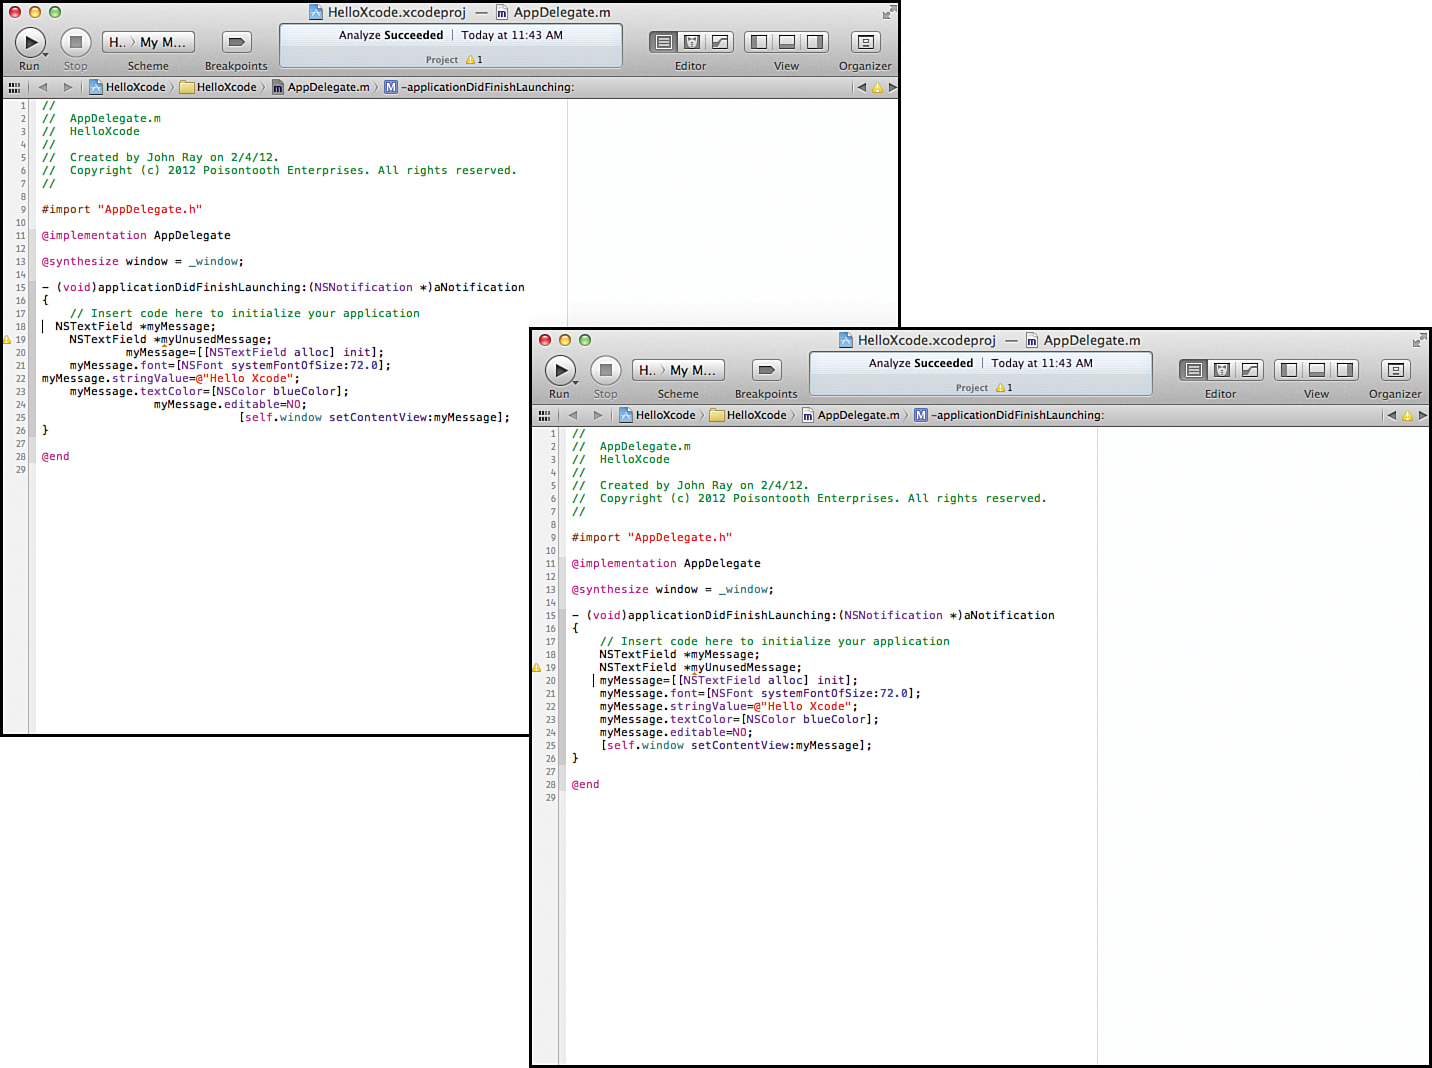
Figure 6.5. Before and after applying the indentation logic.
You can access the Structure menu by right-clicking directly in the Xcode Source Editor. This can be a useful menu to access while editing, so the faster you can get to it, the better.
Balancing Delimiters
Indentation may be “just for looks,” but delimiters are not. Properly balanced delimiters are the difference between code that works the way you want and code that seems to have a mind of its own. When coding in Objective-C, you work with three primary types of block delimiters:
() Parentheses for function calls
[] Square brackets for Objective-C messaging
{} Curly brackets for logical programming blocks
Each time you type one of these delimiters, you need another matching one added to your code. If you happen to miss one or put one in the wrong place, chances are your code won’t run. Worse yet, it might run and not do what you expect.
To help you keep track of where your delimiters are (or aren’t) balanced, Xcode automatically highlights the first delimiter when you type the second (or move the cursor to the immediate right of the second delimiter).
For example, return to the sample method that you wrote earlier (applicationDidFinishLaunching), position your text entry cursor immediately before the right curly bracket, }, at the end of the method. Next, press the right arrow to move the text cursor to the right of the curly bracket. As you do this, notice that the left curly bracket, {, at the start of the method is briefly highlighted. This same behavior occurs with parentheses and square brackets, too.
To select all of the code that is contained within a set of delimiters, right-click within the code, and then choose Structure, Balance Delimiter (also available from the Editor menu), as shown in Figure 6.6.
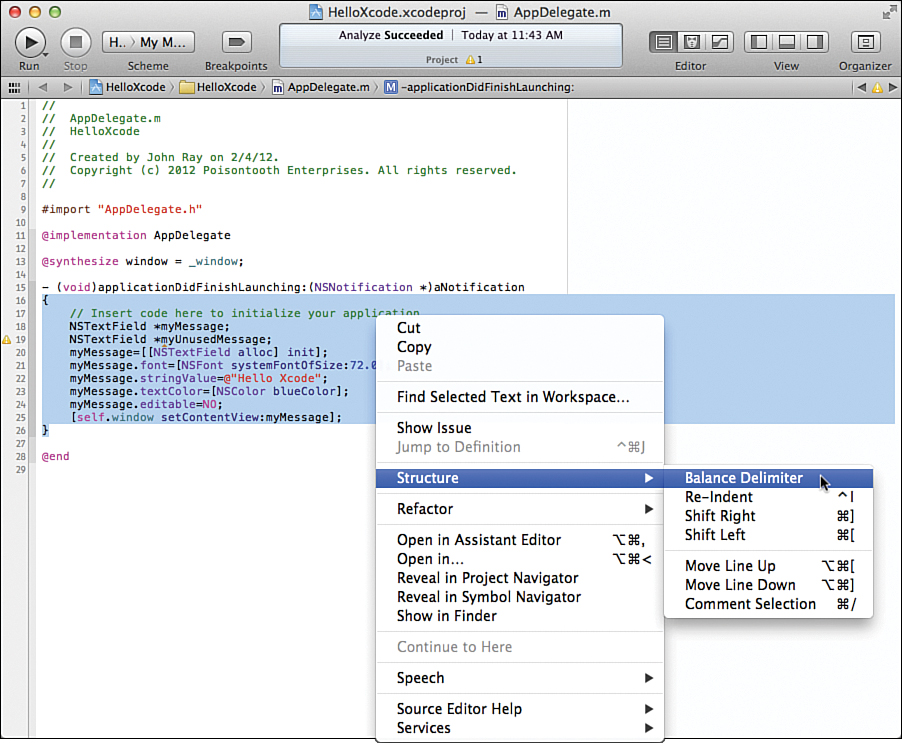
Figure 6.6. Select the code between two delimiters.
By the Way
When you are entering your code, Xcode automatically inserts matching curly and square brackets when you type the first bracket. In other words, if you type {, Xcode automatically adds a corresponding } for you. You can disable this behavior in the Xcode Text Editing preferences (Xcode, Preferences, Text Editing, Editing).
Code Folding
Working in conjunction with your code delimiters and the logical blocks/methods you define in your code, Xcode’s code-folding features let you focus on editing a specific piece of code and hide the rest. To the immediate right of your Editor is the gutter, which typically holds line numbers (enabled in Xcode’s Text Editing preferences) and error/warning icons. The very right side of the gutter is the code-folding ribbon. By clicking in the ribbon, you can fold (collapse) your methods and functions and comment blocks.
For example, view the code in the applicationDidFinishLaunching method. Click immediately to the left of the method in the code-folding ribbon. The code collapses and is replaced with an ellipsis (...), as shown in Figure 6.7. You can expand the code again by double-clicking the ellipsis or by using the disclosure arrow that appears in the ribbon.
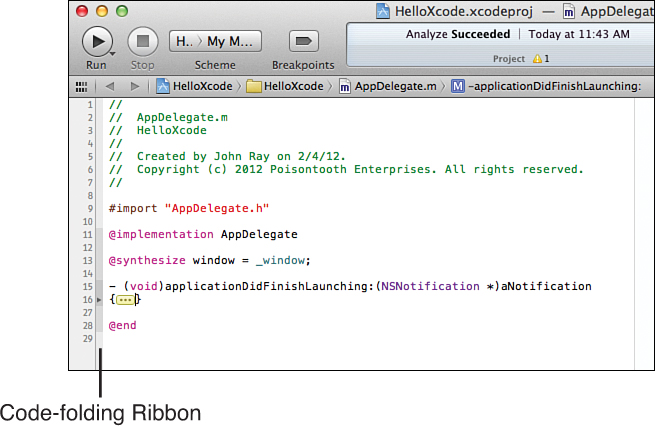
Figure 6.7. Collapse your code to improve your focus.
By the Way
To help identify what blocks of your code can be collapsed, Xcode lightly shades the code folding ribbon. Blocks within blocks are successively darker in color. Hovering your mouse over a shaded portion of the code-folding ribbon highlights the relevant block within Xcode.
You can quickly collapse all comment blocks (text between /* and */) and function/methods using the Editor, Code Folding menu.
The Other Bits
As with any application, some settings and options (although useful to some) do not warrant a full discussion. The Xcode Source Editor has a number of other features that might come in handy but that do not necessarily pertain to the editing process itself.
What follows are a few configuration tweaks and editing functions that you might want to use in your projects.
Line Numbers
To enable or disable the display of line numbers beside your code, use the Line Numbers check box accessed within the Text Editing section of Xcode preferences. Line numbers are a great help when debugging code or describing your code to other developers.
Edit All in Scope
If you’ve ever written a function or method only to smack yourself in the head and say, “I should have named that variable something else,” you will love the Edit All in Scope feature. To simultaneously change all the instances of a variable name within a method, select the variable name, and then choose Editor, Edit All in Scope (Control+Command+E). Each instance of the variable highlights, and all update as you edit one, as shown in Figure 6.8.
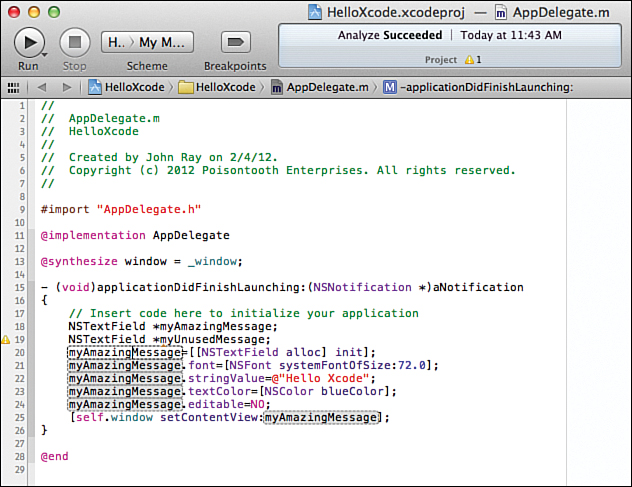
Figure 6.8. Quickly change symbol names using Edit All in Scope.
Shift, Move, or Comment
The Structure contextual menu (also accessible from the Editor menu) contains commands for shifting (indenting/outdenting) your code left or right, moving it up or down, or commenting it out. Use these functions to quickly act on a selection of lines, rather than changing each one individually.
Hide/Show Invisibles
There’s more to your code than you can see. To get a glimpse at how the code is formatted (tabs/spaces/return characters) or check for any gremlins that may have crept into your code from pasting from other applications, use the Editor, Show Invisibles command. This displays all normally invisible characters directly within your code listing. To hide the characters, choose Editor, Hide Invisibles.
Syntax Coloring
Normally, Xcode colors your code based on the type of file you are editing. You can override the chosen syntax-highlighting scheme by choosing Editor, Syntax Coloring from the menu. You can also change the syntax colors entirely using the Xcode Fonts & Colors preferences, shown in Figure 6.9.
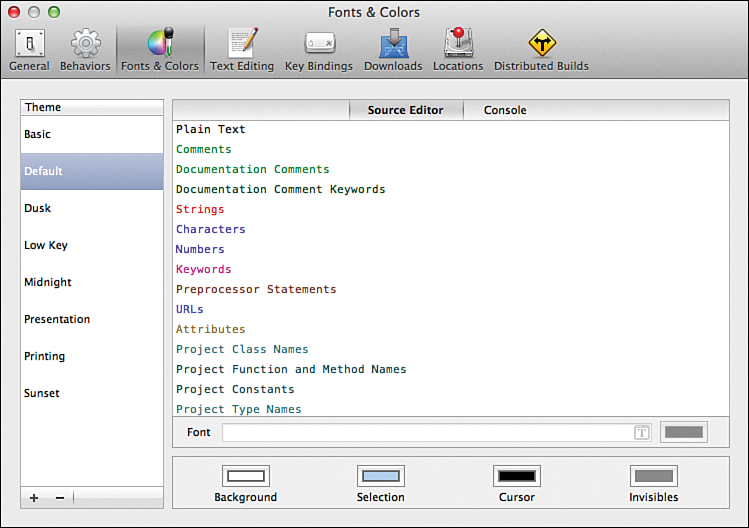
Figure 6.9. Change the syntax color rules to suit your sensibilities.
Navigating Within and Between Files
Now that you know the basic code-editing features provided by Xcode, we can turn our attention to some of the features that simplify working with multiple files. Except in the most rudimentary development, your projects will consist of multiple source files with multiple methods spread between them. Becoming efficient and jumping between these files is a skill that becomes increasingly valuable as your applications increase in scale.
This section examines some of the tools you can use when working with multiple files (or very large individual files).
Tabbed Editing
Tabbed editing is just like tabbed browsing in your favorite web browser. Using tabbed editing, you can have many files open simultaneously and switch between them by clicking tabs at the top of the Editor area.
To create a new tab, choose File, New, New Tab (Command+T). A new tab appears with the contents of the file you are currently editing. You can switch the contents of the tab to whatever you want by clicking a file in the Project Navigator. You can repeat this process to create as many tabs as you want, with whatever file contents to want, as shown in Figure 6.10.

Figure 6.10. Keep multiple editors open simultaneously with tabs.
To close a tab, click the X that is displayed on the left side of the tab when hovering over it with your mouse. As with all files in Xcode, the files you edit in tabs are automatically saved when you close them; you do not have to explicitly use the Save command.
The Jump Bar
When editing a file, you might have noticed that above the Editor area is a visual path to the file you are editing and several buttons. This is collectively known as the jump bar. Clicking any portion of the path reveals a pop-up menu for quickly jumping to other files in same location, as shown in Figure 6.11. The last segment (on the right) of the jump bar is special: You can click it to view and jump between the symbols (methods, properties, and so on) within the file you are currently editing.
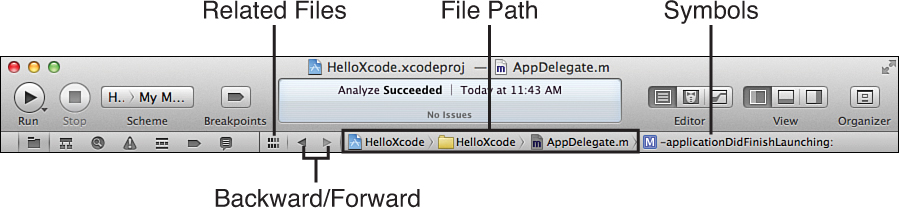
Figure 6.11. Quickly navigate your project hierarchy.
To the left of the path are forward and back arrows. The arrows move back and forth between files that you have been editing—just like pages you visit in a web browser. Finally, to the left of the arrows is the Related Files button.
Use the Related Files button to show a pop-up menu of categorized files such as recently opened or unsaved. This menu even displays files that are just referenced (even if just included or imported) in the file currently open in the Source Editor. Figure 6.12 shows the contents of the menu when editing the application delegate file for an empty iOS application.
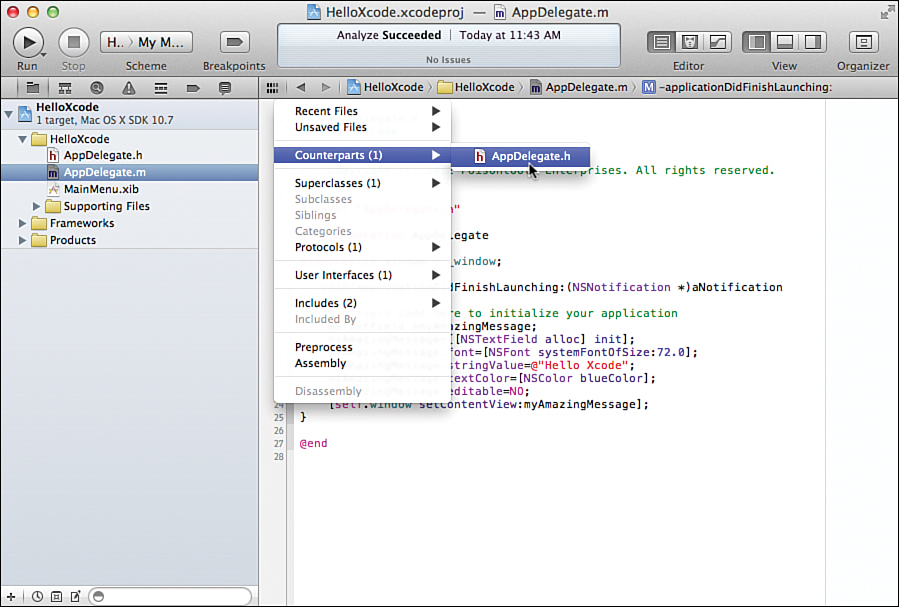
Figure 6.12. Find files that are referenced by, or directly/indirectly related to the file you are editing.
The Symbol Navigator
The easiest way to find a method or property within a source code file is to use the Symbol Navigator, opened by clicking the icon to the immediate right of the Project Navigator. This view, shown in Figure 6.13, enables you to expand your project classes to show all the methods, properties, and variables that are defined. Choosing an item from the list jumps to and highlights the relevant line in your source code.
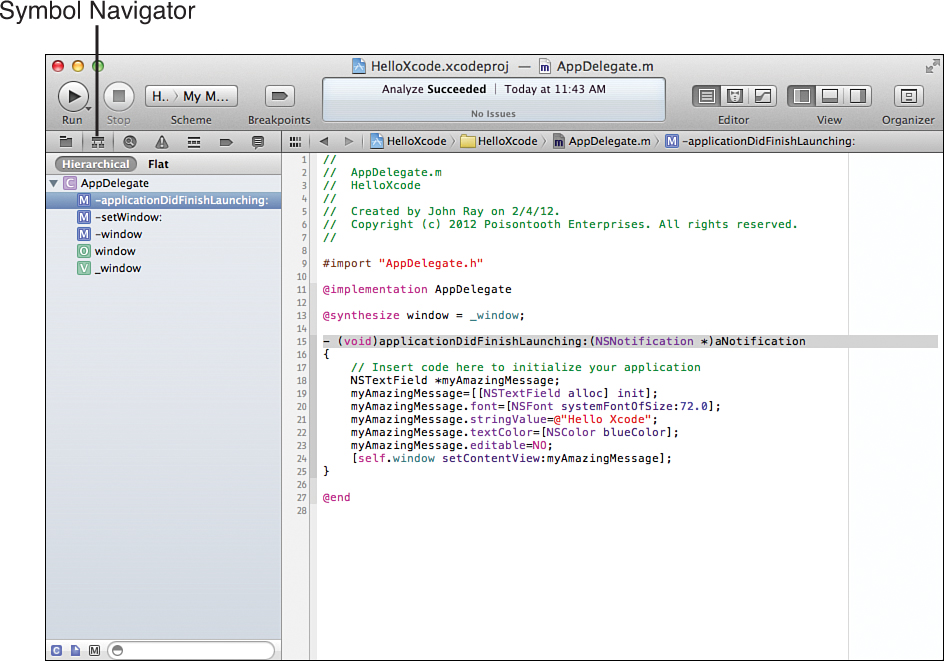
Figure 6.13. The Symbol Navigator is a quick way to jump between methods and properties.
For example, with the HelloXcode project open, switch to the Symbol Navigator and expand the AppDelegate item. This is the only object used in this application. Next, find and select applicationDidFinishLaunching from the list that is displayed. Xcode jumps to the finds and select the line where the method begins.
The Search Navigator
Searching for text anywhere in your project is trivial using the Search Navigator. To access this search feature, click the magnifying glass icon in the icon bar above the Navigator. A Search field displays at the top of the Navigator area, into which you can enter whatever you want to find. As you type, a drop-down menu appears, as shown in Figure 6.14, that shows potential options for refining your search. Choose one of the options or press Return to perform a non-case-sensitive search of the text you enter.
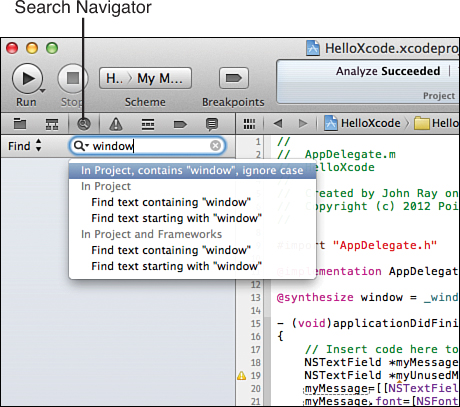
Figure 6.14. Use the Search Navigator to find text in your project.
The search results display below the Search field, along with a snippet of the file containing the text you were looking for, as shown in Figure 6.15. Clicking a search result opens the corresponding file in the Source Editor and jumps to the line containing your search string.
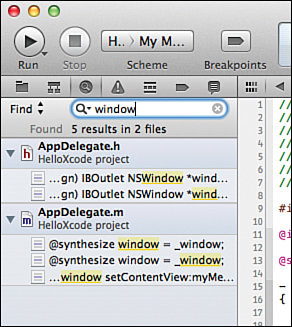
Figure 6.15. Search results are displayed along with the context of the match.
To make things even more interesting, you can use the Filter field at the bottom of the Search Navigator to filter your search results by a secondary term. You can also click the Find label at the top of the Search Navigator to switch to a Replace mode, enabling you to perform projectwide find and replace.
If you’re looking for a string within a file you are actively editing, choose Edit, Find, Find (Command+F) to open a more traditional Find field at the top of the Source Editor. This gives you quick access to find (or find/replace) within a given file, rather than across the entire project.
Pragma Marks
Sometimes navigating code by symbols or with a search is not very efficient. To help denote important pieces of code in plain English, you can insert a #pragma mark directive. Pragma marks do not add any features to your application; instead, they create logical sections within your code. These sections are then are displayed, with the rest of the code symbols, when you click the last item in the visual path above the Editor area.
There are two common types of pragma marks:
#pragma mark -
and
#pragma mark <label name>
The first inserts a horizontal line in the symbol menu; the second inserts an arbitrary label name. You can use both together to add a section heading to your code. For example, to add a section called Methods for starting and stopping the application followed by a horizontal line, you can enter the following:
#pragma mark Methods for starting and stopping the application
#pragma mark -
After the pragma mark has been added to your code and saved, the symbol menu updates accordingly, as shown in Figure 6.16. Choosing a pragma mark from the Symbol menu jumps to that portion of the code.
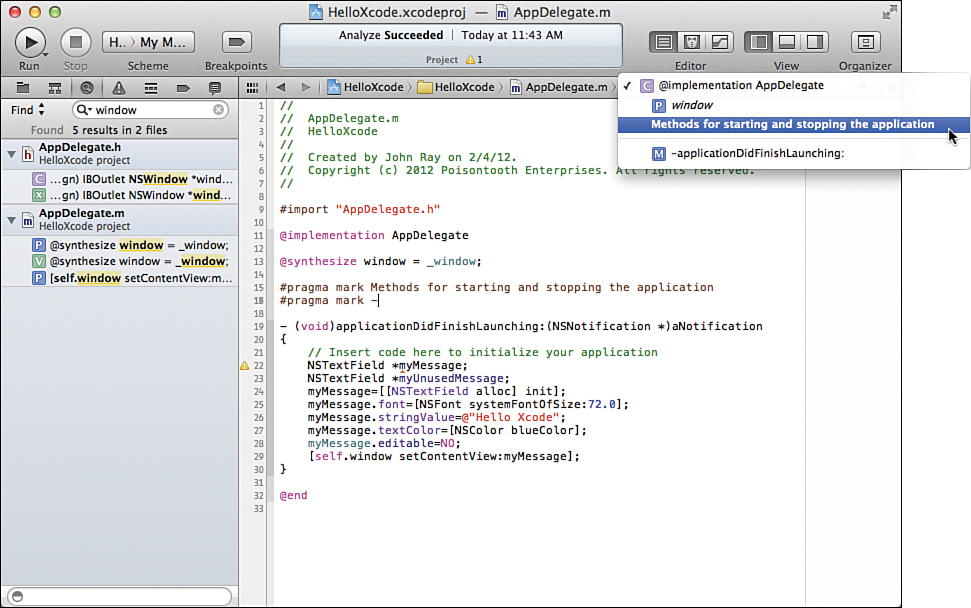
Figure 6.16. Use pragma marks to add logical delimiters to your code.
Using the Assistant Editor
As you work with Xcode projects, you will quickly realize that most program functionality comes from editing one of two related files: an implementation file (.m extension) and an interface file (.h extension). You’ll also learn that when you make changes to one of these two files, you’ll often need to make changes to the other. You will see a similar pattern emerge when you start editing GUIs in Xcode.
Xcode simplifies this back-and-forth editing with the Assistant Editor mode. The Assistant Editor (or just called Assistant in Apple documentation) automatically looks at the file you have opened for editing and opens, right beside it (or under it, if you prefer), the related file that you also need to work on, as shown in Figure 6.17.
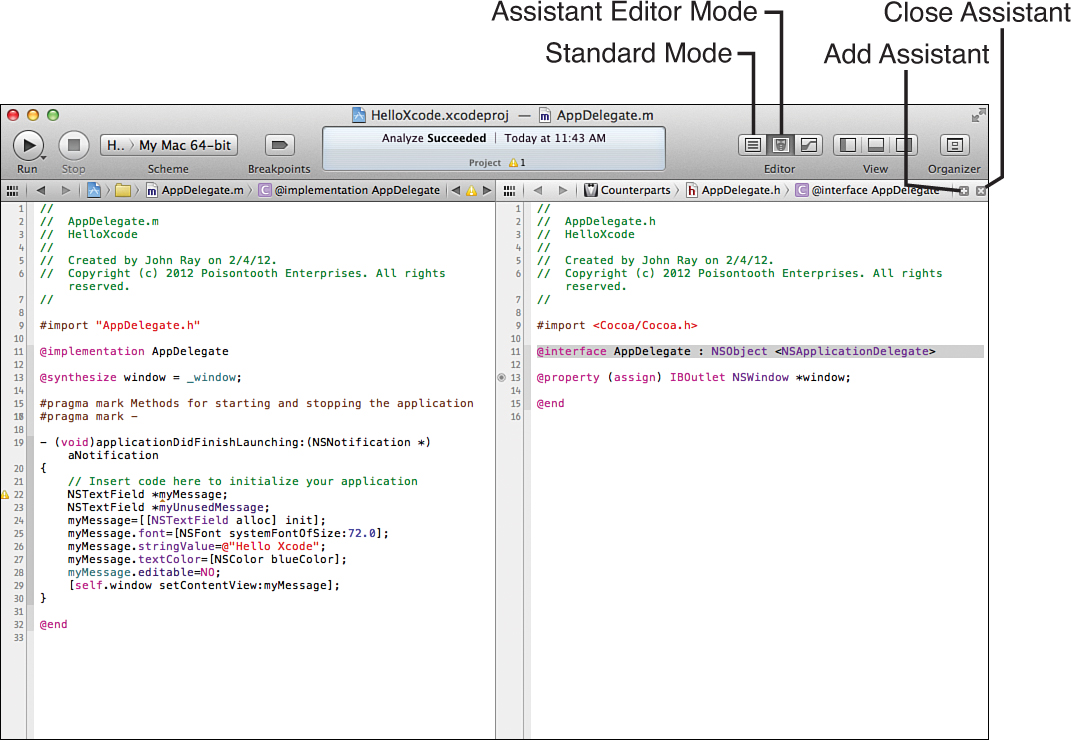
Figure 6.17. Xcode opens the file related to what you are working on.
To switch between Standard and Assistant Editor modes, you use the first and second buttons, respectively, in the Editor section of the Xcode toolbar.
By the Way
In the upper-right corner of the Assistant Editor’s jump bar, notice a + icon and an X icon. The + icon adds another Assistant Editor to your screen; the X icon closes the current Assistant Editor.
Choosing the Assistant File
When you are using the Assistant Editor, it sometimes chooses a file that it thinks you want to edit but that really is not what you had in mind. To view all the Assistant’s recommended options, click the Assistant Editor icon (a little suit and bowtie) displayed in the jump bar located at the top of the Assistant Editor view. This displays a menu of all the related files that the Assistant Editor has identified, sorted by type, as shown in Figure 6.18.
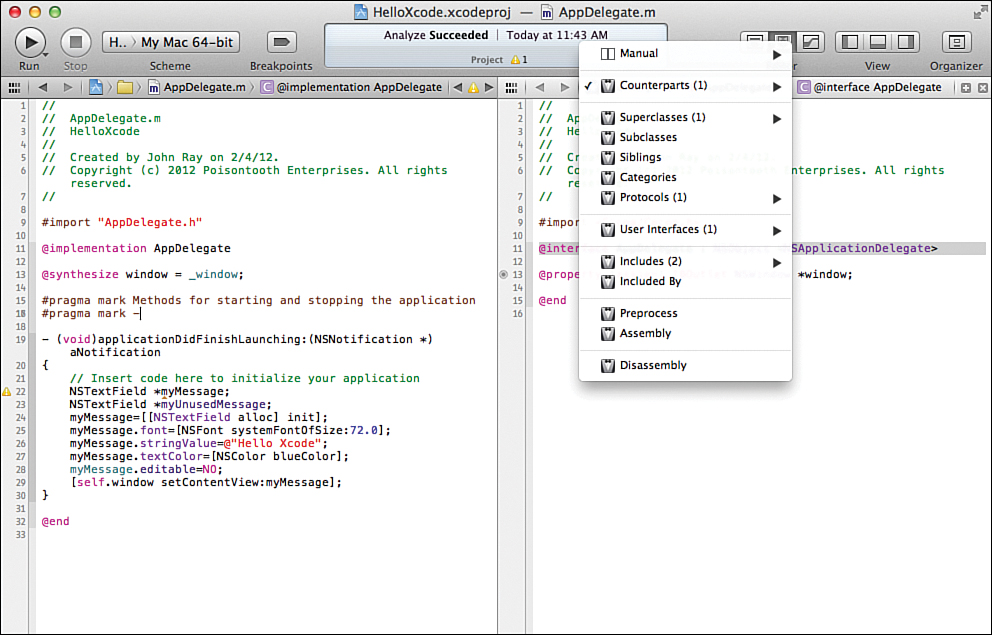
Figure 6.18. Choose a different file to edit.
Changing the Assistant Editor Layout
As you can see, the Assistant Editor occupies more than a little bit of screen space. If you are coding on a MacBook Air (which I love), you’ll find that you need to hide the Navigator/Utility areas to make the full Assistant Editor work.
To change how the Assistant Editor displays in the Xcode interface, choose View, Assistant Editor, as shown in Figure 6.19. From there, you can choose how the Assistant Editor is added to the display and what will happen if multiple Assistant Editors are in use.
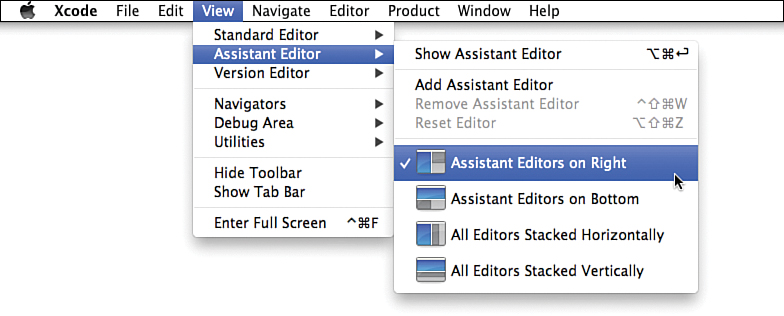
Figure 6.19. Configure how the Assistant Editors will appear in the display.
By the Way
To set up shortcuts for when the Assistant Editor (or tabs) are used, open the Xcode general preferences (Xcode, Preferences, General). You have several options to fine-tune how you invoke the special editing modes of Xcode.
Correcting Errors and Warnings in the Issue Navigator
As you write your code, Xcode is sitting in the background judging you, but do not take it personally—it only wants to help. Xcode analyzes your code and detects issues that might be (or are) problems and displays warnings and errors before you ever click the Run button.
Error Types
You can receive three general types of feedback from Xcode when it analyzes your application: errors, warnings, and logic problems. Warnings are potential problems that might cause your application to misbehave; a yellow caution sign warns you of these. Errors, however, are complete showstoppers. You cannot run your application if you have an error. The symbol for an error, appropriately enough, is a red stop sign.
Logic problems, found by the Xcode analyze process, are shown as a blue badge. All of these bugs, across all your files, are consolidated in the Issue Navigator. The Issue Navigator displays automatically if problems are found during a build or analyze process. You can also open it directly by clicking the exclamation point icon (on the toolbar above the Navigator area).
For example, the method applicationDidFinishLaunching that you wrote earlier contains an unused variable (myUnusedMessage). This is highlighted with a yellow exclamation point in the Issue Navigator (Unused Entity Issue), as shown in Figure 6.20.
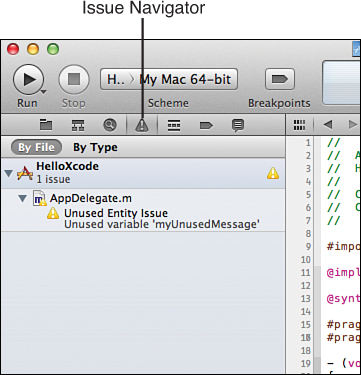
Figure 6.20. Use the Issue Navigator to browse all your project’s potential problems.
By the Way
Logic problems must be detected by choosing Product, Analyze from the menu bar. Warnings and errors are shown immediately as you code.
Jumping to an Error
To jump to an error in your code, just click it in the Issue Navigator. The corresponding code is opened, and the error message is visible directly after the line that caused the problem. To remove the warning from the sample method, just delete the line NSTextField *myUnusedMessage; to empty the Issue Navigator.
If you are in the middle of editing a file that contains errors, you’ll see the errors immediately displayed onscreen—so no need to jump back and forth to the Issue Navigator. You can also quickly cycle through your errors using the forward and backward arrows found at the rightmost side of the window, directly above the Editor area. These controls are visible only if errors are present, however.
Fixing Errors to Find Others
With the warning message still visible in the applicationDidFinishLaunching method (add the code line back in, if you need to), try adding a line of complete garbage into the code. Pay attention to what happens when you click off of the line.
What you will see is that the new code is flagged as an error (red stop sign), but the original warning has disappeared. This brings up an important point: Sometimes not all errors or warnings are detected and displayed in the Issue Navigator or in a source file. You might find, after fixing a line or two, that new and previously undetected errors appear. Conversely, you’ll also occasionally see false errors that disappear when you correct others.
By the Way
To control which issues are visible (hiding warnings, for example), choose Editor, Issues from the menu bar.
Refactoring Code
Earlier in this hour, you learned how to use Edit All in Scope to change the name of a variable within a method. But what happens if you need to make a more massive change, such as changing the name of a class? Making changes like this is called refactoring and can involve a ridiculous amount of work given the amount of code that needs to be touched, filenames that need to change, and so on. If you find yourself in this situation, however, Xcode offers refactoring features to help get you out of a jam.
To access the refactoring tools, choose Edit, Refactor from the menu bar or right-click in your code to use the Refactor contextual menu item.
Renaming
To rename a symbol across your entire project, including any files named after that symbol, follow these steps:
1. Select the symbol in your project.
2. Choose Edit, Refactor, Rename from the menu bar.
You are prompted for the new name, and whether to rename any associated files, as shown in Figure 6.21.

Figure 6.21. Rename a symbol (variable, class, method, etc. across your project).
3. After you have made your naming choice, click Preview to show the files that will be changed and the differences between the original and new versions, as shown in Figure 6.22.
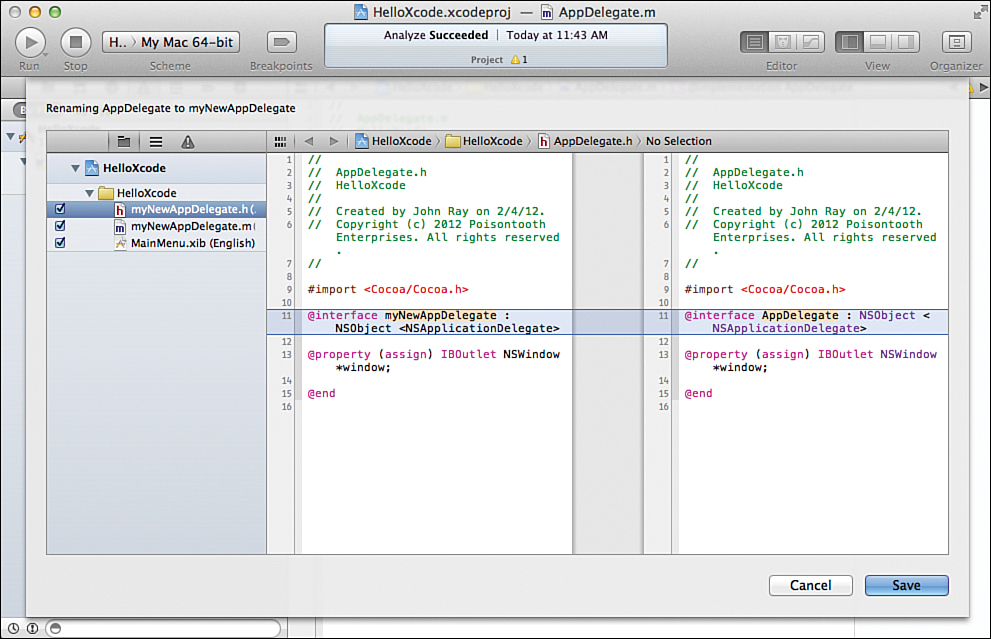
Figure 6.22. Confirm the changes that will be made.
From this window, you can choose which files to change (check or uncheck the boxes in front of their names) and even edit the code directly in the comparison views.
4. Click Save to make the changes across the entire project.
The remaining refactoring options work in a similar way, but with different effects.
Extracting
If you find that you have written code for a method but that code would be better suited in its own method or function that is called by the current method, you can use the Extract function. Simply select the code you want to move out of the current method, and then choose Edit, Refactor, Extract.
You are prompted for the new function or method name, then presented with a preview of the change. Xcode automatically analyzes the code to determine what parameters are necessary for the new method, and even includes the method/function call in your original method.
Watch Out!: Double-Check Xcode’s Work!
Be sure to double-check the methods that Xcode creates when using the Extract feature. I have had mixed results with its ability to correctly parse the method parameters.
Creating Superclasses
Sometimes, when writing a class, you might discover that it would have made more sense for the class you’re building to be a subclass of a larger superclass. To quickly create a superclass, select the class name, and then choose Edit, Refactor, Create Superclass, and, again, follow the onscreen prompts to name and save the new class file.
Moving Up/Down
After creating a superclass (or if you already have one), it might make sense to move some of the variables or methods from your current class into the superclass. Conversely, you might have a superclass symbol that make more sense being contained in one of its subclasses. Use the Edit, Refactor, Move Up/Down functions to move a variable/method into a class’s superclass or a superclass’s variable/method into a subclass.
Encapsulating
When you use the Edit, Refactor, Encapsulate action on an instance variable, it creates explicit getters and setters for that variable. In most cases, however, the @property/@synthesize combination should be enough to handle setting up your accessors.
By the Way
If you need a refresher on instance variables, classes, setters, getters, and so on, refer back to Hour 2, “Just Enough Objective-C and Cocoa.” These are important concepts to understand, so be sure you have got a good grip on the basics before moving on.
Using Code Snippets
When you are writing code, you will often find yourself typing statements that are very similar to one another: catch-try blocks, if-then statements, switch statements, and so on. Instead of having to remember the syntax of each of these common code sequences, you can make use of the built-in Xcode Code Snippet Library.
You can access the Code Snippet Library from the Xcode Source Editor by choosing View, Utilities, Show Code Snippet Library, or by pressing Control+Option+Command+2. The library appears in the Utility area and is represented by the {} icon, as shown in Figure 6.23.
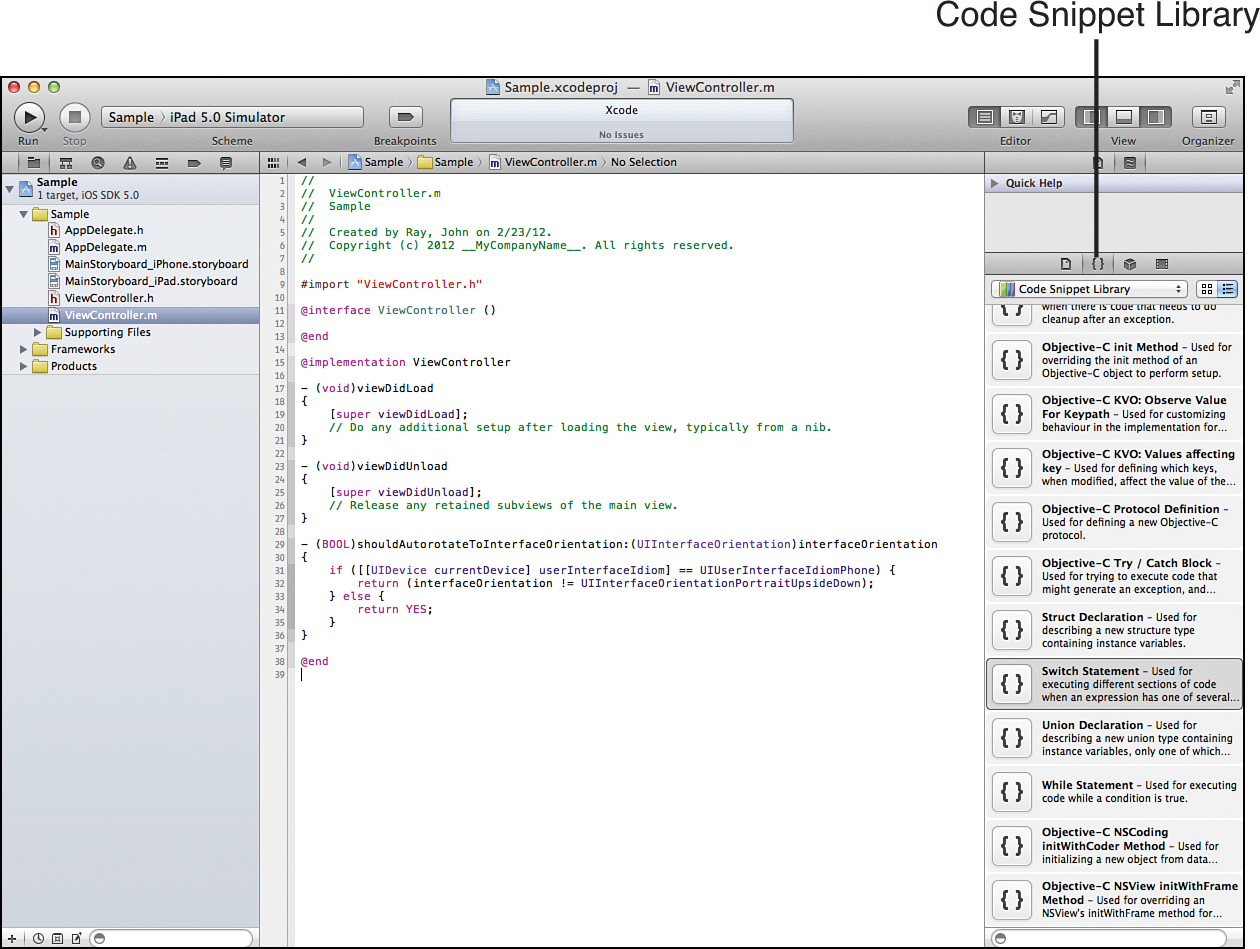
Figure 6.23. The Code Snippet Library contains snippets of useful code.
Viewing Snippets
To view what a snippet contains, click its entry in the library. A popover window appears displaying the contents of the snippet, as shown in Figure 6.24.
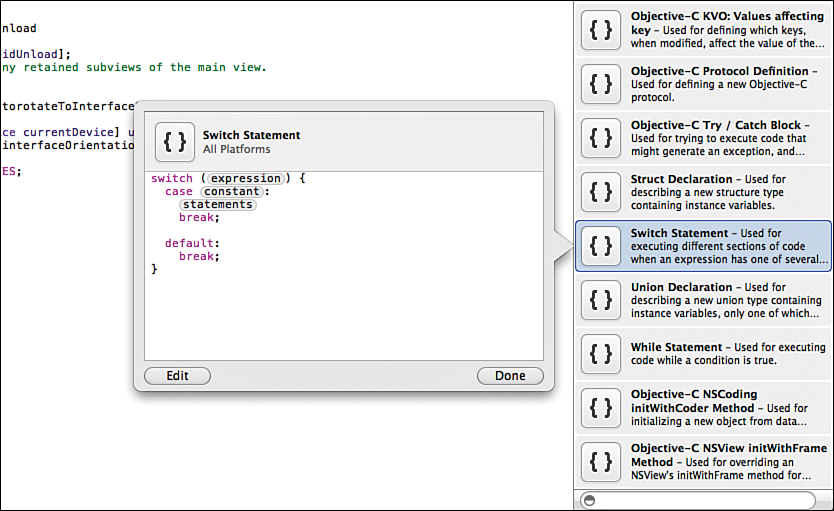
Figure 6.24. View the contents of a snippet.
Notice that certain parts of the snippet are highlighted in gray. These represent portions of the code that you need to provide. When a snippet is inserted into your code, you can use the Tab key to jump between these areas. Click the Done button when viewing the snippet code to hide the popover.
Inserting Snippets
To insert a code snippet into your class files, just drag and drop from the Code Snippet Library into your code. Wherever your cursor points, the snippet is inserted, exactly as if you had typed the code yourself.
Adding Snippets
Not only can you use the existing snippets to help code, but when you write useful code sequences of your own, you can add them to the Code Snippet Library as user-defined snippets. To do this, follow these steps:
1. Select the code in the Source Editor that you want to turn into a snippet.
2. Make sure the Code Snippet Library is visible (Control+Option+Command+2).
3. Click and drag from the selected text to the Code Snippet Library, as shown in Figure 6.25.
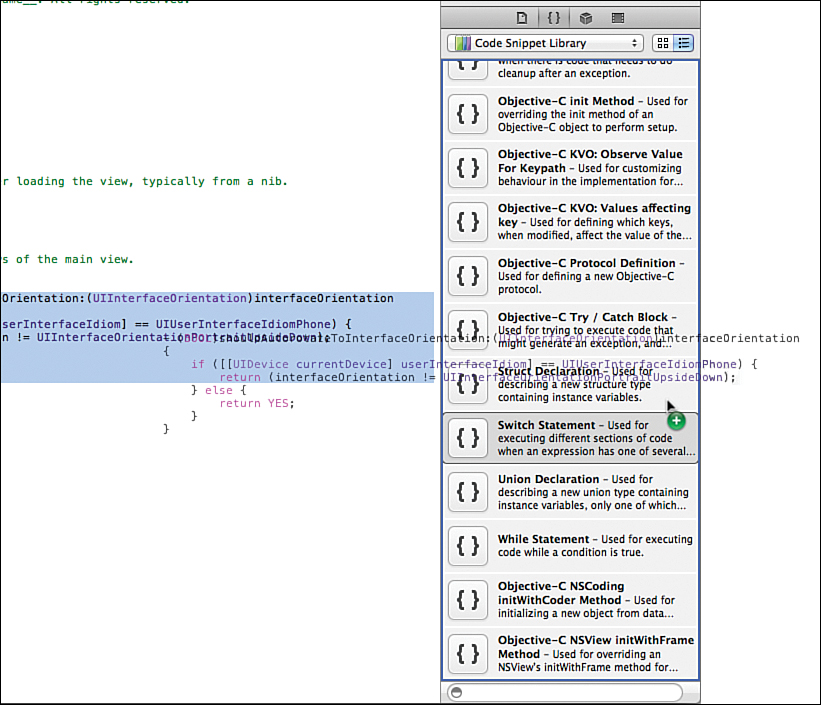
Figure 6.25. Drag the code to the Code Snippet Library.
The text is added to the library under the title My Code Snippet, as shown in Figure 6.26.
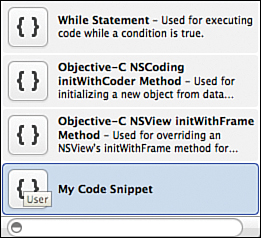
Figure 6.26. The new snippet is visible in the library.
Because the default name is not very descriptive, you will probably want to edit it to reflect its purpose.
Editing Snippets
To edit a snippet you have defined, follow these steps:
1. Click it in the library so that the popover appears displaying its code.
2. Click the Edit button in the lower-left corner. Figure 6.27 shows a snippet in edit mode.
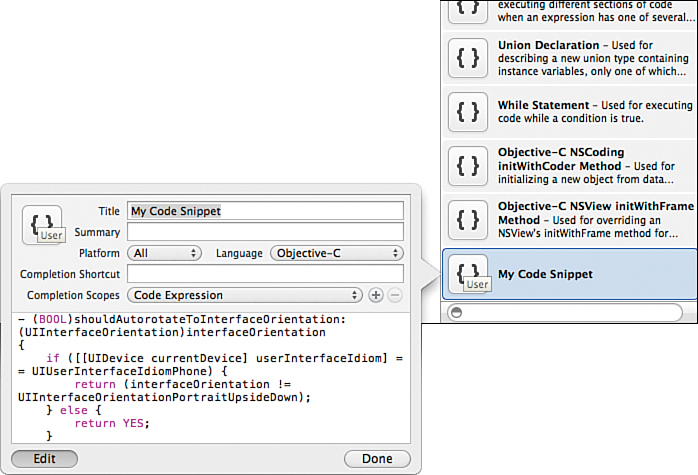
Figure 6.27. Edit the snippet and the information stored about the snippet.
3. Use the fields in the Source Editor to set a title and summary for the snippet and define the platform and development language the snippet applies to.
4. Enter a shortcut that can be typed to automatically insert the snippet and the different areas (scopes) within a typical source file where the completion shortcut should be active.
5. Click Done to save the snippet.
By the Way
To remove a snippet from the library, just click once to select it in the Code Snippet Library and then press the Delete key on your keyboard.
Summary
In this hour, you learned how to use the Xcode Source Editor for more than just typing text. We looked at special features like automatic code completion, auto-indentation, and code folding. You also learned how the Assistant Editor mode makes working on multiple related files a pain-free process.
In addition to the Source Editor itself, you explored the tools for identifying and correcting errors in your code, for searching and replacing text across your entire project, and for refactoring existing code. Although it is technically true that you can develop an application using any text editor you want, using Xcode gets you best-of-breed tools that are specific to the language and methodology of the Apple development platform.
Q&A
Q. I really hate editing files in a huge window. Can I break out into just a single window per file?
A. Yes. Just double-click the file in the Navigator to open a new window with all features disabled except the Source Editor. You can turn this into a single-click in the Xcode preferences if you prefer.
Q. I’m confused. What is a symbol?
A. Think of a symbol as anything you’ve named within your code. Typically, this means variables/properties—but it can also be method names, class names, and so on.
Q. Xcode keeps autocompleting methods that I don’t want. What do I do?
A. Unless you press Tab or the arrow keys, Xcode will not autocomplete at all. You can either just keep typing and enter the full name yourself, or you can disable autocompletion in the Text Editing area of the Xcode preferences.
Workshop
Quiz
1. I use a MacBook for my development. How will I ever get the Assistant Editor to fit on my screen?
2. Besides the Assistant Editor, you can only have a single file open at once. True or false?
3. It is impossible to easily rename a class after creating it. True or false?
Answers
1. Learn to use the View buttons on the Xcode toolbar. If you disable the Project Navigator and Utility area, you’ll find that the Assistant Editor fits quite nicely on your screen.
2. False. Using the tabbed editing feature, you can open as many files simultaneously as you want, using the tabs below the Xcode toolbar to switch between them.
3. False. The Rename refactoring tool simplifies the process of changing a class name after the fact.
Activities
1. Using the sample project you created this hour, walk through the different features of the Source Editor and Assistant Editor. Try your hand at Edit All in Scope and refactoring.
2. Create errors your HelloXcode application by duplicating lines or methods in the AppDelegate class files. Add a few lines with arbitrary text for good measure. Note where and when Xcode detects the errors. Does it find all the erroneous lines at once, or does it present one error, which, when fixed, shows another, and so on? Get used to this behavior; it is rare you’ll write perfect code, and knowing how Xcode presents errors and warnings is a big help when things do not work right.