8. Preparing Images for Different Media
In this lesson you’ll learn how to intelligently prepare and manage images for use across different media:
• Understanding the multiple meanings of resolution and how they apply to different media
• Adjusting image size as you crop
• Sharpening images for different media
• Preparing image color for different media
• Inspecting and changing image resolution in various Adobe software applications

You’ll probably need between one and two hours to complete this lesson.
Learn how to optimize the size, resolution, and color of a source image so that it reproduces well in print, on the web, and on mobile devices.
One Image, Multiple Paths
An image today can be reproduced in many different ways. Unlike the time when an image’s only destiny was to be printed on a press, now an image can also be shown on a website or displayed in a video. These media have very different reproduction requirements, so if you want your images to look their best, use Adobe Creative Suite 6 Design & Web Premium to properly optimize versions of an image for different media. For example, it’s important to prepare images for a website at a size that’s appropriate for the connection speed of the site’s audience so that the website loads quickly. Preparing images in the correct color space helps ensure that image colors are spot on.
When you prepare an image for output on only one device, such as a press, you can simply edit the image as needed and archive it when the job is done. But when you know an image will be used in multiple media, you need to do a little more advance planning. Every output device—from a press to a tablet to an inkjet printer—has its own capabilities and limitations, so optimizing an image for one specific device may make it work less well on other devices. For example, if you convert an RGB image to CMYK color for a printing press, and then later create a copy of that CMYK image for the web, its colors may appear dull compared to if you had created a web version from the original RGB image. Similarly, taking a low-resolution image from a website and printing it on a printing press may result in a coarse-looking image due to inadequate resolution. In both cases, the best solution is to produce each media-specific version from the original, or master, image. The master image can be a camera raw image or a digital negative (DNG) file if all necessary corrections were completed in Adobe Camera Raw, or it can be a layered Photoshop document containing your edits. If the image is a graphic drawn from scratch, it can also be an Adobe Illustrator (AI) document or an Adobe Fireworks (PNG) document.
Adobe Creative Suite 6 Design & Web Premium is built to help you optimize images for different media. You can use Adobe Photoshop, Adobe Illustrator, and Adobe Fireworks to easily export a web-optimized duplicate of an image that leaves the master (original) image untouched.
Image Resolution and Media
The number of pixels you send to a printer or a screen affects your production efficiency and your viewer’s experience. Send an image with too few pixels and the image looks coarse and blocky. Send too many pixels and you’ll slow downloading, viewing, and printing. Fortunately, Adobe Creative Suite 6 Design & Web Premium provides ways to inspect and adjust resolution while preserving quality.
Understanding the multiple meanings of resolution
In digital design, the term resolution is used in different ways:
• As pixel dimensions, such as 1024 x 768 pixels. This is typically used for onscreen media such as web and video, as well as for cameras. You’ll probably also recognize this usage from the specifications for computer and video displays; for example, 1920 x 1080 pixels is the display size for 1080p HD televisions.
The abbreviations ppi (pixels per inch) and dpi (dots per inch) are both used to describe resolution as pixel density. Generally, ppi is used when measuring pixels (picture elements) in an image file or on a monitor, whereas dpi is generally used when referring to dots on printed output.
• As a measure of pixel or printed dot density, such as 300 pixels per inch. Expressing resolution as a ratio is typically done when referring to printed output. However, it’s starting to work its way into discussions of displays such as tablets and smartphones as their pixel density approaches that of print, for instance the 326 ppi display of the iPhone 4S. Thinking of resolution this way requires both horizontal and vertical pixel dimensions, as well as a physical measurement, such as inches. For more information, see the sidebar “Preparing graphics for high-resolution displays” later in this lesson.
• As megapixels. This is simply the number of pixels in an image expressed in millions of pixels; 1 megapixel is 1 million pixels. You usually see resolution expressed as megapixels in the specifications for digital cameras. Megapixels are directly related to the pixel dimensions of the images produced by a digital camera, so it’s easy to work out the megapixel resolution of any image. For example, to find out how many megapixels are in a digital camera image that’s 4500 x 3000 pixels, simply multiply the two dimensions: 4500 times 3000 equals 13,500,000 pixels, or 13.5 megapixels.
In conversation, these different meanings for resolution can cause confusion, so keep these differences in mind as you work in various media. Later in this lesson you’ll learn how to inspect images for both pixel dimensions and density.
Typical media resolutions
As you prepare images for various media, what resolutions should you aim for? This overview provides some guidelines for sizing images for various media, and later in this lesson you’ll adjust an image to various media sizes.
Online media
When you’re designing for onscreen media, such as websites, video programs, or mobile devices, you’ll want to determine the space available to the image in the design as expressed in pixel dimensions. In conventional web design, the pixel dimensions of a web page are based on the pixel dimensions of the typical display used by the target audience, and the pixel dimensions of individual images are designed to fit within that layout. For example, a web designer might design based on an assumption that a site will be viewed mostly on netbook displays that are 1024 pixels wide.
However, that practice is rapidly changing as more sites accommodate mobile devices, which have a very wide range of screen sizes. It’s no longer practical to assume one or two primary screen sizes. Web designers are moving toward modular page designs that can automatically recompose themselves into smaller yet still readable chunks based on columns, as you saw in Lesson 5, Building a Website. It is increasingly likely that the pixel dimensions of web graphics will fit into these smaller chunks so that they can display as effectively on mobile device displays as they do on desktop displays.
For any online medium, remember to increase the pixel dimensions of an image if the image will be magnified, so that it still appears detailed after it’s enlarged. For example, if you expect a 1080p video to zoom into an image 200%, instead of creating a 1920 x 1080 pixel image you’ll want to scale each dimension by 200%, resulting in a 3840 x 2160 pixel image.
Video projects, such as the kind you can create in Adobe Photoshop, still use fixed frame sizes. If you want an image to fill the screen, determine the pixel dimensions of the video standard, and then resize or crop the image as needed. For example, if you’re creating a 720p HD video, you should create images that match the 1280 x 720 pixel dimensions of that video standard.
Printed media
The resolution requirements for printed media are not always straightforward. Just because an inkjet printer creates output at 2880 dpi does not mean you should save images at 2880 dpi; in fact, it’s very unlikely that you would because most printing technologies create colors and tones by combining printer dots into larger cells or patterns. In general, you’ll find the following guidelines to be helpful:
• For general office use or for documents you’ll photocopy, it’s usually best to use image resolutions between 150 and 300 dpi.
For prepress output, you may hear the term lines per inch or lpi, also called a screen frequency or screen ruling. This is a different value than dpi or ppi, and describes the number of lines of halftone cells per inch. Halftone cells are a method for creating the illusion of gray shades using solid black ink, and each cell is built out of multiple printer dots. For example, you may be asked to provide 300 dpi images for 150 lpi output on a 2400 dpi imagesetter.
• For prepress or fine-art printing, images are typically reproduced at 240 to 360 dpi. However, the more expensive the job, the more you’ll want to consult with your prepress service provider before committing to the job to find out what resolution you should target when preparing images, based on the specific printing system your service provider uses.
• Viewing distance can affect resolution requirements. For example, a roadside billboard or large banner can be printed at 100 dpi because it won’t be seen up close. An image’s pixel density of 150 dpi at arm’s length becomes an effective pixel density of 300 dpi simply by doubling the viewing distance. Your service provider can advise you on the optimum resolution for the printing medium and viewing distance of your job.
Image Color and Media
Different media have varying color requirements:
• Online media use color specified using the RGB color mode, either as RGB values (such as red 108, green 18, and blue 172) or a hexidecimal value (#6c12ac).
• Printed media intended for a press typically uses color specified using the CMYK color mode (such as cyan 72%, magenta 95%, yellow 0%, black 0%).
• Although printing ink is typically based on the CMYK color mode, some printing processes may expect to receive color specified using the RGB color mode if the conversion to CMYK will happen after the job is sent to the printer, for example, when colors are converted by the printer driver behind the scenes. This is the case with most desktop inkjet printers and some on-demand presses.
Within a color mode, multiple color spaces are possible. Color spaces are variations commonly based on the particular color range that a display or print device can actually reproduce. You can read a more complete explanation of color management in Lesson 10, but for this lesson, you’ll convert online RGB colors to the sRGB color space, which is a standard for both the web and computer monitors. You’ll also convert print colors to a generic CMYK color space—although for an actual print job you’d convert CMYK color to the color space of a specific press standard.

The color picker in Adobe Photoshop lets you specify color values in different color modes, including HSB (Hue, Saturation, Brightness), RGB, hexadecimal for the web, and CMYK.
Preparing Graphics for the Web or Mobile Devices
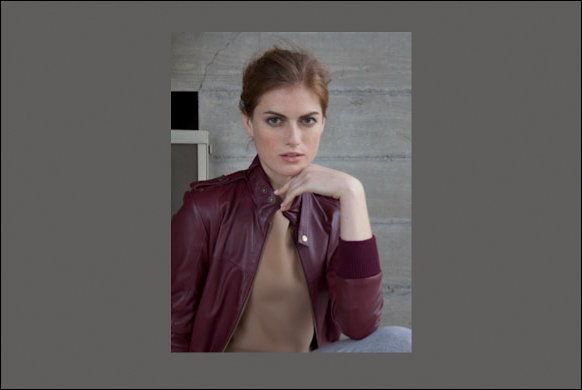
Now you’ll walk through preparing an image for online media. The image starts out as a DNG (digital negative) file from a digital camera. You’ll make the necessary corrections to size, resolution, and color.
Exporting images for online media using only Bridge and Camera Raw
For this part of the lesson, you’ll create a graphic that’s 240 pixels wide and 320 pixels tall to fit in a mobile-friendly web page layout.
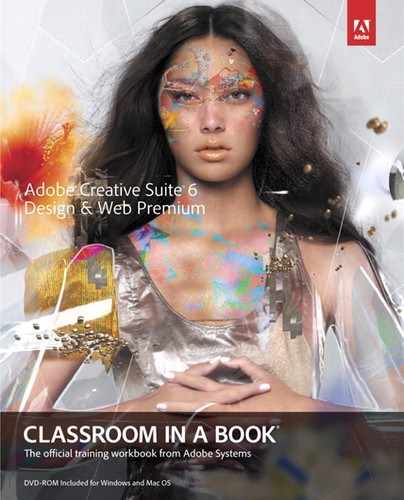
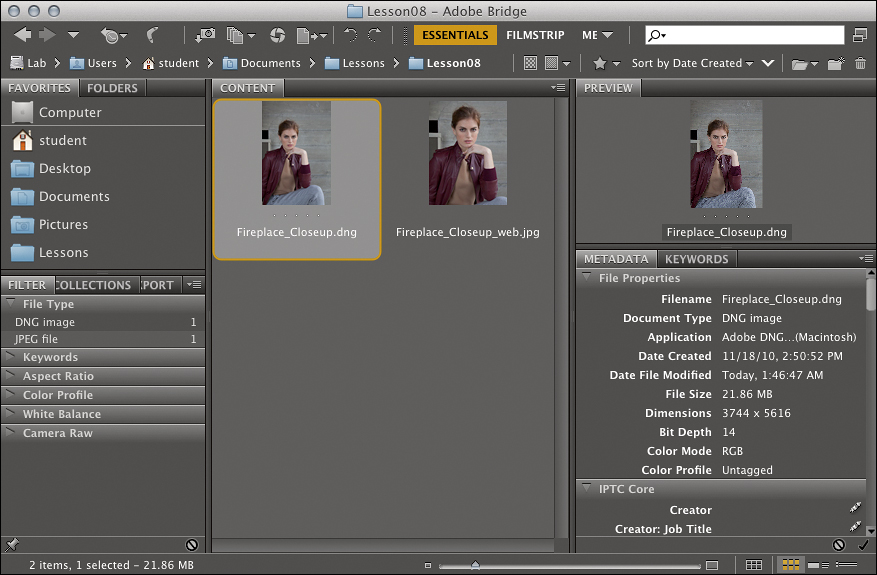
1. In Adobe Bridge, navigate to the Lesson08 folder in your Lessons folder.
2. Select the file Fireplace_Closeup.dng.
3. If the Metadata panel isn’t visible, choose Window > Metadata Panel.
In the Metadata panel, note the Dimensions, Color Mode, and Color Profile sections. The Dimensions are the pixel dimensions, the Color Mode is RGB, and the Color Profile is “Untagged” because it’s a camera raw file. The Metadata panel in Adobe Bridge is a great way to check file specifications without opening them.
Now you’ll take the steps necessary to meet the specifications from the website.

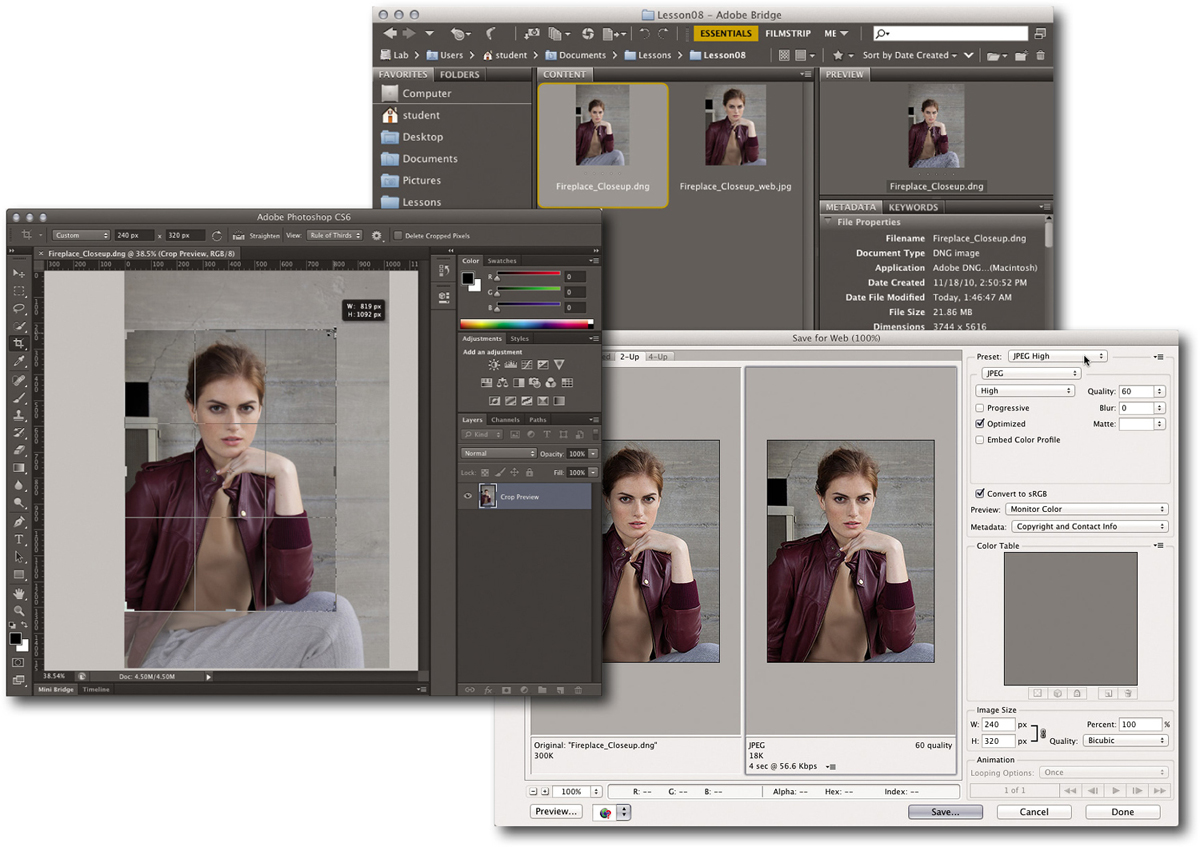
4. Choose File > Open in Camera Raw.
This lesson concentrates on the production aspects of the image, not basic image correction, so you won’t make other adjustments in Camera Raw. You’ll set up options that affect the conversion to Photoshop and then proceed directly to Photoshop.
5. Click the underlined link text at the bottom of the Camera Raw dialog box.
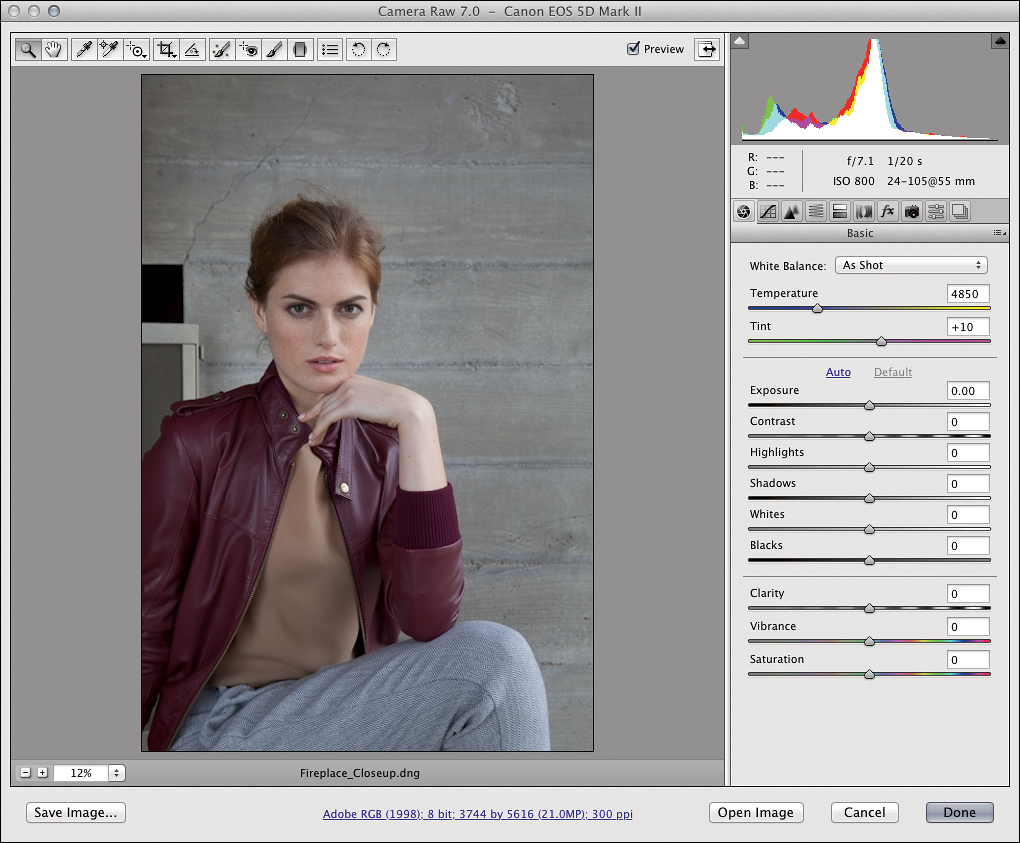
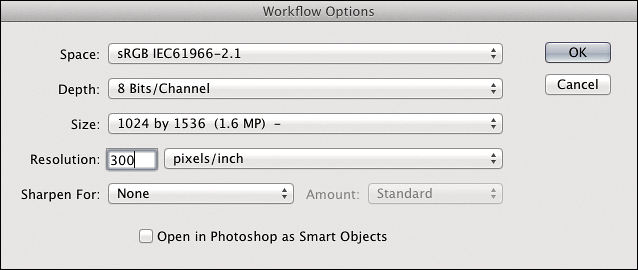
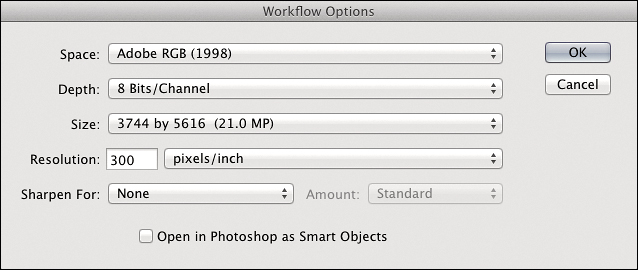
6. In the Workflow Options dialog box that appears, set Space to sRGB, set Depth to 8 Bits/Channel, leave Size and Resolution unchanged (more on that in a moment), and for the Sharpen For option, select Screen.
The Workflow Options dialog box has no immediate effect on the raw file: It affects the conversion to another format, such as when you open the raw file in Photoshop or save directly from Camera Raw.
7. Click OK.
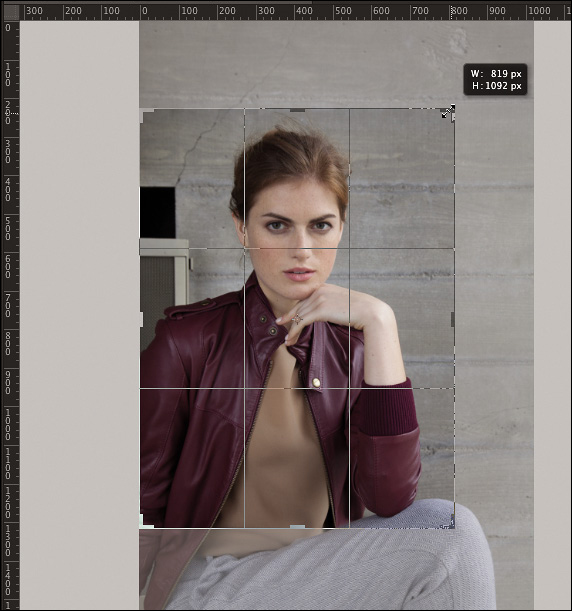
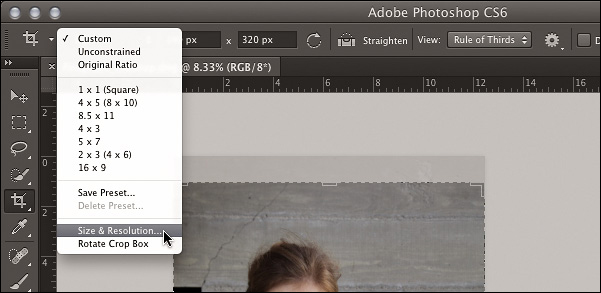
8. Hold the mouse on the Crop tool (![]() ) and choose Custom from the Crop tool menu.
) and choose Custom from the Crop tool menu.
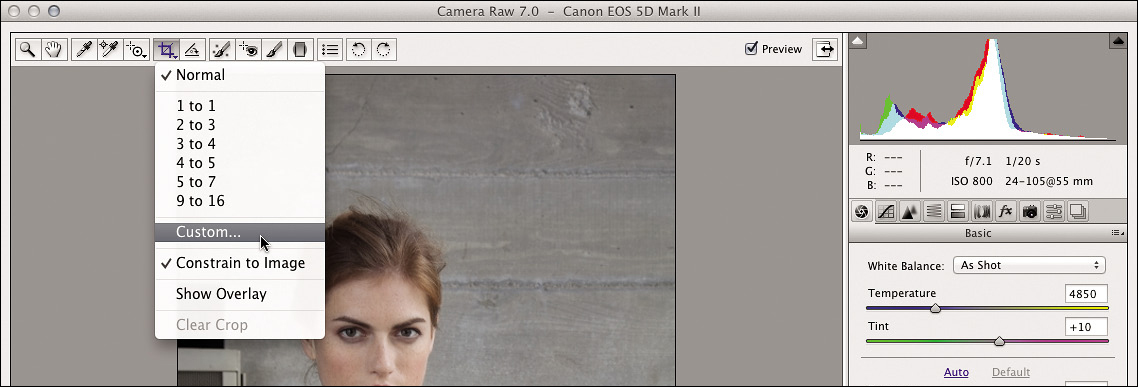
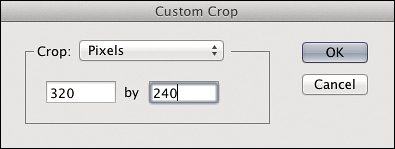
9. In the Custom Crop dialog box that appears, choose Pixels from the Crop menu, enter 320 by 240, and click OK.
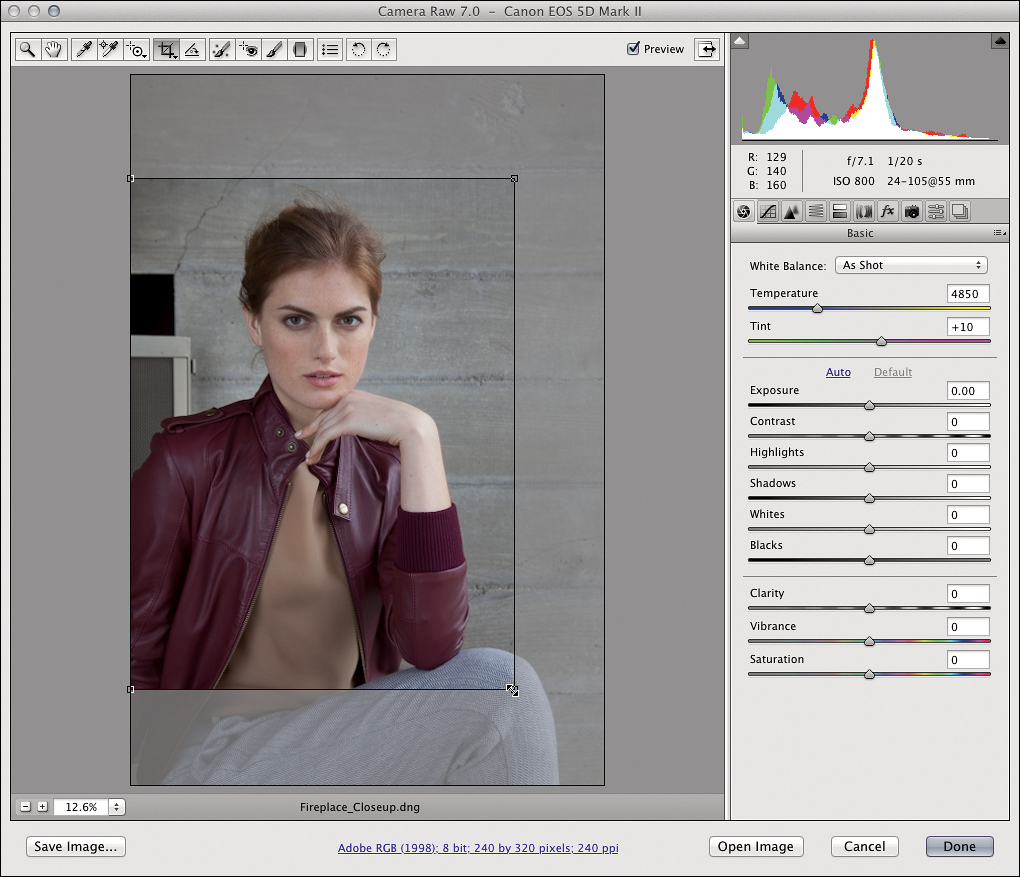
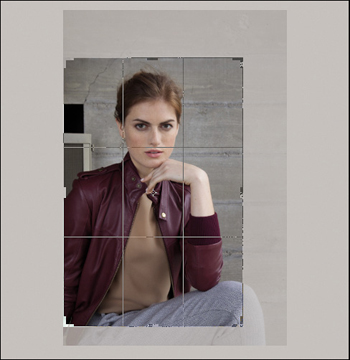
10. Using the Crop tool, drag a crop rectangle around the model, and press Enter/Return.
11. Click the Save Image button, and in the Save Options dialog box, do the following:
• Click the Select Folder button and set the location to your Lesson08 folder.
• For File Naming, choose Document Name for the first field, and enter _web for the second field.
• Choose JPEG from the Format menu.
• Set Quality to High (8-9).

12. Click Save to close the Save Options dialog box.
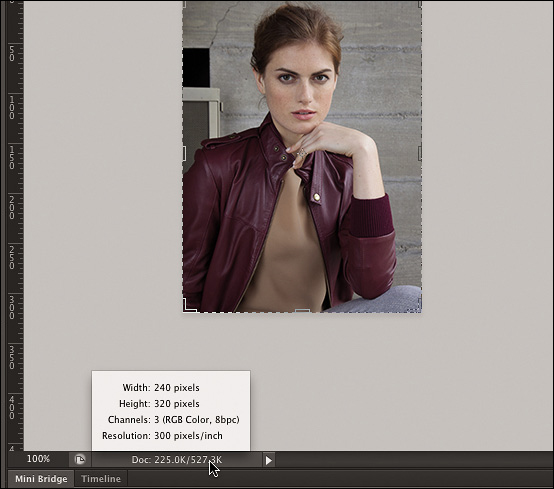
13. Click Done. In Adobe Bridge select the Fireplace_Closeup_web.jpg image you just saved.
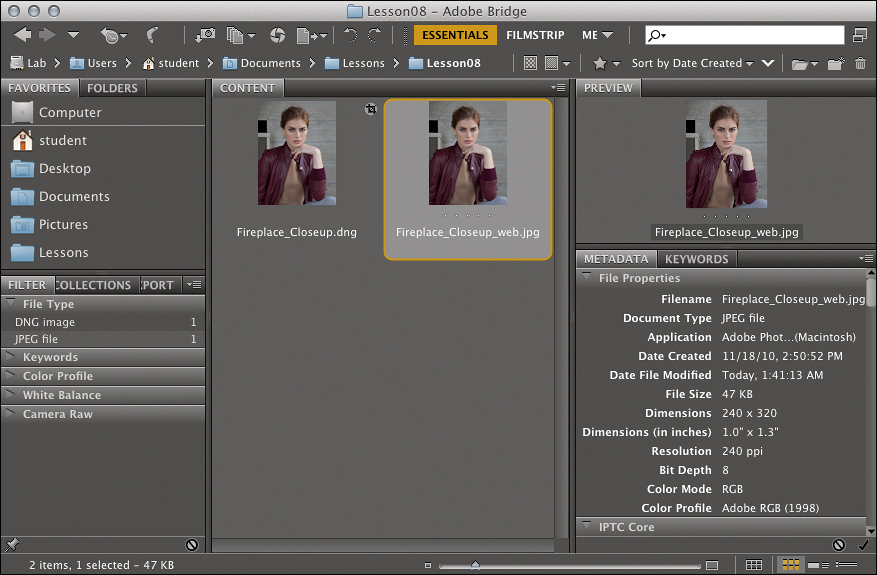
14. In the Metadata panel, notice that the Dimensions are 240 by 320 pixels because of your Crop tool settings, and the Color Profile is sRGB because of your Workflow Options settings.
And even though you left the Workflow Options dialog box set to the image’s original pixel dimensions (3744 by 5616 pixels), the final dimensions were dictated by your Crop tool settings of 240 by 320 pixels.
You might also have noticed that the Resolution setting in Workflow Options was left at 240 ppi and remained that way in Adobe Bridge. Most websites and mobile devices don’t use a ppi or dpi resolution value; instead, it’s the pixel dimensions that are important. So, for online media full-screen it typically doesn’t matter what ppi value you use.
15. Press the spacebar to display your web image in full-screen view. Press the left arrow key to view the DNG file you cropped; it will look less sharp because of the sharpening you applied in the Save dialog box.
16. Press the spacebar to close the full-screen view.
Exporting images for online media using Photoshop
In the previous example, you were able to crop an image to specific pixel dimensions and set its color space to sRGB using Adobe Camera Raw without entering Photoshop. If the edits you need can be accomplished by the tools in Camera Raw, you can stay in Adobe Bridge and quickly export web images from Camera Raw. But because you sometimes need to use the additional tools in Photoshop, you’ll take a look at that in this section.
1. In Adobe Bridge, select the file Fireplace_Closeup.dng in your Lesson08 folder.
You don’t want to create a new version from the optimized JPEG image you just exported, so you’ll begin by selecting the full-quality master image.
2. You’ll be using the Crop tool in Photoshop, so with Fireplace_Closeup.dng still selected in Adobe Bridge, choose Edit > Develop Settings > Clear Settings to revert the raw file to its original state. The image regains the area you cropped out earlier, because cropping in Camera Raw isn’t a permanent change.
3. With the image still selected, press Enter/Return. This time, instead of opening in Camera Raw hosted by Adobe Bridge, the file opens in Camera Raw hosted by Photoshop. If Photoshop isn’t already open, it may take a few seconds to load.
4. Click the underlined link text at the bottom of the Camera Raw dialog box. You’ll use slightly different settings this time because you’ll be cropping and sizing in Photoshop instead of Camera Raw.
5. In the Workflow Options dialog box, do the following:
• Leave the Space at sRGB and the Depth at 8 Bits/Channel.
• Because you only need a 320-by-240-pixel image, choose the smallest Size setting, 1024 x 1536 (1.6 MP). By converting fewer pixels, Photoshop will work faster and use less memory.
• Set the Resolution to 300 pixels/inch.
• In the Sharpen For menu, choose None. You could leave it set to Screen if you did not plan to sharpen any further, but typically output sharpening should be left as the last step, and Photoshop has more sharpening options than Camera Raw.
6. Click OK to close the Workflow Options dialog box
7. Click Open Image.
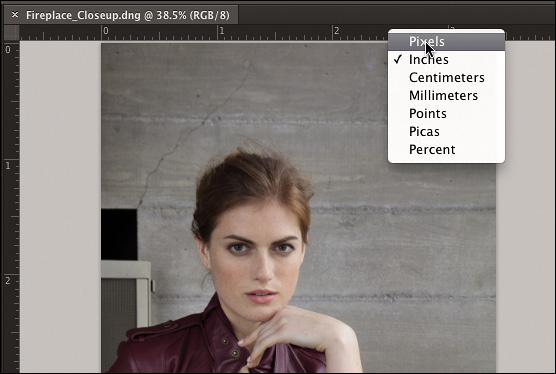
8. Choose View > Rulers. If they’re currently set to inches, right-click/Control-click a ruler and choose Pixels.
9. Select the Crop tool. In the Options bar, enter dimensions of 240 px x 320 px. Typing px after the dimension value tells Photoshop to use pixels as the unit of measure for the crop rectangle.
10. Adjust any side or corner of the crop rectangle until the image is properly composed, and then press Enter/Return.
11. Choose View > Actual Pixels to see the image at 1:1 magnification.
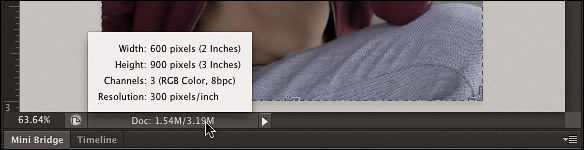
To permanently display the dimensions of a document in the status bar, click the triangle to the right of the status bar and choose Document Dimensions.
12. Click the status bar at the bottom of the document window. You can use this display to confirm that the document dimensions are correct.
In the Smart Sharpen dialog box, you can compare the sharpening settings to the unsharpened image in two ways. Select the Preview check box (or press P) to toggle between the sharpened and unsharpened images in the document window, or hold down the mouse on the preview inside the Smart Sharpen dialog box.
13. Choose Filter > Sharpen > Smart Sharpen, choose Lens Blur from the Remove menu, and adjust Amount and Radius until the image is pleasingly sharpened. You can use the settings in the following figure as a guideline.

14. When you’re done, click OK to close the Smart Sharpen dialog box.
15. Choose File > Save for Web. You’ll find that this dialog box gives you more options than the Save dialog box in Camera Raw.
16. In the Save for Web dialog box, do the following and then click Save:
• Click the 2-Up tab, and choose JPEG High from the Preset menu.
• Examine the Original and JPEG tabs to make sure the image appearance and file size are acceptable. If they aren’t, you can change the optimization settings in the top-right corner of the Save for Web dialog box.
• Make sure Convert to sRGB is selected to ensure that whatever the original color space was it will be properly converted for online media here.
• Look at the Image Size options to verify they’re correct. The Image Size options are an alternate way to resize an image if the image is already cropped to the correct proportions.
17. Click Save to close the Save for Web dialog box.

18. Click the Save button, and in the Save Optimized As dialog box, navigate to your Lesson08 folder, name the file Fireplace_Closeup_web2.jpg, and click Save. If you see a compatibility warning about filename characters, click OK to accept it.
19. Close the Photoshop document. When asked if you want to save changes, click Save, name it Fireplace_Closeup_web2.psd, and save it to your Lesson08 folder.
if you want to compare specific images in full-screen mode, select them before pressing the spacebar so that they are the only images you’ll cycle through. If you want to see images side by side, select them and make the Preview panel larger.
20. Switch to Adobe Bridge, select the Fireplace_Closeup_web2.jpg, and press the spacebar to view it full screen. You can compare it to the other JPEG image you exported earlier.
You’ve tried two ways to prepare an image for online media: editing through Camera Raw and editing through Photoshop, and in both cases you used Adobe Bridge to inspect images before editing and to verify them after editing.
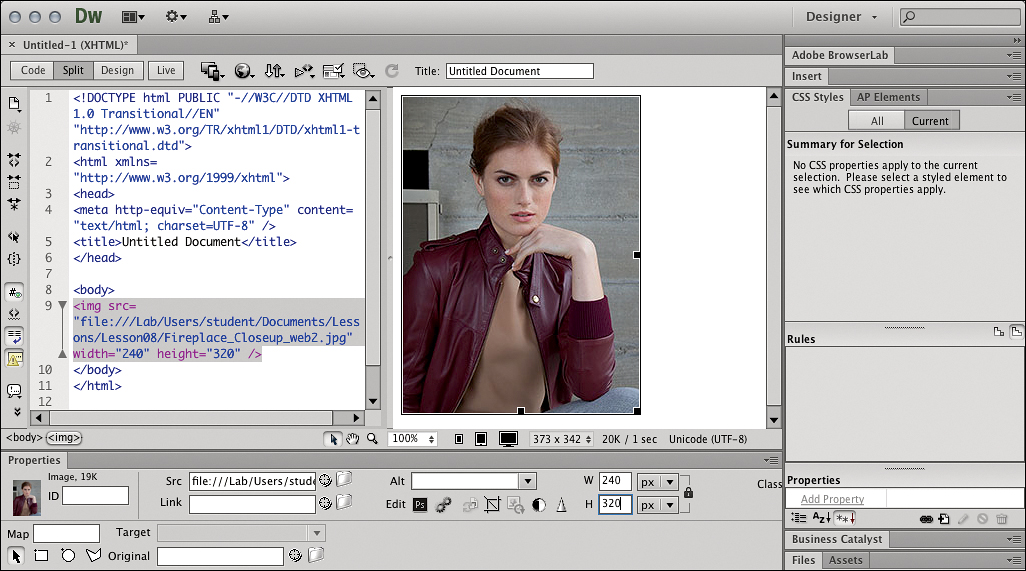
Inspecting image size in Dreamweaver
When you import an image into Dreamweaver, you can easily check its size and resize it if needed.
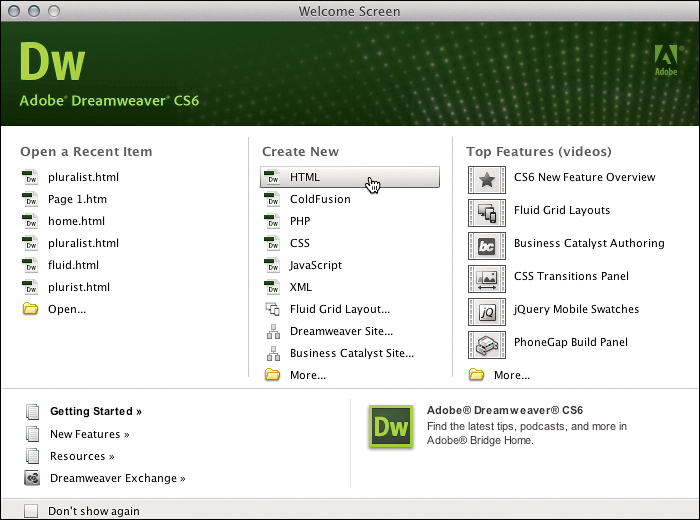
1. Start Dreamweaver, and in the Create New section of the Welcome Screen, click HTML.
2. Position the Dreamweaver and Adobe Bridge windows so that you can see both.
3. Switch to Adobe Bridge, and drag one of the JPEG images you exported into the Design view on the right side of the split Dreamweaver window. Click OK or Save in any dialog boxes that follow; Dreamweaver is ensuring that the image is copied within the folder structure of the site.
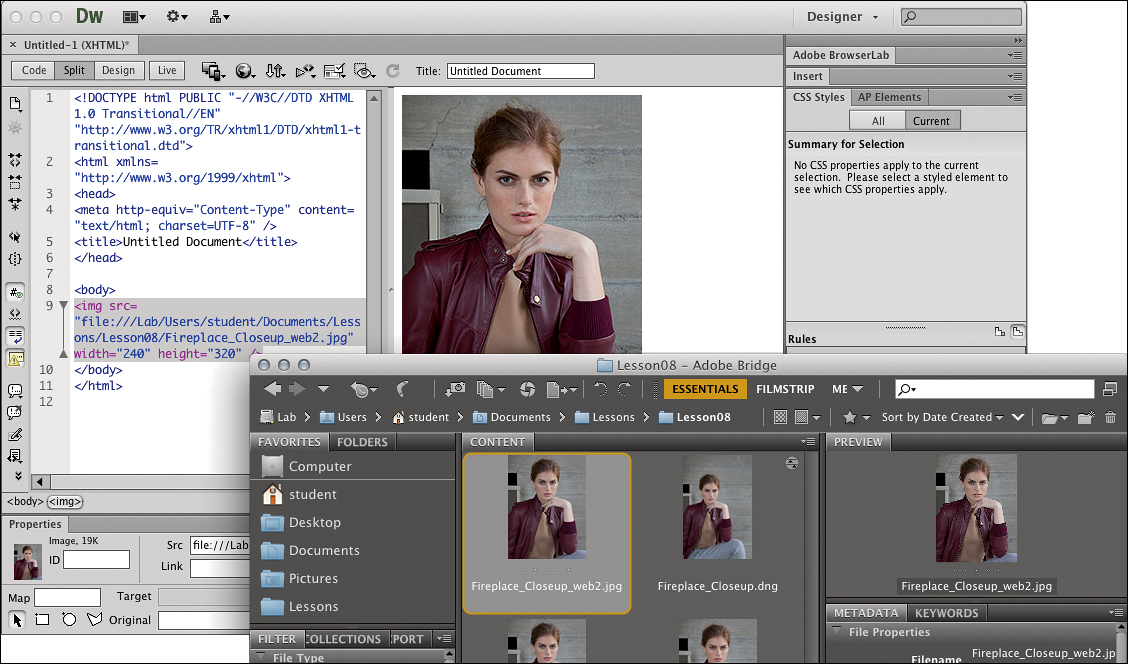
4. With the image selected, notice that there are width (W) and height (H) options in the Properties panel at the bottom of the Dreamweaver window. You can use these options to verify image dimensions when you design a web page. You can also change these values to resize an image on a layout, but this is not as optimal as resizing the image in Adobe Photoshop or Adobe Fireworks.
5. Exit Dreamweaver. When asked to save changes, click Don’t Save.
You’ll find a similar Properties panel in Adobe Fireworks, and in Adobe Flash you’d check the image size in the Position and Size panel.
Preparing Graphics for Print
Now you’ll walk through preparing the same DNG image for a job going to press, making necessary corrections to size, resolution, and color.
Exporting images for print media using Photoshop
For this part of the lesson, you’ll create a graphic that’s 2-inches wide and 3-inches tall to fit in a page layout for printed output.
1. In Adobe Bridge, select the file Fireplace_Closeup.dng in the Lesson08 folder in your Lessons folder, and press Enter/Return to open it in Camera Raw hosted by Photoshop.
Again, to create a new version at optimal quality, you start from the original, not from any of the derivative JPEG versions you’ve already created.
2. Click the underlined link text at the bottom of the Camera Raw dialog box.
3. In the Workflow Options dialog box that appears, do the following:
• Set Space to Adobe RGB, which better accommodates the range of colors in the CMYK color mode into which the image will be converted later in Photoshop.
• Set Depth to 8 Bits/Channel.
• Set Size to 3744 by 5616 (21.0 MP). Note that this is the one option in the Size menu that doesn’t have a minus or plus sign after it. This means it’s the native size of the image—Camera Raw won’t enlarge or reduce it.
• Set Resolution to 300 pixels/inch.
• Set the Sharpen For menu to None.
4. Click OK to close the Workflow Options dialog box.
As in the earlier example for online media, this lesson concentrates on the production aspects of the image, not basic image correction, so you won’t make other adjustments in Camera Raw; you’ll proceed directly to Photoshop.
5. Click Open Image to convert the raw image into Adobe Photoshop format using the settings in the Workflow Options dialog box.
6. If the rulers aren’t visible, choose View > Rulers to display them. If the rulers display in pixel units, right-click/Control-click the rulers and choose Inches from the context menu that appears.
7. Select the Crop tool. The Options bar probably retained the settings you entered earlier for online images; you’ll need to change those now.
8. In the Options bar, choose Size & Resolution from the Crop tool options menu, and do the following:
• Set the Width and Height menus to Inches.
• Enter a Width of 2, a Height of 3, and a Resolution of 300 Pixels/Inch.
• Select Save as Crop Preset.
Creating a new crop preset means that if you need to use the Crop tool with the same settings in the future, you can simply choose that preset from the Crop tool options menu.

9. Click OK.

10. Adjust any side or corner of the crop rectangle until the image is properly composed, and then press Enter/Return.
11. Choose View > Fit on Screen to see the entire image.
For the web image you created earlier, you used the View > Actual Pixels command, but the pixel dimensions of this image are so much higher that on some monitors Actual Pixels may be too large for the display.
To permanently display the dimensions of a document in the status bar, click the triangle to the right of the status bar and choose Document Dimensions.
12. Click the status bar at the bottom of the document window to confirm that the document dimensions are 2 by 3 inches and the resolution is 300 ppi. The Crop tool accomplished both resizing and setting the resolution in one step.
13. Choose Filter > Sharpen > Smart Sharpen, choose Lens Blur from the Remove menu, and adjust Amount and Radius until the image is pleasingly sharpened. You can use the settings in the following figure as a guideline.
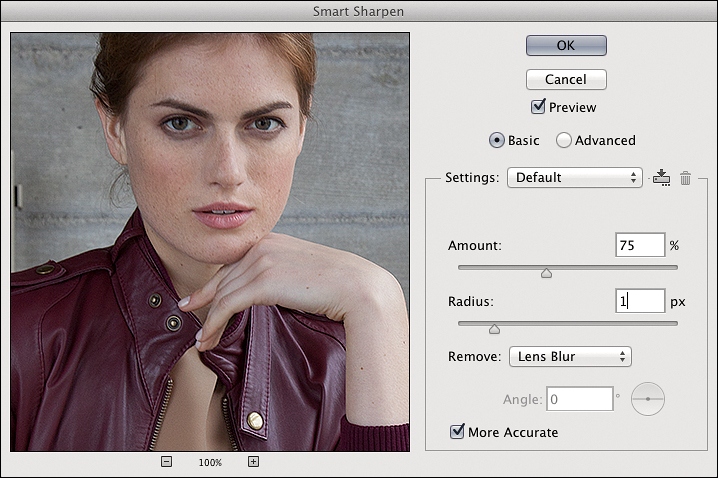
You might notice that the settings are much higher than they were for the online media image you prepared earlier. The higher pixel density of printed output requires that you apply more sharpening for the effect to be visible. For actual press runs, it’s best to run tests in advance to determine the appropriate level of sharpening, because you can’t reliably preview printed sharpening onscreen.
14. When you’re done, click OK to close the Smart Sharpen dialog box.
The image is currently in RGB color mode, which you can verify by viewing the menu that appears when you click the status bar. But the job requires converting the image to CMYK color mode, which you’ll do now.
15. Choose Edit > Convert to Profile, and in the Destination Space menu, choose U.S. Web Coated (SWOP) v2. This may also appear at the top of the menu as Working CMYK – U.S. Web Coated (SWOP) v2, and you may choose that option as well. Leave the other settings at their defaults, as shown in the following figure. Click OK.
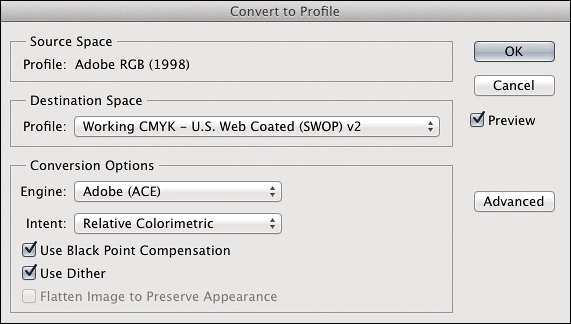
On an actual CMYK print job, it’s likely that your prepress service provider would provide a CMYK profile for you to install so that it appears in the Destination Space menu. You would then choose that specific profile instead of the generic one you chose for this lesson. Using a specially tailored CMYK profile helps ensure that colors are converted properly for the specific press on which the job will be printed.
16. Choose File > Save As, navigate to your Lesson08 folder, name the file Fireplace_Closeup_CMYK.psd, and click Save. Close the document window.
Some older workflows may require you to save the image in TIFF format, but recent versions of Adobe InDesign can directly import Photoshop format (PSD) image files.
Inspecting an Image in Adobe InDesign
When you import an image into Adobe InDesign, you can easily check its size, resolution, and other attributes.
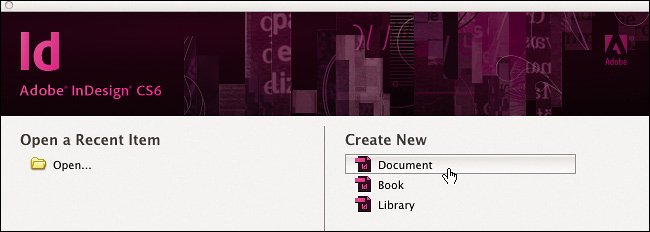
1. Start Adobe InDesign.
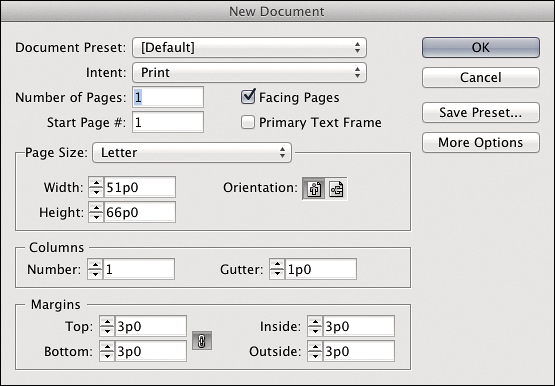
2. In the Create New section on the Welcome Screen, click Document.
3. In the New Document dialog box, make sure [Default] is selected as the Document Preset and click OK.
4. Position the InDesign and Adobe Bridge windows so that you can see both.
5. Switch to Adobe Bridge, and drag the PSD image you saved into the InDesign layout. Click the loaded place icon anywhere on the layout.
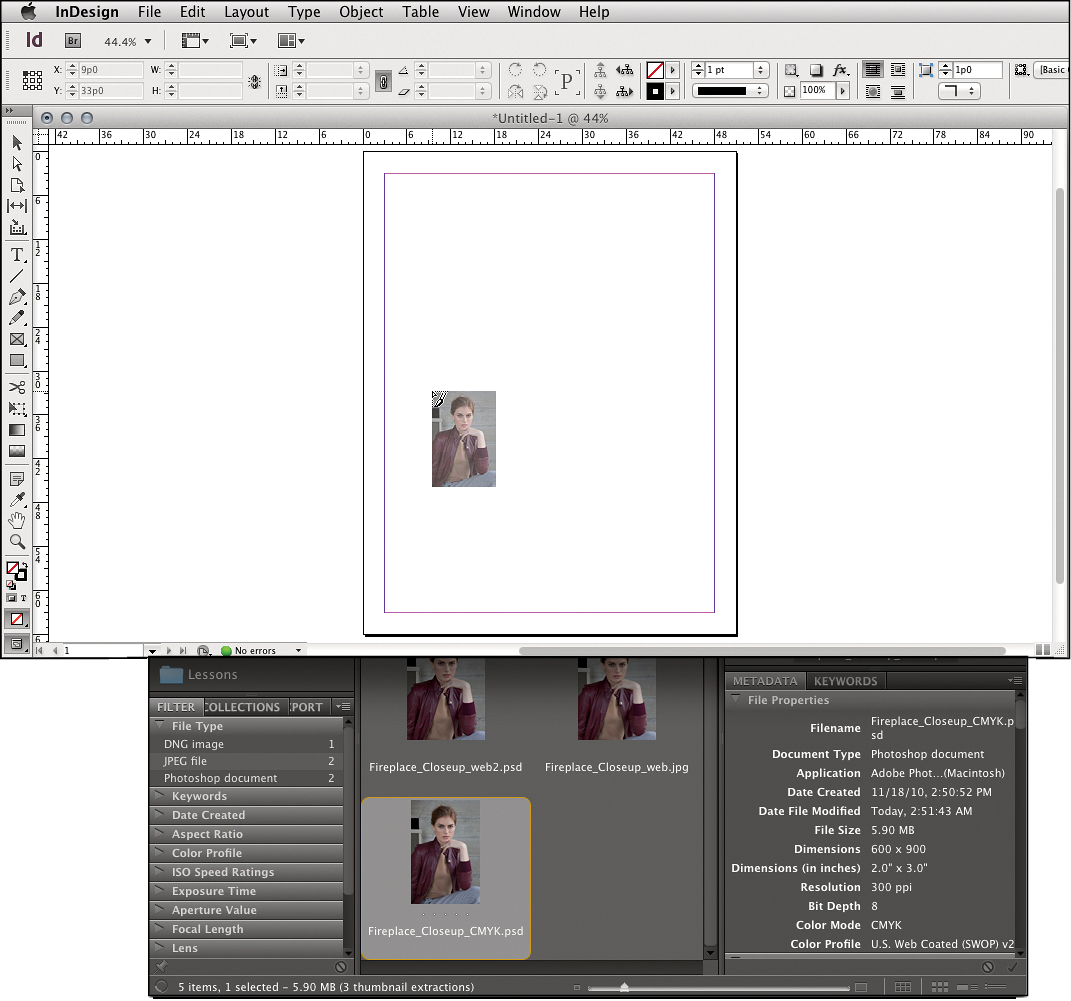
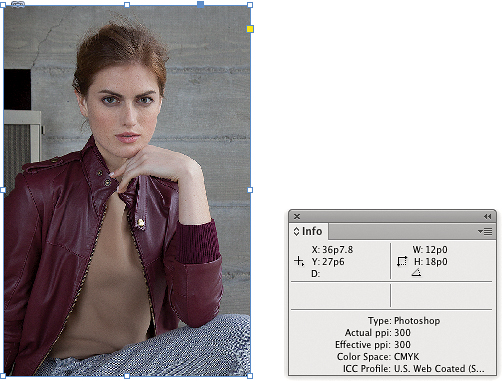
6. With the image selected, notice that there are width (W) and height (H) options in the Control panel at the top of the InDesign workspace. You can change these values to resize an image on a layout.
The Info panel displays the color profile of the CMYK image used in this lesson because the profile was set to be embedded in the Save As dialog box in Photoshop. In some CMYK workflows, your prepress service provider may ask you to not embed the CMYK profile, so be sure to ask.
7. If the Info panel isn’t visible, choose Window > Info. It tells you the file type, Actual and Effective ppi, and the image’s current color space and color profile.
(If you still can’t see the ppi readout in the Info panel, make sure the image is selected, and in the Info panel choose Show Options from the Info panel menu.)
The Info panel lists Actual and Effective ppi because pixel density on a print layout depends on its physical dimensions on the page. Enlarging lowers the pixel density; reducing increases pixel density.
To view images at full resolution, make sure View > Display Performance > High Quality Display is selected. High Quality Display takes more time to redraw, so the three Display Performance options let you balance screen display speed and quality.
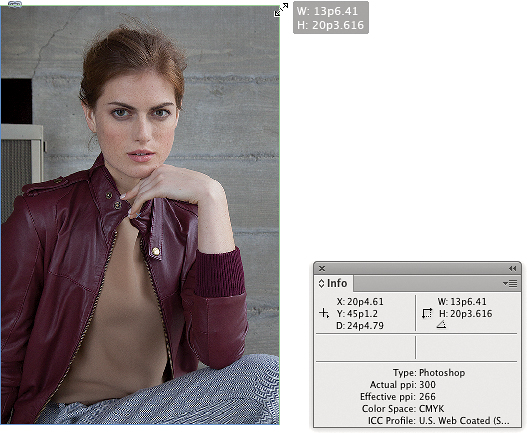
8. Ctrl-Shift-drag/Command-Shift-drag any corner handle of the image outward to enlarge the image on the layout. (If the image doesn’t enlarge, choose Edit > Undo and try again, but this time hold down the two keys before dragging the handle.)
Notice that in the Info panel the Effective ppi is now lower than the Actual ppi to show that you’re stretching the same number of pixels across a larger area, lowering the pixel density. Your prepress service provider can help you figure out the lowest acceptable Effective ppi for your print job.
When you’re getting ready to send out a print job, you don’t have to check the specs of each image using the Info panel. The Preflight feature lets you verify all images in the document at once. You used the Preflight feature in Lesson 2.
Remember that you can use Adobe Bridge to check the specifications of images outside of InDesign or Dreamweaver.
Wrapping Up
Congratulations! You’ve walked through key steps in properly inspecting and setting image size and resolution for printed and online media using several Adobe Creative Suite 6 Design & Web Premium software applications.
Review Questions
1. What are the three different ways that the term resolution is used in digital media?
2. In Adobe Bridge, which panel is useful for inspecting pixel dimensions, pixel density, and other specifications of a selected image?
3. Why can’t the same sharpening settings apply to both online and printed images?
4. When converting image colors to CMYK, which profile is best for printing to a press?
5. In Adobe InDesign, what is the difference between Actual ppi and Effective ppi?
Review Answers
1. The term resolution is used when referring to the pixel dimensions of an image or display, the pixel density (ppi or dpi), and camera megapixels.
2. In Adobe Bridge you can use the Metadata panel to inspect image resolution and other specifications for a selected image.
3. The effectiveness of sharpening settings is affected by pixel density, and printed images typically require much higher pixel density than online images.
4. The best CMYK profile to use for a job printed to a press is the profile recommended by your prepress service provider.
5. Actual ppi is the pixel density of the image as it was saved; Effective ppi describes how pixel density is changed after you resize an image on a page layout.