1. What Is iPhoto?
In this chapter, you learn about all the requirements you need to run iPhoto and use it to its fullest. This chapter also takes a look at the iPhoto interface so you can easily return to this chapter to reference what is where in iPhoto.
→ What is iPhoto?
→ Getting iPhoto on your Mac
→ Keeping iPhoto up to date
→ Exploring the iPhoto interface
On the surface, iPhoto is a free photo management app for Macs running OSX, but as you delve deeper into the app, you realize iPhoto is different things to different people. That’s to say, it’s a very versatile app. But versatility does not necessarily mean complicated. After you learn it, you’ll see just how simple Apple has made it to use. This chapter first talks about the three primary things iPhoto allows you to do: organize, edit, and share your photos. After that, the chapter shows you how to keep iPhoto up to date and gives you a quick walk-through of its main interface.
In the days before the digital camera, taking and developing photographs were expensive and time consuming. But thanks to camera manufacturers going digital, we can now take a virtually limitless (and free) number of photos. Although the digital camera manufacturers freed us from the chains and expenses associated with old, physical development techniques, the one thing they didn’t do is give us a good way to sort through and organize our digitized pics. Thankfully, Apple stepped in and created iPhoto for just that purpose.
Apple realized that although digital cameras were fun and powerful tools, camera manufacturers weren’t as good at designing software as they were at creating phenomenal photography equipment. As a result, Apple designed iPhoto to work with any camera on the market. The app enables you to easily plug your camera into your Mac and upload your photos. What’s more, iPhoto automatically separates your photos into Events, which are collections of photos based on the time you took them. Furthermore, iPhoto automatically separates your photos into specific albums called Faces and Places, and it lets you navigate through them by the people in the photo or the location where the photo was taken. You’ll discover more about Events, Faces, and Places later in the book.
Apple also understands that users want control over their photo organization and navigation. That’s why users can easily merge or add to events, create albums, create folders full of albums, and even create smart albums, which are albums that have rules applied, such as “Show me all the photos I’ve rated four stars.”
Furthermore, Apple lets users easily search through their photo libraries using iPhoto’s powerful Search and Tagging feature.
iPhoto Lets You Edit Your Photos

Editing your photos
iPhoto is more than just an organization tool. It’s also a powerful photo editor. Using the built-in editing tools, iPhoto can rotate and crop your photos, eliminate red-eye and blemishes with the click of a button, and even straighten crooked pictures.
iPhoto also lets you apply several effects to your photographs, such as lightening or darkening a photo, making it warmer or cooler, and adding sepia tones, vignettes, blurs, and more to your photos. Finally, iPhoto gives you access to complete histogram tools so you can tweak your photos like a pro.
The best (and least known) feature of iPhoto’s editing capabilities, however, is that it uses a nondestructive editor, which means that no matter how many times you adjust a photo’s color, crop a photo, or apply effects, you can always return to the original photo with a click of a button. iPhoto accomplishes this by creating and saving an original copy of your imported photograph every time you begin to edit it. It doesn’t matter if you’ve edited a photo a hundred times over a period of years. Simply click Revert to Original and the photograph will look as it did the day you took it.
iPhoto Lets You Share Your Photos
Sharing your photos
iPhoto’s organization and editing features are great, but let’s be honest—many times you don’t take photographs solely for your enjoyment. You also love to share them with your friends and family.
iPhoto enables you to do this through many old-school ways, such as printing a photograph on your printer or emailing a photo to a friend. But iPhoto also makes it possible for you to share your photos in fun and creative new ways.
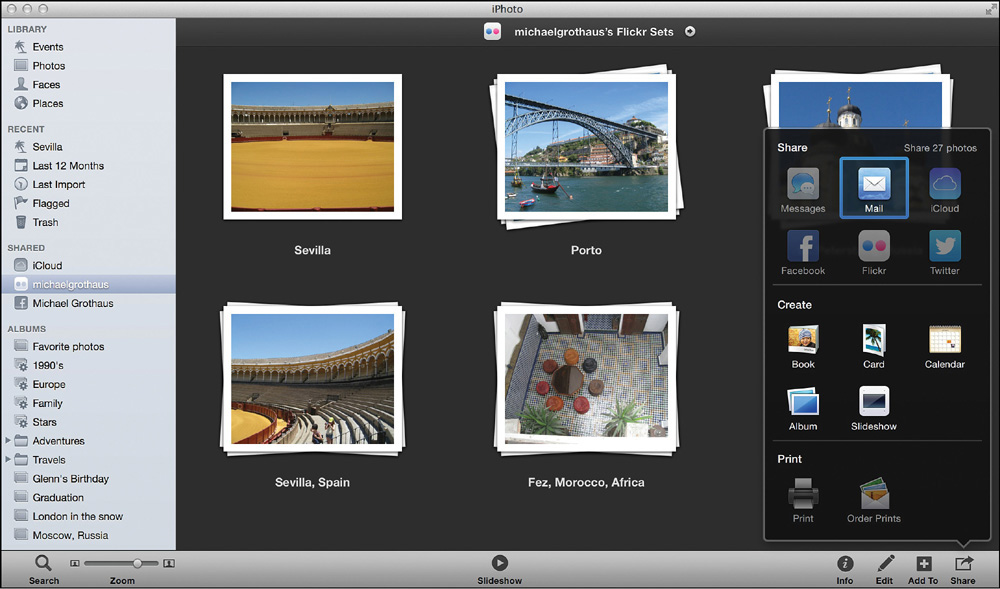
You can share your photos across the Web via iPhoto’s tight social networking integration with Facebook, Flickr, and Twitter. iPhoto also mixes the old with the new because it enables you to easily design slideshows, calendars, books, and cards right in the app. You can then purchase these items within iPhoto and give them to your friends and family as keepsakes.
iPhoto also enables you to access your photos via the cloud with a technology called iCloud Photo Stream. Photo Stream enables you to easily download and share photos you have taken on your iOS devices, such as the iPhone and iPad.
Getting iPhoto
Before you can use iPhoto, you first need to make sure it’s on your Mac. If you’ve bought a new Mac recently, you should have the latest version of iPhoto already on it—iPhoto 9.5, the version this book covers. If you don’t have iPhoto, you can buy it through the Mac App Store. Simply launch the Mac App Store from the Applications folder on your Mac, search for iPhoto, and then click the Buy button.
iPhoto System Requirements
If iPhoto is already on your Mac, you are good to go. However, if you need to download it (or upgrade to the latest version), make sure your Mac has the following minimum system requirements:
• An Intel dual-core processor.
• A Mac OS X 10.9 (known as Mavericks) or newer operating system.
• At least 2GB of RAM. (4GB or more is recommended for the best experience.)
• At least 5GB of free hard-drive space.
Recommended Extras
Considering the scope of what iPhoto enables you to do, it’s also helpful if you have the following extra items. These are not necessary to use iPhoto, but you’ll find having them allows you to really take advantage of all the app has to offer.
• An Internet connection
• A digital camera
• An email account
• An iCloud account
• A Facebook account
• A Flickr account
• A Twitter account
Keeping iPhoto Up to Date
Just because you already have iPhoto on your computer doesn’t mean you necessarily have the latest version.
Like any good software company, Apple frequently pushes out updates to its applications. These updates typically provide bug fixes or tweaks, but sometimes they even add new functionality to the applications. To make sure you are using the latest version of iPhoto, do the following:
1. Go to the Apple menu in the upper-right corner of your screen.
2. Select Software Update.

3. Software Update opens the Mac App Store to check for any updates to OS X or any apps on your computer, and if it finds any updates, it lists them.

4. Click the Update button if an update is listed for iPhoto (or you can click the Update All button to get the iPhoto update and any others that are available).
Which Version of iPhoto Do I Have?
To check which version of iPhoto you have, open iPhoto and then from the menu bar at the top of your screen, select iPhoto, About iPhoto. A box opens that shows you the version and build number. This number changes from time to time as Apple pushes out iPhoto updates. This book covers version 9.5 of iPhoto.
Launching iPhoto
Unless you have removed it, iPhoto’s icon always appears in the Dock at the bottom of your screen (or on the sides of your screen if you’ve moved the dock there). If the iPhoto icon is not in the Dock, navigate to your Mac HD icon on your desktop, and then go to the Applications folder to find iPhoto there.

Click the iPhoto icon once in the Dock to launch it; double-click it if you are launching iPhoto from within the Applications folder in the Finder.
The iPhoto Interface
The good news about iPhoto is that the app has a fairly simple layout. There are no floating palettes or hidden windows you need to regularly access. The editing tools are always available right in the app’s window.
What is tricky about iPhoto, however, is that the layout of the app changes slightly depending on what you’re doing. For example, while you are editing a photo, you see different buttons and toolbars than you see when you are organizing your photos or creating a book or card.
This book shows you the complete layouts for all the functions in iPhoto in the appropriate sections. For now, however, let’s look at how iPhoto appears each time you launch the application.

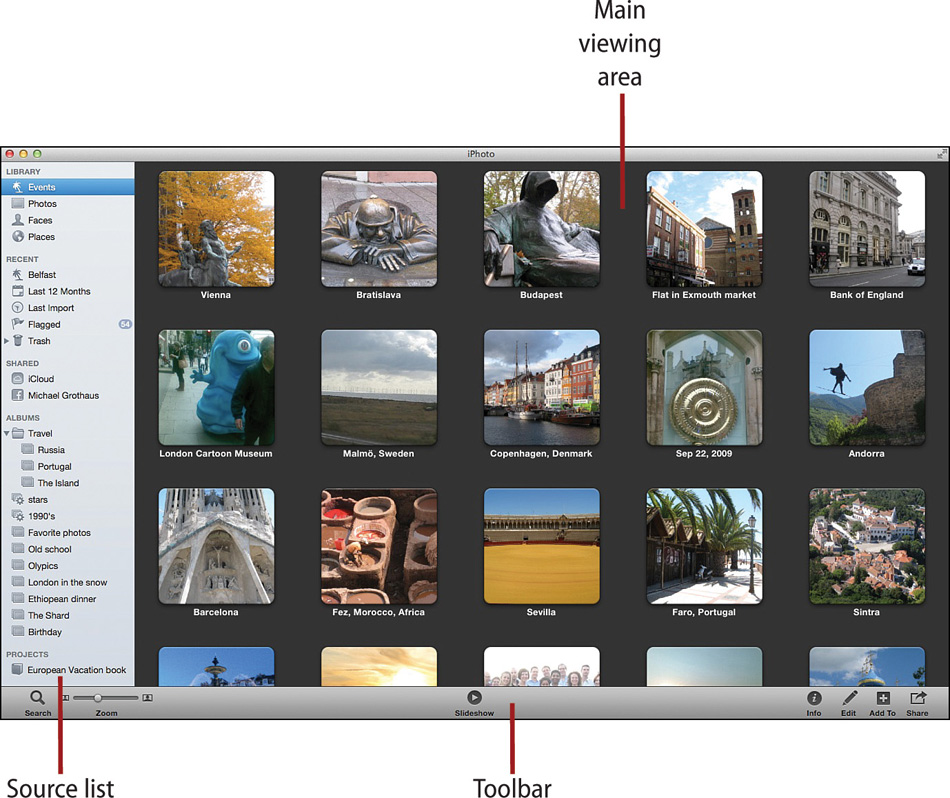
The following sections break down the anatomy of the iPhoto app. As you can see, when iPhoto launches, the application is divided into three primary parts: the main viewing area, the source list, and the toolbar.
The Main Viewing Area
A majority of the screen space of iPhoto is consumed by the main viewing area. It’s the dark gray space with all the square images in it. Each square image is an event that contains further photos.
As you can imagine, the main viewing area changes depending on what function iPhoto is performing. When you are editing, the main viewing area shows you the edit screen. When you are creating a calendar, the main viewing area shows you the projects screen. These screens are covered in detail throughout the book.
The Source List
Running down the left side of iPhoto is the source list. You use the source list to navigate through your photos and your organizational structure. This organization includes how you are sharing the photos and any projects you may be working on. The source list is divided into seven sections:
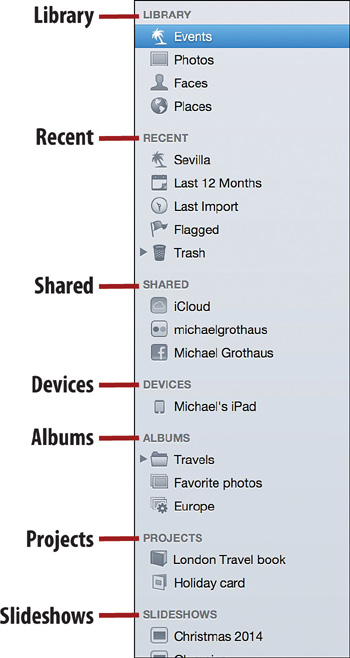
• Library: This header consists of four subsections: Events, Photos, Faces, and Places. Select one to navigate your photos using the respective view. Each view is described in more detail later in the book.
• Recent: This header consists of five subsections. The top one, labeled Belfast in the image, shows you the most recent event you have viewed. Last 12 Months shows you all the photos you have imported in the last 12 months. Last Import shows you all the photos you imported from the last time you connected your camera. Flagged shows you all the photos you have flagged. Trash contains all the photos you have deleted from your iPhoto Library.
• Shared: If you are using any of the web-based sharing features of iPhoto, such as iCloud, Facebook, Twitter, or Flickr, your accounts show up here. Read more about web sharing in Chapter 13, “Sharing Your Photos Digitally.”
• Devices: This header only shows up when you have devices that contain photos plugged into your Mac. It lists any currently connected cameras, iPods, iPhones, iPads and also shows memory cards such as SD cards plugged directly into the computer if they contain photos. Read more about devices in Chapter 2, “Importing Your Photos.”
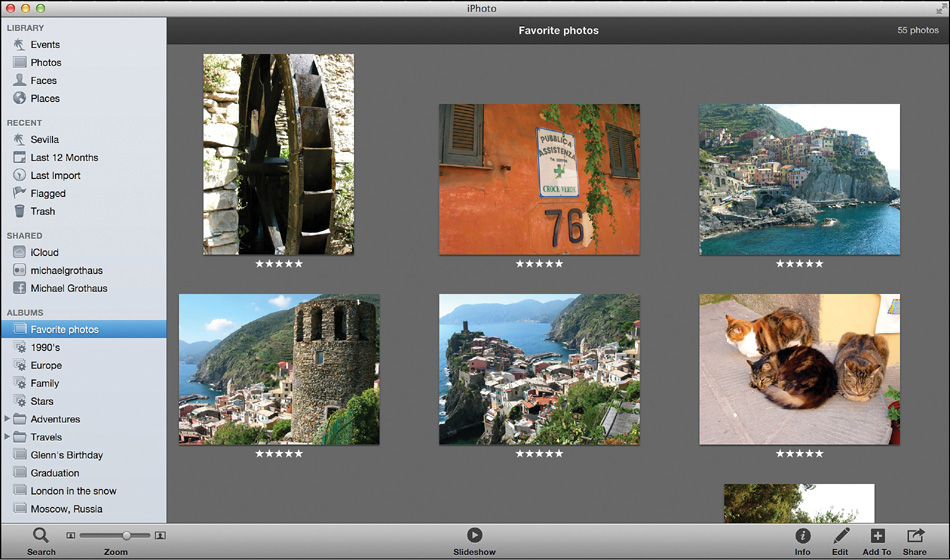
• Albums: This header displays all the albums, smart albums, and folders you have created. These albums are covered in Chapter 6, “Working with Albums.”
• Projects: Any projects, such as cards, books, or calendars, that you have created or are working on are in this section. Chapter 12, “Creating Keepsakes: Books, Cards, Calendars, and Slideshows,” covers projects.
• Slideshows: Slideshows, unlike other projects, get their own header. You can find any slideshows you make here.
The Toolbar
The toolbar runs along the bottom of iPhoto in the thick gray strip below the source list and the main viewing area. It’s divided into three sections: the left, center, and the right. In the left toolbar are the following buttons:

• Search: Click the Search button to find photos by title, keyword, description, date, or rating.
• Icon Zoom slider: Adjust this slider to increase or decrease the size of the event or photo icons in the main viewing area.
In the center of the toolbar you’ll find a single button:
• Slideshow: Click the Slideshow button to automatically display a slideshow of your currently selected event or photos.
The right side of the toolbar contains four buttons. These buttons are how you access the meatiest features of iPhoto.

• Info: Click Info to bring up a sidebar that displays detailed information about a selected photo, Event, or Faces group. The information can include the camera the photo was taken with, the date and time the photo was taken, a list of people who are in the photo, the GPS coordinates where the photo was taken, and keywords and ratings.
• Edit: Click the Edit button to switch iPhoto to Edit mode.
• Add To: Click the Add To button to add currently selected photos or events to an already existing album, book, card, calendar, or slideshow.
• Share: Click the Share button to share currently selected photos or events with others by uploading them to your iCloud, Twitter, Flickr, or Facebook accounts; by sending them to friends via email or Messages; and by ordering prints or printing them yourself. The Share button also enables you to create an album, book, card, calendar, or slideshow.
Note that these buttons might vary depending on what is selected in iPhoto. For instance, when you select an item under the Device header, only the zoom slider is shown. Also note that one important button that isn’t in the toolbar is the Full Screen button. It’s in the upper-right corner of the app. Click it to expand the iPhoto app to take up your whole screen.