Chapter 1. GoPro Primer
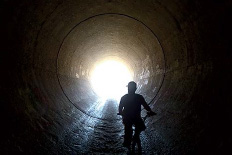
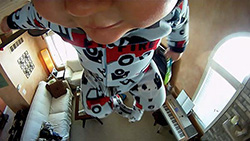
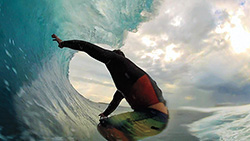
Gunnar Jeannette / Daytona International Speedway ![]() Helmet
Helmet ![]() 1080p30/Photo/5sec
1080p30/Photo/5sec
Gopro’s Creator, Nicholas Woodman, Describes a GoPro as a proactive capture device, which differentiates itself from reactive capture devices such as smartphones. A proactive capture device encourages users to think about what they are doing and how they are going to capture it beforehand. Although many books out there show you how to use a traditional camera, this is the first book demonstrating how to tap the true potential of your GoPro to capture immersive and engaging content from an unlimited range of perspectives.
GoPro is marketed as a professional quality yet easy-to-use consumer camera. You can take it out of the box, mount it, and press a button. Generally speaking, you’ll have a good chance of achieving great results due to the GoPro’s simplicity and performance. And while leaving the camera in its default settings is fine in most cases, you’ll be missing out on all the versatility this powerful tool has to offer. We believe that understanding the GoPro’s full capabilities is the first step to consistently capturing powerful content.
Basic Definitions
The world of digital photography and video features plenty of jargon, and it can be intimidating if you’re just getting started. The basics aren’t too complicated, however. To best understand your GoPro, you should have a handle on a few concepts: resolution, aspect ratio, field of view and frame rate. In the following section, we define these terms and also touch on the basics of image processing with respect to video quality for more advanced users.
Resolution
The resolution of a digital image refers to the size of the image as measured in picture elements, or pixels. More pixels equals bigger image equals higher image quality. Photo and video resolutions are measured differently.
Photo resolution is typically measured in millions of pixels, or megapixels (MP). For example, the highest resolution photo possible from the GoPro HERO4 Black Edition is 4000 pixels wide by 3000 pixels high: 4000 × 3000 = 12,000,000 pixels, or 12 MP.
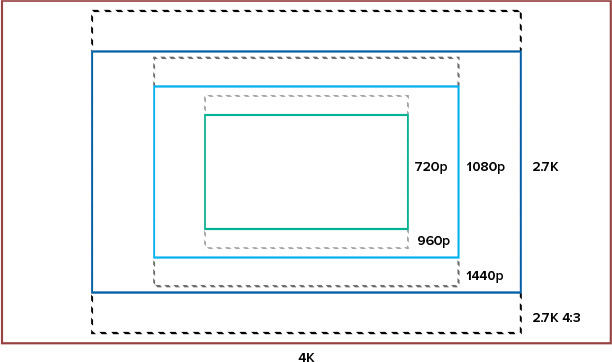
Video resolution is usually measured by width and height, often using only the height for shorthand. Video with dimensions of 1920 pixels wide by 1080 pixels high can be called 1920 × 1080, or shortened using the vertical dimension alone, to 1080, or in the GoPro’s case, 1080p (the p stands for progressive and describes how the image sensor records video information). For widescreen resolutions over 1080p, the shortened form is expressed using the width instead. Video shot in 2.7K has dimensions of 2704 pixels wide by 1520 pixels high, and can be referred to as 2704×1520, or simply 2.7K.
Aspect Ratio
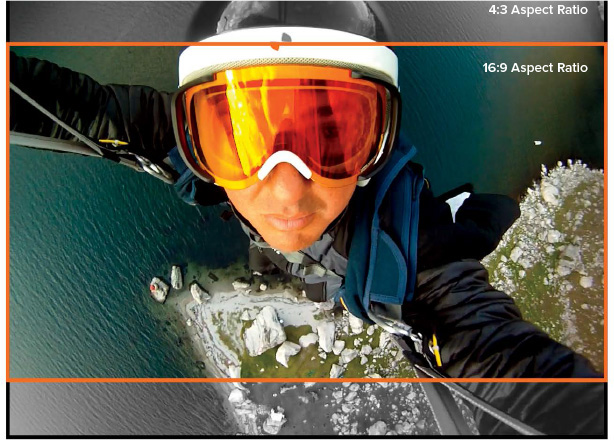
Aspect ratio is the ratio between the width and the height of an image. A GoPro primarily captures video in two aspect ratios: 4:3 and 16:9. The 4:3 ratio produces a taller squarish frame, the standard ratio for older televisions and computer monitors. The 16:9 ratio produces a wider and more rectangular frame, the traditional widescreen ratio that is the shape of many modern HD TVs and laptop displays.
The number of pixels in the width and height are usually reduced to their simplest terms. 1920:1440 contains large numbers that are hard to visualize. The reduced ratio of 4:3 is the same thing and it’s easier to wrap our minds around. 4:3 tells us that for every 4 pixels of frame width, there are 3 pixels of height—in real-world terms, the frame is squarish, just a bit wider than it is tall.
GoPro’s media production team often captures video in 4:3 aspect ratio because point-of-view angles from locations such as the helmet or chest require a taller frame to capture all the action. Head strap, helmet, chest, and surfboard mounts...pretty much any body or gear-mounted shot benefits from a 4:3 resolution. Fixed perspective shots involving less rapid direction changes, such as those from a vehicle or tripod, are inherently more stable and are thus prime candidates for widescreen, 16:9 resolutions.
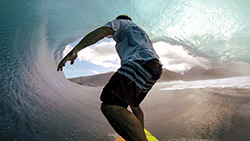
Marshall Miller / Norway ![]() Gnarwhal
Gnarwhal ![]() 960p30
960p30
SuperView
Displaying 4:3 video is an issue nowadays because virtually all video players use widescreen ratios like 16:9. Displaying 4:3 in widescreen yields black bars on each side of the screen. In a number of GoPro’s early videos, you will see these characteristic black bars. In those days, we didn’t really know what to do with the 4:3 aspect ratio except to leave it, or zoom in and crop out the black bars. Later in editing we learned how to dynamically stretch 4:3 footage while retaining the proportions in the center of the frame. The next logical step was to do this in-camera, and thus SuperView was born.
SuperVIew is currently available in 4K, 2.7K, 1080p, and 720p. It can be a great option for those who want to avoid the manual process of cropping or stretching their 4:3 footage and it is best suited for body-worn and gear-mounted scenarios when you want to capture the maximum view angle for the most immersive and stable footage. For advanced users seeking ultimate creative control we recommend experimenting with cropping or stretching footage yourself (see the “Cropping and Stretching” section in Chapter 5). There is an advantage to the HERO4 Black’s 4K SuperView, however, in that GoPro’s 4K resolution doesn’t have a 4:3 aspect ratio equivalent. If you are editing on a 4K timeline, 4K24 SuperView is the highest resolution option for POV footage, though it is only available in 24 fps.
Field of View
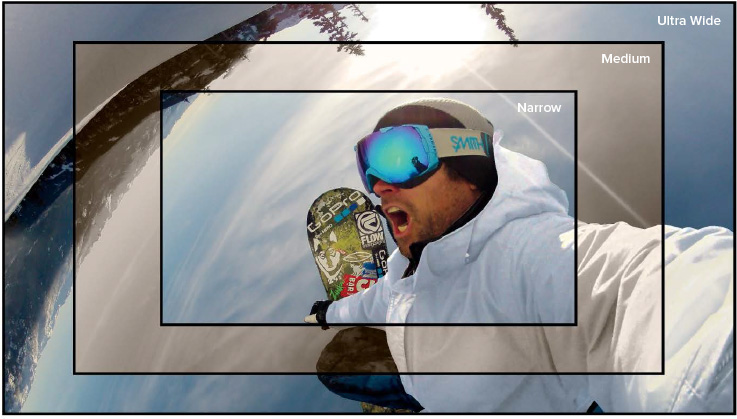
Field of view, abbreviated as FOV, refers to the extent of the visible world that the camera’s lens is capable of capturing, as measured in degrees. Traditionally, rounder, shorter lenses capture more of the world and are thus said to be “wide,” while longer, flatter lenses capture less of the world and are “narrow.” The GoPro has an ultrawide lens that, while shooting in the default Wide mode, can capture 170 degrees of the world in front of it.
While a traditional camera’s FOV is changed by switching between lenses, the GoPro’s field of view can be varied electronically. It does this by sampling smaller areas of the image sensor. The GoPro’s Wide, Medium, and Narrow modes have FOVs of 170, 127, and 90 degrees, respectively. Because the purpose of 4:3 resolutions is to offer the maximum possible FOV, only 16:9 resolutions offer optional Medium and Narrow FOVs. The narrower FOV causes all objects in the frame to appear closer. It also produces less lens distortion around the periphery of the frame and simulates the long lens look of a more traditional camera.
![]() Wide (170 degrees) = 14 mm Focal Length
Wide (170 degrees) = 14 mm Focal Length
![]() Medium (127 degrees) = 21 mm Focal Length
Medium (127 degrees) = 21 mm Focal Length
![]() Narrow (90 degrees) = 28 mm Focal Length
Narrow (90 degrees) = 28 mm Focal Length
Medium FOV is best used for static and stable mounted shots, such as a tripod or steadicam. We use Medium for interviews and wide shots because faces and horizons appear less distorted. Narrow FOV is used for specific shots, typically when you have restricted access or where close camera placement is impossible.
Mike Basich / Tahoe, California ![]() Handheld
Handheld ![]() Photo/.5sec
Photo/.5sec
Frame Rate
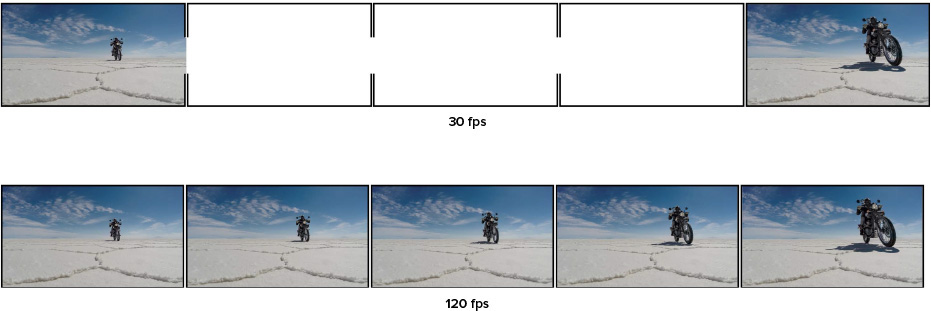
Video is essentially a series of pictures, often called frames, captured at a high rate of speed. The speed at which these frames are captured is known as frame rate, and it is measured in frames per second (fps). The standard frame rates used for television in the world today are 30 fps in the United States, and 25 fps in parts of Europe, Asia, and elsewhere. The GoPro is capable of capturing video at both 30 and 25 fps, as well as many other frame rates.
It’s important to differentiate between capture frame rate and playback frame rate. While a video may be captured at 60 fps, you can later play that footage back at any speed you choose. Playing it back at 60 fps gives the video normal speed—because the action is played back at the same speed it was captured. Playing the same video back at a lower speed such as 30 fps results in slow motion. Playback at a higher speed such as 120 fps results in fast motion.
Another important thing to note is that video’s frame rate directly affects exposure time. Lower frame rates allow more time for light to register on the sensor for each frame, which is useful for low light. High frame rates, on the other hand, are best suited for bright sunlight.
For simplicity, GoPro users often combine both resolution and frame rate when talking about the camera’s video modes. Shooting 1080p resolution at a 60 fps frame rate can be abbreviated as shooting 1080p60.
Kyle Camerer, Joseph Johnson / Bolivia ![]() Static
Static ![]() 720p120
720p120
Suggested Modes for Maximum Quality
In general, as sensors for digital cameras gain higher resolution and video mode options get more numerous, a balance must be found between the frame rate, number of pixels, the FOV, and what the processor can handle. To allow for certain combinations of resolutions and frame rates that might otherwise be challenging for the processor to compute, a digital camera’s firmware may use different methods of lowering the pixel count that is being read off the sensor at any one time. These methods of reducing pixel count are referred to as ‘binning’ and ‘skipping’ as opposed to ‘native,’ which is the term used when all of the sensor’s pixels are being read from the sensor.
Native capture yields the highest image quality. With native, one or more pixels in the image sensor correspond to a single pixel in the output image. Binning and skipping allow for higher frame rates by combining pixels in order to reduce the load on the processor. Cropping is another technique that allows for higher frame rates as the camera reads a smaller “cropped” portion of the image sensor’s pixel area. Cropping is also often used to produce a smaller FOV.
A camera’s processing power matters because it ultimately affects the amount of data that gets read and utilized from the sensor. Generally speaking, more data means better image quality. Keeping maximum image quality in mind, our media department’s resident image quality guru Abe Kislevitz has compiled a list of recommended modes for the HERO4 Black:
![]() 4K30: For static or very stable mounted shots (non-POV) that DON’T require slow motion.
4K30: For static or very stable mounted shots (non-POV) that DON’T require slow motion.
![]() 2.7K48 Wide and Medium: For non-POV shots that DO require slow motion.
2.7K48 Wide and Medium: For non-POV shots that DO require slow motion.
![]() 1080p120 Narrow: For non-POV shots that require super slow motion. 1080p120 Wide is also good but has a bit more aliasing.
1080p120 Narrow: For non-POV shots that require super slow motion. 1080p120 Wide is also good but has a bit more aliasing.
![]() 2.7K 4:3: For body or gear-mounted shots (POV) that DON’T require slow motion.
2.7K 4:3: For body or gear-mounted shots (POV) that DON’T require slow motion.
![]() 1440p60: For POV shots that DO require slow motion. 1440p80 is also good but has a bit more aliasing.
1440p60: For POV shots that DO require slow motion. 1440p80 is also good but has a bit more aliasing.
![]() 960p120: For POV shots that require SUPER slow motion.
960p120: For POV shots that require SUPER slow motion.
Photo Modes
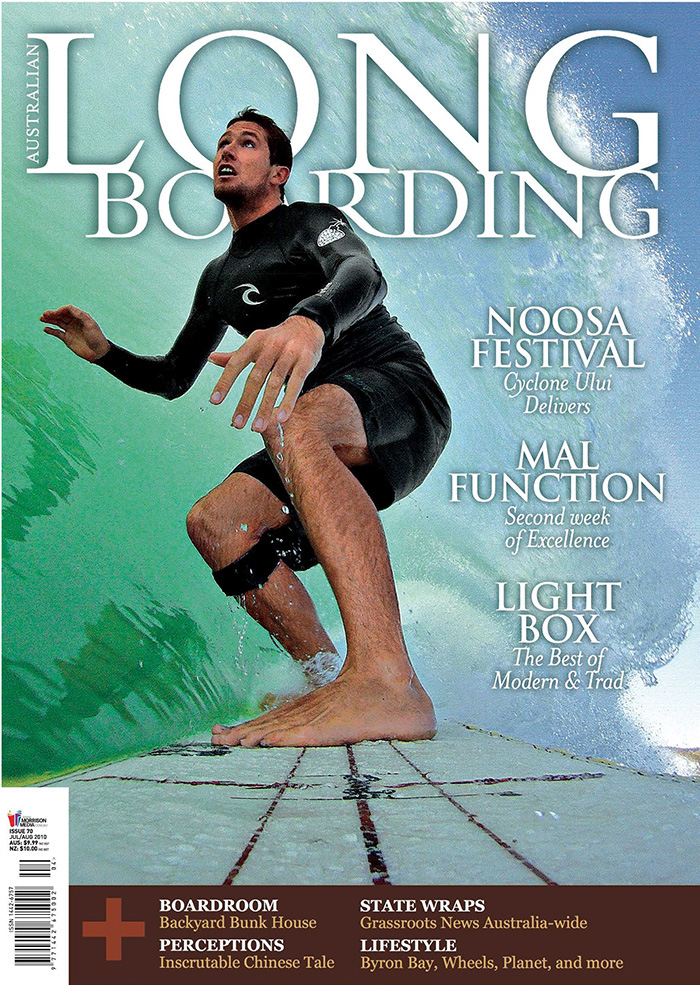
In 2010, world champion longboarder Harley Ingleby paddled out at a break in New South Wales, Australia. Attached to the nose of his board was his 5 megapixel HD HERO. As a set rolled in, Ingleby pressed the shutter button and began recording in time-lapse photo mode, automatically capturing a photo every 2 seconds. He swung his board around, caught a wave, and pulled into his first barrel of the day. As GoPro-luck would have it, one of the photos captured on this wave became the cover shot of Australian Longboarding magazine. Ingleby later told us this was the first time he’d ever tried shooting time-lapse photos with his GoPro. Until then, he’d only captured video.
Since then, GoPro has continued to push the photo-capture limits of its cameras. The HERO4 Black can capture 12 megapixel photos at time-lapse rates of a photo every 0.5 seconds and burst photos at speeds up to 30 photos per second. The HERO4 added photo-specific Protune settings (much like those of video) and powerful new Night Photo and Night-Lapse modes, which feature adjustable long exposure times from 2 to 30 seconds. These improvements, combined with the rising popularity of photo sharing platforms such as Facebook and Instagram, have made GoPro the tool of choice for self-capturing immersive and engaging photos.
As a side note, Ingleby’s cover shot was monumental for another reason. Nick Woodman had grown up reading surfing magazines and was enamored by the lure of the “cover shot.” When he first started GoPro, he dreamed of the day when one of his cameras would capture a cover shot for one of his customers. Eight years later, Ingleby’s cover, GoPro’s first, brought tears to his eyes.
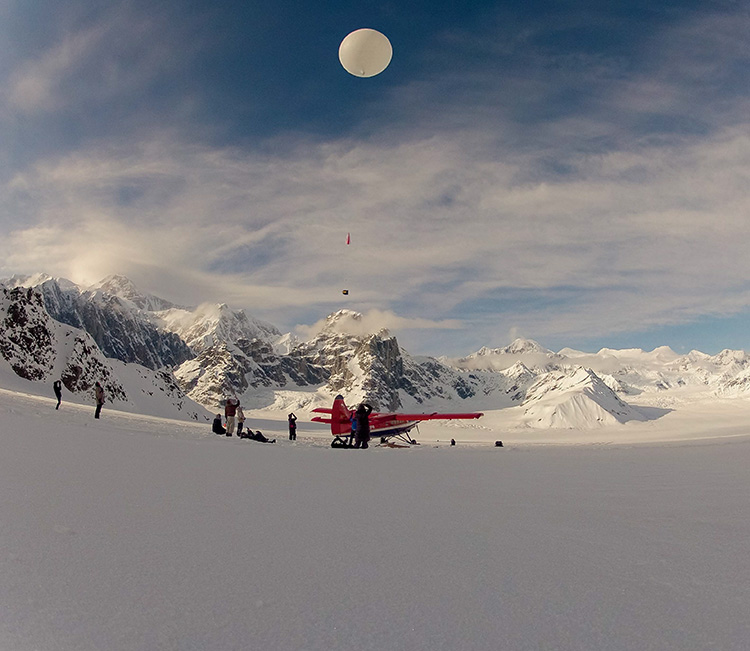
Jordan Miller / Alaska ![]() Tripod
Tripod ![]() Photo/2sec
Photo/2sec
Time-Lapse Photos

Time-lapse photo mode and video are two of the camera’s most frequently used functions. The traditional definition of time-lapse is a series of photos combined to create a moving image on a video timeline. It gives an otherwise unseen view of time—sunsets, clouds zooming by, or plants growing. Time-lapses are useful in storytelling because they can introduce an environment, add variety to a montage, or control a video’s pacing. Chapter 5 discusses such functions in more depth.
GoPro has expanded the role of time-lapse photo capture to also include the capturing of high quality, never-before-seen photos of intense action. This was a simple solution to the user’s inability to press a shutter button while being upside-down or spinning in mid-air. Shooting half-second photos has become the most popular use of the GoPro time-lapse function, and many of the photos in this book were captured this way.
Shorter interval time-lapses have some trade-offs. In order to accomplish .5 and 1 second time-lapses, the processor must compress the images more. Less exposure time occurs per photo as well. In bright sunlight, you won’t notice a difference, but in clouds, shade, or low light, this setting is less ideal. The 2, 5, 10, 30, and 60 second modes have ample time for exposure, and the images will be less compressed.
With the HERO4 came new photo-specific Protune settings which include white balance, color profile, ISO limit, sharpening, and exposure compensation (see the upcoming section, “Protune,” for more details). During the day, you’ll generally get the best results by leaving all of these settings in AUTO mode. If you are inclined to experiment, photo white balance should only be changed for a specific reason, such as while shooting night photos or time-lapses (we cover these in the next section). We recommend using GoPro Color for your color profile, unless you are a color grading professional. ISO limit performs similarly to video, but is limited to 800 on the high end. The lower the ISO, the less grain will appear in your image. Set on auto during the day, the camera will hover around 100 ISO. However, night-lapses are a different case. We always set sharpening at low for more control while editing and coloring our photos. For the most part, we recommend setting the exposure compensation to 0, but it can be advantageous to set compensation to -.5 to keep highlights from blowing out.
Night-Lapse Photos

GoPro’s night-lapse function was introduced with the release of the HERO4. During the day, a photo will typically expose between 1/60th and 1/8000th of a second. The night-lapse feature allows the camera to expose from 2 to 30 seconds, thus allowing more light to enter the camera’s image sensor. Night-lapse is perhaps the most complex GoPro capture mode as it requires some forethought and a few nights of trial and error to perfect.
The Auto setting has a wide variety of uses. If there is ample light such as from a city, cars, or street lights, the Auto setting can be a good choice. It will automatically adjust for exposure up to 2 seconds. Freeway driving, cityscapes, and campfires work well in this mode. Auto setting is also ideal for day-to-night transition time-lapses such as sunrises and sunsets, both of which require a broader exposure range than the standard GoPro time-lapse provides.
Exposure settings beyond Auto require more consideration. The manually selected 2- and 5-second exposure times are great for cityscapes, thunderstorms, fireworks, and light painting. 10-to-20-second exposures work well for full moon landscapes and rural settings. With these longer exposures, try lowering the ISO in Protune for less grain (but also less light). 30-second exposures with an 800 ISO will yield the best star-lapses. For the brightest stars, try pointing the camera away from the moon’s trajectory across the night sky, as the moon in the frame will overpower the stars’ twinkling. However, the sliver of a moon can also give spectacular exposure to foreground landscape elements and give perspective to the stars travelling across the night sky.
Keep in mind the HERO4’s new Protune settings for photos when capturing at night. White Balance and ISO settings will differ for every situation. A good rule of thumb is: 5500K works for a neutral setting, while a higher ISO will give a brighter image but also more noise. We almost always test out a few night photos and check to see if all the settings are correct before leaving the camera overnight. We recommend keeping the Interval setting to continuous, unless for a specific reason.
It’s wise to make sure your HERO4 is safe and protected during a night-lapse. If it’s a 30-second exposure, you’ll most certainly leave it and go to bed. Try using a durable external battery with USB plug to keep your camera powered all night long. GoPro’s Battery BacPacs are great in a pinch, but only last for a few hours. Generally speaking, a frame mount is ideal because the heat of the camera will keep dew from forming on the lens. If there is rain or possible weather, however, try using a skeleton housing and a zip-lock bag for your external USB battery.
Burst Photos

A time-lapse photo every half second is good for blanket photo coverage through an entire run or session. But sometimes even a half-second interval doesn’t capture the exact frame you want. Looking through a half-second photo stream, you’ll inevitably find those moments where the camera almost captured the perfect shot. Even with video, when looking frame by frame, you will always spot that one frame that makes you say to yourself, “If only THAT were a photo!”
Burst Photo Mode was designed just for this kind of situation. Burst captures 30 full resolution photos per second. Burst also features settings for capturing 30 photos over 2 or 3 seconds, giving a little bit of margin for error when pressing the shutter button as you leap off a cliff or attempt to photograph your friend’s incredible feat... or folly.
To achieve really precise burst photo timing, try using GoPro’s Smart Remote or App. The handheld Smart Remote allows the user to precisely trigger the camera right before the action happens while the GoPro App does the same if you’re able to have a smartphone or tablet accessible while filming.
The compression and file sizes of burst photos are similar to those of .5 and 1 second time-lapses. However, the exposure is set only once at the very first frame, and remains the same throughout the next 29 photos.


Video Modes
1080p120. 2.7K48. 1440p80. 4K30, and so on. Why does GoPro offer so many different video settings, anyway? One reason is the need for multiple aspect ratios: the GoPro’s 16:9 and 4:3 video modes are designed to capture so many different activities from so many different perspectives. Another has to do with the realities of image processing limitations and the trade-off between resolution and frame rate. Higher resolutions limit the number of frames per second a camera can capture. So when ultra high resolution and detail are the goal, then a slower frame rate may be required. When super slow motion is your aim, then a higher frame rate takes precedence and you may need to shoot in a slightly lower resolution. 2.7K48 is a great example of a resolution and frame rate that effectively balances both sides of the equation.
This is all well and good. But it doesn’t answer the question most GoPro users will inevitably face, which is: “What mode should I shoot in?” The good news is that the answer to this question matters less than you might think.
In the fall of 2012, GoPro released the HERO3, which surpassed most consumer cameras in both maximum resolution and frame rates—a testament to our engineering team’s capabilities. In January, we needed a 30-second commercial to air during the Super Bowl, the most widely viewed forum for advertising in the world. It was the perfect opportunity to showcase a video shot on the newly released, 1080p60 capable HERO3. Yet, what video did we choose? Dubstep Baby, a customer video shot in the sub-premium 720p60 resolution on our first generation HD HERO camera. Why?
Because content is king. At the end of the day, the actual content being captured is more important than the resolution or frame rate it is captured in. So if you’re feeling anxious about whether or not the mode you’re using is correct, don’t worry. Throughout this book we aim to help you learn without getting bogged down by the numbers. As long as you’re passionate and focused on creating great content, the technical knowledge will come naturally with experience.
Super Bowl 2013 Dubstep Baby Commercial

720p

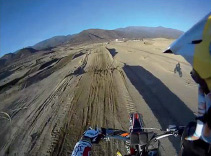
Introduced in November 2009, the original HD HERO was capable of capturing both 1080p30 and 720p60 video. While 1080p30 was impressive, 720p60 really showed the world what a GoPro could do. Prior to this, point of view (POV) action footage was typically filmed through a narrower FOV lens at 30 fps. You might see a shaky POV shot cut into your favorite 1980s- or 1990s-era ski or skateboard movie, for instance. But such shaky footage induced nausea in the viewer, and was considered unwatchable by general audiences for more than a few seconds. 720p60 was our golden mode during the first two years of the HD HERO, from late 2009 to late 2011. This changed with the HD HERO2 as 960p48 became the standard for mounted POV. In the Fall of 2012, we introduced HERO3 which boasted both 1080p60 and 720p120. 720p120 is still a great choice for complex high action activities, such as Kalani Chapman’s End of the Road barrel at Teahupo’o, filmed on the HERO3 and featured below. Note the considerable difference in speed to a similar shot he captured at Cloudbreak, which was filmed in 720p60 on the HD HERO2 (also featured below). While most people would usually use 4:3 aspect ratio modes for mounted shots like these, in both cases Chapman chose to forgo the extra coverage for a higher frame rate.
End of the Road with Kalani Chapman

Endless Cloudbreak Barrel with Kalani Chapman

960p

960p is an innovative 4:3 resolution that GoPro introduced in the first HD HERO. Designed to provide 25% more vertical viewing area than 16:9 resolutions, such as 720p and 1080p, 960p makes it easier to capture your knees and skis AND the horizon while skiing, or the handlebars and front fender of your bike AND the track ahead while racing motocross. The result is a much more immersive and stable viewing experience that better mimics your natural vision. An added sense of stability comes from having less relative motion in the scene relative to the viewing area of the scene. Just consider the difference in stability between a video shot with a hand-held telephoto lens versus one shot with an ultra-wide GoPro lens. Every bit of motion is far less noticeable and distracting when the relative FOV is larger.
960p was the go-to mode for the media department and was responsible for nearly all mounted footage prior to the release of HERO3. Today, the HERO4’s 1440p gives the same taller aspect ratio as 960p but with twice the resolution, and so is much preferred. The primary reason to use 960p now is for the 120 fps super slowmo.
Professional motocross and stunt rider Ronnie Renner filmed the first ever motocross video to make it to the GoPro Channel on YouTube. This was before we knew about dynamic stretching and SuperView, so black bars are present on either side of the frame. The beauty and effectiveness of 960p are perfectly illustrated as the horizon, Ronnie’s hands, handlebars, and front fender are always in the frame.
Ronnie Renner at the MX Track

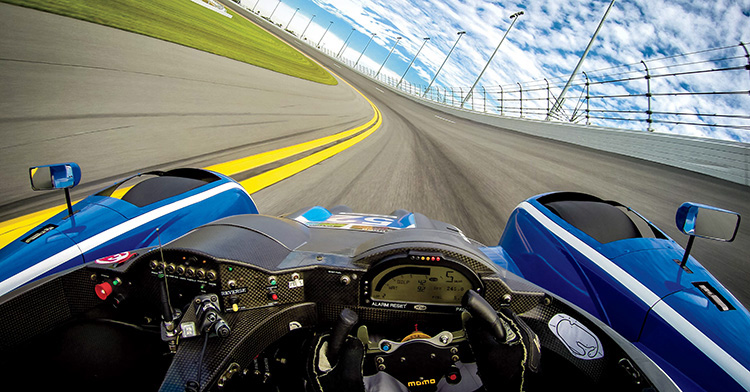
1080p

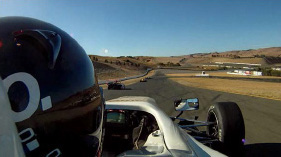
Back in 2009, watching full 1080p from atop a race car flying over the track at 150 mph on a large HDTV was a hypnotic and near-religious experience. It was the kind of content viewing experience that made believers out of thousands of customers visiting our booth at GoPro trade shows. The original HD HERO featured 1080p30 which, unlike 720p, was considered “true” HD and gave GoPro industry cred as a fully high definition camera. Due to sensor limitations, the HD HERO’s 1080p had a restricted FOV (127 degrees), which meant it was primarily used for static shots or when the camera would be mounted to more stable objects or devices like a race car. To find wider use thoughout all of our productions, 1080p had to wait several years for the wider FOV that came with the HD HERO2 and the higher frame rates that came with the HERO3. Notice the difference in quality between Nick Woodman’s “Formula Car Clip,” filmed on the original HD HERO in 2009, and his later HERO3 video, “Grand Prix of Sonoma.” The HERO3 delivered 1080p with the largest selection of frame rates and FOVs, and thus it became our go-to resolution for everything except mounted POV, which required the taller 4:3 frame. With the HERO3+ in 2013, came a new 1080p mode: 1080-S or SuperView.


1440p

1440p was the higher resolution evolution of 960p, with the same 4:3 aspect ratio and frame rates now reaching 80 fps with the HERO4 Black. 1440p adds 180 extra pixels to the top and 180 to the bottom of the traditional 1080p frame, delivering a 25% taller FOV. Like 960p, 1440p is best used for mounted POV shots.
Kelly McGarry’s mountain bike run at Red Bull Rampage—GoPro’s first un-edited, or “uncut,” viral video to top 20 million views—is a great example of how 1440p can help capture a legendary moment. The increased vertical resolution of the screen creates context by showing the horizon and Kelly’s bike, and by prefacing the approaching course features in the distance. This extra context keeps the audience from becoming disoriented through the jolts, shakes, and flips of Kelly’s epic run. The extra frames from 48 fps give us just enough slow motion through Kelly’s backflip to appreciate what’s happening. A higher frame rate could have been useful for even slower motion, but due to the cloud cover, 48 fps was the wisest choice for the best exposure. It’s also good to note that 1440p frame rates beyond 30fps require more image processing. Our media team generally uses 1440p60 for the best combination of slow motion and image quality.
1440p is downscaled to fit on a 1080p timeline, which most editors are still editing on today. The imminent popularity of 4K, both on Ultra HD televisions and on the Internet, will change all that. For now, modes like 1440p, 2.7K, or 4K that go beyond high definition give the user more options in post-production. Anything that requires image enlargement, such as graphics work or motion stabilization, benefits from the extra pixels. An editor can also use the additional resolution to choose their own frame by pushing in and cropping.
Backflip Over 72′ Canyon


2.7K

With the release of the HERO4 camera, 2.7K48 mode has become the new 1080p60 in GoPro’s media department. Each frame of 2.7K video is essentially a 4 MP photo. It has over 30 percent more resolution with nearly the same frame rate as 1080p60 for slow motion. Sometimes we’ll even switch to GoPro’s PAL setting at 2.7K50 for an extra 2 fps.
2.7K includes two FOV options: Ultra Wide and Medium. 2.7K Medium is extremely useful and replaces 1080p Medium for most interviews, establishing wides and environmental static shots. The Ultra Wide FOV is great for shooting on vehicles, wide shots, and aerial footage. The short film “Koh Yao Noi” by Philip Bloom provides a perfect example. Composed entirely of 2.7K drone footage, the film was edited on a 1080p timeline. The extra resolution of the 2.7K footage gave Philip plenty of leeway to crop frames and stabilize any shaky drone shots while still retaining full 1080p HD resolution in the final edit.
Koh Yao Noi, a Film by Philip Bloom

2.7K 4:3

2.7K 4:3 is GoPro’s most powerful 4:3 resolution and frame rate combo for POV or body-mounted shots that don’t require slow motion. The higher resolution and lower frame rate make 2.7K 4:3 a go-to for shoots where low light is an issue. Filming low light music performances is a perfect example of when 2.7K 4:3 shines. And if you are trying to retain a professional 4K video with POV footage at 30 fps, then 2.7K 4:3 will upscale nicely into a 4K timeline.
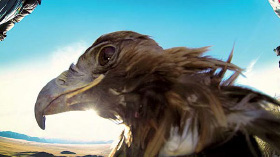
“Golden Eagle POV Flight in 2.7K” is a prime example of how well 4:3 aspect ratio video captures body-mounted POV. In this case, the subject is an animal, but the same principles apply. The taller video gives more space on the top of the frame to capture the horizon, and more space on the bottom for the eagle’s head, thus orienting the viewer’s perspective. Another good resolution and frame rate to consider for this shot might have been 1440p60, which would have allowed the editor to slow down the flight of the eagle, although the ultra high resolution is certainly stunning.

4K

4K, also called Ultra HD, is the future brought to reality by the HERO4 Black. The HERO3 aimed for 4K at 24 fps but fell just short because of processor limitations. The HERO3’s 4K15 was only a promise of what was to come.
The HERO4’s launch video marked the first time GoPro released a video in full 4K resolution—currently the highest resolution supported by YouTube and other online video distribution platforms sites. At 4K, the video contains over 8 million pixels per frame with each still representing the equivalent of an 8.3 megapixel photo. And although that kind of data may be a stretch for current internet bandwidths and compression technology, the time is coming when 4K will replace 1080p as the online viewing resolution of choice.
4K televisions are becoming more affordable. For exhibiting your work on 4K screens or in theaters, the HERO4 Black’s 4K30 mode is the best possible option; however, there’s still reason to shoot in Ultra HD even if you are editing on a 1080p timeline. The additional video information also helps preserve quality through transcoding, resizing, and compression in the post-production workflow. And just as with 1440p or 2.7K, the higher resolution will give you leeway in choosing the perfect frame for shots in your video.
For professionals seeking to work exclusively in 4K on a 24 fps timeline, 4K24 SuperView takes advantage of the camera’s entire sensor. It pulls the image from a taller 4:3 aspect ratio and dynamically stretches it into a 16:9 frame.
GoPro HERO4: The Adventure of Life in 4K


WVGA

WVGA is the wide-screen equivalent of the standard VGA resolution. An unfortunate side effect of the ever-increasing HD resolutions in cameras is that standard definition WVGA only continues to look more outdated. The advent of 15-second video for Instagram, however, has made GoPro’s WVGAp240 a popular mode.
WVGA’s real advantage is the 240 fps frame rate. The super slow motion is fun to play with and portends the day when HD will have similar frame rates. If image quality is your main concern but you still want wicked-fast frame rates, stick with the HERO4 Black and 1080p120. Motion interpolation software, such as GoPro Studio’s Flux, can make 120 or even 60 fps footage look far slower than WVGA slowed from 240 to 30 fps. If implemented skillfully, the results can look nearly seamless. Certain shots, however, will still only be possible with frame rates of 240 and beyond.
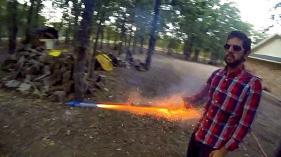
In the featured video, filmmaker Jeremiah Warren shows an innovative use of this mode by extending a GoPro from a ceiling fan twirling in the trees as he set off fireworks below. The video is so striking you’d swear he was using a Matrix-style multicamera array to freeze time. It’s interesting to note that Jeremiah tried shooting the scene in 720p120, but the effect was not the same.
Fireworks Showdown with Jeremiah Warren

Protune

Protune was first introduced as a HERO2 firmware update to enhance video quality and give GoPro’s professional users more power over image correction during post-production. Protune drastically increased video bit rates, added a flat color space with higher dynamic range for more latitude in post-production, and unlocked 24 fps frame rates for all modes so GoPro footage could be transferred easily to film and television industry timelines. An additional HERO3+ firmware update added selectible features such as GoPro Color, White Balance, ISO Limit, Sharpening, and Exposure, giving you more control over the camera than ever.
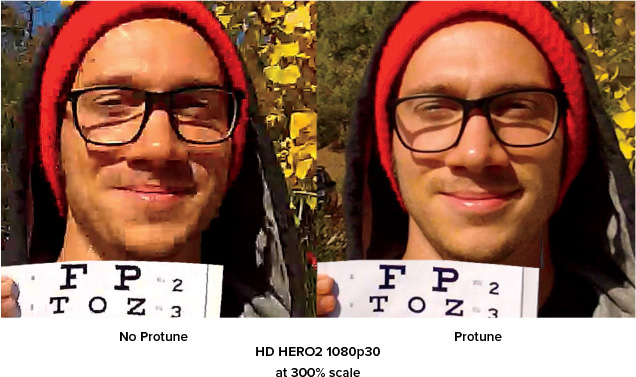
We recommend always using Protune. The higher data rate greatly reduces compression artifacting and increases image quality. The difference can be seen in the two featured frame grabs from HD HERO2 Protune test footage. Here, the camera has been shaken to induce compression artifacts and the images have been scaled up. The Protune footage does a much better job handling high motion.
Flat Color has a neutral, milky look and initially appears unflattering compared with normal GoPro images. When color corrected, however, Flat Color will give more definition in the shadows and highlights. A general rule to follow with color and sharpening is to let the camera do whatever you aren’t comfortable doing yourself in post-production. Time can also be an issue. GoPro’s media team will often use GoPro Color and in-camera sharpening when working events such as the X Games, where fast turnarounds on videos are required.
Auto White Balance
![]() Auto (default): Unless under specific shooting conditions, this is always recommended.
Auto (default): Unless under specific shooting conditions, this is always recommended.
![]() 3000K: Looks the coolest. This setting is best for incandescent lighting indoors or sunrise and sunset outdoors.
3000K: Looks the coolest. This setting is best for incandescent lighting indoors or sunrise and sunset outdoors.
![]() 5500K: Looks neutral. This is best for outdoor settings during the day.
5500K: Looks neutral. This is best for outdoor settings during the day.
![]() 6500K: Looks the warmest. This is best for shooting indoors with cool fluoresecent white light.
6500K: Looks the warmest. This is best for shooting indoors with cool fluoresecent white light.
![]() Native or RAW: This is considered native. It is a direct sensor readout without any color correction and works best for a controlled, heavy post-production workflow.
Native or RAW: This is considered native. It is a direct sensor readout without any color correction and works best for a controlled, heavy post-production workflow.
Color
![]() GoPro Color (default): GoPro’s in-camera color settings for a natural look.
GoPro Color (default): GoPro’s in-camera color settings for a natural look.
![]() Flat: A flat color profile for professionals seeking the most control in post-production.
Flat: A flat color profile for professionals seeking the most control in post-production.
ISO Limit
![]() 6400 (default): Brighter video in low light, increased image noise, especially in the blacks.
6400 (default): Brighter video in low light, increased image noise, especially in the blacks.
![]() 1600: Moderately bright video in low light, moderate image noise.
1600: Moderately bright video in low light, moderate image noise.
![]() 400: Darker video in low light, reduced image noise.
400: Darker video in low light, reduced image noise.
Sharpness
![]() High (default): Ultra-sharp video. This is the same level of sharpness as applied when the camera is not in Protune.
High (default): Ultra-sharp video. This is the same level of sharpness as applied when the camera is not in Protune.
![]() Medium: Moderately sharp video.
Medium: Moderately sharp video.
![]() Low: Softest sharpening.
Low: Softest sharpening.
Exposure
Ranges in values from –2.0 to +2.0, in .5 step increments. The default setting is 0. This setting works within the limits of the ISO setting to adjust image exposure. Use under complex lighting conditions, such as when the camera is inside a vehicle, to keep the world outside the windshield from overexposing.
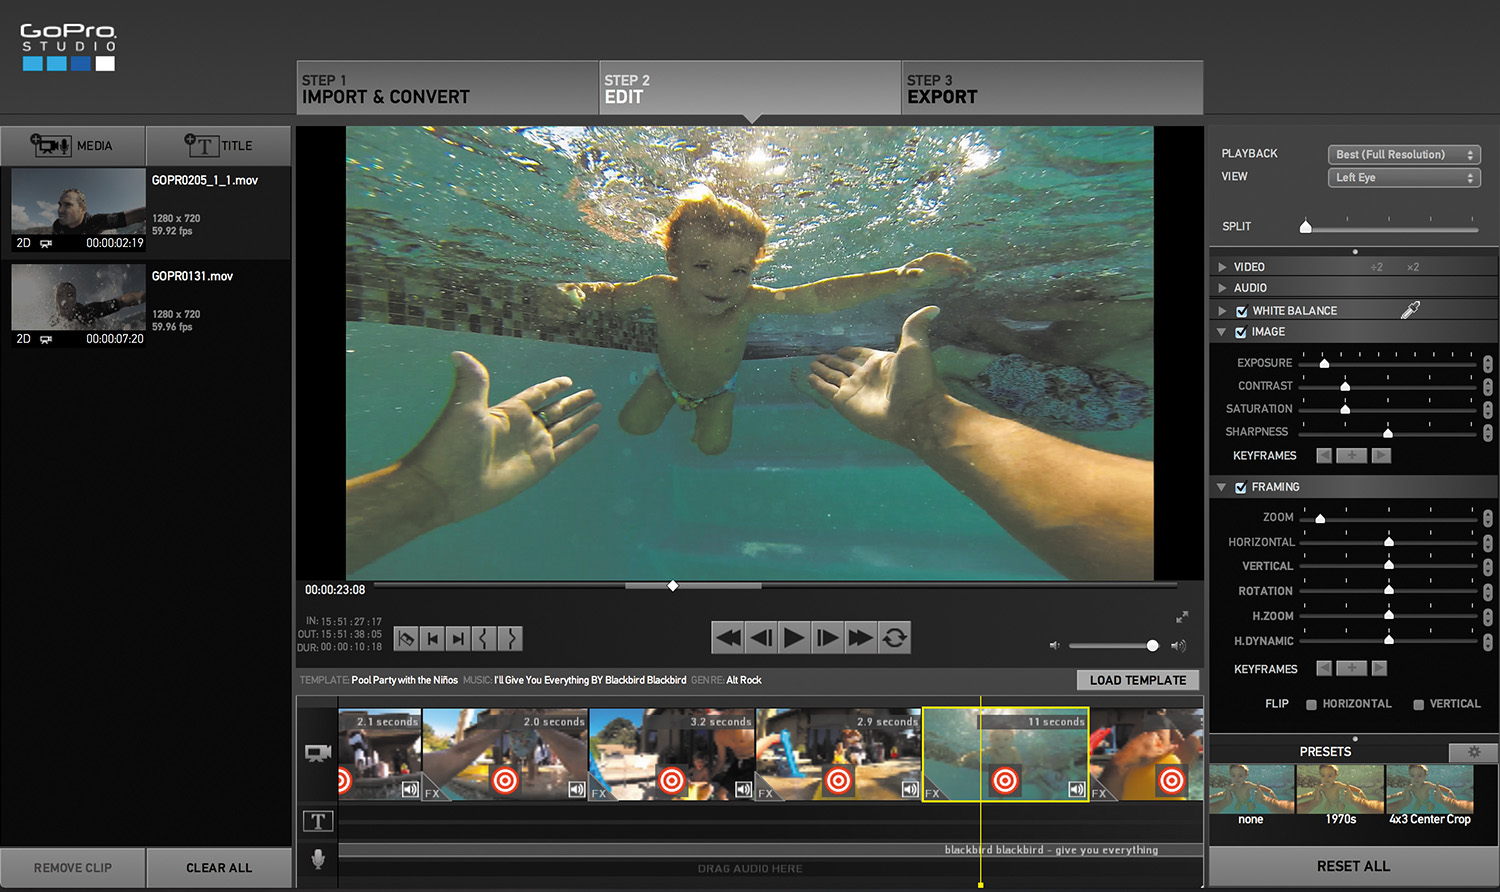
GoPro Studio
The 3D blockbuster Avatar renewed a massive 3D craze in the film and camera industry. We began developing the first GoPro 3D system in preparation for GoPro’s first NAB trade show in April 2010. After capturing a variety of “jam sync” 3D footage (the firmware for frame sync was not yet developed), we tried a variety of available 3D software and, through trial and error, we found the best program to be Cineform. At 5 a.m. on the opening day at NAB, we were still editing the 3D reel on the trade show floor. As we’d hoped, the audience was astounded at the quality and ability of this tiny inexpensive GoPro camera to capture high quality 3D footage—at a fraction of the price of anything else available at the time.
Serendipitously, Cineform owners David Newman and David Taylor introduced themselves at the GoPro booth, delighted that we had used their software and made such a large splash at the trade show. Months later, our firmware engineers cracked the code for frame sync between two GoPros. We became convinced that collaborating with Cineform was the best solution in order to build an editing software for our upcoming 3D HERO System. This collaboration turned into a merging of GoPro and Cineform, and GoPro Studio, our desktop editing application, was born.
What began as a program for syncing and muxing stereoscopic video soon grew to include other features to aid in the GoPro post-production workflow: transcoding into the GoPro Cineform Codec, time-lapse processing, image correction, fisheye adjustment control, and eventually template video editing. More recent updates give users the ability to view HiLight tags on the timeline to quickly find their best moments, as well as Flux motion interpolation for super slow motion and speed changes.
A cool feature of GoPro Studio is that it’s nondestructive: any changes made to a clip inside Studio do not need to be rendered. Instead, they are stored alongside the clip as metadata. The computer then uses this metadata to reinterpret the video when you play it back. Essentially, Studio works in parallel with your editing program. While a clip is on the timeline, you can open it up in GoPro Studio and adjust any changes you made previously or remove them entirely.
From the genesis of Studio to where it’s headed in the future, perhaps, the most interesting part about GoPro is that it’s not just a camera company anymore. It’s becoming an end-to-end content creation company, and isn’t that why we all got excited about GoPro in the first place? It’s for the content!
Wi-Fi

First introduced as a modular BacPac accessory for the HD HERO2 (similar to the LCD and Battery BacPac), Wi-Fi is now integrated into all GoPros except for the entry level HERO. Wi-Fi gives the user power to take full control of his or her GoPro using either GoPro’s Smart Remote or the GoPro App when using a smartphone or tablet. A number of tutorials on www.gopro.com give step-by-step instructions on the setup and pairing of Wi-Fi between your control devices and your GoPro. Chapter 7 discusses download and sharing features within the GoPro App.
The durable, waterproof Smart Remote can control up to 50 GoPros simultaneously at a maximum range of approximately 600 feet. And as mentioned, the Smart Remote is extremely handy for triggering video and photo capture when your GoPro is out of reach.
The GoPro App has become an essential tool on all GoPro media productions due to its ability to turn your smartphone or tablet into a live preview screen and remote control ability. Pressing record remotely, switching in between photo and video, or choosing between FOVs and resolutions is a welcome convenience for our productions to work quickly and efficiently. The GoPro App also makes it easy to wirelessly play back your footage on your smartphone, which can be valuable for immediately checking to see if you nailed the shot or if you need to reshoot. Once you’ve got the shot, you can quickly copy that photo or video over to your smartphone or tablet to share it without needing to connect to a computer.
Mike “Rooftop” Escamilla’s BMX Fullpipe Dreams