4. Placing and Receiving Calls
In this chapter, you learn to use the phone to place and receive calls. Topics include the following:
→ Dialing calls manually and from contact records
→ Using the call logs to return calls, redial numbers, and reply to messages
→ Dialing from embedded numbers in email and messages
→ Using call waiting and call forwarding
→ Using in-call options, such as the keypad, speakerphone, and Bluetooth headset
→ Enabling Mute, Vibrate, and Airplane Mode
With all the functionality your smartphone provides, it’s easy to forget that you can also use it to make and receive calls. But smartphone power often comes at a price. To optimize your use of the phone as a phone, you should learn the various calling procedures and the different options for performing each one.
Placing Calls
The Galaxy S 4 provides many convenient ways for you to make calls. You can manually enter numbers, dial a number from a contact record, use the call logs to return missed calls and redial numbers, call embedded numbers in text or email messages, create and use speed dial entries, and make three-way and emergency calls.
With or Without the 1
When dialing a number, you need to add the dialing prefix/country code only when you’re calling a country that uses a different code. As a result, most numbers that you dial manually, as well as ones stored in Contacts, can either omit or include the dialing prefix.
Manual Dialing
You can use the Phone app’s keypad to manually dial numbers. The procedure differs slightly if the number you’re dialing is also associated with a record in Contacts.
Dialing Someone Without a Contacts Record
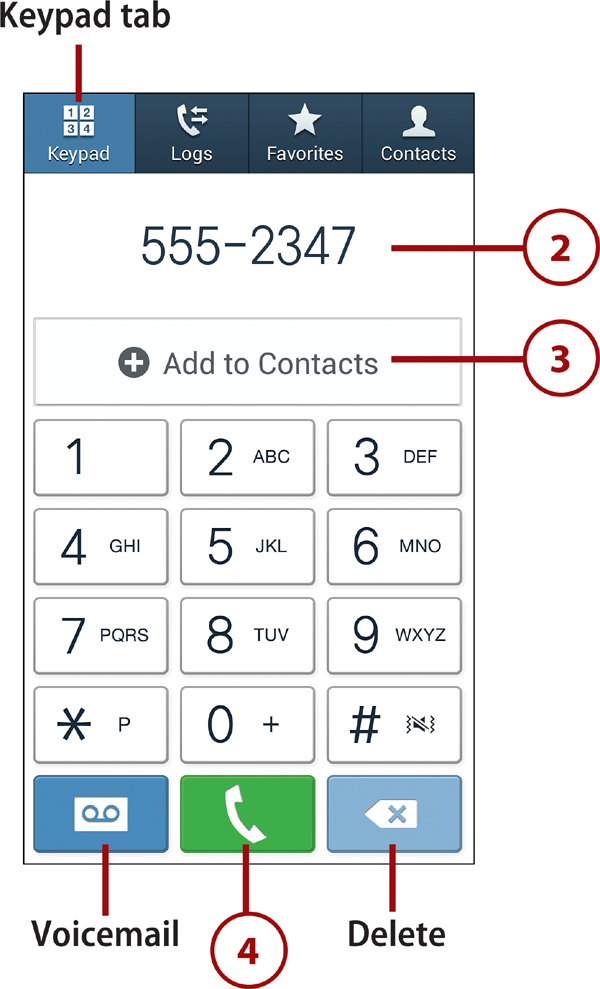
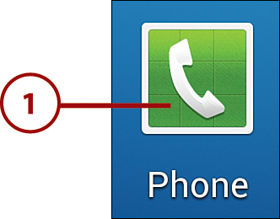
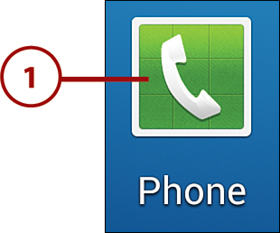
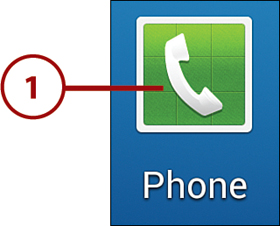
1. Tap the Phone icon at the bottom of the Home screen.
Launching Phone from the Lock Screen
If you’re on the lock screen, you can go directly to the phone by dragging the Phone icon at the bottom of the screen upward (if the icon is present).
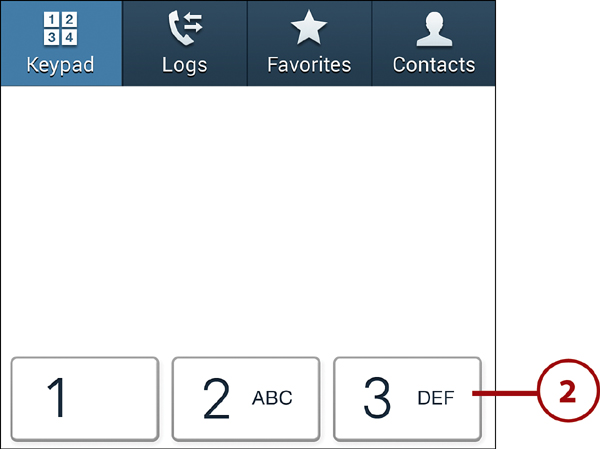
2. If the keypad isn’t displayed, tap the Keypad tab. Then tap the digits in the phone number.
Dialing International Numbers
To make an international call, press and hold 0. A plus symbol appears as the first character in the number. Enter the country code, followed by the phone number.
Mistakes Happen
If you make a mistake, you can press the Delete key to delete the last digit entered. To remove the entire number and start over, press and hold Delete. You can also use normal editing techniques to position the text insertion mark within the number and make changes, such as inserting the area code.
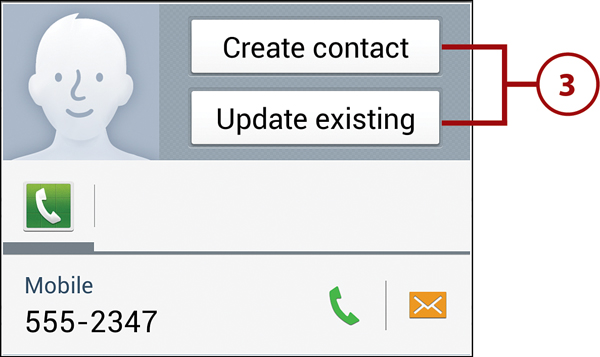
3. Optional: To create a new contact record for this number or add the number to an existing contact record, tap Add to Contacts and select an option from the menu that appears.
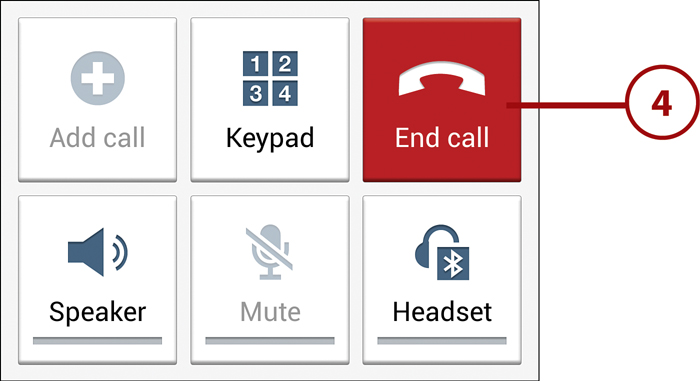
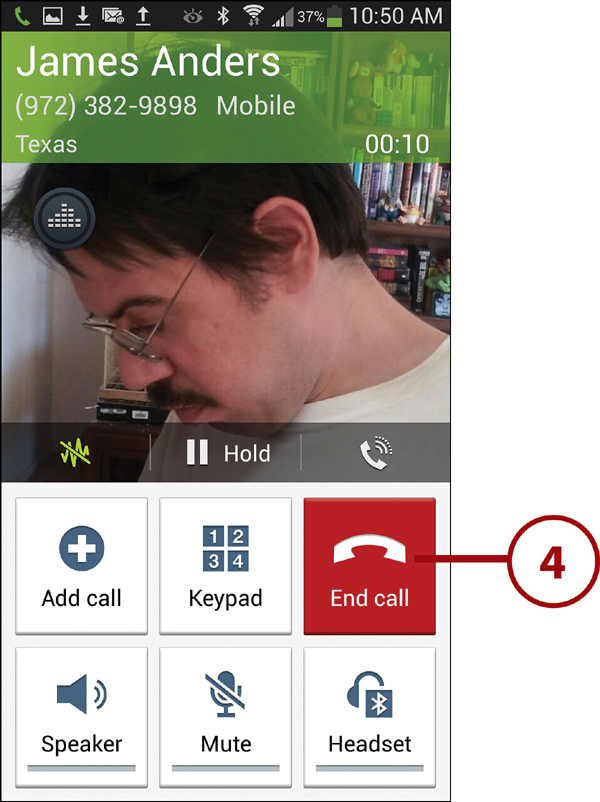
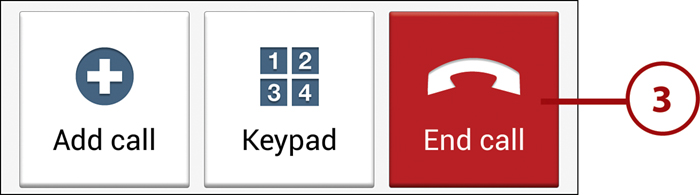
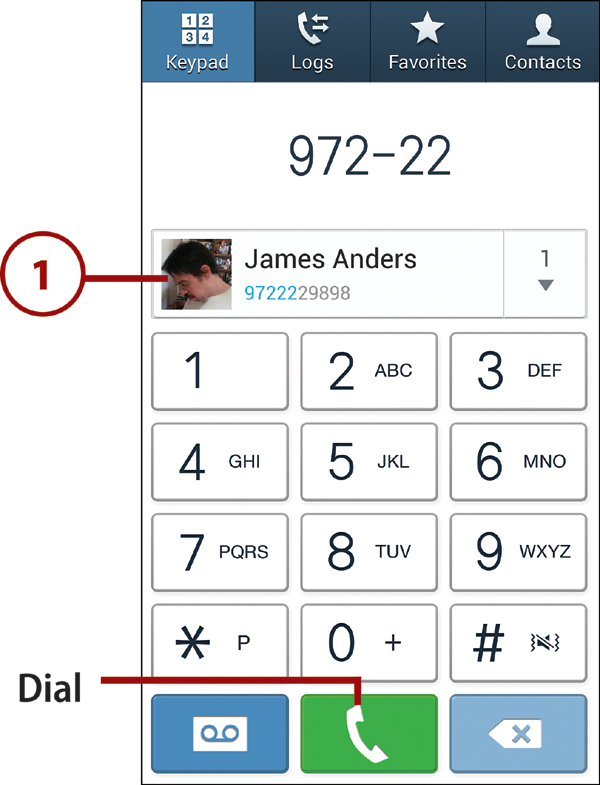
4. Tap the green phone icon to dial the call. When you finish talking, tap the red End Call icon to disconnect.
2. Tap the Keypad tab if it isn’t automatically selected. Then tap any of the phone number’s digits. You can start at the beginning or with any consecutive string of digits that you remember. As you enter the digits, potential matches from Contacts and from numbers you’ve previously dialed display.
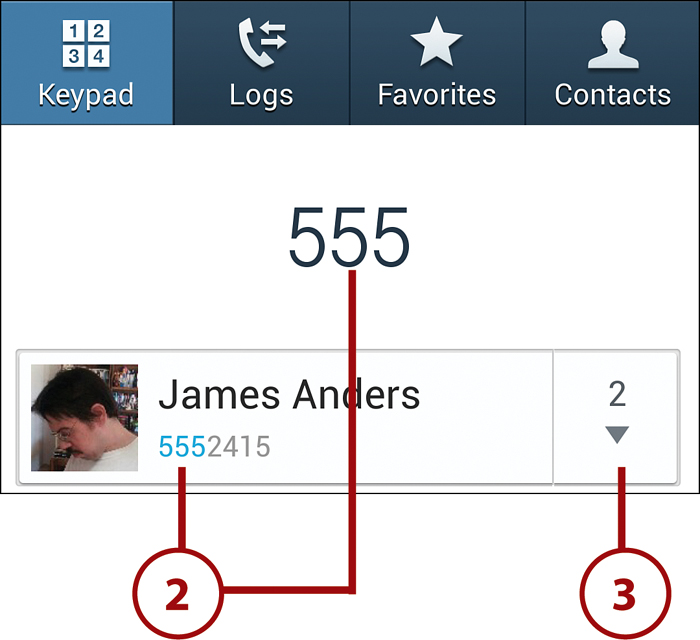
3. Do one of the following:
• To select the main suggestion, tap the person or company’s name.
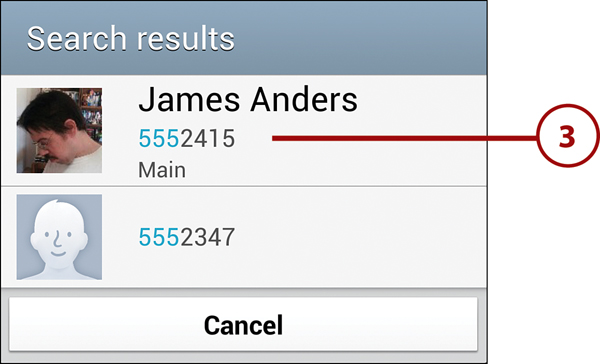
• To view additional matches, tap the numbered down arrow and select someone from the Search Results list.
• Continue entering digits until the correct match is suggested, and then tap the person or company’s name.
Dialing by Name
If you can’t remember any part of a person’s number but are sure he has a Contacts record, you can use the keypad to spell the person’s name.
4. Tap the green phone icon to dial the call. When you finish talking, tap the red End Call icon to disconnect.
Dialing from a Contact Record
Many of your outgoing calls will be to people and companies that have a record in Contacts.
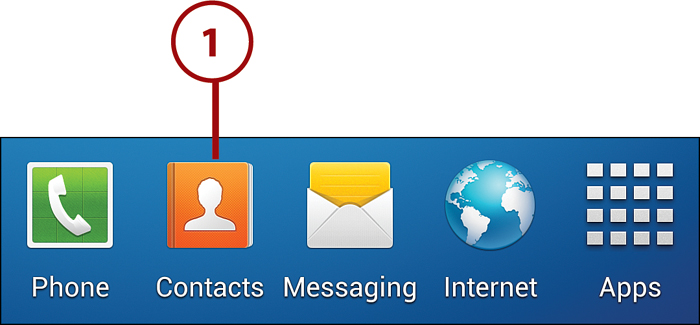
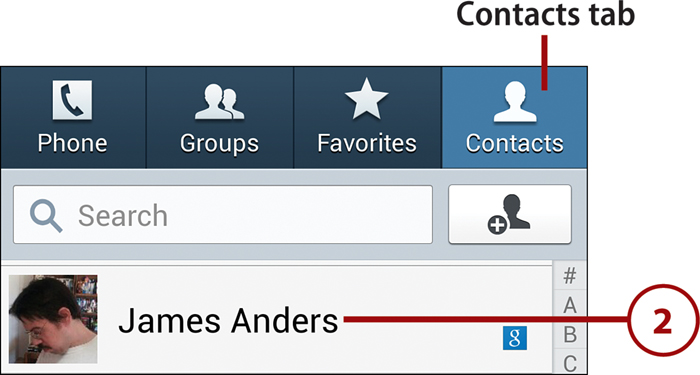
1. Open Contacts by tapping its icon at the bottom of the Home screen, tapping the Phone icon on the Home screen and then selecting the Contacts tab, or accessing Contacts from another app, such as Messaging.
2. If it isn’t already selected, tap the Contacts tab at the top of the screen. Find the record by scrolling or searching, and then tap the entry to view the full record.
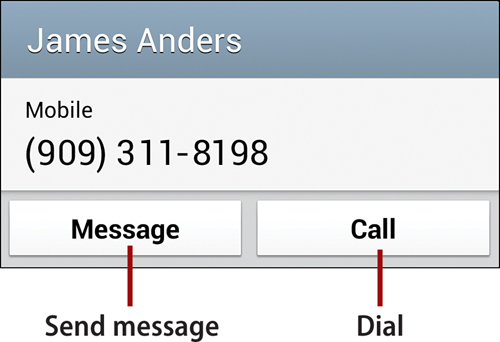
3. Tap a listed phone number or its green telephone icon to dial that number.
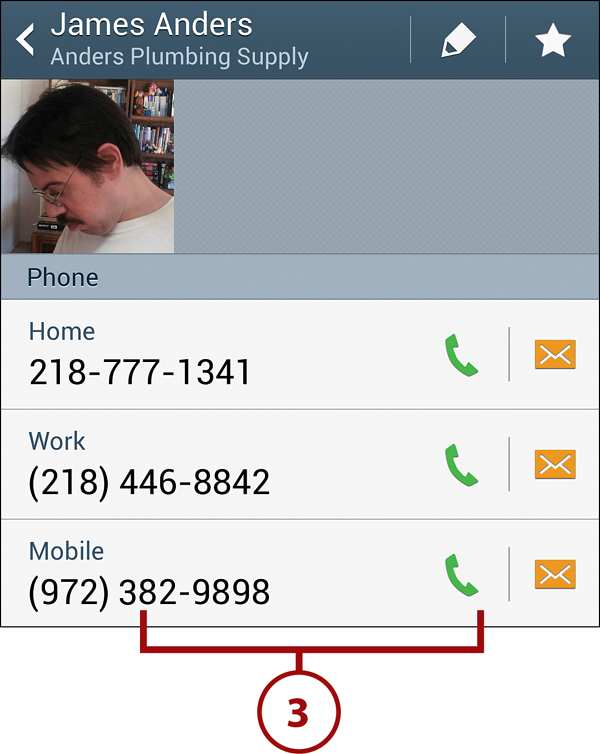
4. When you finish talking, tap the red End Call icon to disconnect.
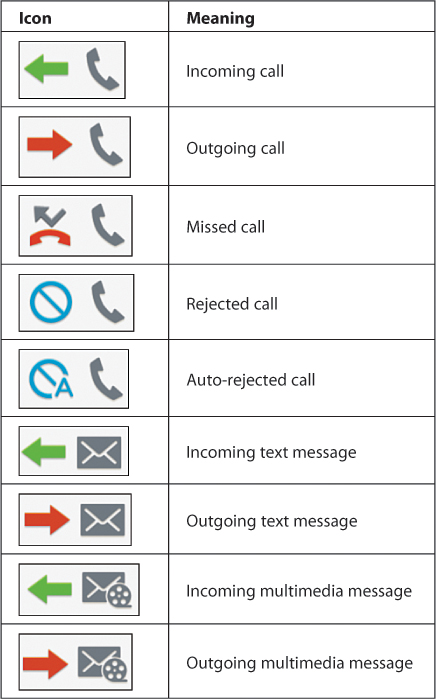
Dialing and Texting from the Call Logs
Every incoming and outgoing call and message is automatically recorded in the Logs section of Phone. By viewing the logs, you can quickly determine which calls and messages need to be returned, as well as initiate a call or the creation of a new message.
Returning and Redialing Calls
By selecting a particular log, you can see whom you’ve called and who has called you. You can also see people with whom you’ve exchanged messages. You can then dial or message any log entry.
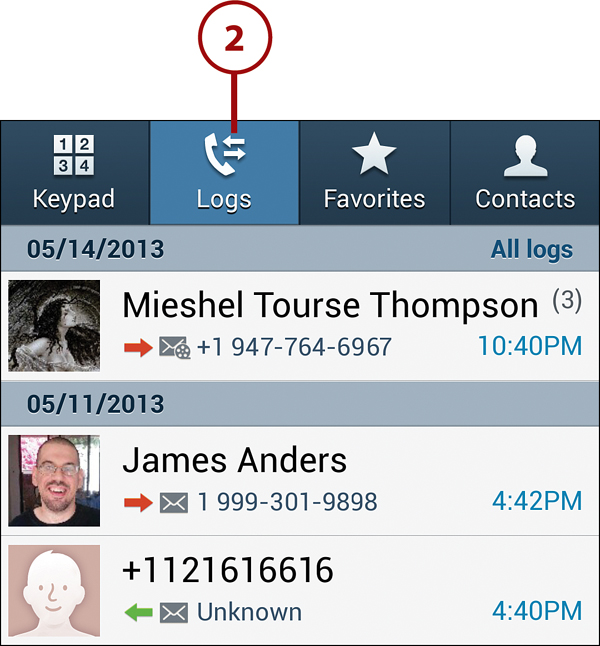
1. On the Home screen, launch Phone by tapping its icon.
2. Tap the Logs tab at the top of the screen.
Viewing the Logs from Contacts
You can also reach Logs from within the Contacts app. At the top of the screen, tap the Phone tab and then tap the Logs tab that appears.
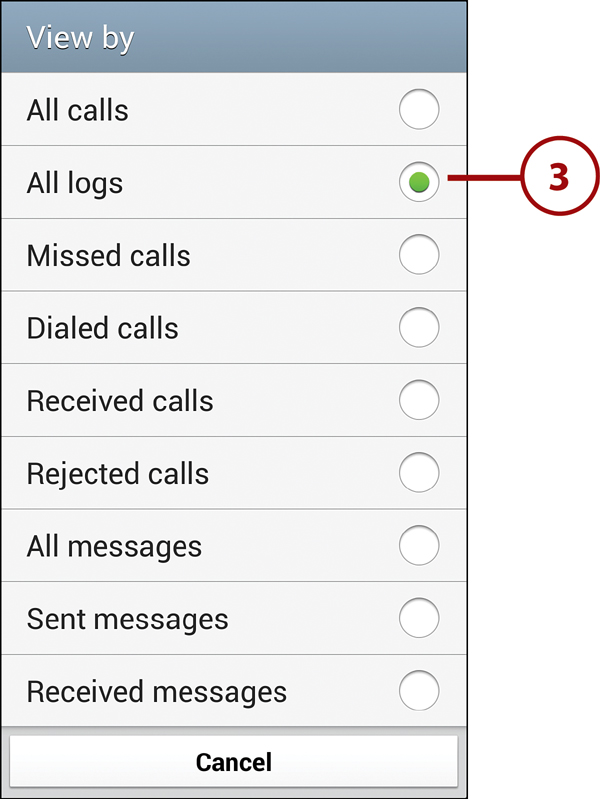
3. To select a log to view (such as All Logs, Missed Calls, or Received Messages), press the Menu key, tap View By, and select an option from the View By menu. (If you don’t select a log, the last one viewed displays.)
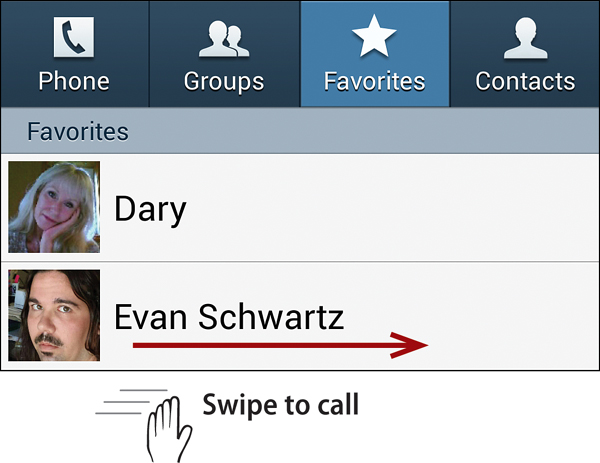
4. To call a person without leaving the current screen, swipe the log entry to the right. The number is automatically dialed.
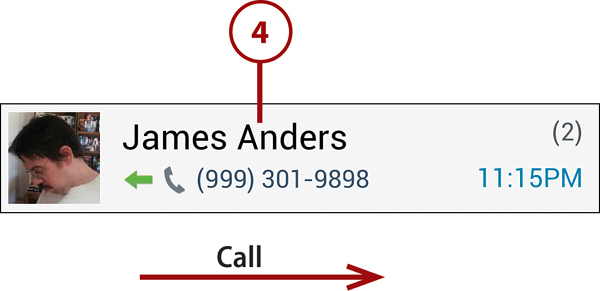
5. To text a person, swipe the log entry to the left. A new message window in Messaging appears.

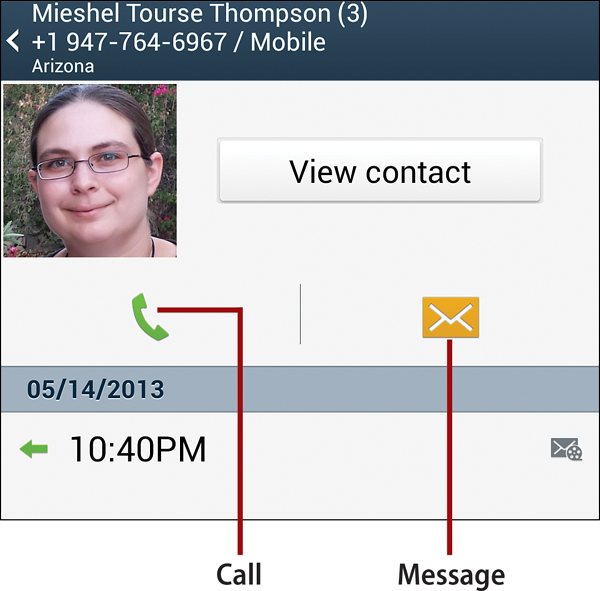
Tap Versus Swipe
If swiping isn’t your thing or you want more control over what happens, tap the log entry. On the screen that appears, you can call the person by tapping the phone icon. To send a text or multimedia message to the person, tap the message icon.
Other Log Options
Using the logs to return calls and messages is often more convenient than dialing manually or searching for the person’s contact record. Here are some other actions you can take in Logs:
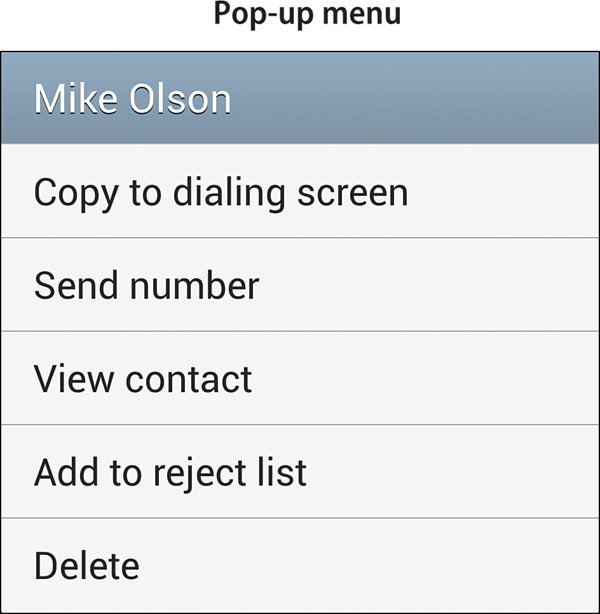
• Press and hold an entry to display a menu of commands specific to that person or company. Note the Delete command, which enables you to delete this single entry, as well as the Add to Reject List command. Future calls from any number in the Reject List are automatically sent to voicemail.
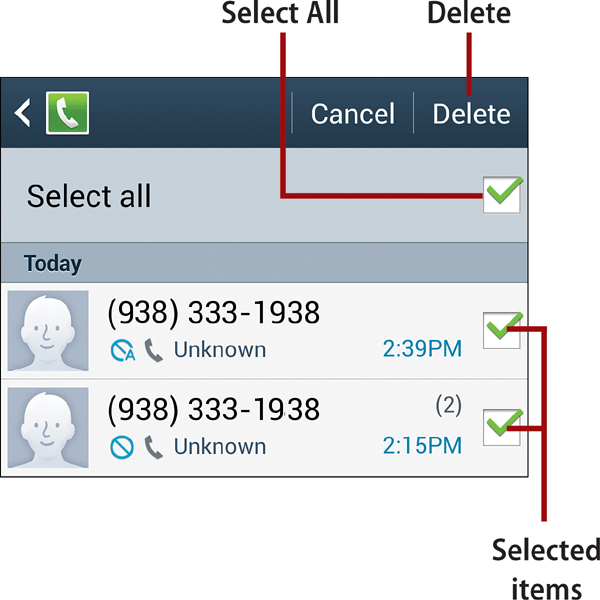
• You can clean up the logs by deleting old, duplicate, and unwanted entries. Press the Menu key, tap View By, and select the log that you want to manage. Press the Menu key again and tap Delete. Select the entries that you want to remove (or tap Select All), tap the Delete button, and tap Delete in the confirmation dialog box.
Dialing a Number in a Text or Email Message
A phone number in an email or text message acts as a link that, when tapped, can dial the number.
Text Message Links
1. In Messaging, display the received or sent message that contains the phone number, and then tap the number.
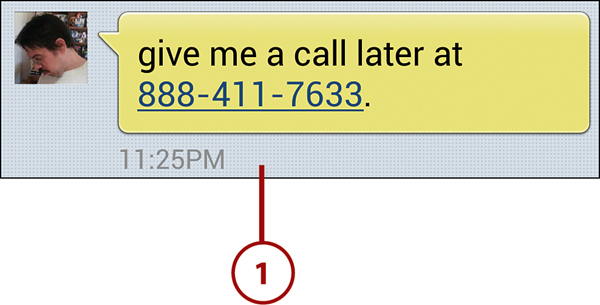
2. In the dialog box that appears, tap Call.
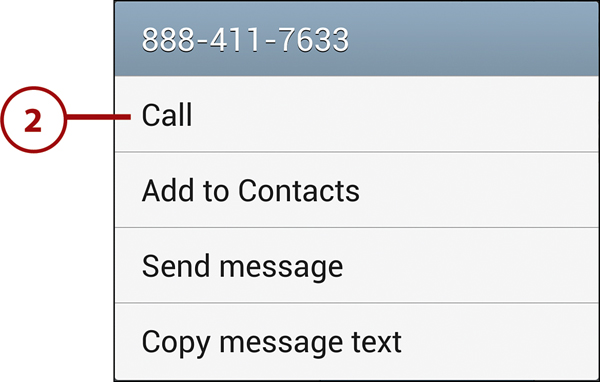
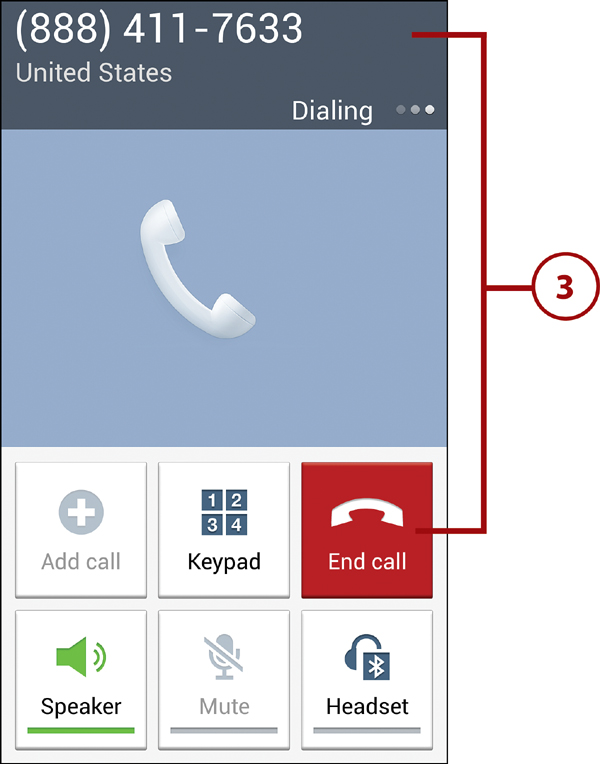
3. Phone launches and dials the number. When you finish talking, tap the red End Call icon to disconnect.
Email Message Links
1. In Email, display the received or sent email message that contains the phone number, and then tap the number.
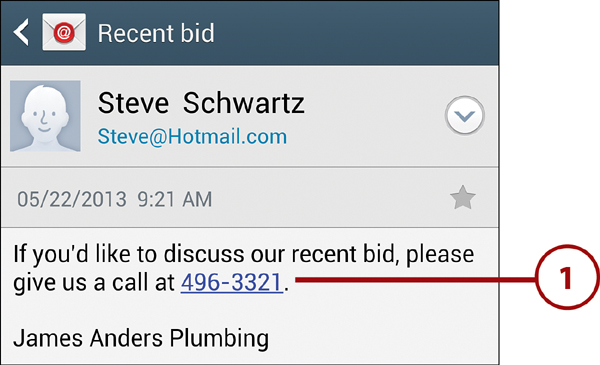
2. The number appears in the Keypad section of Phone. If necessary, you can edit it (adding or removing the area code, for example) using normal editing techniques.
3. Tap the green phone icon to dial the number.
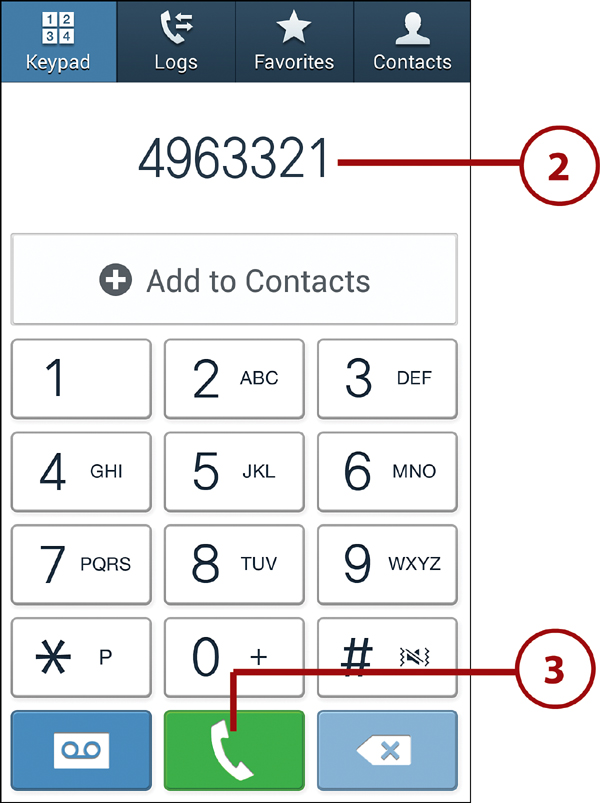
4. When you finish talking, tap the red End Call icon to disconnect.

>>>Go Further: Quick Dialing Techniques
Emergency Calling
Where available, the Galaxy S 4 supports e911 (Enhanced 911), enabling it to connect to a nearby emergency dispatch center regardless of where in the United States or Canada you happen to be. (The equivalent emergency number is different in other countries. In the United Kingdom, for example, it’s 999.) When you place a 911 call, your position can usually be determined by the phone’s GPS or by triangulating your position using nearby cell sites.
Calling 911
1. Do one of the following:
• On the Home screen, tap the Phone app’s icon.
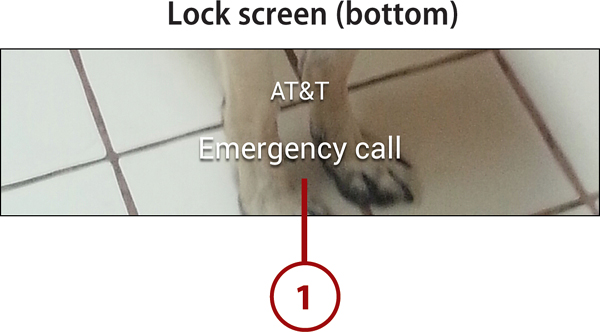
• If the lock screen is displayed and the phone is protected, you can go directly to the Phone screen by tapping the Emergency Call text at the bottom of the screen. (When you use this method to initiate an emergency call, an Emergency Dialer banner appears atop the Phone screen.)
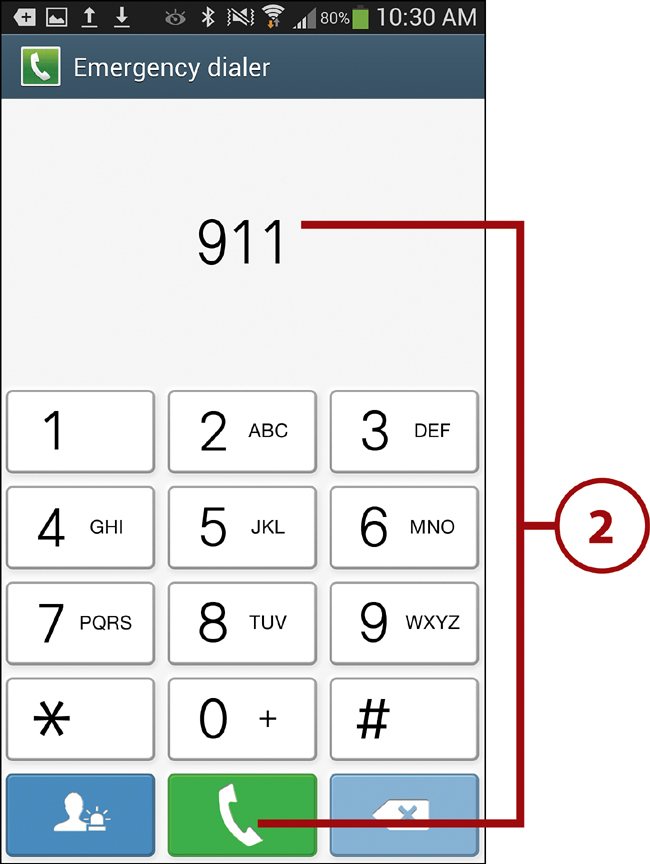
2. Using the keypad, enter 911 (or your country’s equivalent number) and tap the green phone icon to dial the number.
About the Emergency Call Text
Although tapping the Emergency Call text enables you to quickly make an emergency call without having to first unlock the screen and launch the Phone app, it has an important restriction. Only calls to 911 and emergency responders (such as the police and fire department) are allowed; all others are blocked. You cannot call your parents or spouse, for example. To emphasize this, the band at the top of the screen reads Emergency Dialer. If you need to call someone other than an emergency responder, you need to unlock the screen by supplying your pattern, PIN, or password; launch the Phone app; and then dial normally.
• Even if you’ve disabled the phone’s location/GPS functions for all other uses, these features remain available for 911 use.
• Not all emergency dispatch centers support e911. Instead of assuming they’ve determined your location based on GPS or triangulation, be prepared to give your location.
• Some emergency dispatch centers use an automated voice menu that prompts you to enter numbers. According to Sprint, for example, “If you encounter a prerecorded message instead of a live operator, wait for the appropriate prompt and say ‘EMERGENCY’ instead of pressing 1. Not all wireless phones transmit number tones during a 911 call.”
Other Outgoing Call Options
The Galaxy S 4 also supports some additional outgoing call options: speed dialing, blocking your caller ID information, three-way calling, and inserting pause and wait commands.
Speed Dialing
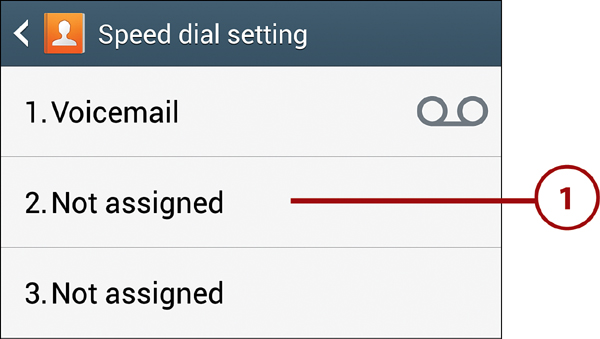
To make it easy to dial your most important numbers, you can assign a speed dial number to anyone with a record in Contacts. The digits 2–100 are available as speed dial numbers; 1 is reserved for voicemail.
Accessing the Speed Dial Setting Screen
1. Launch Phone or Contacts by tapping an icon at the bottom of the Home screen.

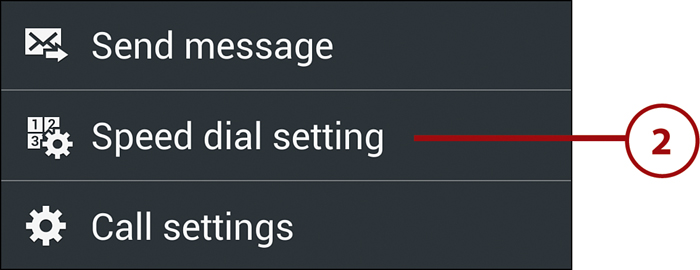
2. To display the Speed Dial Setting screen, do either of the following:
• With the Keypad tab in Phone selected, press the Menu key and tap Speed Dial Setting.
• With the Contacts tab selected, press the Menu key and tap Speed Dial Setting.
What Next?
When you reach the Speed Dial Setting screen, jump ahead to the section that describes the task you want to perform.
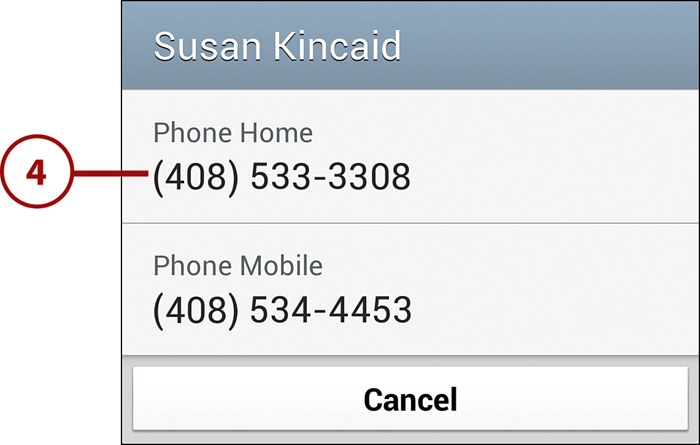
Assigning a Speed Dial Number
1. On the Speed Dial Setting screen, tap a currently unassigned number—that is, one that says Not Assigned.
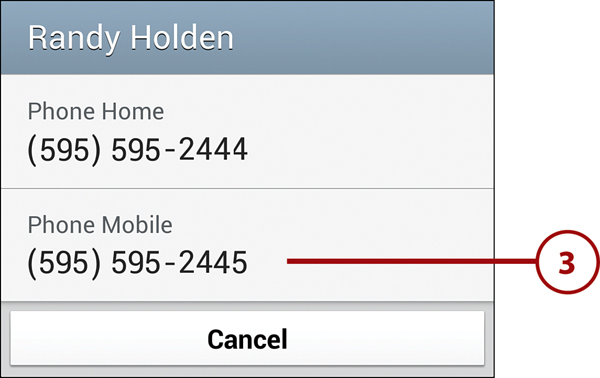
2. In Contacts, select the person or company in the contacts list with which to associate this speed dial number.

3. If the contact record contains only one phone number, the number is automatically used. If the contact record contains more than one phone number, select the number to use.
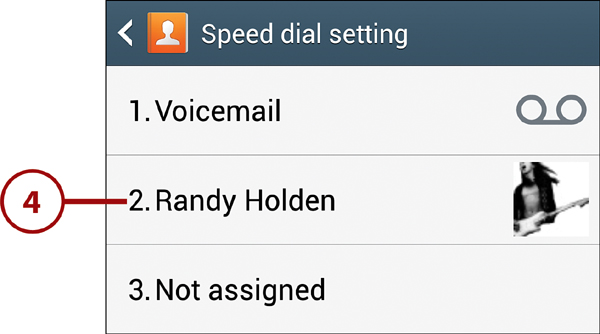
4. The contact’s phone number is assigned to the speed dial number.
Replacing an In-Use Speed Dial Number
1. On the Speed Dial Setting screen, press and hold the number that you want to reassign.
2. In the dialog box that appears, tap Replace.
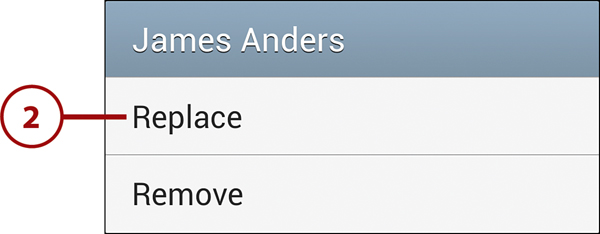
3. Select a person or company in the Contacts list.

4. If the contact record contains only one phone number, the number is automatically used. If the contact record contains more than one phone number, select the number to use.
5. The contact’s phone number replaces the one previously assigned to the speed dial number.

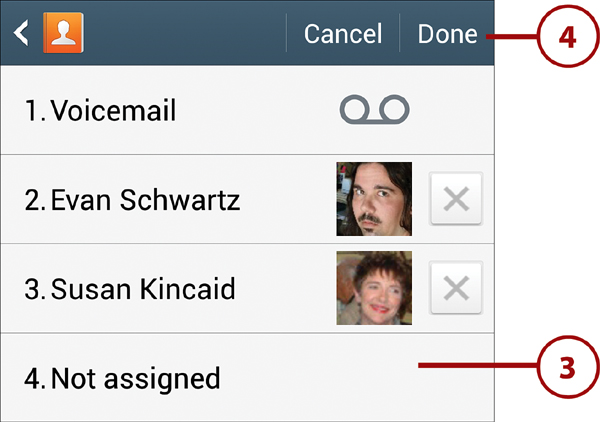
2. The Speed Dial list appears with an X beside each entry.
3. Tap each entry that you want to remove. The entry changes to Not Assigned.
4. When you finish, tap Done to complete the deletions or Cancel to retain the original speed dial assignments.
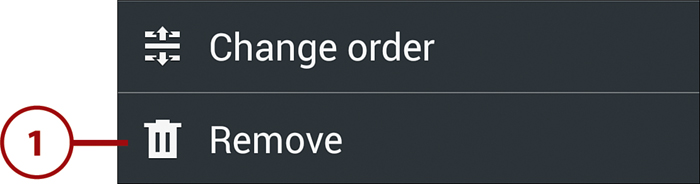
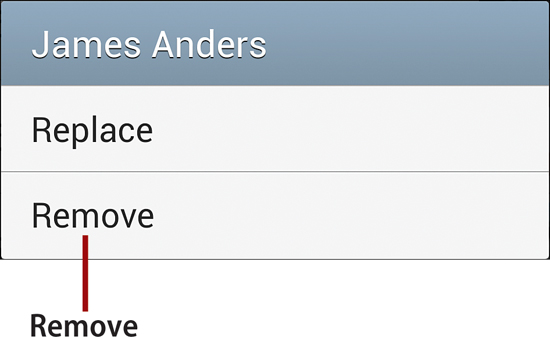
Removing a Single Speed Dial Number
If you want to clear only a single speed dial number, go to the Speed Dial Setting screen, and press and hold the number you want to remove. In the dialog box that appears, tap Remove. The contact previously associated with that speed dial number is instantly removed.
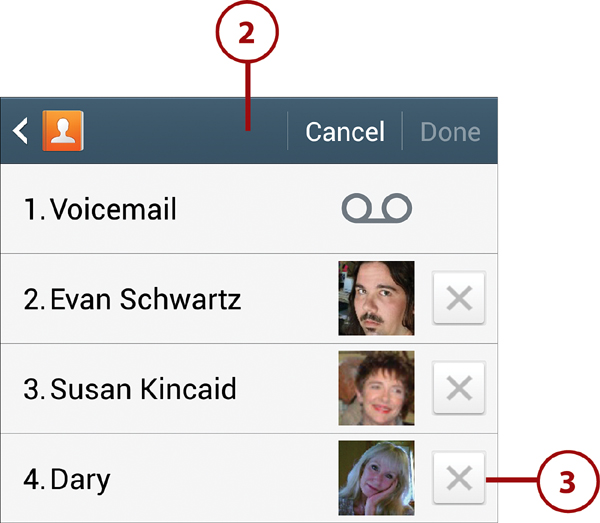
Rearranging Speed Dial Numbers
1. With the Speed Dial Setting screen displayed, press the Menu key and tap Change Order.

2. Tap the contact thumbnail to which you want to assign a new speed dial number.
3. Tap the destination slot—it can be empty or currently occupied. If empty, the contact is assigned the new speed dial number. If currently occupied, the contacts swap slots.
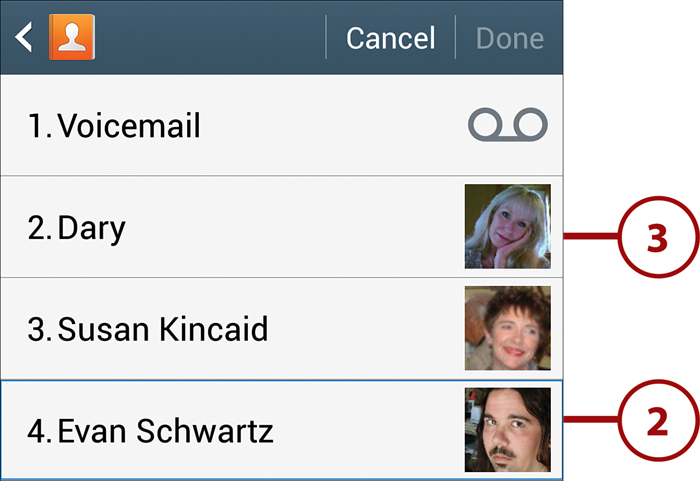
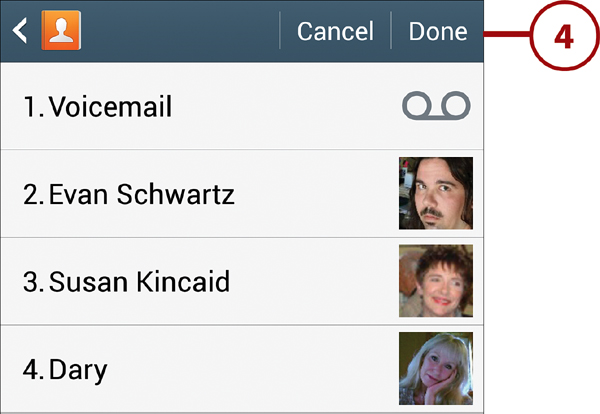
4. Repeat steps 2 and 3 for each additional pair of slots that you want to swap. When you finish, tap Done to accept the new arrangement or Cancel to restore the previous arrangement.
Dialing a Speed Dial Number
1. Launch Phone by tapping its icon at the bottom of the Home screen.
2. With the Keypad tab selected, enter the speed dial number. Press and hold the final digit.
3. The phone dials the person or company associated with the speed dial number. When you finish talking, tap the red End Call icon to disconnect.
Dialing from the Speed Dial Setting Screen
If you can’t remember a particular speed dial number, you can initiate a call or message from the Speed Dial Setting screen. Scroll to find the person or company’s entry, tap it, and then tap Call or Message in the dialog box that appears.
Temporarily Blocking Your Caller ID Information
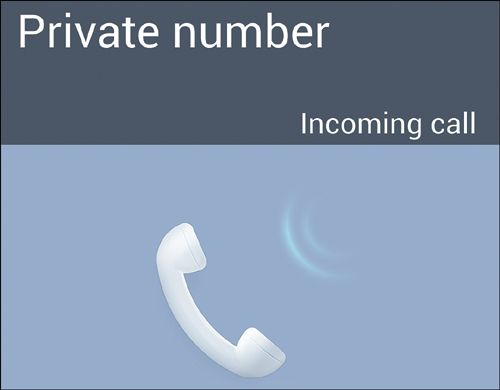
If you want to prevent your caller ID information from displaying on an outgoing call, precede the number with *67, such as *675591234 for a local call or *672925591234 for a long-distance call. The recipient’s phone should display Private Number rather than your name, city, or number. Note that *67 is the correct prefix in the United States and Canada only; other countries have a different prefix.
If you want to prevent your caller ID information from displaying on every call, contact your service provider for assistance.
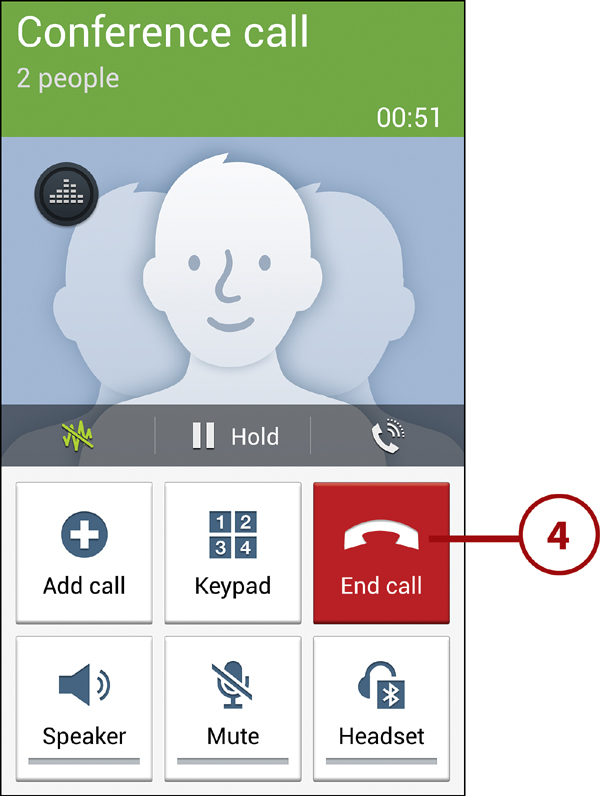
Three-Way Calling
By making a three-way call, you can talk to two people at the same time. (If you don’t have an unlimited minutes plan, check with your service provider to determine how three-way calls are billed.)
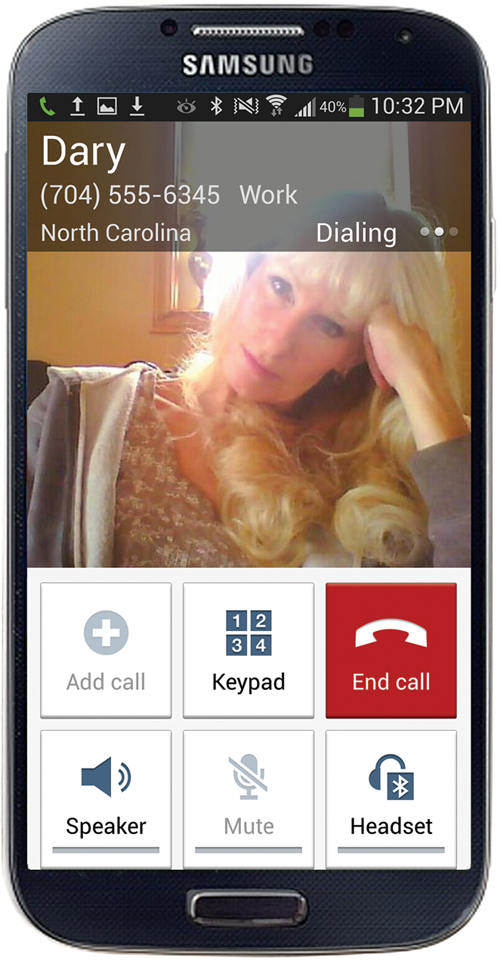
1. Launch Phone, enter the first phone number or select it from Contacts, and tap the green phone icon to dial the number.
2. When the first person answers, tell him to wait while you call the second person. Tap the Add Call icon and dial the second number. The first person is automatically placed on hold.
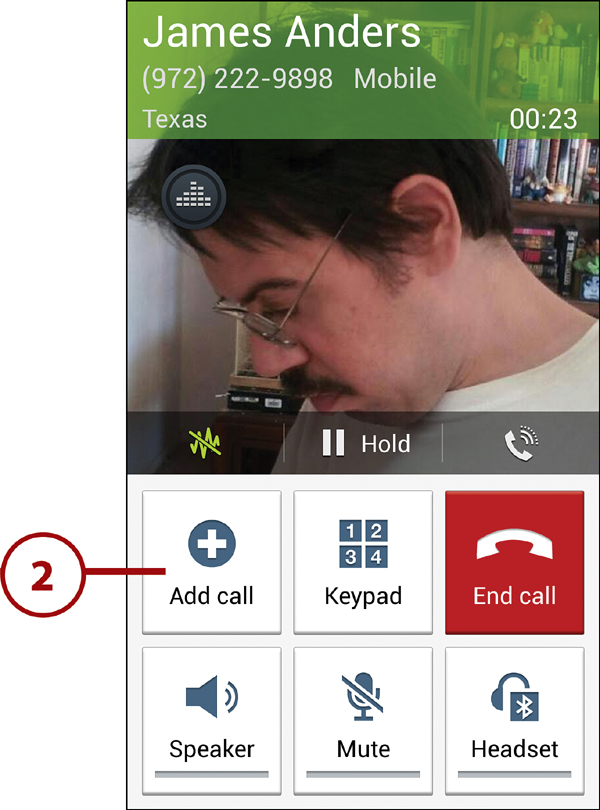
3. When the second person answers, tap the Merge icon.
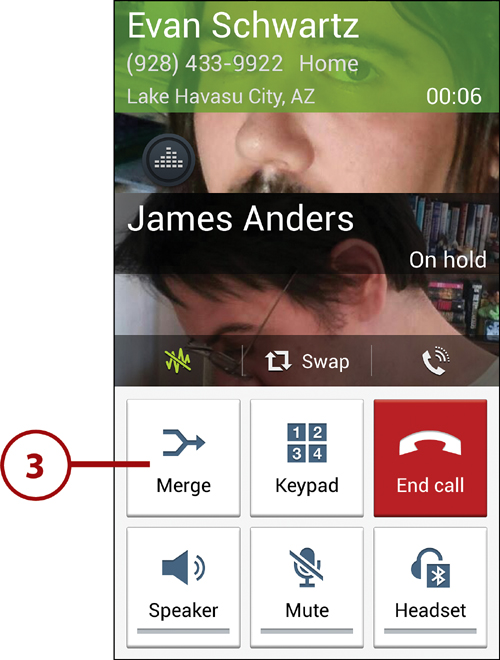
4. The display shows that you’re all connected to a conference call. When the call is completed, tap End Call. Any person who is still connected will be disconnected.
Inserting Pause and Wait Commands
If you’re fed up with listening and responding to the convoluted automated answering systems used by banks, insurance companies, telephone companies, and cable systems, you might consider programming their Contacts record to automatically tap the correct keypad digits in response to their menus. For instance, 2148527777,,1,2,6310,,43 might take you to your Internet provider’s technical support group.
In addition to digits, each phone number can contain commas (,) and semicolons (;). Each comma represents a 2-second pause (you can string together multiple pauses), and each semicolon instructs the phone to wait until you enter any number or press a key. Creating a number that responds correctly to voice prompts requires trial and error. For example, if you don’t wait long enough (using pauses) before the next number is entered, the process fails.
As you enter or edit a phone number, press the Sym key to insert a pause or wait. The best numbers in which to use pauses and waits are the simple ones, such as those for which the initial prompt is for an extension. Complex, multilayered menus take much longer to program, and your efforts will “break” if the answering system’s menu structure changes.
Receiving Calls
The other half of the phone call equation is that of receiving and responding to incoming calls.
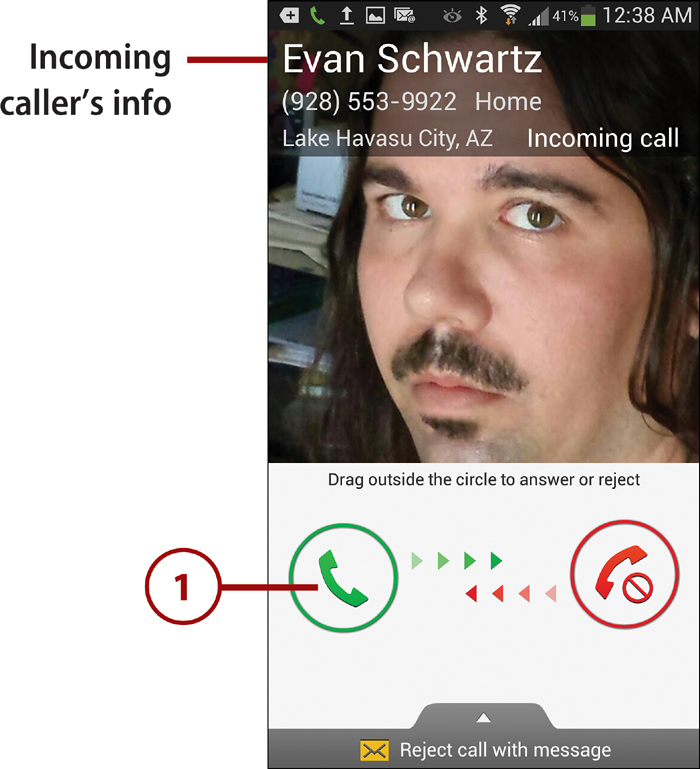
Responding to an Incoming Call
1. When a call comes in, the caller is identified by name and number (if she has a Contacts record), by number (if there’s no matching Contacts record), or by Private Number (if she has blocked her caller ID).
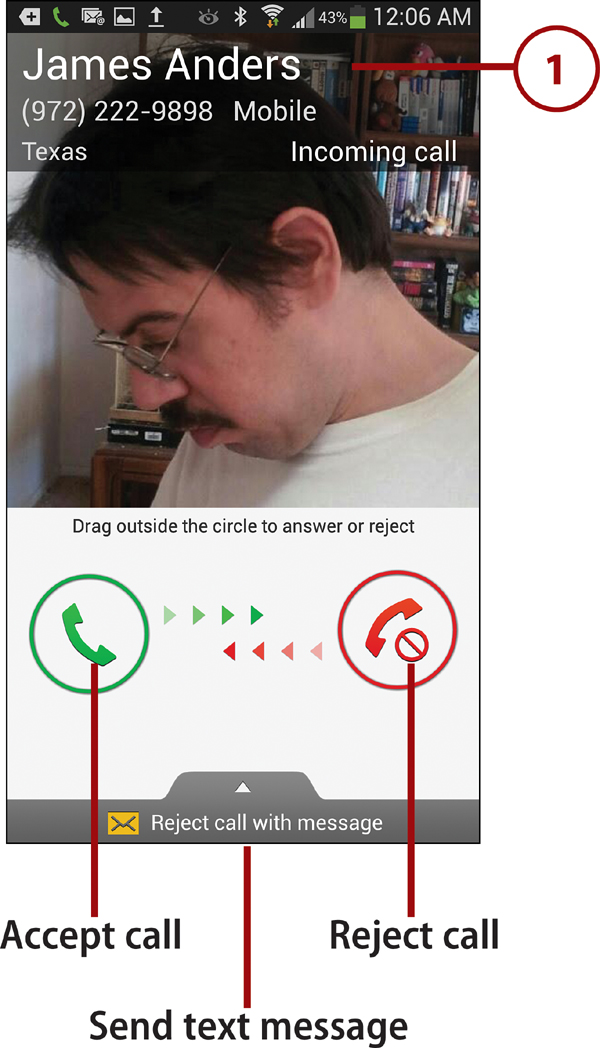
2. You can respond in any of the following ways:
• Accept call. Drag the green phone icon in any direction.
• Reject call. Drag the red phone icon in any direction, sending the caller to voicemail.
• Ignore call. Do nothing; let the phone ring. After a number of rings, the caller is transferred to voicemail.
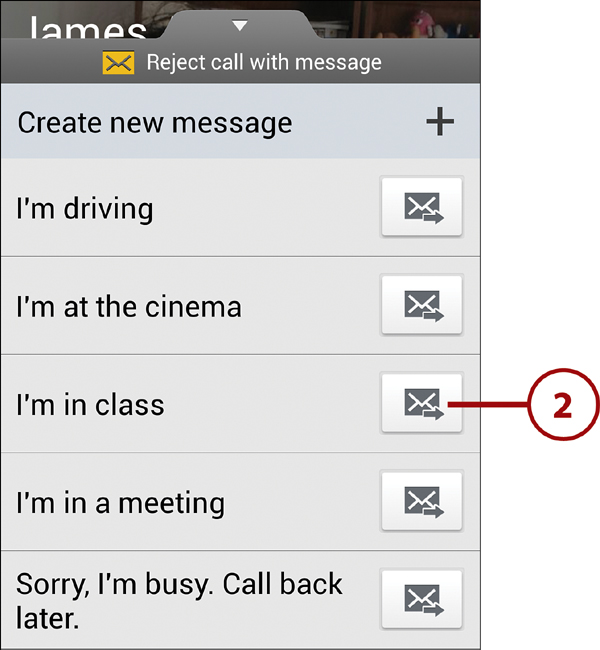
• Reject with explanation. Drag Reject Call with Message upward and select a text message to transmit to the caller. (Note that if the caller doesn’t have a messaging plan or is calling from a landline, the text message might not be delivered.)
3. When the call concludes, tap the End Call icon.
Air Call Accept and Muting the Ringtone
When Air Call Accept is enabled, you can accept an incoming call and switch to the speakerphone by merely waving your hand over the sensor at the top of the phone. To learn about enabling Air Call Accept and other air gestures, see “Enabling Air Gesture” in Chapter 3.
If you’ve enabled Mute/Pause in Motion Settings, you can turn the phone over to mute the ringtone that accompanies an incoming call. For instructions, see “Enabling Motion and Palm Motion Settings” in Chapter 3.
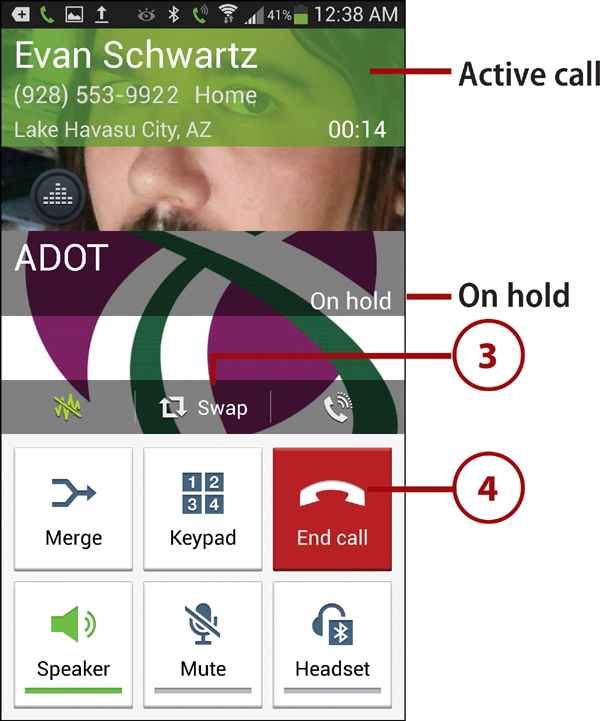
Call Waiting
Call waiting enables you to answer an incoming call when you’re already on a call.
1. Answer the incoming call by sliding the green phone icon in any direction.
2. In the Accept Call After dialog box, tap Putting current caller On Hold.
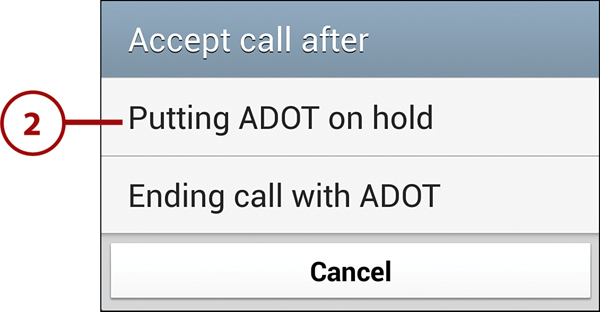
3. The initial call is automatically placed on hold while you speak to the new caller. To switch between callers, tap the Swap icon. The active call is always shown in green at the top of the screen.
4. To end the active call, tap the End Call icon. The other call automatically becomes active.
Call Forwarding
You can have all or particular kinds of calls that your cell phone would normally receive forwarded to another number automatically. Forwarding works even when the Galaxy S 4 is turned off. To restore normal calling, deactivate call forwarding when you’re finished. (Check with your service provider or review your plan to determine the cost of using call forwarding.)
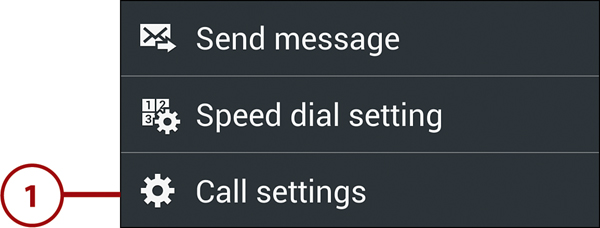
1. Tap the Phone icon on the Home screen.
2. Press the Menu key and tap Call Settings.
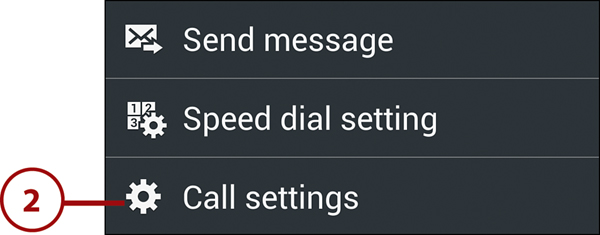
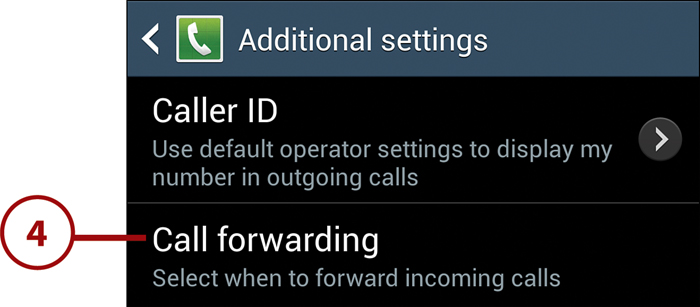
3. Tap Additional Settings (at the bottom of the first section).

4. Tap Call Forwarding.
First Use
Before making any changes to call forwarding, be sure to write down the default phone number listed on the Call Forwarding screen. It’s the number for your carrier’s voicemail, where calls are normally forwarded when you miss or reject a call, for example. You may need this number later if you elect to temporarily forward calls to a different number, such as a friend’s landline.
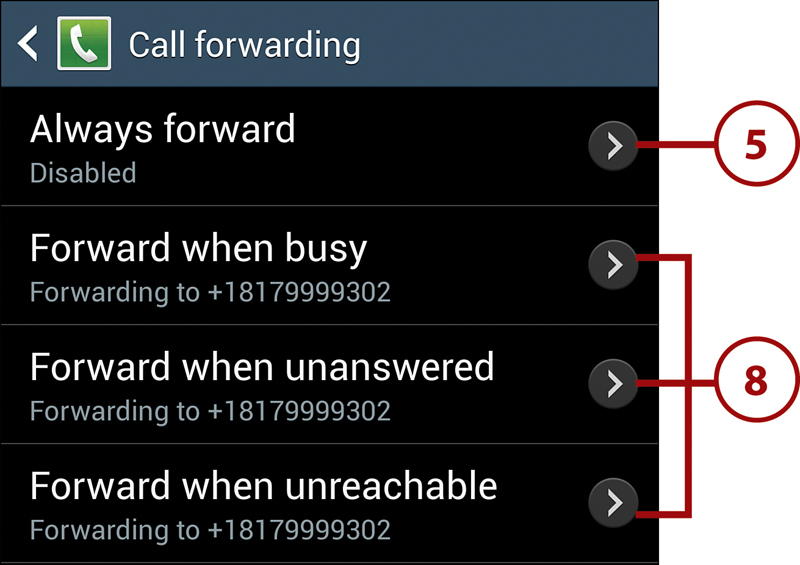
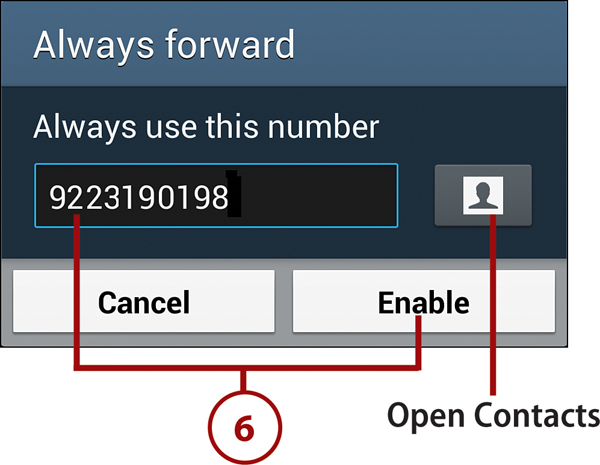
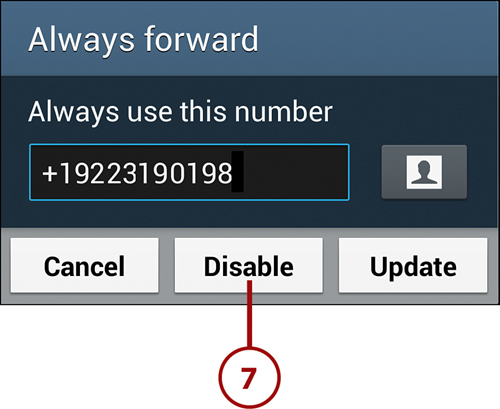
5. To enable unconditional forwarding of all calls (regardless of type), tap Always Forward. When Always Forward is enabled, all other forwarding options are disabled.
6. Enter, edit, or review the phone number to which all calls will be forwarded, and tap Enable. You can manually enter the number or select it from a Contacts record. When you’re ready to restore normal call handling, see “Ending Call Forwarding” at the end of this task.
Dialing Prefix
It isn’t necessary to enter the +country code (such as +1) at the beginning of the number. It’s entered for you when you tap Enable.
7. To enable conditional forwarding (selective forwarding based on call type), you must first disable Always Forward—if it’s currently enabled. Tap Always Forward, and then tap the Disable button in the Always Forward dialog box.
About Forwarding
One forwarding state or the other is always active. Either all calls are automatically routed to a single number (Always Forward) or selected calls (Busy, Unanswered, or Unreachable) are routed to one or multiple numbers, depending on the type of call. Unless you change it, the forward-to number is your voicemail number.
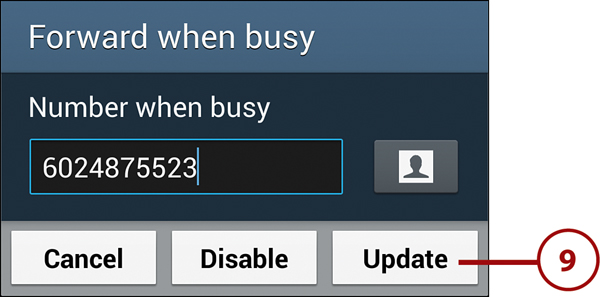
8. To enable forwarding for selected conditions, tap any of the following options:
• Forward when busy. Forward only when you’re already on a call.
• Forward when unanswered. When you ignore a call, it is forwarded.
• Forward when unreachable. Forward calls only when it’s determined that you’re out of your provider’s service area or the phone is turned off.
9. In the dialog box that appears, enter, edit, or review the phone number to which calls will be forwarded. You can manually enter the number or select it from a Contacts record. Tap the Enable, Update, Disable, or Cancel button. Repeat steps 8 and 9 for other forwarding options that you want to enable or change.
Ending Call Forwarding
To restore normal call handling, perform steps 1–5. In the Always Forward dialog box, tap the Disable button. Be sure to reset all conditional formatting options to the voicemail number. This happens automatically when you tap the option name and click Disable in the dialog box that appears.
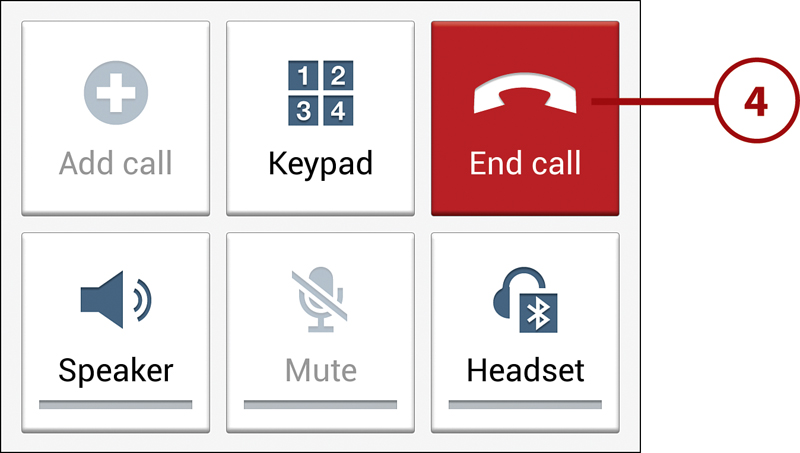
In-Call Options
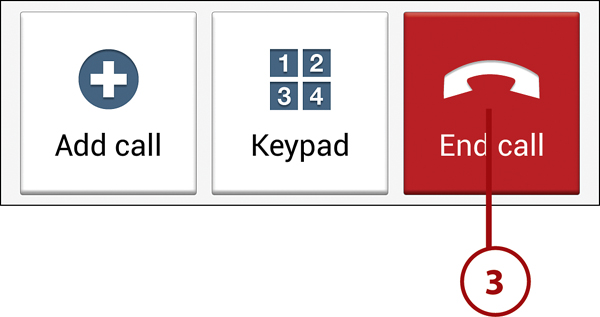
While on a call, you can access common in-call options by tapping various icons. (The first icon in the section at the bottom of the screen—variously labeled Add Call or Merge—was discussed in previous sections.) Additional options are available via hardware controls and the Notification panel.
Icon Options
During any call, you can tap icons to enable or disable options. In general, when an in-call option is enabled or active, its icon is green.
• Personalize Call Sound. Tap this icon to choose an equalizer setting for the current call. Before you can use this feature, you must set it up as described in “Personalize Call Sound,” later in this chapter.
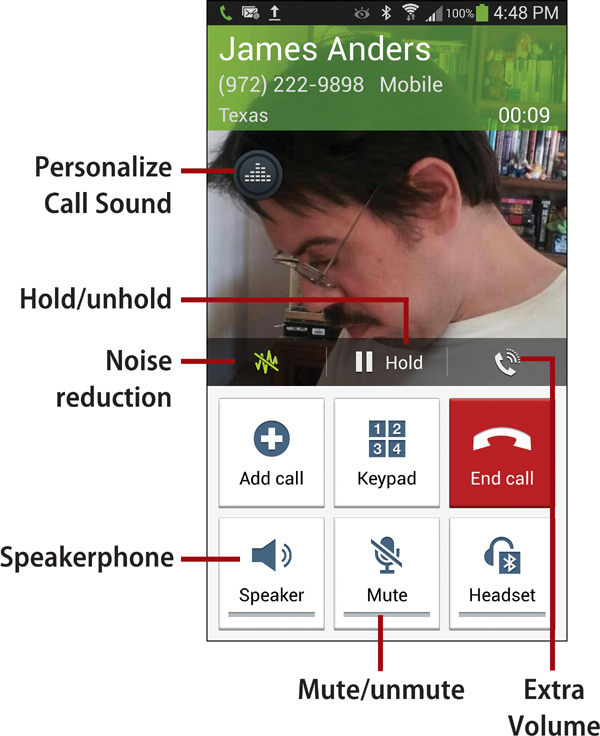
• Noise Reduction. When enabled (green), this feature can improve call quality by reducing ambient noise. Tap the icon to toggle Noise Reduction on or off.
• Hold/Unhold. Place the current call on hold. Tap the icon again to reactivate the call.
• Extra Volume. You can boost in-call volume above the normal maximum by tapping the Extra Volume icon. Tap it a second time to disable the volume boost.
• Keypad. If you need to enter information to respond to a voice prompt system or enter an extension, for example, tap the Keypad icon to display the dialing keypad. The Keypad icon’s label changes to Hide. To dismiss the keypad, tap the Hide icon or press the Back key.
• Speaker. To toggle the phone between normal and speakerphone modes, tap the Speaker icon. When the speakerphone is active, the icon is green.

• Mute. To temporarily turn off the phone’s microphone so that the other party can’t hear you, tap the Mute icon. When muting is active, the icon is green.
• Headset. To use a Bluetooth headset on the current call, tap the Headset icon. When Bluetooth is active, the icon is green. To return to a normal, non-Bluetooth call, tap the icon again.
• End Call. Tap End Call to “hang up,” disconnecting from the other party.
Other In-Call Options
Two other important options are available during calls that aren’t represented by icons:
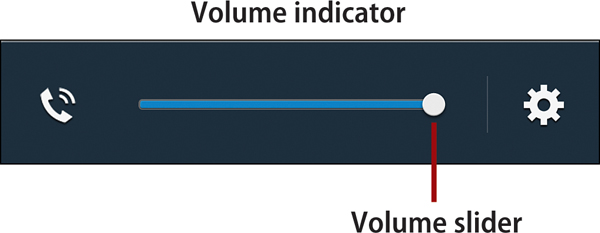
• Volume adjustment. To change the volume, press the volume control on the left side of the phone. An onscreen volume indicator appears. Press the top half of the hardware volume control to raise the volume; press the lower half to lower the volume. You can also adjust the volume by dragging the onscreen slider.
• Notification panel controls. You can drag down the Notification panel to access the Mute, Speaker, and End options. This is especially useful if you leave the Phone screen during the call to run other apps.

Phone Call Multitasking
You can run other apps while on a call. Return to the Home screen by pressing the Home key and then launch the apps, or press the Menu key while on the Phone screen to launch Contacts, S Memo, or Messaging. The status bar turns neon green to indicate that a call is in progress. When you’re ready to end the call, launch Phone again or tap the End icon in the Notification panel.
Using Voicemail
Using your service provider’s voicemail, people can leave messages for you when you’re unavailable or the phone is turned off. See Chapter 1 for instructions on setting up voicemail.
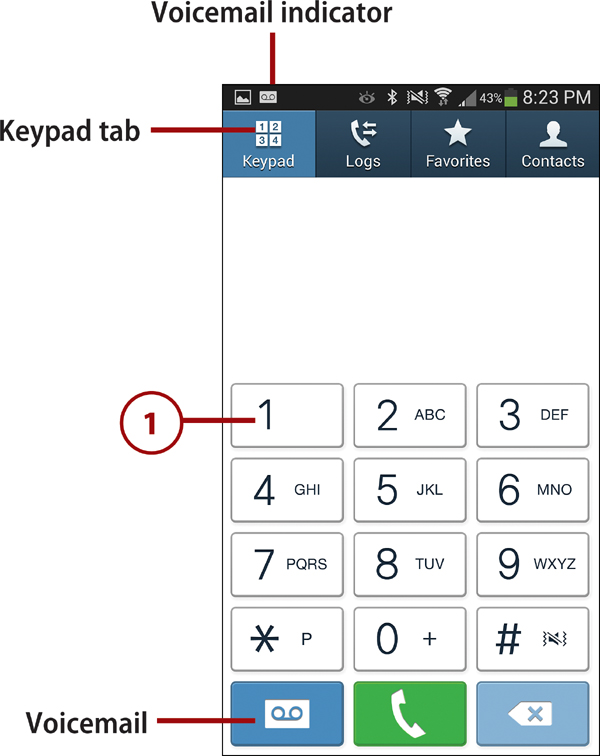
You can check your voicemail in two or more ways. First, you can tap a received New Voicemail entry in the Notification panel. Second, you can launch the Phone app, and then press and hold 1 (the speed dial number assigned to voicemail) or tap the Voicemail icon on the keypad. Finally, your service provider may include a separate voicemail app with which you can listen to and manage your voicemail.
When voicemail messages are waiting, a notification icon appears in the status bar. Note that if you set up voicemail to require a password, you’ll be asked to enter it each time you contact voicemail. When prompted, tap each digit in the password and end by tapping the pound sign (#)—or follow whatever instructions your carrier provides.
1. Connect to your carrier’s voicemail service by doing either of the following:
• Drag down the Notification panel and tap the New Voicemail entry. The carrier’s voicemail is automatically dialed.
• Launch the Phone app and open the Keypad by tapping its tab. Press and hold 1 (the speed dial number assigned to voicemail) or tap the voicemail icon. The Phone app dials the carrier’s voicemail.

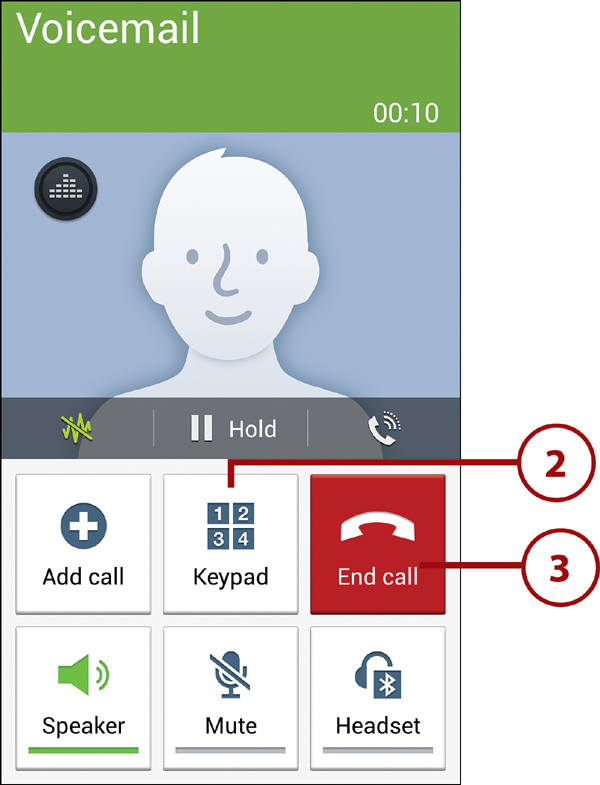
2. You connect to your carrier’s voicemail system. Because the voicemail menus require you to enter numbers to choose options, tap the Keypad icon to reveal the keypad (if it’s currently hidden). Listen to the menu options and tap numbers to indicate your choices.
3. When you finish using voicemail, tap the End Call icon.
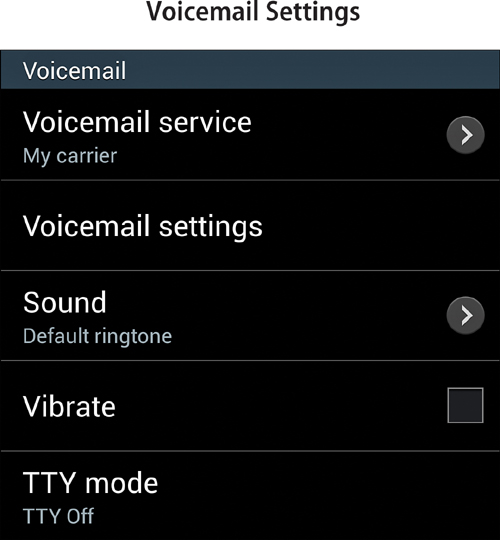
Changing Voicemail Settings
You can change your voicemail settings (such as your greeting, password, and notification methods) whenever you want. Connect with voicemail and respond to the prompts.
Enabling Mute, Vibrate, or Airplane Mode
Your phone has three special settings that you’ll occasionally find useful: Mute, Vibrate, and Airplane Mode. Enable Mute when your phone must remain silent, such as when you’re in a meeting or place of worship. Vibrate also silences notifications, but denotes them by vibrating the phone. Enable Airplane Mode during flights to quickly make your phone compliant with government and airline regulations by disabling the ability to place or receive calls, as well as transmit data.
Mute and Vibrate
When Mute is enabled, all sounds except media playback and alarms are disabled. Incoming calls cause the Phone app to launch—even when the screen is dark—but no sound or vibration occurs. Vibration has the same silencing effect as Mute, but important events are signaled by vibration.
1. To enable muting or vibration, do one of the following:
• Press and hold the Power button until the Device Options menu appears, and then tap the Mute or Vibrate icon.
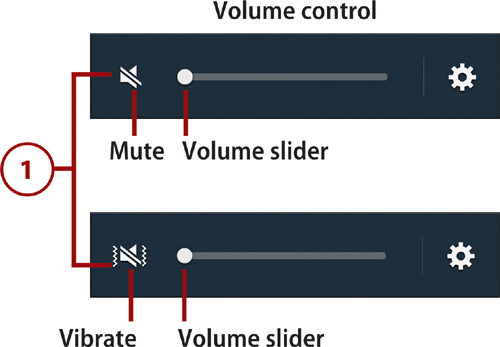
• On the Home screen, press and hold the Volume down key until the onscreen volume control shows that Mute or Vibrate is enabled. (Lower the volume all the way to enable Mute. When the Mute icon is shown, you can quickly switch to Vibrate by tapping the Volume up key once.)
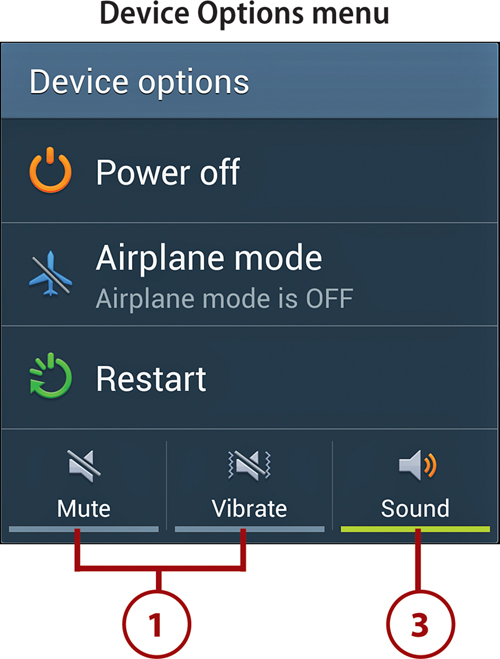
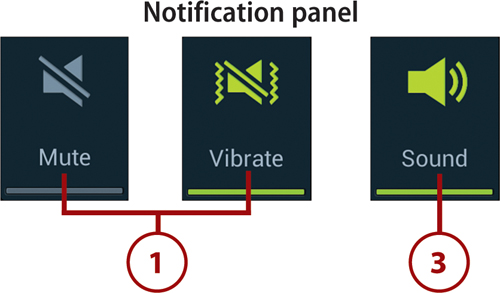
• Open the Notification panel. Repeatedly tap the Sound icon to toggle between its three states: Mute, Vibrate, and Sound.
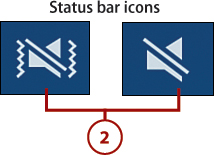
2. When Vibrate or Mute is active, a matching indicator displays in the status bar.
3. To restore normal sound, select Sound in the Device Options menu or the Notification panel, or increase the volume.
Airplane Mode
When flying, you can quickly set your phone to Airplane Mode, disabling its capability to place or receive calls and to send or receive data. Other functions operate normally.
1. To enable Airplane Mode, do one of the following:
• Open the Notification panel, scroll to the right, and tap the Airplane Mode icon. When enabled, the icon is green.
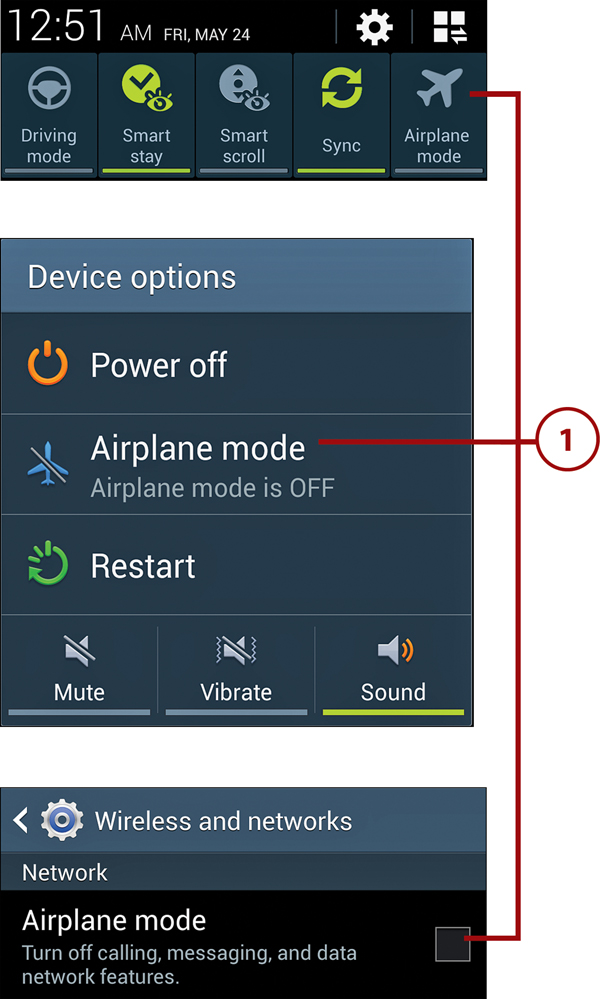
• Press and hold the Power button until the Device Options menu appears. Tap Airplane Mode.
• Open Settings, select the Connections tab, tap More Networks, and tap the Airplane Mode check box.
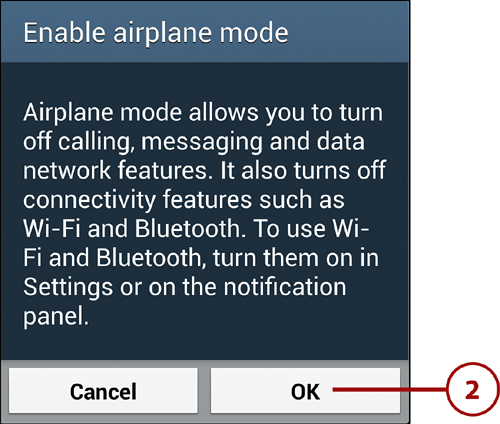
2. In the Enable Airplane Mode dialog box, confirm by tapping OK. The Airplane Mode indicator appears in the status bar; 3G/4G, Wi-Fi, and Bluetooth are automatically disabled.
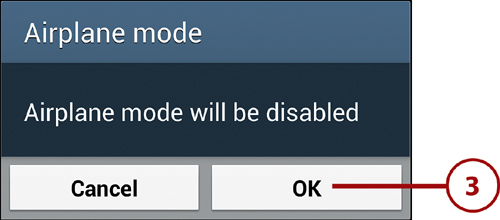
3. To restore normal calling and data transmission functionality, disable Airplane Mode by reversing any of the actions described in step 1. Tap OK in the Airplane Mode dialog box.
Configuring Call Settings
You can set preferences for many phone operations in Call Settings. Although the default settings will suffice for most calling situations, here are some settings that you might want to examine.
1. Within Phone, press the Menu key and tap Call Settings.
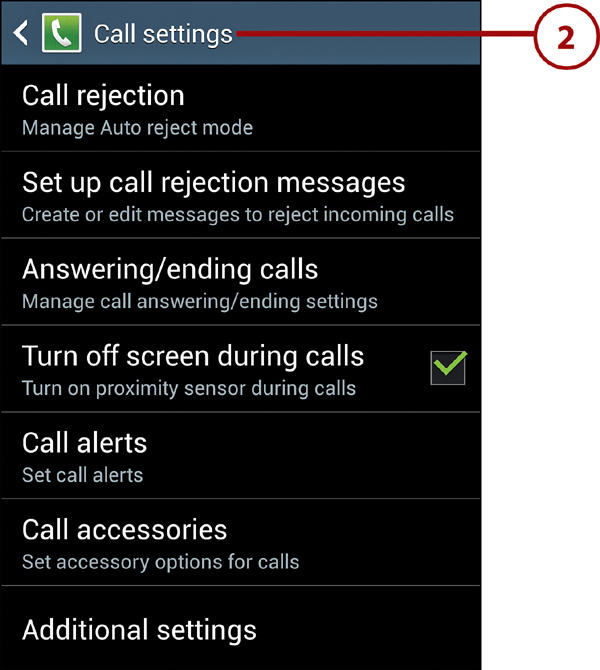
2. The Call Settings screen appears. Here are some of the more common, useful settings:
• Call Rejection. Tap Call Rejection to enable/disable Auto Reject Mode for blocked callers (or to temporarily reject all incoming calls), as well as add or remove numbers from the Auto Reject List. Rejected calls are sent straight to voicemail.
• Set Up Call Rejection Messages. Add or delete text messages that you can send when manually rejecting an incoming call by dragging Reject Call with Message upward.
• Answering/Ending Calls. Add methods to quickly answer incoming calls or end calls. (Answer calls by pressing the Home key or by saying “Answer” or “Reject.” End calls by pressing the Power button.)
• Turn Off Screen During Calls. When enabled, the proximity sensor determines when you’re on a call and the display is automatically turned off to reduce battery consumption.
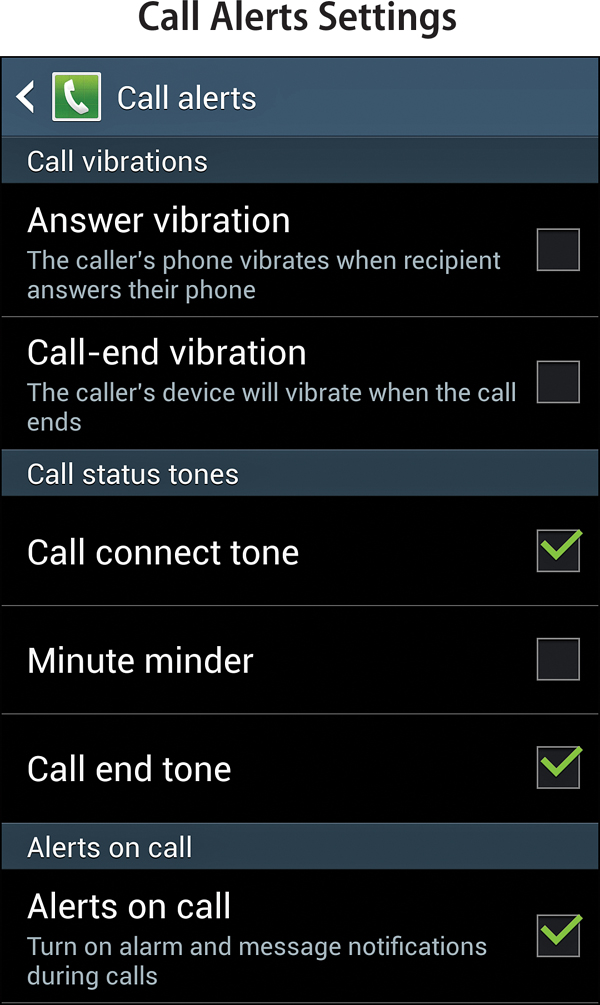
• Call Alerts. Specify whether the phone vibrates when the call recipient answers and when the call ends, whether tones denote each call connection and end, and whether alarm and new message notifications are active during calls. When Minute Minder is enabled, the phone beeps twice whenever another minute of connect time passes.
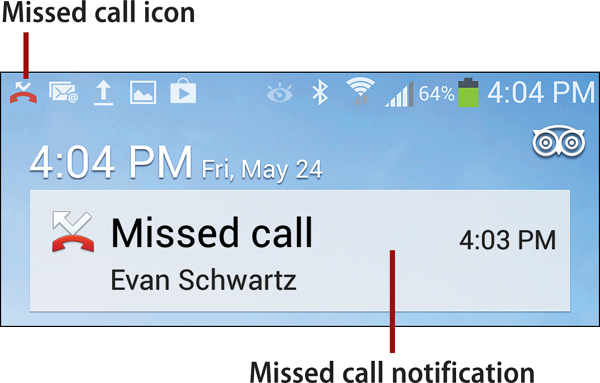
Missed Call Notification
If you miss a call, a missed call icon appears in the status bar and a message is displayed on the lock screen. If you tap the lock screen message, you’re taken directly to the call log, enabling you to return the call or delete the log entry.
• Call Accessories. Configure the phone for a Bluetooth headset, enabling the headset to automatically answer incoming calls and specify a delay period prior to answering.
• Additional Settings. Two settings that you might want to examine are Caller ID (specifies how calls from your phone are identified to others) and Auto Redial (instructs the phone to automatically redial whenever your call can’t connect or is cut off).
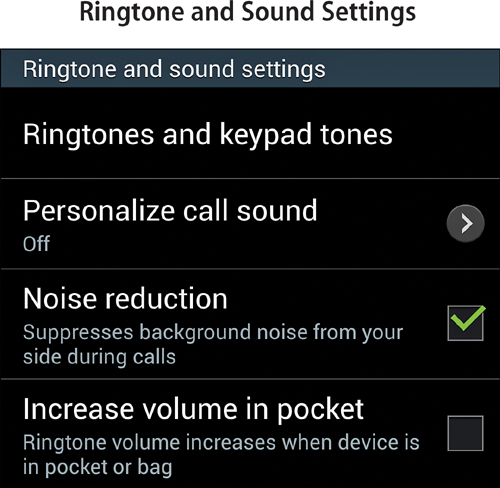
• Ringtone and Sound Settings. These specify the sounds that announce an incoming call and govern sound quality during calls. Tap Ringtones and Keypad Tones to select or create a ringtone for incoming calls (see “Setting Ringtones” in Chapter 3), change the vibration pattern, enable or disable vibration when ringing, and enable or disable the playing of tones when touching numbers on the keypad. Tap Personalize Call Sound to adapt the call audio to your needs (see “Personalize Call Sound” at the end of this section). Enable Noise Reduction to suppress background/ambient noise during calls. When Increase Volume in Pocket is enabled, the ringtone volume is boosted when the proximity sensor detects that the phone is in a pocket or bag.
• Voicemail Settings. Tap Sound to change the sound effect that announces new voicemail. Tap Vibrate to enable or disable vibration when new voicemail is available.
3. When you finish viewing and changing settings, press the Back key to return to the main Phone screen.
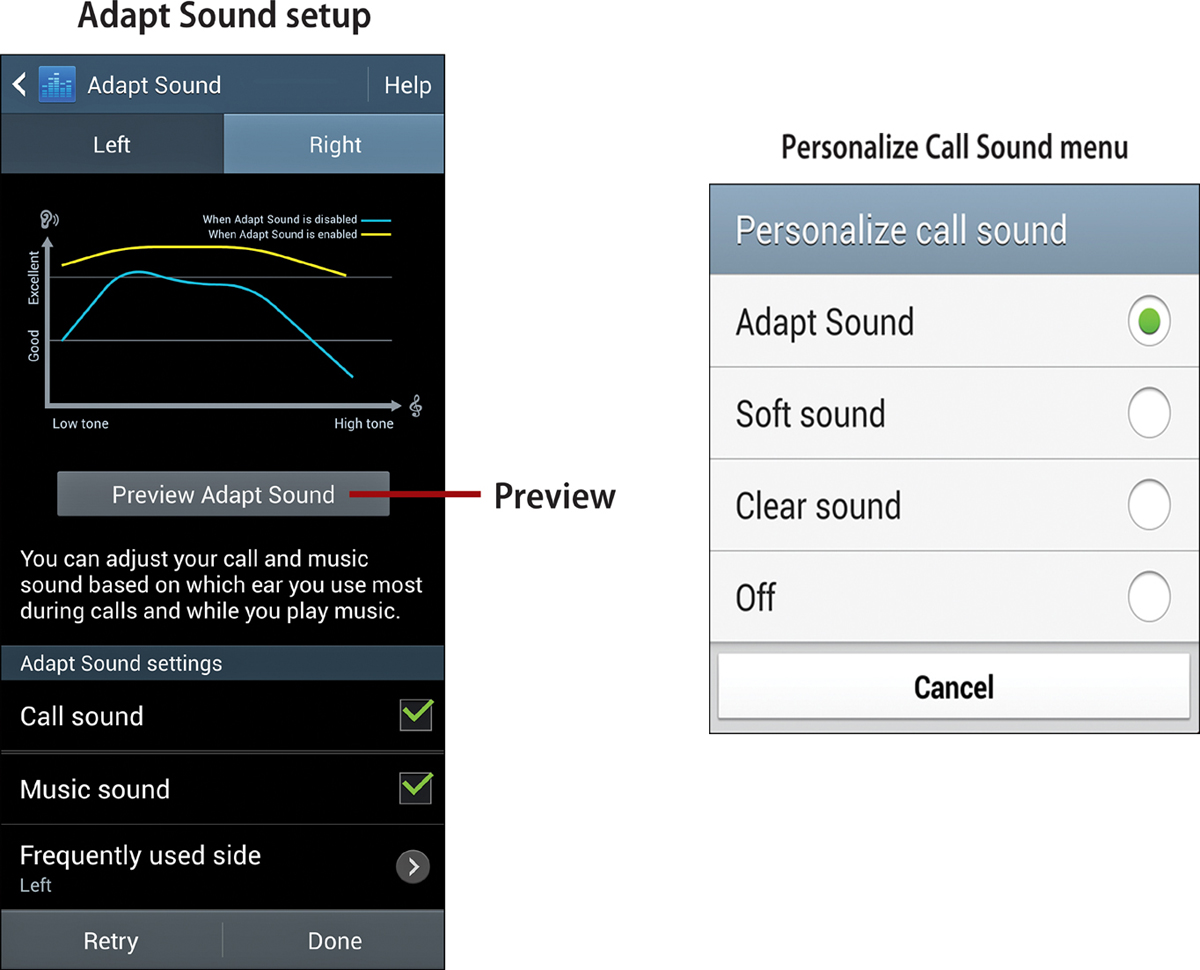
>>>Go Further: Personalize Call Sound
1. In Phone, press the Menu key and tap Call Settings.
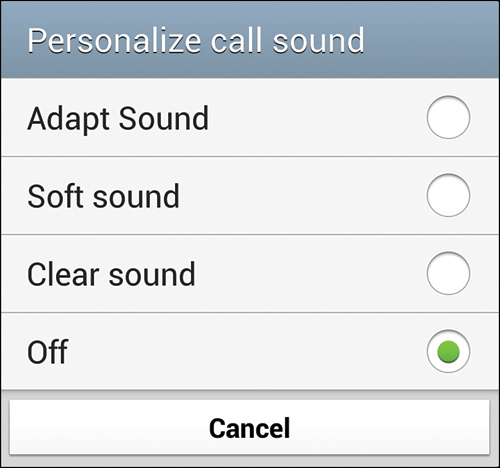
2. Scroll down and tap Personalize Call Sound.
3. Plug in your earphones and, following the instructions, take the audio test.
4. At the test’s conclusion, tap icons to compare unaltered (Original) audio in the left, right, and both ears with that of the Adapt Sound (Personalized) audio. When you finish listening, press the Back key or tap the Back icon at the top of the screen.
5. Set options in the Adapt Sound Settings section of the screen. To enable Adapt Sound during calls and listening to music, tap their check boxes. Tap Frequently Used Side to specify the side of your face that you typically use when speaking on the phone.
6. Tap Done.