13. Shooting, Editing, and Sharing Photos
In this chapter, you learn to use the phone’s cameras to shoot, edit, share, and manage photos of yourself and other subjects. Topics include the following:
→ Using the front and rear cameras to shoot self-portraits and photos of other subjects
→ Viewing, managing, and sharing the current photo
→ Viewing stored photos in Gallery
→ Using Photo Editor to make simple edits to your shots
→ Generating a slideshow from selected folders or photos
If you keep your phone handy, you have no excuse for missing an unexpected photo opportunity. Using the pair of built-in cameras on the Galaxy S 4, you can easily shoot posed and candid high-resolution photos of friends, family, yourself, and anything else that catches your eye.
Setting a Storage Location for Photos and Videos
If you’ve added a memory card to the phone, be sure to set the Storage setting to Memory Card (as explained in “Using the Settings Dialog Box,” later in this chapter).
Shooting Photos
You can shoot photos of subjects in front of you using the 13MP (megapixel) rear camera or take self-portraits with the 2MP front camera.
Shooting Self-Portraits with the Front Camera
Use self-portrait mode to take pictures of yourself—or yourself and a friend or two. Note that you can’t use the flash or zoom in this mode.
1. Tap the Camera shortcut on the Home screen (if you haven’t removed it). Otherwise, tap Apps and then tap Camera.
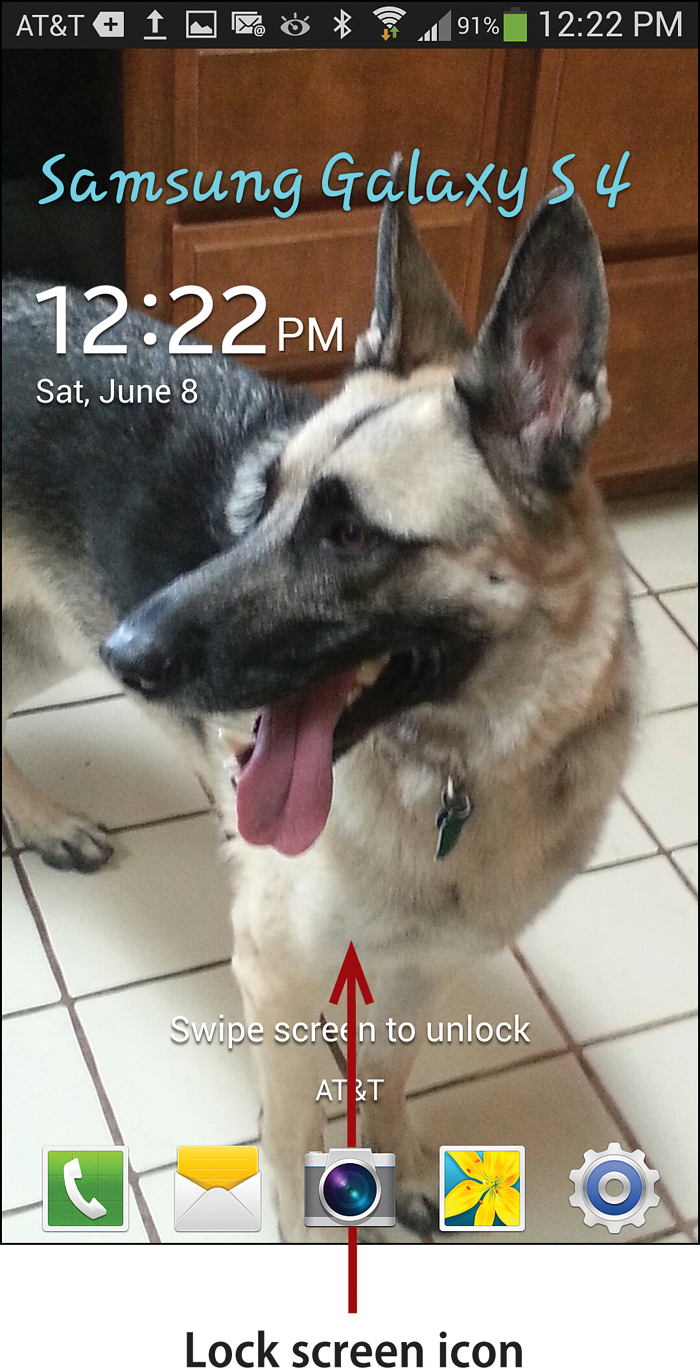
Lock Screen Quick Launch
You can also launch Camera from the lock screen by sliding the Camera icon upward (if it’s present). For instructions on configuring the lock screen in this manner, see “Setting Lock Screen Options” in Chapter 17.
2. On the viewfinder screen, determine whether the rear or front camera is active. If the rear camera is active, switch to the front camera by tapping the Self Portrait icon.
3. Optional: To review or adjust the camera settings that will be used for the shot, tap the Settings icon twice. (The first tap reveals the Quick Settings icons; the second opens the Settings dialog box.) Make any desired changes on the Camera and General tabs of the Settings dialog box, and then dismiss the dialog box by pressing the Back key or tapping elsewhere onscreen. For additional information about Settings, see “Changing the Camera Settings,” later in this section.
4. Optional: Tap the Mode button to set a shooting mode, such as Beauty Face or Best Photo. The default setting is Auto. The current mode is displayed near the top of the viewfinder screen. To learn more about modes, see “Selecting a Shooting Mode,” later in this chapter.
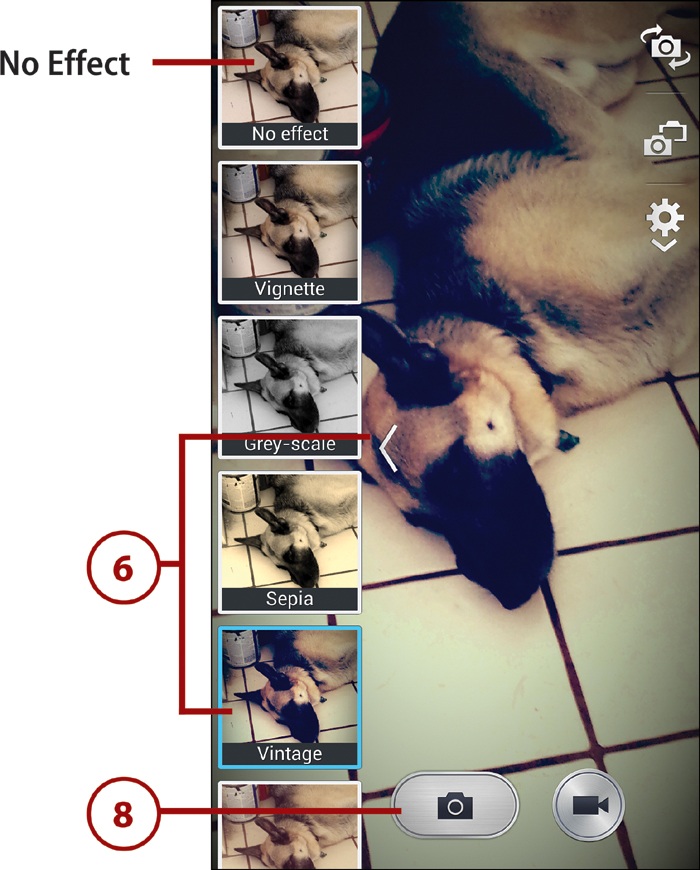
5. Optional: Tap the Effects panel icon to open the panel and apply a special effect, such as Vignette. The effect is shown on the viewfinder screen as you frame the shot. To disable the effect on subsequent shots, open the panel, and select No Effect.
6. When you’re ready to take the picture, tap the Camera button.


Where’s the Photo?
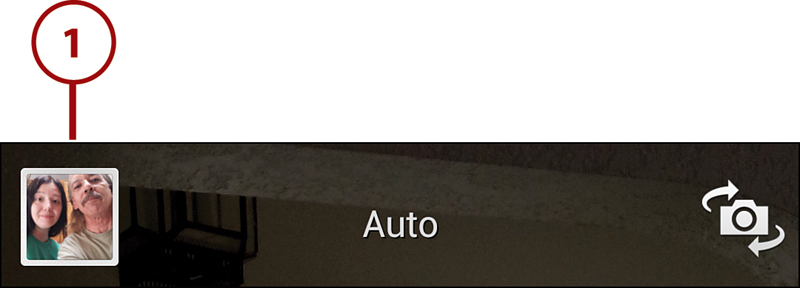
To review all photos taken with the cameras, launch the Gallery app and open the Camera folder. (If you have an add-in memory card, there may be two Camera folders.) To go straight from the Camera app to the most recent photo you’ve taken, tap its thumbnail in the upper-left corner of the viewfinder screen.
Shooting Photos with the Rear Camera
Of course, most of the photos you’ll shoot with your Galaxy S 4 will be of other people and subjects. Shooting photos of others is similar to shooting self-portraits, but it uses the higher-resolution rear camera and has many additional options. Note that virtually every step in the following task is optional, and you can perform steps 2–6 in any order that’s convenient for you.
1. Launch the Camera app and determine whether the rear or front camera is active. If the front camera is active, switch to the rear camera by tapping the Self Portrait icon.
2. Whether you use the front or rear camera, you can take any photo in portrait (right-side up) or landscape (sideways) mode. To shoot in landscape mode, turn the phone sideways.
3. Optional: Frame your subject by zooming in or out. (The Galaxy S 4 has a 4x digital zoom.) Press the volume up/down button on the side of the phone, or you can touch the viewfinder screen with two fingers and spread them apart to zoom in or pinch them together to zoom out.
4. Optional: Review or adjust the camera settings that will be used for the shot. To open the Settings dialog box, tap the Settings icon twice, or press the Menu key and tap Settings. Make any necessary changes on the Camera and General tabs of the Settings dialog box, and then dismiss the dialog box by pressing the Back key or tapping elsewhere onscreen. For additional information about Settings, see “Changing the Camera Settings,” later in this section.


5. Optional: Tap the Mode button at the bottom of the screen to set a shooting mode, such as Beauty Face or Best Photo. The default setting is Auto. The currently selected mode is displayed near the top of the viewfinder screen. To learn more about modes, see “Selecting a Shooting Mode,” later in this chapter.

6. Optional: Tap the Effects panel icon to open the panel and apply a special effect, such as Grey-scale, Sepia, or Moody. The effect is shown on the viewfinder screen as you frame the shot. To disable the effect on subsequent shots, open the panel and select No Effect.
7. Optional: To set the focus to a particular area, tap that spot on the viewfinder screen. The focus rectangle turns green when the lighting and focus are sufficient to snap the photo.
8. When you’re ready to take the picture, tap the Camera button.
Avoid Odd Angles for Faces
When shooting portraits, you can avoid misshapen faces by holding the camera at the same angle as that of your subject. If your results are subpar, try another shot while ensuring that the phone isn’t tilted—even a little.
Changing the Camera Settings
Before taking a photo, you can apply optional settings to enable or disable the flash and adjust the exposure, resolution, ISO, and so on. Note that some settings are available only for the rear-facing camera and others only for self-portraits. Also, certain automated settings can interact with and prevent you from altering manual settings. For example, when Anti-Shake is enabled, you cannot set ISO.
You can change settings in three places: the Quick Settings menu, the Settings dialog box, and by selecting a shooting mode.
Using Quick Settings
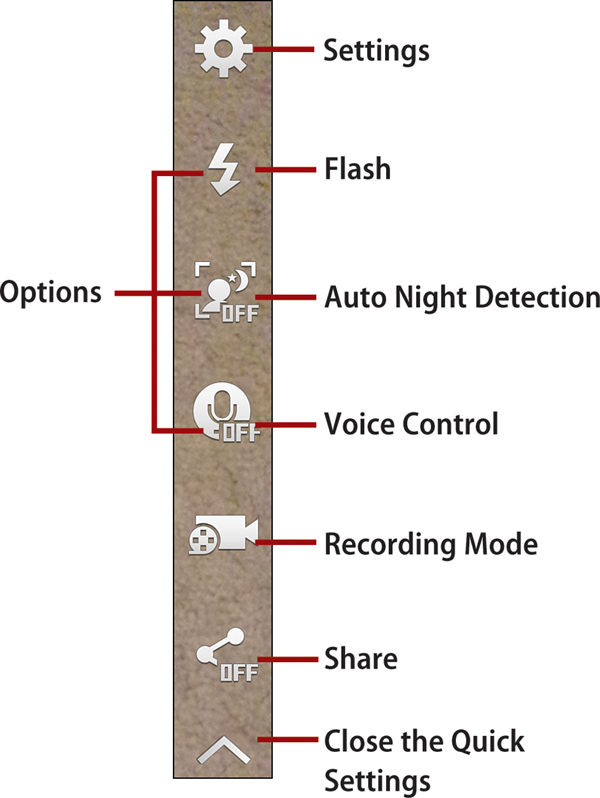
The Quick Settings are six icons on the viewfinder screen from which you can make settings adjustments prior to taking a photo or recording a video. To reveal the Quick Settings, tap the Settings icon. The permanent Quick Settings are Settings, Recording Mode, and Share. The other three icons (Flash, Auto Night Detection, and Voice Control) are explained later in “The Settings Dialog Box.” You can replace them with icons of your choosing, as described at the end of this section.
Ever-Present Icons
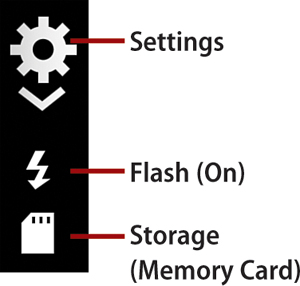
When the Quick Settings are hidden, the current Flash setting is displayed beside or beneath the Settings icon. The current Storage setting (Device or Memory Card) is also shown, specifying where the shot will be saved. This pair of icons is for display purposes only; you can’t interact with them.
• Settings. Tap the Settings icon to open the Settings dialog box. You can also open it by pressing the Menu key and tapping Settings.
• Recording Mode. Applicable only when shooting videos, you can set one of these special recording modes: small movie for inclusion in a multimedia message, slow motion, or fast motion.
• Share. When enabled, photos are automatically shared with others using the selected method, such as Buddy Photo Share.
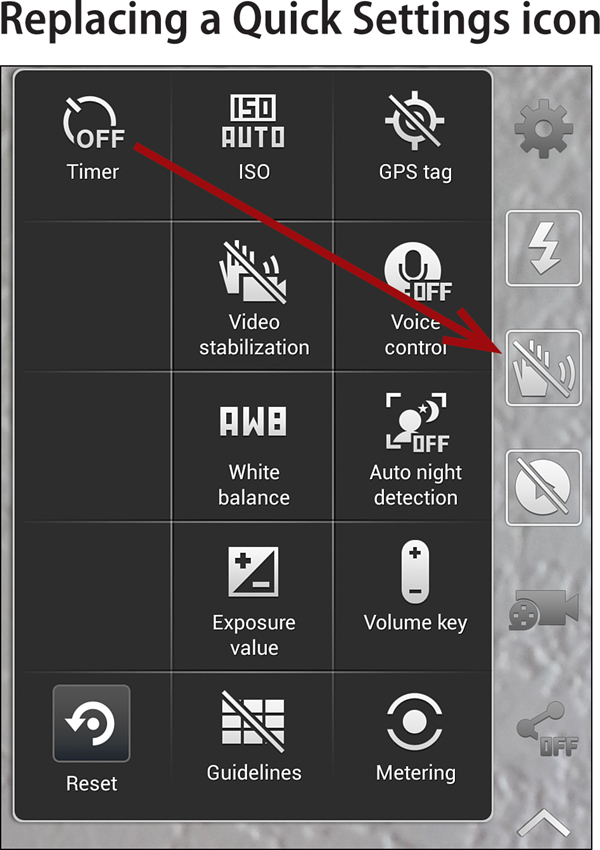
Customize the Quick Settings
You can replace the Flash, Auto Night Detection, and Voice Control icons with other icons of your choosing. Press the Menu key and tap Edit Quick Settings. To replace an icon, select a replacement icon in the large array, press and hold the icon, and then drag it onto an eligible icon in Quick Settings.
Using the Settings Dialog Box
To open the Settings dialog box, tap the Settings icon at the top of the screen twice. (You can also press the Menu key and tap Settings.) Settings are organized in three tabs: Camera, Video, and General. Settings that apply to still photos are on the Camera and General tabs.
Camera Settings
• Photo Size. To shoot at the camera’s highest resolution, select 13M: 4128×3096 (4:3). If you want the photo to match the screen’s dimensions, select the next lower resolution of 9.6M: 4128×2322 (16:9). If you’re running out of storage space or intend to share the photo on the web or in email, you can select a lower resolution.
Alter the Resolution After the Shot
Using almost any image-editing program (such as Photoshop), you can reduce the resolution after shooting the photo.
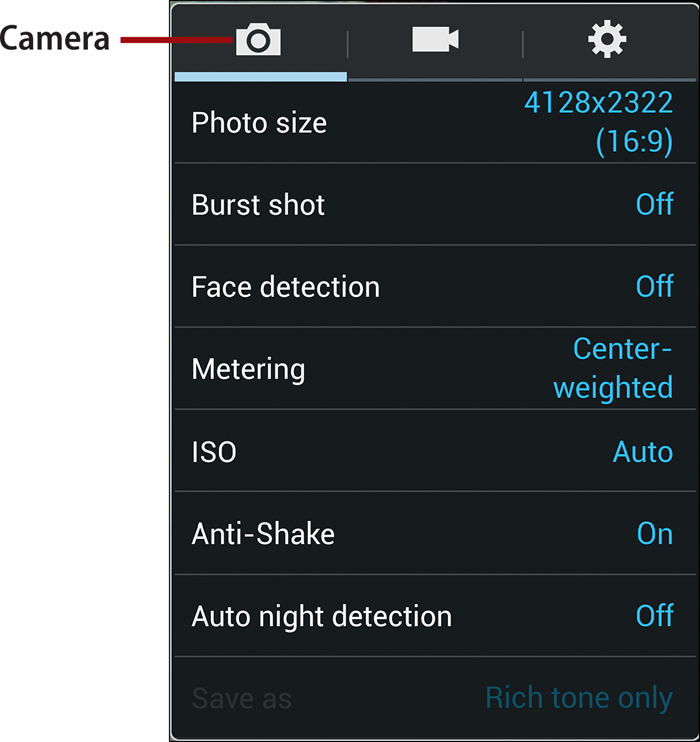

• Burst Shot. When enabled, you can quickly take up to 20 shots by holding down the Camera button. The Burst Shot photos are stored in Device memory, regardless of your Storage setting.
• Face Detection. Enable Face Detection when you want the camera to search for a face in the shot and optimize the focus for the face.
• Metering. Specify the method used to perform light metering: Center-Weighted, Matrix, or Spot.
• ISO. The ISO setting is for film speed or sensitivity to light. You can use a lower ISO for shots taken on a bright, sunny day and use a higher ISO for dimly lit shots or ones taken in dark settings. Options include Auto (allow the camera to set the ISO), 100, 200, 400, and 800.
• Anti-shake. Anti-shake adjusts shots for unintended blur caused by camera movement.
• Auto Night Detection. Detects and adjusts for low-light conditions.
• Save As. This setting is only enabled when the shooting mode is Rich Tone (HDR).
General Settings
• GPS Tag. When enabled, the image file’s metadata contains information that shows where the shots were taken, based on the GPS.
• Review. When enabled and you take a shot, the photo immediately opens in Gallery, so you can examine, delete, or edit it.
• Volume Key. This setting dictates what happens when you press the Volume key. Options include Zoom Key (zooms in or out), Camera Key (snaps a photo), or Record Key (starts a video recording).
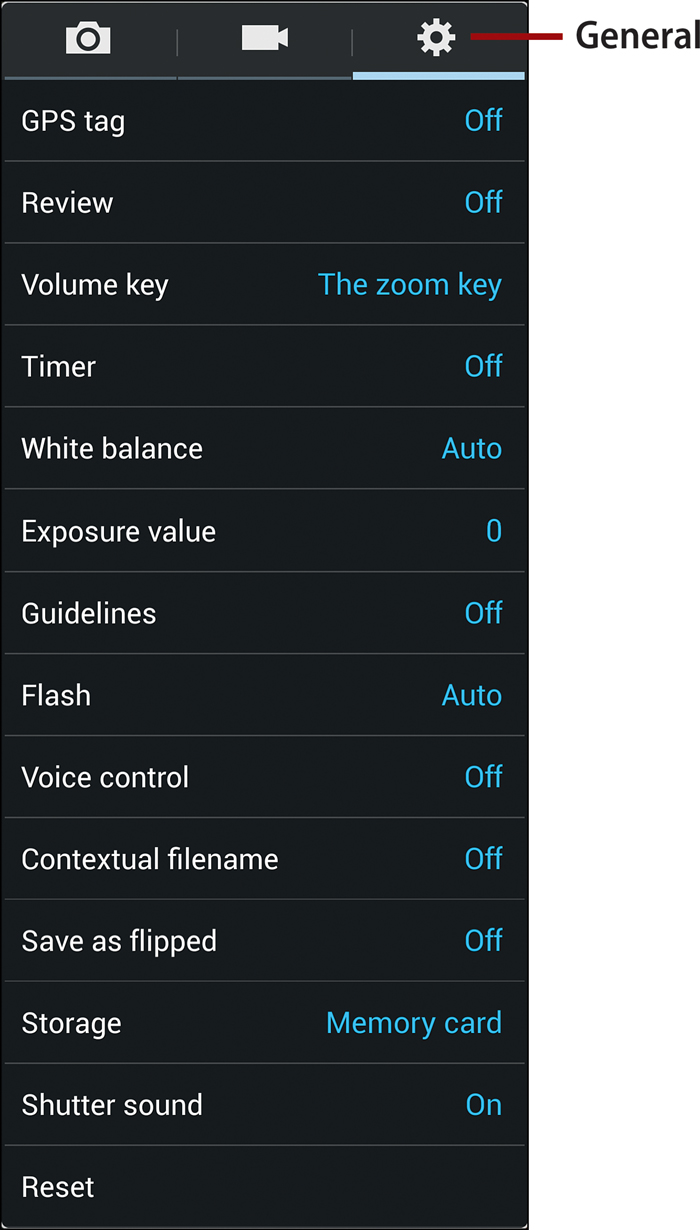
• Timer. To instruct the camera to snap the upcoming picture after a preset delay, select a 2-, 5-, or 10-second delay.
Timer Shots
With a 35mm camera, you’d use its timer to give yourself a few seconds to dash into a photo. With your Galaxy S 4, however, using the timer assumes that you have some way to make the phone stand on its own. You can prop it up or mount it in a tripod designed for smartphones.
• White Balance. To adjust shots for current lighting “temperature” and how white will be displayed, select Auto (allow the camera to determine the best setting), Daylight, Cloudy, Incandescent, or Fluorescent.
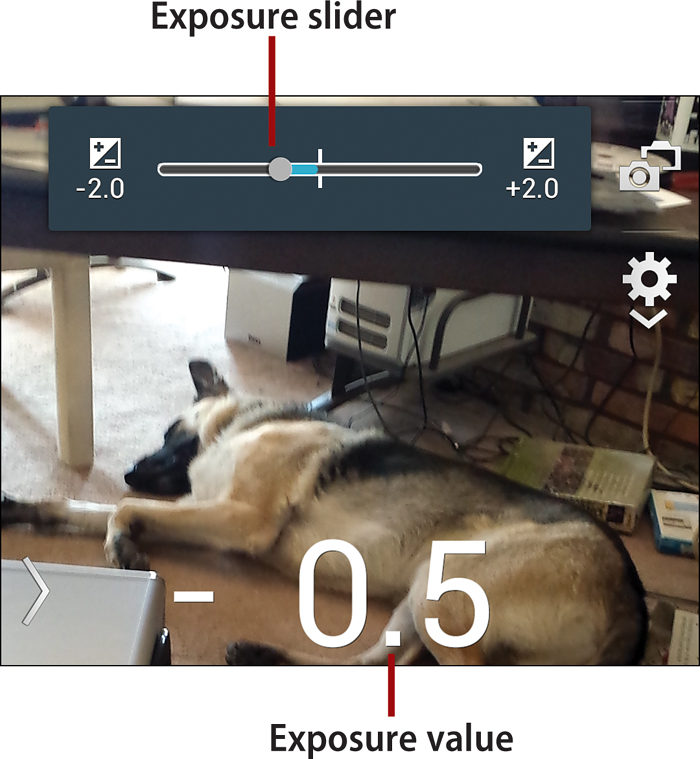
• Exposure Value. Drag the Exposure value slider to the right to adjust for a dark scene or to the left for an overly bright scene.
• Guidelines. When enabled, white guidelines divide the screen into a 3×3 grid to make it easier to center and frame the subject matter.
• Flash. Tap Flash repeatedly to cycle through its three states: On, Off, and Auto. When set to Auto, the camera fires the flash when current lighting dictates that it’s needed. To avoid blinding you, Flash is automatically disabled when taking self-portraits.
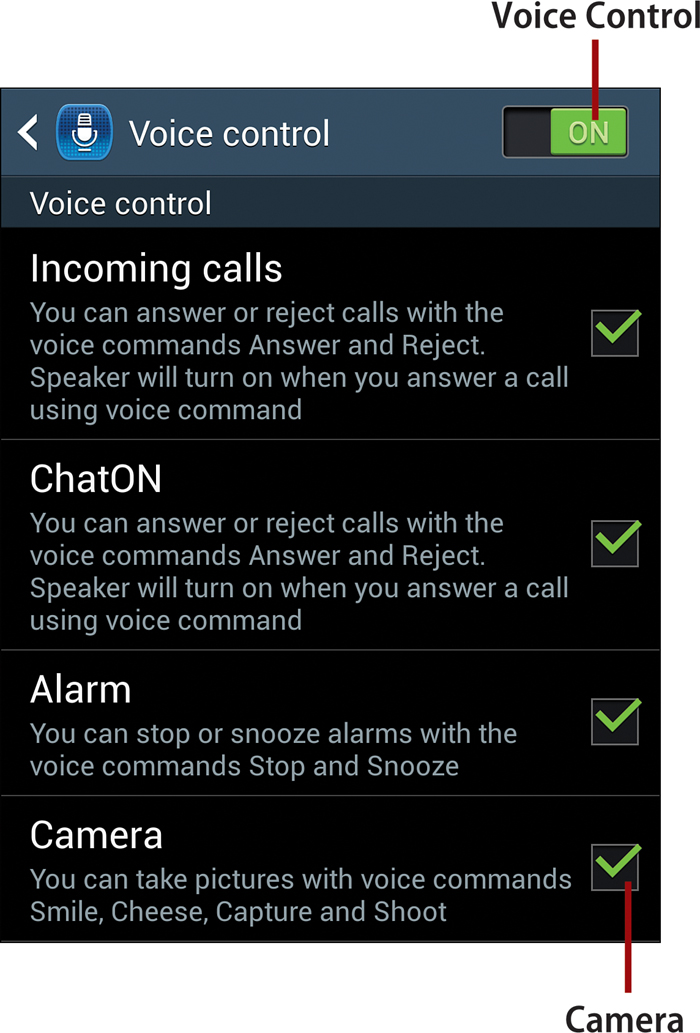
• Voice Control. You can optionally use voice commands (Smile, Cheese, Capture, or Shoot) to snap photos. When you set Voice Control to On, you’re taken to the My Device tab, Voice Control section of Settings. You must enable both Voice Control and Camera to use voice commands to take photos.
• Contextual Filename. When enabled, your current location is used as the suffix of each shot’s filename. While shooting, you must also enable GPS Tags and activate GPS on the phone.
• Save as Flipped. This setting is available only when shooting a self-portrait with the front-facing camera. Enable it to automatically flip each shot horizontally.
• Storage. Specify where photos are stored as they’re shot: Device (internal memory) or Memory Card (add-in memory card). An icon for this setting is displayed in Quick Settings.
• Shutter Sound. When enabled, pressing the Camera button results in a sound effect like a shutter snap.
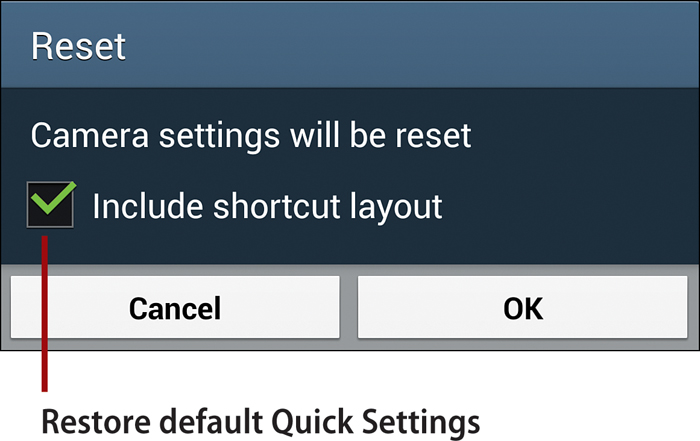
• Reset. Select this option and tap OK to reset all settings in the Settings dialog box to their default values. Remove the check mark if you want to leave previously modified Quick Settings intact.
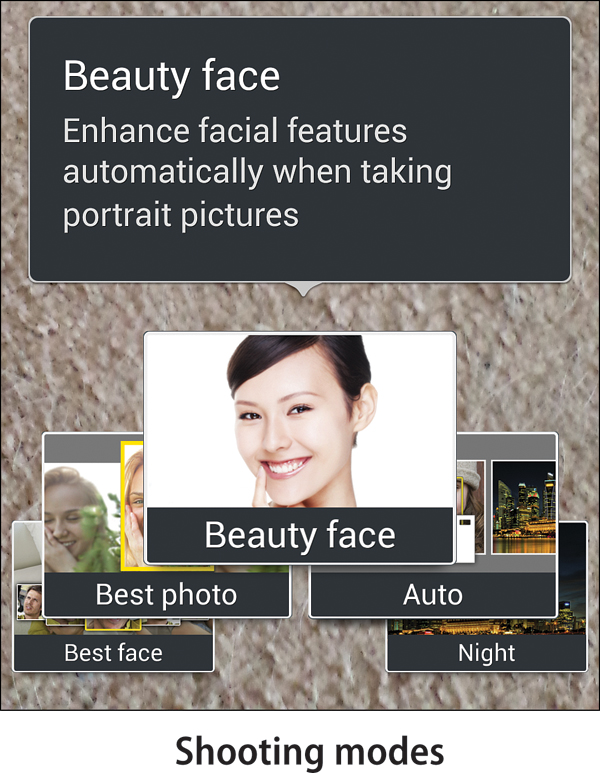
Selecting a Shooting Mode
When you’re in a rush—but not that much of a rush—you can select a shooting mode that automatically specifies a combination of camera settings or enables a special feature for the upcoming shot(s). Tap the Mode button and select one of these options:
• Auto. The default mode that snaps a single normal photo.
• Night. Enables you to shoot at night without using the flash.
• Sports. Useful when taking action shots.
• Panorama. Takes multiple shots as you pan across a scene and then stitches them together. Tap the Camera button to start the shot, slowly pan the camera, and then tap the button again to conclude the process. Reset the camera to Auto when you finish.
• Eraser. Takes five photos approximately 1–2 seconds apart and then creates a composite photo that eliminates any person or thing that wanders into the shot. You can optionally restore the moving items by tapping the running man icon.

• Rich Tone (HDR). Takes photos in High Dynamic Range (HDR) mode, increasing the amount of detail. When selected, the Save As setting on the Camera tab is also enabled.
• Animated Photo. Enables you to take a sequence of photos of a moving person, animal, or object; specify which parts of the object remain stationary and which ones move; and generate an animated GIF.
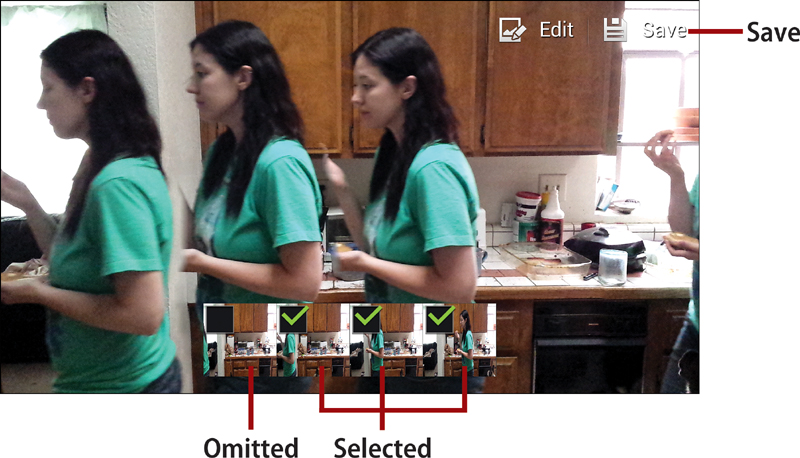
• Drama. Combines multiple shots of a moving person or object into a single photo. Press the Camera button once to take the shot. Tap thumbnails of the images you want to include, and tap Save to store the composite photo. Drama works best when the subject moves through the shot—from one side of the frame to the other—rather than toward or away from you.
• Sound & Shot. Enables you to add up to 9 seconds of recorded audio to the photo you’re shooting.
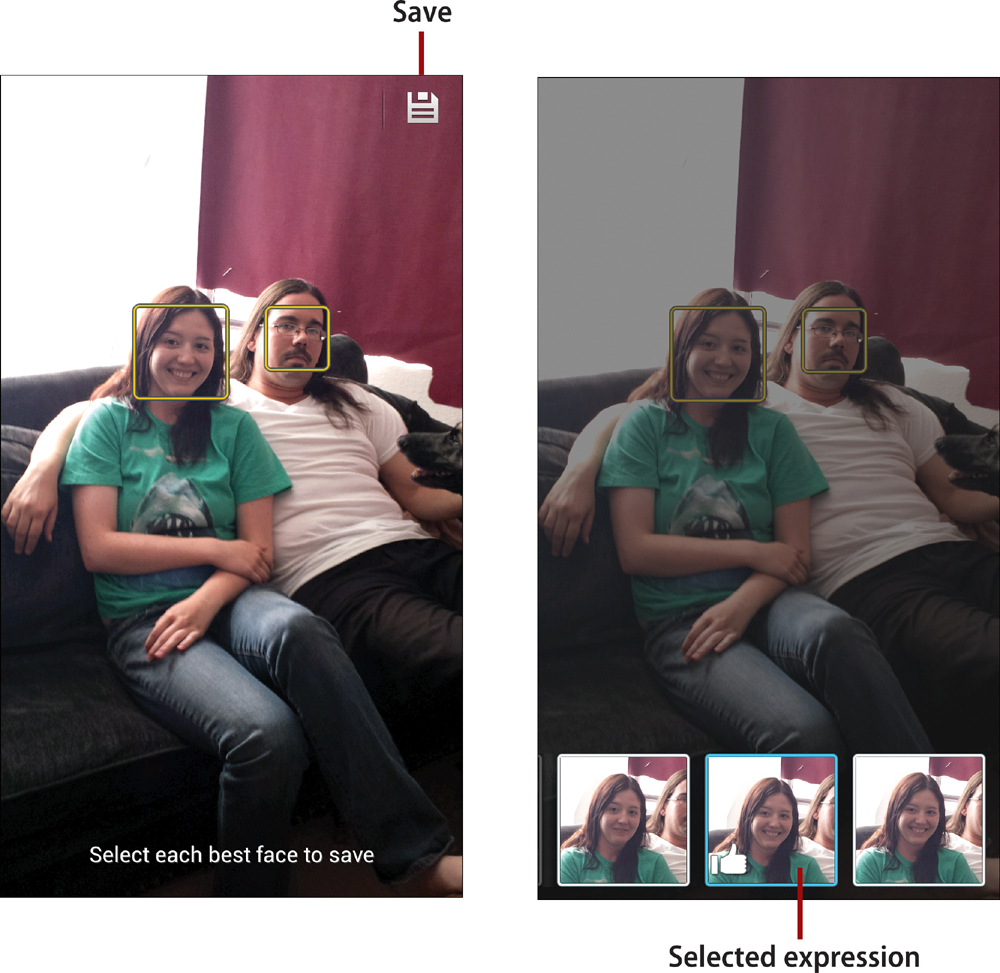
• Best Face. Enables you to take multiple shots of a group of people, pick the best expression for each person, and then merge them into a single shot. When framing the shot, the camera identifies each face by surrounding it with a yellow rectangle. Tap the Camera button once to take the series of shots. Then—one person at a time—tap the individual’s selection rectangle, review the facial expression thumbnails, and tap the one you like best. Repeat this process for every additional person in the group, and then tap the Save icon.
• Best Photo. Takes eight shots in quick succession and asks you to pick the ones you want to keep. Hold the camera steady, and tap the Camera button once. The photo judged by Camera to be the best is marked with a thumbs-up. Review the shots, tap thumbnails of the photos you want to save, and then tap the Disk icon.
• Beauty Face. Smooths the subject’s facial features, reducing simple wrinkles, hiding pores and small blemishes, and so on. (People will accuse you of having these shots professionally retouched.)
Reset the Shooting Mode
The most recent shooting mode is retained. After shooting in any of the special modes, remember to reset the shooting mode to Auto. Other settings may also be retained and should be reset as needed.
Reviewing Photos
After taking a photograph, you can immediately examine and perform various actions on it, such as sharing, deleting, or renaming the shot. Read about additional options when viewing any stored photo or video in the “Using Gallery” section, later in this chapter.
Automatic Review
If you find that you typically review each photo before taking the next one, you can automate the switch to Gallery. In Camera, open Settings, select the General tab, and set Review to On.
1. To review the photo in Gallery, tap the photo’s thumbnail in the upper-left corner of the viewfinder screen.
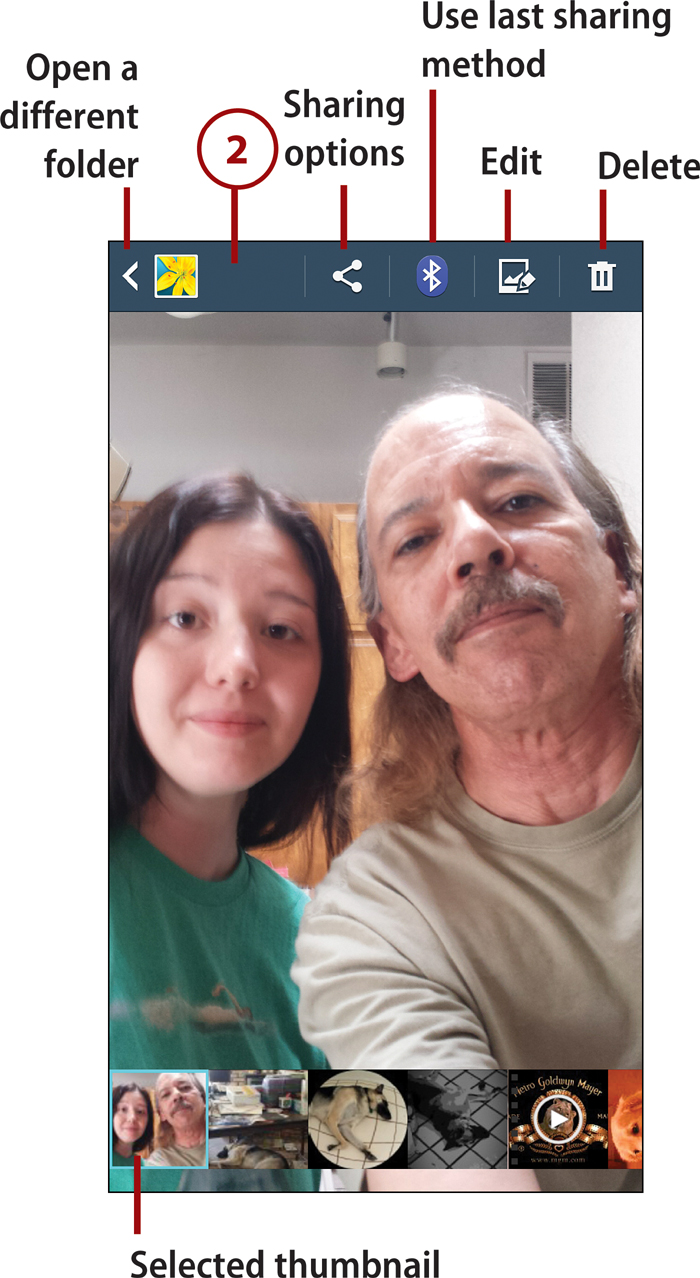
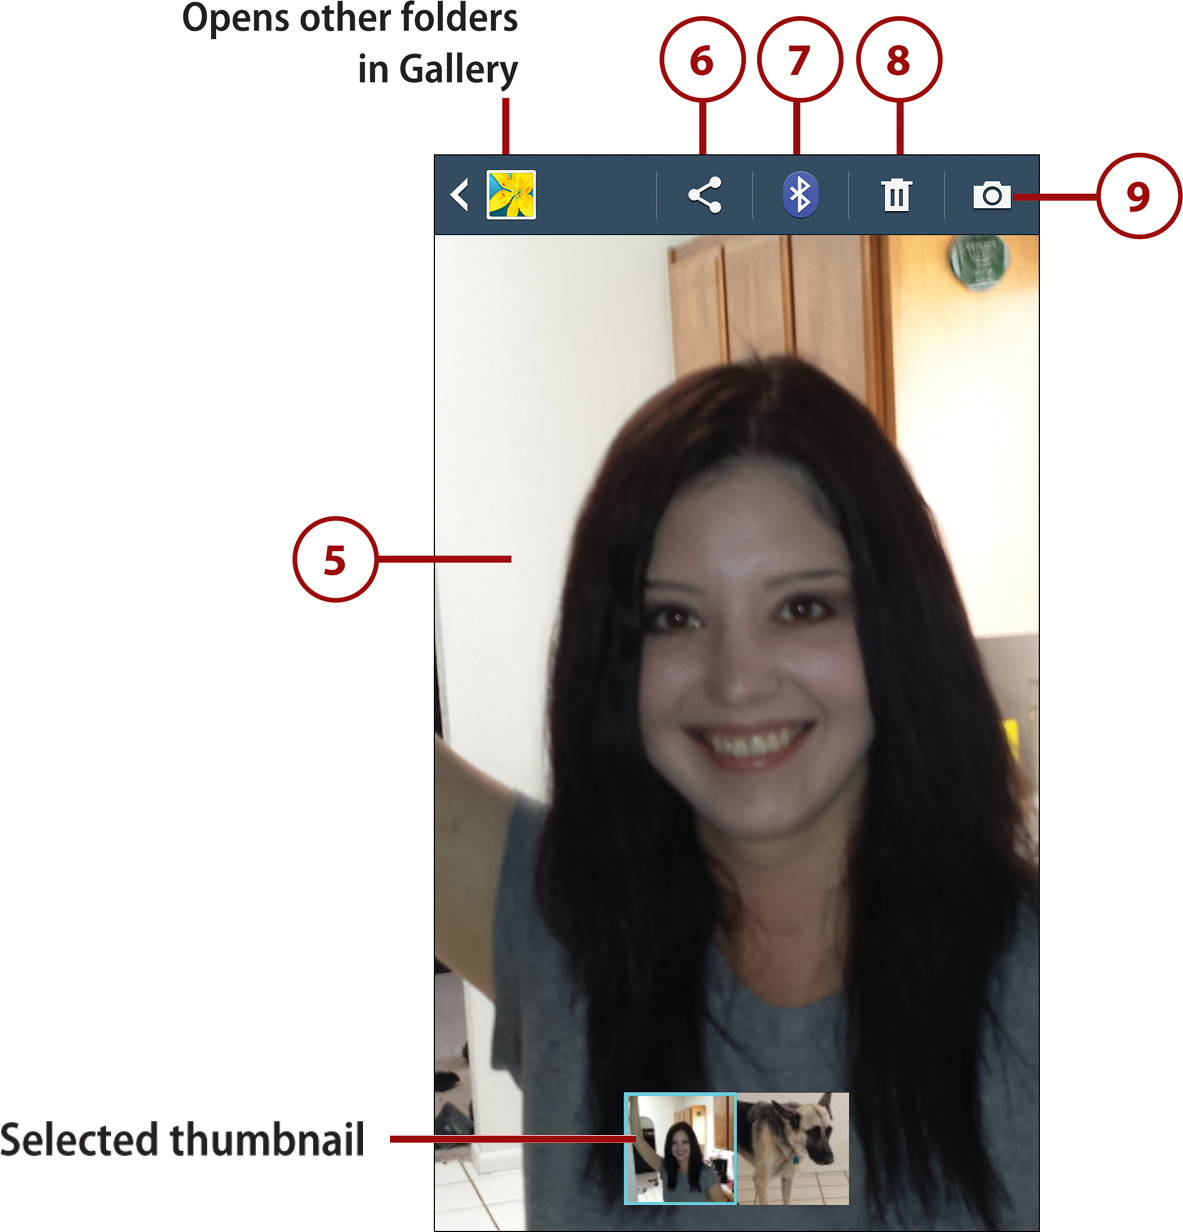
2. In Gallery, if tool icons aren’t visible across the top of the screen, you can make them appear by tapping anywhere onscreen. In order, tapping icons enables you to do the following:
• Select a different folder to open.
• Share the image using a variety of methods, such as sending by Email, enclosing in a multimedia message, or posting it to Facebook.
• Apply the most recently used sharing method.
• Edit the photo.
• Delete the photo.
3. While examining the photo, you can also do any of the following:
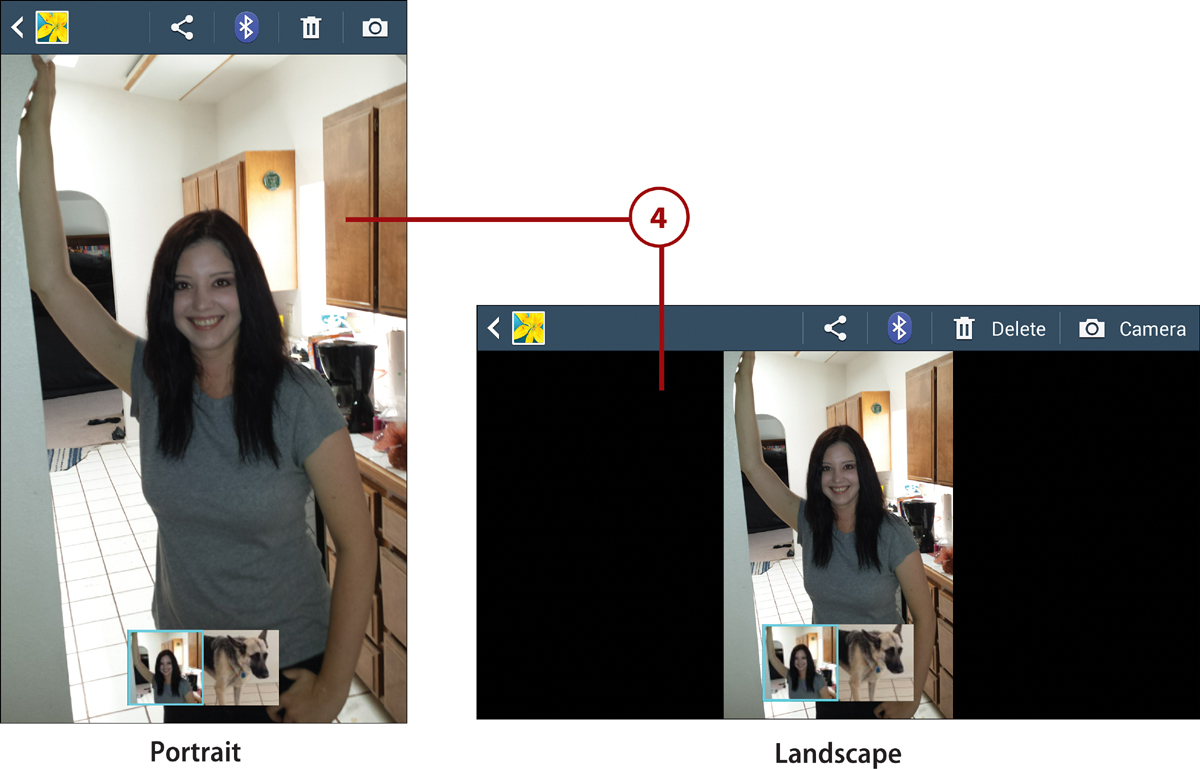
• Review the photo in portrait or landscape orientation by rotating the phone.
• Zoom in or out by double-tapping the photo, spreading your fingers apart, or pinching your fingers together.
• Tap other thumbnails at the bottom of the screen or swipe the screen horizontally to view other recent shots.
• Press the Menu key and choose commands to perform other operations on the photo, such as rename it, mark it as a favorite, use it as Home screen or Lock screen wallpaper, rotate it, or add a note to the front or back.
4. When you’re ready to return to Camera, press the Back key.
Using Gallery
All photos and videos that are stored on your phone—regardless of whether you took them with Camera—can be viewed, edited, and managed in the Gallery app.
1. From the Home screen, launch Gallery by tapping the Apps icon, selecting the Apps tab, and tapping the Gallery icon. You can also launch it by tapping a Gallery shortcut on the Home screen.
2. On the main Gallery screen, tap the album/folder that holds the pictures you want to view. The Camera folder, for example, contains photos you’ve taken with the phone’s cameras. (Note that all folders that contain photos or videos are automatically listed in Gallery, regardless of the files’ sources or whether they’re in device memory or on an add-in memory card.) The number in parentheses beside each folder shows the number of files in the folder.
Two Views
There are two possible views of the screen: one in which the main album (Camera) is much larger than the other album thumbnails and a second view in which every album thumbnail is the same size. To switch between these views, pinch your fingers together or spread them apart—as you do when zooming. You can use these techniques to change the relative size of thumbnails within albums, too.

3. Thumbnails of the photos and videos contained in the folder appear. To view a photo, tap its thumbnail.
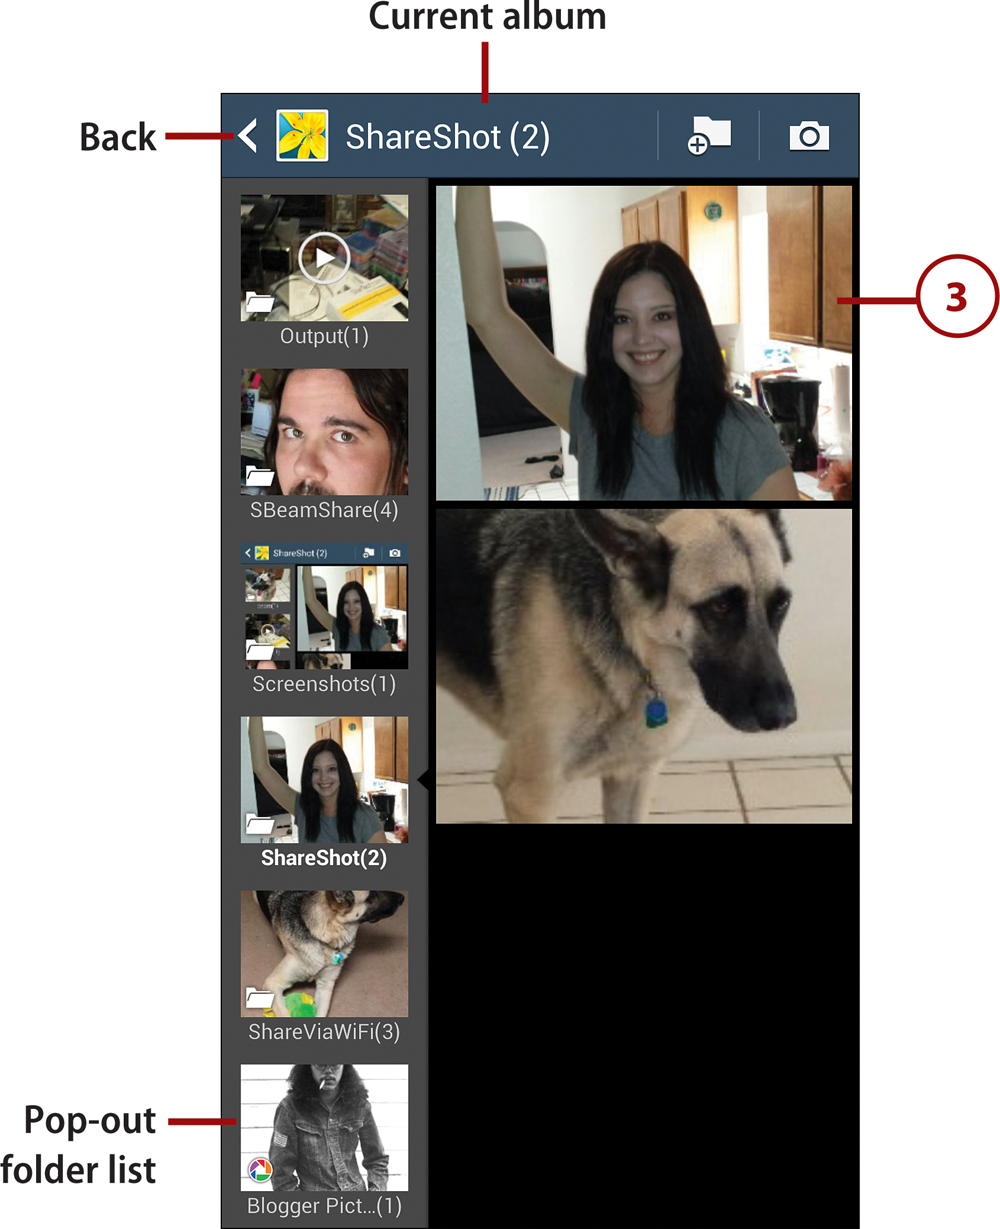
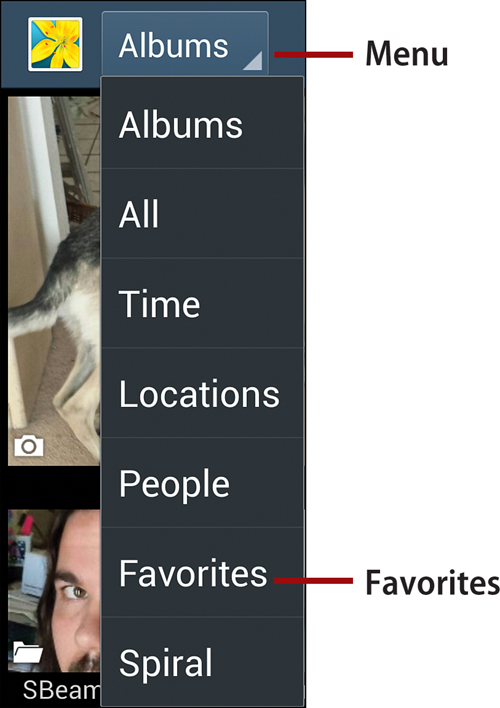
Pop-Out Folder List
To enable you to quickly switch folders without having to tap the Back icon or press the Back key, a pop-out scrolling list of image folders can optionally be displayed on the left side of the screen. Swipe to the right or left to reveal or hide the folder list.
4. You can view photos in portrait or landscape mode by rotating the phone. (Note that you must have Settings, My Device tab, Display, Auto-Rotate Screen enabled.)
5. You can zoom in or out on the photo by doing any of the following:
• Double-tap the image to double the current magnification. Repeat to shrink it to its previous size in the current orientation (portrait or landscape).
• Touch the screen and pinch your fingers together (zoom out) or spread them apart (zoom in).
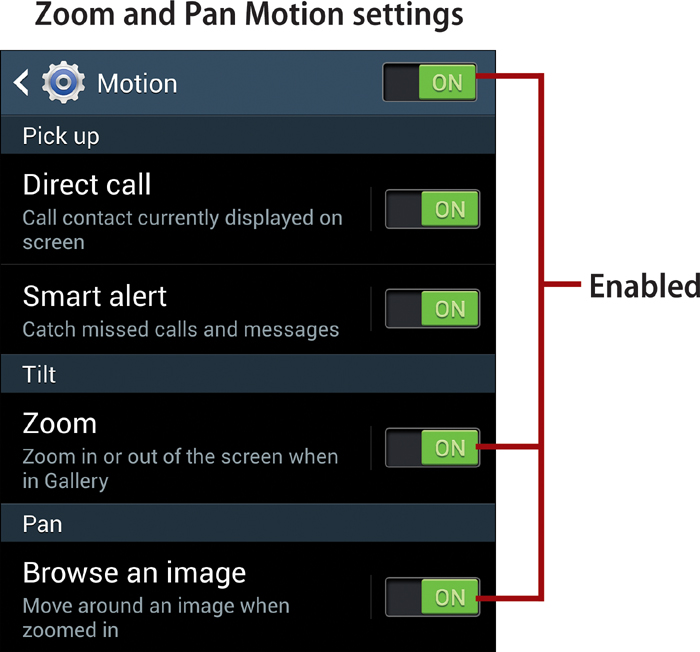
• If Zoom (a Motion setting) is enabled, you can zoom in and out by pressing two fingers to the screen and then tilting the phone toward or away from you.
• If Pan (another Motion setting) is enabled and you’ve zoomed in on a photo, you can view the parts that are off-screen by pressing one finger to the screen and moving the phone up, down, left, or right.
Enabling Zoom
When Zoom is enabled, you can tilt the screen in Gallery to zoom in or out on the current picture. To enable this feature, open Settings, select the My Device tab, tap Motions and Gestures, enable and then tap Motion, and then enable Zoom. If you also want to be able to move around within images by moving the phone, you can enable Pan, too.
6. To share the current photo via Email, Messaging, Facebook, or another means, tap the Share Via icon, and then choose a sharing method from the vertically scrolling menu. Options vary according to your installed apps, registered accounts, and carrier, but typically include the following:
• Email, Gmail. Send the image file as an email attachment using one of your email accounts or Gmail. See “Emailing Files” in Chapter 15 for instructions.
• Messaging. Transmit the photo as part of a multimedia message. See “Composing a Multimedia Message (MMS)” in Chapter 9 for instructions.
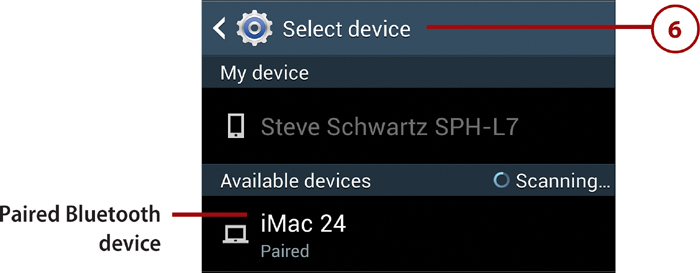
• Bluetooth. To transmit the photo to a Bluetooth-paired device (such as an iMac or a Bluetooth-equipped laptop), tap the Bluetooth icon and then tap the destination in the list of Bluetooth-paired devices. See “Transferring Files Using Bluetooth” in Chapter 15 for instructions.
• Wi-Fi Direct. Send the photo to another cell phone within range of yours that supports Wi-Fi Direct. See “Transferring Files Between Phones” in Chapter 15 for information on using Wi-Fi Direct.
• Group Play. Broadcast the photo to up to 10 nearby phones and devices that are running Group Play (see “Sharing Songs with Group Play” in Chapter 12).
• Flipboard. Post the photo as a status update to your Facebook, Twitter, or similar account using the Flipboard app (see Chapter 9).
• Google+, Twitter, Facebook. Post the photo as a status update to your account.
• Picasa. Upload the photo to Picasa Web Albums (associated with your Google account). To view the uploaded photo, visit https://picasaweb.google.com.
• S Memo. Use the photo as a basis for a new S Memo that you can save and share.
• ChatON. Share the photo with ChatON buddies.
7. An icon for the most recently used Share Via method—in this case, Bluetooth—is always displayed, enabling you to quickly repeat the sharing method.
8. To delete the photo, tap the Delete icon. Tap OK in the confirmation dialog box.
9. To launch the Camera app to shoot a photo or video, tap the Camera icon.
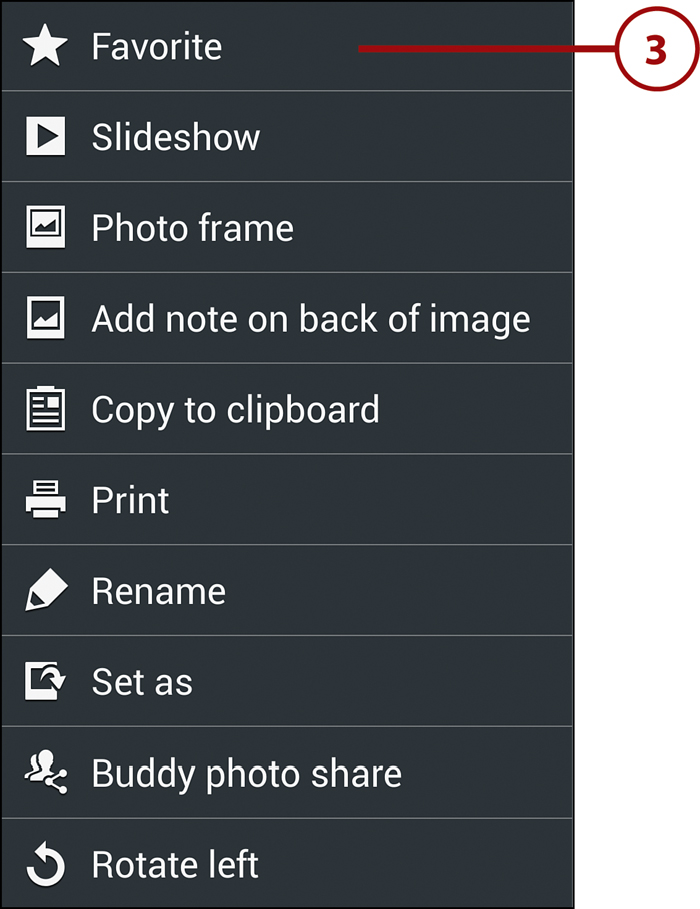
10. Press the Menu key to see the following additional options:
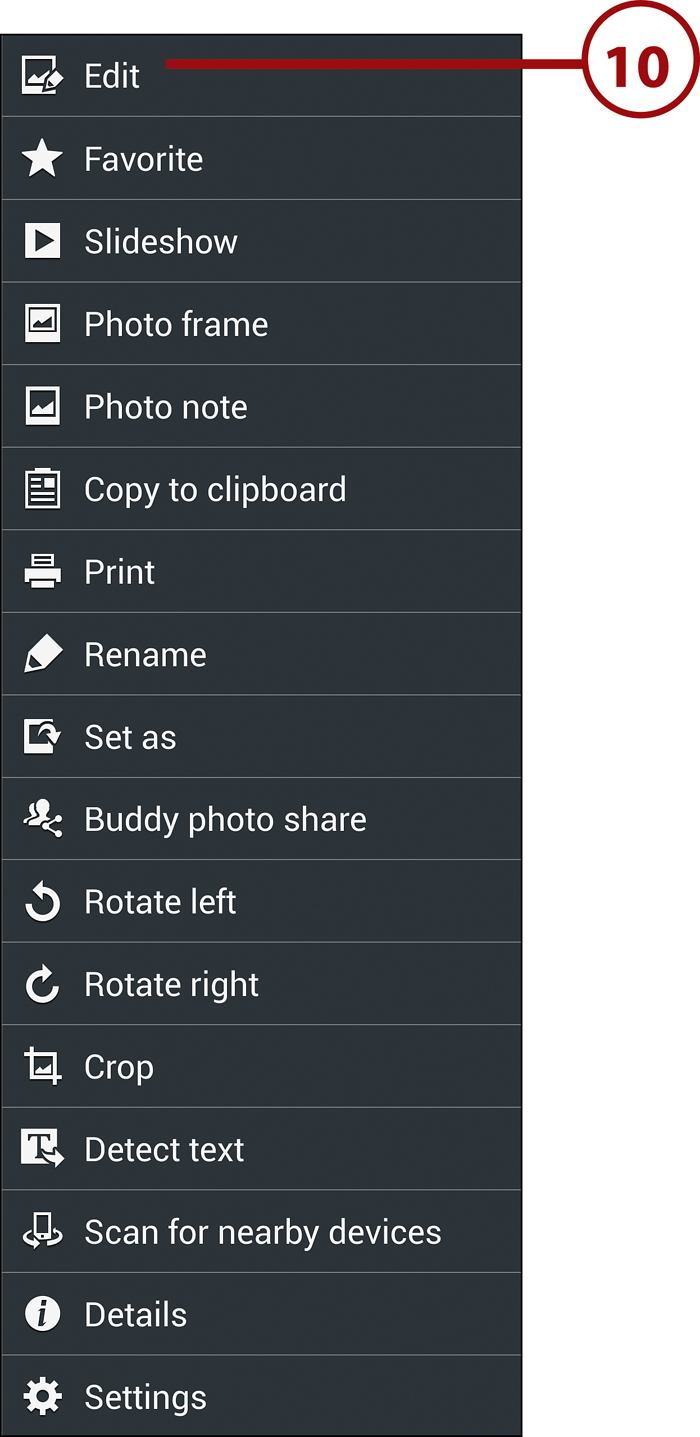
• Edit. Open the image for editing in Photo Editor. See “Using Photo Editor,” later in this chapter, for instructions.
• Favorite. Mark this photo as a favorite. To later view your favorites in Gallery, open the menu and tap Favorites.
• Slideshow. Generate a slideshow from all images in the current folder. See “Running a Slideshow,” later in this chapter, for instructions.
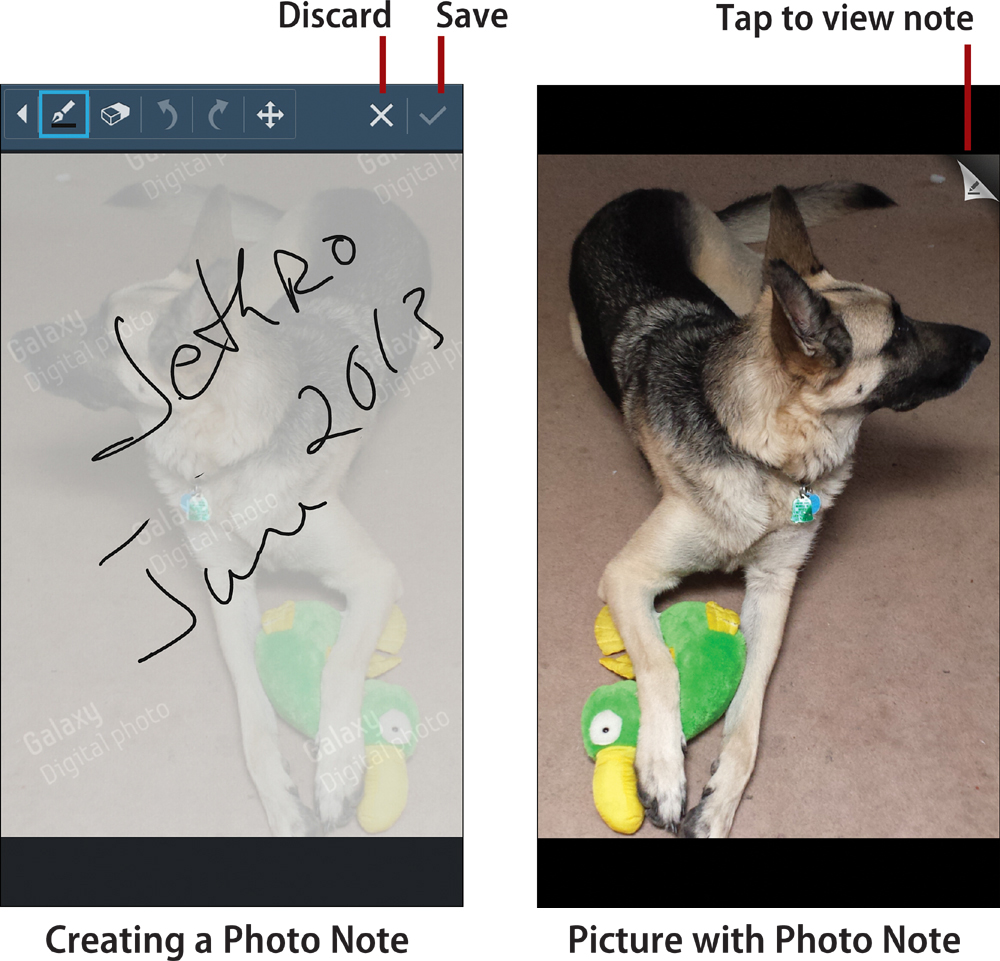
• Photo Frame, Photo Note/Add Note On Back of Image. Using your finger, you can jot something on the front or back of the photo, respectively. When you finish, tap the check mark icon to save your changes or tap the X icon to discard the note.
• Copy to Clipboard. Copy the image so that you can paste it elsewhere, such as into an email message.
• Print. Print the photo on a compatible Samsung wireless printer.
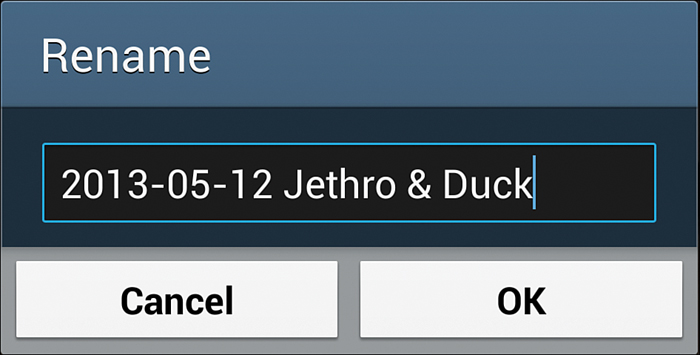
• Rename. Change the default name assigned to the photo to something meaningful. In the Rename dialog box, enter a new filename and tap OK.
• Set As. Use the photo as a person’s image in Contacts, the Home screen wallpaper, the Lock screen wallpaper, or both types of wallpaper.
• Buddy Photo Share. Use facial recognition to share the photo with friends who are in the shot.
• Rotate Left, Rotate Right. Rotate the image 90 degrees in the specified direction.
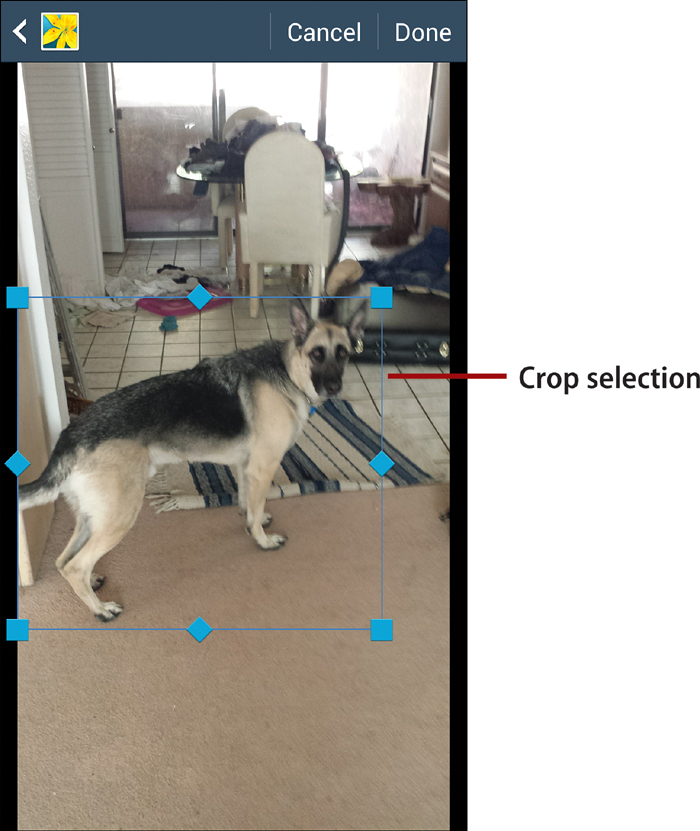
• Crop. By dragging the selection rectangle and its handles, specify the portion of the image that you want to retain and tap Done. (The cropped image is saved in addition to the original image—not as a replacement for it.)
• Detect Text. If the photo contains a clear shot of some text, this command attempts to extract the text. Although there’s no option to save the extracted text, you can use various sharing methods (such as Email or Gmail) to send the text to yourself or others.
• Scan for Nearby Devices. Scan for eligible devices within range with which the media can be shared.
• Details. Display the image’s title, dimensions, file size, storage location, and other properties.
• Settings. Opens Google/Gmail Settings in which you can enable or disable tagging in your photos.
11. To view additional images, do one of the following:
• Images in the current folder. Swipe the screen to the left or right. As an alternative, you can tap the thumbnail of the specific image that you want to view. (If the thumbnails aren’t visible, tap the current image once to reveal them.)
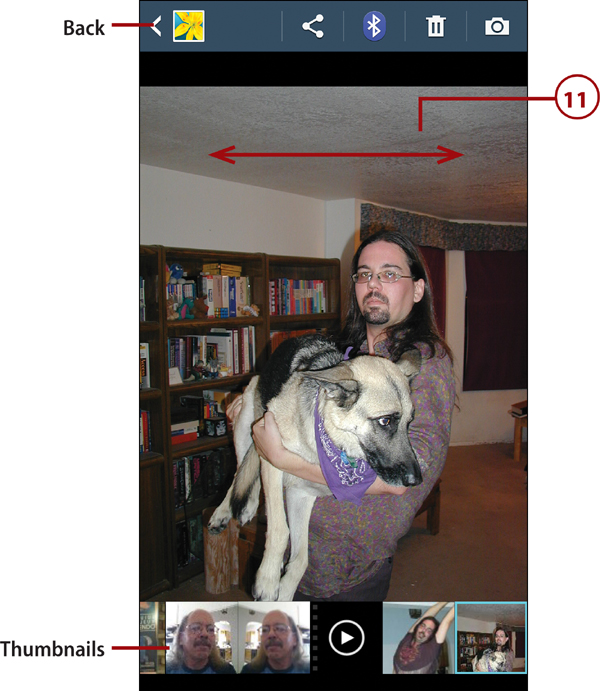
• Images in a different folder. Press the Back key or tap the Back icon repeatedly until the main Gallery screen appears; then go to step 2.
>>>Go Further: Folder and Image Selection
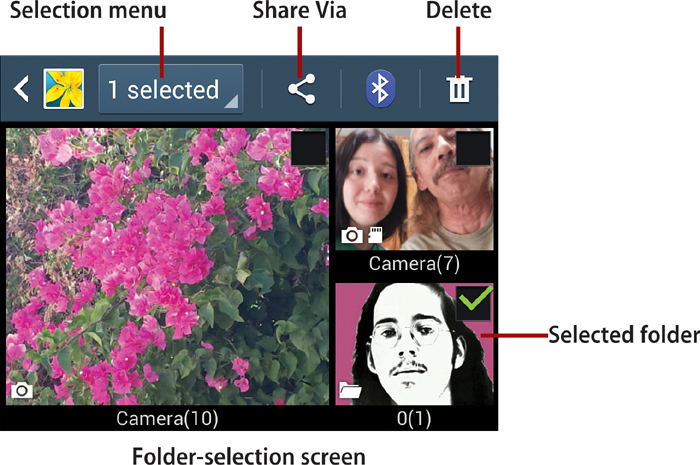
• Folder-selection (main) screen. You can delete an entire folder or transmit all of its files with a single command. Firmly press the folder and release; a green check mark appears on the folder to show it’s selected. Then tap the Share Via or Delete icon. If you want to transmit or delete multiple folders, tap to select the additional folders before tapping a command icon. (To simultaneously select all folders, tap the Selection menu and choose Select All.) The Share Via or Delete command is performed on all selected folders. You can also press the Menu key and tap Slideshow to create a slideshow based on only images in the selected folders.
• Image-selection screen. Similarly, after opening a folder, you can select one or more files on which to perform a command. Firmly press and release an image thumbnail to select it; a green check mark appears on the image to show it’s selected. To select additional images, tap their thumbnails or choose Select All from the Selection menu. Then tap the Share Via or Delete icon.
Different Options for Different Image Sources
Not all actions can be performed on every folder. For example, you can share and transmit Picasa folders via Bluetooth, but you can’t delete them. And you can’t perform either action on your Facebook folders or images.
Using Photo Editor
If you don’t need the feature set of a dedicated Mac or PC image-editing program, you can use Samsung’s built-in Photo Editor app to perform basic edits on any image that’s stored on the phone.
1. To edit the photo you’re currently viewing in Gallery, press the Menu key and tap Edit.

2. Tool icons are displayed above and below the photo and are explained in the following steps. Tools on the bottom scroll horizontally.
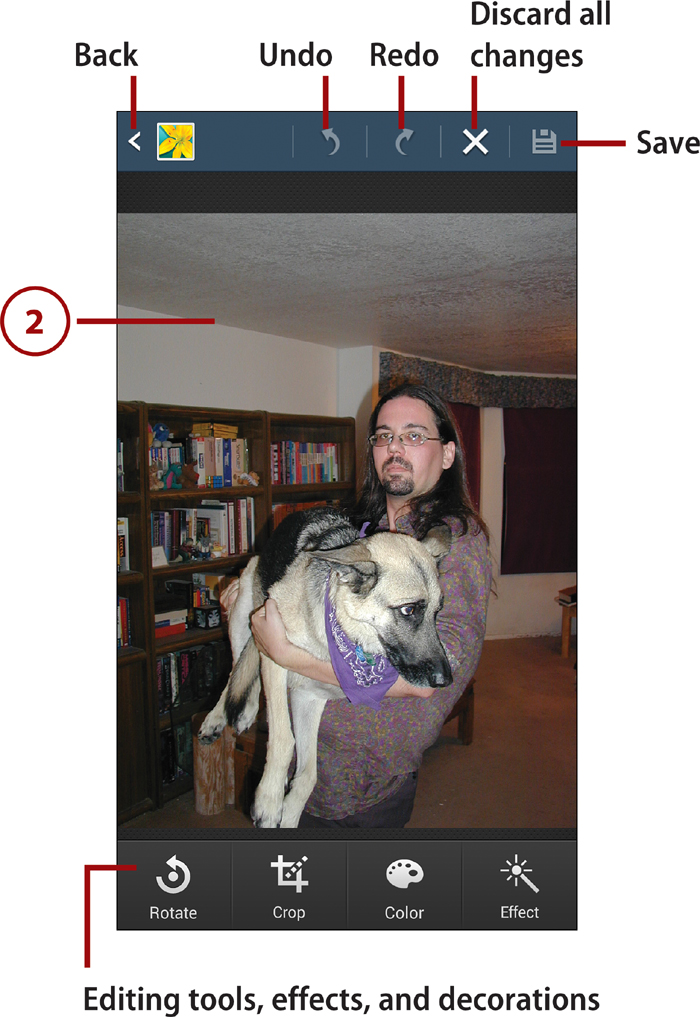
Using Undo, Redo, Discard, and Save
Note the following important tidbits while using Photo Editor:
• You can reverse the most recent edit by tapping Undo or tap it repeatedly to step backward through multiple edits. To reverse an Undo, tap Redo.
• You can complete any edit by tapping the original icon again, tapping the Back icon, or pressing the Back key. Any edits made that you haven’t reversed by tapping Undo or Discard are automatically saved. Saves are made to a separate file—not to the original, which remains unaltered. Whether you deliberately save your edits by tapping the Save icon or simply exit Photo Editor, the edited file is saved and named with today’s date.
• If you tap Discard while applying an edit, all changes made with the current editing tool are simultaneously removed.
• If you tap Discard on the main Photo Editor screen, all edits are discarded.
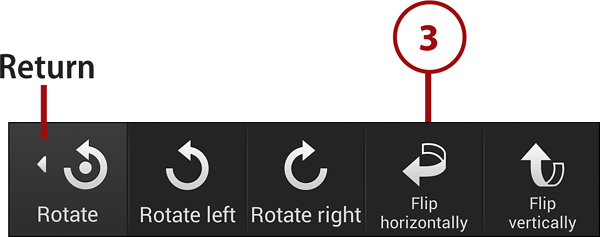
3. Rotate. Tap Rotate to rotate or flip the image. Rotate Left and Right rotate the image in 90-degree increments with each tap. Flip Horizontal and Flip Vertical reverse the image horizontally (left-to-right) or vertically (top-to-bottom). Tap the Rotate icon again when you’re satisfied with the changes.
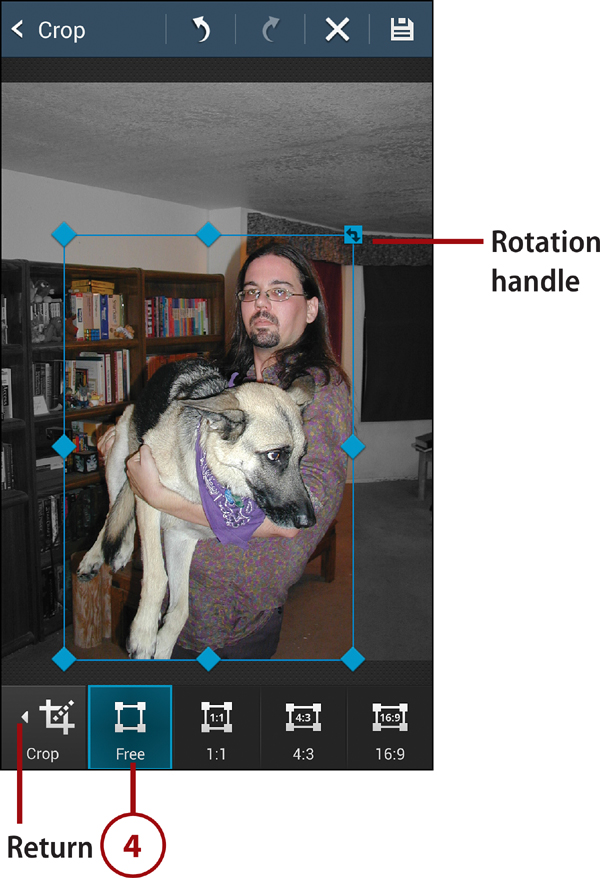
4. Crop. Use the Crop tool to retain only a selected portion of the image, while discarding the rest. Tap one of these selection tools in the scrolling list:
• Select Free if you don’t want any restrictions on the cropping dimensions. To constrain the dimensions to a ratio, select 1:1, 4:3, or 16:9. To set the cropping area, drag the rectangle’s edge and corner handles to change the size of the selection, drag the rotation handle in the upper-right corner to change the selection rectangle’s angle, and/or drag the center of the rectangle to reposition it.
• To create an irregular selection, choose the Lasso tool and use your fingertip to trace around the area you want to crop.
When you’ve selected the part of the image that you want to retain, tap the Crop icon again.
5. Color. Use Color to adjust the contrast, brightness, saturation, and other attributes of the entire image. Tap Color and then tap an attribute icon in the horizontally scrolling list. Most icons require that you manipulate one or more sliders—to increase or decrease contrast, for example. Tap Color again when you finish making adjustments.

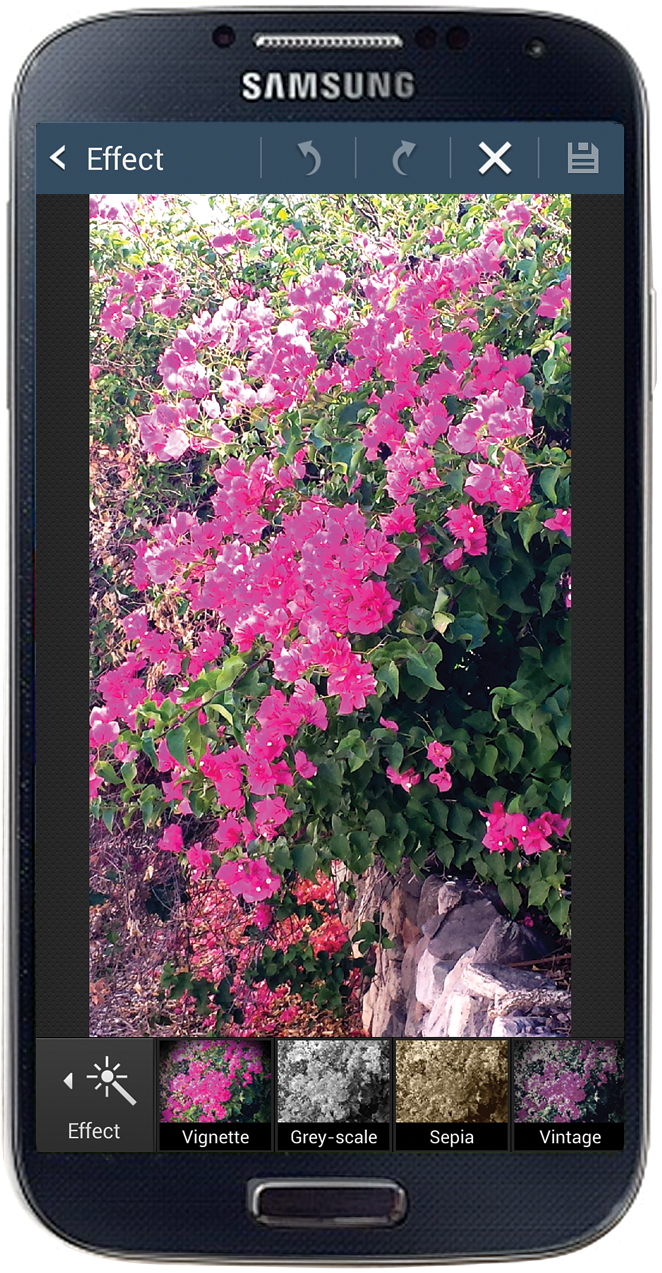
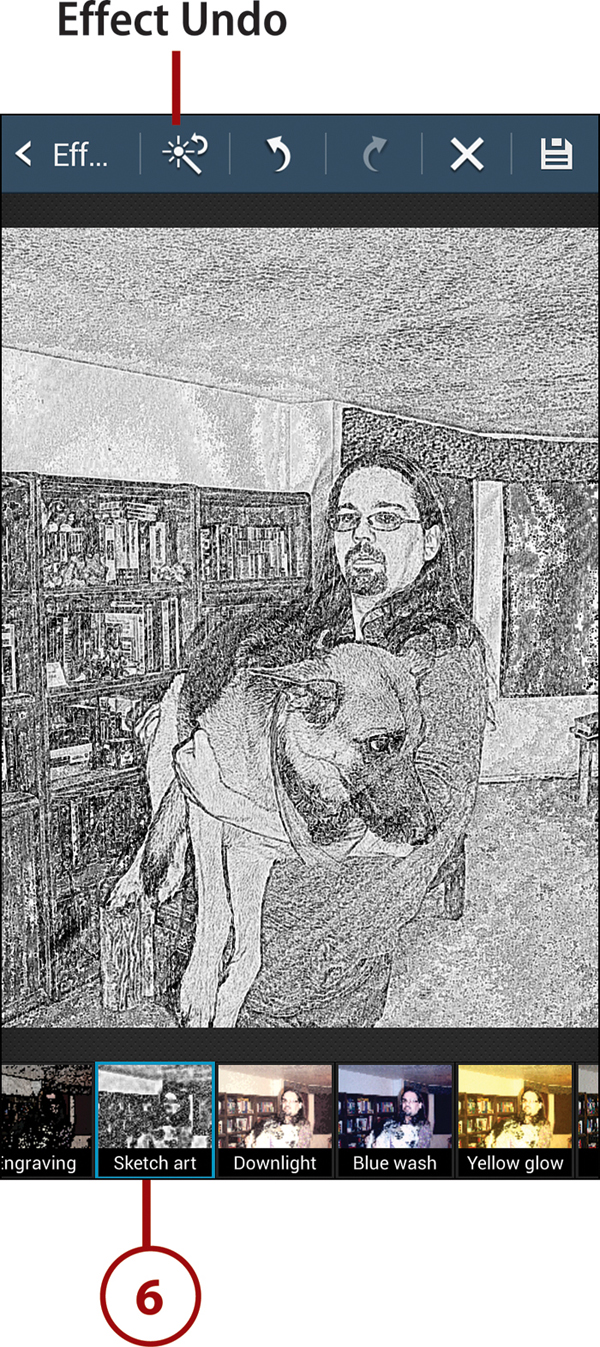
6. Effect. Tap the Effect icon and select a special effect to apply from the horizontally scrolling list. To compare the image with and without the current effect, press the Effect Undo icon. Note that effects aren’t cumulative; each one you apply replaces the current effect. Tap Effect again when you finish.
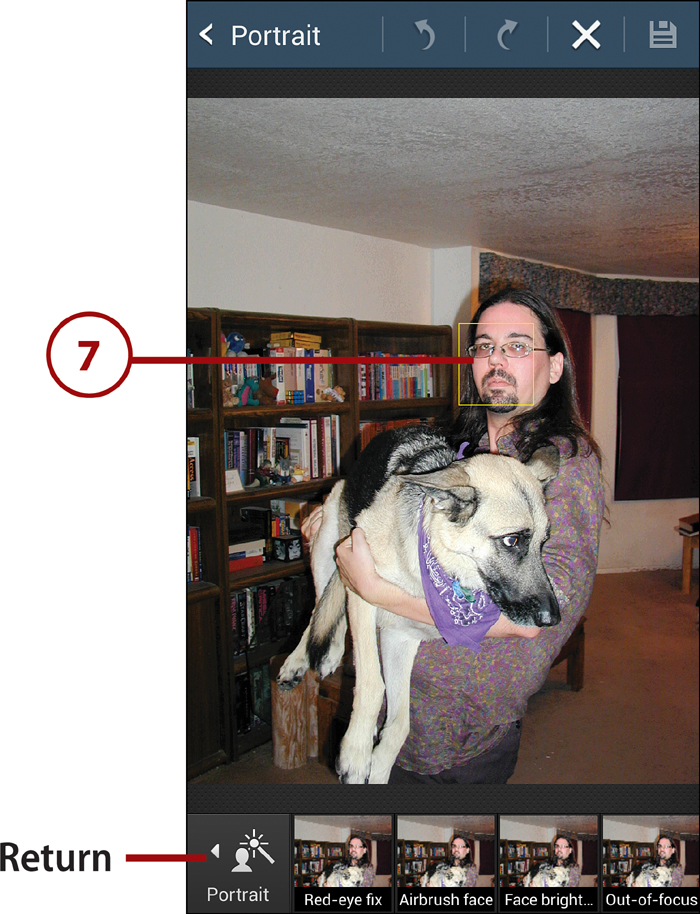
7. Portrait. Tap the Portrait icon to apply facial corrections, such as Red-eye Fix or Beauty Face. Portrait adjustments work best when modifying a headshot. Tap Portrait again when you finish.
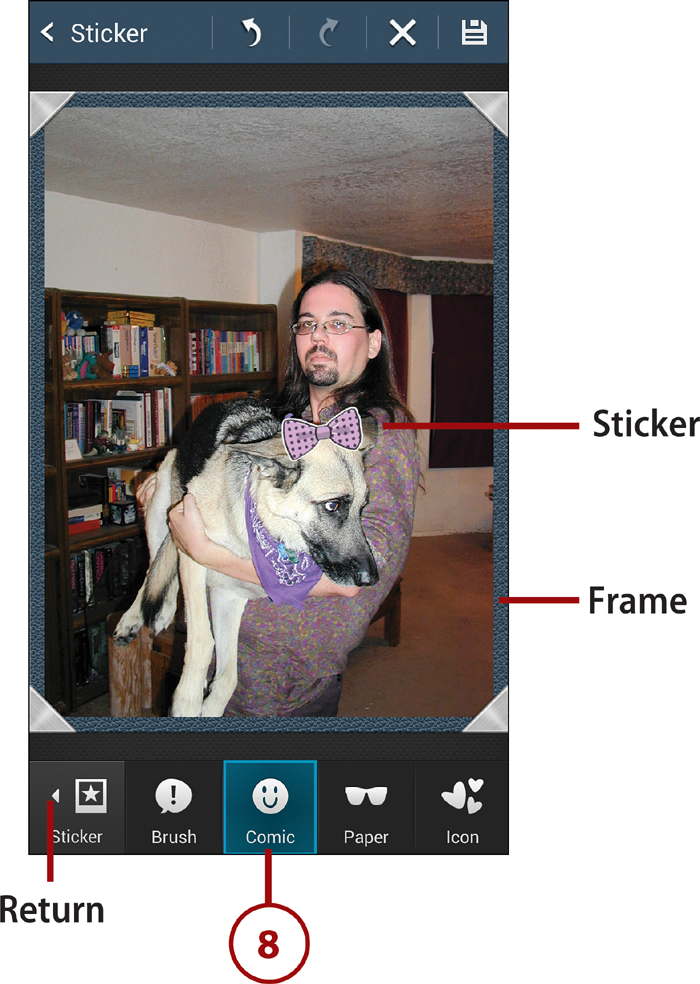
8. Sticker, Drawing, or Frame. Tap these icons to apply decorative embellishments to the photo—adding a sticker, freehand drawing, or frame. (Note that stickers can be resized, moved, and rotated.) When you finish, tap Sticker, Drawing, or Frame again.
Drawing with the Pen and Eraser
Use the Pen and Eraser tools together to do freehand drawing or write on the image. If you want to correct part of the Pen’s drawing, you can remove it using the Eraser.
9. When you finish editing, you can save your work as a new image file by tapping the Save icon. The edited image is saved in the current folder using today’s date as part of the filename. To rename the image, open it in Gallery, press the Menu key, and tap Rename.

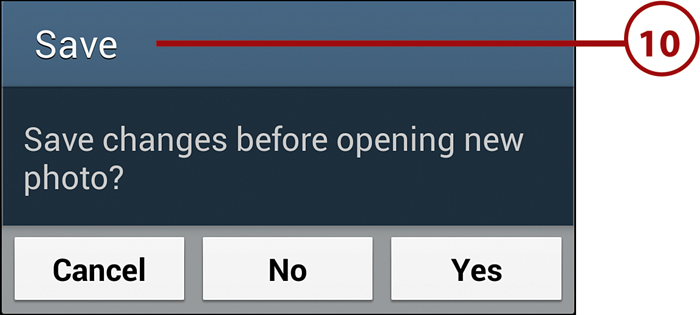
10. Optional: To edit another image, press the Menu key and tap Select Image. Respond to the Save dialog box by tapping Yes (save edits made to the current image), No (ignore edits made to the current image), or Cancel (continue editing the current image).
Running a Slideshow
You can create a slideshow with transition effects and music using all or selected images from one or more folders. The show plays in portrait or landscape mode, depending on the phone’s orientation.
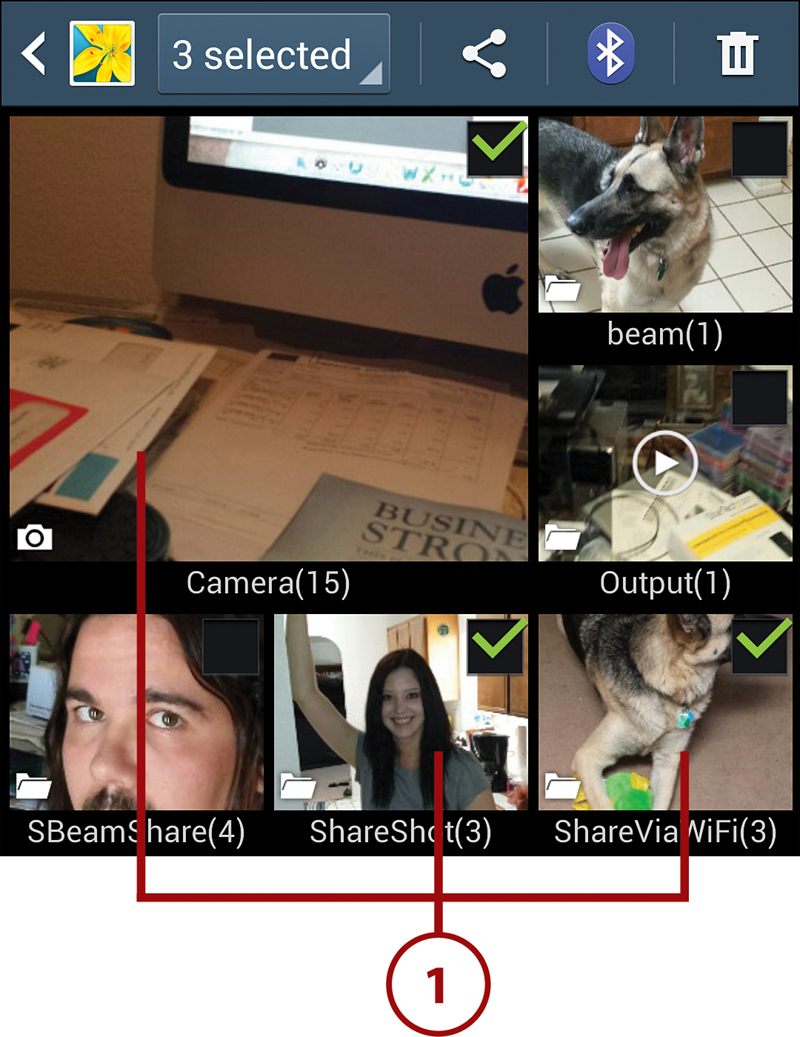
1. In Gallery, select the folders, folder, or images that you want to include in the slideshow. (If you’re reviewing a photo that you just took with Camera and request a slideshow, the Camera folder is automatically used as the basis for the show.) You can use any of the following selection techniques:
• On the main screen, select nothing to include all stored photos in the show, or select one or more folders to include all of their photos.
• If a folder is open, make no selection to use all its photos or select the particular photos that you want to use.
2. Press the Menu key and tap Slideshow.

3. Review or set options for the show in the dialog box that appears:
• On the Effect tab, select an effect to use when transitioning between slides.

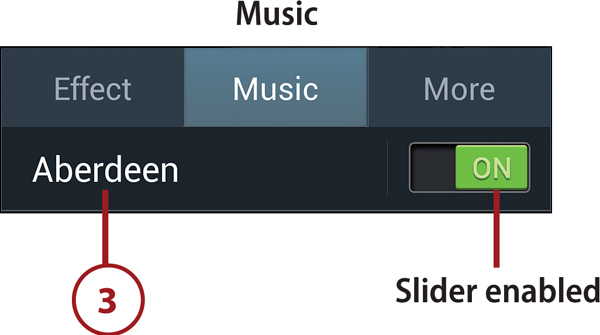
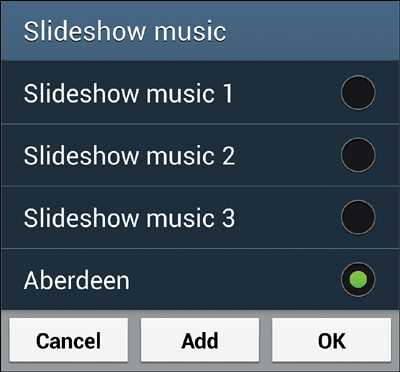
• On the Music tab, select the music track that will accompany the show. To change the current track, tap its name. To select a track other than the ones listed in the Slideshow Music dialog box, tap Add, pick a song, and tap OK. To run the show without music, set the track selection slider to Off; otherwise, ensure that the slider is On.
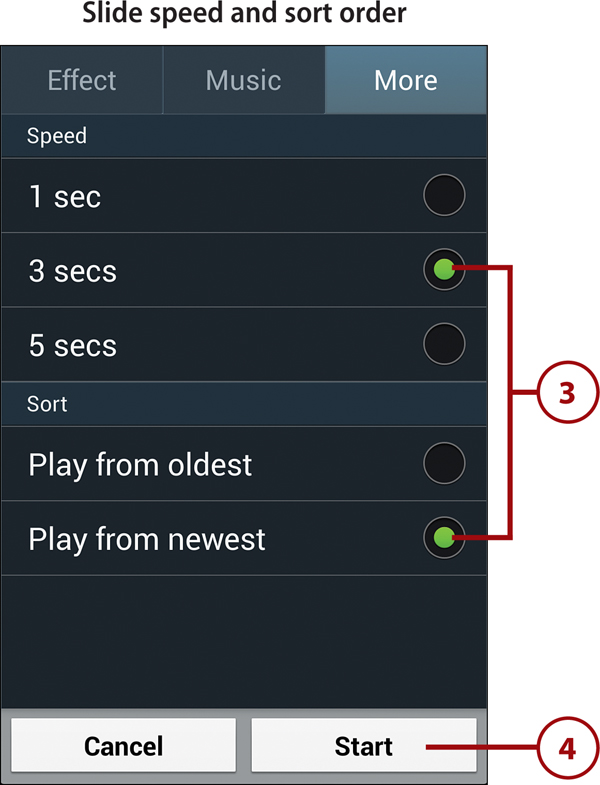
• On the More tab, specify the speed (number of seconds per slide) and a sort order for the images.
4. Tap the Start button to begin the show.
5. To end the show, tap any slide or press the Back key.