
Chapter 9. Time, Part II: Nonlinear Motion
Topics in This Chapter
• 9.1 Understand Time and Its Derivatives
• 9.2 Use Animation Timers and Easing Functions to Implement Nonlinear Jumping
• 9.3 Implement Animation Timers
• 9.4 Implement Easing Functions
• 9.5 Fine-tune Easing Functions
• 9.6 Implement a Realistic Bounce Behavior
• 9.8 Implement Nonlinear Color Changes with Animation Timers and Easing Functions
From sprinting gazelles on the plains of Africa to someone reaching for a cup of coffee in a high-rise office building in Tokyo, natural motion is predominantly nonlinear, meaning it involves accleration. In Snail Bait, the runner’s jumping motion is nonlinear because gravity slows her down as she ascends and increases her speed as she descends.
In the previous chapter we implemented a jump behavior that resulted in linear motion, meaning the runner ascended and descended at a constant rate of speed.
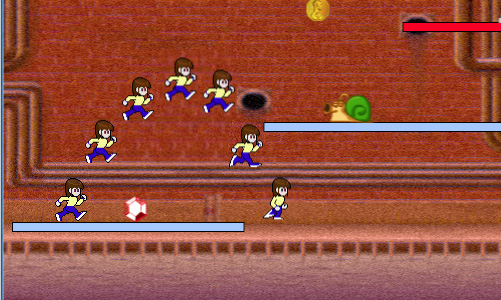
In this chapter, we turn that linear motion into nonlinear motion as depicted in Figure 9.1.
Figure 9.1. A natural jumping sequence
In this chapter, you will learn how to do the following:
• Use animation timers and easing functions to implement nonlinear jumping (Section 9.2 on p. 233)
• Implement animation timers—a stopwatch with an easing function (Section 9.3 on p. 235)
• Implement JavaScript functions, known as easing functions, that modify the flow of time (Section 9.4 on p. 237)
• Implement a realistic bouncing behavior (Section 9.6 on p. 241)
• Randomize behaviors (Section 9.7 on p. 246)
• Implement nonlinear color changes (Section 9.8 on p. 248)
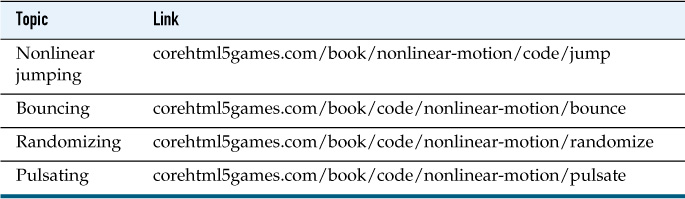
The online examples for this chapter are listed in Table 9.1.
Table 9.1. Nonlinear motion examples online
9.1. Understand Time and Its Derivatives
To implement more realistic jumping than the linear motion we implemented in the last chapter, you might expect us to modify the runner’s jump behavior, but we do not. Instead of modifying the runner’s jump behavior, we temporarily modify the underlying flow of time as she jumps. Because motion is derived from time, modifying time results in changes to motion.
The reason we modify time to influence motion instead of modifying motion directly is that motion is not the only derivative of time. A pulsating platform, for example, involves nonlinear color change over time as an initial rapid pulse of color slowly fades, so the platform’s color change is also a derivative of time.
If we directly implement derivatives of time—such as motion and color change—case by case, we end up implementing nonlinear behavior in multiple places. For example, we might implement nonlinear motion for jumping and later implement nonlinear color change for pulsating platforms. However, if we instead modify the underlying flow of time, we automatically affect its derivatives and we need modify time in only one place.
To manipulate the flow of time, we use animation timers and easing functions.
9.2. Use Animation Timers and Easing Functions to Implement Nonlinear Jumping
Recall the runner’s jump behavior from the last chapter, when we used two stopwatches to time the runner’s ascent and descent during a jump. Those timers were created by Snail Bait’s equipRunnerForJumping() method, as shown in Example 9.1.
SnailBait.prototype = {
...
equipRunnerForJumping: function () {
...
this.runner.ascendTimer = new Stopwatch();
this.runner.descendTimer = new Stopwatch();
...
},
...
};
The runner’s jump behavior uses those stopwatches to position the runner in the vertical direction when she’s jumping. To implement nonlinear motion for jumps, we simply swap stopwatches for animation timers with appropriate easing functions, as shown in Example 9.2. By modifying the flow of time through the jump behavior, we don’t have to modify the behavior’s code at all.
Example 9.2. Using animation timers instead of stopwatches
SnailBait.prototype = {
...
equipRunnerForJumping: function () {
...
// On the ascent, the runner looses speed
// due to gravity (ease out)
this.runner.ascendTimer =
new AnimationTimer(
this.runner.JUMP_DURATION/2,
AnimationTimer.makeEaseOutEasingFunction(1.0)
);
// On the descent, the runner gains speed
// due to gravity (ease in)
this.runner.descendTimer =
new AnimationTimer(
this.runner.JUMP_DURATION/2,
AnimationTimer.makeEaseInEasingFunction(1.0)
);
...
};
},
...
};
The runner’s ascend animation timer is created with an ease-out function, which means time flows quickly in the beginning and slows throughout the ascent. The ease-out function is created by another function—AnimationTimer.makeEaseOutEasingFunction()—which we illustrate in Section 9.3, “Implement Animation Timers,” on p. 235.
The descend timer is created with an ease-in easing function. Time starts slowly and flows faster throughout the descent. Like the ease-out function, the ease-in function is created by an AnimationTimer method: AnimationTimer.makeEaseInEasingFunction().
You’ve seen how to use animation timers and easing functions to implement nonlinear motion during a jump. Realize that’s all there is to implementing nonlinear jumping; the runner’s jump behavior remains unchanged. Next, let’s take a look at the implementation of those timers and functions.
![]() Note: Cuckoo birds and animation timers
Note: Cuckoo birds and animation timers
Cuckoos are one of several bird species known as brood parasites because they lay their eggs in another bird’s nest, leaving the unsuspecting parent to raise the cuckoo’s young. Cuckoos are masters at laying eggs that look almost like the adoptive parent’s eggs.
The animation timer that we implemented in this chapter is like a cuckoo bird egg because we replaced stopwatches with animation timers, without any changes to the unsuspecting jump behavior, which uses those timers to time jumps. Just as the cuckoo’s egg looks nearly identical to the adoptive parent’s egg, our animation timer looks nearly identical to a stopwatch because it implements the same methods with identical signatures.
9.3. Implement Animation Timers
Animation timers are essentially stopwatches with two additional features:
• Animation timers run for a specific duration.
• You can attach an easing function to an animation timer to modify the flow of time through the timer.
Easing functions, which you create with AnimationTimer convenience methods such as makeEaseInEasingFunction() and makeEaseOutEasingFunction(), convert time from one value to another, as shown in Figure 9.2.
Figure 9.2. An easing function. Real time is on the left and the modified time is on the right.

Example 9.3 shows the implementation of the AnimationTimer constructor.
Example 9.3. Animation timer constructor
AnimationTimer = function (duration, easingFunction) {
this.easingFunction = easingFunction;
if (duration !== undefined) this.duration = duration;
else this.duration = 1000;
this.stopwatch = new Stopwatch();
};
The animation timer’s duration and easing function are both optional; if you don’t specify a duration it defaults to one second, and if you don’t specify an easing function, it defaults to undefined. The most interesting part of the AnimationTimer constructor is the fact that it creates a stopwatch that it subsequently uses in its methods, which are listed in Example 9.4.
Example 9.4. Animation timer methods
AnimationTimer.prototype = {
start: function () { this.stopwatch.start(); },
stop: function () { this.stopwatch.stop(); },
pause: function () { this.stopwatch.pause(); },
unpause: function () { this.stopwatch.unpause(); },
isPaused: function () { return this.stopwatch.isPaused(); },
isRunning: function () { return this.stopwatch.running; },
reset: function () { this.stopwatch.reset(); },
isExpired: function () {
return this.stopwatch.getElapsedTime() > this.duration;
},
getElapsedTime: function (now) {
var elapsedTime = this.stopwatch.getElapsedTime(now),
percentComplete = elapsedTime / this.duration;
if (this.easingFunction === undefined ||
percentComplete === 0 ||
percentComplete > 1) {
return elapsedTime;
}
return elapsedTime *
(this.easingFunction(percentComplete) / percentComplete);
}
};
Nearly all AnimationTimer methods simply delegate to the animation timer’s stopwatch. The signatures of those methods are identical to Stopwatch methods, so animation timers can masquerade as stopwatches, which is why we did not have to modify the jump behavior to turn linear motion into nonlinear.
Unlike stopwatches, animation timers have a duration. You can find out if a timer has expired, meaning it has run for its duration, with the isExpired() method. The most interesting difference between stopwatches and animation timers, however, is that you can attach a easing function to an animation timer.
The AnimationTimer.getElapsedTime() method gets the elapsed time from the timer’s stopwatch and calculates the percent of the animation that has elapsed. If the animation timer has an easing function associated with it, getElapsedTime() passes the percent of the animation that has elapsed to the easing function, which presumably returns a different percent, thereby modifying the flow of time.
Subsequently, the getElapsedTime() method calculates and returns the elapsed time based on the modified percent returned from the easing function.
9.4. Implement Easing Functions
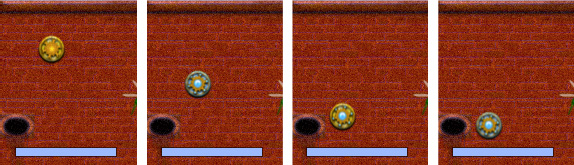
Figure 9.3 illustrates two classic easing functions: ease-in and ease-out. To illustrate those effects, the application shown in Figure 9.3 draws a vertical timeline that represents real time.
Figure 9.3. Ease-in (left) and ease-out (right)
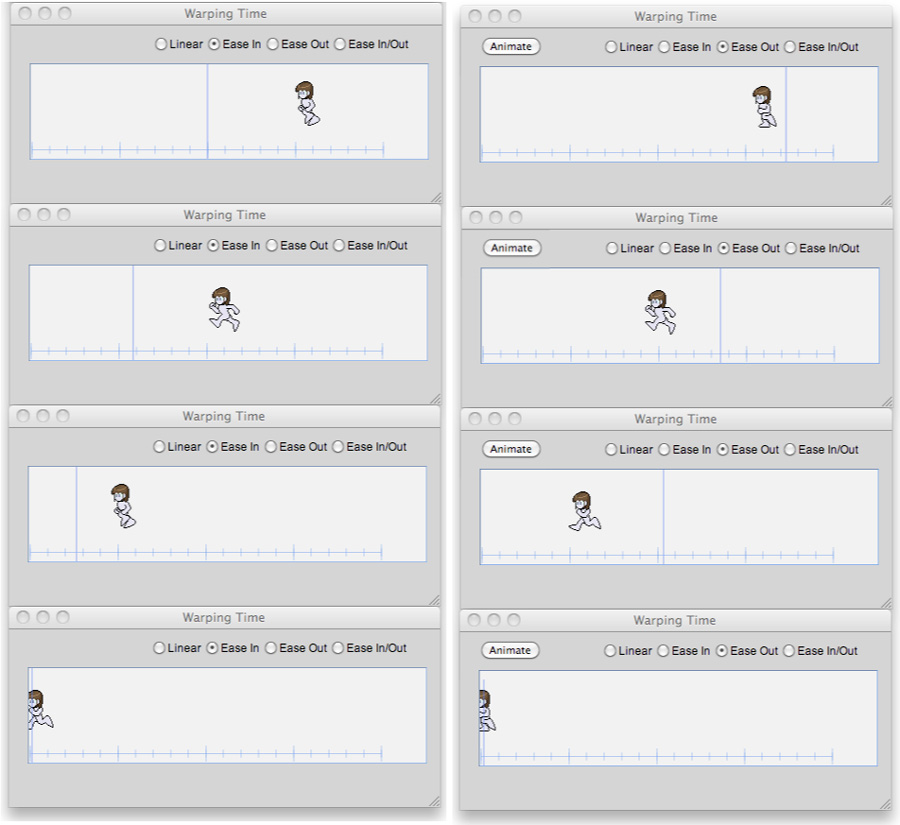
Ease-in is illustrated by the screenshots in the left column in Figure 9.3 from top to bottom. Ease-in starts slowly, far behind the timeline, and gains speed at the end. Ease-out, illustrated in the right column, is the opposite effect, starting with a burst of speed and slowing at the end. In both cases, the runner is aligned with the timeline at the end of the animation.
The ease-in and ease-out effects, from a mathematical standpoint, are implemented by equations depicted by the two graphs in Figure 9.4. The horizontal axis represents the actual percent of the animation that is complete and the vertical axis represents the percent returned from an appropriate easing function. The straight lines in the graphs represent real time, and the curves show how the easing functions warp time.
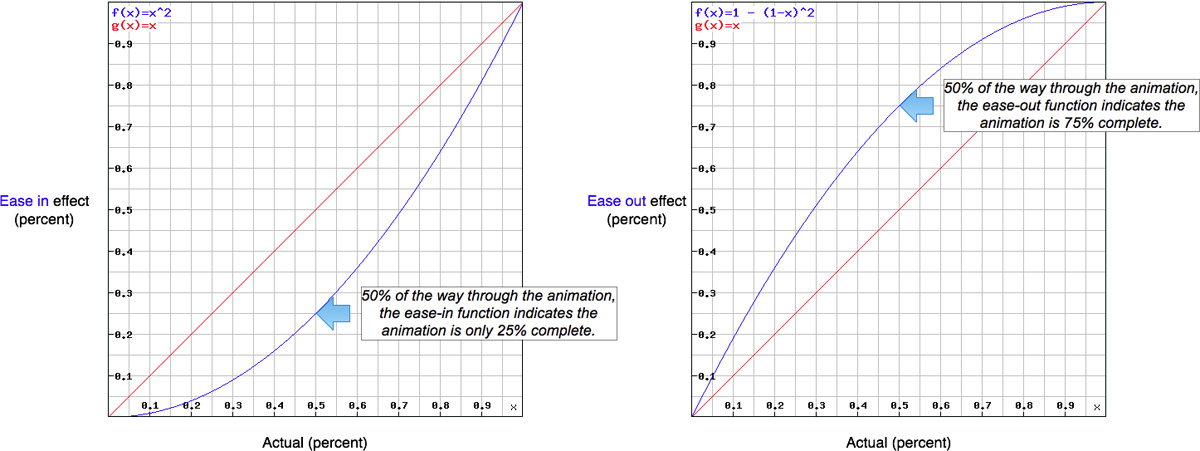
The ease-in effect, shown in the left-hand graph in Figure 9.4, consistently reports less time than has actually passed. For example, when real time (on the horizontal axis) is halfway through the animation, the ease-in easing function in Figure 9.4 reports that it’s only one-quarter of the way through the animation.
The ease-out effect, shown in the right-hand graph in Figure 9.4, consistently reports more time than has actually passed. For example, when real time is halfway through the animation for the ease-out easing function in Figure 9.4, the ease-out easing function reports that it’s three-quarters of the way through the animation.
Note that for both ease-in and ease-out, time returns to normal when the timer expires.
The AnimationTimer object provides several methods, listed in Example 9.5, that create easing functions. You can create an instance of an easing function and pass it to the animation timer’s constructor, as we did in Example 9.2.
Example 9.5. Making easing functions
AnimationTimer.makeEaseOutEasingFunction = function (strength) {
return function (percentComplete) {
return 1 - Math.pow(1 - percentComplete, strength*2);
};
};
AnimationTimer.makeEaseInEasingFunction = function (strength) {
return function (percentComplete) {
return Math.pow(percentComplete, strength*2);
};
};
AnimationTimer.makeEaseOutInEasingFunction = function () {
return function (percentComplete) {
return percentComplete +
Math.sin(percentComplete*2*Math.PI) / (2*Math.PI);
};
};
AnimationTimer.makeEaseInOutEasingFunction = function () {
return function (percentComplete) {
return percentComplete -
Math.sin(percentComplete*2*Math.PI) / (2*Math.PI);
};
};
The preceding methods include algorithms for easing in and out, in addition to combinations of those two algorithms. In Section 9.6, “Implement a Realistic Bounce Behavior,” on p. 241, you’ll see how to use the easing function returned by AnimationTimer.makeEaseOutInEasingFunction() to implement a bouncing motion. In Section 9.8, “Implement Nonlinear Color Changes with Animation Timers and Easing Functions,” on p. 248 you’ll see how to use the function returned by AnimationTimer.makeEaseInOutEasingFunction() to implement pulsating platforms.
![]() Note: Easing function equations on the web
Note: Easing function equations on the web
The equations used above for easing functions are well established and widely available; for example, see www.dzone.com/snippets/robert-penner-easing-equations for one online resource.
![]() Note: Easing functions in UI toolkits
Note: Easing functions in UI toolkits
Many software developers are familiar with easing functions from user interface toolkits, such as jQuery, which provides a rich set of easing functions for animating user interface elements. See http://api.jqueryui.com/easings/ for more information.
9.5. Fine-tune Easing Functions
Because they use the power of a number to compute values, the curves shown in Figure 9.4 are known as power curves. Power curves are prevalent in many disciplines, from animation to economics. Figure 9.4 shows curves for a power of 2; changing that number, as shown in Figure 9.5, results in different power curves.
Figure 9.5. Power curves with varying exponents for an ease in effect
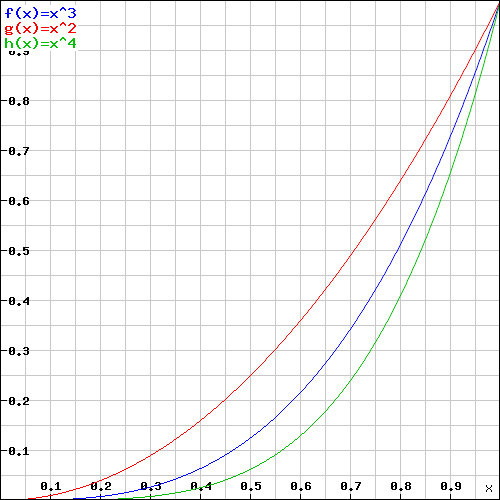
Figure 9.5 shows three power curves for an ease-in effect. From left to right, they represent powers of 2, 3, and 4, respectively. Increasing the exponent exaggerates the ease-in effect.
The AnimationTimer methods that create the ease-in and ease-out easing functions in Example 9.5 take a strength argument representing one-half of the exponent for their power curves. The default strength value is 1, which results in a power of 2.
By modifying the strength value you pass to AnimationTimer.makeEaseInEasingFunction() and AnimationTimer.makeEaseOutEasingFunction(), you can control the effect’s strength. For example, the modified version of equipRunnerForJumping(), listed in Example 9.6, increases the strength of the ease-in and ease-out effects during the runner’s jump from 1.0 to 1.15. That small change slightly exaggerates both effects, which makes the runner hang in the air a little longer at the apex of the jump.
Example 9.6. Increasing the easing effect
SnailBait.protoype = {
...
equipRunnerForJumping: function () {
...
this.runner.ascendTimer =
new AnimationTimer(this.runner.JUMP_DURATION/2,
AnimationTimer.makeEaseOutEasingFunction(1.15));
this.runner.descendTimer =
new AnimationTimer(this.runner.JUMP_DURATION/2,
AnimationTimer.makeEaseInEasingFunction(1.15));
...
},
...
};
9.6. Implement a Realistic Bounce Behavior
Animation timers encapsulate the ability to modify the flow of time for a given activity. To use them, as you saw in Section 9.2, “Use Animation Timers and Easing Functions to Implement Nonlinear Jumping,” on p. 233, you implement a behavior fitted with an animation timer with an appropriate easing function.
That’s how Snail Bait makes coins and jewels bounce on their platforms, as shown in Figure 9.6.
Besides a cycle behavior that makes coins appear to throb, coins have a bounce behavior, as shown in Example 9.7.
Example 9.7. Creating coins with bounce behaviors
SnailBait.prototype = {
...
createCoinSprites: function () {
var BLUE_THROB_DURATION = 100, // milliseconds
GOLD_THROB_DURATION = 500, // milliseconds
BOUNCE_DURATION = 800, // milliseconds
BOUNCE_HEIGHT = 50, // pixels
coin,
i;
for (i = 0; i < this.coinData.length; ++i) {
if (i % 2 === 0) {
coin = new Sprite('coin',
new SpriteSheetArtist(this.spritesheet,
this.goldCoinCells),
[ new BounceBehavior(BOUNCE_DURATION, BOUNCE_HEIGHT),
new CycleBehavior(GOLD_THROB_DURATION)
]
);
}
else {
coin = new Sprite('coin',
new SpriteSheetArtist(this.spritesheet,
this.blueCoinCells),
[ new BounceBehavior(BOUNCE_DURATION, BOUNCE_HEIGHT),
new CycleBehavior(BLUE_THROB_DURATION)
]
);
}
...
}
},
...
};
The two arguments to the bounce behavior’s constructor, which is listed in Example 9.8, represent the duration of an entire single bounce—both the ascent and descent—and the height of the bounce. Both values are optional, defaulting to 1000 milliseconds for the duration and 50 pixels for the height.
Example 9.8. Bounce behavior’s constructor
BounceBehavior = function (duration, height) {
this.duration = duration || 1000;
this.distance = height*2 || 100;
this.bouncing = false;
this.timer =
new AnimationTimer(this.duration,
AnimationTimer.makeEaseOutInEasingFunction());
this.paused = false;
};
The bounce behavior’s constructor invokes AnimationTimer. makeEaseOutInEasingFunction() to create an easing function that mimics bouncing: easing out on the way up and easing in on the way down. The bounce behavior applies the easing function for the entire bounce, so it’s more convenient for the behavior to deal with the entire distance of the bounce rather than the bounce’s height; for that reason, the constructor calculates the distance by doubling the height.
The bounce behavior’s execute() method is listed in Example 9.9.
If the sprite associated with the bounce behavior is not bouncing when Snail Bait invokes the behavior’s execute() method, the behavior starts bouncing the sprite; otherwise, if the bounce has completed, the execute() method resets the timer and returns. Resetting the timer resets the timer’s elapsed time to zero, and because the behavior’s bouncing property is still true, the bouncing repeats endlessly.
Example 9.9. Bounce behavior’s execute() method
BounceBehavior.prototype = {
...
execute: function (sprite, now, fps, context,
lastAnimationFrameTime) {
var elapsed,
deltaY;
if (!this.bouncing) { // not bouncing
this.startBouncing(sprite); // start bouncing
}
else { // already bouncing
elapsed = this.timer.getElapsedTime();
if (this.timer.isExpired()) { // bounce is complete
this.resetTimer(); // restart the bounce
return; // done
}
this.adjustVerticalPosition(sprite, elapsed);
}
}
};
If the sprite is already bouncing and the bounce is still in progress—which is the case nearly all of the time—the behavior gets the elapsed time from the behavior’s timer (fitted with the ease-in-out easing function) and uses that value to adjust the sprite’s vertical position.
The bounce behavior’s execute() method uses three helper methods:
• startBouncing()
• resetTimer()
• adjustVerticalPosition()
The implementation of the three methods is shown Example 9.10.
When the behavior’s sprite starts bouncing, the behavior records the vertical position of the sprite, starts the timer, and sets a bouncing flag to true.
The most interesting method listed in Example 9.10 is adjustVerticalPosition(), which as its name implies, adjusts the vertical position of the behavior’s sprite. The distance to move the sprite in the vertical direction is easy to calculate. First, adjustVerticalPosition() divides the timer’s elapsed time by the bounce’s duration to calculate what percent of the bounce has elapsed, then the method multiplies that percent by the entire distance of the bounce.
Example 9.10. Bounce behavior support methods
BounceBehavior.prototype = {
...
startBouncing: function (sprite) {
this.baseline = sprite.top;
this.bouncing = true;
this.timer.start();
},
resetTimer: function () {
this.timer.stop();
this.timer.reset();
this.timer.start();
},
adjustVerticalPosition: function (sprite, elapsed) {
var rising = false,
deltaY = this.timer.getElapsedTime() / this.duration *
this.distance;
if (elapsed < this.duration/2)
rising = true;
if (rising) {
// Move the sprite up
sprite.top = this.baseline - deltaY;
}
else {
// Move the sprite down
sprite.top = this.baseline - this.distance + deltaY;
}
},
...
};
Once the adjustVerticalPosition() method has calculated the delta to move the sprite in the vertical direction, it checks to see whether the sprite is currently rising or falling and adjusts the vertical position of the sprite accordingly.
Recall from Chapter 8 that behaviors with internal timers must implement pause() and unpause() methods so that the behaviors stay in sync with the game when players pause and unpause the game. The bounce behavior’s pause() and unpause() methods are listed in Example 9.11.
Example 9.11. Pausing bounce behaviors
BounceBehavior.prototype = {
...
pause: function(sprite) {
if (!this.timer.isPaused()) {
this.timer.pause();
}
this.paused = true;
},
unpause: function(sprite) {
if (this.timer.isPaused()) {
this.timer.unpause();
}
this.paused = false;
},
...
};
![]() Note: Snail Bait has several bouncing sprites
Note: Snail Bait has several bouncing sprites
Besides coins, Snail Bait’s rubies and sapphires also bounce endlessly until the runner collides with them or they scroll out of view. Snail Bait adds bounce behaviors to its ruby and sapphire sprites similarly to how it adds bounce behaviors to coins. In the interest of brevity, that code is not listed in this book.
9.7. Randomize Behaviors
The implementation of Snail Bait’s createCoinSprites() method in Example 9.7 created identical bounce behaviors for every coin. The game is more interesting, however, if coins bounce at different heights and rates of speed. Example 9.12 shows a revised listing of createCoinSprites() that creates behaviors with random bounce durations and heights.
Example 9.12. Creating coins with random bounce behaviors
SnailBait.prototype = {
...
createCoinSprites: function () {
var BLUE_THROB_DURATION = 100,
GOLD_THROB_DURATION = 500,
BOUNCE_DURATION_BASE = 800, // milliseconds
BOUNCE_HEIGHT_BASE = 50, // pixels
coin;
for (var i = 0; i < this.coinData.length; ++i) {
if (i % 2 === 0) {
coin = new Sprite('coin',
new SpriteSheetArtist(this.spritesheet,
this.goldCoinCells),
[ new BounceBehavior(BOUNCE_DURATION_BASE +
BOUNCE_DURATION_BASE * Math.random(),
BOUNCE_HEIGHT_BASE +
BOUNCE_HEIGHT_BASE * Math.random()),
new CycleBehavior(GOLD_THROB_DURATION)
]
);
}
else {
coin = new Sprite('coin',
new SpriteSheetArtist(this.spritesheet,
this.blueCoinCells),
[ new BounceBehavior(BOUNCE_DURATION_BASE +
BOUNCE_DURATION_BASE * Math.random(),
BOUNCE_HEIGHT_BASE +
BOUNCE_HEIGHT_BASE * Math.random()),
new CycleBehavior(BLUE_THROB_DURATION)
]);
}
...
}
},
...
};
The revised createCoinSprites() method creates random values by starting with a base—800 ms for the duration and 50 pixels for the height—and then adding a value between zero and the base. When JavaScript’s Math.random(), which returns a number between 0.0 and 1.0, returns zero, the value is equal to the base and when Math.random() returns 1.0, the value is equal to two times the base. As a result, durations lie somewhere between 800 and 1600 ms, and heights lie somewhere between 50 and 100 pixels.
Now that you’ve seen how to use animation timers and easing functions to implement nonlinear motion, let’s see how to use them to implement nonlinear effects for other derivatives of time.
9.8. Implement Nonlinear Color Changes with Animation Timers and Easing Functions
Up to now we’ve used animation timers and easing functions to modify time so we could influence motion. We can easily do the same to influence another derivative of time: color change.
Figure 9.7 shows a platform equipped with a pulse behavior. That behavior continuously modifies the opacity of the platform’s colors to make it appear as though the platform is pulsating.
Figure 9.7. A pulsating platform
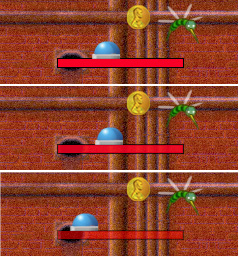
Example 9.13 shows how Snail Bait creates platforms, taking pulsating into account. Platforms don’t do anything other than pulsate, and there’s only one pulsating platform in the game, so Snail Bait’s createPlatformSprites() method creates each platform sprite without any behaviors. Subsequently, if the platform’s pulsate property is true, createPlatformSprites() adds a pulse behavior to the platform.
Example 9.13. Creating platforms with pulse behaviors
SnailBait.prototype = {
...
createPlatformSprites: function () {
var sprite, pd, // Sprite, Platform data
PULSE_DURATION = 800,
PULSE_OPACITY_THRESHOLD = 0.1;
for (var i=0; i < this.platformData.length; ++i) {
...
sprite = new Sprite('platform', this.platformArtist); // No behaviors
...
if (sprite.pulsate) { // Add a behavior
sprite.behaviors =
[ new PulseBehavior(PULSE_DURATION,
PULSE_OPACITY_THRESHOLD) ];
}
this.platforms.push(sprite);
}
},
...
};
When you create a pulse behavior, you can optionally specify the pulse duration in milliseconds and the opacity threshold for the pulse. That threshold represents the minimum opacity for a sprite during a pulse. The opacity threshold of 0.1 used by the preceding createPlatformSprites() method means that the platform will fade out until it’s barely visible before fading back into view.
Pulse behaviors manipulate their sprite’s opacity similar to the way bounce behaviors manipulate their sprite’s position. Let’s see how they do it.
9.8.1. The Pulse Behavior
The pulse behavior’s constructor is listed in Example 9.14.
Example 9.14. The pulse behavior’s constructor
PulseBehavior = function (duration, opacityThreshold) {
this.duration = duration || 1000;
this.opacityThreshold = opacityThreshold || 0;
this.timer =
new AnimationTimer(this.duration,
AnimationTimer.makeEaseInOutEasingFunction());
this.paused = false;
this.pulsating = false;
};
The pulse’s behavior’s duration represents the time it takes for an entire pulse to take place. A pulse is a flash of color that subsequently fades away—to take place. The opacity threshold is the minimum value for the behavior’s associated sprite’s opacity during the pulse. The defaults for those values are 1000 ms for the duration and zero for the opacity threshold.
The pulse behavior methods are listed in Example 9.15.
Example 9.15. The pulse behavior’s methods
PulseBehavior.prototype = {
pause: function(sprite, now) {
if (!this.timer.isPaused()) {
this.timer.pause(now);
}
this.paused = true;
},
unpause: function(sprite, now) {
if (this.timer.isPaused()) {
this.timer.unpause(now);
}
this.paused = false;
},
dim: function (sprite, elapsed) {
sprite.opacity = 1 - ((1 - this.opacityThreshold) *
(parseFloat(elapsed) / this.duration));
},
brighten: function (sprite, elapsed) {
sprite.opacity += (1 - this.opacityThreshold) *
parseFloat(elapsed) / this.duration;
},
startPulsing: function (sprite) {
this.pulsating = true;
this.timer.start();
},
resetTimer: function () {
this.timer.stop();
this.timer.reset();
this.timer.start();
},
execute: function (sprite, now, fps, context,
lastAnimationFrameTime) {
var elapsed;
if (!this.pulsating) {
this.startPulsing(sprite);
}
else {
elapsed = this.timer.getElapsedTime();
if (this.timer.isExpired()) {
this.resetTimer();
return;
}
if (elapsed < this.duration/2) {
this.dim(sprite, elapsed);
}
else {
this.brighten(sprite, elapsed);
}
}
}
};
The pulse behavior methods are nearly identical to the bounce behavior discussed earlier in this chapter. Instead of adjusting a sprite’s vertical position, as was the case for the bounce behavior, the pulse behavior dims and brightens the sprite by manipulating its opacity.
The pulse behavior’s dim() and brighten() methods calculate the sprite’s opacity based on what percent of the pulse is complete at the current time, similar to the way the bounce behavior calculated the delta in which to move its sprite in the vertical direction.
9.9. Conclusion
The most fundamental aspect of implementing a video game is how time flows through the game. Everything else in the game–-the position of sprites, what they look like and what they are doing–-depends on the flow of time.
In this chapter you saw how to use animation timers and easing functions to temporarily modify the flow of time during sprite behaviors. By modifying the flow of time you automatically influence its derivatives such as motion and color change.
In the next chapter you will see how to modify the flow of time throughout an entire game; that capability is a powerful tool you can use for special effects and gameplay aspects.
9.10. Exercises
1. Comment out the assignment to this.easingFunction in the AnimationTimer constructor and restart the game. What happens when the runner jumps? Why?
2. Change the ease-out-in easing function used by the bounce behavior to an ease-in-out easing function by using AnimationTimer.makeEaseInOutEasingFunction() instead of AnimationTimer.makeEaseOutInFunction(). Verify that changing the easing function makes it look like coins and jewels are bouncing upside down.
3. Modify the bounce behavior to use two timers—one for the bounce ascent and another for the descent—instead of one. Experiment with the strength parameters that you pass to AnimationTimer.makeEaseInEasingFunction() and AnimationTimer.makeEaseOutEasingFunction() to distort bouncing. Can you make it look as though coins and jewels are bouncing on the moon?