
Chapter 5. Loading Screens
Topics in This Chapter
• 5.1 Define Snail Bait’s Chrome
• 5.2 Fade Elements In and Out with CSS Transitions
• 5.3 Fade Any Element In or Out That Has a CSS Transition Associated with Its Opacity
• 5.4 Implement the Loading Screen
The first thing players do when they play your game is watch it load. First impressions are important, so it’s worthwhile to implement a memorable loading screen. Besides making a good first impression, an interesting loading screen also makes the inevitable delay before players get to the fun part of your game pass more quickly. Players will appreciate that.
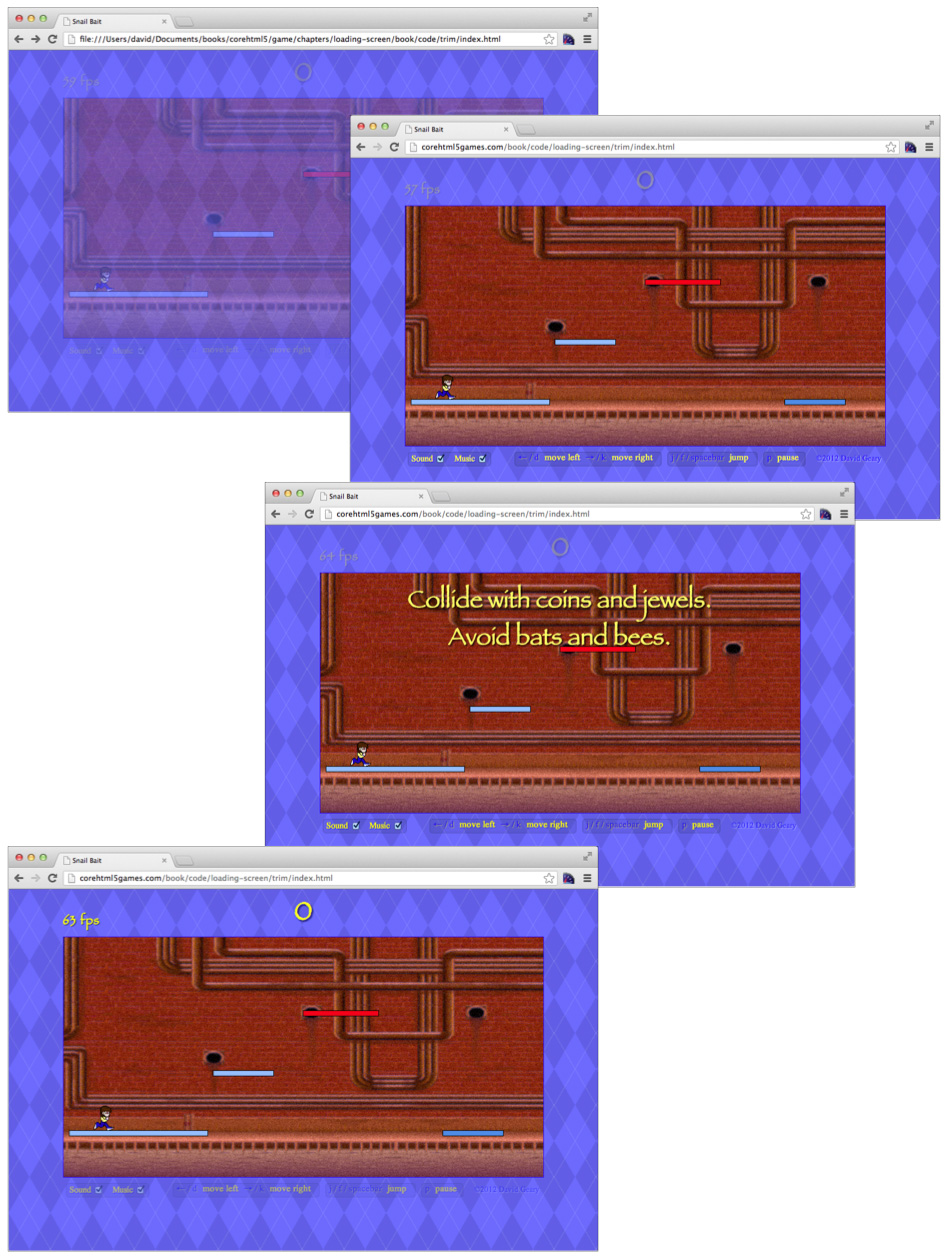
As it currently stands, Snail Bait simply shows its webpage background as the game’s background image loads. In this chapter, we implement a loading screen and subsequently reveal the game, as shown in Figure 5.1.
Figure 5.1. Snail Bait’s loading sequence Retake with all sprites mentioned above
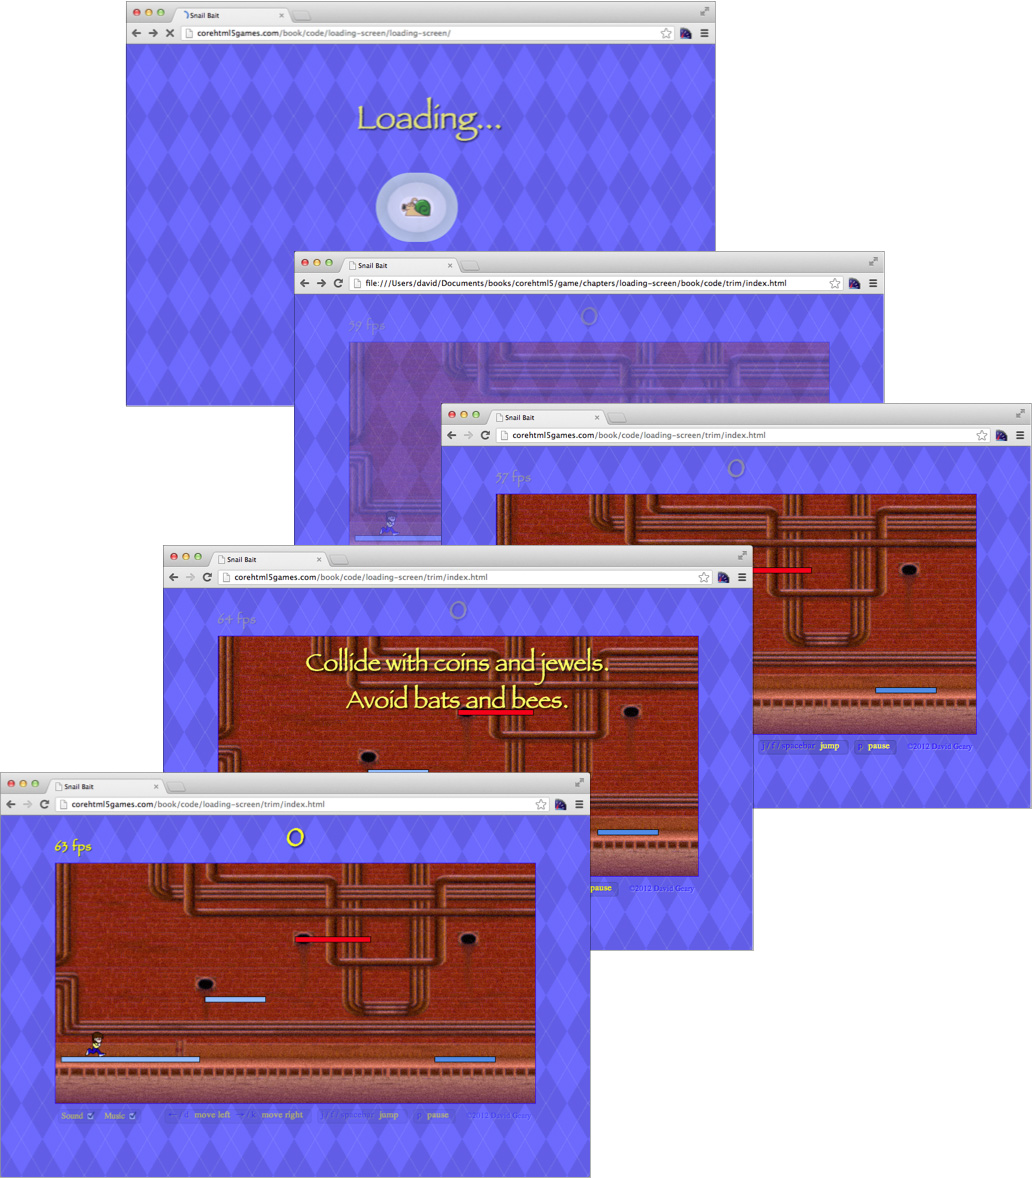
As it starts to load resources, Snail Bait fades in the Loading... text and the animated GIF shown in the top screenshot in Figure 5.1. The animated GIF shows the snail shooting snail bombs without any ammunition. The game displays the Loading... text and the animated GIF until it finishes loading resources.
When Snail Bait is done loading resources, it simultaneously fades out the Loading... text and the animated GIF and fades in the game’s chrome—the HTML elements above and below the canvas—along with the canvas itself. The second screenshot from the top in Figure 5.1 shows the canvas and chrome fading into view.
Once they fade into view, the canvas and the bottom chrome are fully opaque, but the opacity of the top chrome, containing the fps indicator and score, is only 0.25. The top chrome is initially barely visible so the player focuses on the instructions at the bottom of the game. You can see the partially transparent top chrome and the fully opaque bottom chrome in the third and fourth screenshots from the top in Figure 5.1.
Shortly after Snail Bait starts to fade in the canvas and chrome, it starts fading in the Collide with... text shown in the fourth screenshot from the top in Figure 5.1. Once that text is fully opaque, Snail Bait displays it for three seconds, before fading it from view.
After the Collide with... text fades from view, Snail Bait reverses the opacity of the top and bottom chrome, so the top chrome becomes fully opaque and the bottom chrome is barely visible, as shown in the bottom screenshot in Figure 5.1. That reversal of opacity triggers CSS transitions that smoothly animate the chrome elements to their final state of opacity. The reduced visibility of the bottom chrome focuses the player’s attention on the canvas and the top chrome.
As we implement various facets of the loading sequence in this chapter, you will learn how to do the following:
• Define a game’s chrome, meaning HTML elements outside the game’s canvas (Section 5.1 on p. 121)
• Fade the game’s chrome elements in and out with CSS transitions (Section 5.2 on p. 125)
• Fade any HTML element that has a CSS transition associated with its opacity property in or out (Section 5.3 on p. 134)
• Implement the loading screen (Figure 5.4 on p. 136)
• Reveal the game (Section 5.5 on p. 141)
Let’s start by defining Snail Bait’s chrome.
5.1. Define Snail Bait’s Chrome
Most games have elements besides their canvas that let players manipulate game settings for things such as sound and music. Those elements are commonly referred to as chrome. Snail Bait’s chrome is shown in Figure 5.2.
Figure 5.2. Snail Bait’s chrome
Snail Bait’s top chrome, meaning the chrome above the game’s canvas, contains a frame rate (fps) indicator and the score. In [Missing XREF!], we replace the fps indicator with a lives indicator that shows how many lives the player has left. Until then we’ll leave the fps indicator in place so we can keep an eye on performance. Also, for the time being, the scoreboard registers zero no matter what, but in Chapter 17 we monitor the score and update it accordingly.
Snail Bait’s bottom chrome contains sound and music checkboxes that ultimately will control whether the game plays sound effects or music, respectively. The bottom chrome also contains instructions for controlling the game with the keyboard, along with a copyright notice.
Example 5.1 shows the HTML for Snail Bait’s chrome.
Example 5.1. HTML elements for Snail Bait’s chrome
<!DOCTYPE html>
<html>
...
<body>
...
<div id='snailbait-arena'>
...
<!--......................TOP CHROME........................-->
<!-- Score and fps..........................................-->
<div id='snailbait-fps'></div>
<div id='snailbait-score'>0</div>
<!--......................BOTTOM CHROME.....................-->
<!-- Sound and music........................................-->
<div id='snailbait-sound-and-music'>
<div id='snailbait-sound-checkbox-div'
class='snailbait-checkbox-div'>
Sound <input id='snailbait-sound-checkbox'
type='checkbox' checked />
</div>
<div class='snailbait-checkbox-div'>
Music <input id='snailbait-music-checkbox'
type='checkbox' checked />
</div>
</div>
<!-- Instructions........................................-->
<div id='snailbait-instructions'>
<div class='snailbait-keys'>
← / d
<div class='snailbait-explanation'>move left</div>
→ / k
<div class='snailbait-explanation'>move right</div>
</div>
<div class='snailbait-keys'>
j <div class='snailbait-explanation'>jump</div>
</div>
<div class='snailbait-keys'>
p <div class='snailbait-explanation'>pause</div>
</div>
</div>
<!-- Copyright...........................................-->
<div id='snailbait-copyright'>© 2012 David Geary</div>
</div>
...
</body>
</html>
The preceding HTML, which defines the elements for Snail Bait’s chrome, is a simple hierarchy of DIV elements with a couple of checkboxes. Most of the complexity surrounding those elements concerns how they look and behave and is encapsulated in CSS and JavaScript, respectively.
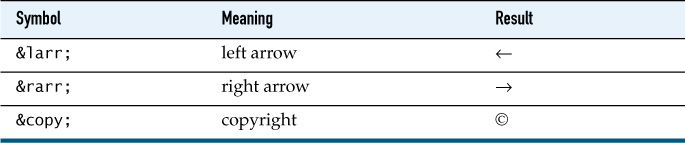
Snail Bait uses three symbols, which are listed in Table 5.1, in the preceding HTML5.
Table 5.1. HTML symbols used by Snail Bait
![]() Note: Styling Snail Bait’s chrome with CSS
Note: Styling Snail Bait’s chrome with CSS
See Chapter 1 for a discussion of the CSS for Snail Bait’s chrome.
![]() Best Practice:
Best Practice:
Constantly monitor performance.
5.1.1. Accessing Chrome Elements in JavaScript
Snail Bait’s JavaScript accesses the HTML elements in its chrome as shown in Example 5.2.
Example 5.2. Accessing chrome elements in Snail Bait’s constructor
var SnailBait = function () { // Snail Bait's constructor function
...
// Top chrome........................................................
this.fpsElement =
document.getElementById('snailbait-fps');
this.scoreElement =
document.getElementById('snailbait-score');
// Bottom chrome.....................................................
this.soundAndMusicElement =
document.getElementById('snailbait-sound-and-music');
// The soundCheckboxElement and musicCheckboxElement references
// are not discussed in this chapter. Snail Bait's use of those
// references is discussed in Chapter 14 on p. 345.
this.soundCheckboxElement =
document.getElementById('snailbait-sound-checkbox');
this.musicCheckboxElement =
document.getElementById('snailbait-music-checkbox');
this.instructionsElement =
document.getElementById('snailbait-instructions');
this.copyrightElement =
document.getElementById('snailbait-copyright');
...
};
As is the case for all of Snail Bait’s elements, the preceding code uses the JavaScript function getElementById() to access the elements in the game’s chrome.
With references to the elements at hand, we are ready to fade them in and out at appropriate times during the game’s loading sequence.
5.2. Fade Elements In and Out with CSS Transitions
Several of Snail Bait’s HTML elements fade in and out at certain times. Examples are: the loading sequence; the credits screen; and the countdown digits. Figure 5.3 shows a countdown digit fading from view.
Figure 5.3. Fading Snail Bait’s countdown digits when a paused game resumes

To fade elements, Snail Bait manipulates their opacity and display CSS properties. It also defines a CSS transition for the opacity property, so when Snail Bait subsequently changes the opacity property, the browser invokes an animation that smoothly transitions from the current opacity to the new setting. Snail Bait specifies the duration of those animations with the CSS transition property.
Initially, Snail Bait sets the opacity property of elements it fades in and out to zero so that the elements are not visible when the game begins (the only element that’s initially visible is the loading screen, shown in the top screenshot in Figure 5.1 on p. 120). The game also sets their display property to none so that the browser does not initially render them. Elements that the browser does not render do not take up space; more importantly for Snail Bait, which displays elements on top of each other, such elements do not prevent events from reaching elements underneath.
The initial settings for HTML elements that Snail Bait fades in and out are summarized as follows:
• display: none
• opacity: 0
• transition: opacity Xs
The Xs for the transition property specifies the duration, in seconds, for the transition’s associated animation.
Now that we’ve discussed initial settings for an element’s CSS properties that make the element initially invisible and incapable of trapping events, let’s see how Snail Bait fades those elements into view.
5.2.1. Fade Elements Into View
Snail Bait fades elements into view in two steps. The first step sets the element’s display property to block. That setting causes the browser to insert the element into the DOM tree so that it takes up space and captures events; however, because its opacity is still zero, the element remains invisible.
The second step is to change the element’s opacity so the CSS transition starts and the element fades into view. However, to start the transition associated with the opacity property, you cannot set the opacity property immediately after you set the display property, because the browser will not start any transitions associated with the element, as shown in Example 5.3.
To ensure that the transition starts, you must set the opacity property after the current JavaScript is done executing and the single thread upon which everything runs returns to the browser. To do that, you can use setTimeout(), as shown in Example 5.4.
Example 5.3. A failed attempt to animate an element’s opacity setting
element.style.display = 'block'; // The element is added to the DOM tree
element.style.opacity = 1.0; // The browser will not start the transition
Example 5.4. Successfully animating an element’s opacity setting
element.style.display = 'block'; // The element is added to the DOM tree
setTimeout ( function () {
element.style.opacity = 1.0; // The browser starts the transition
}, 50); // milliseconds - any value will work
![]() Caution: Using
Caution: Using setTimeout() to force transitions is not guaranteed to work
HTML5 has its sharp edges; here’s one of them. According to the same CSS specification cited above as this book went to press:
Since this specification does not define when a style change event occurs, and thus what changes to computed values are considered simultaneous, authors should be aware that changing any of the transition properties a small amount of time after making a change that might transition can result in behavior that varies between implementations, since the changes might be considered simultaneous in some implementations but not others.
In layman terms, if an implementation (most likely a browser) considers changing transition properties a small amount of time after making a change to be simultaneous, then the trick, if you will, of using setTimeout() to get transitions to occur when adding elements to the DOM tree will not work. Note also that the specification does not further elaborate on the specific meaning of a small amount of time.
As this book went to press, using setTimeout() as described above does indeed work in all browsers, but if you find that it has stopped working, you’ll know why.
![]() Caution: HTML5 specifications are living documents
Caution: HTML5 specifications are living documents
Keep in mind that HTML5 specifications are almost constantly under revision, so you might want to look at the current version of the CSS Transitions specificiation cited above to see what changes have been made to the specification since this book went to press.
5.2.2. Fade Elements Out of View
Snail Bait fades elements out of view with nearly the inverse of the procedure it uses to fade them into view.
The first step to fade an element out of view is to set its opacity property to zero. That setting triggers the animation associated with the element’s CSS transition.
After waiting for the element to fully fade out of view, Snail Bait sets the element’s display property to none so that the element does not take up space or capture events. Example 5.5 shows the JavaScript for fading an element out of view.
var TRANSITION_DURATION = 2000; // 2 seconds
element.style.opacity = 0; // The browser starts the transition
setTimeout ( function () {
element.style.display = 'none'; // Removes element from the DOM tree
}, TRANSITION_DURATION);
Now that you’ve seen how to fade elements in and out, let’s see how Snail Bait applies that formula for its toast.
![]() Note: A key difference between fading in and fading out
Note: A key difference between fading in and fading out
When Snail Bait fades elements in, it doesn’t need to know the transition’s duration because there’s nothing to do after the element fades in. When the game fades elements out, on the other hand, it must know the transition’s duration because after the transition, the game sets the element’s display property to none to remove it from the tree so that the element doesn’t capture events.
![]() Note: Other ways to fade elements in and out
Note: Other ways to fade elements in and out
There are other ways to fade HTML elements in and out with CSS; for example, you can manipulate an element’s visibility property. If you set visibility to hidden, the corresponding element will not be visible, but it will still be rendered by the browser, meaning it will take up space and capture events. Because Snail Bait displays HTML elements on top of each other (for example, the high score elements are directly above the game’s canvas), we do not want invisible elements inadvertently capturing events; therefore, Snail Bait manipulates both the opacity and display properties instead of simply manipulating the visiblity property.
5.2.3. The toast Element’s CSS
Snail Bait’s toast element, first discussed in [Missing XREF!] and shown in Figure 5.3, is a DIV the game uses to briefly display messages to players. Example 4.15 shows that element’s CSS.
Example 5.6. Specifying a CSS transition for the toast element
#snailbait-toast {
position: absolute;
margin-left: 100px;
margin-top: 20px;
width: 600px;
font: 40px fantasy;
text-align: center;
color: #ff6;
text-shadow: 2px 2px 4px rgb(0,0,0);
/* The duration of the following transition is
tightly coupled to Snail Bait's
JavaScript. See SnailBait.hideToast(). */
-webkit-transition: opacity 0.5s;
-moz-transition: opacity 0.5s;
-o-transition: opacity 0.5s;
transition: opacity 0.5s;
opacity: 0;
display: none;
z-index: 1;
}
The properties near the top of Example 4.15 set the toast’s position, size, margins, font, and color. The most interesting part of the preceding CSS is the transition along with settings for the element’s opacity and display properties. That transition and those settings coincide to the CSS discussed in Section 5.3, “Fade Any Element In or Out That Has a CSS Transition Associated with Its Opacity,” on p. 134 indicate that Snail Bait fades the toast in and out.
![]() Note: Four versions of the CSS
Note: Four versions of the CSS transition property
To ensure that its CSS transitions work across browsers that support HTML5, Snail Bait defines four versions of the transition, the first three of which have a browser-specific prefix. The version without a prefix corresonds to the W3C standard. See Chapter 3 for more information about using standard and browser-specific functionality.
![]() Note: Another way to specify CSS transitions
Note: Another way to specify CSS transitions
Snail Bait uses a single CSS attribute for transitions, but you can specify each aspect of a transition with separate attributes: transition-property, transition-duration, transition-timing-function, and transition-delay.
![]() Note: CSS transitions vs. CSS animations
Note: CSS transitions vs. CSS animations
Snail Bait opts for the simpler and less capable CSS transitions instead of CSS animations. Animations can be triggered by something other than a change in a CSS property. Animations also give you more fine-grained control of the animation itself. See www.kirupa.com/html5/css3_animations_vs_transitions.htm for a discussion of the differences between CSS transitions and animations.
5.2.4. Revealing and hiding the toast
Snail Bait’s revealToast() method, originally discussed in Chapter 4, is reimplemented in Example 5.7 to fade the toast in and out instead of merely displaying and hiding it as was the case in Chapter 20.
Example 5.7. Revealing toast, revisited
SnailBait.prototype = {
...
revealToast: function (text, duration) {
var DEFAULT_TOAST_DURATION = 1000;
duration = duration || DEFAULT_TOAST_DURATION;
this.startToastTransition(text, duration); // Start CSS transition
setTimeout( function (e) {
snailBait.hideToast();
}, duration);
},
...
};
The revealToast() method takes two arguments: the text that Snail Bait displays in the toast, and the duration, in milliseconds, that the toast is visible. The duration is optional; it defaults to one second if you don’t specify it.
revealToast() invokes Snail Bait’s startToastTransition() method, which is listed in Example 5.8.
Example 5.8. Starting the toast transition
var SnailBait = function () {
...
this.OPAQUE = 1.0; // opacity
this.SHORT_DELAY = 50; // milliseconds
...
};
SnailBait.prototype = {
...
startToastTransition: function (text, duration) {
this.toastElement.innerHTML = text;
this.toastElement.style.display = 'block';
setTimeout( function () {
snailBait.toastElement.style.opacity = snailBait.OPAQUE;
}, this.SHORT_DELAY);
},
...
};
The startToastTransition() method uses setTimeout(), as discussed in Section 5.3, “Fade Any Element In or Out That Has a CSS Transition Associated with Its Opacity,” on p. 134, to fade in the toast element by setting the element’s display CSS property to block and subsequently, after a short delay, setting the element’s opacity property to 1.0.
After the toast has been displayed for the specified duration, Snail Bait hides it with the hideToast() method, listed in Example 5.9.
var SnailBait = function () {
...
this.TRANSPARENT = 0; // opacity
...
};
SnailBait.prototype = {
...
hideToast: function () {
var TOAST_TRANSITION_DURATION = 500; // Tightly coupled to CSS
this.toastElement.style.opacity = this.TRANSPARENT;
setTimeout( function (e) {
snailBait.toastElement.style.display = 'none';
}, TOAST_TRANSITION_DURATION);
},
...
};
The hideToast() method fades the toast element out of view by setting the element’s opacity CSS property to zero and subsequently, when the transition has completed, setting the display property to none.
Now that you’ve seen how to fade elements in and out, let’s implement Snail Bait methods that let the game fade any element in or out.
![]() Note: Snail Bait’s constants
Note: Snail Bait’s constants
To increase code readability, Snail Bait defines constant variables, such as the TOAST_TRANSITION_DURATION and snailBait.TRANSPARENT variables used in Example 5.9. Notice that the former variable is a local function variable, whereas the latter is a property of the snailBait object.
Snail Bait uses local constants when those constants are only used by a single method. Snail Bait defines constants that are used by multiple methods as properties of the SnailBait object.
![]() Note: Snail Bait’s transition durations are tightly coupled to the game’s JavaScript
Note: Snail Bait’s transition durations are tightly coupled to the game’s JavaScript
Snail Bait’s fadeOutElements() method sets an element’s CSS display property to none to make the element disappear at the end of the element’s opacity transition, so fadeOutElements() must know the duration of that transition, thereby creating a dependency between Snail Bait’s CSS and its JavaScript.
That dependency means, for example, that you must change the TOAST_TRANSITION_DURATION constant in Snail Bait’s hideToast() method if you change the duration of the toast’s transition in CSS.
Admittedly, such a dependency is far from ideal; in fact, the dependency could be removed by programmatically determining the transition duration in the fadeOutElements() method. Unfortunately, it’s not trivial to reliably determine transition durations in JavaScript across browsers, so Snail Bait lives with the dependency.
5.3. Fade Any Element In or Out That Has a CSS Transition Associated with Its Opacity
Snail Bait has several HTML elements besides the toast DIV that it fades in and out over the course of the game, so it’s worth the effort to implement more general methods that fade HTML elements in or out.
Snail Bait fades multiple elements simultaneously at certain points in the game, so in this section we implement two methods—fadeInElements() and fadeOutElements()—that can fade any number of elements simultaneously as long as those elements have a CSS transition associated with their opacity property. Example 5.10 shows how to use those methods to fade elements in and out.
Example 5.10. Using fadeInElements() and fadeOutElements()
snailBait.fadeInElements(snailBait.fpsElement,
snailBait.scoreElement);
...
snailBait.fadeOutElements(snailBait.fpsElement,
snailBait.scoreElement,
3000); // fade duration in milliseconds
The preceding code fades the frames/second indicator and the score element into view and subsequently fades them out of view over a three-second duration.
The fadeInElements() method is listed in Example 5.11.
Both fadeInElements() and fadeOutElements() take advantage of JavaScript’s support for variable-length argument lists. Every JavaScript function has a local variable named arguments, which is an arraylike object that lets you access the function’s arguments. For example, you access the first argument to a function with arguments[0] and the last argument with arguments[arguments.length-1].
Example 5.11. fadeInElements()
SnailBait.prototype = {
...
fadeInElements: function () { // Variable-length argument list
var args = arguments;
for (var i=0; i < args.length; ++i) {
args[i].style.display = 'block';
}
setTimeout( function () {
for (var i=0; i < args.length; ++i) {
args[i].style.opacity = snailBait.OPAQUE; // OPAQUE is 1.0
}
}, this.SHORT_DELAY);
},
...
};
You pass fadeInElements() a variable-length list of elements to fade; the method uses the arguments variable to iterate over the elements, setting each element’s CSS display property to block. Subsequently, after a short delay of approximately 50 ms, fadeInElements() sets the opacity of each element to 1.0 (fully opaque), which triggers any CSS transitions associated with the element’s opacity property, fading those elements into view.
The fadeOutElements() method is listed in Example 5.12.
Example 5.12. fadeOutElements()
SnailBait.prototype = {
...
fadeOutElements: function () { // Variable-length argument list
var args = arguments,
fadeDuration = args[args.length-1]; // Last argument
for (var i=0; i < args.length-1; ++i) {
args[i].style.opacity = snailBait.TRANSPARENT; // zero
}
setTimeout(function() {
for (var i=0; i < args.length-1; ++i) {
args[i].style.display = 'none';
}
}, fadeDuration);
},
...
};
Like fadeInElements(), fadeOutElements() takes a variable number of arguments. Unlike fadeInElements(), however, the last argument to fadeOutElements() is the fade’s duration and not an element. fadeOutElements() iterates over the elements you pass it, setting each element’s CSS opacity property to zero, which kicks in any transitions associated with that property. Subsequently, after the elements have faded, fadeOutElements() sets each element’s CSS display property to none so that the elements do not take up space or intercept events.
Now that we have more general methods for fading elements in and out, we use those methods to reimplement Snail Bait’s startToastTransition() and hideToast() methods, as shown in Example 5.13.
Example 5.13. Using fadeInElements() and fadeOutElements() for showing toasts
SnailBait.prototype = {
...
hideToast: function () {
var TOAST_TRANSITION_DURATION = 500;
this.fadeOutElements(this.toastElement,
TOAST_TRANSITION_DURATION);
},
startToastTransition: function (text, duration) {
this.toastElement.innerHTML = text;
this.fadeInElements(this.toastElement);
},
...
};
You’ve seen how to define Snail Bait’s chrome and how to fade elements in and out, so let’s see how to implement the game’s loading screen.
5.4. Implement the Loading Screen
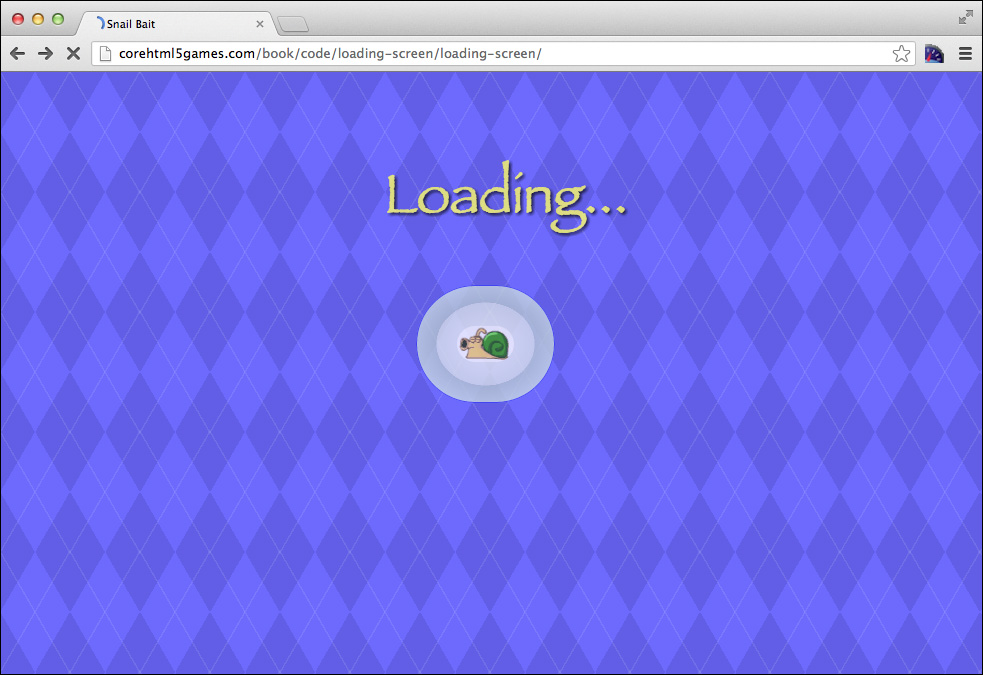
As it loads resources, Snail Bait reveals the loading screen, which consists of the text Loading... and an animated GIF as illustrated in Figure 5.4.
Figure 5.4. The loading screen
The HTML for the loading screen is shown in Example 5.14.
Example 5.14. HTML elements for Snail Bait’s loading screen
<!DOCTYPE html>
<html>
...
<body>
...
<div id='snailbait-arena'>
...
<!-- Loading screen........................................-->
<div id='snailbait-loading'>
<div id='snailbait-loading-title'>Loading...</div>
<img id='snailbait-loading-animated-gif'/> <!-- no src -->
</div>
...
</div>
...
</body>
</html>
The img element for the animated GIF does not have a src attribute because Snail Bait assigns a value to that attribute in the game’s JavaScript.
The CSS for Snail Bait’s loading screen is shown in Example 5.15.
Example 5.15. CSS for the loading screen
#snailbait-loading {
position: absolute;
margin-top: 80px;
width: 790px;
font: 55px fantasy;
text-align: center;
-webkit-transition: opacity 2.0s;
-moz-transition: opacity 2.0s;
-o-transition: opacity 2.0s;
transition: opacity 2.0s;
}
#snailbait-loading-title {
padding-left: 40px;
padding-bottom: 30px;
color: #ff6;
text-shadow: 2px 2px 4px rgb(0,0,0);
-webkit-transition: opacity 2.0s;
-moz-transition: opacity 2.0s;
-o-transition: opacity 2.0s;
transition: opacity 2.0s;
opacity: 0;
display: none;
}
#snailbait-loading-animated-gif {
margin: 0 auto;
border: thin solid rgba(0, 0, 255, 0.7);
border-radius: 60px 60px 60px;
padding: 40px;
margin-top: 10px;
/* Radial gradient from http://www.colorzilla.com/gradient-editor */
background: -moz-radial-gradient(center, ellipse cover, #f2f6f8 0%,
#d8e1e7 50%, #b5c6d0 51%, #e0eff9 100%);
background: -webkit-gradient(radial, center center, 0px,
center center, 100%,
color-stop(0%,#f2f6f8),
color-stop(50%,#d8e1e7),
color-stop(51%,#b5c6d0),
color-stop(100%,#e0eff9));
background: -webkit-radial-gradient(center, ellipse cover,
#f2f6f8 0%,
#d8e1e7 50%,
#b5c6d0 51%,
#e0eff9 100%);
background: -o-radial-gradient(center, ellipse cover, #f2f6f8 0%,
#d8e1e7 50%,#b5c6d0 51%,#e0eff9 100%);
background: -ms-radial-gradient(center, ellipse cover, #f2f6f8 0%,
#d8e1e7 50%,#b5c6d0 51%,#e0eff9 100%);
background: radial-gradient(ellipse at center, #f2f6f8 0%,
#d8e1e7 50%,#b5c6d0 51%,#e0eff9 100%);
filter: progid:DXImageTransform.Microsoft.gradient(
startColorstr='#f2f6f8', endColorstr='#e0eff9',
GradientType=1 );
-webkit-transition: opacity 2.0s;
-moz-transition: opacity 2.0s;
-o-transition: opacity 2.0s;
transition: opacity 2.0s;
opacity: 0;
display: none;
}
A good deal of the preceding CSS defines the radial gradient around the snail in the loading screen’s animated GIF. The CSS for that gradient was generated by an online tool found at www.colorzilla.com/gradient-editor.
The snailbait-loading DIV, which has no visible aspects of its own, is initially displayed by the browser, but the DIV’s contents — the snailbait-loading-title and snailbait-loading-animated-gif elements — are not displayed. The opacity and display property values for the snailbait-loading-title and snailbait-loading-animated-gif elements, along with their transitions, are an indication that Snail Bait uses the formula discussed in Section 5.3, “Fade Any Element In or Out That Has a CSS Transition Associated with Its Opacity,” on p. 134 to fade those elements in and out.
With the HTML and CSS for the loading screen out of the way, we turn our attention to the associated JavaScript for the loading screen. First, Snail Bait defines a boolean value gameStarted, which is initially false. Subsequently, Snail Bait obtains references to the three elements that constitute the loading screen, as shown in Example 5.16.
Example 5.16. Accessing loading-screen elements
var SnailBait = function () {
...
this.gameStarted = false;
// Loading screen elements...........................................
this.loadingElement =
document.getElementById('snailbait-loading');
this.loadingTitleElement =
document.getElementById('snailbait-loading-title');
this.loadingAnimatedGIFElement =
document.getElementById('snailbait-loading-animated-gif');
...
};
Example 5.17 lists a revised implementation of Snail Bait’s initializeImages() method, which was originally discussed in Chapter 3. As in the original implementation, the method sets the src attributes for the background and runner images besides adding an onload event handler to the background image that starts the game. Additionally, the revised version of initializeImages() sets the src attribute of the animated GIF and adds an onload event handler to that image, which fades in the animated GIF and its associated title.
Example 5.17. Starting the game, revisited
SnailBait.prototype = {
...
backgroundLoaded: function () {
var LOADING_SCREEN_TRANSITION_DURATION = 2000;
this.fadeOutElements(this.loadingElement,
LOADING_SCREEN_TRANSITION_DURATION);
setTimeout ( function () {
snailBait.startGame();
snailBait.gameStarted = true;
}, LOADING_SCREEN_TRANSITION_DURATION);
},
loadingAnimationLoaded: function () {
if (!this.gameStarted) {
this.fadeInElements(this.runnerAnimatedGIFElement,
this.loadingTitleElement);
}
},
initializeImages: function () {
this.background.src = 'images/background.png';
this.runnerImage.src = 'images/runner.png';
this.runnerAnimatedGIFElement.src = 'images/snail.gif';
this.background.onload = function (e) {
snailBait.backgroundLoaded();
};
this.runnerAnimatedGIFElement.onload = function () {
snailBait.loadingAnimationLoaded();
};
},
...
The difference in byte size between Snail Bait’s background image and the animated GIF it displays on its loading screen is enormous; 11MB for the background versus only 8K for the animated GIF. That difference in size virtually ensures that the animated GIF will load more quickly than the background image; in that case, Snail Bait starts the game after the background loads.
The gameStarted property serves as a guard in the unlikely event that it takes longer for the animated GIF to load than the background image. If that happens, Snail Bait starts the game after the animated GIF loads.
Now that you’ve seen how Snail Bait implements its loading screen, let’s look at the next step: revealing the game.
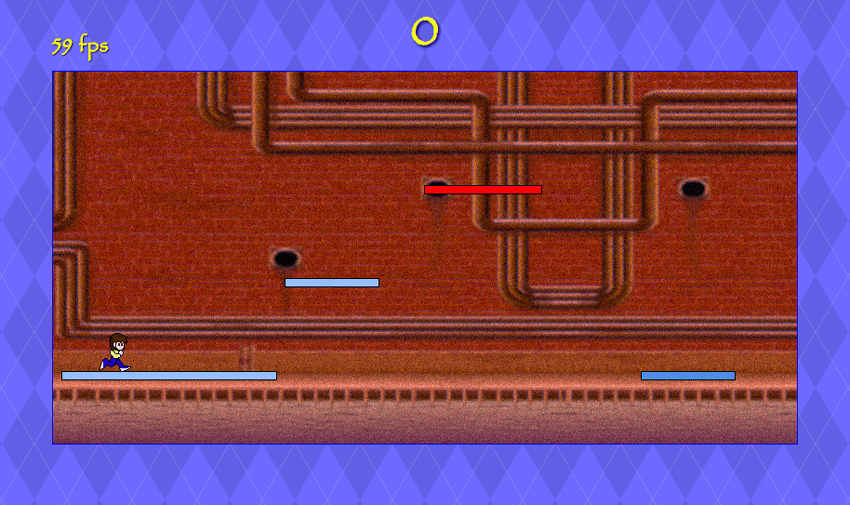
5.5. Reveal the Game
Once Snail Bait loads all its resources and the loading screen has faded out, Snail Bait reveals the game itself, as discussed at the beginning of this chapter and as shown in Figure 5.5.
Figure 5.5. Revealing Snail Bait
Here’s how Snail Bait reveals the game:
1. For a duration of five seconds, the game fades in the top chrome at 0.25 opacity, and fades in the canvas and bottom chrome at 1.0 opacity (the top two screenshots in Figure 5.5).
2. For a duration of 0.5 seconds, the game fades in the initial toast, subsequently displays it for three seconds, then fades it out for 0.5 seconds. (The third screenshot from the top in Figure 5.5)
3. Finally, the game changes the top chrome’s opacity to 1.0 and the bottom chrome’s opacity to 0.5 (The bottom screenshot in Figure 5.5). The browser smoothly animates both changes in opacity over a period of five seconds thanks to CSS transitions on the elements.
Snail Bait’s startGame() method is shown in Example 5.18.
Example 5.18. Starting the game
SnailBait.prototype = {
...
startGame: function () {
this.revealGame();
this.revealInitialToast();
requestNextAnimationFrame(this.animate);
},
...
};
The startGame() method reveals the game and its initial toast before starting the game’s animation. The revealGame() method is shown in Example 5.19.
Example 5.19. Revealing the game
SnailBait.prototype = {
...
revealGame: function () {
var DIM_CONTROLS_DELAY = 5000; // Tightly coupled to CSS
this.revealTopChromeDimmed();
this.revealCanvas();
this.revealBottomChrome();
setTimeout( function () {
snailBait.dimControls();
snailBait.revealTopChrome();
}, DIM_CONTROLS_DELAY);
},
...
};
The revealGame() method reveals the top chrome dimmed, along with the canvas and the bottom chrome at full opacity. It takes five seconds for the elements to fade in, and after that length of time, revealGame() dims the controls and reveals the top chrome at full opacity.
The revealInitialToast() method, which is invoked by the startGame() method listed in Example 5.18, is listed in Example 5.20.
Example 5.20. Revealing the initial toast
SnailBait.prototype = {
...
revealInitialToast: function () {
var INITIAL_TOAST_DELAY = 1500,
INITIAL_TOAST_DURATION = 3000;
setTimeout( function () {
snailBait.revealToast('Collide with coins and jewels. ' +
'Avoid bats and bees.',
INITIAL_TOAST_DURATION);
}, INITIAL_TOAST_DELAY);
},
...
};
The revealInitialToast() delays 1.5 seconds before calling the revealToast() method to actually reveal the initial toast. That delay lets the game fade into view briefly before the message appears.
The revealCanvas(), revealTopChrome(), and revealBottomChrome() methods are listed in Example 5.21. Those methods use the more general fadeInElements() method, discussed in Section 5.3, “Fade Any Element In or Out That Has a CSS Transition Associated with Its Opacity,” on p. 134.
Example 5.21. Revealing the canvas and chrome
SnailBait.prototype = {
...
dimControls: function () {
var FINAL_OPACITY = 0.5;
snailBait.instructionsElement.style.opacity = FINAL_OPACITY;
snailBait.soundAndMusicElement.style.opacity = FINAL_OPACITY;
},
...
revealTopChromeDimmed: function () {
var DIM = 0.25;
this.scoreElement.style.display = 'block';
this.fpsElement.style.display = 'block';
setTimeout( function () {
snailBait.scoreElement.style.opacity = DIM;
snailBait.fpsElement.style.opacity = DIM;
}, this.SHORT_DELAY);
},
...
};
When the game starts, the top chrome is nearly transparent and the bottom chrome is fully opaque. Subsequently, the bottom controls fade to nearly transparent while the top chrome becomes fully opaque. The revealTopChromeDimmed() and dimControls() methods dim those elements. They are listed in Example 5.22.
Example 5.22. Dimming controls and the top chrome
SnailBait.prototype = {
...
dimControls: function () {
var FINAL_OPACITY = 0.5;
snailBait.instructionsElement.style.opacity = FINAL_OPACITY;
snailBait.soundAndMusicElement.style.opacity = FINAL_OPACITY;
},
...
revealTopChromeDimmed: function () {
var DIM = 0.25;
this.scoreElement.style.display = 'block';
this.fpsElement.style.display = 'block';
setTimeout( function () {
snailBait.scoreElement.style.opacity = DIM;
snailBait.fpsElement.style.opacity = DIM;
}, this.SHORT_DELAY);
},
...
};
5.6. Conclusion
Smooth transitions between states, such as returning to the beginning of a level when a player loses a life, add polish to a game. In this chapter you saw how to implement a fundamental operation: defining CSS transitions for a particular CSS property (such as opacity) and subsequently manipulating that property with JavaScript to initiate the transition’s animation.
Snail Bait fades HTML elements in and out with CSS transitions on the elements’ opacity properties as described above, but it also goes to the trouble of manipulating the display property to make sure that invisible elements are not rendered by the browser so that they do not take up space and, more importantly, do not capture events meant for elements underneath them.
You can combine fading elements in and out with the setTimeout() method to produce sophisticated effects, as you saw in this chapter’s coverage of Snail Bait’s loading sequence.
In the next chapter, we discuss how to implement graphical objects known as sprites.
5.7. Exercises
1. Create a different animated GIF for Snail Bait’s loading screen and integrate it into the game. See Chapter 2 for a discussion of online resources for creating animated GIFs.
2. If you only briefly see the loading screen, clear your browser’s cache and reload the game. You should see the loading screen for a much longer period of time.
3. Modify the fadeInElements() and fadeOutElements() methods so that they do not manipulate the display CSS property. Change the CSS for the canvas, chrome, and toast so those element’s display property is block instead of none. Does everything work the same as it did before?