
Chapter 19. On the Server: In-game Metrics, High Scores, and Deployment
Topics in This Chapter
• 19.2 Include socket.io’s JavaScript in Snail Bait
• 19.3 Implement a Simple Server
• 19.4 Create a Socket on the Server
• 19.6 Create a Socket on the Client and Connect to the Server
• 19.10 Upload files to a Server
The most important aspect of any game is how much fun it is to play. One way to make your game more fun is to adjust gameplay based on in-game metrics. For example, if you see that very few players advance past a particular point, you can make it easier to get past that point.
Many games send in-game metrics to a server as players play the game, especially during beta-testing. Games have other reasons to transfer data to a server; for example, most games store high scores on a server.
Sending data to a server as a game progresses seems like a difficult thing to do, in addition to also being a drag on performance. Fortunately, for HTML5 game developers, neither is true. Two popular JavaScript frameworks, whose popularity stems from their ease of use, makes it easy to transfer data between clients and a server with virtually no impact on performance.
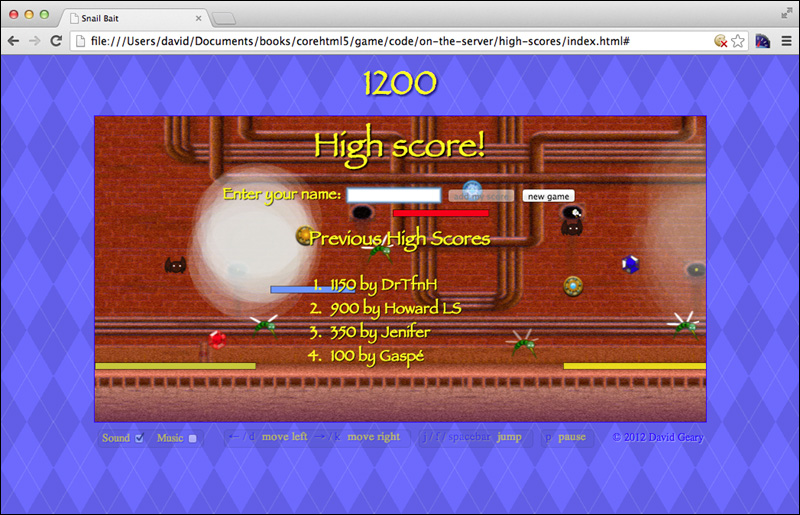
In this chapter, we use Node.js and socket.io to communicate between clients and the server to store high scores, depicted in Figure 19.1, and in-game metrics, on a server. You will also see how to deploy your game to a server.
In this chapter you will learn how to do the following:
• Import socket.io’s JavaScript on the client (Section 19.2 on p. 498)
• Implement a simple server with Node.js (Section 19.3 on p. 500)
• Create a socket on the server (Section 19.4 on p. 500)
• Connect to the server when the game starts (Section 19.6 on p. 502)
• Send in-game metrics to the server as the game runs (Section 19.7 on p. 503)
• Store and retrieve high scores from the server (Section 19.8 on p. 506)
• Minify and obfuscate your game’s JavaScript (Section 19.9 on p. 520)
• Use Gzip compression to reduce the size of your text-based resources (Section 19.9 on p. 520)
• Deploy to a server (Section 19.10 on p. 522)
19.1. Node.js and socket.io
Most web applications, games included, implement code on the server. For web applications implemented in client-side JavaScript, it’s most convenient if they can implement server-side code in the same language. Node.js is a platform built on Chrome’s JavaScript runtime that runs JavaScript on the server.
Besides running JavaScript on the server, Node.js has a vibrant ecosystem of modules, which are pluggable pieces of functionality that you can use with Node.js; for example, the Passport module provides a simple way to add authentication to web applications.
Snail Bait uses several modules, most notably a module named socket.io, that lets you communicate with the greatest of ease between your clients—where players play your game—and your server. The websites for Node.js and socket.io are shown in Figure 19.2.
Figure 19.2. Node.js and socket.io

![]() Note: Installing Node.js and socket.io
Note: Installing Node.js and socket.io
Node.js is easy to install. Click the install button on the Node.js website (shown in Section 19.1, “Node.js and socket.io,” on p. 497) to download a package you can install. You can also download the code for Node.js and build it yourself, if you prefer. See http://bit.ly/1ah2ArA for instructions on the latter.
![]() Note: Other Node.js modules used by Snail Bait
Note: Other Node.js modules used by Snail Bait
Besides socket.io, Snail Bait uses the http, io (input/output), fs (file system), and validator Node.js modules.
19.2. Include socket.io’s JavaScript in Snail Bait
Here’s how Snail Bait implements high scores and in-game metrics:
• On the server, a Node.js application uses the socket.io module to send and receive high scores and in-game metrics to and from clients. The application stores those values in files on the server.
• On the client, Snail Bait also uses socket.io to send and receive high scores and in-game metrics to and from the server. That code is part of the game itself, implemented with SnailBait properties and methods, just like the rest of the game.
Snail Bait not only uses JavaScript on both the client and server, it also uses the same socket.io module to transfer data, which makes writing code on the server similar to writing code on the client. Additionally, it’s a simple matter to transfer data via sockets using socket.io, making it even easier to accomplish the seemingly formidable task of communicating between a player’s computer and the game’s server.
There’s one catch, however. Snail Bait uses socket.io on the client and therefore needs to include socket.io’s JavaScript into the game. As it turns out, the task of including socket.io’s JavaScript on the client is simple but not well documented. The trick is to include a script tag in your game’s HTML file before you include the game’s main JavaScript file, as shown in Example 19.1.
Example 19.1. Client: Including socket.io’s JavaScript
<!DOCTYPE html>
<html>
...
<body>
...
<script
src='http://corehtml5canvas.com:98/socket.io/socket.io.js'>
</script>
<script src='snailbait.js'></script>
...
</body>
</html>
The src attribute of the script tag points to the game’s host (http://corehtml5canvas.com) and port (98). The socket.io/socket.io.js at the end of the src attribute causes the server to automatically send the socket.io JavaScript to the client.
Once we have the socket.io JavaScript on the client, and Node.js and socket.io installed on the server, we’re ready to write some code. Here’s what we’re going to do:
• Implement a simple server with Node.js
• Create a socket on the server
• Start the server
• Create a socket on the client
• Connect the socket on the client to the socket on the server
• Send data between the client and server to implement in-game metrics and high scores
19.3. Implement a Simple Server
Creating a server and subsequently listening to a port is about as easy as it gets. Use Node.js’s http module, as shown in Example 19.2.
Example 19.2. Server: A simple server running on port 98
var http = require('http'),
server = http.createServer();
server.listen(98);
![]() Note: Requiring modules with
Note: Requiring modules with require()
If you require a module in Node.js, you simply invoke the require() method, as shown in Example 19.2. That method returns an object whose methods represent the functionality provided by the module; for example, creating servers with the createServer() method is part of the functionality provided by the http module. See http://nodejs.org/api/http.html#http_http for more information about Node.js’s http module.
19.4. Create a Socket on the Server
Now that we have a server, let’s create a socket as shown in Example 19.3.
Example 19.3. Server: Creating a socket with socket.io
var io = require('socket.io'),
socket = io.listen(server);
Once again we require a Node.js module; this time, it’s socket.io. That module has a listen() method that opens a socket on the specified server.
Sockets are communication endpoints, so we need another one on the client. We will see how to create that socket in Section 19.6, “Create a Socket on the Client and Connect to the Server,” on p. 502, but first we need to start the server.
![]() Note: CommonJS,
Note: CommonJS, require, and nodejs modules
Modules and the require() function are defined by CommonJS, which is a JavaScript ecosystem for web servers that’s implemented by Node.js. You can also use CommonJS for command-line applications or apps that run in a browser. See http://wiki.commonjs.org/wiki/CommonJS for more about CommonJS.
![]() Note: Debugging on the server
Note: Debugging on the server
You can debug your server-side Node.js code in Chrome’s debugger just like you can for your client-side code with node-inspector. See http://bit.ly/1ah6bWr for more information.
19.5. Start the Server
Once we’ve implemented the preceding code to create the server and socket, we must run the code on the server. Example 19.4 shows how to run the code with Node.js, assuming the code resides in a file named game-server.js.
Example 19.4. Server: Running the server code
> node game-server.js
Some operating systems, such as UNIX and its variants, kill your processes when you log off. For those operating systems, you can use the nohup command (short for no hangup), as shown in Example 19.5, so that your Node.js application continues to run when you log off.
Example 19.5. Server: Using Unix’s nohup to prevent hangups
> nohup node game-server.js
Now that we’ve started the server, let’s go to the client and connect back to the server.
19.6. Create a Socket on the Client and Connect to the Server
Snail Bait connects to the server in the game’s constructor function, as shown in Example 19.6.
Example 19.6. Client: Opening a socket and connecting to the server
var SnailBait = function () {
...
this.serverAvailable = true;
try {
this.socket =
new io.connect('http://corehtml5canvas.com:98');
}
catch(err) {
this.serverAvailable = false;
}
...
};
Recall we have a socket on the server that listens to port 98. The preceding code connects to that port and gives us a socket on the client. Snail Bait keeps track of whether it successfully connected to the server with a serverAvailable property. If the connection fails, Snail Bait sets that property to false; otherwise, it’s true.
At this point, we have the server running with connected sockets on both the server and client. With those preliminaries out of the way, it’s time to implement in-game metrics and high scores by sending data between those sockets.
![]() Caution: The port numbers must match on the server and client.
Caution: The port numbers must match on the server and client.
At first glance it may appear as though the io JavaScript object in Example 19.6 is the same as the object with the same name in Example 19.3, but that’s not the case because the code in Example 19.6 runs on the client, whereas the code in Example 19.3 runs on the server.
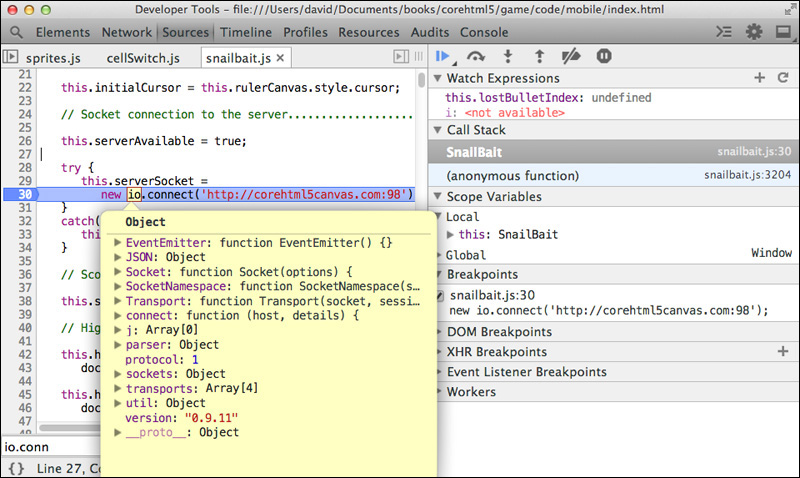
A more interesting observation about the io object in Example 19.6 is that Snail Bait never explicitly declares it on the client. That object, whose properties are shown in Figure 19.3, is created by the socket.io code that Snail Bait downloads from the server, as discussed in Section 19.2, “Include socket.io’s JavaScript in Snail Bait,” on p. 498.
Figure 19.3. The io object on the client
19.7. Record In-game Metrics
A great way to gain insights into making your games more fun to play is to analyze in-game metrics. For example, every time a player loses a life, Snail Bait sends the location at which the runner lost her life to the server. That simple metric is useful for calibrating the level of difficulty at certain points in the game.
Snail Bait maintains a file named lives-lost.txt, partially listed in Example 19.7, that contains (X,Y) locations where players lost their lives.
Example 19.7. The lives-lost.txt file
(1703, 160)(284, 169)(59, 153)(271, 111)(685, 258)(1975, 169)...
When the player loses a life:
1. Snail Bait emits a life lost message to the server, passing the location where the runner lost her life.
2. On receiving the life lost message, the server appends the location where the player lost a life to the end of lives-lost.txt.
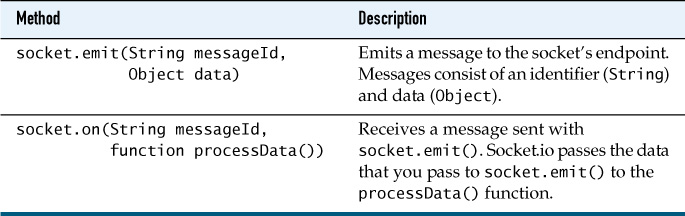
The sockets that we previously created on the client and server have an emit() method for emitting messages, and an on() method for receiving messages. Those methods are summarized in Table 19.1.
Table 19.1. Socket methods used by Snail Bait
On the client, Snail Bait uses the socket’s emit() method to emit a life lost message to the server. The data for that message is an object with left and top properties that represent the location at which the runner lost her life, as you can see in Example 19.8.
Example 19.8. Client: Emit the life lost message
SnailBait.prototype = function () {
...
loseLife: function () {
...
if (this.serverAvailable) {
this.socket.emit(
'life lost',
{
left: this.spriteOffset + this.runner.left,
top: this.runner.top
}
);
}
...
},
...
};
Subsequently on the server, Snail Bait processes the life lost message as shown in Example 19.9.
Example 19.9. Server: Handle the life lost message
var fs = require('fs'); // require file-system module
socket.on('connection', function (client) {
...
client.on(
'life lost',
function (data) {
fs.appendFile(
'lives-lost.txt',
'(' + data.left.toFixed(0) + ', ' +
data.top.toFixed(0) + ')',
function (err) {
if (err) throw err;
}
);
}
);
...
});
When the client connects to the server, socket.io invokes the function Snail Bait passes to socket.on() in the preceding listing. That function implements handlers with calls to client.on() that receive messages from client sockets.
In the preceding code, on a life lost message from the client (thus client.on('life lost', ...)), the associated function appends data to a file. That data comes from the JavaScript object Snail Bait passed to socket.emit() in Example 19.8. The preceding code uses the fs module, which lets you do file system-related things, so Snail Bait requires that module and calls its appendFile() method, passing the file name and the string to append to the file.
With the server running and connected sockets on the client and server, all that’s required to implement in-game metrics is the code listed in Example 19.8 on the client and the code in Example 19.9 on the server. You can easily send other in-game metrics—for example, the amount of time it takes players to complete a level—by emitting another message on the client with the appropriate data, and adding code on the server to receive the message.
Sending in-game metrics from the client to the server and subsequently processing them on the server is straightforward, as you’ve seen in this section. In the next section we look at a more complicated scenario that involves several round trips to the server to implement high scores.
19.8. Manage High Scores
At the end of the game, Snail Bait emits a message to the server. On receiving that message, the server returns the last high score. If the player’s score exceeds the last high score, Snail Bait emits another message to the server requesting the top-five high scores and the server obliges. With the top five high scores in hand, Snail Bait displays the heads-up display (HUD) shown in Figure 19.4.
Figure 19.4. High scores display
At this point the player has a choice: add his or her name to the list of high scores or decline to do so and start a new game. Notice that the button to add the player’s score to the list of high scores is initially disabled to prevent someone from entering a blank name. Once the player types a character in the text field, Snail Bait enables the add my score button.
When the player activates the add my score button from the high scores display, Snail Bait emits a final message to the server, passing the new high score and the player’s name. On receiving that message, the server adds the high score to the file containing the game’s high scores.
In this section we discuss the implementation of Snail Bait’s high scores, starting with the HTML and CSS for the high scores HUD display.
19.8.1. The High Scores User Interface
The HTML for Snail Bait’s high scores is shown in Example 19.10.
Example 19.10. The HTML for the high scores HUD display
<!DOCTYPE html>
<html>
...
<body>
...
<!-- Arena.....................................................-->
<div id='snailbait-arena'>
<!-- High scores............................................-->
<div id='snailbait-high-score-toast'>
<p class='snailbait-title'>High score!</p>
Enter your name:
<input id='snailbait-high-score-name'
class='snailbait-textfield'>
<input id='snailbait-high-score-add-score'
type='button' value='add my score' disabled='true'>
<input id='snailbait-high-score-new-game'
type='button' value='new game'>
<p id='snailbait-previous-high-scores-title'>
Previous High Scores
</p>
<div id='snailbait-previous-high-scores'>
<ol id='snailbait-high-score-list'></ol>
</div>
</div>
...
</div>
</body>
</html>
The preceding HTML is uneventful. The most interesting aspect of that HTML is the ordered list of high scores at the end of the listing, which is initially empty. That list is filled in by the game’s JavaScript.
The CSS for the game’s high scores is shown in Example 19.11.
Example 19.11. The CSS for the high score HUD display
#snailbait-high-score-toast {
position: absolute;
padding: 5px;
margin-left: 135px;
margin-top: 32px;
color: yellow;
font: 20px fantasy;
text-shadow: 1px 1px 1px black;
text-align: center;
width: 520px;
height: 390px;
z-index: 1;
opacity: 0;
display: none;
-webkit-transition: opacity 1s;
-moz-transition: opacity 1s;
-o-transition: opacity 1s;
transition: opacity 1s;
}
#snailbait-high-score-toast .snailbait-title {
font-size: 45px;
text-shadow: 2px 2px 2px black;
margin-bottom: 10px;
}
#snailbait-previous-high-scores-title {
font-size: 25px;
}
#snailbait-previous-high-scores {
text-align: left;
margin: 0 auto;
padding-left: 130px;
}
Most of the attributes in the preceding CSS are involved in the mundane business of positioning elements and specifying how they look. The most interesting aspect of the preceding CSS is the by now familiar footprint of elements that fade in and out: the opacity transition and corresponding initial invisibility for the high scores. We will see how to fade in the high scores in Section 19.8.2, “Retrieve High Scores from the Server,” on p. 510.
Example 19.12 shows how Snail Bait accesses the high score elements in its JavaScript.
Example 19.12. Accessing the high scores HTML elements in JavaScript
var SnailBait = function () {
...
// High scores.......................................................
this.highScoreElement =
document.getElementById('snailbait-high-score-toast');
this.highScoreListElement =
document.getElementById('snailbait-high-score-list');
this.highScoreNameElement =
document.getElementById('snailbait-high-score-name');
this.highScoreNewGameElement =
document.getElementById('snailbait-high-score-new-game');
this.highScoreAddScoreElement =
document.getElementById('snailbait-high-score-add-score');
this.highScoreNamePending = false;
...
};
The game also declares a highScoreNamePending variable, discussed in the next section. Now that you’ve seen the HTML and CSS for the game’s high scores display, let’s look behind the scenes of the action.
19.8.2. Retrieve High Scores from the Server
Snail Bait stores high scores as comma-separated values (CSVs) in a file on the server, as shown in Example 19.13.
Example 19.13. The high-scores.txt file
DrTfnH,1150,Howard LS,900,Jenifer,350,Gaspé,100
...
When the game is over, the client checks the current high score as follows:
1. The client emits a get high score message to the server.
2. On receiving the get high score message, the server emits a high score message containing the current high score to the client.
3. On receiving the high score message, the client checks to see if the player exceeded the current high score; if so, the client emits a get high scores message to retrieve the top-five high scores.
4. On receiving the get high scores message, the server reads the high scores file and emits a high scores message containing a list of the current high scores to the client.
5. The client updates the heads-up display with the high scores from the server.
Let’s see what the preceding steps look like in code. First, Example 19.14 shows how the gameOver() method emits a get high score message to the server, using the socket that Snail Bait created previously on the client.
Example 19.14. Client: Emit a get high score message to the server
SnailBait.prototype = {
...
checkHighScores: function () {
this.socket.emit('get high score');
},
gameOver: function () {
...
if (this.serverAvailable) {
this.checkHighScores();
}
else {
this.revealCredits();
}
},
...
};
The server handles the get high score message with the file system module’s readFile() method, as shown in Example 19.15. That method takes the name of the file, the file’s encoding, and a function that receives the file’s data.
Example 19.15. Server: Emit the high score to the client
socket.on('connection', function (client) {
...
client.on(
'get high score',
function (data) {
var highScoreEntries = [];
fs.readFile(
'high-scores.txt', // Filename
'utf-8', // Encoding
function (err, data) { // Handler
if (err) throw err;/
highScoreEntries = data.splitCSV();
client.emit('high score',
{ score: highScoreEntries[1] });
}
);
}
);
...
});
The function that receives the data from the high scores file splits that data into an array with the string’s splitCSV() method listed in Example 19.16. The function in the preceding listing then emits a high score message whose data object contains a lone score property. That property’s value is the current high score—highScoreEntries[0] refers to the name of the person with the high score, whereas highScoreEntries[1] refers to that person’s score.
Example 19.16. Server: Adding a splitCSV() method to all strings that turns a list of CSVs into an array
String.prototype.splitCSV = function() {
// Add a splitCSV() function to strings
var regex = /(s*'[^']+'|s*[^,]+)(?=,|$)/g;
return this.match(regex);
};
On the client, Snail Bait handles the high score message from the server as shown in Example 19.17.
Example 19.17. Client: Emit a get high scores message to the server
snailBait.socket.on(
'high score',
function (data){
// data is the current high score
if (snailBait.score > data.score) {
snailBait.socket.emit('get high scores');
snailBait.highScoreNamePending = true;
}
else {
snailBait.revealCredits();
...
}
}
);
Recall from Example 19.15 that when the server emits the high score to the client, it sends a data object with a lone score property whose value represents the last high score. The preceding code checks to see if the current player’s score exceeds that high score; if so, Snail Bait requests all high scores by emitting a get high scores message back to the server. The preceding code also sets the value of the game’s highScoreNamePending property to true. We discuss that property in Section 19.8.4, “Monitor Name Input,” on p. 515.
Example 19.18 shows how the server handles the get high scores message.
Example 19.18. Server: Emit high scores to the client
socket.on('connection', function (client) {
...
client.on(
'get high scores',
function (data) {
fs.readFile(
'high-scores.txt', // Filename
'utf-8', // Encoding
function (err, data) { // Handler
if (err) {
throw err;
}
client.emit('high scores', { scores: data.splitCSV() });
}
);
}
);
});
The preceding code reads the high scores file and emits a high scores message back to the client. The data object for that message contains an array of names and high scores. Now let’s see how Snail Bait displays those high scores on the client.
19.8.3. Display High Scores on the Client
Example 19.19 shows how Snail Bait handles the high scores message from the server.
Example 19.19. Client: Create HTML for the high score list
snailBait.socket.on(
'high scores',
function (data) {
snailBait.highScoreListElement.innerHTML = "";
for(var i=0; i < data.scores.length; i += 2) {
snailBait.highScoreListElement.innerHTML +=
"<li>" + data.scores[i+1] + " by " +
data.scores[i] + "</li>";
}
snailBait.revealHighScores();
}
);
When it receives a list of high scores from the server, Snail Bait adds list elements to the high scores HTML element and subsequently reveals the high scores, as you can see from the preceding code. Example 19.20 shows the implementation of the game’s revealHighScores() method.
Example 19.20. Client: Reveal high scores
SnailBait.prototype = {
...
revealHighScores: function () {
this.highScoreNameElement.value = '';
this.highScoreNameElement.focus();
this.fadeInElements(snailBait.highScoreElement);
},
...
};
The revealHighScores() method clears the name text field, gives it focus, and fades in the high score element. See Chapter 5 for more information about Snail Bait’s fadeInElements() method.
19.8.4. Monitor Name Input
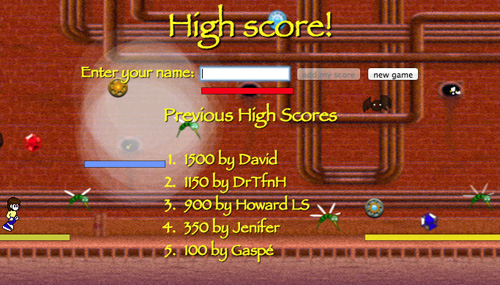
At this point, if the player has exceeded the previous high score, Snail Bait has displayed the list of high scores, placed the cursor in the name text field, and disabled the add my score button, as shown in the top screenshot in Figure 19.5.
Figure 19.5. The name input field

When the player types the first character of their name, Snail Bait enables the add my score button, as you can see from the bottom screenshot in Figure 19.5.
Initially, the add my score button is disabled by default. When the player subsequently types a name’s first character, the name element’s onkeypress event handler enables the button by setting its disabled property to false, as shown in Example 19.21.
Example 19.21. The name element’s onkeypress event handler
ssnailBait.highScoreNameElement.onkeypress = function () {
if (snailBait.highScoreNamePending) {
snailBait.highScoreAddScoreElement.disabled = false;
snailBait.highScoreNamePending = false;
}
};
The preceding event handler does something only if the highScoreNamePending property is true. When that’s the case, the event handler immediately resets the property to false so that the event handler’s code executes only for the first character in the player’s name.
Any time a web application receives input from its users, the application must validate that input. Let’s see how to do that next.
19.8.5. Validate and Set the High Score on the Server
Recall the player entered a name, which means we must validate that input to prevent breaches of security such as cross-site scripting (XSS) or SQL injection. It’s also easy to intercept HTTP requests and change values sent from the client on their way to the server, so Snail Bait also validates the score in addition to the player’s name.
To do that validation, Snail Bait uses the validator module for Node.js. The validator, as you can see from Example 19.22, is simple to install with Node.js’s package manager, known as npm.
Example 19.22. Installing Node.js’s validator module
> npm install validator
npm http GET https://registry.npmjs.org/validator
npm http 200 https://registry.npmjs.org/validator
npm http GET https://registry.npmjs.org/validator/-/validator-3.1.0.tgz
npm http 200 https://registry.npmjs.org/validator/-/validator-3.1.0.tgz
[email protected] node_modules/validator
When the player activates the add my score button to send a name and score to the server:
1. The client emits a set high score message to the server, passing the new high score and the player’s name.
2. On receiving the set high score message, the server validates the player’s name to make sure it contains only alphanumeric characters. It also validates the score to make sure it contains only numeric characters.
3. Subsequently, the server adds the high score to the file containing high scores and emits a high score set message to the client.
The add my score button’s click event handler, which emits the set high score message to the server, is listed in Example 19.23.
Example 19.23. Client: Emit the set high score message to the server
snailBait.highScoreAddScoreElement.addEventListener(
'click',
function () {
snailBait.highScoreAddScoreElement.disabled = true;
snailBait.socket.emit(
'set high score',
{
name: snailBait.highScoreNameElement.value,
score: snailBait.score
}
);
}
);
The data object emitted by the event handler to the server contains the player’s name and score.
The server validates the player’s name and score; if they pass inspection, the server stores the name and score in the game’s high scores file, as shown in Example 19.24.
Example 19.24. Server: Setting the high score
var validator = require('validator');
socket.on('connection', function (client) {
...
client.on('set high score', function (data) {
var highScoreEntries = [],
MAX_CARRYOVER_ENTRIES = 4, // Up to 5 high scores are kept
newEntries = data.name + ',' + data.score; // new high score
if (validator.isAlphanumeric(data.name) &&
validator.isNumeric(data.score)) {
fs.readFile(
'high-scores.txt',
'utf-8',
function (err, data) {
if (err)
throw err;
highScoreEntries = data.splitCSV();
for(var i=0; i < highScoreEntries.length; i+=2) {
if (i > MAX_CARRYOVER_ENTRIES*2)
break;
newEntries += ',' + highScoreEntries[i] + ',' +
highScoreEntries[i+1];
}
fs.writeFile(
'high-scores.txt',
newEntries,
function (err) {
if (err)
throw(err);
}
);
client.emit('high score set',
{ score: data.score });
}
);
}
});
...
});
After validating the name and score, the preceding code reads data from the high scores file. It subsequently creates a new array of high score entries containing the new high score and writes them back out to the same file. Finally, the code emits a high score set message back to the client.
19.8.6. Redisplay High Scores
On receiving the high score set message from the server, the client emits a get high scores message back to the server, causing the client, as before, to redisplay the high scores.
Example 19.25. Redisplaying high scores
snailBait.socket.on('high score set', function (data) {
snailBait.socket.emit('get high scores'); // redisplay scores
});
![]() Note: Snail Bait could redisplay high scores without going back to the server
Note: Snail Bait could redisplay high scores without going back to the server
In the interests of simplicity, Snail Bait makes another round-trip to the server to redisplay high scores even though that redisplay could be handled entirely on the client. In this case, Snail Bait opts for simplicity over performance because even though it’s crucial to keep HTTP requests to a minimum when games load, once games are running, asynchronous calls to the server are inexpensive.
19.8.7. Start a New Game
When the player activates the new game button, the browser invokes the button’s click event handler, listed in Example 19.26.
Example 19.26. The new game button’s click event handler
snailBait.highScoreNewGameElement.addEventListener(
'click',
function () {
snailBait.highScoreAddScoreElement.disabled = true;
snailBait.restartGame();
snailBait.hideHighScores();
}
);
The click event handler for the new game button disables the add my score button, hides the high scores, and restarts the game. The hideHighScores() method, listed in Example 19.27, uses Snail Bait’s fadeOutElements() method to fade out the high scores.
Example 19.27. Hiding high scores
SnailBait.prototype = {
...
hideHighScores: function () {
var HIGH_SCORE_TRANSITION_DURATION = 1000;
snailBait.fadeOutElements(snailBait.highScoreElement,
HIGH_SCORE_TRANSITION_DURATION);
},
...
};
Now that you’ve seen how to store in-game metrics and high scores on a game’s server with Node.js and socket.io, let’s turn our attention to the final topic in this chapter: deploying Snail Bait.
19.9. Deploy Snail Bait
To keep your game’s loading time to a minimum, make as few HTTP requests and download as few bytes as possible. We’ve already addressed minimizing HTTP requests throughout this book. To keep your files as small as possible, you should minify your text resources and use Gzip to further compress your files.
A good resource for minifying your text files is the YUI compressor, shown in Figure 19.6.
Figure 19.6. The YUI Compressor
The YUI Compressor, which is implemented and maintained by Yahoo!, lets you minify and obfuscate your code. It’s a Java application, so you must have Java (version 1.4 or greater) installed on your computer. You run the application as shown in Example 19.28.
Example 19.28. The compress.sh script
#!/bin/bash
for f in `find . -name "*.css"`
do
echo 'Minifying and obfuscating ' $f
java -jar ~/Utilities/yuicompressor-2.4.7.jar $1 $f >> all.css
done
for f in `find . -name "*.js"`
do
echo 'Minifying and obfuscating ' $f
java -jar ~/Utilities/yuicompressor-2.4.7.jar $1 $f >> all.js
done
The preceding listing shows a Unix script that iterates over Snail Bait’s JavaScript and CSS files, minifying and obfuscating each in turn with the YUI Compressor, redirecting the JavaScript output to the end of a file named all.js and the CSS output to the end of all.css. Those are the files that the final version of Snail Bait includes, as you can see from Example 19.29, instead of the snailbait.css file and the myriad JavaScript files that the game previously included individually.
Example 19.29. Snail Bait’s revised HTML file
<!DOCTYPE html>
<html>
...
<head>
<title>Snail Bait</title>
<link rel='stylesheet' href='all.css'/>
...
</head>
<body>
...
<script src='all.js'></script>
</body>
</html>
Snail Bait has a simple deploy script, shown in Example 19.30, that removes the previous all.js and all.css files and runs the preceding script to recreate them.
Example 19.30. The deploy.sh script
#!/bin/bash
rm all.js
rm css.js
echo 'Minfiying and obfuscating...'
echo
compress.sh
echo 'Deploying...'
echo
That’s all there is to minifying your text-based resources and obfuscating your JavaScript.
![]() Note: Implementing scripts on operating systems other than Unix
Note: Implementing scripts on operating systems other than Unix
The shell script discussed in this section is a UNIX script. You can easily write equivalent scripts for other operating systems, such as Windows. You can also use many UNIX commands in general on Windows with MKS. See www.mkssoftware.com for details.
![]() Note: The problems with obfuscation
Note: The problems with obfuscation
Obfuscation seems like a pretty good idea. You make your JavaScript code more difficult to decipher and you reduce the size of your JavaScript files. However, obfuscation has two serious drawbacks. First, obfuscating your code can introduce bugs into your code. Second, the most determined hackers—which are the only ones you really need to worry about—can figure out what your code is doing anyway.
19.10. Upload files to a Server
With minified and obfuscated text-based resources, we’re ready to upload Snail Bait’s files to the server. Example 19.31 shows the files and directories stored on the server.
Example 19.31. Snail Bait files on the server
> ls -al
total 116
-rw-r--r-- 1 root root 9274 Jan 12 19:17 all.css
-rw-r--r-- 1 root root 77385 Jan 12 19:17 all.js
-rw-r--r-- 1 root root 1150 Jan 12 19:17 favicon.ico
drwxr-xr-x 2 root root 4096 Jan 12 19:18 images
-rw-r--r-- 1 root root 10265 Jan 12 19:17 index.html
drwxr-xr-x 2 root root 4096 Jan 12 19:17 sounds
./images:
total 1272
-rw-r--r-- 1 root root 4297 Jan 12 19:23 runner-small.png
-rw-r--r-- 1 root root 7990 Jan 12 19:17 snail.gif
-rw-r--r-- 1 root root 1286324 Jan 12 19:17 spritesheet.png
./sounds:
total 4680
-rw-r--r-- 1 root root 314716 Jan 12 19:17 audio-sprites.mp3
-rw-r--r-- 1 root root 114140 Jan 12 19:17 audio-sprites.ogg
-rw-r--r-- 1 root root 2463196 Jan 12 19:17 music.mp3
-rw-r--r-- 1 root root 1876471 Jan 12 19:17 music.ogg
![]() Note: Using Gzip
Note: Using Gzip
As a final step to reduce the size of your files, you should take advantage of gzip compression. To do so, simply configure your server to gzip your files on the fly and deliver them to clients—you don’t even need to zip the files yourself. Zipping on the fly may sound slow, but it’s blazingly fast on the server.
19.11. Conclusion
In this chapter you saw how to communicate between clients and your game’s server with Node.js and socket.io, to implement in-game metrics and high scores. Additionally, we discussed how to deploy your game to a server.
In the next chapter, which is the last chapter in the book, we take a step back and apply what we’ve learned previously in the book to implement another video game.
19.12. Exercises
1. Modify Snail Bait’s in-game metrics to include the game’s elapsed time when the player lost a life, in addition to the location.
2. Add another metric to Snail Bait’s in-game metrics that tracks the percent of assets that the runner captured. For example, if the runner ran past 10 assets (coins, rubies, or sapphires) and collected seven of the assets, the metric would be 0.7.
3. Once every 0.5 seconds, send the game’s current frame rate to the server. On the server, append the frame rate to a file named frame-rates.txt.