
Chapter 3. Graphics and Animation
Topics in This Chapter
• 3.1 Drawing Graphics and Images with the HTML5 canvas Element
• 3.2 Implementing Smooth HTML5 Animations
• 3.3 Implementing a Game Loop
• 3.5 Scrolling the Background
• 3.6 Creating Time-Based Motion
• 3.7 Reversing Scroll Direction
• 3.8 Drawing Animation Frames
• 3.9 Using Parallax to Create the Illusion of Depth
Graphics and animation are the most fundamental aspects of any video game. The ability to draw images and shapes and to create smooth, flicker-free animations are the most important skills a game developer must possess.
Animations continuously draw animation frames, typically between 30 and 60 times per second. That rate is known as the animation’s frame rate. Each animation frame is much like a page in a flip book; frames look almost identical to the last, with minor differences from the preceding frame to create the illusion of motion as the game rapidly displays animation frames. See Section 3.2, “Implementing Smooth HTML5 Animations,” on p. 74 for more about flip books.
Figure 3.1 shows a screenshot of a single animation frame. That version of the game, which is where the game stands at the end of this chapter, also displays the animation’s frame rate as it scrolls the background and platforms from right to left.
Figure 3.1. Scrolling the background and monitoring frame rate
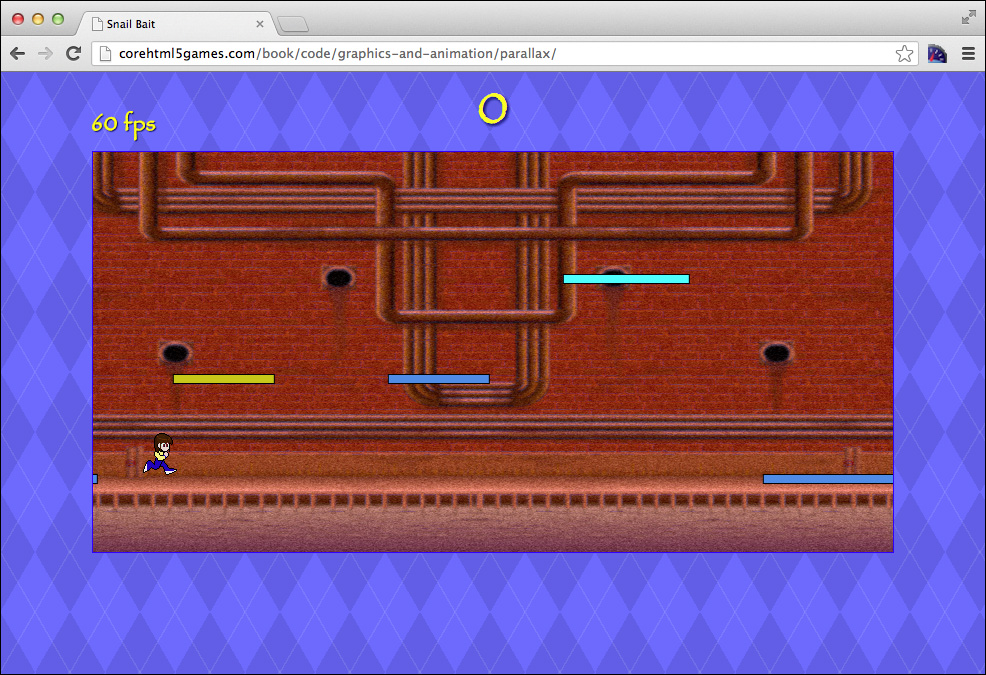
The platforms are in the foreground, so they move noticeably faster than the background, creating the illusion of depth. That illusion is known as the parallax effect.
At this stage of development, the runner does not move. Also, the game has no collision detection yet, so the runner floats in mid-air when no platforms are underneath her.
Eventually, icons above and to the left of the game’s canvas will indicate the number of remaining lives. For now, the game displays the current animation rate in frames per second at that location.
This chapter starts with a brief overview of the Canvas 2D API, followed by a discussion of the implementation of Snail Bait’s central animation. In this chapter, you will learn how to do the following:
• Draw images and graphics primitives into a canvas (Section 3.1, “Drawing Graphics and Images with the HTML5 canvas Element,” on p. 68)
• Create smooth, flicker-free animations (Section 3.2, “Implementing Smooth HTML5 Animations,” on p. 74)
• Implement a game loop (Section 3.3, “Implementing a Game Loop,” on p. 80)
• Calculate frame rate in frames per second (Section 3.4, “Calculating Frame Rates,” on p. 81)
• Scroll the game’s background (Section 3.5, “Scrolling the Background,” on p. 83)
• Implement motion that’s unaffected by the underlying animation frame rate (Section 3.6, “Creating Time-Based Motion,” on p. 91)
• Reversing scroll direction (Section 3.7, “Reversing Scroll Direction,” on p. 92)
• Drawing individual animation frames (Section 3.8, “Drawing Animation Frames,” on p. 92)
• Use the parallax effect to simulate three dimensions (Section 3.9, “Using Parallax to Create the Illusion of Depth,” on p. 93)
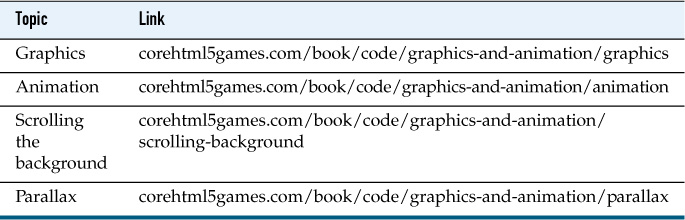
Before continuing, you might want to try the parallax version of the game as shown in Figure 3.1; the code will be easier to understand if you do. Table 3.1 shows the online examples for the code described in this chapter, in order of appearance.
Table 3.1. Graphics and animation examples online
![]() Note: Immediate-mode graphics
Note: Immediate-mode graphics
Canvas is an immediate-mode graphics system, meaning it immediately draws what you specify and then immediately forgets. Other graphics systems, such as Scalable Vector Graphics (SVG), implement retained-mode graphics, which means they retain a list of objects to draw. Without the overhead of maintaining a display list, Canvas is faster than SVG; however, if you want to maintain a list of objects that users can manipulate, you must implement that functionality on your own in Canvas.
![]() Note: Canvas double buffering
Note: Canvas double buffering
The preceding note indicated that the canvas element immediately draws whatever you specify. That claim needs further clarification.
When the browser invokes Snail Bait’s animate() method to draw the current animation frame, the canvas element does indeed immediately draw whatever you specify; however, it draws to an off-screen canvas instead of the canvas on-screen. After the call to animate() returns, the browser copies the entire contents of the off-screen canvas to the on-screen canvas in one graphics operation. That technique, known as double buffering, results in smoother animations than if you draw directly into the on-screen canvas in the first place.
![]() Note: Path-based graphics
Note: Path-based graphics
Like Apple’s Cocoa and Adobe’s Illustrator, the Canvas API is path based, meaning you draw graphics primitives in a canvas by creating a path and then subsequently stroking or filling that path. The strokeRect() and fillRect() methods are convenience methods that stroke or fill a rectangle, respectively.
![]() Note: HTML5 Canvas was introduced by Apple
Note: HTML5 Canvas was introduced by Apple
Apple included what would eventually become HTML5 Canvas in WebKit in 2004. You can read more at http://en.wikipedia.org/wiki/Html5_canvas.
3.1. Drawing Graphics and Images with the HTML5 canvas Element
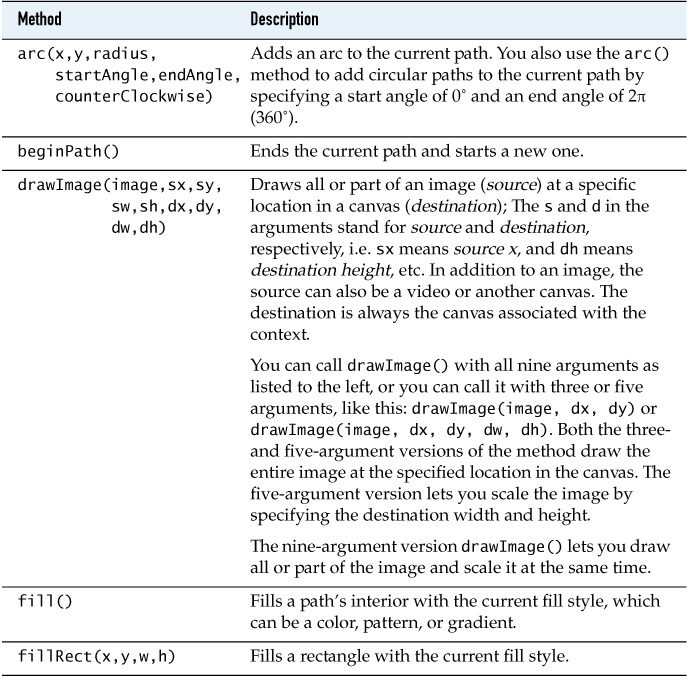
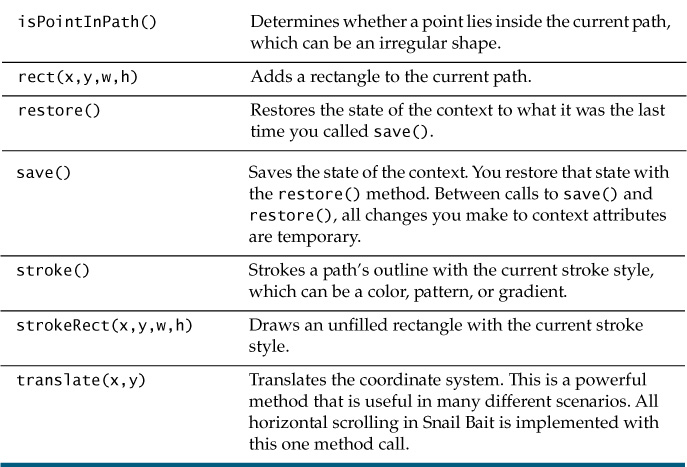
The Canvas 2D context provides an extensive graphics API that lets you implement everything from text editors to platform video games. At the time this book was
written, that API contained more than 30 methods; Snail Bait uses about one-third of them, listed in Table 3.2.
Table 3.2. Canvas 2D context methods
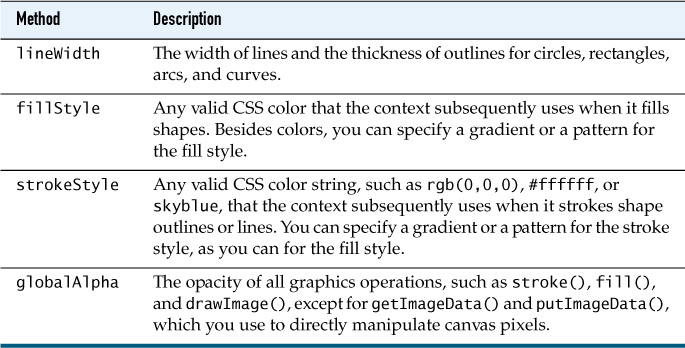
The Canvas 2D context also has more than 30 attributes, but only the handful listed in Table 3.3 are used by Snail Bait.
Table 3.3. Canvas 2D context attributes
Everything in Snail Bait, with the exception of the platforms, is an image. The background, the runner, and all the good guys and bad guys are images that the game draws with the drawImage() method.
Ultimately Snail Bait will use a spritesheet—a single image containing all the game’s graphics—but for now we use separate images for the background and the runner.
3.1.1. Drawing the Background
Snail Bait draws its background with the game’s drawBackground() function. The initial version of that function is shown in Example 3.1.
Example 3.1. Drawing the background (initial version of drawBackground())
function drawBackground() {
context.drawImage(background, 0, 0);
}
The drawBackground() function in Example 3.1 draws the background image at (0,0) in the canvas. That location places the upper-left corner of the image exactly at the upper-left corner of the canvas’s drawing surface. Later, in Section 3.5, “Scrolling the Background,” on p. 83, we modify that function to scroll the background horizontally.
3.1.2. Drawing the Runner
Until we get to sprites in Chapter 6, Snail Bait draws the runner with a drawRunner() function, listed in Example 3.2.
Example 3.2. Drawing the runner
var RUNNER_LEFT = 50;
function drawRunner() {
context.drawImage(
runnerImage, // image
RUNNER_LEFT, // left
calculatePlatformTop(runnerTrack) - runnerImage.height); // top
}
The drawRunner() function passes three arguments to drawImage(): an image and the left and top coordinates at which to draw that image in the canvas. The left coordinate is a constant, RUNNER_LEFT; the drawRunner() method calculates the runner’s top coordinate by subtracting the runner’s height from the top of the platform on which the runner resides. The method subtracts the runner’s height to place the runner’s feet on the platform. You might think it should add the runner’s height instead of subtracting, but the canvas coordinate system increases from top to bottom, so to move something up in a canvas, you decrease its Y coordinate.
3.1.3. Drawing Platforms
Snail Bait’s platforms are not images, so drawing them requires a more extensive use of the Canvas API than merely invoking drawImage(), as shown in Example 3.3.
The JavaScript in Example 3.3 defines an array named platformData. Each object in that array describes an individual platform. Those platforms have properties such as left, width, height, track, etc., that describe the platform’s position and what it looks like.
Example 3.3. The drawPlatforms() method
// An array of JavaScript objects that describe platforms..............
var platformData = [
// A JavaScript object with properties that describe a platform.....
{
left: 10,
width: 230,
height: PLATFORM_HEIGHT,
fillStyle: 'rgb(250,250,0)',
opacity: 0.5,
track: 1,
pulsate: false,
},
// Other platform data definitions omitted for brevity.
],
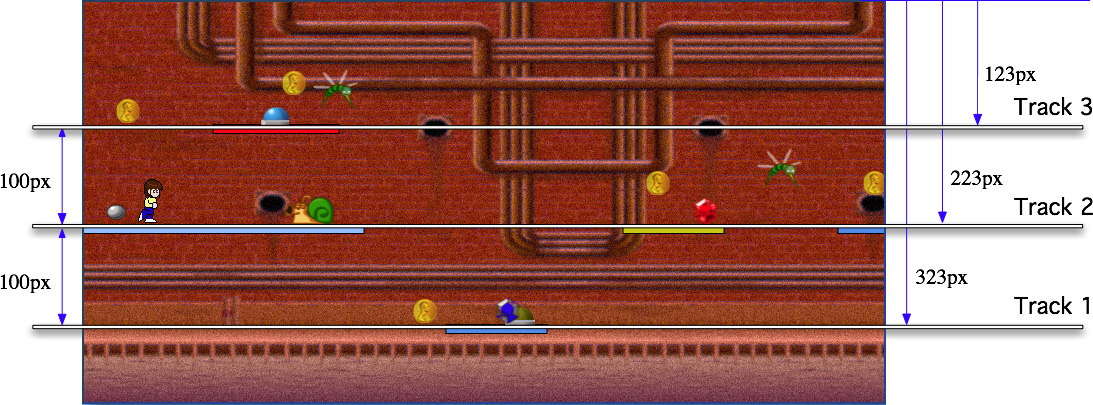
// Track baselines.....................................................
TRACK_1_BASELINE = 323, // pixels in the vertical direction from (0,0)
TRACK_2_BASELINE = 223, // pixels in the vertical direction from (0,0)
TRACK_3_BASELINE = 123; // pixels in the vertical direction from (0,0)
...
// Functions...........................................................
function calculatePlatformTop(track) {
if (track === 1) { return TRACK_1_BASELINE; } // 323 pixels
else if (track === 2) { return TRACK_2_BASELINE; } // 223 pixels
else if (track === 3) { return TRACK_3_BASELINE; } // 123 pixels
}
function drawPlatform(data) {
var platformTop = calculatePlatformTop(data.track);
context.lineWidth = PLATFORM_STROKE_WIDTH;
context.strokeStyle = PLATFORM_STROKE_STYLE;
context.fillStyle = data.fillStyle;
context.globalAlpha = data.opacity;
context.strokeRect(data.left, platformTop, data.width, data.height);
context.fillRect (data.left, platformTop, data.width, data.height);
}
function drawPlatforms() {
var index;
for (index = 0; index < platformData.length; ++index) {
drawPlatform(platformData[index]);
}
}
Platforms move on horizontal tracks, as illustrated in Figure 3.2.
The drawPlatforms() method iterates over the platformData array, in turn passing each object in the array to the drawPlatform() method, which calculates the top of the platform, sets context variables, and invokes drawPlatform() to draw the platform’s rectangle.
The drawPlatform() function uses the Canvas context’s strokeRect() and fillRect() methods to draw platform rectangles. It uses the characteristics of those rectangles, which are stored in the objects in the platformData array, to set the context’s line width, stroke style, fill style, and it uses the globalAlpha attribute to set the opacity of anything you subsequently draw in the canvas.
At this point, you know almost everything you need to know about the 2D canvas context to implement Snail Bait. The rest of this book focuses on other aspects of HTML5 game development, starting with animation.
![]() Note: Saving and restoring canvas context properties
Note: Saving and restoring canvas context properties
When you set properties of a canvas context, such as lineWidth or fillStyle, those settings are permanent, meaning they affect all subsequent graphics operations you perform with the canvas context. To make settings temporary, you enclose them within calls to the context’s save() and restore() methods, which save and restore all the context’s properties.
![]() Note: Data-driven sprites
Note: Data-driven sprites
All Snail Bait’s graphical objects (known as sprites) are data driven, meaning Snail Bait creates them from data objects that contain sprite properties, such as left, top, etc., similar to the objects in the platformData array. That sprite metadata provides an important separation of concerns; for example, although Snail Bait stores sprite metadata in static arrays, the same metadata could come from, for example, a sophisticated level generator that generates game levels at runtime based on game conditions. Such a level generator would require no changes to Snail Bait’s code that creates sprites.
3.2. Implementing Smooth HTML5 Animations
Fundamentally, implementing animations is simple: You continuously draw a sequence of images that make it appear as though objects are animating in some fashion. That means you must implement a loop that continuously draws images.
Traditionally, animation loops were implemented in JavaScript with setTimeout() or, as illustrated in Example 3.4, setInterval().
If you implement a draw() function that draws your next animation frame, the preceding code will undoubtedly produce an animation by continuously invoking that function. However, you may not be satisfied with the results, because setInterval() and setTimeout() know nothing about animation and are not millisecond-precise.
Example 3.4. Implementing animations with setInterval()
// DO NOT USE setInterval() for time-critical animations
setInterval( function (e) {
draw(); // A function that draws the current frame
}, 1000 / 60); // Approximately 60 frames/second (fps)
The code in Example 3.4 invokes a function named draw() every 1000/60 milliseconds, which equates to 60 frames per second. That rate is an estimate of an optimal frame rate, and since it’s an estimate, it might not be accurate.
We must estimate the optimal time to draw the next animation frame because setInterval() and setTimeout() don’t know anything about animation, leaving it up to developers to specify the frame rate. It would be much better if the browser, which assuredly knows better than the developer when to draw the next animation frame, specified the frame rate instead.
There is an even more serious drawback to using setTimeout() and setInterval(). Although you pass those methods time intervals specified in milliseconds, the methods are not millisecond-precise; in fact, according to the HTML specification, those methods, in an effort to conserve resources, can generously pad the interval you specify.
To ensure smooth animations, you should never use setTimeout() and setInterval() for time-critical animations; instead, you should use requestAnimationFrame(), which we discuss in the next section.
![]() Note: Flip books
Note: Flip books
Before animation and film, there were flip books. The pages of a flip book contain drawings that gradually change as you flip through the book, creating the illusion of motion. Flip books were popularized by Cracker Jack (a sweet mix of popocorn and nuts), which included them as a prize in each box of the snack.
The techniques we use today to implement animations in video games is similar to a flip book. Instead of a finite number of pages in a book, video games have a never-ending stream of animation frames, and like the pages of a flip book, a game’s animation frames display a static picture that, at the millisecond level, gradually changes over time.
![]() Note:
Note:
Best practice: Always use requestAnimationFrame() instead of setTimeout() or setInterval() for time-critical animations.
3.2.1. The requestAnimationFrame() Method
A W3C specification titled Timing Control for Script-based Animations defines a method on the window object named requestAnimationFrame(). Unlike setTimeout() or setInterval(), requestAnimationFrame() is specifically meant for implementing animations. It therefore suffers from none of the drawbacks discussed above associated with setTimeout() and setInterval(). It’s also simple to use, as Example 3.5 illustrates.
Example 3.5. Implementing animations with requestAnimationFrame()
function animate(now) { // Animation loop
draw(now); // Draws the current animation frame
requestAnimationFrame(animate); // Keep the animation going
}
...
requestAnimationFrame(animate); // Start the animation
You pass requestAnimationFrame() a reference to a callback function, and when the browser is ready to draw the next animation frame, it calls back (thus, the name) to the callback. To sustain the animation, the callback also invokes requestAnimationFrame(), identifying itself as the function to invoke when it’s time to draw the next animation frame.
As you can see from Example 3.5, the browser passes a parameter referred to as now to the callback function. You may wonder exactly what that now parameter means. Is it a string representing the current time, a number representing how many seconds have elapsed since Jan. 1, 1970, or something else?
Surprisingly, there is no set definition of that time. The only thing you can be sure of is that for any given browser, it always represents the same thing; therefore, you can use it to calculate the elapsed time between animation frames, as illustrated in Section 3.4, “Calculating Frame Rates,” on p. 81.
3.2.2. A requestAnimationFrame() Polyfill
In many ways, HTML5 is a programmer’s utopia. Free from proprietary APIs, developers use HTML5 to implement applications that run across platforms and devices in the ubiquitous browser. The specifications progress rapidly, constantly incorporating new technology and refining existing functionality.
New technology, however, often makes its way into the specification through existing browser-specific functionality. Browser vendors often prefix such functionality so that it doesn’t interfere with another browser’s implementation; requestAnimationFrame(), for example, was originally implemented by Mozilla as mozRequestAnimationFrame(). Then it was implemented by other browser vendors such as WebKit, who named their function webkitRequestAnimationFrame(). Finally, the W3C standardized it as requestAnimationFrame().
Vendor-prefixed implementations and varying support for standard implementations make new functionality tricky to use, so the HTML5 community invented something known as a polyfill. Polyfills, which also go by the names shim and shiv, determine the browser’s level of support for a particular feature. They give you either direct access to it if the browser implements it or access to a stopgap implementation that does its best to mimic the standard functionality.
Polyfills are simple to use but can be complicated to implement. Example 3.6 shows the implementation of a polyfill for requestAnimationFrame().
The polyfill implemented in Example 3.6 attaches a function named requestNextAnimationFrame() to the window object. The inclusion of Next in the function name differentiates it from the underlying requestAnimationFrame() function.
The function that the polyfill assigns to requestNextAnimationFrame() is either requestAnimationFrame() or a vendor-prefixed implementation. If the browser does not support any of those functions, the function is an ad-hoc implementation that uses setTimeout() to mimic requestAnimationFrame() the best it can.
Nearly all the polyfill’s complexity involves working around two bugs and constitutes the code before the return statement at the end of Example 3.6. The first bug involves Chrome 10, which passes an undefined value for the time. The second bug involves Firefox 4.0, which restricts frame rates to 35–40 frames per second.
Example 3.6. A requestAnimationFrame() polyfill
window.requestNextAnimationFrame =
(function () {
var originalWebkitRequestAnimationFrame = undefined,
wrapper = undefined,
callback = undefined,
geckoVersion = 0,
userAgent = navigator.userAgent,
index = 0,
self = this;
// Workaround for Chrome 10 bug where Chrome
// does not pass the time to the animation function.
if (window.webkitRequestAnimationFrame) {
// Define the wrapper
wrapper = function (time) {
if (time === undefined) {
time = +new Date();
}
self.callback(time);
};
// Make the switch
originalWebkitRequestAnimationFrame =
window.webkitRequestAnimationFrame;
window.webkitRequestAnimationFrame =
function (callback, element) {
self.callback = callback;
// Browser calls the wrapper and
// wrapper calls the callback.
originalWebkitRequestAnimationFrame(wrapper, element);
};
}
// Workaround for Gecko 2.0, which has a bug in
// mozRequestAnimationFrame() that restricts animations
// to 30-40 fps.
if (window.mozRequestAnimationFrame) {
// Check the Gecko version. Gecko is used by browsers
// other than Firefox. Gecko 2.0 corresponds to
// Firefox 4.0.
index = userAgent.indexOf('rv:');
if (userAgent.indexOf('Gecko') != -1) {
geckoVersion = userAgent.substr(index + 3, 3);
if (geckoVersion === '2.0') {
// Forces the return statement to fall through
// to the setTimeout() function.
window.mozRequestAnimationFrame = undefined;
}
}
}
return window.requestAnimationFrame ||
window.webkitRequestAnimationFrame ||
window.mozRequestAnimationFrame ||
window.oRequestAnimationFrame ||
window.msRequestAnimationFrame ||
function (callback, element) {
var start,
finish;
window.setTimeout( function () {
start = +new Date();
callback(start);
finish = +new Date();
self.timeout = 1000 / 60 - (finish - start);
}, self.timeout);
};
}
)
();
Although the requestNextAnimationFrame() polyfill’s implementation is interesting, it’s not necessary that you understand the implementation; all you need to know is how to use it, as the next section illustrates.
![]() Note: Polyfills: Programming for the future
Note: Polyfills: Programming for the future
In the past, cross-platform software was implemented for the lowest common denominator. Polyfills turn that notion on its head by giving you access to advanced features if they are available and falling back to a less capable implementation when necessary.
![]() Note:
Note: +new Date()
+new Date() is one of several ways to access the current time in JavaScript. The plus sign coerces the date created by new Date() into a number.
![]() Note:
Note: requestAnimationFrame() vs. requestNextAnimationFrame()
Throughout this book we use the requestNextAnimationFrame() polyfill discussed above, which uses the underlying requestAnimationFrame() if it’s available; otherwise, the polyfill works as a fallback solution.
3.3. Implementing a Game Loop
Now that we’ve covered graphics and animation prerequisites, it’s time to put Snail Bait in motion. To start, we include the JavaScript for requestNextAnimationFrame() in the game’s HTML, as shown in Example 3.7.
<html>
...
<body>
...
<!-- The final version of Snail Bait has only
one JavaScript file. -->
<script src='js/requestNextAnimationFrame.js'></script>
<script src='game.js'></script>
</body>
</html>
Example 3.8. shows the starting point for the game’s animation loop, commonly referred to as the game loop.
var fps,
background = new Image(),
runnerImage = new Image();
function draw(now) {
drawBackground();
drawPlatforms();
drawRunner();
}
function animate(now) {
fps = calculateFps(now);
draw(now); // Draw an animation frame
requestNextAnimationFrame(animate); // Call animate() again
}
function startGame() {
requestNextAnimationFrame(animate);
}
// Launch game.........................................................
initializeImages();
function initializeImages() {
background.src = 'images/background.png';
runnerImage.src = 'images/runner.png';
background.onload = function (e) {
startGame();
};
}
The startGame() function, which is invoked by the onload event handler for the background image, starts the game by calling the requestNextAnimationFrame() polyfill for the first time. Subsequently, when it’s time to draw the game’s first animation frame, the browser invokes the animate() function.
The animate() function invokes the calculateFps() function to calculate the animation’s frame rate, given the current time. (See Section 3.2.1, “The requestAnimationFrame() Method,” on p. 76 for more about that time value.) After calculating the frame rate, animate() invokes a draw() function that draws the next animation frame. Subsequently, animate() calls requestNextAnimationFrame() to sustain the animation.
3.4. Calculating Frame Rates
Example 3.9 shows the implementation of Snail Bait’s calculateFps() function, which calculates the frame rate.
Example 3.9. Calculating frame rate
var lastAnimationFrameTime = 0;
function calculateFps(now) {
var fps = 1 / (now - lastAnimationFrameTime) * 1000;
lastAnimationFrameTime = now;
...
return fps;
}
The frame rate, expressed in frames/second, is one frame divided by the amount of time, in seconds, since the last animation frame.
A small modification to the preceding function results in updates to the frame rate readout shown in Example 3.10.
Example 3.10. Updating the fps element
var lastAnimationFrameTime = 0,
lastFpsUpdateTime = 0,
fpsElement = document.getElementById('snailbait-fps');
function calculateFps(now) {
var fps = 1 / (now - lastAnimationFrameTime) * 1000;
if (now - lastFpsUpdateTime > 1000) { // Once per second
lastFpsUpdateTime = now;
fpsElement.innerHTML = fps.toFixed(0) + ' fps';
}
lastAnimationFrameTime = now;
return fps;
}
Example 3.10 also illustrates an important animation technique: performing a task at a rate other than the animation rate. If you update the frames/second readout every animation frame, it will be unreadable because it will always be in flux; instead, the preceding code updates the readout once per second.
With the game loop in place and frame rate in hand, we are now ready to scroll the background.
![]() Note: Keep the game loop in mind
Note: Keep the game loop in mind
It’s important to keep in mind that Snail Bait invokes many its methods continuously, typically around 60 frames/second.
If you lose sight of the fact that Snail Bait invokes methods continuously, code will be hard to understand. For example, in Example 3.9 the declaration of the lastAnimationFrameTime variable and its assignment to zero only happens once. But Snail Bait invokes the calculateFps() function every animation frame, meaning that the first time Snail Bait calls calculateFps(), the value of lastAnimationFrameTime is zero, but on subsequent calls, it is not (because of the assignment to lastAnimationFrameTime in calculateFps()).
3.5. Scrolling the Background
Everything in Snail Bait, with the exception of the runner, continuously scrolls in the horizontal direction while the game is in play. This section discusses the implementation of that scrolling.
3.5.1. Translating the Coordinate System
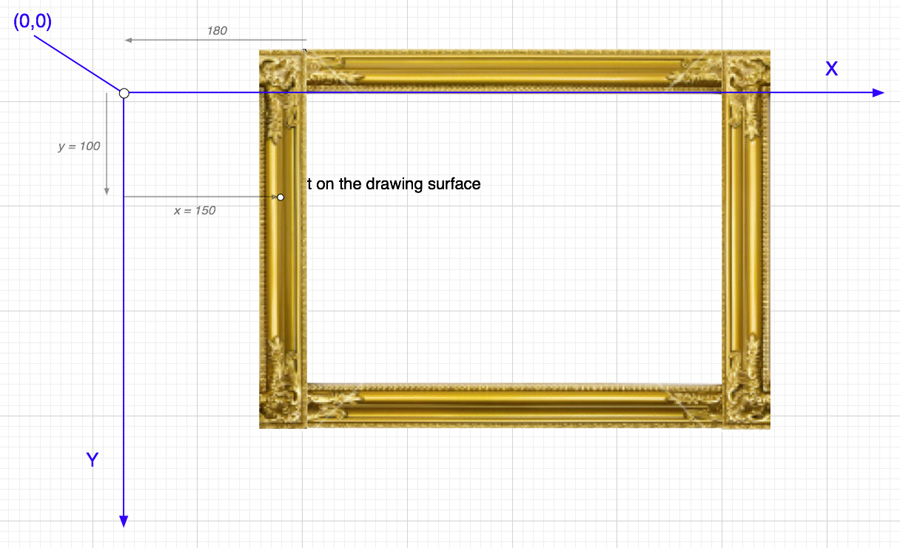
Every canvas consists of two things: its HTML element and a drawing surface, which are depicted in Figure 3.3 as a picture frame and a sheet of graph paper, respectively.
Figure 3.3. A canvas element (picture frame) and its drawing surface (graph paper)
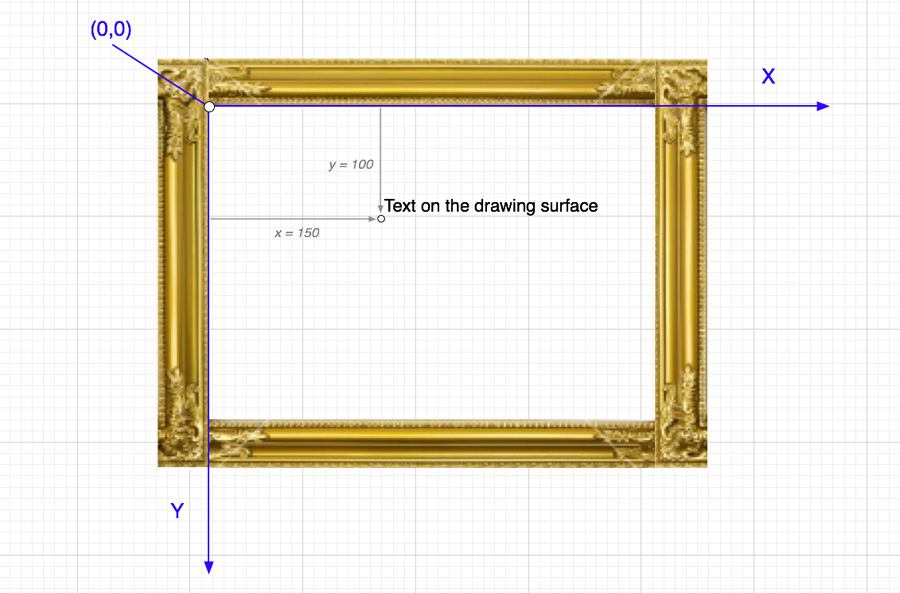
The drawing surface has a coordinate system so you that can draw at specific locations, such as the text in Figure 3.3, which is located at (150,100). You draw that text with the canvas context as shown in Example 3.11.
Example 3.11. Drawing text on the drawing surface
context.drawText("Text on the drawing surface", 100, 150);
By default the origin of the coordinate system-meaning the location of (0,0)-is at the upper left corner of the canvas. X coordinates increase from left to right, and Y coordinates increase from top to bottom, as you can see from Figure 3.3. However, you can move the origin of the coordinate system, as shown in Figure 3.4, like moving the graph paper underneath the picture frame.
Figure 3.4. Translating the coordinate system
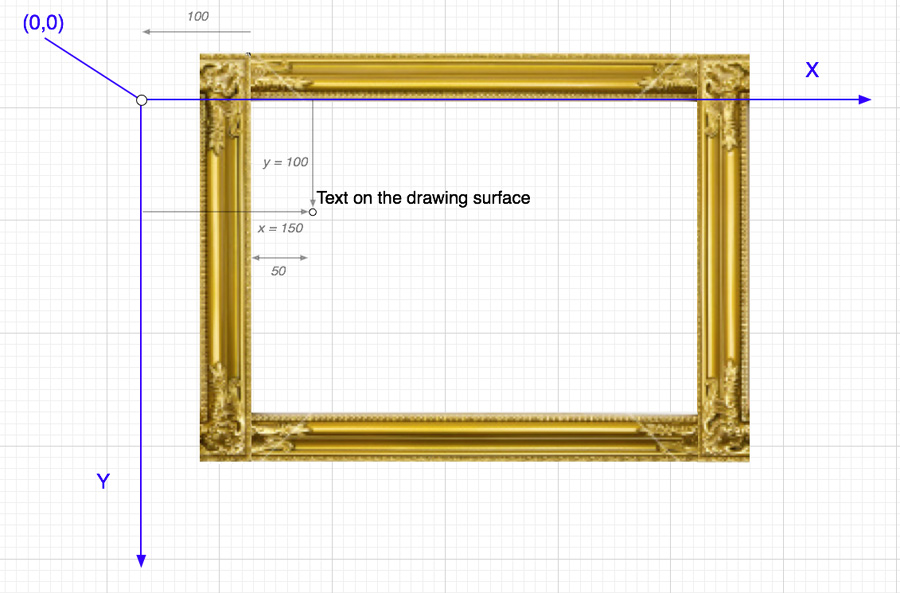
In Figure 3.4, the coordinate system is translated to the left by 100 pixels. The code for translating the coordinate system and drawing the text is shown in Example 3.12.
Example 3.12. Setting the background offset
context.translate(-100, 0); // Translate drawing surface to the left
context.drawText("Text on the drawing surface", 100, 150);
The two arguments you pass to context.translate() represent how far, in pixels, to translate the coordinate system in the horizontal and vertical directions. In this example, we are only translating horizontally, but context.translate() can translate in both directions.
Notice that the text in Figure 3.4 appears to move to the left relative to the canvas compared with its original location in Figure 3.3, even though it’s drawn at the same coordinates. Conversely, the canvas appears to move to the right in relation to the text. That apparent motion comes from translating the coordinate system.
You can draw anywhere you want on the drawing surface, but anything you draw outside the canvas cannot be seen, as illustrated by Figure 3.5.
Figure 3.5. Drawing outside the picture frame (canvas) has no effect
The code for translating the coordinate system as shown in Figure 3.5 is listed in Example 3.13.
Example 3.13. Setting the background offset
context.translate(-180, 0);
context.drawText('Text on the drawing surface', 100, 150);
The preceding code translates the coordinate system far enough to the left so that only part of the text is visible in the canvas.
As the previous discussion illustrates, you can create apparent motion by continuously translating the coordinate system and redrawing everything at the same coordinates. That’s how Snail Bait scrolls the background and everything else.
3.5.2. Scrolling Snail Bait’s Background
Snail Bait’s background image is shown in Figure 3.6.
Figure 3.6. The background image

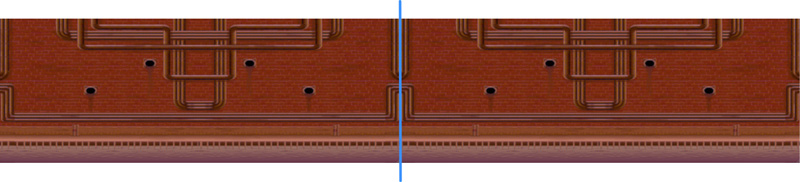
Snail Bait draws the background twice, end to end, to accommodate scrolling, as shown in Figure 3.7.
Figure 3.7. Drawing the background twice. The blue line is drawn at the junction between the two backgrounds.
The drawBackground() function is shown in Example 3.14.
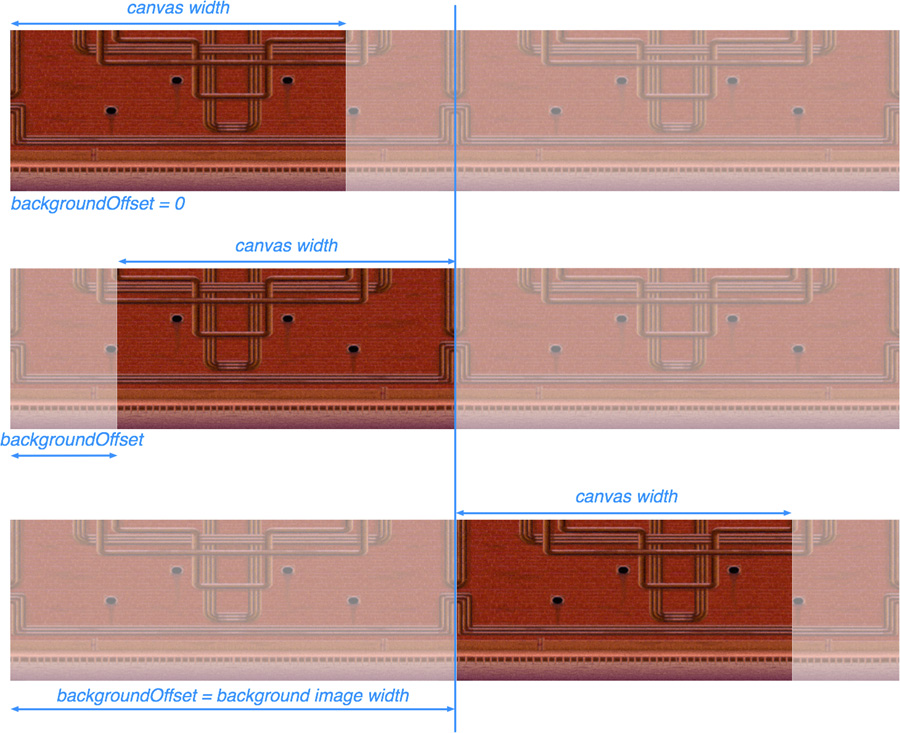
The drawBackground() function is invoked by draw(), which Snail Bait calls for every animation frame. drawBackground() translates the coordinate system to the left by backgroundOffset pixels, draws the background twice end to end, and then translates the coordinate system back to where it was before drawBackground() was called. To scroll the background, therefore, Snail Bait continuously increases the value of backgroundOffset. The effect of increasing that value is shown in Figure 3.8.
Figure 3.8. Scrolling right to left: Translucent areas represent the offscreen parts of the images. The canvas coordinate system moves from right to left.
Example 3.14. Drawing the background
var backgroundOffset = 0; // Constantly updated as the game runs
function drawBackground() {
context.translate(-backgroundOffset, 0);
context.drawImage(background, 0, 0);
context.drawImage(background, background.width, 0);
context.translate(backgroundOffset, 0);
}
Continuously translating the coordinate system to the left makes the game’s background appear to scroll to the left in the canvas, as you can see in Figure 3.8.
The background image, whose width is 1103 pixels, is wider than the game’s canvas, which is 800 pixels wide. When the game begins, backgroundOffset is zero, and the only visible part of the two backgrounds is approximately the first three-quarters of the image drawn at (0,0), as shown in the top illustration in Figure 3.8. The final quarter of that image and the entire image drawn at (background.width,0) are initially not visible because they lie outside the bounds of the canvas.
A short time after the game starts, backgroundOffset is no longer zero, and the coordinate system is translated to the left by a significant amount, as shown in the middle illustration in Figure 3.8. The background drawn at (background.width,0), however, is still not visible.
In the last phase of scrolling (bottom illustration in Figure 3.8), backgroundOffset is equal to the width of the background image; more importantly, the visible part of the background is exactly the same as the visible part of the background when scrolling begins. At that point, Snail Bait resets backgroundOffset to zero, taking us back to the top illustration in Figure 3.8.
It’s interesting to note that the final quarter or so of the background image drawn at (background.width, 0) is never displayed, because of the size mismatch between the canvas and the background image. If the two were the same width, that final quarter of the background image drawn at (background.width, 0) would be visible at some point.
It may not be readily apparent from the preceding figures, but the background image has a special quality that makes it well suited to game backgrounds: The vertical rows of pixels on the left and right edges of the image are identical, as shown in Figure 3.9.
Figure 3.9. Identical edges make smooth transitions (left: right edge; right: left edge)
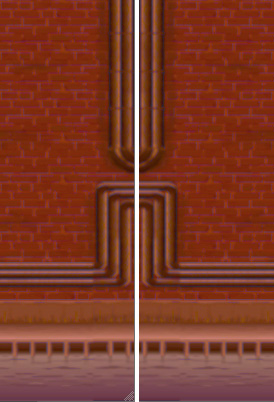
Without identical edges, the background would have a noticable discontinuity where the two backgrounds meet, meaning the blue lines in Figure 3.7 and Figure 3.8.
There is one unanswered question concerning the scrolling of Snail Bait’s background: How does the game adjust the backgroundOffset variable that controls background scrolling? That question is answered in the next section, where we scroll the background at a constant rate regardless of the underlying animation frame rate.
![]() Note:
Note:
Best practice: Make sure your background image has identical edges for smooth scrolling.
3.6. Creating Time-Based Motion
Your animation’s frame rate will vary, but you cannot let that varying frame rate affect the speed of objects in your game, including the background. You must unfurl smooth continuous action regardless of any chaos that’s disrupting the game’s underlying animation. For example, Snail Bait scrolls the background at 25 pixels/second regardless of the animation’s underlying frame rate. Motion must be time based, meaning it depends only on time (eg., pixels/second) and not the animation’s frame rate.
Using time-based motion to calculate the number of pixels to move an object for any given animation frame is simple: Multiply the object’s velocity by the elapsed time, in seconds, since the last animation frame. When you multiply velocity (pixels/second) by the elapsed time since the previous animation frame (seconds/frame), the seconds cancel out and you get pixels/frame, meaning the number of pixels you need to move something for the current frame.
Example 3.15 shows how Snail Bait uses time-based motion to calculate the background’s offset.
To calculate the number of pixels to move the background for the current frame, the setBackgroundOffset() function multiplies the background velocity by the time it took, in seconds, to complete the previous animation frame. The function then adds that value to the background offset.
To continuously scroll the background, setBackgroundOffset() resets the background offset to zero when it becomes less than zero or greater than the width of the background.
Example 3.15. Setting the background offset
var BACKGROUND_VELOCITY = 25, // pixels / second
bgVelocity = BACKGROUND_VELOCITY;
function setBackgroundOffset(now) {
backgroundOffset +=
bgVelocity * (now - lastAnimationFrameTime) / 1000;
if (backgroundOffset < 0 || backgroundOffset > background.width) {
backgroundOffset = 0;
}
}
![]() Note:
Note:
Snail Bait uses time-based motion to move everything in the game, not just the background.
3.7. Reversing Scroll Direction
Recall that all horizontal motion in Snail Bait is the result of continuously translating the coordinate system of the game’s drawing surface and continually redrawing everything at the same horizontal location. That method of creating apparent horizontal motion results in several simplifications in the game’s code. First, the game never has to calculate horizontal locations for any of its sprites, because their horizontal location never changes; instead, one sprite offset controls their horizontal motion, just as the background offset controls the background’s horizontal motion. Second, changing direction so that everything scrolls horizontally in the opposite direction merely involves setting the game’s background velocity, as in Example 3.16.
Example 3.16. Turning left and right
function turnLeft() {
bgVelocity = -BACKGROUND_VELOCITY;
}
function turnRight() {
bgVelocity = BACKGROUND_VELOCITY;
}
Once again, keep in mind that Snail Bait’s animation loop is continuous. Setting the bgVelocity variable has an effect the next time Snail Bait draws an animation frame.
Now that you’ve seen how to scroll the background at a constant rate regardless of the underlying animation frame rate, let’s see how the setBackgroundOffset() and drawBackground() functions discussed above are used by Snail Bait.
3.8. Drawing Animation Frames
Recall Section 3.3, “Implementing a Game Loop,” on p. 80, which lists Snail Bait’s game loop. That loop consists of an animate() function that the browser invokes when it’s time to draw the game’s next animation frame. That animate() function, in turn, invokes a draw() function that draws the next animation frame. The code for the draw() function at this stage of development is shown in Example 3.17.
Example 3.17. The draw() function
function draw(now) {
setBackgroundOffset(now);
drawBackground();
drawRunner();
drawPlatforms();
}
The draw() function sets the background offset and then draws the background, runner, and platforms. All the methods invoked by the draw() function have already been discussed in this chapter.
Now that you’ve seen how Snail Bait scrolls its background with time-based motion, let’s see how it scrolls the game’s platforms.
3.9. Using Parallax to Create the Illusion of Depth
If you’ve ever sat in the passenger’s seat of a moving car and watched your hand race against telephone poles at high speed, you know that things close to you appear to move faster than things that are farther away. That’s known as parallax.
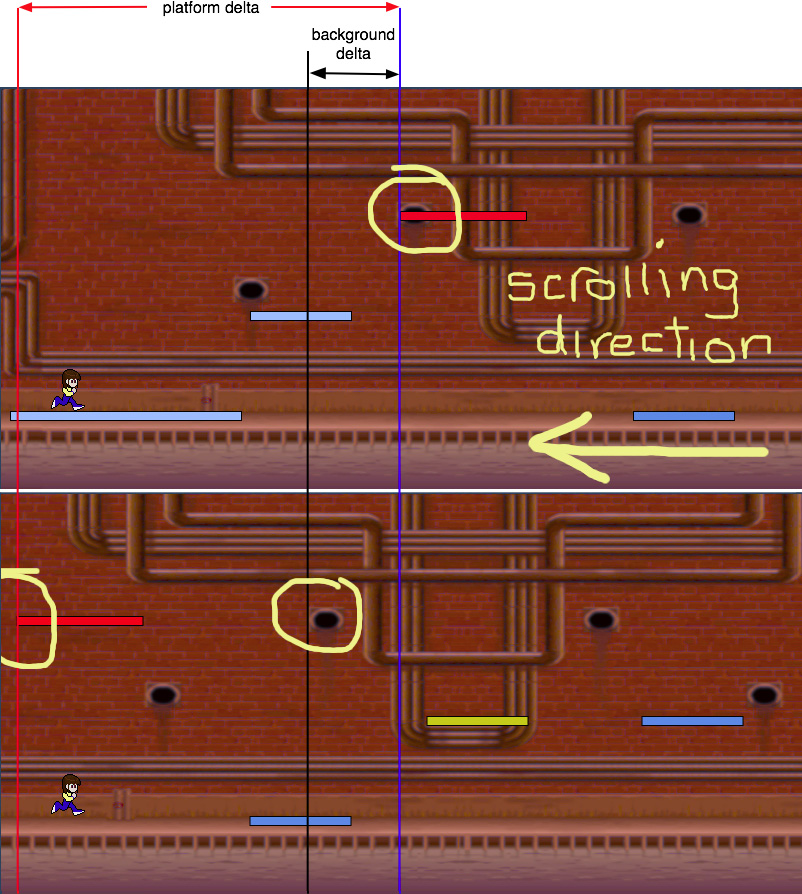
Snail Bait is a 2D platformer, but it uses a mild parallax effect to make it appear as though the platforms are closer to the player than the background. The game implements that parallax by scrolling the platforms noticeably faster than the background, as illustrated in Figure 3.10. The top screenshot shows the background at a particular point in time, and the bottom screenshot shows the background a few animation frames later. From those two screenshots you can see that the platforms have moved much farther than the background in the same amount of time.
Figure 3.10. Parallax: The platforms (near) scroll faster than the background (far)
To implement parallax, the first thing we do is revise the drawPlatforms() function, as in Example 3.18.
Example 3.18. The drawPlatforms() function, revised
function drawPlatforms() {
var index;
context.translate(-platformOffset, 0);
for (index = 0; index < platformData.length; ++index) {
drawPlatform(platformData[index]);
}
context.translate(platformOffset, 0);
}
The original version of drawPlatforms() simply iterated over the platform data and invoked drawPlatform() for each data instance as listed in Example 3.3. The revised version of drawPlatforms() translates the game canvas’s coordinate system to the left by platformOffset pixels, iterates over the data, and then translates the coordinate system back to where it was before the drawPlatforms() was invoked.
Realize that the revised implementation of drawPlatforms() scrolls platforms similarly to how drawBackground() scrolls the background, as listed in Example 3.14. Snail Bait uses two offsets to scroll the background and platforms: one for the background and another for the platforms.
Now that were using a platform offset to scroll the platforms, we must calculate that value. Example 3.19 Shows the implementation of Snail Bait’s setPlatformOffset() method, which calculates the platform offset similarly to how setBackgroundOffset() sets the background offset, as listed in Example 3.15.
Example 3.19. Setting platform velocities and offsets
var platformOffset = 0,
PLATFORM_VELOCITY_MULTIPLIER = 4.35;
function setPlatformVelocity() {
// Platforms move 4.35 times as fast as the background
platformVelocity = bgVelocity * PLATFORM_VELOCITY_MULTIPLIER;
}
function setPlatformOffset(now) {
platformOffset +=
platformVelocity * (now - lastAnimationFrameTime) / 1000;
}
The final piece to the parallax puzzle is to update the draw() function to account for scrolling the platforms. That revised version of draw() is listed in Example 3.20.
Example 3.20. The draw() function, revised
function setOffsets(now) {
setBackgroundOffset(now);
setPlatformOffset(now);
}
function draw(now) {
setPlatformVelocity();
setOffsets(now);
drawBackground();
drawRunner();
drawPlatforms();
}
For every animation frame, the draw() function sets the platform velocity with setPlatformVelocity(), sets offsets with setOffsets() and setPlatformOffset(), and then draws the background, runner, and platforms.
3.10. Conclusion
The most salient aspects of any videogame are its graphics and animation. In this chapter you learned the fundamentals of drawing shapes and images with the HTML5 canvas element, and you saw the correct way to implement time-critical animations with requestAnimationFrame()-wrapped in a requestNextAnimationFrame() polyfill-instead of the traditional setTimeout() and setInterval(), which are poorly suited for animation.
This chapter also showed you how to continuously translate the coordinate system for a canvas’s drawing surface to create apparent motion. Although the discussion of translating coordinate systems in this chapter focused on horizontal scrolling, you can easily extrapolate the code in this chapter to scroll vertically or even in both directions at once.
Objects in video games should not slow down or speed up simply because the underlying animation frame rate changed, so this chapter showed you how to implement time-based motion, meaning motion that is strictly based on time and does not depend on the current frame rate.
Finally, this chapter covered how you can create the illusion of depth by making objects in the foreground move faster than objects in the background.
3.11. Exercises
1. The canvas 2D context has four attributes for drawing shadows:
• shadowColor: A CSS color string, gradient, or pattern with which to draw the shadow
• shadowOffsetX: The shadow’s offset, in pixels, in the X direction
• shadowOffsetY: The shadow’s offset, in pixels, in the Y direction
• shadowBlur: A Gaussian blur applied to the shadow; the higher the number, the blurrier the shadow.
In the drawPlatform() method in the parallax example, set all four of the preceding values in addition to lineWidth, fillStyle, strokeStyle, and globalAlpha, to create shadows underneath the platforms. Do those shadows affect the frame rate?
2. Notice that setting context shadow attributes in step 1 not only adds shadows to the platforms but also adds a shadow to the runner’s image. That’s because setting shadow attributes affects all further graphics operations in the canvas (except for getImage() and putImage(), which are not discussed in this book).
To add shadows to the platforms but not the runner, save the graphics context at the beginning of drawPlatform() and restore it at the end of the method, with context.save() and context.restore(), respectively. Any settings you make to the graphics context between context.save() and context.restore() are only in effect between those two calls. As a result, you will see shadows underneath the platforms, but not the runner.
3. Use a different background for the parallax example. Make sure the new background does not have identical rows of vertical pixels on the right and left edges of the left and right sides of the image, respectively, as discussed in Section 3.5, “Scrolling the Background,” on p. 83. Is the discontinuity between the two background images obvious as the animation progresses?
4. Run the animation example (corehtml5games.com/book/code/graphics-and-animation/animation) and see if you can slow the frame rate by doing other things on your computer. Good candidates for slowing the game are playing YouTube videos in another browser window; running system backup software; opening semi transparent windows.