Hour 17. Using Advanced Touches and Gestures
,What You’ll Learn in This Hour:
![]() The multitouch gesture-recognition architecture
The multitouch gesture-recognition architecture
![]() How to detect taps
How to detect taps
![]() How to detect swipes
How to detect swipes
![]() How to detect pinches
How to detect pinches
![]() How to detect rotations
How to detect rotations
![]() How to use the built-in shake gesture
How to use the built-in shake gesture
A multitouch screen allows applications to use a wide variety of natural finger gestures for operations that would otherwise be hidden behind layers of menus, buttons, and text. From the very first time you use a pinch to zoom in and out on a photo, map, or web page, you realize that’s exactly the right interface for zooming. Nothing is more human than manipulating the environment with your fingers.
iOS provides advanced gesture-recognition capabilities that you can easily implement within your applications. This hour shows you how.
Multitouch Gesture Recognition
While working through this book’s examples, you’ve gotten used to responding to events, such as Touch Up Inside, for onscreen buttons. Gesture recognition is a bit different. Consider a “simple” swipe. The swipe has direction, it has velocity, and it has a certain number of touch points (fingers) that are engaged. It is impractical for Apple to implement events for every combination of these variables; at the same time, it is extremely taxing on the system to just detect a “generic” swipe event and force you, the developer, to check the number of fingers, direction, and so on each time the event is triggered.
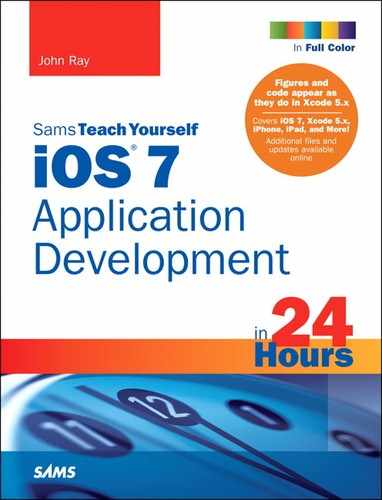
To make life simple, Apple has created “gesture-recognizer” classes for almost all the common gestures that you may want to implement in your applications, as follows:
![]() Tapping (UITapGestureRecognizer): Tapping one or more fingers on the screen
Tapping (UITapGestureRecognizer): Tapping one or more fingers on the screen
![]() “Long” Pressing (UILongPressGestureRecognizer): Pressing one or more fingers to the screen for a specific period of time
“Long” Pressing (UILongPressGestureRecognizer): Pressing one or more fingers to the screen for a specific period of time
![]() Pinching (UIPinchGestureRecognizer): Pinching to close or expand something
Pinching (UIPinchGestureRecognizer): Pinching to close or expand something
![]() Rotating (UIRotationGestureRecognizer): Sliding two fingers in a circular motion
Rotating (UIRotationGestureRecognizer): Sliding two fingers in a circular motion
![]() Swiping (UISwipeGestureRecognizer): Swiping with one or more fingers in a specific direction
Swiping (UISwipeGestureRecognizer): Swiping with one or more fingers in a specific direction
![]() Panning (UIPanGestureRecognizer): Touching and dragging
Panning (UIPanGestureRecognizer): Touching and dragging
![]() Shaking: Physically shaking the iOS device
Shaking: Physically shaking the iOS device
In early versions of iOS, developers had to read and recognize low-level touch events to determine whether, for example, a pinch was happening: Are there two points represented on the screen? Are they moving toward each other?
In iOS 4 and later, you define what type of recognizer you’re looking for, add the recognizer to a view (UIView), and you automatically receive any multitouch events that are triggered. You even receive values such as velocity and scale for gestures such as “pinch.” Let’s see what this looks like translated into code.
Tip
Shaking is not a multitouch gesture and requires a slightly different approach. Note that it doesn’t have its own recognizer class.
Adding Gesture Recognizers
You can add gesture recognizers to your projects in one of two ways: either through code or visually using the Interface Builder editor. While using the editor makes life much easier for us, it is still important to understand what is going on behind the scenes. Consider the code fragment in Listing 17.1.
LISTING 17.1 Example of the Tap Gesture Recognizer
1: UITapGestureRecognizer *tapRecognizer;
2: tapRecognizer=[[UITapGestureRecognizer alloc]
3: initWithTarget:self
4: action:@selector(foundTap:)];
5: tapRecognizer.numberOfTapsRequired=1;
6: tapRecognizer.numberOfTouchesRequired=1;
7: [self.tapView addGestureRecognizer:tapRecognizer];
This example implements a “tap” gesture recognizer that will look for a single tap from a single finger within a view called tapView. If the gesture is seen, the method foundTap is called.
Line 1 kicks things off by declaring an instance of the UITapGestureRecognizer object, tapRecognizer. In line 2, tapRecognizer is allocated and initialized with initWithTarget:action. Working backward, the action is the method that will be called when the tap occurs. Using @selector(foundTap:), we tell the recognizer that we want to use a method called foundTap to handle our taps. The target we specify, self, is the object where foundTap lives. In this case, it will be whatever object is implementing this code (probably a view controller).
Lines 5 and 6 set two properties of the tap gesture recognizer:
![]() numberOfTapsRequired: The number of times the object needs to be tapped before the gesture is recognized
numberOfTapsRequired: The number of times the object needs to be tapped before the gesture is recognized
![]() numberOfTouchesRequired: The number of fingers that need to be down on the screen before the gesture is recognized
numberOfTouchesRequired: The number of fingers that need to be down on the screen before the gesture is recognized
Finally, line 7 uses the UIView method addGestureRecognizer to add the tapRecognizer to a view called tapView. As soon as this code is executed, the recognizer is active and ready for use, so a good place to implement the recognizer is in a view controller’s viewDidLoad method.
Responding to the event is simple: Just implement the foundTap method. An appropriate method stub for the implementation looks like this:
- (void)foundTap:(UITapGestureRecognizer *)recognizer {
}
What happens when the gesture is found is entirely up to you. One could simply respond to the fact the gesture took place, use the parameter provided to the method to get additional details about where the tap happened on the screen, and so on.
All in all, not too bad, don’t you think? What’s even better? In most cases, you can do almost all of this setup entirely within Interface Builder, as shown in Figure 17.1. The tutorial in this hour shows how to do exactly that.
Using Gesture Recognizers
As people become more comfortable with touch devices, the use of gestures becomes almost natural—and expected. Applications that perform similar functions are often differentiated by their user experience, and a fully touch-enabled interface can be the deciding factor between a customer downloading your app and passing it by.
Perhaps the most surprising element of adding gestures to applications is just how easy it is. I know I say that often throughout the book, but gesture recognizers are one of those rare features that “just works.” Follow along and find out what I mean.
Implementation Overview
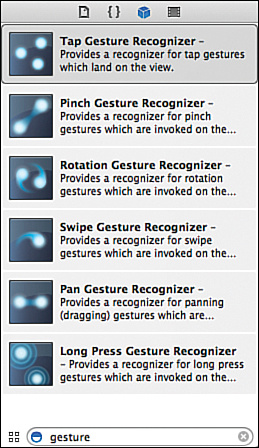
In this hour’s application, which we’ll name Gestures, you implement five gesture recognizers (tap, swipe, pinch, rotate, and shake), along with the feedback those gestures prompt. Each gesture updates a text label with information about the gesture that has been detected. Pinch, rotate, and shake take things a step further by scaling, rotating, or resetting an image view in response to the gestures.
To provide room for gesture input, the application displays a screen with four embedded views (UIView), each assigned a different gesture recognizer directly within the storyboard scene. When you perform an action within one of the views, it calls a corresponding action method in our view controller to update a label with feedback about the gesture, and depending on the gesture type, updates an onscreen image view (UIImageView), too.
Figure 17.2 shows the final application.
Caution: Auto Layout: Our Frenemy
We have to be a bit clever in this application because image views that we add in Interface Builder are subject to Apple’s constraint system. Ideally, we want to be able to take advantage of the Auto Layout system to position our image view in a nice default position, regardless of our screen size (exactly what you learned in the preceding hour). Once the application launches, however, we don’t want any of the constraints enforced because we want to be able to resize and rotate the image view using our gestures.
You can take care of this in any number of ways, including programmatically finding and removing constraints with the removeConstraints NSLayoutConstraint method. The method we take, however, is to add an image view in Interface Builder so that we can position it visually and then replace it with our own constraint-free image view right after the application launches. It’s a relatively simple way to take advantage of Auto Layout for the initial interface object layout and then gain the flexibility of working with a constraint-free object as the application executes.
Setting Up the Project
Start Xcode and create a new single-view iOS application called Gestures. This project requires quite a few outlets and actions, so be sure to follow the setup closely. You’ll also be making connections directly between objects in Interface Builder, so even if you’re used to the approach we’ve taken in other projects, you might want to slow down for this one.
Adding the Image Resource
Part of this application’s interface is an image that can rotate or scale up and down. We use this to provide visual feedback to users based on their gestures. Included with this hour’s project is an Images folder and a file named flower.png. Open the Images.xcassets asset library in your project and drag the Images folder into the column on the left of the library.
Planning the Properties and Connections
For each touch gesture that we want to sense, we need a view where it can take place. Often, this would be your main view. For the purpose of demonstration, however, we will add four UIViews to our main view that will each have a different associated gesture recognizer. Surprisingly, none of these require outlets, because we’ll connect the recognizers to them directly in Interface Builder.
We do, however, need two outlets and properties, outputLabel and imageView, of the classes UILabel and UIImageView, respectively. The label is used to provide text feedback to the user, while the image view shows visual feedback to the pinch and rotate gestures.
When the application senses a gesture within one of the four views, it needs to invoke an action method that can interact with the label and image. We will connect the gesture recognizers to methods called foundTap, foundSwipe, foundPinch, and foundRotation.
Note
Notice that we don’t mention the shake gesture here? Even though we will eventually add shake recognition to this project, it will be added by implementing a very specific method in our view controller, not through an arbitrary action method that we define upfront.
Adding a Property for the Image View Size
When our gesture recognizers resize or rotate the image view in our UI, we want to be able to reset it to its default position and size. To make this happen, we need to “know” in our code what the default position for the image was. View positioning and sizing is described using a data structure (not an object) called a CGRect that contains four values: x and y coordinates (origin.x and origin.y), and width and height (size.width and size.height). We will add a private property to the project that, when the application first launches, stores the size and location of the image view (the CGRect of the view) we added in Interface Builder. We’ll name this originalRect.
Open your ViewController.m file and update the @interface block following the #import line so that it reads as follows:
@interface ViewController ()
@property (nonatomic) CGRect originalRect;
@end
The originalRect property is declared and ready to be used in our implementation; but first, we need an interface.
Designing the Interface
Open the Main.storyboard file and make room in your workspace. It’s time to create our user interface (UI).
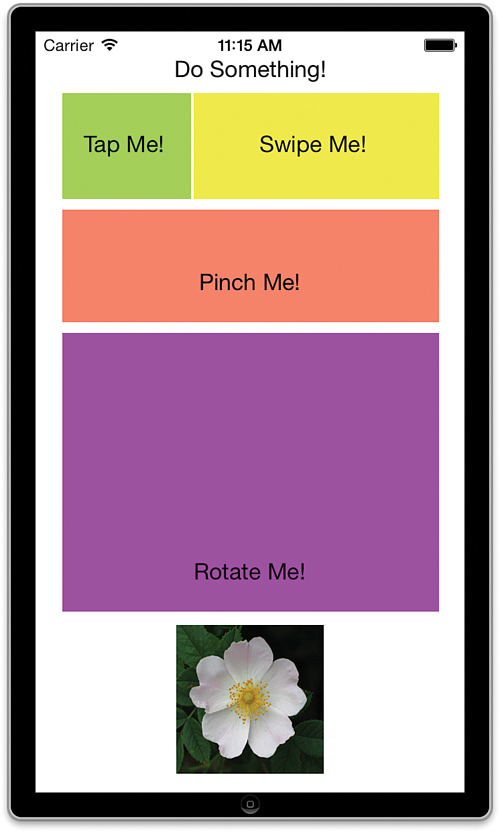
To build the interface, start by dragging four UIView instances to the main view. Size the first to a small rectangle in the upper-left portion of the screen; it will capture taps. Make the second a long rectangle beside the first (for detecting swipes). Size the other two views as large rectangles below the first two (for pinches and rotations). Use the Attributes Inspector (Option-Command-4) to set the background color of each view to be something unique.
Tip
The views you are adding are convenient objects that we can attach gestures to. In your own applications, you can attach gesture recognizers to your main application view or the view of any onscreen object.
Tip
Gesture recognizers work based on the starting point of the gesture, not where it ends. In other words, if a user uses a rotation gesture that starts in a view but ends outside the view, it will work fine. The gesture won’t “stop” just because it crosses a view’s boundary.
For you, the developer, this is a big help for making multitouch applications that work well on a small screen.
Next, drag labels into each of the four views. The first label should read Tap Me!. The second should read Swipe Me!. The third label should read Pinch Me!. The fourth label should read Rotate Me!.
Drag a fifth UILabel instance to the main view, and center it at the top of the screen. Use the Attributes Inspector to set it to align center. This will be the label we use to provide feedback to the user. Change the label’s default text to Do something!.
Finally, add a UIImageView layout, and then position it in an appropriately attractive location at the bottom center of the scene; use the Auto Layout constraints if you so desire (see Figure 17.3). Remember that we will not actually be using this image view to display gesture feedback; we want it solely for positioning. So, there is no need to set a default image for the image view.
With the view finished, in most projects, we start connecting our interface to our code through outlets and actions—but not this hour. Before we can create our connections, we need to add the gesture recognizers to the storyboard.
We’re about to do a bunch of dragging and dropping of objects onto the UIViews that you just created. If you often use the document outline to refer to the objects in your view, you may want to use the Label field of the Identity group in the Identity Inspector (Option-Command-3) to give them more meaningful names than the default View label they appear with. Labels are arbitrary and do not affect the program’s operation at all.
Adding Gesture Recognizers to Views
As you learned earlier, one way to add a gesture recognizer is through code. You initialize the recognizer you want to use, configure its parameters, and then add it to a view and provide a method it will invoke if a gesture is detected. Alternatively, you can drag and drop from the Interface Builder Object Library and barely write any code. We’re going to do this now.
Make sure that Main.storyboard is open and that the document outline is visible.
The Tap Recognizer
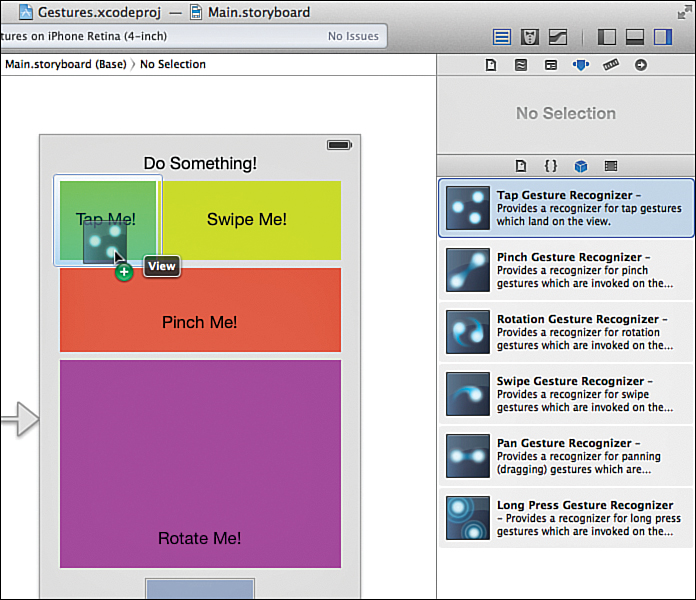
Our first step is to add an instance of the UITapGestureRecognizer object to our project. Search the Object Library for the tap gesture recognizer and drag and drop it onto the UIView instance in your project that is labeled Tap Me!, as shown in Figure 17.4. The recognizer will appear as an object at the bottom of the document outline, regardless of where you drop it.
Caution: Everything Is a View
Be careful not to drag the recognizer onto the label within the view. Remember that every onscreen object is a subclass of UIView, so you could potentially add a gesture recognizer to the label rather than to the intended view. You might find it easier to target the views in the document outline rather than in the visual layout.
Through the simple act of dragging the tap gesture recognizer into the view, you’ve created a gesture-recognizer object and added it to that view’s gesture recognizers. (A view can have as many as you want.)
Next, you need to configure the recognizer so that it knows what type of gesture to look for. Tap gesture recognizers have two properties:
![]() Taps: The number of times the object needs to be tapped before the gesture is recognized
Taps: The number of times the object needs to be tapped before the gesture is recognized
![]() Touches: The number of fingers that need to be down on the screen before the gesture is recognized
Touches: The number of fingers that need to be down on the screen before the gesture is recognized
In this example, we’re defining a tap as one finger tapping the screen once, so we define a single tap with a single touch. Select the tap gesture recognizer, and then open the Attributes Inspector (Option-Command-4), as shown in Figure 17.5.
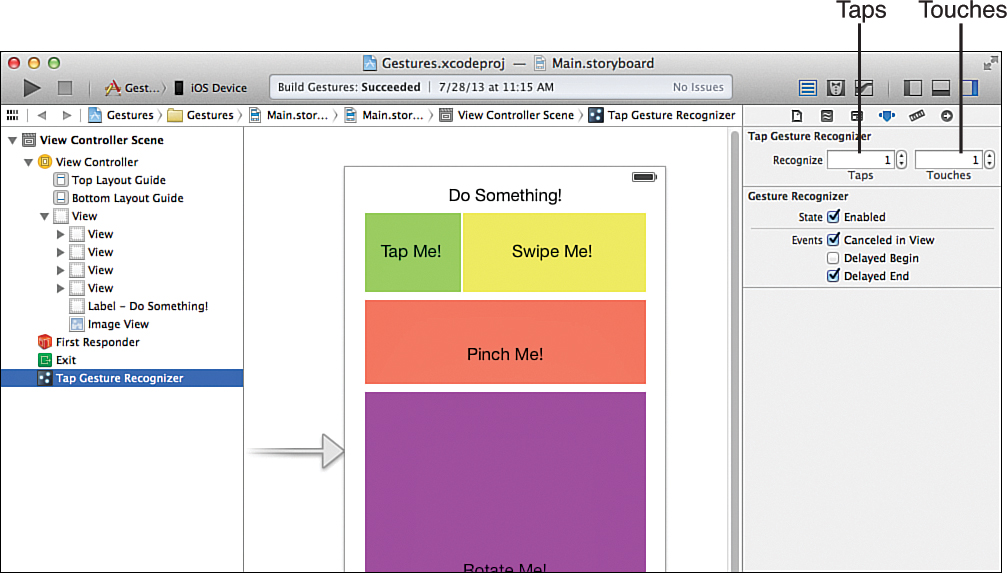
Set both the Taps and Touches fields to 1—or go nuts; this is a perfect time to play with the recognizer properties as much as you like. Just like that, the first gesture recognizer is added to the project and configured. We still need to connect it to an action a bit later, but now we need to add the other recognizers.
Tip
If you look at the connections on the UITapGestureRecognizer object or the view that you dropped it onto, you’ll see that the view references an “outlet collection” called gesture Recognizers. An outlet collection is an array of outlets that make it easy to refer to multiple similar objects simultaneously. If you add more than one gesture recognizer to a view, the recognizer is referenced by the same outlet collection.
The Swipe Recognizer
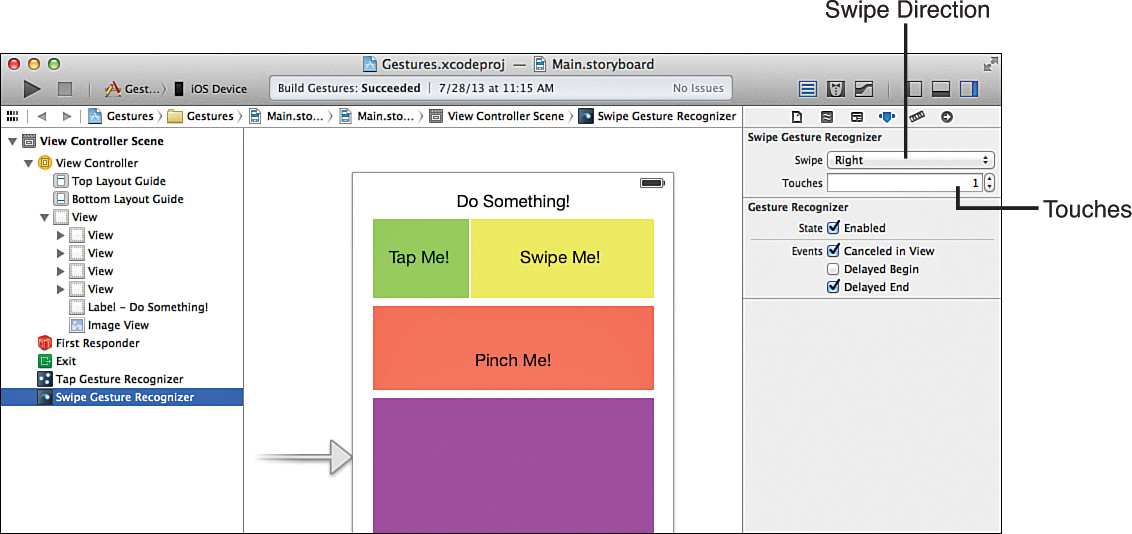
You implement the swipe gesture recognizer in almost the same manner as the tap recognizer. Instead of being able to choose the number of taps, however, you can determine in which direction the swipes can be made—up, down, left, or right—as well as the number of fingers (touches) that must be down for the swipe to be recognized.
Again, use the Object Library to find the swipe gesture recognizer (UISwipeGesture Recognizer) and drag a copy of it in into your view, dropping it on top of the view that contains the Swipe Me! label. Next, select the recognizer and open the Attributes Inspector to configure it, as shown in Figure 17.6. For this tutorial, I configured the swipe gesture recognizer to look for swipes to the right that are made with a single finger.
Note
If you want to recognize and react to different swipe directions, you must implement multiple swipe gesture recognizers. It is possible, in code, to ask a single swipe gesture recognizer to respond to multiple swipe directions, but it cannot differentiate between the directions.
The Pinch Recognizer
A pinch gesture is triggered when two fingers move closer together or farther apart within a view, and it is often used to make something smaller or larger, respectively. Adding a pinch gesture recognizer requires even less configuration than taps or swipes because the gesture itself is already well defined. The implementation of the action that interprets a pinch, however, will be a bit more difficult because we are also interested in “how much” a user pinched (called the scale of the pinch) and how fast (the velocity), rather than just wanting to know that it happened. More on that in a few minutes.
Using the Object Library, find the pinch gesture recognizer (UIPinchGestureRecognizer) and drag it onto the view that contains the Pinch Me! label. No other configuration is necessary.
Tip
If you look at the Attributes Inspector for a pinch, you’ll see that you can set a scale property. The scale, by default, starts at 1. Imagine you move your fingers apart to invoke a pinch gesture recognizer. If you move your fingers twice as far apart as they were, the scale property becomes 2 (1 × 2). If you repeat the gesture, moving them twice as far apart again, it becomes 4 (2 × 2). In other words, the scale value changes using its previous reading as a starting point.
Usually you want to leave the default scale value to 1, but be aware that you can reset the default in the Attributes Inspector if need be.
The Rotation Recognizer
A rotation gesture is triggered when two fingers move opposite one another as if rotating around a circle. Imagine turning a doorknob with two fingers on the top and bottom and you’ll get the idea of what iOS considers a valid rotation gesture. As with a pinch, the rotation gesture recognizer requires no configuration; all the work occurs in interpreting the results—the rotation (in radians) and the speed (velocity) of the rotation.
Find the rotation gesture recognizer (UIRotationGestureRecognizer) and drag it onto the view that contains the Rotate Me! label. You’ve just added the final object to the storyboard.
Tip
Just like the pinch gesture recognizer’s scale property, the rotation gesture recognizer has a rotation property that you can set in the Attributes Inspector. This value, representing the amount of rotation in radians, starts at 0 and changes with each successive rotation gesture. If you want, you can override the initial starting rotation of 0 radians with any value you choose. Subsequent rotation gestures start from the value you provide.
Caution: Gesture Overload
Be mindful of the built-in iOS gestures when you start using gestures in your own applications. Apple has been increasingly adding gestures throughout iOS, including bottom and side swipes in iOS 7. If your gesture conflicts with those provided by the system, the user experience will likely be poor.
Creating and Connecting the Outlets and Actions
To respond to gestures and access our feedback objects from the main view controller, we need to establish the outlets and actions we defined earlier.
Let’s review what we need, starting with the outlets:
![]() The image view (UIImageView):
The image view (UIImageView): imageView
![]() The label for providing feedback (UILabel):
The label for providing feedback (UILabel): outputLabel
And the actions:
![]() Respond to a tap gesture:
Respond to a tap gesture: foundTap
![]() Respond to a swipe gesture:
Respond to a swipe gesture: foundSwipe
![]() Respond to a pinch gesture:
Respond to a pinch gesture: foundPinch
![]() Respond to a rotation gesture:
Respond to a rotation gesture: foundRotation
Prepare your workspace for making the connections. Open the Main.storyboard file and switch to the assistant editor mode with ViewController.m visible. Because you will be dragging from the gesture recognizers in your scene, make sure that the document outline is showing (Editor, Show Document Outline) or that you can tell the difference between them in the object dock below your view.
Adding the Outlets
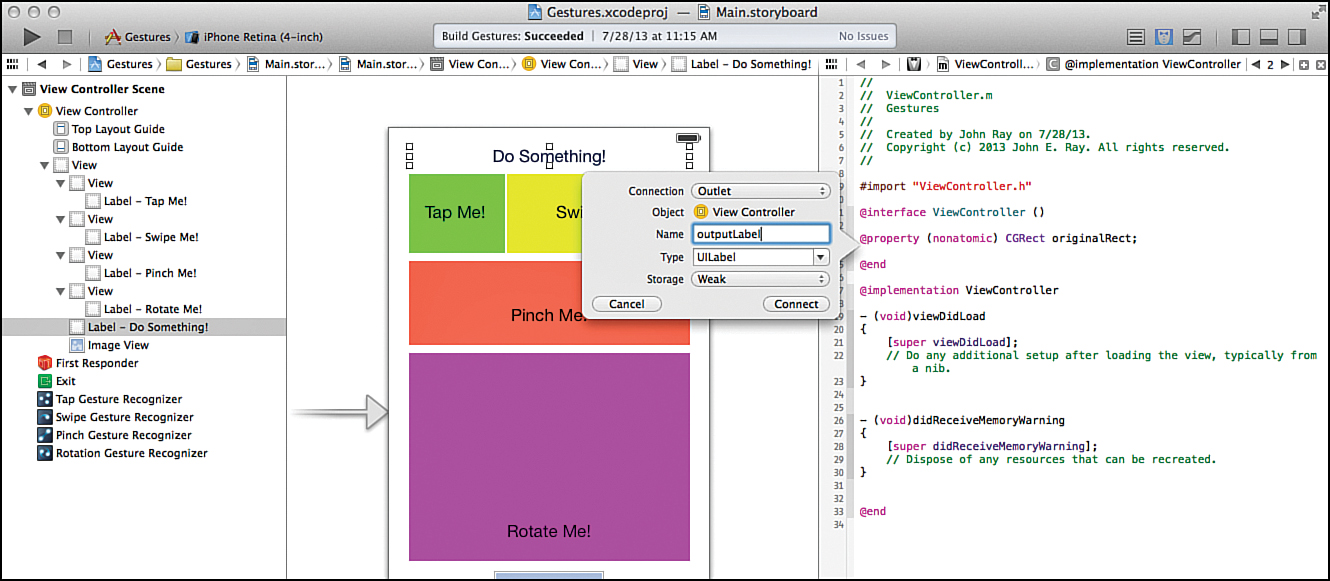
Control-drag from the Do Something! label to just below the @property line you added earlier. When prompted, create a new outlet called outputLabel, as shown in Figure 17.7. Repeat the process for the image view, naming it imageView.
Adding the Actions
Connecting the gesture recognizers to the action methods that we’ve identified works as you probably imagine, but with one difference. Usually when you connect an object to an action you’re connecting a particular event on that object—such as Touch Up Inside, for buttons. In the case of a gesture recognizer, you are actually making a connection from the recognizer’s “selector” to a method. Recall in the earlier code example that the selector is just the name of the method that should be invoked if a gesture is recognized.
Tip
Some gesture recognizers (tap, swipe, and long press) can also trigger segues to other storyboard scenes by using the Storyboard Segues section in the Connections Inspector. You learned about multiscene storyboards in Hour 11, “Implementing Multiple Scenes and Popovers.”
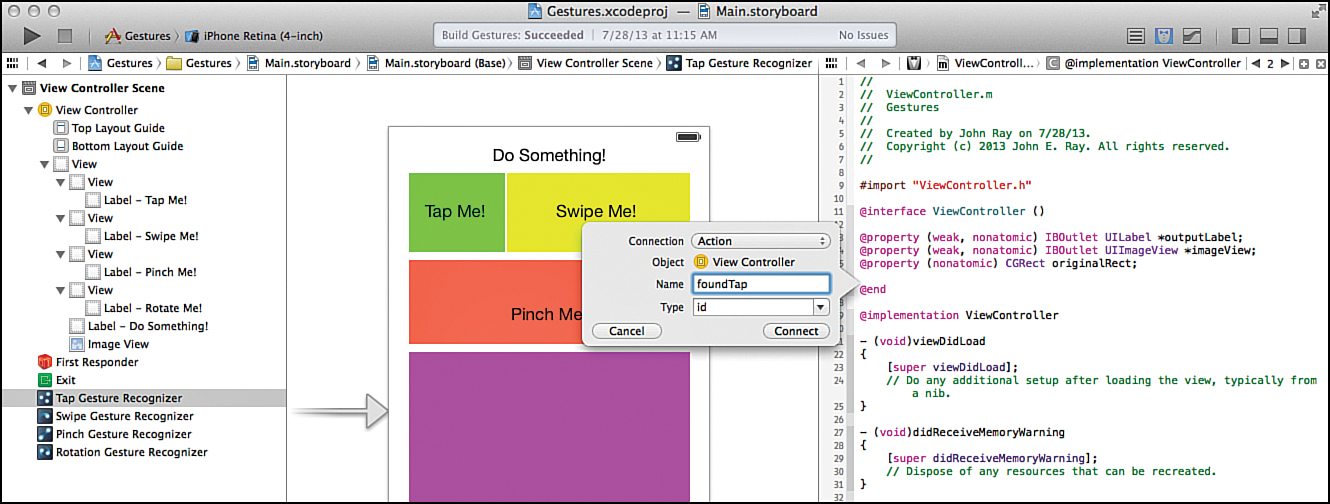
To connect the gesture recognizer to an action method, just Control-drag from the gesture recognizer entry in the document outline to the ViewController.m file. Do this now with the tap gesture recognizer, targeting just below the properties you defined earlier. When prompted, configure the connection as an action with the name foundTap, as shown in Figure 17.8.
Repeat this process for each of the other gesture recognizers—connecting the swipe recognizer to foundSwipe, the pinch recognizer to foundPinch, and the rotation recognizer to found Rotation. To verify your connections, select one of the recognizers (here, the tap recognizer) and view the Connections Inspector (Option-Command-6). You should see the action defined in Sent Actions and the view that uses the recognizer referenced in the Referencing Outlet Collections section, as shown in Figure 17.9.
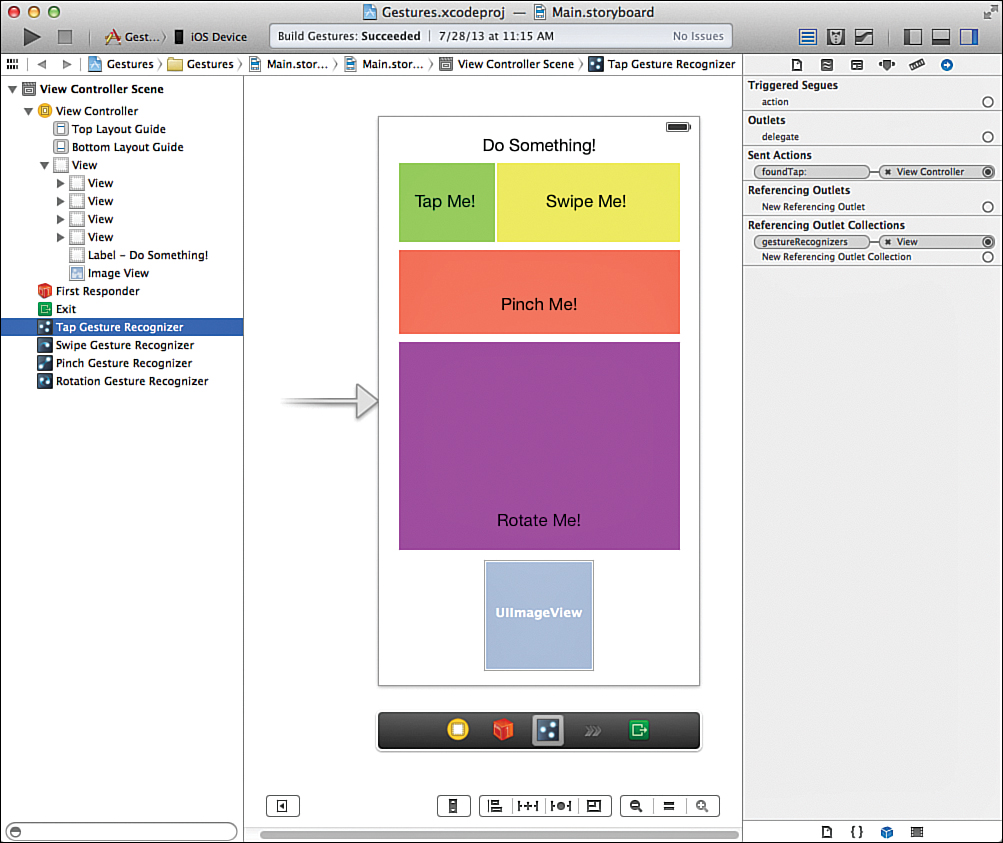
Tip
Hover your mouse over a given connection in the Connection Inspector to see that item highlighted in your scene (shown in Figure 17.9). This is a quick way of verifying that your gestures are connected to the right views.
We’re done with our interface and done adding gesture recognizers to our project; now let’s make them do something.
Implementing the Application Logic
To begin the implementation, we address our image view problem: We need to replace the image view that gets added through Interface Builder with one we create programmatically. We also grab the position and size of the image view from its frame attribute (a CGRect) and store it in the originalRect property. Where will this happen? In a new view controller method viewDidAppear, which is called as soon as the interface comes up.
Replacing the Image View
Make sure the standard editor mode is selected, and then open the ViewController.m file and add the method in Listing 17.2.
LISTING 17.2 Implementing the viewDidAppear Method
1: - (void)viewDidAppear:(BOOL)animated {
2: [super viewDidAppear:animated];
3:
4: self.originalRect=self.imageView.frame;
5:
6: UIImageView *tempImageView;
7: tempImageView=[[UIImageView alloc]
8: initWithImage:[UIImage imageNamed:@"flower.png"]];
9: tempImageView.frame=self.originalRect;
10: [self.view addSubview:tempImageView];
11:
12: self.imageView=tempImageView;
13: }
Line 2 passes the viewDidAppear message up the to the parent class; this is a standard line in any viewDidAppear implementation.
Line 4 grabs the frame attribute from the image view that we added in Interface Builder. This is of the type CGRect and consists of four floating point values: origin.x, origin.y, size.width, and size.height. The original values are stored in originalRect.
Lines 6–8 declare, allocate, and initialize a new UIImageView (tempImageView) using the flower.png image that we added to our project earlier.
In Line 9, we set the frame of the new image view to the frame of the original image view, conveniently stored in originalRect. That finishes up the configuration of the constraint-free image view; it is added to the view controller’s main view (the scene) with the addSubview method in Line 10.
As a final step in swapping the image views, line 12 reassigns the imageView property to the new tempImageView. We can now access the new image view through the property that originally pointed to the image view added in Interface Builder.
Now, let’s move on to the gesture recognizers, beginning with the tap recognizer. What you’ll quickly discover is that after you’ve added one recognizer, the pattern is very, very similar for the others. The only difference is the shake gesture, which is why we’re saving that for last.
Responding to the Tap Gesture Recognizer
Responding to the tap gesture recognizer is just a matter of implementing the foundTap method. Update the method stub in the view controller (ViewController.m) with the implementation shown in Listing 17.3.
LISTING 17.3 Implementing the foundTap Method
- (IBAction)foundTap:(id)sender {
self.outputLabel.text=@"Tapped";
}
This method doesn’t need to process input or do anything other than provide some indication that it has run. Setting the outputLabel’s text property to "Tapped" should suffice nicely.
Ta da! Your first gesture recognizer is done. We’ll repeat this process for the other four, and we’ll be finished before you know it.
If you want to get the coordinate where a tap gesture (or a swipe) takes place, you add code like this to the gesture handler (replacing <the view> with a reference to the recognizer’s view): CGPoint location = [(UITapGestureRecognizer *)sender locationInView: <the view>];
This creates a simple structure named location, with members x and y, accessible as location.x and location.y.
Responding to the Swipe Recognizer
We respond to the swipe recognizer in the same way we did with the tap recognizer, by updating the output label to show that the gesture was recognized. Implement the foundSwipe method as shown in Listing 17.4.
LISTING 17.4 Implementing the foundSwipe Method
- (IBAction)foundSwipe:(id)sender {
self.outputLabel.text=@"Swiped";
}
So far, so good. Next up, the pinch gesture. This requires a bit more work because we’re going to use the pinch to interact with our image view.
Responding to the Pinch Recognizer
Taps and swipes are simple gestures; they either happen or they don’t. Pinches and rotations are slightly more complex, returning additional values to give you greater control over the user interface. A pinch, for example, includes a velocity property (how quickly the pinch happened) and scale (a fraction that is proportional to change in distance between your fingers). If you move your fingers 50% closer together, the scale is .5, for example. If you move them twice as far apart, it is 2.
You’ve made it to the most complex piece of code in this hour’s lesson. The foundPinch method accomplishes several things. It resets the UIImageView’s rotation (just in case it gets out of whack when we set up the rotation gesture), creates a feedback string with the scale and velocity values returned by the recognizer, and actually scales the image view so that the user receives immediate visual feedback.
Implement the foundPinch method as shown in Listing 17.5.
LISTING 17.5 Implementing the foundPinch Method
1: - (IBAction)foundPinch:(id)sender {
2: UIPinchGestureRecognizer *recognizer;
3: NSString *feedback;
4: double scale;
5:
6: recognizer=(UIPinchGestureRecognizer *)sender;
7: scale=recognizer.scale;
8: self.imageView.transform = CGAffineTransformMakeRotation(0.0);
9: feedback=[[NSString alloc]
10: initWithFormat:@"Pinched, Scale:%1.2f, Velocity:%1.2f",
11: recognizer.scale,recognizer.velocity];
12: self.outputLabel.text=feedback;
13: self.imageView.frame=CGRectMake(self.originalRect.origin.x,
14: self.originalRect.origin.y,
15: self.originalRect.size.width*scale,
16: self.originalRect.size.height*scale);
17: }
Let’s walk through this method to make sure we understand what’s going on. Lines 2–4 declare a reference to a pinch gesture recognizer (recognizer), a string object (feedback), and a floating-point value (scale). These are used to interact with our pinch gesture recognizer, store feedback for the user, and hold the scaling value returned by the pinch gesture recognizer, respectively.
Line 6 takes the incoming sender object of the type id and casts it as a UIPinchGesture Recognizer, which can then be accessed through the recognizer variable. The reason we do this is simple. When you created the foundPinch action by dragging the gesture recognizer into your ViewController.m file, Xcode wrote the method with a parameter named sender of the generic “handles any object” type id. Xcode does this even though the sender will always be, in this case, an object of type UIPinchGestureRecognizer. Line 6 just gives us a convenient way of accessing the object as the type it really is.
Line 7 sets scale to the recognizer’s scale property.
Line 8 resets the imageView object to a rotation of 0.0 (no rotation at all) by setting its transform property to the transformation returned by the Core Graphics CGAffine TransformMakeRotation function. This function, when passed a value in radians, returns the necessary transformation to rotate a view.
Lines 9–11 allocate and initialize the feedback string to show that a pinch has taken place and output the values of the recognizer’s scale and velocity properties. Line 12 sets the outputLabel in the UI to the feedback string.
For the scaling of the image view itself, lines 13–17 do the work. All that needs to happen is for the imageView object’s frame to be redefined to the new size. To do this, we can use CGRectMake to return a new frame rectangle based on a scaled version of the CGRect stored in the original image view position: originalRect. The top-left coordinates (origin.x, origin.y) stay the same, but we multiply size.width and size.height by the scale factor to increase or decrease the size of the frame according to the user’s pinch.
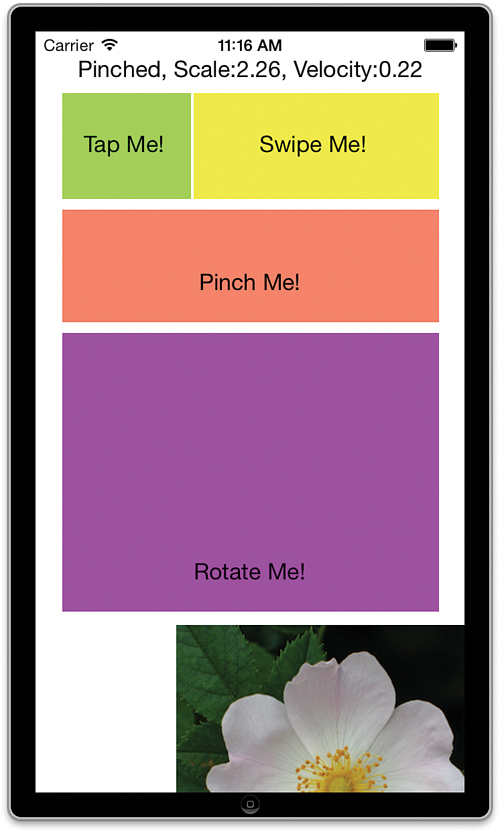
Building and running the application will now let you enlarge (even beyond the boundaries of the screen) or shrink the image using the pinch gesture within the pinchView object, as shown in Figure 17.10.
Note
If you don’t want to cast the sender variable to use it as a gesture recognizer, you can also edit Xcode’s method declarations to include the exact type being passed. Just change the method declaration from
- (IBAction)foundPinch:(id)sender;
to
- (IBAction)foundPinch:(UIPinchGestureRecognizer *)sender;
If you do so, you’ll be able to access sender directly as an instance of UIPinchGestureRecognizer.
Responding to the Rotation Recognizer
The last multitouch gesture recognizer that we’ll add is the rotation gesture recognizer. Like the pinch gesture, rotation returns some useful information that we can apply visually to our onscreen objects, notably velocity and rotation. The rotation returned is the number of radians that the user has rotated his or her fingers, clockwise or counterclockwise.
Tip
Most of us are comfortable talking about rotation in “degrees,” but the Cocoa classes usually use radians. Don’t worry. It’s not a difficult translation to make. If you want, you can calculate degrees from radians using the following formula:
Degrees = Radians × 180 / Pi
There’s not really any reason we need this now, but in your own applications, you might want to provide a degree reading to your users.
I’d love to tell you how difficult it is to rotate a view and about all the complex math involved, but I pretty much gave away the trick to rotation in the foundPinch method earlier. A single line of code will set the UIImageView’s transform property to a rotation transformation and visually rotate the view. Of course, we also need to provide a feedback string to the user, but that’s not nearly as exciting, is it?
Add the foundRotation method in Listing 17.6 to your ViewController.m file.
LISTING 17.6 Adding the foundRotation Method
1: - (IBAction)foundRotation:(id)sender {
2: UIRotationGestureRecognizer *recognizer;
3: NSString *feedback;
4: double rotation;
5:
6: recognizer=(UIRotationGestureRecognizer *)sender;
7: rotation=recognizer.rotation;
8: feedback=[[NSString alloc]
9: initWithFormat:@"Rotated, Radians:%1.2f, Velocity:%1.2f",
10: recognizer.rotation,recognizer.velocity];
11: self.outputLabel.text=feedback;
12: self.imageView.transform = CGAffineTransformMakeRotation(rotation);
13: }
Again, we begin by declaring a reference to a gesture recognizer (recognizer), a string (feedback), and a floating-point value (rotation), in lines 2–4.
Line 6 takes the incoming sender object of the type id and casts it as a UIRotationGesture Recognizer, which can then be accessed through the recognizer variable.
Line 7 sets the rotation value to the recognizer’s rotation property. This is the rotation in radians detected in the user’s gesture.
Lines 8–10 create the feedback string showing the radians rotated and the velocity of the rotation, while line 11 sets the output label to the string.
Line 12 handles the rotation itself, creating a rotation transformation and applying it to the imageView object’s transform property.
Note
The foundPinch method can also be implemented by updating the transform property for imageView and using the CGAffineTransformMakeScale method. In essence, you could replace lines 13–16 of foundPinch with a single line:
self.imageView.transform = CGAffineTransformMakeScale(scale,scale);
Why did we update the frame of the imageView instead? Two reasons. First, because it gives you experience with two approaches to manipulating a view. Second, because setting a transformation for the image view doesn’t really change the view’s underlying frame; it changes the appearance instead. If you really want to the view’s size and location to change (not just the appearance of its size and location), applying a transformation isn’t the way to go.
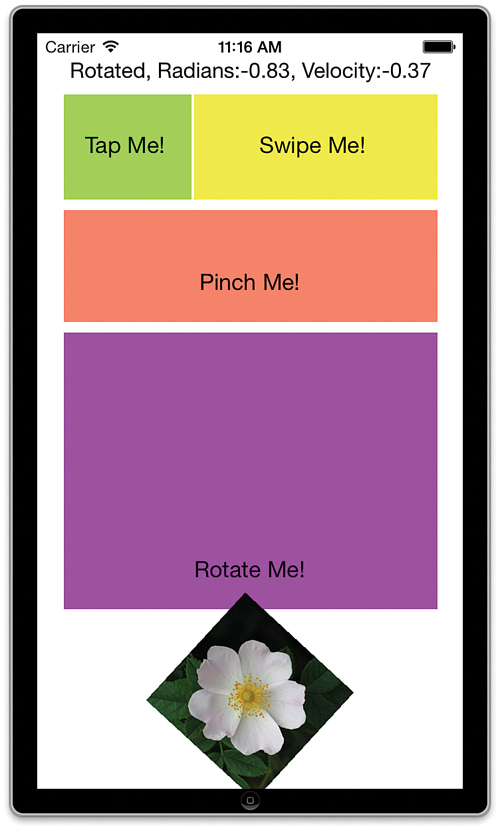
Run and test your application now. You should be able to freely spin the image view using a rotation gesture in the rotate view, as shown in Figure 17.11.
Although it might seem like we’ve finished, we still need to cover one more gesture: a shake.
Implementing the Shake Recognizer
Dealing with a shake is a bit different from the other gestures covered this hour. We must intercept a UIEvent of the type UIEventTypeMotion. To do this, our view controller or view must be the first responder in the responder chain and must implement the motionEnded:withEvent method.
Let’s tackle these requirements one at a time.
Becoming a First Responder
For our view controller to be a first responder, we have to allow it through a method called canBecomeFirstResponder that does nothing but return YES, and then ask for first responder status when the view controller loads its view. Start by adding the new method canBecomeFirstResponder, shown in Listing 17.7, to your ViewController.m implementation file.
LISTING 17.7 Enabling the Ability to Be a First Responder
- (BOOL)canBecomeFirstResponder{
return YES;
}
Next, we need our view controller to become the first responder by sending the message becomeFirstResponder as soon as it has displayed its view. Update the ViewController.m viewDidAppear method to do this, as shown in Listing 17.8.
LISTING 17.8 Asking to Become a First Responder
- (void)viewDidAppear:(BOOL)animated {
[super viewDidAppear:animated];
[self becomeFirstResponder];
self.originalRect=self.imageView.frame;
UIImageView *tempImageView;
tempImageView=[[UIImageView alloc]
initWithImage:[UIImage imageNamed:@"flower.png"]];
tempImageView.frame=self.originalRect;
[self.view addSubview:tempImageView];
self.imageView=tempImageView;
}
Our view controller is now prepared to become the first responder and receive the shake event. All we need to do now is implement motionEnded:withEvent to trap and react to the shake gesture itself.
Responding to a Shake Gesture
To react to a shake, implement the motionEnded:withEvent method, as shown in Listing 17.9.
LISTING 17.9 Responding to a Shake Gesture
1: - (void)motionEnded:(UIEventSubtype)motion withEvent:(UIEvent *)event {
2: if (motion==UIEventSubtypeMotionShake) {
3: self.outputLabel.text=@"Shaking things up!";
4: self.imageView.transform = CGAffineTransformIdentity;
5: self.imageView.frame=self.originalRect;
6: }
7: }
First things first: In line 2, we check to make sure that the motion value we received (an object of type UIEventSubtype) is, indeed, a motion event. To do this, we just compare it to the constant UIEventSubtypeMotionShake. If they match, the user just finished shaking the device.
Lines 3–5 react to the shake by setting the output label, rotating the image view back to its default orientation, and setting the image view’s frame back to the original size and location stored in our originalRect property. In other words, shaking the device will reset the image to its default state. Pretty nifty, huh?
Building the Application
You can now run the application and use all the gestures that we implemented this hour. Try scaling the image through a pinch gesture. Shake your device to reset it to the original size. Scale and rotate the image, tap, swipe—everything should work exactly as you’d expect and with a surprisingly minimal amount of coding. Although not a useful app in and of itself, this tutorial does illustrate many techniques that you can use in your own applications.
Gestures have become an integral part of applications and user expectations in iOS. Adding them to your applications will increase their viability and improve the overall user experience.
Further Exploration
In addition to the four gestures discussed this hour, you should be able to immediately add two other recognizers to your apps: UILongPressGestureRecognizer and UIPanGesture Recognizer. The UIGestureRecognizer class is the parent to all the gesture recognizers that you’ve learned about in this lesson and offers additional base functionality for customizing gesture recognition.
We humans do a lot with our fingers, such as draw, write, play music, and more. Each of these possible gestures has been exploited to great effect in third-party applications. Explore the App Store to get a sense of what’s been done with the iOS multitouch gestures.
You also might want to learn more about the lower-level handling of touches on iOS. See the “Event Handling” section of the Data Management iOS documentation for more information.
Be sure to look at the SimpleGestureRecognizers tutorial project, found within the Xcode documentation. This project provides many additional examples of implementing gestures on the iOS platform and demonstrates how gestures can be added through code. Although the Interface Builder approach to adding gesture recognizers can cover many common scenarios, it’s still a good idea to know how to code them by hand.
Summary
In this hour, we’ve given the gesture recognizer architecture a good workout. Using the gesture recognizers provided through iOS, you can easily recognize and respond to taps, swipes, pinches, rotations, and more—without any complex math or programming logic.
You also learned how to make your applications respond to shaking: Just make them first responders and implement the motionEnded:withEvent method. Your ability to present your users with interactive interfaces just increased dramatically.
Q&A
Q. Why don’t the rotation/pinch gestures include configuration options for the number of touches?
A. The gesture recognizers are meant to recognize common gestures. Although it is possible that you could manually implement a rotation or pinch gesture with multiple fingers, it wouldn’t be consistent with how users expect their applications to work and isn’t included as an option with these recognizers.
Workshop
Quiz
1. What gesture recognizer detects the user briefly touching the screen?
2. How can you respond to multiple swipe directions in a single gesture recognizer?
3. The rotation recognizer returns a rotation in degrees. True or false?
4. Adding shake sensing to your application is as simple as adding any other gesture recognizer.
Answers
1. The UITapGestureRecognizer is used to trap and react to one or more fingers tapping the screen.
2. You can’t. You can trap multiple swipe directions in a single recognizer if you add it through code, but you should consider those directions to be combined into a single gesture. To react differently to different swipes, they should be implemented as different recognizers.
3. False. Most Cocoa classes dealing with rotation (including the rotation gesture recognizer) work with radians.
4. False. The shake gesture requires that your view or view controller become the first responder and trap motion UIEvents.
Activities
1. Expand the Gestures application to include panning and pressing gestures. These are configured almost identically to the gestures you used in this hour’s tutorial.
2. Alter this project to use the image view that you added in Interface Builder rather than the one created programmatically. Practice using the constraints system to see the effect that constraints have on the image view as it changes size and rotates.
3. Improve on the user experience by adding the pinch and rotation gesture recognizers to the UIImageView object itself, enabling users to interact directly with the image rather than another view.