Hour 21. Implementing Location Services
,What You’ll Learn in This Hour:
![]() The available iOS location-sensing hardware
The available iOS location-sensing hardware
![]() How to read and display location information
How to read and display location information
![]() Detecting orientation with the compass
Detecting orientation with the compass
In the preceding hour’s lesson, we looked briefly at the use of Map Kit to display map information in an application. In this lesson, we take the GPS capabilities of our devices a step further: We tie into the hardware capabilities of the iDevice lineup to accurately read location data and compass information.
In this hour, we work with Core Location and the electromagnetic compass. With location-enabled apps enhancing the user experience in areas such as Internet searches, gaming, and even productivity, you can add value and interest to your own offerings with these tools.
Understanding Core Location
Core Location is a framework in the iOS SDK that provides the location of the device. Depending on the device and its current state (within cell service, inside a building, and so forth), any of three technologies can be used: GPS, cellular, or WiFi. GPS is the most accurate of these technologies and will be used first by Core Location if GPS hardware is present. If the device does not have GPS hardware (WiFi iPads, for example), or if obtaining the current location with GPS fails, Core Location falls back to cellular and then to WiFi.
Getting Locations
Core Location is simple to understand and to use despite the powerful array of technologies behind it. (Some of it had to be launched into space on rockets.) Most of the functionality of Core Location is available from the location manager, which is an instance of the CLLocationManager class. You use the location manager to specify the frequency and accuracy of the location updates you are looking for and to turn on and off receiving those updates.
To use a location manager, you must first add the Core Location framework to your project and then import its interface file. As of Xcode 5, this can be done with a single statement:
@import CoreLocation;
Next, you initialize an instance of the location manager, specify a delegate that will receive location updates, and start the updating, like this:
CLLocationManager *locManager = [CLLocationManager new];
locManager.delegate = self;
[locManager startUpdatingLocation];
When the application has finished receiving updates (a single update is often sufficient), stop location updates with location manager’s stopUpdatingLocation method.
Location Manager Delegate
The location manager delegate protocol defines the methods for receiving location updates. Whatever class we’ve designated as our delegate for receiving location updates must conform to the CLLocationManagerDelegate protocol.
There are two methods in the delegate relating to location: locationManager:didUpdate ToLocation:fromLocation and locationManager:didFailWithError.
The locationManager:didUpdateToLocation:fromLocation method’s arguments are the location manager object and two CLLocation objects (one for the new location and one for the previous location). The CLLocation instances provide a coordinate property that is a structure containing longitude and latitude expressed in CLLocationDegrees. CLLocationDegrees is just an alias for a floating-point number of type double.
As already mentioned, different approaches to geolocating have different inherit accuracies, and each approach may be more or less accurate depending on the number of points (satellites, cell towers, WiFi hot spots) it has available to use in its calculations. CLLocation passes this confidence measure along in the horizontalAccuracy property.
The location’s accuracy is provided as a circle, and the true location could lie anywhere within that circle. The circle is defined by the coordinate property as the center of the circle and the horizontalAccuracy property as the radius of the circle in meters. The larger the horizontalAccuracy property, the larger the circle defined by it will be, so the less confidence there is in the accuracy of the location. A negative horizontalAccuracy property indicates that the coordinate is completely invalid and should be ignored.
In addition to longitude and latitude, each CLLocation provides altitude (in meters) above or below sea level. The altitude property is a CLLocationDistance, which is also just an alias for a floating-point number of type double. A positive number is an altitude above sea level, and a negative number is below sea level. Another confidence factor, this one called verticalAccuracy, indicates how accurate the altitude is. A positive verticalAccuracy indicates that the altitude could be off, plus or minus, by that many meters. A negative verticalAccuracy means the altitude is invalid.
Listing 21.1 shows an implementation of the location manager delegate’s locationManager: didUpdateToLocation:fromLocation method that logs the longitude, latitude, and altitude.
LISTING 21.1 Implementing Location Updates
1: - (void)locationManager:(CLLocationManager *)manager
2: didUpdateToLocation:(CLLocation *)newLocation
3: fromLocation:(CLLocation *)oldLocation {
4:
5: NSString *coordinateDesc = @"Not Available";
6: NSString *altitudeDesc = @"Not Available";
7:
8: if (newLocation.horizontalAccuracy >= 0) {
9: coordinateDesc = [NSString stringWithFormat:@"%f, %f +/- %f meters",
10: newLocation.coordinate.latitude,
11: newLocation.coordinate.longitude,
12: newLocation.horizontalAccuracy];
13: }
14:
15: if (newLocation.verticalAccuracy >= 0) {
16: altitudeDesc = [NSString stringWithFormat:@"%f +/- %f meters",
17: newLocation.altitude, newLocation.verticalAccuracy];
18: }
19:
20: NSLog(@"Latitude/Longitude:%@ Altitude: %@", coordinateDesc,
21: altitudeDesc);
22: }
The key statements to pay attention to in this implementation are the references to the accuracy measurements in lines 8 and 15, and accessing the latitude, longitude, and altitude in lines 10, 11, and 17. These are just properties, something you’ve grown accustomed to working with over the past 20 hours.
One element in this example that you might not be familiar with is line 20’s NSLog function. NSLog, which you learn to use in Hour 24, “Application Tracing, Monitoring, and Debugging,” provides a convenient way to output information (often debugging information) without having to design a view.
The resulting output looks like this:
Latitude/Longitude: 35.904392, -79.055735 +/- 76.356886 meters Altitude:
28.000000 +/- 113.175757 meters
Caution: Watch Your Speed
CLLocation also provides a property speed, which is based on comparing the current location with the prior location and comparing the time and distance variance between them. Given the rate at which Core Location updates, the speed property is not very accurate unless the rate of travel is fairly constant.
Handling Location Errors
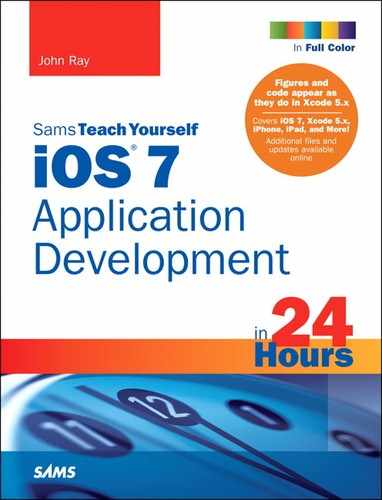
When your application begins tracking the user’s location, a warning displays on the user’s screen, as shown in Figure 21.1.
If the user chooses to disallow location services, iOS does not prevent your application from running, but instead generates errors from the location manager.
When an error occurs, the location manager delegate’s locationManager:didFailWith Error method is called, letting you know the device cannot return location updates. A distinction is made as to the cause of the failure. If the user denies permission to the application, the error argument is kCLErrorDenied; if Core Location tries but cannot determine the location, the error is kCLErrorLocationUnknown; and if no source of trying to retrieve the location is available, the error is kCLErrorNetwork. Usually Core Location continues to try to determine the location after an error. After a user denial, however, it doesn’t, and it is good form to stop the location manager with location manager’s stopUpdatingLocation method and set its property or instance variable (if you used one in your implementation) to nil so that the object’s memory can be freed. Listing 21.2 shows a simple implementation of location Manager:didFailWithError.
LISTING 21.2 Reacting to Core Location Errors
1: - (void)locationManager:(CLLocationManager *)manager
2: didFailWithError:(NSError *)error {
3:
4: if (error.code == kCLErrorLocationUnknown) {
5: NSLog(@"Currently unable to retrieve location.");
6: } else if (error.code == kCLErrorNetwork) {
7: NSLog(@"Network used to retrieve location is unavailable.");
8: } else if (error.code == kCLErrorDenied) {
9: NSLog(@"Permission to retrieve location is denied.");
10: [manager stopUpdatingLocation];
11: }
12: }
As with the previous example implementation of handling location manager updates, in the error handler we also work solely with properties on the objects the method receives. In lines 4, 6, and 8, we check the incoming NSError object’s code property against the possible error conditions and react accordingly.
Caution: Please Wait While I Get My Bearings
Keep in mind that the location manager delegate will not immediately receive a location. It usually takes a number of seconds for the device to pinpoint the location, and the first time it is used by an application, Core Location first asks the user’s permission. You should have a design in place for what the application will do while waiting for an initial location and what to do if location information is unavailable because the user didn’t grant permission or the geolocation process failed. A common strategy that works for many applications is to fall back to a user-entered ZIP code.
Location Accuracy and Update Filter
It is possible to tailor the accuracy of the location to the needs of the application. An application that needs only the user’s country, for example, does not need 10-meter accuracy from Core Location and will get a much faster answer by asking for a more approximate location. You do this by setting the location manager’s desiredAccuracy property, before you start the location updates. desiredAccuracy is an enumerated type, CLLocationAccuracy. Five constants are available with varying levels of precision (with current consumer technology, the first two are the same): kCLLocation AccuracyBest, kCLLocationAccuracyNearestTenMeters, kCLLocationNearest HundredMeters, kCLLocationKilometer, and kCLLocationAccuracyThreeKilometers.
After updates on a location manager are started, updates continue to come into the location manager delegate until they are stopped. You cannot control the frequency of these updates directly, but you can control it indirectly with location manager’s distanceFilter property. The distanceFilter property is set before starting updates and specifies the distance in meters the device must travel (horizontally, not vertically) before another update is sent to the delegate.
For example, starting the location manager with settings suitable for following a walker’s progress on a long hike might look like this:
CLLocationManager *locManager = [CLLocationManager new];
locManager.delegate = self;
locManager.desiredAccuracy = kCLLocationAccuracyHundredMeters;
locManager.distanceFilter = 200;
[locManager startUpdatingLocation];
Caution: Location Comes with a Cost
Each of the three methods of locating the device (GPS, cellular, and WiFi) can put a serious drain on the device’s battery. The more accurate an application asks the device to be in determining location, and the shorter the distance filter, the more battery the application will use. Be aware of the device’s battery life and only request as accurate and as frequent location updates as the application needs. Stop location manager updates whenever possible to preserve the battery life of the device.
Getting Headings
The location manager includes a headingAvailable property that indicates whether the device is equipped with a magnetic compass. If the value is YES, you can use Core Location to retrieve heading information. Receiving heading events works similarly to receiving location update events. To start receiving heading events, assign a location manager delegate, assign the headingFilter property for how often you want to receive updates (measured in degrees of change in heading), and call the startUpdatingHeading method on the location manager object:
locManager.delegate = self;
locManager.headingFilter = 10
[locManager startUpdatingHeading];
Caution: North Isn’t Just “Up”
There isn’t one true north. Geographic north is fixed at the North Pole, and magnetic north is located hundreds of miles away and moves every day. A magnetic compass always points to magnetic north; but some electronic compasses, like the one in the iPhone and iPad, can be programmed to point to geographic north instead. Usually, when we deal with maps and compasses together, geographic north is more useful. Make sure that you understand the difference between geographic and magnetic north and know which one you need for your application. If you are going to use the heading relative to geographic north (the trueHeading property), request location updates as well as heading updates from the location manager; otherwise, the trueHeading property won’t be properly set.
The location manager delegate protocol defines the methods for receiving heading updates. There are two methods in the delegate relating to headings: locationManager:didUpdate Heading and locationManager:ShouldDisplayHeadingCalibration.
The locationManager:didUpdateHeading method’s argument is a CLHeading object. The CLHeading object makes the heading reading available with a set of properties: the magneticHeading and the trueHeading. (See the relevant Caution.) These values are in degrees, and are of type CLLocationDirection, which is just a double-precision floating-point number. In plain English, this means that
![]() If the heading is 0.0, we’re going north.
If the heading is 0.0, we’re going north.
![]() When the heading reads 90.0, we’re headed due east.
When the heading reads 90.0, we’re headed due east.
![]() If the heading is 180.0, we’re going south.
If the heading is 180.0, we’re going south.
![]() Finally, if the heading reads 270.0, we’re going west.
Finally, if the heading reads 270.0, we’re going west.
The CLHeading object also contains a headingAccuracy confidence measure, a timestamp of when the reading occurred, and an English language description that is more suitable for logging than showing to a user. Listing 21.3 shows an implementation example of the location Manager:didUpdateHeading method.
LISTING 21.3 Handling Heading Updates
1: - (void)locationManager:(CLLocationManager *)manager
2: didUpdateHeading:(CLHeading *)newHeading {
3:
4: NSString *headingDesc = @"Not Available";
5:
6: if (newHeading.headingAccuracy >= 0) {
7: CLLocationDirection trueHeading = newHeading.trueHeading;
8: CLLocationDirection magneticHeading = newHeading.magneticHeading;
9:
10: headingDesc = [NSString stringWithFormat:
11: @"%f degrees (true), %f degrees (magnetic)",
12: trueHeading,magneticHeading];
13:
14: NSLog(headingDesc);
15: }
16: }
This implementation looks very similar to handling location updates. We check to make sure there is valid data (line 6), and then we grab the true and magnetic headings from the true Heading and magneticHeading properties passed to us in the CLHeading object (lines 7–8). The output generated looks a bit like this:
180.9564392 degrees (true), 182.684822 degrees (magnetic)
The other delegate method, locationManager:ShouldDisplayHeadingCalibration, literally consists of a line returning YES or NO. This indicates whether the location manager can display a calibration prompt to the user. The prompt asks the user to step away from any source of interference and to rotate the device 360 degrees. The compass is always self-calibrating, and this prompt is just to help that process along after the compass receives wildly fluctuating readings. It is reasonable to implement this method to return NO if the calibration prompt would be annoying or distracting to the user at that point in the application (in the middle of data entry or game play, for example).
Note
The iOS Simulator reports that headings are available, and it provides just one heading update.
Creating a Location-Aware Application
Many iOS and Mac users have a, shall we say, “heightened” interest in Apple Computer; visiting Apple’s campus in Cupertino, California, can be a life-changing experience. For these special users, we’re going to create a Core Location-powered application that keeps you informed of just how far away you are.
Implementation Overview
The application is created in two parts: The first introduces Core Location and displays the number of miles from the current location to Cupertino. In the second section, we use the device’s compass to display an arrow that points users in the right direction, should they get off track.
In this first installment, we create an instance of a location manager and then use its methods to calculate the distance between our current location and Cupertino, California. While the distance is being determined, we display a Please Wait message. In cases where we happen to be in Cupertino, we congratulate the user. Otherwise, a display of the distance, in miles, is shown.
Setting Up the Project
For the rest of this hour, we work on a new application that uses the Core Location framework. Create a new single-view iOS application in Xcode and call it Cupertino.
Adding Background Image Resources
To ensure that the user remembers where we’re going, we have a nice picture of an apple as the application’s background image. Click the main Images.xcassets asset catalog to open the project’s image assets. Now, within the Finder, drag the project’s Images folder into the left-hand column of the asset catalog in Xcode. The new addition to the asset catalog contains apple.png, our background image, along with several other images we’ll be using later.
Planning the Properties and Connections
The view controller serves as the location manager delegate, receiving location updates and updating the user interface to reflect the new locations. Within the view controller, we need a private property for an instance of the location manager. We will name this locMan.
Within the interface itself, we need a label with the distance to Cupertino (distanceLabel) and two subviews (distanceView and waitView). The distanceView contains the distanceLabel and is shown only after we’ve collected our location data and completed our calculations. The waitView is shown while our iDevice gets its bearings.
Adding Location Constants
To calculate the distance to Cupertino, we obviously need a location in Cupertino that we can compare to the user’s current location. According to http://gpsvisualizer.com/geocode, the center of Cupertino, California, is at 37.3229978 latitude, –122.0321823 longitude. Add two constants for these values (kCupertinoLatitude and kCupertinoLongitude) after the #import line in the ViewController.m implementation file:
#define kCupertinoLatitude 37.3229978
#define kCupertinoLongitude -122.0321823
Designing the View
The user interface for this hour’s lesson is simple: We can’t perform any actions to change our location (teleportation isn’t yet possible), so all we need to do is update the screen to show information about where we are.
Open the Main.storyboard file, open the Object Library (View, Utilities, Show Object Library), and commence design:
1. Start by adding an image view (UIImageView) onto the view and position it so that it covers the entire view. This serves as the background image for the application.
2. With the image view selected, open the Attributes Inspector (Option-Command-4). Select apple from the Image drop-down menu.
3. Drag a new view (UIView) on top of the image view. Size it to fit in the bottom of the view; it serves as our primary information readout, so it needs to be sized to hold about two lines of text.
4. Use the Attributes Inspector to set the background to black. Change the Alpha to 0.75, and check the Hidden check box.
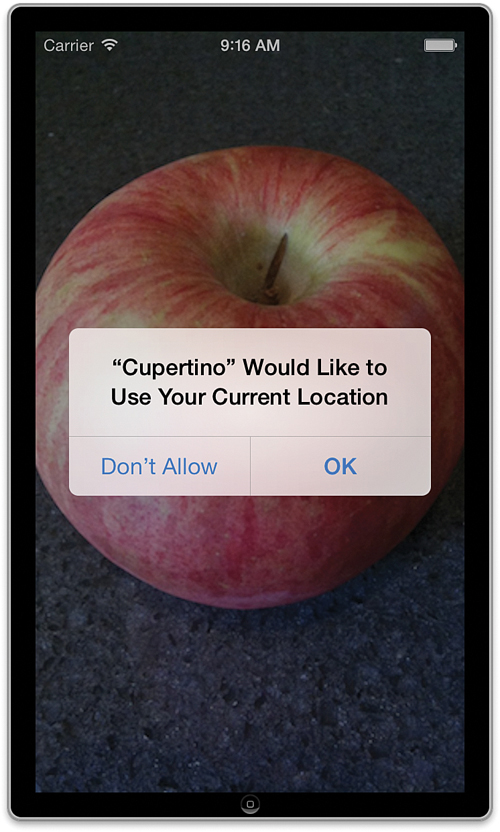
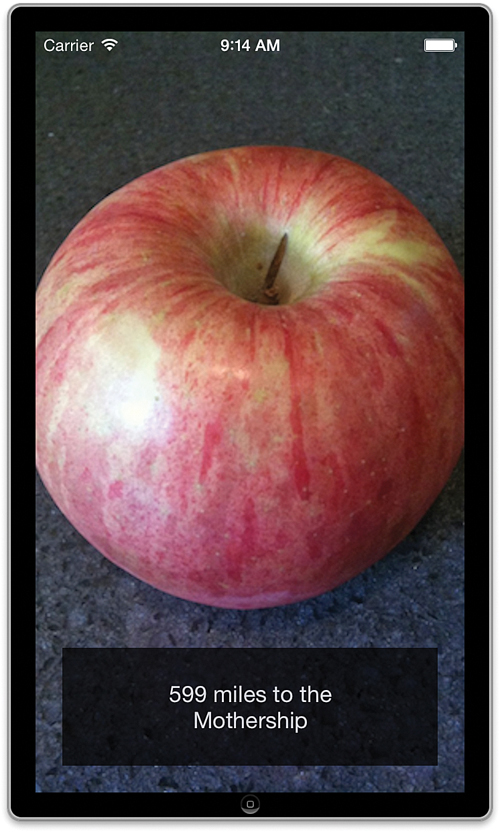
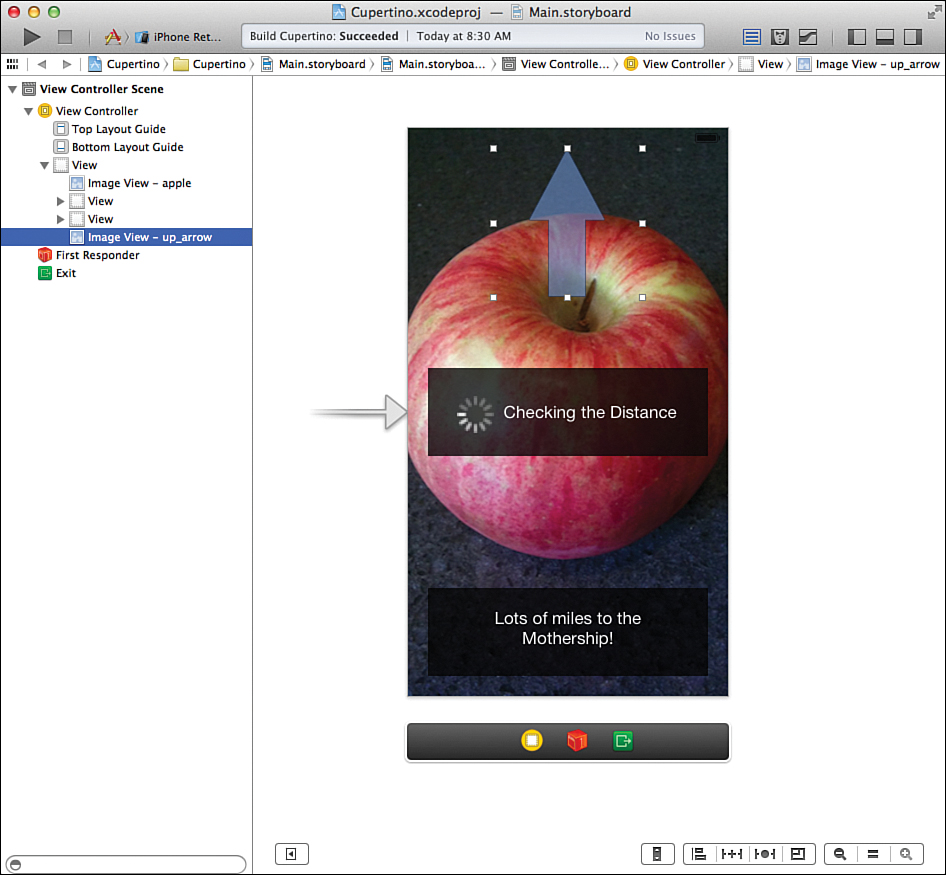
5. Add a label (UILabel) to the information view. Size the label up to all four edge guidelines and change the text to read Lots of miles to the Mothership. Use the Attributes Inspector to change the text color to white, aligned center, and sized as you want. Figure 21.2 shows my view.
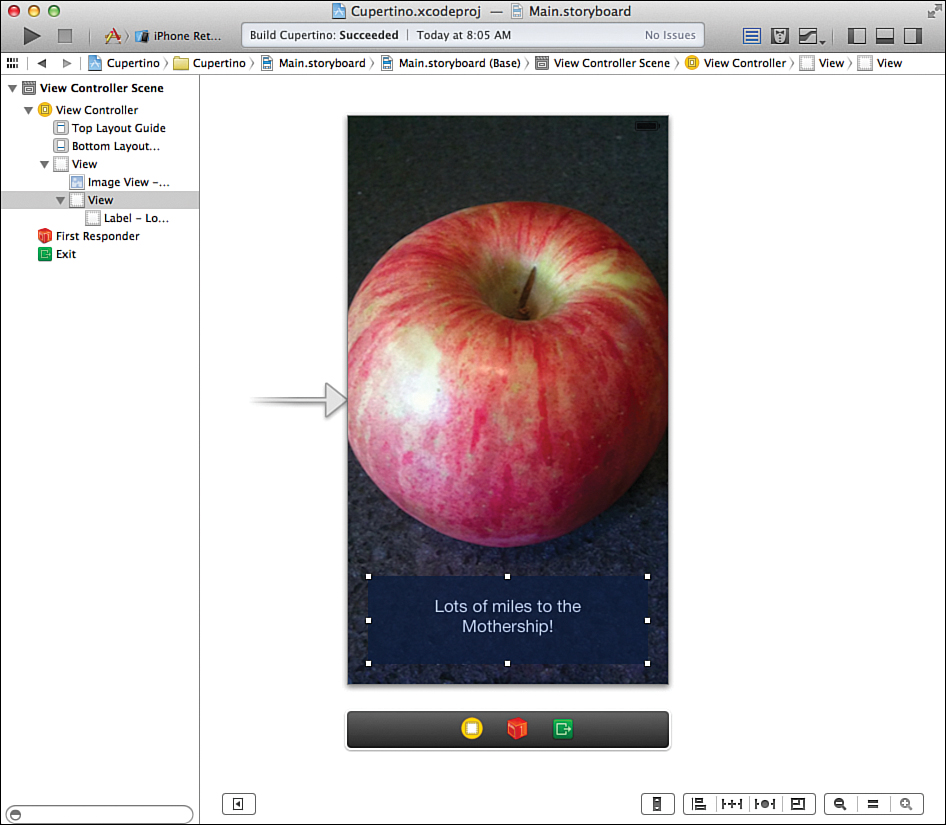
6. Create a second semitransparent view with the same attributes as the first, but not hidden, and with a height of about an inch.
7. Drag the second view to vertically center it on the background. This view will contain the Please Wait message while the device is finding our location.
8. Add a new label to the view that reads Checking the Distance. Resize the label so that it takes up approximately the right two-thirds of the view.
9. Drag an activity indicator (UIActivityIndicatorView) to the new view and align it to the left side of the label. The indicator shows a “spinner” graphic to go along with our Checking the Distance label. Use the Attributes Inspector to set the Animated attribute; it makes the spinner spin.
The final view should resemble Figure 21.3.
Creating and Connecting the Outlets
In this exercise, all we do is update the user interface (UI) based on information from the location manager. In other words, there are no actions to connect (hurray). We need connections from the two views we added as well as the label for displaying the distance to Cupertino.
Switch to the assistant editor. Control-drag from the Lots of Miles label to below the @interface line in ViewController.m. Create a new outlet named distanceLabel when prompted. Do the same for the two views, connecting the view with the activity indicator to a waitView outlet and the view that contains the distance estimate to a distanceView outlet.
Implementing the Application Logic
Based on the interface we just laid out, the application starts up with a message and a spinner that let the user know that we are waiting on the initial location reading from Core Location. We’ll request this reading as soon as the view loads in the view controller’s viewDidLoad method. When the location manager delegate gets a reading, we calculate the distance to Cupertino, update the label, hide the activity indicator view, and unhide the distance view.
Preparing the Location Manager
To use Core Location and create a location manager, we need to make a few changes to our setup to accommodate the framework. First, update ViewController.h by importing the Core Location module, and then add the CLLocationManagerDelegate protocol to the@interface line. The ViewController.h file should now consist of these lines:
#import <UIKit/UIKit.h>
@import CoreLocation;
@interface ViewController : UIViewController <CLLocationManagerDelegate>
@end
Our project is now prepared to use the location manager, but we still need to add the private property that we’ll use to reference it (locMan). This will need to be a strong so that ARC doesn’t clean up the location manager when we aren’t expecting it.
Update the @interface block at the top of your ViewController.m file one last time, so that it reads:
@interface ViewController ()
@property (weak, nonatomic) IBOutlet UILabel *distanceLabel;
@property (weak, nonatomic) IBOutlet UIView *waitView;
@property (weak, nonatomic) IBOutlet UIView *distanceView;
@property (strong, nonatomic) CLLocationManager *locMan;
@end
It’s time to implement the location manager and distance calculation code.
Creating the Location Manager Instance
To use the location manager, we need to make one. Update the viewDidLoad method in ViewController.m, and instantiate a location manager with the view controller itself as the delegate, a desiredAccuracy of kCLLocationAccuracyThreeKilometers, and a distance Filter of 1,609 meters (1 mile). Start the updates with the startUpdatingLocation method. The implementation should resemble Listing 21.4.
LISTING 21.4 Creating the Location Manager Instance
- (void)viewDidLoad
{
[super viewDidLoad];
self.locMan = [CLLocationManager new];
self.locMan.delegate = self;
self.locMan.desiredAccuracy = kCLLocationAccuracyThreeKilometers;
self.locMan.distanceFilter = 1609; // a mile
[self.locMan startUpdatingLocation];
}
If you have any questions about this code, refer to the introduction to location manager at the start of this hour’s lesson. This code mirrors the examples from earlier, with some slightly changed numbers and, because it isn’t just a code fragment, the use of an actual property for accessing the location manager.
Implementing the Location Manager Delegate
Now we need to implement the two methods of the location manager delegate protocol. We start with the error condition: locationManager:didFailWithError. In the case of an error getting the current location, we already have a default message in place in the distanceLabel, so we just remove the waitView with the activity monitor and show the distanceView. If the user denied access to Core Location updates, we also clean up the location manager property. Implement locationManager:didFailWithError in ViewController.m as shown in Listing 21.5.
LISTING 21.5 Handling Location Manager Errors
1: - (void)locationManager:(CLLocationManager *)manager
2: didFailWithError:(NSError *)error {
3:
4: if (error.code == kCLErrorDenied) {
5: // Turn off the location manager updates
6: [self.locMan stopUpdatingLocation];
7: self.locMan=nil;
8: }
9: self.waitView.hidden = YES;
10: self.distanceView.hidden = NO;
11: }
In this error handler, we’re only worried about the case of the location manager not being able to provide us with any data. In line 4, we check the error code to make sure access wasn’t denied. If it was, the location manager is stopped (line 6) and we let iOS know it can get rid of it (freeing up memory) by setting it to nil in line 7.
In line 9, the wait view is hidden and the distance view, with the default text of Lots of miles to the Mothership, is shown.
Note
In this example, I use self.locMan to access the location manager. I could have used the manager variable provided to the method; there really wouldn’t have been a difference in the outcome. Because we have the private property, however, using it consistently makes sense from the perspective of code readability.
Our next method (locationManager:didUpdateLocation:fromLocation) does the dirty work of calculating the distance to Cupertino. This brings us to one more hidden gem in CLLocation. We don’t need to write our own longitude/latitude distance calculations because we can compare two CLLocation instances with the distanceFromLocation method. In our implementation of locationManager:didUpdateLocation:fromLocation, we create a CLLocation instance for Cupertino and compare it to the instance we get from Core Location to get the distance in meters. We then convert the distance to miles, and if it’s more than 3 miles, we show the distance with an NSNumberFormatter used to add a comma if more than 1,000 miles. If the distance is less than 3 miles, we stop updating the location and congratulate the user on reaching “the Mothership.” Listing 21.6 provides the complete implementation of locationManager:didUpdateLocation:fromLocation.
LISTING 21.6 Calculating the Distance When the Location Updates
1: - (void)locationManager:(CLLocationManager *)manager
2: didUpdateToLocation:(CLLocation *)newLocation
3: fromLocation:(CLLocation *)oldLocation {
4:
5: if (newLocation.horizontalAccuracy >= 0) {
6: CLLocation *Cupertino = [[CLLocation alloc]
7: initWithLatitude:kCupertinoLatitude
8: longitude:kCupertinoLongitude];
9: CLLocationDistance delta = [Cupertino
10: distanceFromLocation:newLocation];
11: long miles = (delta * 0.000621371) + 0.5; // meters to rounded miles
12: if (miles < 3) {
13: // Stop updating the location
14: [self.locMan stopUpdatingLocation];
15: // Congratulate the user
16: self.distanceLabel.text = @"Enjoy the
Mothership!";
17: } else {
18: NSNumberFormatter *commaDelimited = [NSNumberFormatter new];
19: [commaDelimited setNumberStyle:NSNumberFormatterDecimalStyle];
20: self.distanceLabel.text = [NSString stringWithFormat:
21: @"%@ miles to the
Mothership",
22: [commaDelimited stringFromNumber:
23: [NSNumber numberWithLong:miles]]];
24: }
25: self.waitView.hidden = YES;
26: self.distanceView.hidden = NO;
27: }
28: }
The method starts off in line 5 by checking that the new location received by the method is useful information (an accuracy greater than zero). If it is, the rest of the method is executed; otherwise, we’re done.
Lines 6–7 create a CLLocation object (Cupertino) with the latitude and longitude of Cupertino.
Lines 9–10 create a CLLocationDistance variable named delta. Remember that CLLocationDistance isn’t an object; it is a double-precision floating-point number, which makes using it quite straightforward. The number is the distance between the CLLocation (Cupertino) object we just made and the new location received by the method.
In line 11, an integer representing the conversion of the distance from meters to miles is calculated and stored in miles.
Lines 12–16 check to see whether the distance calculated is less than 3 miles. If it is, the location manager is stopped and the message Enjoy the Mothership is added to the distance label.
If the distance is greater than or equal to 3 miles, we initialize a number formatter object called commaDelimited in line 18. Line 19 sets the style for the formatter.
Tip
Number formatters work by first setting a style for the object with the setNumberStyle method (in this case, NSNumberFormatterDecimalStyle). The NSNumberFormatterDecimalStyle setting defines decimal numbers with properly placed commas (for example, 1,500).
Once configured, the formatter can use the method stringFromNumber to output a nicely formatted number as a string. Unfortunately, a catch applies: The formatter accepts NSNumber objects for formatting, not simple C data types. To satisfy this requirement, you must use one of the NSNumber convenience methods, such as numberWithLong or numberWithInt, to convert from a simple data type to an NSNumber object.
Lines 20–23 set the distance label to show the number of miles (as a nicely formatted number).
Lines 25 and 26 hide the “wait” view and show the distance view, respectively.
Setting the Status Bar to White
One final method and we’re done. Like some of the other projects in this book, Cupertino has a dark background that obscures the iOS 7 status bar. To lighten it up, add the method in Listing 21.7 to your ViewController.m file.
LISTING 21.7 Setting the Status Bar Appearance in preferredStatusBarStyle
-(UIStatusBarStyle)preferredStatusBarStyle{
return UIStatusBarStyleLightContent;
}
Building the Application
Choose Run and take a look at the result. Your application should, after determining your location, display the distance to Cupertino, California, as shown in Figure 21.4.
Tip
You can set simulated locations when your app is running. To do this, start the application, and then look at the bottom-center of the Xcode window. You will see the standard iOS “location” icon appear (among other controls). Click it to choose from a number of preset locations.
Another option is to use the Debug, Location from the menu bar in the iOS Simulator itself. There, you can easily configure a custom latitude and longitude for testing.
Note that you must set a location before responding to the app’s request to use your current location; otherwise, it assumes that no locations are available as soon as you click OK. If you make this mistake, stop the application’s execution in Xcode, uninstall the app from the iOS Simulator, and then run it again. This forces it to prompt for location information again.
Using the Magnetic Compass
The iPhone 3GS was the first iOS device to include a magnetic compass. Since its introduction, the compass has been added to the iPad. It is used in Apple’s Compass application and in the Maps application (to orient the map to the direction you are facing). The compass can also be accessed programmatically within iOS, which is what we look at now.
Implementation Overview
As an example of using the compass, we are going to enhance the Cupertino application and provide the users with a left, right, or straight-ahead arrow to get them pointed toward Cupertino. As with the distance indicator, this is a limited look at the potential applications for the digital compass. As you work through these steps, keep in mind that the compass provides information much more accurate than what we’re indicating with three arrows.
Setting Up the Project
Depending on your comfort level with the project steps we’ve already completed this hour, you can continue building this directly off the existing Cupertino application or create a copy. You’ll find a copy of Cupertino Compass, which includes the additional compass functionality for comparison, in this hour’s projects folder.
Open the Cupertino application project, and let’s begin by making some additions to support the use of the compass.
Adding the Direction Image Resources
The Images folder that you added to the asset catalog in the Cupertino project contains three arrow images: arrow_up.png, arrow_right.png, and arrow_left.png. If you removed these extra images from your first project (thought you were being clever, didn’t you?), add them back in now.
Planning the Properties and Outlets
To implement our new visual direction indicator, the view controller requires an outlet to an image view (UIImageView) to show the appropriate arrow. We’ll name this directionArrow.
We also need the last location that we were at, so we create another private property (also strong) called self.recentLocation. We need to store this because we’ll be doing a calculation on each heading update that uses the current location. We implement this calculation in a new method called headingToLocation:current.
Adding Radian/Degree Conversion Constants
Calculating a relative direction requires some rather complicated math. The good news is that someone has already written the formulas we need. To use them, however, we need to be able to convert between radians and degrees.
Add two constants to ViewController.m, following the latitude and longitude for Cupertino. Multiplying by these constants allows us to easily perform our conversions:
#define kDeg2Rad 0.0174532925
#define kRad2Deg 57.2957795
Updating the User Interface
To update our application for the compass, we need to add a new image view to the interface, as follows:
1. Open the Main.storyboard file and the Object Library.
2. Drag an image view (UIImageView) onto the interface, positioning it above the waiting view.
3. Using the Attributes Inspector (Option-Command-4), set the image for the view to up_arrow.
4. We’ll be setting this dynamically in code, but choosing a default image helps with designing the view.
5. Use the Attributes Inspector to configure the image view as hidden; you can find this in the Drawing settings of the View section of the attributes. We don’t want to show a direction until we’ve calculated one.
6. Using the Size Inspector (Option-Command-5), set the width and height of the image view to be 150 points × 150 points.
7. Adjust the view so that it is centered nicely on the screen and not overlapping the “waiting” view. Feel free to shift things around as you see fit.
My final UI resembles Figure 21.5.
Creating and Connecting the Outlet
When finished with your interface, switch to the assistant editor and make sure that ViewController.m is showing on the right. We need to make a single connection for the image view we just added. Control-drag from the image view to just below the last @property line in ViewController.m. When prompted, create a new outlet named directionArrow.
We can now wrap up our app by implementing heading updates. Switch back to the standard editor and open the ViewController.m implementation file.
Updating the Application Logic
To finish the project, we must do four things:
1. We need to ask our location manager instance to start updating us whenever it receives a change in heading.
2. We need to store the current location whenever we get an updated location from Core Location so that we can use the most recent location in the heading calculations.
3. We must implement logic to get a heading between our current location and Cupertino.
4. When we have a heading update, we need to compare it to the calculated heading toward Cupertino and change the arrow in the UI if any course adjustments need to be made.
Starting Heading Updates
Before asking for heading updates, we should check with the location manager to see whether heading updates are available via the class method headingAvailable. If heading updates aren’t available, the arrow images are never shown, and the Cupertino application works just as before. If headingAvailable returns YES, set the heading filter to 10 degrees of precision and start the updates with startUpdatingHeading. Update the viewDidLoad method of the ViewController.m file, as shown in Listing 21.8.
LISTING 21.8 Requesting Heading Updates
1: - (void)viewDidLoad
2: {
3: [super viewDidLoad];
4:
5: self.locMan = [CLLocationManager new];
6: self.locMan.delegate = self;
7: self.locMan.desiredAccuracy = kCLLocationAccuracyThreeKilometers;
8: self.locMan.distanceFilter = 1609; // a mile
9: [self.locMan startUpdatingLocation];
10:
11: if ([CLLocationManager headingAvailable]) {
12: self.locMan. headingFilter = 10; // 10 degrees
13: [self.locMan startUpdatingHeading];
14: }
15: }
The squeaky-clean new code just takes up four lines. In line 11, we check to see whether a heading is available. If one is, we ask to be updated only if a change in heading is 10 degrees or more (line 12). In line 13, the location manager instance is asked to start updating us when there are heading changes. If you’re wondering why we didn’t just set a delegate, it’s because the location manager already has one set from our earlier code in line 6. This means that our class must handle both location updates and heading updates.
Storing the Recent Location
To store the recent location, we need to declare a new property that we can use in our methods; this, like the location manager, should be another private property with the strong attribute. Locations are managed as objects of type CLLocation; we’ll name ours recentLocation. Update the @interface block at the top of ViewController.m to include this new property. The block should now read as follows:
@interface ViewController ()
@property (weak, nonatomic) IBOutlet UILabel *distanceLabel;
@property (weak, nonatomic) IBOutlet UIView *waitView;
@property (weak, nonatomic) IBOutlet UIView *distanceView;
@property (weak, nonatomic) IBOutlet UIImageView *directionArrow;
@property (strong, nonatomic) CLLocationManager *locMan;
@property (strong, nonatomic) CLLocation *recentLocation;
@end
Next, we need to add a line to set self.recentLocation to the value of newLocation in the locationManager:didUpdateLocation:fromLocation method. We should also stop updating the heading if we are within 3 miles of the destination, just as we stopped updating the location. Listing 21.9 shows these two changes to the locationManager:didUpdateLocation: fromLocation method.
LISTING 21.9 Storing the Recently Received Location for Later Use
1: - (void)locationManager:(CLLocationManager *)manager
2: didUpdateToLocation:(CLLocation *)newLocation
3: fromLocation:(CLLocation *)oldLocation {
4:
5: if (newLocation.horizontalAccuracy >= 0) {
6:
7: // Store the location for use during heading updates
8: self.recentLocation = newLocation;
9:
10: CLLocation *Cupertino = [[CLLocation alloc]
11: initWithLatitude:kCupertinoLatitude
12: longitude:kCupertinoLongitude];
13: CLLocationDistance delta = [Cupertino
14: distanceFromLocation:newLocation];
15: long miles = (delta * 0.000621371) + 0.5; // meters to rounded miles
16: if (miles < 3) {
17: // Stop updating the location and heading
18: [self.locMan stopUpdatingLocation];
19: [self.locMan stopUpdatingHeading];
20: // Congratulate the user
21: self.distanceLabel.text = @"Enjoy the
Mothership!";
22: } else {
23: NSNumberFormatter *commaDelimited = [NSNumberFormatter new];
24: [commaDelimited setNumberStyle:NSNumberFormatterDecimalStyle];
25: self.distanceLabel.text = [NSString stringWithFormat:
26: @"%@ miles to the
Mothership",
27: [commaDelimited stringFromNumber:
28: [NSNumber numberWithLong:miles]]];
29: }
30: self.waitView.hidden = YES;
31: self.distanceView.hidden = NO;
32: }
33: }
The only changes from the previous tutorial are the addition of line 8, which stores the incoming location in self.recentLocation, and line 19, which stops heading updates if we are sitting in Cupertino.
Calculating the Heading to Cupertino
In the previous two sections, we avoided doing calculations with latitude and longitude. This time, it requires just a bit of computation on our part to get a heading to Cupertino and then to decide whether that heading is straight ahead or requires the user to spin to the right or to the left.
Given two locations such as the user’s current location and the location of Cupertino, it is possible to use some basic geometry of the sphere to calculate the initial heading the user would need to use to reach Cupertino. A search of the Internet quickly finds the formula in JavaScript (copied here in the comment), and from that we can easily implement the algorithm in Objective-C and provide the heading. We add this as a new method, headingToLocation:current, that takes two locations and returns a heading that can be used to reach the destination from the current location.
Begin by adding a method prototype to ViewController.m. This isn’t strictly necessary, but it is good form and will help you avoid warnings in Xcode. Why ViewController.m and not ViewController.h? Because it’s a method we consider “private,” and we only want it to be used within the ViewController class (not advertised to the world in the ViewController.h file). Add these lines after the property definitions:
-(double)headingToLocation:(CLLocationCoordinate2D)desired
current:(CLLocationCoordinate2D)current;
The final @interface block at the top of ViewController.m should now resemble the following:
@interface ViewController ()
@property (weak, nonatomic) IBOutlet UILabel *distanceLabel;
@property (weak, nonatomic) IBOutlet UIView *waitView;
@property (weak, nonatomic) IBOutlet UIView *distanceView;
@property (weak, nonatomic) IBOutlet UIImageView *directionArrow;
@property (strong, nonatomic) CLLocationManager *locMan;
@property (strong, nonatomic) CLLocation *recentLocation;
-(double)headingToLocation:(CLLocationCoordinate2D)desired
current:(CLLocationCoordinate2D)current;
@end
Next, add the headingToLocation:current method to the ViewController.m file as in Listing 21.10.
LISTING 21.10 Calculating a Heading to a Destination
/*
* According to Movable Type Scripts
* http://mathforum.org/library/drmath/view/55417.html
*
* Javascript:
*
* var y = Math.sin(dLon) * Math.cos(lat2);
* var x = Math.cos(lat1)*Math.sin(lat2) -
* Math.sin(lat1)*Math.cos(lat2)*Math.cos(dLon);
* var brng = Math.atan2(y, x).toDeg();
*/
-(double)headingToLocation:(CLLocationCoordinate2D)desired
current:(CLLocationCoordinate2D)current {
// Gather the variables needed by the heading algorithm
double lat1 = current.latitude*kDeg2Rad;
double lat2 = desired.latitude*kDeg2Rad;
double lon1 = current.longitude;
double lon2 = desired.longitude;
double dlon = (lon2-lon1)*kDeg2Rad;
double y = sin(dlon)*cos(lat2);
double x = cos(lat1)*sin(lat2) - sin(lat1)*cos(lat2)*cos(dlon);
double heading=atan2(y,x);
heading=heading*kRad2Deg;
heading=heading+360.0;
heading=fmod(heading,360.0);
return heading;
}
Don’t worry about the math here. I didn’t make it up, and there’s no reason you need to understand it. What you do need to know is that, given two locations—one current and one desired (the destination)—this method returns a floating-point number in degrees. If the returned value is 0, we need to head north to get where we’re going. If it’s 180, we need to go south (and so on).
If you’re interested in the history of the process and how it works, look up “great circle navigation” on your search engine of choice.
Handling Heading Updates
The last piece of our implementation is handling heading updates. The ViewController class implements the CLLocationManagerDelegate protocol, and as you learned earlier, one of the optional methods of this protocol, locationManager:didUpdateHeading, provides heading updates anytime the heading changes by more degrees than the headingFilter amount.
For each heading update our delegate receives, we should use the user’s current location to calculate the heading to Cupertino, compare the desired heading to the user’s current heading, and then display the correct arrow image: left, right, or straight ahead.
For these heading calculations to be meaningful, we need to have the current location and some confidence in the accuracy of the reading of the user’s current heading. We check these two conditions in an if statement before performing the heading calculations. If this sanity check does not pass, we hide the directionArrow.
Because this heading feature is more of a novelty than a true source of directions (unless you happen to be a bird or in an airplane), there is no need to be overly precise. Using +/–10 degrees from the true heading to Cupertino as close enough to display the straight-ahead arrow. If the difference is greater than 10 degrees, we display the left or right arrow based on whichever way would result in a shorter turn to get to the desired heading. Implement the locationManager:didUpdateHeading method in the ViewController.m file, as shown in Listing 21.11.
LISTING 21.11 Handling the Heading Updates
1: - (void)locationManager:(CLLocationManager *)manager
2: didUpdateHeading:(CLHeading *)newHeading {
3:
4: if (self.recentLocation != nil && newHeading.headingAccuracy >= 0) {
5: CLLocation *cupertino = [[CLLocation alloc]
6: initWithLatitude:kCupertinoLatitude
7: longitude:kCupertinoLongitude];
8: double course = [self headingToLocation:cupertino.coordinate
9: current:self.recentLocation.coordinate];
10: double delta = newHeading.trueHeading - course;
11: if (abs(delta) <= 10) {
12: self.directionArrow.image = [UIImage imageNamed:
13: @"up_arrow.png"];
14: }
15: else
16: {
17: if (delta > 180) {
18: self.directionArrow.image = [UIImage imageNamed:
19: @"right_arrow.png"];
20: }
21: else if (delta > 0) {
22: self.directionArrow.image = [UIImage imageNamed:
23: @"left_arrow.png"];
24: }
25: else if (delta > -180) {
26: self.directionArrow.image = [UIImage imageNamed:
27: @"right_arrow.png"];
28: }
29: else {
30: self.directionArrow.image = [UIImage imageNamed:
31: @"left_arrow.png"];
32: }
33: }
34: self.directionArrow.hidden = NO;
35: } else {
36: self.directionArrow.hidden = YES;
37: }
38: }
We begin in line 4 by checking to see whether we have valid information stored for self.recentLocation and a meaningful heading accuracy. If these conditions aren’t true, the method hides the directionArrow image view in line 36.
Lines 5–7 create a new CLLocation object that contains the location for Cupertino. We use this for getting a heading from our current location (stored in self.recentLocation) in lines 8–9. The heading that would get us to our destination is stored as a floating-point value in course.
Line 10 is a simple subtraction, but it is the magic of the entire method. Here we subtract the course heading we calculated from the one we’ve received from core location (newHeading.trueHeading). This is stored as a floating-point number in the variable delta.
Let’s think this through for a second. If the course we should be going in is north (heading 0) and the heading we’re actually going in is also north (heading 0), the delta is 0, meaning that we do not need to make a course correction. However, if the course we want to take is east (a heading of 90), and the direction we are going in is north (a heading of 0), the delta value is –90. Need to be headed west but are traveling east? The delta is –270, and we should turn toward the left. By looking at the different conditions, we can come up with ranges of delta values that apply to the different directions. This is exactly what happens in lines 11–33. You can try the math yourself if you need convincing. Line 11 is a bit different; it checks the absolute value of delta to see whether we’re off by more than 10 degrees. If we aren’t, the arrow keeps pointing forward.
Note
We don’t have a backward-pointing arrow here, so any course correction needs to be made by turning left or right. Understanding this can be helpful in seeing why we compare the delta value to greater than 180 and greater than –180 rather than greater than or equal to. 180/–180 is exactly in the opposite direction we’re going, so left or right is ambiguous. Up until we reach 180/–180, however, we can provide a turn direction. At exactly 180, the else clause in line 29 kicks in and we turn left. Just because.
Building the Application
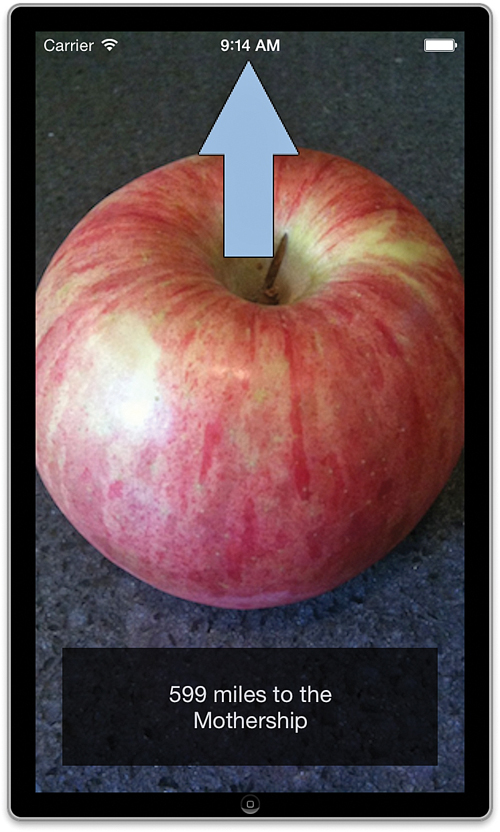
Run the project. If you have a device equipped with an electromagnetic compass, you can now spin around in your office chair and see the arrow images change to show you the heading to Cupertino (see Figure 21.6). If you run the updated Cupertino application in the iOS Simulator, you might not see the arrow; heading updates seem to be hit or miss in the Simulator. Usually miss.
Further Exploration
In the span of an hour, you covered a great deal of what Core Location has to offer. I recommend that you spend time reviewing the Core Location Framework Reference as well as the Location Awareness Programming Guide, both of which are accessible through the Xcode documentation.
In addition, I greatly recommend reviewing Movable Type Scripts documentation on latitude and longitude functions (http://www.movable-type.co.uk/scripts/latlong.html). Although Core Location provides a great deal of functionality, there are some things (such as calculate a heading/bearing) that it just currently cannot do. The Movable Type Scripts library should give you the base equations for many common location-related activities.
Summary
In this hour, you worked with the powerful Core Location toolkit. As you saw in the application example, this framework can provide detailed information from an iDevice’s GPS and magnetic compass systems. Many modern applications use this information to provide data about the world around the user or to store information about where the user was physically located when an event took place.
You can combine these techniques with the Map Kit from the previous hour to create detailed mapping and touring applications.
Q&A
Q. Should I start receiving heading and location updates as soon as my application launches?
A. You can, as we did in the tutorial, but be mindful that the hardware’s GPS features consume quite a bit of battery power. After you establish your location, turn off the location/heading updates.
Q. Why do I need that ugly equation to calculate a heading? It seems overly complicated.
A. If you imagine two locations as two points on a flat grid, the math is easier. Unfortunately, the Earth is not flat but a sphere. Because of this difference, you must calculate distances and headings using the great circle (that is, the shortest distance between two points on a curved surface).
Q. Can I use Core Location and Map Kit to provide turn-by-turn directions in my application?
A. Yes and no. You can use Core Location and Map Kit as part of a solution for turn-by-turn directions, and some developers do this, but they are not sufficiently functional on their own. In short, you have to license some additional data to provide this type of capability.
Workshop
Quiz
1. True north and magnetic north are the same thing. True or false?
2. What can be done to limit the drain on battery life when using Core Location?
3. Explain the role of these important classes: CLLocationManager, CLLocationManagerDelegate, and CLLocation.
Answers
1. False. Magnetic fields vary and are not exactly aligned with true (geographic) north. The error between the two is called declination.
2. Use the distanceFilter and headingFilter properties of CLLocationManager to get updates only as frequently as your application can benefit from them. Use the stopUpdatingLocation and stopUpdatingHeading methods of CLLocationManager to stop receiving the updates as soon as you no longer need them.
3. A CLLocationManager instance provides the basis of the interaction with Core Location services. A location manager delegate, implementing the CLLocationManegerDelegate protocol, is set on the CLLocationManager instance, and that delegate receives location/heading updates. Location updates come in the form of a pair of CLLocation objects, one providing the coordinates of the previous location, and the other providing the coordinates of the new location.
Activities
1. Adopt the Cupertino application to be a guide for your favorite spot in the world. Add a map to the view that displays your current location.
2. Identify opportunities to use the location features of core location. How can you enhance games, utilities, or other applications with location-aware features?