Hour 1. Overview of the Developer Program
What You’ll Learn in This Hour
![]() Exploring Objective-C
Exploring Objective-C
![]() Gaining access to Apple’s developer program and its tools
Gaining access to Apple’s developer program and its tools
![]() Exploring Xcode and its workspace window
Exploring Xcode and its workspace window
Introducing Objective-C
Objective-C was developed in the early 1980s by Brad Cox and Tom Love. It was licensed by Steve Jobs’s company, NeXT, in 1988, where it was used to develop the first two key frameworks of the NeXTSTEP operating system—Application and Foundation Kits. When Apple purchased NeXT in 1996, the projects moved to Cupertino, California. At Apple, NeXTSTEP became Rhapsody and then morphed into OS X; since then, another transformation led it to become the iPhone OS and then iOS (it was becoming too difficult to explain to people why the iPad used the iPhone OS). You can find Application Kit (AppKit) in the operating systems today along with a direct descendant of the Foundation Kit—Core Foundation.
One of the primary purposes of Objective-C was to prove that it was not difficult to add object-oriented programming capabilities to the C programming language. Objective-C was envisioned as a lightweight superset of C, and that is what was implemented.
This cursory summary of 30 years of Objective-C brings you up to date on some of the key points in the evolution of Objective-C. Looking at Objective-C today, some of the high points (and, at the time, often much-debated and contentious issues) are not relevant to many people. Rather than looking back, you (and this book) can focus on the present and the future.
Note
It is important to consider why people learn Objective-C today. The primary reason to learn Objective-C today is because you want to write apps for OS X or iOS.
Writing apps for OS X or iOS is the reason to learn Objective-C, but Objective-C is not all you need. You also need the Xcode development tool. If you want to test on iOS devices or submit apps to the Mac App Store or the App Store, you need to register as a developer with Apple. With those items, you are ready to get started developing for OS X or iOS.
Enrolling as an Apple Developer
Most of the time, you register as a developer at developer.apple.com. The terms and conditions vary from country to country, and they have changed and will probably continue to change as Apple’s business changes. You need to choose your program and then select the type of enrollment you want. Certain program resources, such as basic documentation, do not require registration or enrollment, and they are available to anyone with a web browser. You can easily see what is available by going to developer.apple.com and not logging in.
Tip
If you see “Hi, Guest” on many pages, you are not logged in. If you are greeted by name, then a cookie has been used to log you in and you see resources that might not be available to unregistered guests.
For a personal account, the entire process is automated so you can be enrolled in a matter of minutes as long as you have a credit card handy to pay the basic program fee of $99 per year for a Mac OS or iOS membership.
Note: How Old Do You Have to Be to Enroll?
You must be at least the age of majority in the country where you live. The age of majority in many countries is 18. In part, this is because you need to accept a legal agreement with regard to the conditions of the enrollment. If you are younger than the age of majority, keep reading: There are ways to legally enroll and get to work.
Choosing Your Program
There are three developer programs. Each program has a Dev Center with sample code and demos. In addition, there is a developer library for each program with videos, references, guides, examples, and other documentation. Access to each of these programs depends on the level of enrollment you have. You do not need a paid registration to access the basic reference information for any of these programs. However, as you see in the following section, paid enrollments in the Mac OS and iOS programs give you more access.
![]() Mac—The basic membership is $99 per year.
Mac—The basic membership is $99 per year.
![]() iOS—The basic membership is $99 per year.
iOS—The basic membership is $99 per year.
![]() Safari—This program is free.
Safari—This program is free.
The basic membership adds access to beta software, developer discussion boards, and an invitation to purchase tickets for developer events such as Apple’s Worldwide Developer Conference (WWDC). In the last several years, basic members have also been able to access videos of most of the WWDC sessions without an additional charge through iTunes.
The Mac OS and iOS programs include the ability to submit apps to the relevant App Store. With the iOS program, it also includes the ability to use the software simulator for iPhone or iPad apps. In addition, two technical support incidents are provided in the annual membership; you can buy more for $50 each. This support is provided by Apple engineers from the Developer Technical Support (DTS) team. They can help you over a technical hurdle as well as give you assistance in finding your way through the vast array of resources on developer.apple.com.
Tip: DTS Support
It is important to note that DTS does not provide support for prereleased (beta) software. However, the developer discussion boards are particularly helpful with problems of that kind; Apple engineers provide technical support in that forum to all registered developers who are interested in a particular topic. DTS support is separate from bug reporting: It is support for your use of Apple’s software.
Tip: Watch Your DTS Calendar
If you do not use them, your technical support incidents expire at the end of your membership year. You can check your status on http://developer.apple.com in the Member Section. If you find yourself with an unused technical support incident, you might want to ask one of those questions you have always thought of asking someday, even if it is not relevant to a project you are working on at the moment.
Selecting Your Membership Category
The Mac OS and iOS programs let you register in various categories. The categories change from time to time; you can find an overview of the current categories and programs at developer.apple.com/programs/. These are the categories as of the writing of this book:
![]() Personal—This is the category most people use. It registers you as a person. As noted, you must be over the age of majority in the country where you live. You are able to build apps and submit them to the appropriate App Store. You also get the resources that let you test your app on iOS devices rather than just on the software simulator that runs on your Mac. To install your test app on an iOS device with a personal membership, that device’s identification must be entered into your Xcode environment.
Personal—This is the category most people use. It registers you as a person. As noted, you must be over the age of majority in the country where you live. You are able to build apps and submit them to the appropriate App Store. You also get the resources that let you test your app on iOS devices rather than just on the software simulator that runs on your Mac. To install your test app on an iOS device with a personal membership, that device’s identification must be entered into your Xcode environment.
![]() Business—A business membership enables you to add other registered developers to your team so that they can install test apps through their own accounts. This solves the problem of working with someone who is far away when you both are working on the same iOS app. Note that the teams you set up are for each app you work on; you give access to other developers only to the app you want them to use. The cost is $99 per year. You can convert a personal membership to a business membership if you are eligible. This requires additional documentation and review by Apple as described on developer.apple.com.
Business—A business membership enables you to add other registered developers to your team so that they can install test apps through their own accounts. This solves the problem of working with someone who is far away when you both are working on the same iOS app. Note that the teams you set up are for each app you work on; you give access to other developers only to the app you want them to use. The cost is $99 per year. You can convert a personal membership to a business membership if you are eligible. This requires additional documentation and review by Apple as described on developer.apple.com.
Note: Eligibility for Business Memberships
Check with developer.apple.com to see if you are eligible for a business membership. In the United States at this time, businesses that are organized as sole proprietorships (doing business as or DBA businesses) are not eligible for business memberships. Partnerships and corporations (including Subchapter-S corporations) are eligible.
![]() University Team (iOS only)—This program allows an instructor at a university to set up a team for up to 200 students. It is available to degree-granting institutions of higher learning. The program is free.
University Team (iOS only)—This program allows an instructor at a university to set up a team for up to 200 students. It is available to degree-granting institutions of higher learning. The program is free.
Tip
This is the route to follow if you are under the age of majority (in most countries, younger than 18).
![]() Enterprise Program (iOS only)—This program enables you to develop and distribute apps within your organization without going through the App Store. The cost is $299 per year.
Enterprise Program (iOS only)—This program enables you to develop and distribute apps within your organization without going through the App Store. The cost is $299 per year.
Registering for Your Apple ID
You need an Apple ID to identify yourself. If you have an iTunes account, you have an Apple ID. You have an Apple ID if you had a Mobile Me account or now have an iCloud account. There is no charge for an Apple ID. You can have multiple Apple IDs. In fact, you may be required to do so: If you publish on iBooks, you need an Apple ID—and you cannot use it for the App Store so you will need to create a separate one.
Setting Up the Development Environment
The heart of your development environment for Objective-C is Xcode, the Integrated Development Environment (IDE) running on your Mac. Even if you have not registered for a developer program, you can freely download it from the Mac App Store. (If you want unreleased beta versions of Xcode, you must be a registered developer, but much of the documentation is available in the public sections of developer.apple.com.)
Your development environment includes Xcode and its Objective-C language. It also includes frameworks such as Cocoa (on OS X) and Cocoa Touch (on iOS). This book focuses specifically on Objective-C, so although examples often use the various frameworks, they are not described in any detail except for their use in Objective-C code.
Talking Xcode
You build projects with Xcode. A project is normally a fully contained set of files that can be moved from one location or computer to another. You can see this as you explore developer.apple.com with its sample code projects. You can download each one and place it anywhere you want on your computer, build it, and run it. You can change settings to make a project access specific files in your environment, but that comes at the expense of portability.
If you need to manage your source code, Xcode has a subset of Git and Subversion commands integrated into its interface. You cannot do every detailed task that Git or Subversion provides with the Xcode commands, but you can certainly do the important source version control tasks. In fact, many people do not even know what is not implemented in the Xcode interface to Git because they simply do not use commands beyond the basics.
Note: About Git
As noted on the Git website at http://git-scm.com/, Git is a fast version control system. It is free and open source, supporting distributed development, branching and merging, and other modern source code version control tools.
Xcode comes with a variety of project templates for iOS and Mac OS. These are built in and are separate from the examples you can download from developer.apple.com. Whereas the examples downloadable from developer.apple.com are fully implemented projects you can use as models, the built-in templates are starting points. Many of them work without any further effort on your part, but what they do is provide a starting place for you to build on. For example, the Cocoa Application template for OS X puts up an empty window and a menu bar with basic commands.
![]() Deployment target—This is the earliest version of the SDK for which the project is targeted.
Deployment target—This is the earliest version of the SDK for which the project is targeted.
![]() Configurations—Most projects have at least a debug and release configuration from the start. You can add or delete others.
Configurations—Most projects have at least a debug and release configuration from the start. You can add or delete others.
![]() Localizations—You can use localization to translate your project into various languages. Localization is built into the Cocoa and Cocoa Touch frameworks.
Localizations—You can use localization to translate your project into various languages. Localization is built into the Cocoa and Cocoa Touch frameworks.
Targets
Each project starts with a single target; you can add new ones. A target is usually an app. Each target can have its own identifier and version number along with its own icons, bundles, and so forth. Some of the Mac OS templates provide a target for users along with another target that is built for Spotlight to use. In many cases, there is no need to distinguish between a project and its target if there is only one target.
For iOS projects, you can specify the device (or universal to build for both iPad and iPhone). On OS X as well as iOS, you specify the user interface for the target.
An increasingly common use of targets is to create an Xcode project with one target for iOS and another for OS X. Both targets can share some common code so that you can easily maintain a project with apps for both platforms.
Introducing the Xcode Workspace
Xcode uses a complex workspace window that packs a great deal of information into a compact and flexible interface. On Mavericks OS X 10.9, the full-screen option from the View menu or the full-screen button at the top right of a traditional window is a good choice with Xcode 5—at least at the beginning.
Because the Xcode workspace window can be configured in many different ways, the first step to understanding the tool that you will be working with is to look at the workspace window components. This section begins with an introduction to those components and then continues with a Try It Yourself activity for you to experiment with.
Note that the sequence of figures in this section is designed to introduce you to the workspace window. If you launch Xcode, you are greeted by a splash screen (probably—it’s an option) and by a project window that will likely look similar to one of the later figures in this sequence. But to get started, look at Figure 1.1, which shows you an editing window that might be familiar to you from other editing environments.
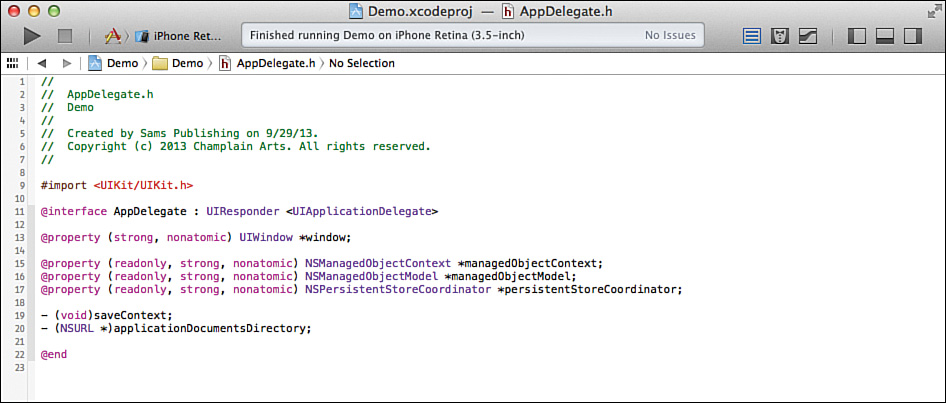
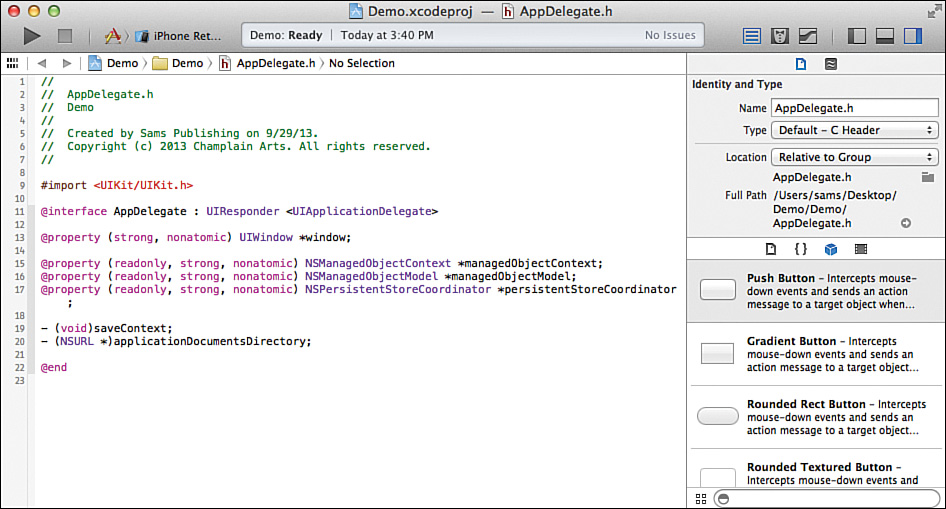
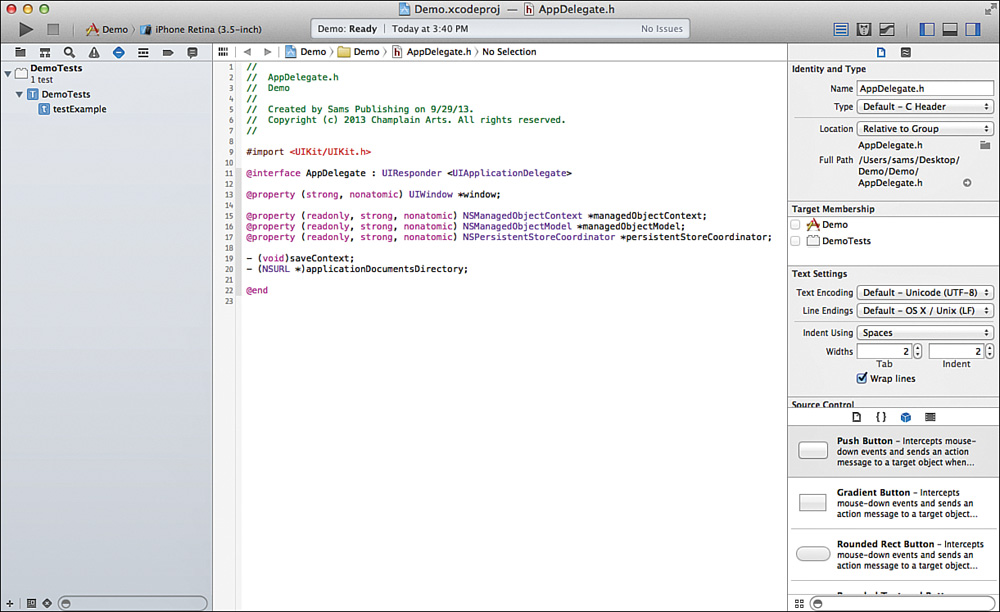
Almost everything in this window is configurable—the fonts, the colors, and the presence of absence of line numbers. At the top left, the right-pointing arrow builds and runs your code; the square stops it. Status updates such as “Finished running Demo on iPhone Retina (3.5-inch)” appear in the center of the window. At the top right are two trios of buttons. The rightmost set controls the optional panes of the window that you can show and hide. (Don’t worry: The rest of the interface is explained later on in this hour.) The button on the left of this trio controls the navigator. Use it to show and hide the navigator at the left of the window, as shown in Figure 1.2.
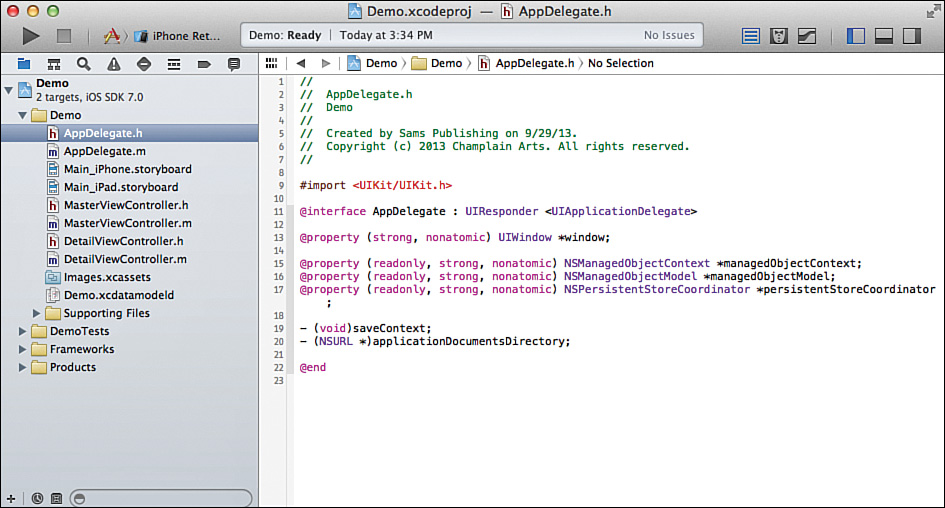
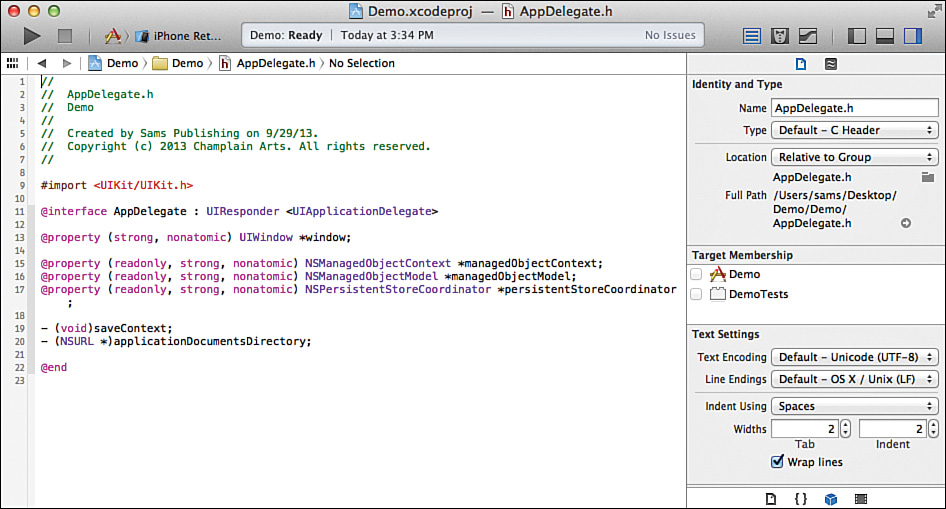
You can hide the navigator with another click of the mouse. Click on the rightmost of those buttons to show the utilities area, as shown in Figure 1.3.
The utilities area has two configurable panes. Drag the top of the library pane up from the bottom to show both utilities and the library, as shown in Figure 1.4.
You can resize the window, as shown in Figure 1.5.
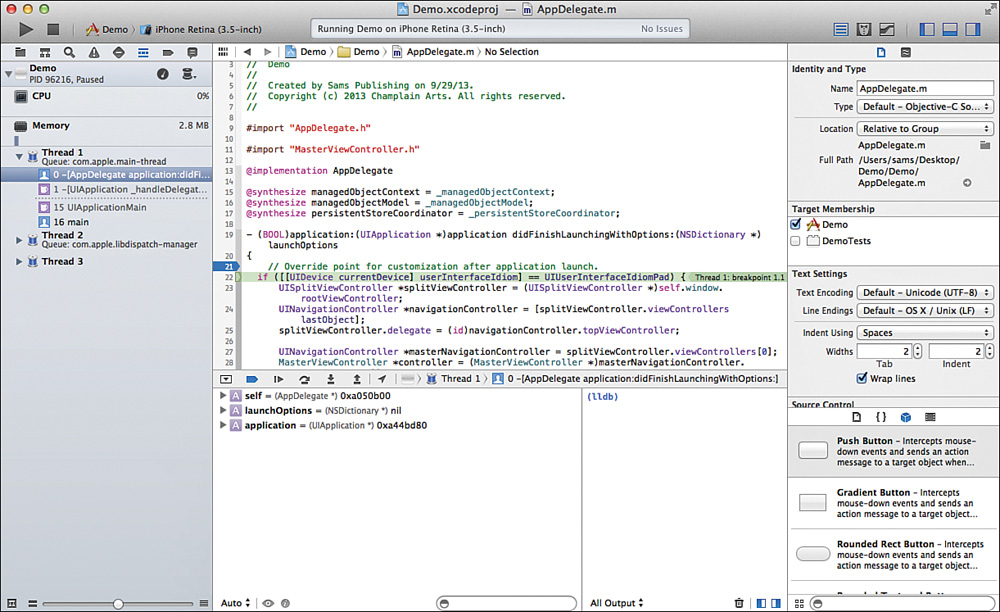
If your code listing is short, there will be blank space at the bottom. Click the central button of the trio to bring up the debug pane, as shown in Figure 1.6. You’ll notice that the navigator has changed. That’s because Figure 1.6 shows the workspace window as it typically is when you are running your app (using the right-pointing triangle in the top left of the window).
You now have an overview that should let you create your first project.
Getting Up and Running with Your First Project
The best way to find out more about using Xcode is to use one of the built-in templates. Build and run it, and you have a basic app on which you can build your own functionality. From the standpoint of this book, what you have is a large amount of Objective-C code that you can study and work with as you read on.
Try it Yourself: Create Your First Project
1. Create a new project from one of the built-in templates. You might see a splash screen with the option to do that as soon as you launch Xcode. That splash screen also lets you turn it off in the future, which is why you might not see it. In any case, you can use File, New, New Project to open the sheet shown in Figure 1.7.
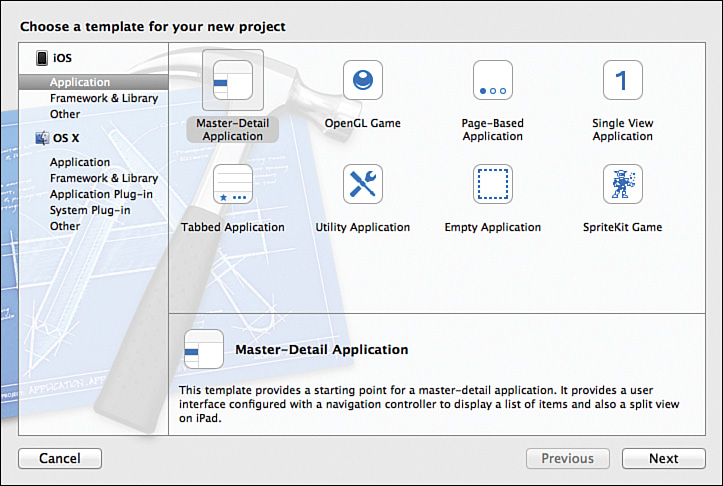
In these steps, the template used is the iOS Master-Detail Application template from the iOS section. You are asked to name the project and choose the folder where it will be created. Don’t bother with any of the other sections.
2. The workspace window opens.
3. Explore your project. Show and hide the parts of the workspace window.
4. Use the right-pointing triangle at the top of the window to run your project. Just to the right of the right-pointing triangle and the square, you’ll find buttons that let you choose how to run it: Choose one of the simulators (it doesn’t matter which one).
Summary
This hour has provided an overview of Objective-C and how it fits into your development environment along with the Cocoa and Cocoa Touch frameworks and Xcode. Objective-C is a superset of C so it builds on everything in C adding just what is necessary to create a full-featured object-oriented environment.
You have also seen the basics of Xcode—the tool you’ll use to build your code, your interface, and even set your app’s icons and launch images.
Q&A
Q. How do you start writing apps for iOS and OS X if you are too young to be a registered developer?
A. You have two routes available to you. If you attend a school that is eligible for the University Developer Program, you might be able to join through them. Otherwise, you can browse developer.apple.com and read the documentation. Go to the Mac App Store and buy Xcode so you can start writing code. (Even though Xcode is free, the store transactions always use the word buy.) You are neither able to place your apps in either the Mac App Store or the original App Store for iOS apps nor test on iOS devices, but you can hone your skills and develop apps that can be used to showcase your skills.
Q. What are the best settings for Xcode preferences?
A. Use whatever is most comfortable for you. As you are getting used to Xcode, one strategy is to create a new user account in System Preferences. Remember that Xcode is installed so that all users on a computer can use it. This enables you to use your test account to explore the preferences. When you find some preferences that you like, move them to your main account. You can even delete the test account at that time. However, most people who use Xcode a lot constantly adjust the workspace depending on what project they are doing and what part of the project they are working on.
Workshop
Quiz
1. How do you get a copy of Xcode?
2. How do you control the workspace window?
Quiz Answers
1. Register at developer.apple.com. There are various registration categories that are designed for different types of developers. The paid levels of developer registration include technical support assistance (two incidents for the basic programs). The developer programs often let you download prerelease versions of Xcode, the operating systems, and other software. You can buy the shipping version of Xcode for free from the Mac App Store.
2. Control the workspace window with buttons in the toolbar, menu commands, and preferences.
Activities
Even though you may be chomping at the bit to start writing your own Objective-C code, take the time to explore several Xcode templates (at least two). Get used to the workspace window, and make certain to build them with the settings before you have modified them. In the case of the basic OS X Cocoa application (the basis for most of your OS X work), the basic template puts up an empty window. It is supposed to do that, so do not think you have done something wrong. Your job is to fill that window.