
Chapter Three. Using Two or More Lights Like a Boss!
Two- and Three-Light Recipes That Are Still Pretty Easy
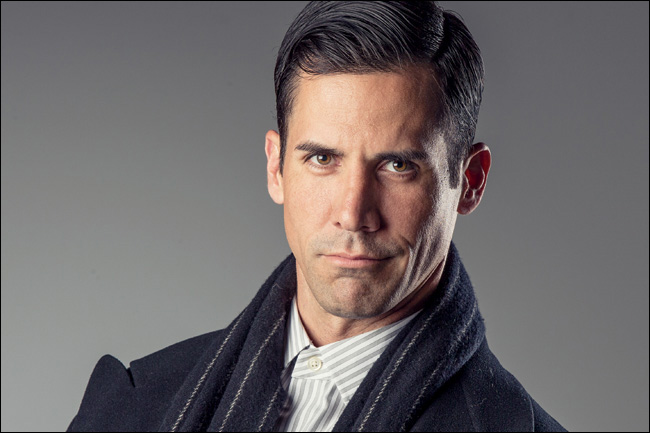
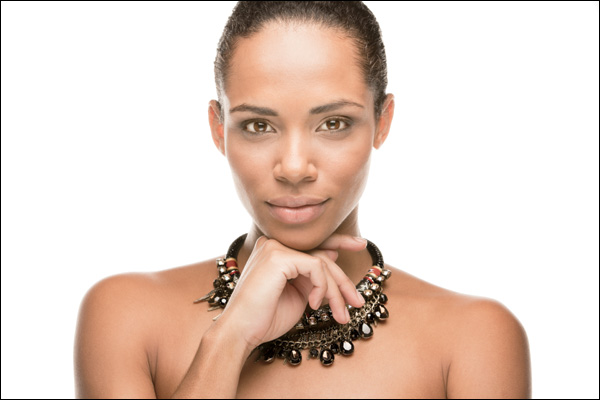
SHUTTER SPEED: 1/750 SEC F-STOP: F/8 ISO: 800 FOCAL LENGTH: 150MM | PHOTOGRAPHER: SCOTT KELBY
How come the title of this chapter says “like a boss” instead of “like a pro”? If you’re even asking that question, that means that you’re Snoop Oldie Old, because if you use that “like a boss” phrase to anyone under the age of 40, they will think you are so cool. But, of course, they don’t use that term “cool” because that’s “uncool.” They use “like a boss!” By the way, if even for a moment you thought that “like a Boss” was some reference to Bruce Springsteen (whose fans call him “The Boss”), then you probably are old enough to be familiar with the phrase “Chairman of the Board” or “Ol’ Blue Eyes,” which are nicknames of one Mr. Francis Albert Sinatra, but you may refer to him as Mr. Sinatra, or if you’re Liza, you can call him “Frank,” but don’t push it. Now, as I mention Ms. Minnelli, I did what we often do when someone’s older and has been out of the spotlight for a while: I wondered aloud, “Is she still alive?” As it turns out, thankfully, she is and she’s not that old—she’s only 68—and by my saying that Liza’s not that old at 68, that should tip you off that perhaps I am no spring chicken myself (despite my silky smooth complexion and otherwise teen-like appearance). My 17-year-old son would say Liza’s “ancient,” but (and this may come as a surprise to you) my son absolutely loves Frank Sinatra. I am not kidding. He has loads of his songs on his iPod, along with Dino and Sammy (right beside Metallica and Falling in Reverse), but because Liza did a duet with Frankie (“I’ve Got the World on a String” from Frank’s Duets album), my son thinks Liza sings “like a boss!” (though if Frank were alive today, he would probably have one of his “fellas” strangle the band members in Metallica and Falling in Reverse for being long-haired punks). Don’t mess with Frank. He is a boss.
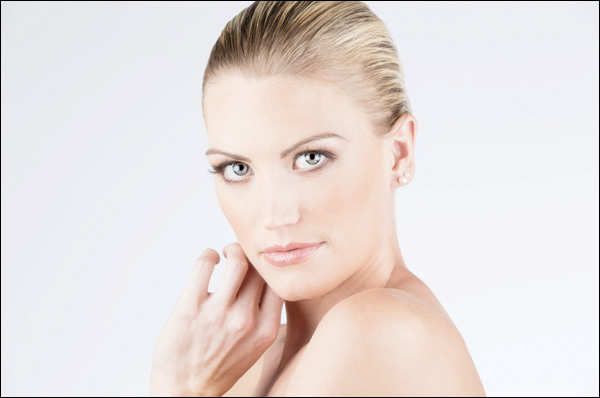
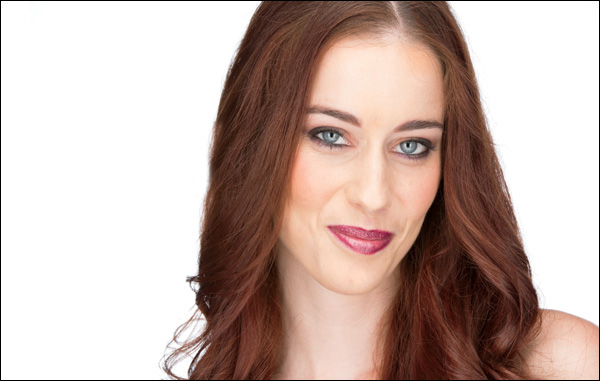
Beauty Look
BEHIND THE SCENES: This shot actually uses one light on the subject (a strobe with a 17" white beauty dish with a diffusion cap over it to soften the light). But since, in this case, I wanted a solid white background, I had to use a second strobe to light the white background. (If you don’t put a bright light on a white background, it becomes a gray background, and if you don’t mind a gray background, then this becomes a one-light shoot.) We are using a special reflector to bounce the light from the beauty dish back onto our subject from below, so it fills in any shadows under her eyes and softens the shadows on her neck. You see this style of lighting a lot in cosmetic ads (hence, the “beauty” name to the look), but it also looks great for just regular headshots of both men and women. The strobe is set at its lowest power setting because it’s so close to our subject.
CAMERA SETTINGS: My f-stop is f/13. Now, normally, I like f/11, but the light was a little too bright and the power on the strobe was already turned all the way down to its lowest setting. Raising the f-stop lowers the amount of overall light, though. It’s kind of like being able to lower the power of the light below its lowest setting. My shutter speed was 1/200 of a second (no particular reason—I usually use 1/125 of a second, but the dial probably got bumped at some point). I’m in the studio, so I’m using my camera’s lowest, cleanest ISO (100 ISO), and I’m using a 70–200mm f/2.8 lens at 100mm.
Final Image

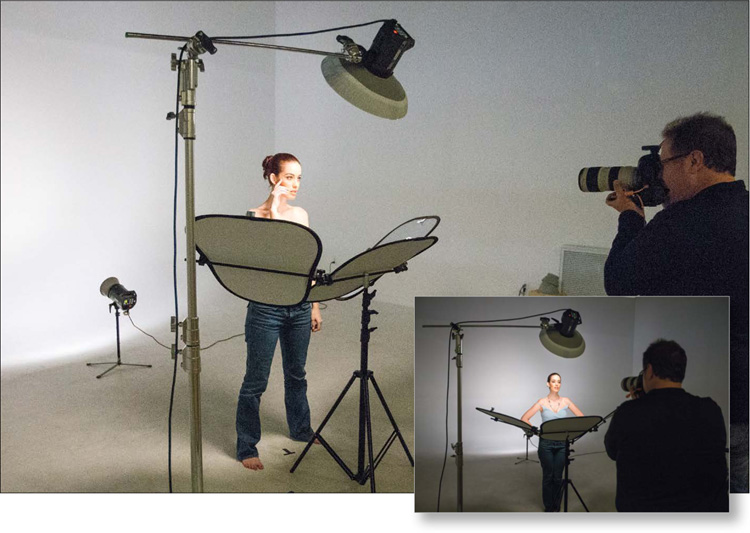
THOUGHT PROCESS: We don’t need a second main light on our subject because we’re using an incredibly handy reflector system from Lastolite called the Triflector MK II, which is basically three individual reflectors mounted on one stand. The advantage is you can control each of the three reflectors individually, so you can wrap your subject in reflected light. Luckily, it’s fairly affordable (B&H Photo has it for $189 at the time of this writing) and, while it’s very lightweight, it’s well made. Besides the lighting (which is pretty simple—one light directly in front of your subject, and by the way, it does not have to be a beauty dish, as a small softbox will work fine), what really gives you this look is: (1) getting the right subject (not everybody’s facial structure works for the beauty look); (2) once you have the right subject, having her hair pulled back in a tight bun behind her head (you don’t want to see any of it sticking out the sides); (3) having her apply natural-looking makeup; and often (4) having her shoulders bare, like you see here.
POST-PROCESSING: If you’re wondering where the three catch lights from the reflectors are in her eyes, I cloned two of them out in Photoshop using the Clone Stamp tool. (It just looked a little weird to me. Nobody else would probably even notice, but it takes all of two seconds—just two clicks, one over each catch light.) Besides the standard retouching stuff (smoothing skin, removing blemishes, etc.), I did lower the Vibrance amount in Light-room’s Develop module (or Camera Raw) to desaturate her skin a bit, so it looked paler and less brown.
Two-Light Catalog Look (Men)
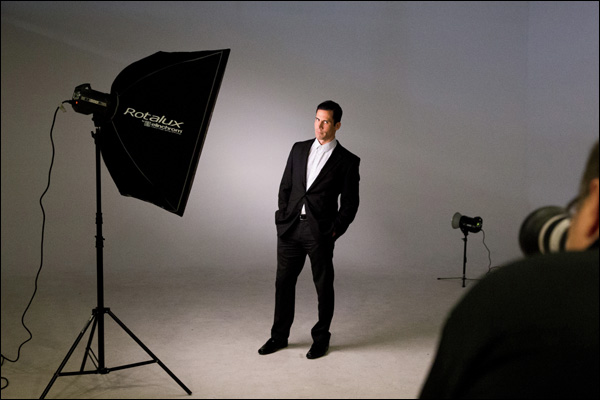
BEHIND THE SCENES: In Chapter 2, you saw how to do a similar look using just one softbox at a 45° angle to the subject, but we let the background be a solid gray color. In this one, we’re adding a background light to add some separation and depth from the background. They sell specially made short light stands for background lights (like the one we’re using here. It’s around $30 at B&H Photo—just go to their site and search for “backlight stands,” and you’ll find a bunch. I have ones by Impact and Manfrotto). When we use a backlight, we attach the metal reflector that comes with the strobe rather than just using the bare bulb. That way, we can control the beam that hits the gray background somewhat. (The front light is far enough away from the background that it doesn’t light the white background, so that falls to gray. Then, we put the background light close enough so it doesn’t turn the whole wall white, but just puts a splash of white light over the gray.) The main light has a 39x39" softbox and is on a light stand positioned up a little higher than our subject, in front and to the side a few feet (it’s not right next to him, but it’s closer to the side of him than normal, so we get lots of dramatic shadows on the far side of his face).
CAMERA SETTINGS: It’s my go-to lens (the 70–200mm f/2.8) at 125mm, at my ideal studio f-stop (f/11), at my lowest, cleanest ISO (100 ISO), but for reasons unknown (I bumped the dial on my camera?) my shutter speed is only 1/50 of a second. Shouldn’t the photo be blurry at just 1/50? Luckily, the flash freezes any motion. Otherwise, it probably would have been.
Final Image

THOUGHT PROCESS: The lighting here is pretty simple (as you saw, there’s just one light on the subject, and one on the background), but the shot on the left is about something more, and it’s something I talk about on my live tour: capturing “real” moments instead of just posed shots. When I’ve shown the shots above to people, they always seem to comment about the shot on the left and they say, “He looks so pensive” or “deep in thought,” but in reality what he’s doing is looking for a black “X” we put on the floor with gaffer’s tape so he’d know where to stand. When I told him that, I still had my eye on my camera’s viewfinder, and when he looked down, I took the shot and got the “real” him before he got back to posing. It’s my favorite shot from the shoot. There are these moments between poses when you’re talking to the subject, or they’re distracted, or you’re intentionally distracting them, and that’s your chance to capture that “moment between the poses.”
POST-PROCESSING: There are two things going on here: (1) the standard portrait retouching for guys (removing blemishes, sharpening, etc.), and (2) the “look,” which comes from adding a cross-processing effect (kind of like a split-tone effect, where you apply one tint to the shadow areas and a different tint to the highlights). I actually use a wildly popular plug-in for this called Nik Color Efex Pro (part of the Nik Collection from Google). I use their Cross Processing filter and their built-in presets. I created a video tutorial for you on how this is applied, as well as a Photoshop/Lightroom split toning version, which you can find on the book’s companion webpage (mentioned in the book’s introduction).
Three-Light Catalog Look (Men)
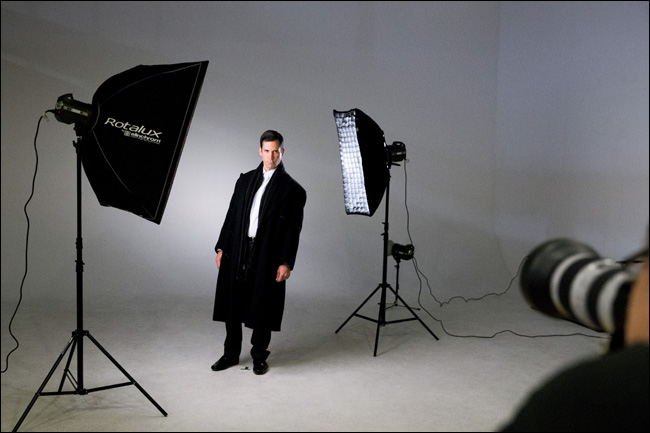
BEHIND THE SCENES: Same exact setup as the previous recipe, but in this case we’ve added what we call a “kicker light” behind our subject to add a bright rim light along the side of his face that would normally be in shadow. For this kicker light, I used a strip bank, which is just a tall, thin softbox that sends out a taller, thinner beam of light than a big ol’ square softbox does. However, it still wasn’t as directional as we’d have liked, so we added an egg crate fabric grid (named because it looks like an egg crate) over the front of the softbox (it was just Velcroed into place), and that focused the beam even tighter.
CAMERA SETTINGS: The settings were pretty much the same as the image in the last recipe (they were taken just a few minutes apart): the same lens (the 70–200mm f/2.8—you can see it in the shot above) at 190mm, at f/11, 100 ISO (clean!), and my shutter speed was 1/50 of a second.
Final Image
THOUGHT PROCESS: When you add this second light, make sure you turn off the front light and get just the kicker light looking good all by itself: aim it at the side of his face from behind, take a test shot with just this one light on, and then re-aim if you think you need to. Ideally, it should light his hair, shoulders, and stuff on that side, but when it comes to his face, it should only light the side of his face, as seen here, so don’t let it wrap and light his cheek or nose—try to keep it on the side. Once that’s looking good, only then do you turn on the front light. My lighting goal for a shot like this is that the left side of his face is well-lit, then it goes a bit shadowy, and then the kicker light kicks in and lights the rest of his face. So, it’s well-lit on the left side of his face, then it goes a little dark on the right side of his face, and then it gets very bright. This extra light helps to add a bit more depth and dimension to the shot.
POST-PROCESSING: Not much in the post-production department on this one (no effects or filters), however with shots of men I generally want to emphasize the texture in their face, so I drag the Clarity slider in Lightroom (or Camera Raw) to the right a bit, which does the trick.
Edgy Lighting for Athletes
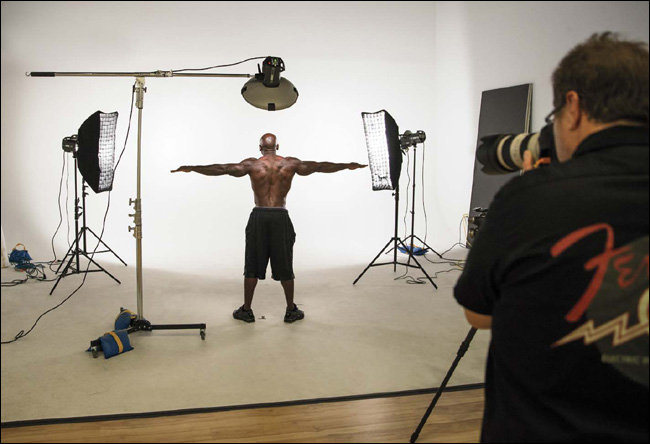
BEHIND THE SCENES: If this looks like a complicated shoot, then good news: it’s much, much easier than it looks. There are three lights on your subject, but this is really such an easy setup. There are two lights behind him, using 1x3’ strip bank softboxes (pretty inexpensive by photography standards—around $120 each). I also added an egg crate fabric grid that is Velcroed over the front of the softbox to focus the beam from the light, so it’s more direct and doesn’t spill over too much. Turn off all your lights and then turn on one of these back strip banks and aim it at an angle toward your subject (like you see here). Since there are no lights on in front, it should just look like a bright rim light outlining his body. Now, turn on the second strip bank. It should look the same, but lighting the other side. Try to get both sides looking about even in height and power output. Lastly, you’ll turn on the front light—in this case, a beauty dish with a metal grid, but you can also use a small softbox if you don’t have a beauty dish. Put it right in front of your subject, up high and aiming back at him at a 45° angle. If you want the background solid white, aim another light at the background with a metal reflector on it (here, I added one on each side, behind the backlights) and turn the power up until the background looks solid white.
CAMERA SETTINGS: I’m using flash, so I’m in manual mode on my camera. I’m using my go-to lens (the 70–200mm f/2.8) at 70mm, at my ideal studio f-stop (f/11), at my lowest, cleanest ISO (100 ISO), and my standard shutter speed of 1/125 of a second. Pretty standard stuff.
Final Image
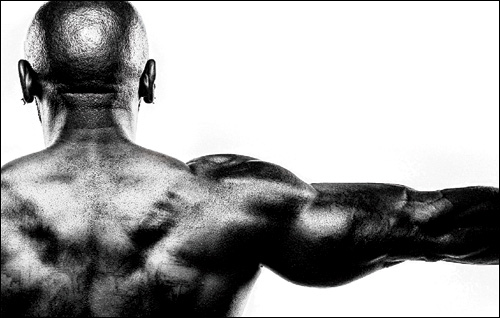
THOUGHT PROCESS: I’m personally not really big on black-and-white images, but I knew I was going to create one when I made this image, because I love how things like muscles and tattoos look in black and white, especially when it’s really contrasty (and I’m going to make it really contrasty in Photoshop). But, before you get to that point, if you have a very muscular subject (like we do here), you can have them apply some body oil to help add a shine to their skin that really looks great (make sure you have some on hand before they arrive). By the way, just in case you’re feeling kinda creepy over this, you’ll be happy to know that applying body oil is pretty common for body builders, especially in competition, so they won’t be shocked if you ask (in fact, my subject here came with his own).
POST-PROCESSING: Even if I know I’m going to create a black-and-white image, I always shoot in color and then use a plug-in to convert to black and white. The one I use pretty much everybody uses because it’s so simple and looks great: Silver Efex Pro from Google’s Nik Collection. Just open your image into it (it works with Lightroom, Photoshop, Elements, and Apple Aperture), and it shows you a bunch of thumbnail previews of different looks (called Presets). Click on the one you like, and then click OK. That’s all there is to it. Click on the one you like the best, and then save. How easy is that? I also add a lot of sharpening in Photoshop to give the image a really sharp, crisp look (like this Unsharp Mask setting: Amount 90, Radius 1.5, Threshold 0. If you think that’s too much, try: Amount 120, Radius 1.0, Threshold 3).
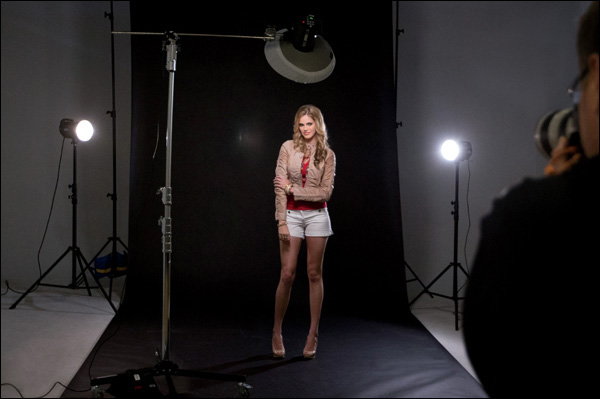
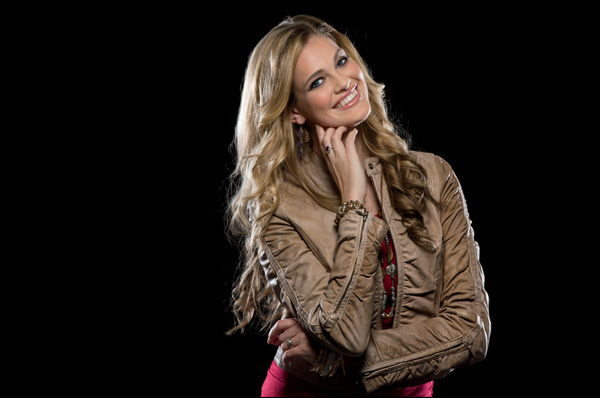
Beauty Look with Wraparound Light
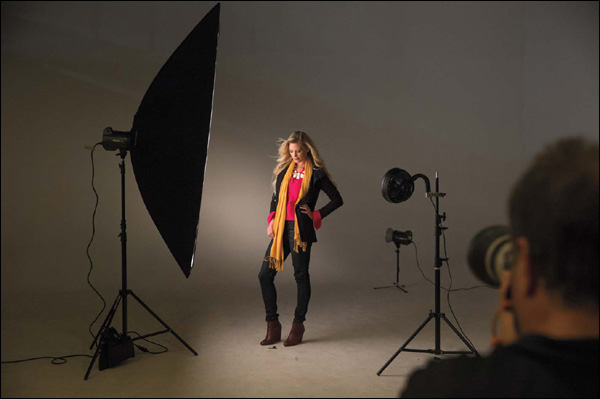
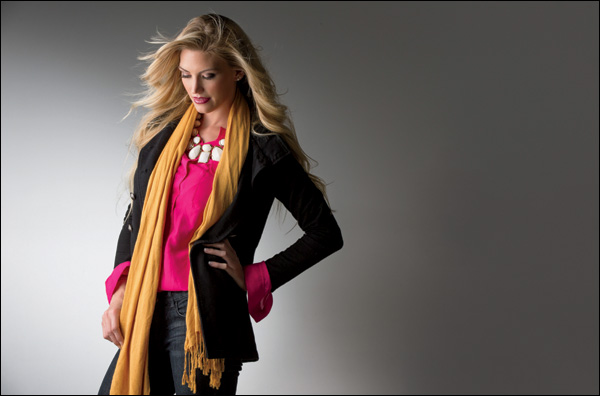
BEHIND THE SCENES: This is a very simple two-light shoot that looks like you used a lot more lights. The first light is a small softbox (it doesn’t really matter what size—it can be a large softbox), and it is positioned directly in front of your subject, up higher than her head, and aiming back at her at a 45° angle. Easy enough. Directly in front of your subject, at about chest height, is a pop-up silver reflector that bounces some of that light from the softbox back into your subject’s eyes and neck to reduce the shadows there. Usually, I’ll just have the subject I’m shooting hold the reflector flat, right out in front of them, for me. Lastly, the second softbox is placed directly behind your subject, aiming up at the ceiling at a 45° angle (that way, the flash inside that softbox isn’t aiming straight back at your camera). It’s this softbox that gives you the white edge light on both sides of her face, and the brighter you make this light, the farther those edges will extend around her face.
CAMERA SETTINGS: In the studio like this, we generally choose an f-stop that makes everything in focus, from your subject’s eyes to the back of their head and everything in between, so something like f/11 is ideal (although I wound up using f/10, probably because I didn’t feel like turning up the lights, so I cheated and lowered the f-stop). In the studio, I use the lowest, cleanest ISO I can (in this case, 100 ISO) and I use my standard shutter speed for flash—1/125 of a second. In short, the settings are really simple.
Final Image
THOUGHT PROCESS: How does this differ from the original one-light beauty shot we did at the beginning of this chapter? Here, we added a 39x39" softbox directly behind her, and that brings light wrapping around both sides of her face (see the image above), along her shoulders, and around her head, as well. The whole thing creates a nice wrapping rim light that adds more dimension to the shot and really emphasizes the highlights. Also, we don’t have to light the background with this setup because the softbox directly behind her becomes the background. This lighting setup is great for headshots because it minimizes shadows on the face, which tends to make people with a lot of wrinkles look younger (the reflector fills in all those shadows that make wrinkles look deeper), and that also works to minimize things like blemishes and acne. In someone younger, like we’re shooting here, this is a classic beauty-style setup, but as I mentioned in the first shot in this chapter, to get a beauty look takes more than just lighting: her hair in a bun, the natural-looking makeup (think oil-free matte finish), and the bare shoulders all come together to create the look.
POST-PROCESSING: Just standard portrait retouching stuff: removing blemishes, smoothing skin, brightening eyes, etc.
One Main with Two Kickers
BEHIND THE SCENES: This setup is similar to the one I did on page 56: the main light is a strobe with a 17" beauty dish attachment, but I’m not using the metal grid that I used on that previous shot with the athlete. (The metal grid is designed to focus the light in a much tighter beam, and in this case I didn’t just want to light her head, I wanted the clothing lit, as well, so I kept the grid off.) Instead, to soften the light, I added a diffusion sock over the front of the beauty dish. The two lights in back don’t have softboxes attached, just the metal reflectors that come with the strobes (these help to focus the light, but without being too tight a beam). We’re shooting on a 9’ roll of black seamless paper, supported by two light stands with a bar between them.
CAMERA SETTINGS: In the studio like this, I generally try to use an f-stop that keeps everything in focus, and although my goal is usually f/11, in the final image on the facing page, I used f/9, which only means that rather than raising the power of the lights until it looked right at f/11, I went to f/9 to make things brighter (either way works: turning up the strobes or changing your f-stop to make the light brighter). In the studio, I use the lowest, cleanest ISO I can (in this case, 100 ISO), and I used my standard shutter speed for flash—1/125 of a second. I shot with my 70–200mm lens, zoomed in almost all the way at 182mm.
Final Image
THOUGHT PROCESS: This is a really popular look today—you see it everywhere and it’s really great for separating your subject from the background by using light to rim their entire body. You want to build a three-light setup like this in stages: Turn off the front light, then start with just one of the backlights and aim it at the back side of your subject’s head, and take a test shot. The power of the strobe will probably have to be pretty high (otherwise, the front light tends to overpower the backlights, and it loses the effect). Once you get one side in back looking good, then turn on the other light. Both lights should be at the same height on the light stands (you don’t want one up high and one a lot lower—try to keep them even, so they look consistent), and I generally keep the power setting of both strobes identical. But, I know some folks who like to vary the background lights, having one set at a high power setting and one at a lower setting for added contrast. (Heck, try both and see which you like best.) With just the backlights on, take a test shot and see if everything looks even (height, brightness, etc.), and then turn on the front light. You really want to see those backlights in a shot like this, so don’t turn up the strobe in front so bright that it overpowers the backlights. I keep my front light close to its lowest power setting.
POST-PROCESSING: The standard portrait retouching stuff, but I did use Lightroom’s Adjustment Brush (also in Camera Raw) to paint increased Clarity over her jacket and jewelry to bring out the texture and make them shinier. That’s it.
Simplified Beauty Headshot Variation
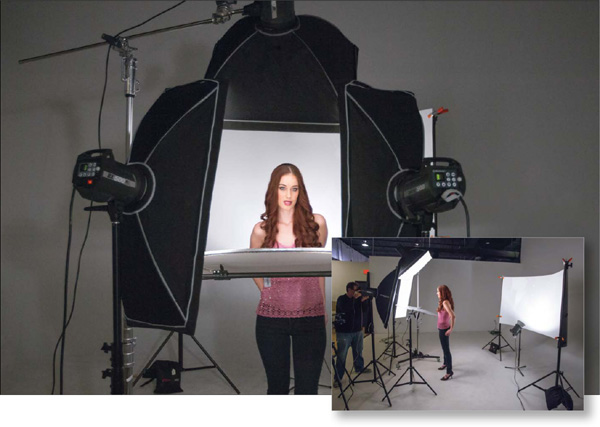
BEHIND THE SCENES: This is a simple three-light shoot, with just two lights on the subject (the third light is lighting the white background to make it actually appear solid white and not just light gray, which means we had to turn the power of the background light up high). We also used a wider metal reflector on the third light, one that’s designed for lighting a background. The two lights lighting our subject are two small softboxes (27x27") on standard light stands. They are on either side of the subject with a small space in between for you to shoot through.
CAMERA SETTINGS: To keep everything in focus in the final image, I’m shooting at f/11, and the rest of my settings are pretty much my standard ones: the lowest ISO (100 on this camera), and my shutter speed at 1/125 of a second. I’m once again using my trusty 70–200mm lens, zoomed in to 145mm.
Final Image
THOUGHT PROCESS: I think this is a great setup for a photographer who wants a clean beauty look but maybe doesn’t own a beauty dish, and/or doesn’t have a big, sturdy boom stand to put the main light up high directly in front of the subject. This just uses two small softboxes—no big boom, no need for a beauty dish—yet it still produces a very nice look. (I learned this setup from awesome fashion/beauty photographer Lindsay Adler. She taught a class at a conference I produced, and I made sure to sit in her audience. As soon as I saw her use this modified beauty setup, I knew I had to try it, and of course it looks great, but without all the hassle of the normal setup. If you’re looking for a very simple way to get the beauty look, this is the ticket!)
POST-PROCESSING: Just standard portrait retouching (removing blemishes, skin softening, brightening eyes, etc.).
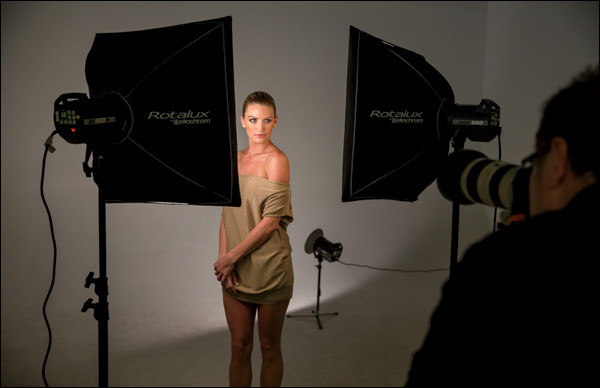
Fashion Lighting Variation
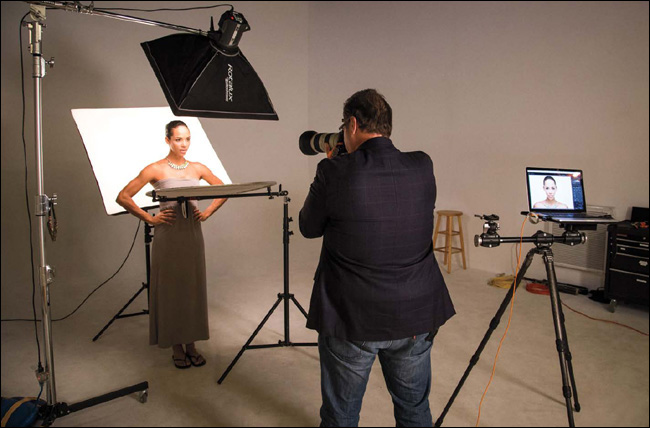
BEHIND THE SCENES: Okay, from the last chapter, you know how much I love a really, really big softbox (it’s almost like cheating), and we’re using that same big ol’ 54x72" shallow softbox from F.J. Westcott, here. It’s placed in pretty much the same position—right beside our subject—but I don’t have her nearly as close as I did in the head-and-shoulders shot. Plus, we’ve added a background light to add some dimension to the background, and we’re using a small light-stand-mounted fan (which I’m using pretty much just to get her hair off her shoulders) from BLOWiT Fans (blowitfans.com).
CAMERA SETTINGS: The final image was taken in manual mode (I always shoot in manual mode whenever I’m using flash) at f/10 and 100 ISO (the cleanest ISO on the camera I shot it with). My shutter speed was my standard 1/125 of a second.
Final Image
THOUGHT PROCESS: In this case, we’re not just using a big softbox so the light is soft and beautiful (although it is), we’re using it to light her clothing, as well. That means we need to light more of her than just her head and shoulders, which means we need to use a much bigger softbox (if you’re shooting fashion, it’s really important that you see the clothing), and this huge softbox does double duty (beautiful light and you can light anything from 3/4-length, like this, to full-length to couples with this one big softbox). The white background looks gray here because we didn’t really light the background to make it white, we just used a light close to the background to add a splash of white in the middle of all that gray—that’s from the normal metal reflector. If we had used the wider reflector we use when we want a solid white background, then it would have “washed” the whole wall with light and it would appear solid white.
POST-PROCESSING: Just the standard portrait retouching stuff.
Hurley-Look Headshot Lighting
BEHIND THE SCENES: This is actually a four-light shoot, but at least it’s a really easy four-light shoot. There are three lights on the subject: two 1x3’ strip banks, one on either side of our subject, and then a small softbox overhead. On the bottom is a small silver reflector bouncing some of the light from the three lights back onto her face to minimize any shadows. The fourth light is on a short light stand directly behind her, aiming up at the background to make it solid white. The background is a 4x8’ reflective HURLEYPRO Pro-Board, created by famous headshot photographer Peter Hurley (the guy that inspired this lighting look). It’s white on one side, black on the other, and makes a perfect background for headshots like this (plus, it rolls up into a tube, so you can take it on location). We have it held up here using two light stands and four A-clamps from Home Depot.
CAMERA SETTINGS: For the final image, I’m using flash, so I’m in manual mode on my camera. I’m using my go-to lens (the 70–200mm f/2.8) at 130mm, at my ideal studio f-stop (f/11), my lowest, cleanest ISO (100 ISO), and my standard shutter speed of 1/125 of a second. Pretty standard stuff.
Final Image
THOUGHT PROCESS: Peter himself uses Kino Flo continuous lights for his front lights, rather than strobes (he uses strobes to light his background), but those Kino Flos are very, very expensive (the four alone would cost around $5,200, so strobes are a much cheaper alternative). He places the four lights to create a square, like a window, but in our example, we’re only using three lights and a reflector (you can use a fourth light instead of the reflector, if you have enough lights). Peter’s trademark square-of-light look produces a nice, flat, flattering light, but at the same time it’s bright and punchy—a wonderful combination for headshots. But, what Peter is famous for isn’t just his lighting look (which he’ll tell you is very simple—he designed it to replicate natural window light), it’s how he works with his subjects to get natural expressions and flattering poses, and he is a master at it. Our lighting setup here is designed to get close to his look without spending close to $5,200 (in fact, if you had to buy all three strobes from scratch and the reflector I used here, it would run around $2,100—well below half the cost). If you want to learn Peter’s trick for getting the most out of his subjects, check out his book, The Headshot (published by Peachpit Press, and edited and produced by yours truly). Even though I was involved in producing the book, I can tell you without reservation, it rocks (and I learned a lot during the process. The guy’s a genius).
POST-PROCESSING: Just your standard portrait retouching stuff.
Working with V-Flats
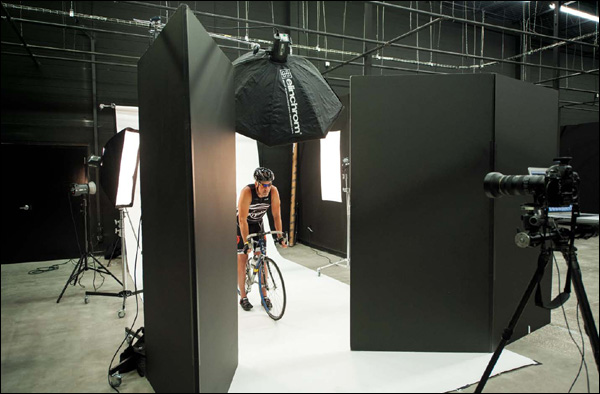
BEHIND THE SCENES: This is essentially the same three-light setup I used for the shot of the athlete from behind in the edgy lighting setup earlier in this chapter, except that because I also wanted to be able to light the entire bike he’s on, instead of using a small 17" beauty dish in front, I used a large 54" midi-octa to cover more area. (By the way, we didn’t put enough sand bags on the boom light stand at first and the whole thing went crashing over and broke the light inside. Luckily, I had a backup light we could use and we continued on with the shoot with a lot more sandbags.) The other difference in this setup is that I’m using two large V-flats (4x8’ reflector boards that are white on one side and black on the other, so although you’re seeing the black sides, the sides facing the cyclist are white). I put them there for two reasons: (1) To help block any light from coming back into my lens and causing lens flare. The two strip banks in the back are pretty much aiming right back at me, and I don’t have the egg-crate grids on them like I did in the previous shoot (the egg-crate grid’s main job is to focus the light, but the happy bonus is that focused light doesn’t spill into my lens nearly as much—that’s why I didn’t need these V-flats blocking the lights in the other shoot). And, (2) the white on the other side of the V-flats (facing the cyclist) bounces some of that light back onto him and the bike.
CAMERA SETTINGS: My settings are pretty much my standard studio settings: my lowest, cleanest ISO (200 ISO) and my shutter speed at 1/160 of a second (probably bumped the dial at some point). I’m once again using my 70–200mm, my go-to lens for portraits, at 200mm.
Final Image
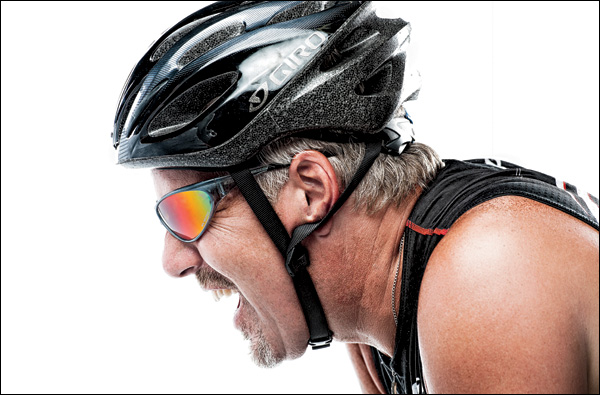
THOUGHT PROCESS: I tried a number of shots with the full bike, including a shot with him carrying it over his shoulder, and riding it straight at me, and a bunch of others, and I just wasn’t really digging what I was getting, so we turned the bike sideways and I zoomed in tight with my 70–200mm to make more of a portrait. Then I told him to act like he was screaming and it wound up being my favorite shot from the shoot (for more of an “extreme sports” look, because hopefully you wouldn’t be doing a lot of screaming while riding on a Saturday morning with a bunch of friends. If you do wind up screaming a lot, perhaps a portrait shoot shouldn’t be your biggest concern. But I digress). You can see the reflection of the softbox in front in his helmet, so you can see we didn’t change any of the lighting, just the position of the subject and his bike.
POST-PROCESSING: I did three main things after the fact in Photoshop: (1) I added a bit of a high-contrast effect using the Nik Color Efex Pro plug-in (part of the Nik Collection from Google—very popular with photographers and around $149). The filter I used inside it was Tonal Contrast, and I just used the default settings. (2) Next, I increased the color on the reflection in his sunglasses. It was already there, but I wanted it to be punchier, so using the Adjustment Brush in Lightroom (or Camera Raw), I dragged the Vibrance slider to the right a bit and painted over the lenses on the sunglasses to make them more colorful. And, (3) of course, I sharpened it to death using the Unsharp Mask filter in Photoshop.
Two-Light Catalog Look (Women)
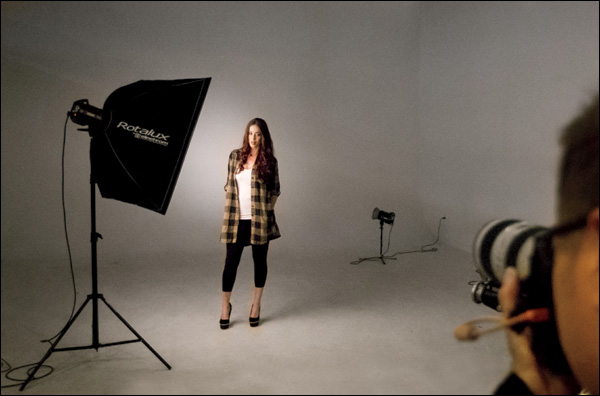
BEHIND THE SCENES: This is pretty much the same lighting setup I used earlier in this chapter to light a man for a catalog shoot (with one important change in the position of the main light, which you’ll read about in a moment). It’s a main light with a softbox aiming at your subject, and a background light with a reflector aiming at the gray background to add a pool of white light.
CAMERA SETTINGS: It’s my go-to lens again (the 70–200mm f/2.8) at 90mm, at f/13, at my lowest, cleanest ISO (100 ISO), and a shutter speed of 1/200 of a second.
Final Image
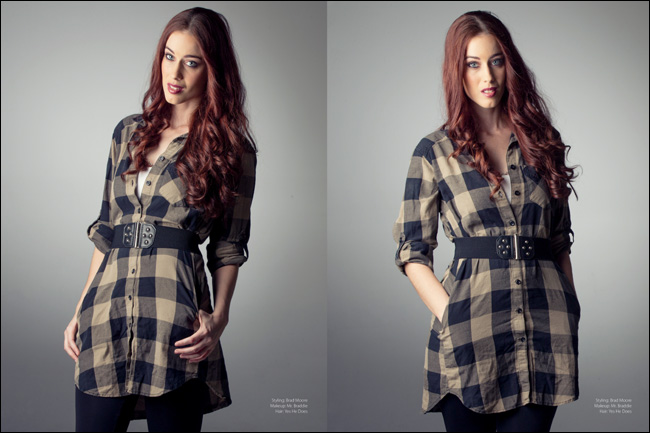
THOUGHT PROCESS: While this setup does look very similar to the one I used with the man on page 52, I changed the placement of the softbox because it’s a woman. Instead of placing it just in front of the subject (like I did with the man), for a woman we don’t generally want the shadows on the far side of her face as dark or shadowy, so we moved the softbox forward a bit more, and you can see above that more of her face is lit, so the shadows aren’t nearly as prevalent on the right side of her face (from the camera view).
POST-PROCESSING: I did two things: (1) standard portrait retouching for women (removing blemishes, softening skin, brightening eyes, etc.), and (2) gave it a fashion look by adding a cross-processing effect (kind of like a split tone in Lightroom or Camera Raw, where you apply one tint to the shadow areas, and a different tint to the highlights). I used Nik Color Efex Pro’s (a plug-in for Lightroom, Photoshop, Elements, or Apple Aperture—part of the Nik Collection from Google) Cross Processing filter with one of the built-in Method presets. Again, see the video tutorial I did on this on the book’s companion webpage (mentioned in the book’s introduction).